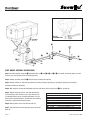
1
This Manual Must Be Read Before Operating The Equipment Owner / Operator’s Manual Spreaders for Snow & Ice Control FOR MODELS Up to m r a W with a E F R EH at! r Winte k Page See Bac ils! for Deta Sand-Pro 1875 Pivot-Pro 1075 Mini-Pro 575 Micro-Pro 375 Junior 325 CUSTOMER COPY Warren, Michigan 48089 800-725-8377 © Trynex International 2006 L1040 Protected by the following patents, #6,089,478, #6,088,865, #Des.425,915 and other pending U.S. and foreign patent applications. 7—1 Table of Contents INTRODUCTION . . . . . . . . . . . . . . . . . . . . . . . . . . . . . . . . . . . . . . . . . . . . . . . . . . . . . . . . . . . . . . . . . . . . . . . . . . . . . . . . . . . . . . . . . . . . . . .3 GENERAL INFORMATION . . . . . . . . . . . . . . . . . . . . . . . . . . . . . . . . . . . . . . . . . . . . . . . . . . . . . . . . . . . . . . . . . . . . . . . . . . . . . . . . . . . . . . . .4 REGISTRATION . . . . . . . . . . . . . . . . . . . . . . . . . . . . . . . . . . . . . . . . . . . . . . . . . . . . . . . . . . . . . . . . . . . . . . . . . . . . . . . . . . . . . . . . . . . . . . .4 SAFETY PRECAUTIONS . . . . . . . . . . . . . . . . . . . . . . . . . . . . . . . . . . . . . . . . . . . . . . . . . . . . . . . . . . . . . . . . . . . . . . . . . . . . . . . . . . . . . . . 5-6 • PREPARATION • OPERATIONS • SERVICE SPREADER PARTS/DIAGRAMS . . . . . . . . . . . . . . . . . . . . . . . . . . . . . . . . . . . . . . . . . . . . . . . . . . . . . . . . . . . . . . . . . . . . . . . . . . . . . . . . . 7-14 • SAND PRO 1875 • PIVOT PRO 1075 • MINI PRO 575 • DRIVE MOTOR ENCLOSURE ASSEMBLY • MICRO PRO 375 • MICRO PRO 375 ASSEMBLY INSTRUCTIONS • JUNIOR 325 • JUNIOR 325 MOUNTING INSTRUCTIONS WIRING INSTRUCTIONS . . . . . . . . . . . . . . . . . . . . . . . . . . . . . . . . . . . . . . . . . . . . . . . . . . . . . . . . . . . . . . . . . . . . . . . . . . . . . . . . . . . . 15-23 OPERATING THE SPREADER . . . . . . . . . . . . . . . . . . . . . . . . . . . . . . . . . . . . . . . . . . . . . . . . . . . . . . . . . . . . . . . . . . . . . . . . . . . . . . . . . 24-25 ADJUSTABLE DEFLECTOR . . . . . . . . . . . . . . . . . . . . . . . . . . . . . . . . . . . . . . . . . . . . . . . . . . . . . . . . . . . . . . . . . . . . . . . . . . . . . . . . . . . 26-27 GATE ASSEMBLY . . . . . . . . . . . . . . . . . . . . . . . . . . . . . . . . . . . . . . . . . . . . . . . . . . . . . . . . . . . . . . . . . . . . . . . . . . . . . . . . . . . . . . . . . . 28-29 VIBRATOR KIT . . . . . . . . . . . . . . . . . . . . . . . . . . . . . . . . . . . . . . . . . . . . . . . . . . . . . . . . . . . . . . . . . . . . . . . . . . . . . . . . . . . . . . . . . . . . . . .30 SPREADER MOUNT PARTS/DIAGRAMS . . . . . . . . . . . . . . . . . . . . . . . . . . . . . . . . . . . . . . . . . . . . . . . . . . . . . . . . . . . . . . . . . . . . . . . . . 31-42 • RECEIVER HITCH MOUNT • PIVOT MOUNT • 3-POINT MOUNT • TRAILER MOUNT • DROP UTILITY MOUNT • UTILITY MOUNT TROUBLESHOOTING . . . . . . . . . . . . . . . . . . . . . . . . . . . . . . . . . . . . . . . . . . . . . . . . . . . . . . . . . . . . . . . . . . . . . . . . . . . . . . . . . . . . . . . 43-48 SPREADER MAINTENANCE . . . . . . . . . . . . . . . . . . . . . . . . . . . . . . . . . . . . . . . . . . . . . . . . . . . . . . . . . . . . . . . . . . . . . . . . . . . . . . . . . . . . .49 ACCESSORIES . . . . . . . . . . . . . . . . . . . . . . . . . . . . . . . . . . . . . . . . . . . . . . . . . . . . . . . . . . . . . . . . . . . . . . . . . . . . . . . . . . . . . . . . . . . . . . .50 WARRANTY . . . . . . . . . . . . . . . . . . . . . . . . . . . . . . . . . . . . . . . . . . . . . . . . . . . . . . . . . . . . . . . . . . . . . . . . . . . . . . . . . . . . . . . . . . . . . . . . .50 7—2 L1040 © Trynex International 2006 Introduction This manual has been designed for your help. It will assist you and instruct you on the proper set-up, installation and use of this spreader. Refer to the table of contents for an outline of this manual. We require that you read and understand the contents of this manual completely (especially all safety information) before attempting any procedure contained herein. THIS SIGN SHOULD ALERT YOU: The Society of Automotive Engineers has adopted this SAFETY ALERT SYMBOL to pinpoint characteristics that, if NOT carefully followed, can create a safety hazard. When you see this symbol in this manual or on the machine itself, BE ALERT! Your personal safety and the safety of others is involved. Defined below are the SAFETY ALERT messages and how they will appear in this manual: (RED) Information that, if not carefully followed, can cause death! (ORANGE) Information that, if not carefully followed, can cause serious personal injury or death! (YELLOW) Information that, if not carefully followed, can cause minor injury or damage to equipment. © Trynex International 2006 L1040 7—3 General Information You have purchased a member of the SnowEx Snow & Ice family, an advanced concept in snow and ice control. Our unique design allows many material spreading applications to be addressed. The modular concept allows multiple hitch variations using the same spreader attachments to meet different vehicle types and varied spreading requirements. Your SnowEx Spreader may be attached to many types of vehicles ranging from pick-up trucks, sport utilities, tractors, utility vehicles, etc. The simplicity of construction using high quality steel and deluxe electrostatic finish requires minimal maintenance. Our poly hopper with custom engineered frame structure, state-of-the-art electronic controller coupled with hi-torque drive assembly will give you ultimate performance and control when spreading. Trynex reserves the right to make any changes or improve the design of any parts and not be obligated to make changes on units previously sold. Registration Record the following information in this manual for quick reference. Spreader Model Number _____________________________________________________________________________________ Spreader Serial Number ________________________________ Controller Serial Number _______________________________ Date of Purchase ___________________________________________________________________________________________ Dealer Where Purchased _____________________________________________________________________________________ When ordering parts, the above information is necessary. This will help to insure that you receive the correct parts. At the right is a diagram of the ID tag. This tag on the spreader is located on the frame. SER. NO.______________________ TRYNEX INTERNATIONAL Warren, MI 48089 (800) 725-8377 Please fill out the warranty card with all the necessary information to validate it. This will also give us a record so that any safety or service information may be communicated to you. 7—4 L1040 © Trynex International 2006 Safety Before attempting any procedure in this book, these safety instructions must be read and understood by all workers who have any part in the preparation or use of this equipment. For your safety warning and information decals have been placed on this product to remind the operator of safety precautions. If anything happens to mark or destroy the decals, please request new ones from Trynex, International. Remember most accidents are preventable and caused by human error. Exercising of care and precautions must be observed to prevent the possibility of injury to operator or others! Never operate equipment when under the influence of alcohol, drugs, or medication that might alter your judgment and/or reaction time. Before working with the spreader, secure all loose fitting clothing and unrestrained hair. Always wear safety glasses with side shields when working metal against metal. Failure to do this could result in serious injury to the eyes. Never allow children to operate or climb on equipment. Never weld or grind on equipment without having a fire extinguisher available. Always check areas to be spread to be sure no hazardous conditions or substances are in the area. Always inspect unit for defects: broken, worn or bent parts, weakened areas on spreader or mount. Always shut off vehicle and power source before attempting to attach or detach or service spreader unit. Be sure vehicle/power source is properly braked or chocked. Always make sure personnel are clear of areas of danger when using equipment. Always keep hands, feet, and clothing away from power-driven parts. Remember it is the owner’s responsibility to communicate information on safe usage and proper maintenance of all equipment. © Trynex International 2006 L1040 7—5 Safety Precautions Never exceed 45 m.p.h. when loaded spreader is attached to vehicle. Braking distances may be reduced and handling characteristics may be impaired at speeds above 45 m.p.h. Never use wet materials, or materials with foreign debris in the SP-375, SP-575 and SP-1075. These units are designed to handle dry, clean, free-flowing material. Note: Can not spread water softener salt. Never leave material in hopper for long periods of time. Be aware that all ice melters are hygroscopic and will attract atmospheric moisture and harden up. Always inspect pins, and latches whenever attaching or detaching spreader, and before traveling. Inspect the unit periodically for defects. Parts that are broken, missing, or worn out must be replaced immediately. The unit, or any part of it should not be altered without prior written permission from the manufacturer. When using pivot mount, NEVER swing spreader with material in hopper. 7—6 L1040 © Trynex International 2006 Sand Pro Spreader Model #SP-1875 / Key Part No. D4121 D4122 D4124 D4125 D6105 D6127 D6130 D6132 D6133 D6134 D6135 D6136 D6137 D6140 D6155 Description Qty. 3/8-16x1” Hex Bolt 4 3/8-16x1-1/2” Hex Bolt 4 3/8-16 Lock Nut 8 3/8” Flat Washer 2 Flexible Draw Latch 2 Cord Strain Relief 2 3/16'' Aluminum Rivit 12 1/4’’-20 x 3/4’’ SS Hex Bolt 8 5/16-18 x 1/2’’ Hex Bolt 1 1/4'' Stainless Lock Washer 8 10/32 x 5/8’’ Cap Screw 4 10/32 Lock Washer 4 5/16-18 x 1’’ Pan Head SS Bolt 6 5/16-18 x 3/8’’ Set Screw 2 5/16’’ Lock Washer 6 © Trynex International 2006 L1040 Key Part No. Description D6356 Bearing Access Cover D6168 5/16’’ Hex Nut D6169 3/8’’ SS Flat Washer D6174 DC-80 Vibrator D6198 Latch Keeper D6225 12’’ Steel Spinner D6232 Motor Trans Coupler D6313 1875 Hopper D6314 1875 Lid D6315 Auger D6317 Spinner Transmission D6501 Auger Transmission D6319 Spinner Motor D6320 Auger Motor D6321 1875 Power cord-48'' Qty. 1 6 2 1 2 1 2 1 1 1 1 1 1 1 1 Key Part No. Description D6323 1875 Frame D6324 Trim Ring D6325 Right Hand Motor Cover D6326 Left Hand Motor Cover D6327 Plastic Deflector D6328 Inverted V-Support D6330 Material Baffle D6331 Chute D6332 Auger Shaft Bearing D6333 3/16’’ Rivet, Long D6334 Top Screen D6337 Inverted V-Mount Brkt D6877 Self Tap Screw Set Qty. 1 1 1 1 1 1 1 1 1 2 1 1 2 7—7 Pivot Pro Spreader Model #SP-1075 Drive Motor Assy. Key 7—8 Part No. D 4115 D 4120 D 4121 D 4124 D 4125 D 6262 D 6263 D 6105 D 6108 D 6110 Description 1/2’’-13x1’’ Hex Bolt 1/2’’-Locknut 3/8’’-16 x 1’’ Hex Bolt 3/8’’-Locknut 3/8’’ -Flat Washer 1075 Hopper 1075 Lid W/Latches Flexible Draw Latch Stainless Throat Liner Deflector - 20’’ Qty. 4 4 4 6 2 1 1 2 1 1 Key Part No. D 6260 D 6128 D 6129 D 6137 D 6155 D 6168 D 6169 D 6198 D 6261 Description Qty. 1075 Main Frame 1 Spinner Guard 1 Throat Clamp 1 5/16’’-18 x 1 1/4’’ Stainless Panhead Phillips Bolt 2 5/16’’ -Lock Washer 2 5/16’’ -Hex Nut 2 3/8’’ -S.S. Washer 2 Latch Keeper 2 1075 Top Screen 1 L1040 © Trynex International 2006 Mini Pro Spreader Model #SP-575 Motor Drive Assembly Key Part No. D 4116 D 4120 D 6463 D 4124 D 4125 D 4135 D 4136 D 6105 D 6108 D 6110 D 6129 Description 1/2"-13 x 1 1/2" Hexbolt 1/2’’-Lock Nut Deflector Push Fastener 3/8"-Lock Nut (Serrated) 3/8" Flat Washer 2 - 5/16'' Hair Pin Clip 5/8" x 5-1/2" Hitch Pin Flexible Draw Latch Stainless Throat Liner Deflector 20" Throat Clamp © Trynex International 2006 L1040 Qty. 8 4 2 2 2 1 1 2 1 1 1 Key Part No. D 6137 D 6149 D 6239 D 6240 D 6245 D 6155 D 6168 D 6169 D 6198 D 6257 D 6452 Description Qty. 5/16"-18x1 1/4" Stainless Pan Head Phillips Bolt 2 2’’ Receiver Hitch 1 575 Hopper 1 575 Lid W/Latches 1 575 Main Frame 1 5/16" lock washer 2 5/16"-Hex Nut 2 2 3/8" S/S Washer Latch Keeper 2 575 Top Screen 1 3/8"-16 x 1" IND HWH TCS 4 7—9 Complete Drive Assembly SP-575 – D6117 2000 – Current SP-1075 – D6175 Key Part No. D 6106 D 6107 D 6109 D 6111 D 6115 D 6162 D 6122 D 6127 D 6467 D 6131 D 6133 D 6135 D 6136 D 6140 D 6224 D 6232 Description Motor 12 Volt DC Transmission Motor Cover Drive Enclosure 1075 Power Cable 575 Power Cable Auger Cord Restraint w/Nut Plastic Push Fastener 1/4"-20 x 1/2" Hex Bolt Stainless 5/16"-18 x 1/2" Hex Bolt #10-32 x 5/8" Cap Screw #10 Lock Washer 5/16"-18 x 3/8" Set Screw 10’’ Steel Spinner Motor Drive Coupler Qty. 1 1 1 1 1 1 1 1 6 4 1 2 2 1 1 1 7 — 10 L1040 © Trynex International 2006 Micro-Pro Spreader Model #SP-375 GATE DECK - CABLE ASSEMBLY MOTOR - TRANSMISSION ASSEMBLY © Trynex International 2006 L1040 Key Part No. D 4121 D 4124 D 4135 D 4136 D 4318 D 6107 D 6131 D 6133 D 6134 D 6135 D 6136 D 6452 D 6155 D 6168 D 6224 D 6232 D 6304 D 6305 D 6308 D 6400 D 6405 D 6409 D 6410 D 6464 D 6413 D 6414 D 6415 D 6416 D 6417 D 6418 D 6419 D 6457 D 6165 Description 3/8'' - 16'' x 1'' Hex Bolt 3/8'' - Locknut 2-5/16' Hair Pin Clip 5/8'' x 5-1/2'' Hitch Pin 3/8'' Fender Washer Transmission 1/4'' - 20 x 1/2" Stainless Hex Bolt 5/16'' - 18 x 1/2'' Hex Bolt 1/4'' Stainless Lock Washer #10 - 32 x 5/8'' Hex Machine Screw #10 - 32 Lockwasher 3/8" - 16 x 1 Serrated Hex Bolt 5/16'' Lockwasher 5/16'' - 18 Hex Nut 10'' Steel Spinner Motor Drive Coupler T-Handle Cable - 10' Bulkhead Cable Fitting 5/16'' - 16 x 3/4'' Bolt w/hole Main Frame Agitator Spring Weather Cover Motor 12 Volt DC Hopper Cord Restraint Bottom Cover Assembly Gate Slide Gate Track Foam Seal 40'' 5/16'' - 18 x 1'' Hex Bolt S.S. Gate Deck Gate Slide Stop Pin w/Lanyard 3/16" Flat Washer Qty. 8 8 1 1 4 1 4 1 4 2 2 2 1 1 1 1 1 1 1 1 1 1 1 1 1 1 1 1 1 4 1 1 4 7 — 11 Micro-Pro Assembly Instructions Step 1: Install foam tape on bottom of motor enclosure/frame assembly. Step 2: Bolt bottom cover assembly on to motor enclosure. Make sure 2'' square tube faces the rear. Step 3: Attach bulkhead cable fitting onto cable outer jacket. Using pliers to hold the cable, thread fitting onto jacket with a wrench. Be careful not to bend or kink cable. Important: To maximize the life of the cable and prevent corrosion, apply a small amount of oil to the inner cable. Step 3A: If you need to reduce the cable length, remove inner cable by twisting the T-handle counter clockwise and pull wire out of cable jacket, and trim to desired length. Make note of the amount of wire that extends beyond outer jacket. You will need to maintain this length for proper operation. Step 3B: Optional* You may run the cable through either the left or right side of rear spreader frame. There are two holes located along the back side of ther rear upper horizontal support. This would be used to keep cable routed away from other equipment or to take up any slack in cable. Also this will keep cable from being kinked if mounted on a pickup truck. Step 4: Attach cable assembly to the side and insert fitting into rear gate deck hole. Make sure you have the first jam hex nut threaded onto the fitting. Step 4A: Once cable is inserted through rear gate deck, slide star washer and second jam nut over cable fitting. Leave these loose for now. Step 5: Locate special 5/16'' hex bolt with a small hole drilled in it. Insert bolt through slide tab. The hole in bolt must be as close to being in line with the cable as possible. Step 6: Rotate hex bolt until hole aligns with the cable. Insert cable through hole. Thread lock washer and hex nut on. Do not tighten yet. Step 7: Make sure gate is at full close and that the cable is at full close. Once this is done, tighten hex bolt on gate slide, then tighten cable assembly on rear gate deck. This will insure that the gate slide can seal off hopper 100%. Step 8: Test gate travel by pulling and pushing the T-handle. The cable assembly has a twist-lock feature. Turning clockwise locks the gate into position, turning counter clockwise allows gate to move back and forth. Step 9: Install nylon lid. Step 10: Mount spreader into a 2'' receiver type tube, align holes on mount and spreader and install 4'' locking pin. 7 — 12 L1040 © Trynex International 2006 Junior Spreader Model #SP-325 Key Part No. D 4116 D 4120 D 4135 D 4136 D 6106 D 6122 D 6131 D 6133 D 6135 D 6136 D 6138 D 6140 D 6162 Description 1/2"-13 x 1-1/2" Hex Bolt 1/2" Lock Nut 2-5/16" Hair Pin Clip 5/8" x 5-1/2" Pin w/Clip 12 VDC Motor Hi-Flow Auger 1/4"-20 x 1/2" Hex S.S. Serrated HWH 5/16"-18 x 1/2" Hex Bolt 10/32 x 5/8" Hex Cap Screw 10/32 Lock Washer 5/16" - 18 Lock Nut 5/16" - 18 x 3/8" S.S. Set Screw 24" Power Cord © Trynex International 2006 L1040 Qty. 4 4 1 1 1 1 4 1 2 2 8 1 1 Key Part No. D 6224 D 6232 D 6462 D 6475 D 6476 D 6477 D 6480 D 6485 D 6487 D 6702 D 6708 D 6715 Description 10'' Steel Spinner Motor Drive Coupler 5/16" - 18 x 1-3/4" HHCS SP-325 Yellow Hopper SP-325 Lid Assy SP-325 Hopper Weldment Trans Mount Weldment LDM-175 Lt Duty Rec Mount #8 x 1/2" Hex Head Sheet Screw Salter Hopper Support Plate Plastic Bottom Cover 14.5 to 1 Transmission Qty. 1 1 1 1 1 1 1 5 1 1 1 7 — 13 Junior SP-325 Mounting Instructions Step 1: Install 2" Receiver Mount to Spreader with supplied hardware. (See parts diagram for more detail) Step 2: Insert Spreader into 2" Vehicle Receiver Hitch. (Use suppled pin with lock to secure Spreader). Step 3: Connect Spreader power plug to bumper plug. Step 4: Read operating Instructions before using spreader. 7 — 14 L1040 © Trynex International 2006 Wiring Instructions Step 1: Take harness assembly and route from the rear of the vehicle to the front. Route harness along frame and attach to frame holes and frame supports. It is not recommended to attach to fuel or brake lines for obvious reasons. Do not route close to exhaust system or engine, even though Trynex uses high temperature wiring, it still could melt under extreme heat and short the spreader electrical system, as well as the vehicle electrical system. Step 2: Mount rear plug on bumper using supplied bolts, locate towards the center of the bumper to reduce the amount of debris the tires will throw to the rear. Important: Apply a small amount of dielectric grease to the plug. Step 3: Secure harness from the rear to the front using heavy duty ty-wraps or frame clips along the frame and lighter duty ty-wraps everywhere else. Step 4: Layout harness portion that connects to the battery along the fire wall and fender well. Do not connect power leads to battery yet. Drill a 3/4" hole in the fire wall, or use existing access hole, for the control portion of the harness and route connector and harness through hole. Be sure to check the area on the other side of the fire wall to make sure you are not going to drill into the vehicle harness or a control module. Generally you can drill on either side of the steering wheel for a good location. Step 4A: (1875 ONLY) The power harness from control box to battery will need to be routed from the inside of the cab to the battery – this results from the large high amperage connector. Route leads with lugs to battery — do not connect power at this time. Step 5: Connect harness to the back of the controller and mount to a suitable location. NOTE: You may want to contact customer before mounting controller, some prefer not to have holes drilled into the dashboard. Ty-wrap loose controller harness and move to the engine compartment. Step 6: Connect power leads to the battery: Red + Positive, Black – Negative, always connect to the primary battery if using a dual battery system, secure loose loom to any other large or medium vehicle harness with medium duty ty-wraps this will secure wiring harness. Step 7: (for 1875 only) Install ignition wire to an auxiliary circuit that is hot when the ignition key is turned to ON position. This wire is 60" long and has a female terminal attached to it. This wire will plug into back of controller. This wire must be installed in order for controller to work. Step 8: Push the ON/OFF button on the controller to check for power, when that has been confirmed turn power OFF. The electrical portion of the installation is complete. NOTE: If adding an inline fuse, use a 35 amp slow blow fuse (575 and 1075 only), and use a 60 amp slow blow fuse for 1875 only. © Trynex International 2006 L1040 7 — 15 1075 Pivot-Pro / 575 Mini-Pro Control and Harness Diagram Connector (rubber molded type) Black Lead (-) Neg + POS Red - NEG Black Red Lead (+) Pos Battery Anderson Connector CONTROL HARNESS PLUG Black Positive (+) SPINNER CIRCUIT Red Negative (–) Anderson Block (4) Pos VEHICLE BUMPER PLUG INPUT POWER Red Positive (+) SPINNER OUTPUT POWER Red Positive (+) INPUT GROUND Black Negative (–) SPINNER OUTPUT GROUND Black Negative (–) Special Notes: 1. All external connections must have dielectric grease. 2. Read lead labels before attaching to power source or ground. 3. No other devices may be spliced into wiring harness. 4. Any repairs to wiring harness must be done with heat shrink butt connectors. 5. If inline fuse is installed, use a 35 amp time delay or a circuit breaker (575 and 1075). 7 — 16 Key Part No. D 6114 D 6230 D 6124 D 6123 D 6118 D 6344 Description Wiring Harness - 24’ 1075/575 Variable Speed Controller Bracket Knob Controller Mounting Bracket Dust Cover (not shown) Dielectric Grease - 1 1/2 oz. (not shown) L1040 Qty. 1 1 2 1 1 1 © Trynex International 2006 1875 Sand-Pro Electrical System Discontinued in 2005 To Vibrator Special Notes: 1. All external connections must have dielectric grease. 2. Read lead labels before attaching to power source or ground. 3. No other devices may be spliced into wiring harness. 4. Any repairs to wiring harness must be done with heat shrink butt connectors. 5. If inline fuse is installed, use a 60 amp maxi fuse or circuit breaker. © Trynex International 2006 L1040 Key Part No. D 6507 D 6124 D 6329 D 6341 D 6322 D 6321 D 7127 D 6118 D 6344 To Auger Motor Description 1875 Controller Bracket Knob 1875 Controller Bracket Control Power Cable 1875 Wiring Harness - 25' Power Cord - 48" 60'' Ignition Wire (Discontinued 2005) Dust Cover (not shown) Dielectric Grease - 1 1/2 oz. (not shown) Qty. 1 2 1 1 1 1 1 1 1 7 — 17 1875 Sand-Pro D6322 Vehicle Harness Circuit Diagram CONTROL OUTPUT PLUG BUMPER PLUG VIBRATOR CIRCUIT OUTPUT SPINNER/AUGER Anderson CIRCUIT Block (4) Pos VIBRATOR White Positive (+) AUGER OUTPUT (housing) Red Positive (+) Red Wire VIBRATOR Black Negative (–) SPINNER White Positive (+) SPINNER Black Negative (–) AUGER Red Positive (+) AUGER Green Negative (–) SPINNER OUTPUT (housing) Red Positive (+) White Wire Anderson Block (2) Pos Red Positive (+) White Wire AUGER OUTPUT (housing) Black Negative (–) Green Wire Black Negative (–) Black Wire SPINNER OUTPUT (housing) Black Negative (–) Black Wire * NOTE: Reference Bumper Plug for Color Code 7 — 18 L1040 © Trynex International 2006 1875 Sand-Pro D6321 Spreader Power Harness Circuit Diagram AUGER Red Positive (+) AUGER Green Negative (–) SPINNER Black Negative (–) VIBRATOR Black Negative (–) VIBRATOR White Positive (+) SPINNER White Positive (+) Black Negative (–) Red Positive (+) MAIN POWER PLUG SPREADER AUGER POWER CONNECTION White Positive (+) Black Negative (–) VIBRATOR POWER PLUG © Trynex International 2006 L1040 Black Negative (–) Red Positive (+) SPINNER POWER CONNECTION 7 — 19 1875 Sand-Pro D6316 Control Vibrator Red Positive (+) Vibrator Black Negative (–) OUTPUT Black Negative (–) Fuse For Vibrator INPUT (discontinued 2004) Auger Red Positive (+) Spinner Red Positive (+) Auger Black Negative (–) Red Positive (+) Spinner Black Negative (–) D6341 Control Power Cable Negative Black (–) to battery Ring Terminal Positive White with Red Tracer (+) to battery Ring Terminal Connect to control mating half * NOTE: A) Leads must only be attached to battery. B) If fusing, must use minimum 60 Amp Maxi type fuse. 7 — 20 L1040 © Trynex International 2006 Micro Pro Wiring Diagram Diagram and Instructions (–) Neg. Black (+) Pos.Red 12 VOLT BATTERY (+) Pos.Red 30 AMP (–) Neg. Black Step 1: First, install switch at desired location. This will determine what the proper wire length should be. Step 2: Run spreader/vehicle harness from the rear of vehicle to switch area. Remove approx. 3'' of the black outer jacket exposing two single leads (red and black), strip a 1/4'' off each lead. Crimp 1/4'' female connector on red lead and crimp the butt connector to the black lead. Place the female spade/red wire to the on/off switch and leave the black wire for the next step. Step 3: Route the power harness from the battery to the switch; this will determine proper length to cut wires. Repeat step #2 regarding cable jacketing and connection points to the switch and butt connector. Step 4: Install an inline 30 amp. fuse on the positive (red) lead from the battery to the switch. Locate an easily accessible place, out of the elements, for the fuse and remove approx. 3'' of the black outer jacket exposing two single leads (red and black). Cut the red lead in half and strip a 1/4'' off each lead. Insert into the fuse connector and crimp. Insert 30 amp. blade fuse into connector. Key Part No. D 6184 D 6234 D 6344 D 6403 D 6404 D 6406 D 6407 D 6408 D 6410 D 6424 D 6425 D 7105 D 7106 Description On/Off Switch Butt Connector Dielectric Grease 20' Vehicle Harness 10' Battery Harness Rubber Switch Boot Spreader Splice Cord - 10'' Harness Splice Cord - 10'' Motor 12 Volt DC 30 Amp Fuse Fuse Holder Ring Terminal Spade Connector Qty. 1 1 1 1 1 1 1 1 1 1 1 2 2 Step 5: At the battery end of the power harness, remove 8'' of the black outer jacket exposing two single leads (red and black). Strip 1/4'' off each lead. Crimp a 3/8'' lug terminal to each lead and attach the red lead to the positive side of the battery and the black lead to the negative side of the battery. Step 6: Install rubber weatherproof boot on switch before finishing installation. © Trynex International 2006 L1040 7 — 21 Junior SP-325 Wiring Instructions Step 1: Take harness assembly and route from the rear of the vehicle to the front. Route harness along frame and attach to frame holes and frame supports. It is not recommended to attach to fuel or brake lines for obvious reasons. Do not route close to exhaust system or engine, even though Trynex uses high temperature wiring, it still could melt under extreme heat and short the spreader electrical system, as well as the vehicle electrical system. Step 2: Mount rear plug on bumper using supplied bolts, locate towards the center of the bumper to reduce the amount of debris the tires will throw to the rear. Important: Apply a small amount of dielectric grease to the plug. Step 3: Secure harness from the rear to the front using heavy duty ty-wraps or frame clips along the frame and lighter duty ty-wraps everywhere else. Step 4: Layout harness portion that connects to the battery along the fire wall and fender well. Do not connect power leads to battery yet. Drill a 3/4" hole in the fire wall, or use existing access hole, for the control portion of the harness and route connector and harness through hole. Be sure to check the area on the other side of the fire wall to make sure you are not going to drill into the vehicle harness or a control module. Generally you can drill on either side of the steering wheel for a good location. Step 5: Connect harness battery leads to battery (+/–) and motor leads (+/–), and mount to a suitable location. NOTE: You may want to contact customer before mounting controller, some prefer not to have holes drilled into the dashboard. Ty-wrap loose controller harness and move to the engine compartment. Step 5A: Verify that the 15 Amp fuse is securely in place. Step 6: Connect power leads to the battery: Red + Positive, Black – Negative, always connect to the primary battery if using a dual battery system, secure loose loom to any other large or medium vehicle harness with medium duty ty-wraps this will secure wiring harness. Step 7: Switch the ON/OFF button on the controller to check for power, when that has been confirmed turn power OFF. The electrical portion of the installation is complete. 7 — 22 L1040 © Trynex International 2006 Junior SP-325 Wiring Diagram Diagram and Instructions SPREADER MOTOR (–) Neg. Black (+) Pos.Red Speed Control Knob 12 VOLT BATTERY (+) Pos.Red On/Off Switch 20 AMP (–) Neg. Black Key © Trynex International 2006 L1040 Part No. D 6474 D 6486 D 6482 Description Mini Control 325 Harness 20 Amp Fuse Qty. 1 1 1 7 — 23 Operating the Spreader PREPARATION CAUTION – Sweep area clear of foreign objects or obstacles that could cause personal injury. Keep other persons, children, or animals out of the area to be spread. SPREADER LOADING WARNING – Do not overload vehicle. Use chart below to calculate weight of material. Weights of material are an average for dry materials. Material Weight Per Cubic Ft. Rock Salt 35-40 lbs. Sand/Salt Mix 85-95 lbs. • Be sure to comply with manufacturer’s maximum gross vehicle weight ratings. • Warning – Never leave materials in hopper for long periods of time as salt is hygroscopic and will attract atmospheric moisture and harden up. When spreading sand mix, a 2 to 1 Sand/Salt mix is recommended to prevent the material from freezing. SPREADING TIPS • Never exceed 10 m.p.h. when spreading. • For a wider pass, increase spinner speed. • For a heavier pass, drive slower, or increase auger speed. • Never operate spreader near pedestrians. • Spread ice melters with the storm to prevent unmanageable levels of ice. • Calculate spread pattern when near vegetation. 7 — 24 L1040 © Trynex International 2006 Operating the Spreader Continued SPREADER OPERATION PIVOT-PRO 1075 / MINI-PRO 575 • The variable speed controller has finger-tip dial action, digital system status with warning protection and blast feature. • To start, press power switch on controller and spreader will accelerate to speed set on dial. • To stop, press power switch on controller to off position. • Adjust speed of spinner by using dial on right side of controller. • If more salt is needed in certain areas, press the blast switch to give maximum power. SAND-PRO 1875 • The Dual Variable Speed Control has dual finger-tip dials for maximum performance, digital system status with warning protection and built-in Vibrator Switch. • To start, press power switch on controller and spreader will accelerate to speed set on spinner and auger dials. • To stop, press power switch on controller to off position. • Speed of auger and spinner may be adjusted separately to get desired flow and spread distance from spreader. • The Vibrator Switch is needed for dense material or to increase the flow to the auger. This eliminates bridging of material in hopper. • A Material Baffle (Part #D6330) has been installed in your spreader to stop fine material from free-flowing. If using dense or damp material, or if more flow is desired, remove Material Baffle. However, it is recommended that the Material Baffle remain in place if using bulk salt. • It is important that the Inverted Vee (Part #D6328) not be removed except when servicing. AUTO-REVERSE “AR” FUNCTION (SAND-PR0 1875 ONLY) • If your controller displays “OL” this could indicate a jammed auger. • To engage the Auto-Reverse “AR” function: Step 1: Shut the Main Power Switch OFF for 3 seconds. Step 2: Turn the Main Power Switch ON. When the machine starts back up the “AR” sequence will automatically start and the auger will reverse for several rotations to clear the jam. • After a pause of several moments, the auger will automatically return to correct rotation. • If the jam is still not cleared, the controller will again display “OL”. • You may repeat Steps 1 & 2 for a second and third time. • If after the third try the controller displays “OL” — you must extract the material that is causing the problem. • Follow all warning directions when clearing jams. WARNING PROTECTION • If audible beeping occurs, read display to identify problem. If display reads “OL” (overload) or “OH” (overheat), shut controller down and carefully clear jammed auger. If display reads “E1“ this means there is a dead short in system. Do not use until problem is corrected. If display reads “E0”, this means that the motor is not getting any power. Check all connections. If display reads “LB”, the vehicle battery is extremely low and could damage system or a poor connection exists. • If there are any problems while operating the spreader, refer to Troubleshooting Guide. © Trynex International 2006 L1040 7 — 25 Adjustable Deflector Model #ADF-020 for SP-375, SP-575 and SP1075 Key 1 2 3 4 5 6 7 8 9 7 — 26 Part No. D 4121 D 4124 D 4125 D 6138 D 6154 D 6166 D 6179 D 6180 D 6181 Description 3/8'' - 13 x 1'' Hex Bolt 3/8'' - Locknuts 3/8'' - Flatwashers 5/16'' - 18 Locknut 36'' Deflector 5/16'' - 18 x 1'' Hex Bolt Deflector Adjustment Bracket Adjustment Bar Mounting Bracket Adjustment Bar Qty. 2 2 2 10 1 10 1 2 2 L1040 © Trynex International 2006 Adjustable Deflector Installation Instructions Model #ADF-020 for SP-375, SP-575 and SP1075 SPREADER ASSEMBLY SPREADER ASSEMBLY INSTALLATION Step 1: Install deflector adjustment bar as seen in Figure A. If needed, drill two 3/8” holes in front apron of drive enclosure. Bolt bracket to drive enclosure. Step 2: Remove original deflector. Step 3: Mount adjustment bar and mounting bracket on back side of 36” deflector. See Figure B. Step 4: Install 36” deflector assembly. OPERATION Step A: To adjust deflector position, simply insert adjustment bars into holes on deflector adjustment bracket until desired spread pattern is achieved. © Trynex International 2006 L1040 7 — 27 Stainless Gate Assembly Kit Model #GAK-020S for SP-575 and SP1075 GAK-020S Assembly Top View Key 7 — 28 Part No. D 4289 D 6138 D 6140 D 6155 D 6185 D 6365 D 6366 D 6302 D 6367 D 6304 D 6305 D 6308 D 6309 D 6311 D 6368 D 6351 Description 1/4'' Lock Nut 5/16'' Lock Nut 5/16'' Set Screw 5/16'' Lockwasher Agitation Auger SS Gate Body SS Gate Slide Gate Knob SS Throat Mount 10' Cable Cable Fitting 5/16'' - 18 Special Bolt Knob Square Nut 1/4 - 20 x 1/2'' Hex Bolt SS Gate Stop Indicator Cable Mounting Bracket Qty. 2 1 1 1 1 1 1 1 1 1 1 1 1 2 1 1 GAK-020S Assembly Bottom View L1040 © Trynex International 2006 Gate Assembly Installation & Operating Instructions INSTALLATION INSTRUCTIONS Step 1: Remove hopper by taking the two 5/16'' stainless steel bolts located inside the hopper. Step 2: Remove throat clamp using a 9/16'' wrench of socket. Step 3: Remove auger using allen key. NOTE: Do not re-install when using gate assembly kit. Step 4: (Optional) Next determine how long your cable should be. Once you have determined the length, pull control wire back 3'' from your cut off point. This will allow you to travel in your gate control. Step 5: Thread the brass bulk head connector onto the cable jacket. Then install this assembly onto the gate using the supplied drawing. Step 6: You can now place the gate assembly on to the shaft and position it so that the cable actuator is on the left side if you are looking at it from the back. Leave the gate body and throat mount loose. Step 7: Now install the new agitator positioning it so that the bolt is on the upper most part of the shaft flat. Use a small amount of blue locktite on the bolt before tightening. Step 8: Place the hopper back into the frame, at the same time you will need to slip the gate throat mount over the hopper throat. Step 9: Place the 5/16'' stainless bolts back into the hopper and tighten. Step 10: Push the gate control up as far as it will go. This will make sure the gate and the spinner will not make contact. Also make sure the gate throat mount is between the hopper throat and the hopper throat clamp. This will help keep it in position when you begin to tighten the throat clamp bolts. Step 11: Take the throat clamp and reinstall making sure that you will be making full contact with the gate throat mount. Step 12: You now can tighten the gate throat mount to the gate body. Make sure that the shaft is centered front to back. If not, move the gate body until desired location is determined and tighten bolts on the gate throat mount. Step 13: Install gate positioning knob into gate slotted opening. Step 14: When gate has been properly positioned to desired location, drill a 1/4'' hole and install a sheet metal screw or a pop rivet to ensure gate will not move from the optimum location. OPERATING INSTRUCTIONS Position the gate locking knob to the desired setting. This will give you a positive reference point for consistent operation. You will need to look into the hopper with the gate open to get an idea of where to locate the stop. When using a variable speed controller, you may need to open the gate slightly more than you would if using a standard on/off control. Once you have determined the gate position, you can then load the hopper with material and perform a test run. A parking lot or paved area is the best way to analyze your pattern. This will assist you in tuning your spreader and material to the specific task. © Trynex International 2006 L1040 7 — 29 Vibrator Kit Model #OFK-020 Wiring Diagram and Installation (–) Neg. Black (+) Pos.Red 12 VOLT BATTERY (+) Pos.Red (–) Neg. Black Key Part No. D 4124 D 6160 D 6161 D 6163 D 6184 D 6233 D 6234 D 6344 D 6403 D 6404 D 6406 D 6425 D 7105 D 7106 Description 3/8'' Lock Nut 3/8'' - 16x2 Hex Bolt DC-80 Vibrator Vibrator Washer On/Off Switch 10 Amp Fuse Butt Connector Dielectric Grease 20' Universal Harness 10' Battery Harness Rubber Switch Boot Fuse Holder Ring Terminal Spade Connector Qty. 4 4 1 4 1 1 1 1 1 1 1 1 2 2 Wiring Installation and Instructions Step 1: First, install switch at desired location. This will determine what the proper wire length should be. Step 2: Run spreader/vehicle harness from the rear of vehicle to switch area. Remove approx. 3'' of the black outer jacket exposing two single leads (red and black), strip a 1/4'' off each lead. Crimp 1/4'' female connector on red lead and crimp the butt connector to the black lead. Place the female spade/red wire to the on/off switch and leave the black wire for the next step. Step 3: Route the power harness from the battery to the switch; this will determine proper length to cut wires. Repeat step #2 regarding cable jacketing and connection points to the switch and butt connector. Step 4: Install an inline 10 amp. fuse on the positive (red) lead from the battery to the switch. Locate an easily accessible place, out of the elements, for the fuse and remove approx. 3'' of the black outer jacket exposing two single leads (red and black). Cut the red lead in half and strip a 1/4'' off each lead. Insert into the fuse connector and crimp. Insert 10 amp. blade fuse into connector. Step 5: At the battery end of the power harness, remove 8'' of the black outer jacket exposing two single leads (red and black). Strip 1/4'' off each lead. Crimp a 3/8'' lug terminal to each lead and attach the red lead to the positive side of the battery and the black lead to the negative side of the battery. Step 6: Locate vibrator approx. 6" to 8" from the top of throat entry and drill four 3/8" holes in rear hopper face. Bolt the vibrator in place using special washers with domed side against hopper. IMPORTANT: It is imperative that SPECIAL DOMED WASHERS are used. Use of any other washer could cause hopper to tear. 7 — 30 L1040 © Trynex International 2006 Receiver Hitch Mount (SP-1075 ONLY) Model #RHT-185 Key © Trynex International 2006 L1040 Part No. D 4116 D 4119 D 4120 D 4121 D 4122 D 4124 D 4133 D 4135 D 4136 D 6270 D 6271 D 6272 D 6503 D 6386 D 6387 D 6388 D 6392 D 4125 Description 1/2’’ - 13 x 1-1/2” Hex Bolt 1/2’’ Flat Washer 1/2” Lock Nut 3/8’’-16x1 Hex Bolt 3/8’’-16x1-1/2” Hex Bolt 3/8’’-Lock Nut 5/16’’ Lynch Pin 2 - 5/16'' Hair Pin Clip 5/8'' x 5-1/2'' Hitch Pin 2” Receiver Weldment Left Bumper Bracket Right Bumper Bracket Ratchet Strap Upper Rail Weldment Lower Rail Weldment Vertical Rail Support 3/8"-16 x 3" Tap Bolt GRZ 3/8" Flat Washer Qty. 4 4 4 16 10 34 2 1 1 1 1 1 2 2 2 2 8 16 7 — 31 Receiver Hitch Mount Mounting Instructions Model #RHT-175 Step 1: Insert either right or left frame support weldment into spreader frame, line up three hole pattern and bolt together. Repeat process for other side. Step 2: You will notice a fourth hole in each rail towards the center of the spreader; we recommend drilling this hole through the frame and securing with supplied hardware. This will add additional strength to the spreader frame. Step 3: Locate the left and right bumper plates, there is a 3/8” hole below the main plate pin, use supplied hardware to bolt both the bumper plate and frame support weldment together, this will help line up the parts while you position the spreader on the bumper. Step 4: Next insert 2” receiver plate into hitch and install pin to locate; remove existing 4 rear 1/2” bolts from spreader drive assembly. Step 5: With assistance, lift spreader onto bumper. Step 6: Re-install 1/2” bolts through receiver plate into frame, re-install lock nuts but leave slightly loose. Step 7: Line spreader up as close as possible to tailgate, at this point you can use a paint pen or other means to locate bumper plate holes to be drilled. Step 8: Remove spreader and drill holes. Step 9: Remove plates from frame assembly and bolt to bumper with supplied hardware. Step 10: With assistance, insert spreader into 2” receiver hitch and install hitch pin. Since you left the plate loose, this will help with alignment in case bumper pads crushed down during bumper plate installation phase. Step 11: Tighten receiver mount bolts. Step 12: Install bumper plate safety pins on both left and right side. Step 13: INSTALL EITHER ONE OR BOTH RATCHET STRAPS FROM THE FRAME SUPPORT WELDMENT TO AN IN BED TIE DOWN OR WITH A SINGLE STRAP, FROM SIDE TO SIDE AROUND BOTH FRAME SUPPORT WELDMENTS. 7 — 32 L1040 © Trynex International 2006 Receiver Hitch Mount (SP-1875 ONLY) Model #RHT-185 Figure 1 © Trynex International 2006 L1040 Figure 2 7 — 33 Receiver Hitch Mount Mounting Instructions Model #RHT-1875 Step 1: Insert either right or left frame support weldment into spreader frame, line up three hole pattern and bolt together. Repeat process for other side. Step 2: You will notice a fourth hole in each rail towards the center of the spreader; we recommend drilling this hole through the frame and securing with supplied hardware. This will add additional strength to the spreader frame. Step 3: Locate the left and right bumper plates, there is a 3/8” hole below the main plate pin, use supplied hardware to bolt both the bumper plate and frame support weldment together, this will help line up the parts while you position the spreader on the bumper. 3A: Place item on the back lower inside rail face, place item on the outside back lower rail (see exploded view). 3B: Install hardware for items and as shown in the exploded view. 3C: Refer to (Figures 1 & 2 ) for proper installation. Step 4: Next insert 2” receiver plate into hitch and install pin to locate; remove existing 4 rear 1/2” bolts from spreader drive assembly. Step 5: With assistance, lift spreader onto bumper. Step 6: Re-install 1/2” bolts through receiver plate into frame, re-install lock nuts but leave slightly loose. Step 7: Line spreader up as close as possible to tailgate, at this point you can use a paint pen or other means to locate bumper plate holes to be drilled. Step 8: Remove spreader and drill holes. Step 9: Remove plates from frame assembly and bolt to bumper with supplied hardware. Step 10: With assistance, insert spreader into 2” receiver hitch and install hitch pin. Since you left the plate loose, this will help with alignment in case bumper pads crushed down during bumper plate installation phase. Step 11: Tighten receiver mount bolts. Step 12: Install bumper plate safety pins on both left and right side. Step 13: INSTALL EITHER ONE OR BOTH RATCHET STRAPS FROM THE FRAME SUPPORT WELDMENT TO AN IN BED TIE DOWN OR WITH A SINGLE STRAP, FROM SIDE TO SIDE AROUND BOTH FRAME SUPPORT WELDMENTS. Key 7 — 34 Part No. D 4116 D 4119 D 4120 D 4121 D 4122 D 4124 D 4133 D 4135 D 4136 D 6391 Description 1/2’’ - 13 x 1-1/2” Hex Bolt 1/2’’ Flat Washer 1/2” Lock Nut 3/8’’-16x1 Hex Bolt 3/8’’-16x1-1/2” Hex Bolt 3/8’’-Lock Nut 5/16’’ Lynch Pin 2 - 5/16'' Hair Pin Clip 5/8'' x 5-1/2'' Hitch Pin 2" Receiver Weldment Qty. 4 4 4 16 10 34 2 1 1 1 Key Part No. D 6271 D 6272 D 6503 D 6390 D 6389 D 6386 D 6387 D 6388 D 6392 D 4125 Description Left Bumper Bracket Right Bumper Bracket Ratchet Strap Backing Plate Frame Adapter Upper Rail Weldment Lower Rail Weldment Vertical Rail Support 3/8"-16 x 3" Tap Bolt GRZ 3/8" Flat Washer L1040 Qty. 1 1 2 1 1 2 2 2 8 16 © Trynex International 2006 Pivot Mount Model #PMT-175 NOTE: See Installation Warning (Packaged with Kit) Before Drilling Holes. NOTE: When installing the Pivot Mount, if any movement is noted with Rail Brackets due to weakened or altered conditions of pick-up bed, drill & bolt thru prepunched Rail Brackets to assure firm mounting. Key Part No. D 4116 D 4119 D 4120 D 4121 D 4122 D 4124 D 4125 D 6138 D 6139 D 6141 D 6142 D 6143 Description 1/2" 13 x 1 1/2" Hex Bolt 1/2" Flat Washer 1/2" Lock Nut 3/8" 16 x 1" Hex Bolt 3/8" 16 x 1 1/2" Hex Bolt 3/8" Lock Nut 3/8" Flat Washer 5/16" Lock Nut 5/16" 18 x 2" Hex Bolt 1/2" Toggle 1/2" 13 x 4" Hex Bolt Full Thread 1/2" 13 x 1 1/4" Hex Bolt © Trynex International 2006 L1040 Qty. 2 7 5 16 13 29 9 1 1 2 2 3 Key Part No. D 6144 D 6200 D 6201 D 6202 D 6203 D 6204 D 6205 D 6206 D 6207 D 6208 D 6222 D 6223 Description 1/2" 13 x 3" Hex Bolt Full Thread Bed Rail Bracket Right Bed Rail Bracket Left Pivot Tube Assembly Angle Top Pivot/ Bumper Bracket Latch /Bumper Bracket Pivot Channel Assembly Latch Channel Assembly Rubber Tip Protector 1/8" x 2-1/16" Hair Pin Clip Latch Bar Qty. 4 1 1 1 1 1 1 2 2 4 2 1 7 — 35 Pivot Mount Installation Instructions Step 1: Insert upper & lower pivot rails into main frame of spreader. Line up the pre-punched holes on the pivot rail with the main frame, then bolt together. Holes are pre-determined and can be relocated if spreader is not centered on vehicle. Step 2: Locate top bed rail mounting brackets and set on top of pickup bed rails; Center by moving out towards the bumper. Maintain a minimum of 2” clearance between tailgate and spreader. Step 3: Locate left & right bumper brackets. The left side or the pivot side will have a two piece system that will act as the hinge for the spreader. (See fig. D) The right side will have a two-piece system that will be the latching side. (See fig. H). Attach pivot tube and latch bar to the bumper plates using the posts as centering guides. Line up with the bed rail brackets. Be sure that the tailgate will open before locating any of these brackets permanently. Make sure bumper brackets are parallel to the lower main frame so that everything will be straight. After aligning all pieces, mark & drill holes using the bumper plates as a guide. (As seen in Fig. A) Once holes have been drilled, bolt securely to bumper. Note: Use a minimum of 3 holes. Step 4: Locate toggle bolt assembly and install on left and right upper bed rail brackets as seen in (Fig. B). Position toggle bolt (Fig. C) to keep in position while tightening. Pull up on the bracket to keep a slight amount of pressure on the toggle bolt. * NOTE *: When tightening toggle bolt assembly, do not exceed 30 foot pounds of torque, or you may damage toggle assembly. Take the two 3” full threaded bolts and screw into bottom of bed rail brackets. Use rubber tip protectors on bolt end as seen in (Fig. E). Torque bolts down using a HAND RATCHET ONLY - you may also want to use a small amount of blue removable thread locker. Do this only as a final assembly once you have a proper tailgate clearance established. Step 4A: Please make sure toggle is positioned so front to back in line with vehicle, this is very important. If the toggle makes contact with the rear inside surface of the pickup box, you may cause an internal dent that will show on the exterior of the box. Also you can damage the paint which can be very costly to repair, not to mention a huge inconvenience for everyone. Please take your time during this step and be sure it is done correctly. Step 5: Now that the lower bumper brackets and upper bed rail brackets are mounted, you will now need to check both the pivot tube assembly and latch bar to see if these need to be cut down. Due to the variety of truck bumpers, bed rail heights, etc. We made these two parts intentionally too long. On the pivot side you will need to align the top of the pivot tube hole to the left side bed rail bracket hole. Trim off the amount needed with a cut off saw. Step 6: Put this piece aside for now. Now that you have the pivot side assembly cut to length, mount spreader main frame assembly to truck. With an assistant, place pivot side of spreader on truck. Take pivot tube assembly and insert through pivot rails to the bumper plate locator tube. Take and bolt the upper pivot tube assembly to the bed rail bracket. (Make sure bed rail bracket is secure) Swing spreader until both support pads on lower main frame rail are completely on the bumper. Drill a 5/16” hole, (as seen in Fig. D) and bolt lower portion of pivot tube assembly. This will now complete pivot side installation. Step 7: The latching side will be done the same way, except that you will need to mount the locator bracket to the right side bed rail bracket (see Fig F, G, H). Once you have completed, trim flush with the top of the locator bracket. After cutting bar to proper length, drill a 1/2” hole in mounting bar. Bolt the upper portion and the lower portion of the latching bar. Step 8: Locate latching rails and insert into spreader main frame, position the latch rails so they are latched to the latching bar. Center latching bar in the pocket of the end of the latch rail. (see Fig. F) This will insure proper latching when closing spreader. Step 9: Using an assistant or a large vice grip to insure rails do not move, drill three 3/8” holes using the pre-punched holes as a guide. Repeat this process for the lower rail also. Bolt together. This completes the latch side of the pivot mount. Step 10: Drill four more 3/8” holes as seen in (Fig I) to stiffen the whole frame/rail system. Bolt together. This will insure minimum frame deflection under extreme load conditions. Step 11: Make sure spreader is level and clear from the tailgate when closed. You can make minor adjustments by loosening the bed rail brackets (one at a time) and trimming the unit out. Also at this time you may want to apply a small amount of removable thread locker to insure the bolts stay secure. Step 12: Lube zerk fittings on pivot tubes. Step 13: IMPORTANT: When installing the Pivot Mount, if any movement is noticed with the bed rail brackets due to weakness or altered conditions of pickup bed, drill and bolt thru the pre-punched holes located on the sides of the bed rail brackets and bolt securely. Step 14: After first use, tighten all nuts and bolts on mount and spreader. 7 — 36 L1040 © Trynex International 2006 Pivot Mount Installation Diagrams (See Instructions) Fig. A Fig. B Fig. C Part Must Remain Straight NO D N A C G R U E NO A T O I N See Step 4A Fig. D Fig. E Fig. F Fig. G Fig. H Fig. I DRILL DRILL DRILL © Trynex International 2006 L1040 7 — 37 3-Point Mount Model #TPM-175 Key Part No. D 4133 D 4135 D 4136 D 4137 D 6147 Description 5/16” Linch Pin 2-5/16” Hairpin Clip 5/8” x 5-1/2” Hitch Pin 7/8” x 5-1/2” Lift Arm Pin 3-Point Frame Qty. 2 1 1 2 1 TRAILER MOUNT ASSEMBLY INSTRUCTIONS Step 1: Insert axle through wheel and axle weldment. Step 2: Put washer on then install hair pin clip to secure axle. Repeat Steps 1 & 2 for other side. Step 3: Bolt tube support on axle weldment. Step 4: Insert trailer tongue per drawing and pin into position. Step 5: Insert spreader mount into opposite side of trailer tongue and pin into position. CAUTION: MAXIMUM OF 240 LBS. GROSS WEIGHT CAN BE PUT ONTO TRAILER. 7 — 38 L1040 © Trynex International 2006 Trailer Mount Model #TLR-175 MAXIMUM LOAD WEIGHT NOT TO EXCEED 240 LBS. GROSS Key © Trynex International 2006 L1040 Part No. D 4116 D 4120 D 4135 D 4136 D 6438 D 6439 D 6440 D 6441 D 6442 D 6443 Description 1/2'' - 13 x 1-1/2'' Hex bolt 1/2'' - Locknuts Hair pin clip 5/8'' x 5 -1/2'' Hitch pin Trailer tongue Trailer “A” frame Receive tube mount Trailer tire 5/8'' - 13 x 7'' Hex bolt special 5/8'' Flat washers Qty. 2 2 3 1 1 1 1 2 2 2 7 — 39 Drop Utility Mount Model #DRM-175 Maximum Load Weight Not To Exceed 240 lbs. Gross Key 7 — 40 Part No. D 4119 D 4120 D 4121 D 4124 D 4125 D 4135 D 4136 D 6246 D 4318 Description 1/2" Flat Washer 1/2"-Lock Nut 3/8"-16x1 Hex Bolt 3/8"-Lock Nut 3/8" Flat Washer 2 - 5/16" Hair Pin Clip 5/8" x 5-1/2" Hitch Pin 1/2" - 13 x 2-1/2" Hex Bolt 3/8" Fender Washer Qty. 2 2 2 8 9 2 2 2 8 Key Part No. D 6420 D 6421 D 6422 D 6423 D 6432 D 6434 D 6435 D 6436 Description 3/8" - 16 x 2 Truss Bolt Full Thread 3/8" - 16 Hex Nut 3/8" - 16 x 5" Hex Bolt 2'' Rubber Stopper Mounting Rail Drop Mount Weldment Mounting Rail Hat Section Mule Adapter L1040 Qty. 8 2 1 1 2 1 2 1 © Trynex International 2006 Drop Utility Mount Installation Instructions MULE 550 Step 1: Temporarily remove the tailgate. Remove the bed liner if equipped. Step 2: Bolt support rails to spreader mount with 1/2'' bolts. Install 1/2'' hex bolt with washer through rail first then spreader mount. Install 1/2'' locknut and tighten. Avoid over tightening to avoid potentially crushing tube. Step 3: Place spreader mounting rails over spreader mount support rails and install pins. Locate the spreader bracket mounting rails on top of the bed by centering left to right and positioning the rear edged of the rails 5/8'' beyond the rear of the bed. Transferring mounting holes to bed & drill 7/16''. Important: Check for proper clearance underneath bed before drilling holes. Step 4: Bolt rails under belt with truss head bolts, fender washers, SAE washers and nylon lock nuts. Install the spreader bracket before tightening hardware. The tailgate and bed liner may be reinstalled now. Step 5: Install 550 anti dump bracket with (2) 3/8'' bolts provided. Step 6: Install gate control cable per attached instructions. Step 7: Route cables at your discretion and install switch. MULE 2500 The installation of the spreader on the 2500 is the same as the 550 with the following exceptions. Step 1: When positioning the mounting rails the end of the rails should be 1/2'' forward of the rear edge of the bed. Step 2: The universal anti dump threads into the lower weld nut on the spreader bracket assembly. Adjust rubber bumper to be 1/2'' to 3/4'' behind the rear axle - receiver hitch assembly. CLUB CAR CARRYALL Step 1: Remove the bed tailgate and bottom angle trim. Also remove the 2 rear carriage bolts from the floor of the bed. Step 2: Place spreader mounting rails over spreader mount and install pins. Locate the 2 front outside mounting rails over the holes from the carriage bolts remove in step 1. Step 3: Install truss head bolts, fender washers, SAE washers and nylon lock nuts in the carriage bolt holes. Transfer the remaining mounting rail holes and bolt rails into bed. JOHN DEERE GATOR Step 1: Remove the bed tailgate. Step 2: Place spreader mounting rails over spreader mount and install pins. Step 3: Locate the spreader bracket mounting rails on top of the bed by centering left to right, push main mount flush up against rear of bed to locate mounting rails. Transfer mounting holes to bed. Step 4: Install mounting rails with truss head bolts, fender washers, SAE Washers and nylon lock nuts in the 1/2'' mounting holes. Step 5: The universal anti dump threads into the lower weld nut on the spreader bracket assembly. The rubber bumper should be adjusted to rest against the frame of the vehicle. The trailer hitch bracket may need to be relocated depending on configuration. CAUTION: MAXIMUM WEIGHT NOT TO EXCEED 240 LBS. © Trynex International 2006 L1040 7 — 41 Utility Mount Model #UTM/FLM-175 Spreader (reference) Maximum Load Weight Not To Exceed 240 lbs. Gross Key 7 — 42 Part No. D 4315 D 6426 D 4116 D 4119 D 4120 D 6148 D 6235 Description Lock Knob Assembly (FLM-175 Only) Fork Lift Mount Frame 1/2"-13 x 1 1/2" Hex Bolt 1/2" Flat Washer 1/2" Lock Nut Utility Receiver Underbody Support Plate Qty. 2 1 8 8 8 1 2 L1040 © Trynex International 2006 Troubleshooting Whenever service is necessary, your local SnowEx Dealer knows your Spreader best. Take your Spreader to your local dealer for any maintenance or service needs on your unit. If this is not possible, the Troubleshooting Guide below may assist you in identifying the problem. Warning: First read all warning instructions and safety messages before servicing your spreader. Preliminary Checks • Be sure all electrical connections are tight and clean. • Be sure nothing is jammed in the hopper. PROBLEM POSSIBLE CAUSE SOLUTION Motor doesn’t run. Loose electrical connections. Check all connections. Blown Fuse. Replace fuse. Motor Seized. Replace motor. Jammed auger. Carefully clear jammed material. Poor electrical connections. Clean or replace connectors. Use dielectric grease. Electrical short. Check electrical connections. Check for bare wires. Controller failure. Replace controller. Empty hopper. Fill hopper. Wet material. Replace with dry material. Frozen or coarse material. Replace material. Spinner not turning. Check drive assembly. Auger loose on shaft. Tighten locking bolt on the side of the auger. There is a flat machined on the driver shaft. Align the auger with this flat and tighten the bolt. Vibrator not working. Replace vibrator Audible alarm beeping and display shows OL or OH. Jammed auger, overload shut down. Turn off for three seconds, then restart. If shut down continues, turn off controller. Clear debris and lumps from auger areas. Audible alarm beeping display shows E1. Short in system. Turn off. Do not use until problem is corrected. Audible alarm beeping display shows EO. Motor is not getting power. Turn off. Check all connections. Audible alarm beeping display shows LB. Vehicle battery is extremely low, or a poor connection exists. Turn off. Charge battery. Controller shut down. Material not flowing from hopper. © Trynex International 2006 L1040 7 — 43 Troubleshooting SP-1875 SPREADER DOES NOT RUN TURNS ON BEEP SHUTS OFF DISPLAYS ERROR CODE OL CODE DEFINITION: AMP DRAW TOO HIGH JAMMED MATERIAL BAD MOTOR CHECK WITH TEST KIT SWITCH OFF & ON FOR AUTO-REVERSE FUNCTION CLEAR JAM TEST 4 TO 20 AMP DRAW NO LOAD GOOD 20+ AMP DRAW NO LOAD BAD BAD TRANSMISSION CHECK WITH TEST KIT CORROSION TEST TURN SHAFT BY HAND SHOULD TURN FREELY DON'T FORGET USE DIELECTRIC GREASE REPLACE ALL CORRODED CONNECTIONS BAD CONTROLLER CHECK WITH TEST KIT EO CODE DEFINITION: OPEN CIRCUIT BETWEEN MOTOR AND CONTROLLER SPREADER UNPLUGGED PLUG IN SPREADER MOTOR POWER CORD DISCONNECTED INSIDE DRIVE ASSEMBLY OPEN ACCESS COVER AND PLUG TOGETHER BREAK IN WIRING HARNESS LB CODE BAD ELECTRICAL CONNECTION CORROSION REPLACE ALL CORRODED CONNECTIONS LOOSE CONNECTION TIGHTEN OR REPLACE LOW BATTERY LESS THAN 12 VOLT OUTPUT LOAD TEST BATTERY E1 CODE DEAD SHORT IN MOTOR CIRCUIT REPLACE AFFECTED COMPONENTS ALL OTHER CODES CHECK HARNESS FOR SPLICED IN ACCESSORY ON/OFF SWITCH LIGHTS NO DISPLAY CHECK POWER TO BLUE WIRE CHECK WITH TEST KIT NOTHING HAPPENS NO DISPLAY ON/OFF SWITCH WILL NOT LIGHT UP CHECK POWER SOURCE TO CONTROLLER CHECK WITH TEST KIT REPLACE HARNESS CHECK WITH TEST KIT BAD CONTROLLER CHECK WITH TEST KIT REPLACE BAD CONTROLLER BAD CONTROLLER SNOWEX DIAGNOSTIC TEST KIT (STK-020) IS AVAILABLE TO ACCURATELY DIAGNOSE ANY ISSUES WITH SNOWEX SPREADERS. CALL YOUR DEALER FOR DETAILS. 7 — 44 L1040 © Trynex International 2006 Troubleshooting SP-1875 Material Flow MATERIAL FREE FLOWS MATERIAL DOES NOT FLOW CHECK BAFFLE LENGTH 18" CORRECT MATERIAL ISSUE CHECK BAFFLE POSITION SHOULD TOUCH HOPPER ON 3 SIDES MATERIAL ISSUE MATERIAL OBSTRUCTION REMOVE OBSTRUCTION MATERIAL ISSUE AUGER RUNS BACKWARDS RUN 12 VOLT TO AUGER CIRCUIT ON SPREADER POWER CORD AUGER RUNS PROPER DIRECTION REPLACE VEHICLE HARNESS AUGER RUNS BACKWARDS CHECK CONNECTIONS AT AUGER MOTOR FOR REVERSE POLARITY TURN ON VIBRATOR SLOW MATERIAL FLOW POLARITY CORRECT REPLACE SPREADER HARNESS TURN ON VIBRATOR INCREASE AUGER SPEED MATERIAL ISSUE SNOWEX DIAGNOSTIC TEST KIT (STK-020) IS AVAILABLE TO ACCURATELY DIAGNOSE ANY ISSUES WITH SNOWEX SPREADERS. CALL YOUR DEALER FOR DETAILS. © Trynex International 2006 L1040 7 — 45 Troubleshooting SP-575 and SP-1075 SPREADER DOES NOT RUN TURNS ON BEEP SHUTS OFF DISPLAYS ERROR CODE OL CODE DEFINITION: AMP DRAW TOO HIGH JAMMED MATERIAL CLEAR JAM BAD MOTOR TEST 4 TO 20 AMP DRAW NO LOAD GOOD CHECK WITH TEST KIT 20+ AMP DRAW NO LOAD BAD BAD TRANSMISSION CHECK WITH TEST KIT TEST TURN SHAFT BY HAND SHOULD TURN FREELY CORROSION REPLACE ALL CORRODED CONNECTIONS DON'T FORGET USE DIELECTRIC GREASE BAD CONTROLLER CHECK WITH TEST KIT EO CODE LB CODE DEFINITION: OPEN CIRCUIT BETWEEN MOTOR AND CONTROLLER BAD ELECTRICAL CONNECTION SPREADER UNPLUGGED PLUG IN SPREADER MOTOR POWER CORD DISCONNECTED INSIDE DRIVE ASSEMBLY OPEN ACCESS COVER AND PLUG TOGETHER BREAK IN WIRING HARNESS CHECK WITH TEST KIT REPLACE HARNESS CORROSION REPLACE ALL CORRODED CONNECTIONS LOOSE CONNECTION TIGHTEN OR REPLACE LOW BATTERY LESS THAN 12 VOLT OUTPUT LOAD TEST BATTERY E1 CODE DEAD SHORT IN MOTOR CIRCUIT REPLACE AFFECTED COMPONENTS ALL OTHER CODES CHECK HARNESS FOR SPLICED IN ACCESSORY ON/OFF SWITCH LIGHTS NO DISPLAY CHECK POWER TO BLUE WIRE NOTHING HAPPENS NO DISPLAY ON/OFF SWITCH WILL NOT LIGHT UP CHECK POWER SOURCE TO CONTROLLER BAD CONTROLLER CHECK WITH TEST KIT REPLACE BAD CONTROLLER CHECK WITH TEST KIT BAD CONTROLLER CHECK WITH TEST KIT SNOWEX DIAGNOSTIC TEST KIT (STK-020) IS AVAILABLE TO ACCURATELY DIAGNOSE ANY ISSUES WITH SNOWEX SPREADERS. CALL YOUR DEALER FOR DETAILS. 7 — 46 L1040 © Trynex International 2006 Troubleshooting SP-575 and SP-1075 RUNS SLOW CHECK AMP DRAW TEST: 4 TO 20 AMP DRAW, NO LOAD, BAD TEST: 20+ AMP DRAW, NO LOAD, BAD ONE SPEED BAD CONTROLLER REPLACE CONTROLLER VIBRATES BENT SHAFT REPLACE TRANSMISSION BENT SPINNER REPLACE SPINNER MATERIAL FREE FLOWS, DOES NOT STOP INSTALL OPTIONAL GATE KIT MATERIAL DOES NOT COME OUT MOTOR RUNS BACKWARDS CORRECT ROTATION IS COUNTER CLOCKWISE REVERSE WIRES AT MOTOR PHYSICAL OBSTRUCTION CLEAR OUT OBSTRUCTION MATERIAL ISSUE MUST BE DRY, CLEAN, FREE FLOWING MATERIAL NOTE: Optional Vibrator Kit Available, To Increase Material Flow SNOWEX DIAGNOSTIC TEST KIT (STK-020) IS AVAILABLE TO ACCURATELY DIAGNOSE ANY ISSUES WITH SNOWEX SPREADERS. CALL YOUR DEALER FOR DETAILS. © Trynex International 2006 L1040 7 — 47 Troubleshooting SP-375 and SP-325 SPREADER DOESN'T RUN FUSE BLOWN JAMED AGITATOR AGITATOR INTERFERENCE FIX OR REPLACE MATERIAL ISSUE TOO MUCH AMP DRAWN BAD MOTOR/TRANS ASSEMBLY BAD MOTOR CHECK WITH TEST KIT TEST GOOD NO LOAD 4-20 AMPS TEST BAD 20+ AMPS BAD TRANSMISSION CHECK WITH TEST KIT BAD ELECTRICAL CONNECTION ELECTRICAL CONNECTION DEAD SHORT IN WIRING REPLACE WIRING TEST DIRECT POWER (12 VOLTS) TO MOTOR BAD MOTOR CHECK WITH TEST KIT TEST TURN SHAFT BY HAND SHOULD TURN FREELY CORROSION AT CONNECTION CLEAN OR REPLACE DON'T FORGET USE DIELECTRIC GREASE LOOSE CONNECTION TIGHTEN OR REPLACE DON'T FORGET USE DIELECTRIC GREASE CHECK SWITCH LOOSE OR UNPLUGGED CORROSION MATERIAL WILL NOT FLOW CHECK BATTERY LOAD TEST GATE WON'T OPEN RECONNECT OR REPLACE CABLE MATERIAL ISSUE SNOWEX DIAGNOSTIC TEST KIT (STK-020) IS AVAILABLE TO ACCURATELY DIAGNOSE ANY ISSUES WITH SNOWEX SPREADERS. CALL YOUR DEALER FOR DETAILS. 7 — 48 L1040 © Trynex International 2006 Spreader Maintenance • WARNING – When servicing is necessary, perform it in a protected area. Do not use power tools in rain or snow because of danger of electrical shock or injury. Keep area well lighted. Use proper tools. Keep the area of service clean to help avoid accidents. • WARNING – Disconnect electricity to spreader before servicing. • CAUTION – The controller is a solid state electronic unit and is not serviceable. Any attempt to service will void warranty. • CAUTION – There are no serviceable parts in the motor/transmission assembly. Any attempt to service will void warranty. • CAUTION – When replacing parts, use only original manufacturer’s parts. Failure to do so will void warranty. • Use dielectric grease on all electrical connections to prevent corrosion at the beginning and end of the season and each time power plugs are disconnected. • Wash unit after each use to prevent material build-up and corrosion. • CAUTION – When pressure washing motor enclosure area, stay at least 36'' away from motor enclosures. • Paint or oil all bare metal surfaces at the end of the season. • Apply small amount of light oil to latches as needed. • If motor cover is removed for any reason, use silicone sealant to ensure weather proofing of enclosure. • Grease bearings after every 20 hours use (SP-1875 only). • After first use, tighten all nuts and bolts on spreader and mount. • Apply a small amount of oil on gate cable to prevent corrosion and maximize the cable life (SP-375 & GAK-020). • Keep pivot assembly well greased to prevent corrosion (PMT-175). © Trynex International 2006 L1040 7 — 49 Accessories Adjustable Deflector Helps limit spread pattern. Gate Assembly Kit Control and calibrate dry free flowing material. Top Screen Prevents large material from entering hopper. Vibrator Kit Helps improve the flow of moist materials. Limited Warranty Snowex products are warranted for a period of two years from the date of purchase against defects in material or workmanship under normal use and service, subject to limitations detailed below. Warranty period of two years begins on the date of purchase by the original retail user. The WARRANTY REGISTRATION CARD must be returned to the manufacturer for this warranty to become effective. This warranty applies to the original retail purchaser only. This warranty does not cover damages caused by improper installation, misuse, lack of proper maintenance, alterations or repairs made by anyone other than authorized Trynex dealers or Trynex personnel. Due to the corrosive properties of the materials dispensed by spreaders, Trynex does not warrant against damage caused by corrosion. Warranty claims by the user must be made to the dealer from where the product was purchased, unless otherwise authorized by Trynex. Trynex reserves the right to determine if any part is defective and to repair or replace such parts as it elects. This warranty does not cover shipping costs of defective parts to or from the dealer. LIMITATION OF LIABILITY Neither Trynex, nor any company affiliated with it, makes any warranties, representations for promise as to the performance or quality other that what is herein contained. The liability of Trynex to the purchaser for damages arising out of the manufacture, sale, delivery, use or resale of this spreader shall be limited to and shall not exceed the costs of repair or replacement of defective parts. Trynex shall not be liable for loss of use, inconvenience or any other incidental, indirect or consequential damages, so the above limitations on incidental or consequential damages may not apply to you. NO DEALER HAS AUTHORITY TO MAKE ANY REPRESENTATION OR PROMISE ON BEHALF OF TRYNEX INTERNATIONAL, OR TO ALTER OR MODIFY THE TERMS OR LIMITATIONS OF THIS WARRANTY IN ANY WAY. 7 — 50 L1040 © Trynex International 2006 Warranty Registration and Customer Survey To initiate the warranty on your new SnowEx spreader and assure prompt warranty service, please complete the following warranty registration and customer survey, sign and mail it back to the factory within 30 days of purchase. 1) Date of Purchase: 2) Name: Address: Phone: 3) SnowEx Model Purchased: Serial Number: 4) Is this your first Trynex Spreader? 5) What type of vehicle are you using with your Spreader? ❏ Yes ❏ No Make Model 6) What type of material are you using in your spreader? 7) SnowEx Dealer Name: Year SnowEx Dealer Address: SnowEx Dealer Phone: 8) Does your Trynex Dealer stock Trynex replacement Parts? 9) Do you feel your Trynex Dealer sold you the correct product for your needs/application? 10) How would you rate your overall satisfaction with your SnowEx Dealer? ❏ Very Satisfied 11) How would you rate your overall satisfaction with your SnowEx Product? ❏ Very Satisfied 12) Would you purchase another Trynex Product? ❏ Yes ❏ Satisfied ❏ Satisfied ❏ Yes ❏ No ❏ I don’t know ❏ Yes ❏ No ❏ Somewhat Satisfied ❏ Somewhat Dissatisfied ❏ Somewhat Satisfied ❏ Somewhat Dissatisfied ❏ Dissatisfied ❏ Dissatisfied ❏ Very Dissatisfied ❏ Very Dissatisfied ❏ No 13) Please use the space below to convey your comments and/or suggestions. NOTE: I have read the owner’s manual and all safety precautions and I understand that this equipment could be dangerous if not operated with care and under the proper conditions. 14) Owner’s signature: X PLEASE FOLD AND SEAL WITH TRANSPARENT TAPE BEFORE MAILING. © Trynex International 2006 L1040 7 — 51 Warm Up to with a FREE Winter Hat! Simply Fill Out Your Warranty Registration and Return It to the Factory! From: Postage Required Post Office will not deliver without proper postage. 23455 REGENCY PARK DR. WARREN MI 48089-2667 Pivot Mount Model #PPT-175 PPT-175 Assembled View Spreader (reference) PIVOT MOUNT ASSEMBLY INSTRUCTIONS Step 1: Assemble spreader swing arm to spreader hitch arm with & and & nut and bolt. Do not over tighten since this since this may cause to bind and will not swing open freely. Step 2: Collapse assembly and install hitch pin to keep assembly from opening. Step 3: Remove existing 1/2" bolts from spreader drive assembly and mount spreader arm assembly to spreader (see illustration). Re-tighten hardware per illustration. Step 4: With assistance, lift spreader into position and insert into vehicle receiver mount. Install hitch pin with clip. Step 5: Remove swing arm hitch pin and swing spreader out and to the driver’s side, at this time use a spray lubricant such as automotive lithium type or a grease based product. This will help prevent unwanted corrosion in the pivot joint; this should be checked on a regular basis during the season. Step 6: Close spreader and re-install hitch pin with clip. Step 7: Plug spreader into vehicle spreader harness and test for power on. PPM — 1 Key Part No. D 6051 D 6050 D 4136 D 6052 D 4124 D 4116 D 4120 D 6049 D 6235 Description Hitch Arm Swing Arm Hitch Pin 1/2" x 2-1/2" Shoulder Bolt 3/8" - 16 Nylon Hex Nut 1/2" - 13 x 1-1/2" Hex Bolt 1/2" - 13 Lock Nut 1/2" Bronze Thrust Washer x 1/16" Underbody Support Plate Qty. 1 1 2 1 1 4 4 2 2 © Trynex International 2006 © Trynex International 2006 PPM — 2