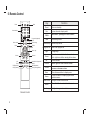
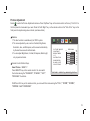
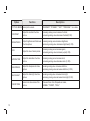
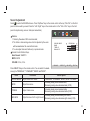
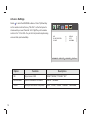
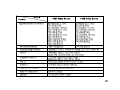
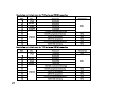
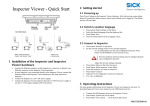
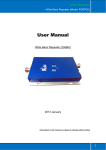
1
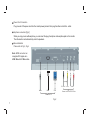
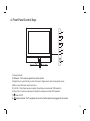
Important Safety Instructions Thank you for selecting ViewEra's high performance, multi-function LCD monitor . To ensure your safety and extend product life, please read and follow the instructions before using it, and comply with the following safety cautions: 1 2) 3 4 5 To avoid electric shock, never touch the inside of the monitor. Only a qualified technician should open the monitor case. Keep the manual for future use. Follow all the warnings and instructions strictly on the manual. It is high dangerous voltage inside the product. Do not attempt to repair the product by yourself. This monitor is equipped with a three-wire grounding type of power source indicated on the marking label. If the plug can't be inserted iinto. the outlet, please contact a technician for replacing the original outlet to keep the safeguard measure in effect. 6 Do not allow water or other liquids to spill on or into the LCD monitor 7 8 9 10 Don't use the attachments which are not recommended by the monitor manufacturer as they may cause hazards. Do not rest anything on the power cord.. If the power cord is damaged, do not use the monitor. Don't overload outlets or extend cords as it can result in fire or electric shock. If you want to disconnect the power cord from the product, be sure to grasp the plug, not the cable. 11 Unplug the monitor when it is going to be left unused for an extended period of time. 12 Place the monitor in a place of good ventilation, low humidity and dust environment, and avoid direct sunlight. 13 The openings on the back cover are designed for ventilation. To prevent overheating, do not block or cover these openings. 141 15 16 17 18 19 20 21 22 3 surface .Don't place the machine near or over heat source or place in built-in installation. Unplug your monitor from the electric outlet before any service is performed. . Don't use solvents, like ethyl alcohol, acetone, ethanol and hexane to clean the surface of LCD screen. Don't place the machine near water source such as bathtub, washbowl, sink, laundry tub, swimming pool, etc. The LCD panel is made of glass, the surface of screen is easy to be frayed. Don't knock or press on the surface of the panel with finger or other objects, otherwise it can result in damage to the panel. Don't remove or open the cover by yourself. It may expose you to dangerous voltage or other hazards . Do not put the monitor at the place where user is subject to mal-operation. High temperatures can cause problems. Keep the monitor away from heaters, stoves, fireplaces, etc. Please keep the foam and box of package for future use. These are ideal packing material for transportation.. Unplug this machine from the outlet and refer servicing to qualified service personnel under the following conditions: A. The power cord is frayed or damaged. B. The monitor has been dropped or the cabinet has been damaged. C. When the performance of the monitor deteriorates distinctly. D. If liquid has been spilled into the machine. 1. INTRODUCTION General information HDMI supports 1080 p/i, 720 p, 576 p/i, 480 p/i video signal. Support HDCP (High-bandwith Digital Content Protection) Featured built-in speakers, they will give you audio enjoyment and save your space. With multiple connectors, you may directly connect it to your DVD player, VCR or game console, etc. The Components Video input connectors let you enjoy beautiful image quality. The monitor can be used as a computer monitor with VGA or HDMI connectors, which can display at resolution of 1680X1050. Fast response time will completely eliminate shadow of picture. Watching films and playing games can be more smooth. Wide viewing angle, highe brightness, highe contrast and lower power consumption Intelligent image mode and sound mode can offer you intelligent audio and visual effects. Built-in digital comb filter makes image more clear. The internal 3D De-Interlace technology can totally eliminate the screen dithering caused by interlace signals. With sleep timer, you can set time to turn off. It will be turned off in state of no signals, too. Convenient use with a remote cotrol Auto-setup function help you set the image to best performance Auto color balance adjustment makes your monitor to display an optimal color setting for different kinds of display device. Advanced noise reduction technology can greatly eliminate background noise and make the picture clear. 4 2. Package Contents Unpack the package and check if you have the following items. TFT-LCD monitor (19 inch for V193 series; 22 inch for V220 series) VGA signal cable Audio cable Power cord Remote control User manual If any of the items is missing, please contact with your dealer at which you purchased the monitor. 5 3. Installation Note: Disconnect the power plug while installing the monitor. Plug the power plug after cable connections are done. You can find more connectors when you take off the cover board on the left of the rear cover [Fig.2] Component connection [Fig.1] Connect Y, Pb/Cb, Pr/Cr Video Out on a video player to the monitor Y, Pb/Cb, Pr/Cr Video In, and then connect Audio Out left and right on a video player to the monitor Audio In left and right. AV connection [Fig.2] TV Audio output TV Video output Y Pb Pr Input Audio Input You can also watch video by connecting composite AV connectors. Connect one end of of the cable to Audio/ Video Out on a video player, and the other end to to the Audio/ Video In on the monitor. Power Supply Computer connection [Fig.2] You can use a VGA or HDMI Male-to-DVI Male cable to connect the monitor to your Pr/Cr Pb/Cb R L computer. For PC audio, you can plug one end of the audio cable to PC Audio on the Connect to DVD monitor, and then plug the other end into the audio input on your computer. Y Connect to VCR CATV Fig.1 6 Power Cord Connection Plug one end of the power cord into the monitor power jack and then plug the other end into the outlet. Earphone connection [Fig.2] When you enjoy music with earphone, you can insert the plug of earphone into earphone jack on the monitor. Then the monitor will automatically mute the speakers. Base installation Please refer to Fig.3, Fig.4 Note: HDMI connector can recognize DVI signal via a HDMI Male-to-DVI Male cable. Left Right OR S-Video Audio HDMI VGA Connect to PC Fig.2 7 Video Audio Connect to DVD/VCR/VCD etc 4. Front Panel Control Keys SOURCE 3 CH+ 5 CH- VOL+ 6 VOL- MENU 4 POWER 7 8 1 2 1) 2) 3) 4) 5) 6) 7) 8) Power Indicator IR Sensor: It is to receive signals from remote contorl. Signal Source: press this key to enter the menu of signal source and choose signal source. Menu: press this key to enter main menu CH+/CH-: Press these two keys to adjust the options you need under OSD operation. VOL+/VOL-: Press these two keys to adjust the analog value under OSD operation. Power On/Off Earphone Socket: The TV speakers will be shut off when earphone is plugged into this socket. 8 5. Remote Control POWER MUTE Power Mute ABC Numerical key DEF 1 2 3 JKL MNO PQR 4 5 6 STU VWX YZ 7 8 9 Info Mute Program list(optional) Digit Smart image 0 SMART S Smart sound SMART P MENU SOURCE Menu Source OK Cursor key OK Volume Info Time VO L PR M Channel 16:9 INFO DCDi O A GR COLOR P/N AUDIO DCDi(optional) Switch16:9/4:3(optional) Return NICAM(optional) Color system(optional) Color(optional) System information display switch Mute sound; press again to restore sound Timer Time setting button Number input button Program list Scan or set program list Digit Cursor OK Channel Volume Source Smart sound Return Smart image 9 Turn on or standby Numerical key Menu Remote Control Function Key Power GHI Change digit Up or down cursor button: function seclect; left or right cursor button: analog add or reduce. Confirm actions Select higher or lower channel number Increase or decrease volume Press this menu button to display menu Press this button to display signal source selection menu Intelligent sound mode selection Press this button to return to last channel Intelligent image mode selection 6. Basic Operations Power On Plug power cord into the outlet and press '' '' key on the front panel or press ''Power'' key on the remote control to turn on the monitor. Signal Source Selection Press ''SOURCE'' key either on the remote control or on the front panel. ''INPUT SOURCE'' will be displayed on the screen. Then press ''Up/Down'' key on remote control or "CH+/CH-" key on the front panel to choose the signal source such as TV(optional) AV, S-VIDEO, YPBPR, PC, HDMI. Press ''OK'' key on the remote control or "MENU" key on the front panel to switch the signal source. TV AV SVIDEO YPBPR PC HDMI 10 OSD Menu Press ''MENU'' key on the remote control or on the front panel. The monitor will display the main menu. 1. Press ''Left/Right'' key on the remote control or ''VOL+/VOL-''key on the front panel to select the submenu, which includes PICTURE SOUND ADVANCE SYSTEM TV-CHANNEL (optional). 2. Press ''Down''key on the remote control or ''CH-'' on the front panel to enter the submenu. 3. Press ''Up/Down'' key on the remote control or ''CH+/CH-'' on the front panel to select what is needed to adjust in submenu. 4. Press ''Left/Right'' key on the remote control or ''VOL+/ VOL-''on the front panel to adjust the value or setting. PICTURE MOD E CONTRAST BRIGHTNESS HUE S AT U R AT I O N SHARPNESS BLACK LIGHT COLOR TONE PICTURE S E L E C T: PERSONAL 6 4 5 4 4 5 WARM A D J U S T: E X I T :MENU 5. Press ''Menu'' key to exit the main menu when the monitor displays Main Menu. Press ''Menu'' key to return to previous menu when the monitor displays the sub-menu. Press ''Source''key to display the signal source menu. 6. During the operation, the selections which can not be adjusted at current mode will be hidden automatically and the color of the selections will be changed into gray. 11 1 1 0 6 8 0 Picture Adjustment Select to enter the Picture Adjustment submenu. Press "Up/Down" key on the remote control or the key " CH+/CH-" on the front panel to choose what you need. Press the "Left /Right "key on the remote control or the" VOL+/VOL-" key on the front panel to adjust analog value or state (see below table). Attention 1. The Hue function is available only for NTSC system. 2. The value adjusted by user, such as Contrast, Brightness, Saturation, Hue, and Sharpness, will be saved automatically by the machine as user's defined mode. 3. You can adjust Brightness, Contrast, Sharpness, Black Light, only in personal model. Remote Control Shortcut Keys Smart Picture : SMART P Press SMART P key on the remote control. You can switch the function among the "STANDARD", "DYNAMIC", "SOFT", "PERSONAL" four states . PICTURE MOD E CONTRAST BRIGHTNESS HUE S AT U R AT I O N SHARPNESS BLACK LIGHT COLOR TONE PICTURE S E L E C T: PERSONAL 6 4 5 4 4 5 1 1 0 6 8 0 WARM A D J U S T: E X I T :MENU 16:9: Press 16:9 key on the remote control, you can switch the mode among the "FULL", "ZOOM", "ZOOM2", "NORMAL" and "PANORAMA" 12 Option Function PICTURE MODE Select picture mode 13 Description "STANDARD", "DYNAMIC", "SOFT", "PERSONAL" four states. Increasing analog value increases Contrast; Decreasing analog value decreases Contrast(0-100). CONTRAST Adjust the contrast of whole picture BRIGHTNESS Adjust brightness and blackness Increasing analog value increases brightness; of whole picture Decreasing analog value decreases brightness(0-100). HUE Adjust the hue of whole picture Increasing analog value increases green; Decreasing analog value increases purple(0-100). SATURATION Adjust the saturation of whole picture Increasing analog value increases color; Decreasing analog value decreases color (0-100). SHARPNESS Adjust the sharpness of whole picture Increasing analog value increases definition; Decreasing analog value decreases definition (0-100). BLACK LIGHT Adjust the black light of whole picture Increasing analog value increases black light; Decreasing analog value decreases black light (0-100). COLOR TONE Select color tone mode of the picture There are three Color Temperature modes, "NORMAL", "WARM", "COOL ". Sound Adjustment Select to enter the SOUND submenu. Press "Up/Down" key on the remote control or the key "CH+/CH-" on the front panel to choose what you need. Press the "Left / Right" key on the remote control or the "VOL+/VOL-" key on the front panel to adjust analog value or state (see below table). Attention 1. Normally, the value of 50 is recommended; 2. The treble or bass analog value which is adjusted by the users will be saved under the user-defined mode. 3. You can adjust bass and treble only in personal mode. Remote Control Shortcut Keys Smart Sound: SMART S MUTE: MUTE VOLUME: VOL+, VOL- SOUND MODE BASS TREBLE BALANCE SOUND S E L E C T: PERSONAL 50 50 26 A D J U S T: E X I T :MENU Press SMART S key on the remote control. You can switch the mode among the "PERSONAL", "STANDARD","NEWS" and "MUSIC". Item Function Description SOUND MODE Adjust audio effect mode BASS Adjust bass value TREBLE Adjust treble value Increasing analog value increases treble; Decreasing analog value decreases treble (0-100). BALANCE Adjust balance of left or right sound Increasing analog value decreasing left volume; Decreasing analog value decreases right volume(0-100). "PERSONAL","STANDARD","NEWS","MUSIC" four states. Increasing analog value increases bass; Decreasing analog value decreases bass (0-100). 14 Advance Settings Select to enter the ADVANCE submenu. Press "Up/Down"key on the remote control or the key "CH+/CH-" on the front panel to choose what you need. Press the "Left / Right"key on the remote control or the " VOL+/VOL-" key on the front panel to adjust analog value or state (see below table). NR BLUE SCREEN SCALE ADVANCE Option 15 Function S E L E C T: WEAK OFF NORMAL A D J U S T: E X I T :MENU Description NR Adjust model of NR "WEAK","MIDDLE","STRONG","OFF". BLUE SCREEN Open or close BLUE SCREEN "ON/OFF", two states. SCALE Select picture scale of the picture. "FULL", "ZOOM", "ZOOM2", "NORMAL", "PANORAMA", System Settings Select to enter the SYSTEM submenu. Press "Up/Down" key on the remote control or the key "CH+/CH-" on the front panel to choose what you need. Press the "Left / Right"key on the remote control or the " VOL+/VOL-" key on the front panel to adjust analog value or state (see below table). OSD LANG UAGE H - POSITION V - POSITION DU RATIO N HALFTONE SLEEP RESET SYSTEM Option Function S E L E C T: ENGLISH 50 50 100 8 OFF A D J U S T: E X I T :MENU Description OSD LANGUAGE Choose OSD menu display language There are many languages to select H-POSITION Adjust H-position of OSD menu Increasing analog value, OSD menu move toward right; Decreasing analog value, OSD menu move toward left (0-100). V-POSITION Adjust V-position of OSD menu Increasing analog value, OSD menu move toward down; Decreasing analog value, OSD menu move toward up(0-100). DURATION Adjust duration of OSD menu Increasing analog value, extend duration time of OSD menu; (0-100). HALFTONE Adjust halftone of whole picture Increasing analog value increases halftone; Decreasing analog value decreases halftone(0-8). SLEEP Set sleep time of the machine Off,15,30, 45, 60,unite: minute. RESET Resume to setting of factory Reset all values to setting of factory. 16