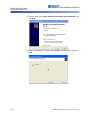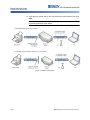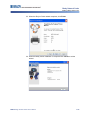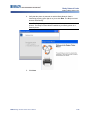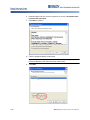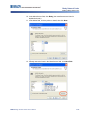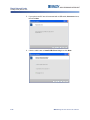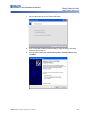
1
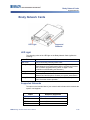
Brady Network Cards
Supported Networks
Brady Network Cards
Supported
Networks
LED Light
LED Light
The changing colors of the LED light on the Brady Network Card signifies the
following:
Color
Solid Green
Blinking Orange
Blinking Green
Solid Red
Blinking Red
Status
Card is functioning normally, status is OK.
The firmware is corrupted and it needs to be upgraded. Use the
Brady Network Card Configuration Utility to upgrade the firmware
(see “Firmware Upgrade/Factory Reset” on page 2-38 for
information on downloading new firmware.)
Firmware upgrade is in progress.
Card failure. There is no communication between the Brady
Network Card and the printer. Contact your system administrator.
An error is detected in the current operation of the Brady Network
Card. Check the current operation.
Supported Networks
The name on the barcode label of your network card indicates which networks the
specific card supports.
Name
Networks Supported
NET-BT-WIFI-LAN
NET-WIFI
Bluetooth, WiFi, and Ethernet
WiFi and Bluetooth ONLY
NET-BT
NET-LAN
Bluetooth ONLY
Ethernet ONLY
BBP®33 Sign & Label Printer User’s Manual
2-13
Brady Network Cards
Installing a Brady Network Card
Installing a Brady Network Card
If your Brady printer is equipped with a Brady Network Card (Ethernet), you can
configure the printer to run as a local printer (physically attached to your PC via a
USB cable) and as a network (shared) printer through Ethernet.
To establish the printer as a network printer, you must configure the Brady
Network Card to recognize and work with your networks. The Brady Printer
Drivers CD contains the installation wizards for the Brady printer drivers and also
the Brady Network Card configuration. The printer drivers and Brady Network
Card drivers can also be downloaded from the Brady website at
www.bradyid.com.
The network card installation and configuration wizard identifies the following
installation scenarios:
2-14
•
Ethernet (first time)
•
Additional PC’s
•
USB Driver
BBP®33 Sign & Label Printer User’s Manual
Brady Network Cards
Installing a Brady Network Card
Install Ethernet (first time)
Use this installation process:
•
if you have just purchased the printer and are setting it up for the first time.
•
if you intend to send print jobs to the printer from a PC using Ethernet or over
a LAN network.
To activate the Ethernet connection:
1. Make sure your printer and your PC are not connected with a USB cable.
2. Insert the Brady Printer Drivers CD into your computer CD drive. The
installation wizard launches automatically.
3. Turn the printer on.
4. Click printer model you are installing, then click Next.
BBP®33 Sign & Label Printer User’s Manual
2-15
Brady Network Cards
Installing a Brady Network Card
5. If your printer and PC are still connected with a USB cable, disconnect it now,
then click Next.
6. Click First time install for network driver (default), then click Next.
2-16
BBP®33 Sign & Label Printer User’s Manual
Brady Network Cards
Installing a Brady Network Card
7. Verify that your printer printer is powered on and the Brady Network Card LED
is solid green.
8. Connect the printer to your PC with a USB cable.
9. If the Found New Hardware Wizard displays, continue with the next step,
otherwise skip to Step 16.
10. Click Yes, now and every time I connect a device radio button, then click
Next.
BBP®33 Sign & Label Printer User’s Manual
2-17
Brady Network Cards
Installing a Brady Network Card
11. Click the radio button Install software automatically (Recommended), then
click Next.
12. When the installation is complete, click Finish to close the wizard, then click
Next.
2-18
BBP®33 Sign & Label Printer User’s Manual
Brady Network Cards
Installing a Brady Network Card
13. Click the radio button for Ethernet, then click Next.
14. In the Printer Description field, enter an easy-to-identify name/description for
this network connection. You can use any alphanumeric characters.
15. In the Network Address Type field, choose the default DHCP protocol.
Note: If you choose Static, you must enter the IP Address, Subnet Mask and
Default Gateway fields.
16. Click Next.
BBP®33 Sign & Label Printer User’s Manual
2-19
Brady Network Cards
Installing a Brady Network Card
17. Verify that your printer and PC are connected to the same network, then click
Next.
Note: To verify that your printer and PC are on the same network, see the
connection guidelines shown below.
Figure 3. Network Connections
2-20
BBP®33 Sign & Label Printer User’s Manual
Brady Network Cards
Installing a Brady Network Card
18. When the Ethernet connection is successful, the Bonjour Printer Wizard
launches automatically. Click Next.
Note: The Bonjour program is designed to establish and monitor network
printers. The Bonjour Printer Wizard establishes your Brady printer as a
network printer.
19. Read the Apple End User License Agreement, then click I accept the terms
in the license agreement and click Next to continue.
BBP®33 Sign & Label Printer User’s Manual
2-21
Brady Network Cards
Installing a Brady Network Card
20. Click the assigned network printer name, then click Next.
Note: For easier identification, the name or description you assigned in Step
14. displays in the lower left corner of the screen.
21. In the Manufacturer field, click Brady (the manufacturers are listed in
alphabetical order).
22. In the Model field, click the printer to install, then click Next.
2-22
BBP®33 Sign & Label Printer User’s Manual
Brady Network Cards
Installing a Brady Network Card
23. When the Bonjour Printer wizard completes, click Finish.
24. When the Brady Printer Installation is completed click Finish to exit the
wizard.
BBP®33 Sign & Label Printer User’s Manual
2-23
Brady Network Cards
Installing a Brady Network Card
Install Additional PC’s using Brady Network Card Utility
Use this installation process if your printer has been configured previously but you
now want to use another PC to send print jobs to the printer.
Note: Your additional PC must be on the same network as the printer. If not, it will
not be detected during installation.
Once the Brady Network Card has been configured for Ethernet, you can install
those network drivers on additional PC’s.
1. Insert the Brady Universal Printer Driver CD into your computer CD drive. The
installation wizard launches automatically.
2. Click the printer model you are installing, then click Next.
3. Click Install network driver for additional PC’s, then click Next.
2-24
BBP®33 Sign & Label Printer User’s Manual
Brady Network Cards
Installing a Brady Network Card
4. Verify that the printer is powered on and the Brady Network Card is
functioning properly (green light is on), then click Next. The Bonjour wizard
lauches automatically.
Note: The Bonjour program is designed to establish and monitor network
printers. The Bonjour Printer Wizard establishes your Brady printer as a
network printer.
5. Click Next.
BBP®33 Sign & Label Printer User’s Manual
2-25
Brady Network Cards
Installing a Brady Network Card
6. Read the Apple End User License Agreement, then click I accept the terms
in the license agreement.
7. Click Next to continue.
8. Click the assigned network printer name.
Note: For easier identification, the name or description you assigned
previously displays in the lower left corner of the screen.
9. Click Next.
2-26
BBP®33 Sign & Label Printer User’s Manual
Brady Network Cards
Installing a Brady Network Card
10. In the Manufacturer field, click Brady (the manufacturers are listed in
alphabetical order).
11. In the Model field, click the printer to install, then click Next.
12. If Brady cannot be found in the Manufacturer field, click Have Disk.
BBP®33 Sign & Label Printer User’s Manual
2-27
Brady Network Cards
Installing a Brady Network Card
13. Browse the supplied CD and locate the .INF file for your printer model. The
example screen shows the .inf file for installing a BBP33 printer.
Example
14. When the Bonjour Printer wizard completes, click Finish.
15. When the Brady Printer Installation is completed, click Finish to exit the
wizard.
2-28
BBP®33 Sign & Label Printer User’s Manual
Brady Network Cards
Installing a Brady Network Card
Install USB Driver (only)
Use this installation process if you intend to send print jobs to the printer from a
PC using USB cable only.
This procedure installs the printer driver for your Brady printer and installs the
Brady Network Card (BNC) configuration utility.
To install the printer driver and the BNC Configuration Utility:
1. Make sure your printer and your PC are not connected with a USB cable.
2. Insert the Brady Printer Drivers CD into your computer CD drive. The
installation wizard launches automatically.
3. Turn the printer on.
4. Click the printer model you are installing, then click Next.
BBP®33 Sign & Label Printer User’s Manual
2-29
Brady Network Cards
Installing a Brady Network Card
5. If your printer and PC are still connected with a USB cable, disconnect it now,
then click Next.
6. Click the radio button to Install USB Driver Only, then click Next.
2-30
BBP®33 Sign & Label Printer User’s Manual
Brady Network Cards
Installing a Brady Network Card
7. Connect the printer to your PC with a USB cable.
8. If the Found New Hardware Wizard displays, continue with the next step,
otherwise skip to Step 10.
9. Click the radio button Yes, now and every time I connect a device, then
click Next.
BBP®33 Sign & Label Printer User’s Manual
2-31
Brady Network Cards
Installing a Brady Network Card
10. Click the radio button Install software automatically (Recommended), then
click Next.
11. When the install is complete, click Finish to close the wizard, then click Next.
2-32
BBP®33 Sign & Label Printer User’s Manual
Brady Network Cards
Installing a Brady Network Card
12. When the Brady Network Card Configuration Utility and USB Driver are
successfully installed, click Finish.
BBP®33 Sign & Label Printer User’s Manual
2-33