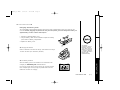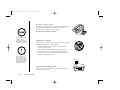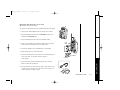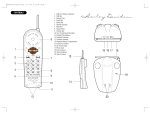
1
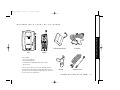
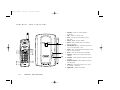
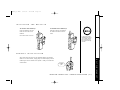
TRU241_2.4GHz
5/22/00
4:39 PM
Page i
OWNER’S
MANUAL
TRU241
TRU241_2.4GHz
5/22/00
4:39 PM
Page ii
CONTENTS
Introduction
1
Features . . . . . . . . . . . . . . . . . . . . . . . . . . . . . . . . 1
Included with Your TRU 241 Phone
3
Controls and Functions
4
Installation
5
• Charging the Battery Pack. . . . . . . . . . . . . . . . . . 5
Charging the Handset . . . . . . . . . . . . . . . . . . . . . 5
Low Battery Indicator . . . . . . . . . . . . . . . . . . . . . 5
Cleaning the Battery Contacts . . . . . . . . . . . . . . . 6
• Selecting a Location . . . . . . . . . . . . . . . . . . . . . 6
• Setting the Dial Mode Switch . . . . . . . . . . . . . . . . 6
• Mounting the Base Unit on the Wall . . . . . . . . . . . 7
• Direct Wall Plate Mounting . . . . . . . . . . . . . . . . . 8
Setting Up Your Phone
• Raising the Antenna. . . . . . . . . . . . .
• Connect the Base Unit. . . . . . . . . . . .
• Adjusting Ringer/Volume Controls . . .
Ringer Tone and Volume . . . . . . . . .
Setting the Handset Earpiece Volume .
.
.
.
.
.
.
.
.
.
.
.
.
.
.
.
.
.
.
.
.
.
.
.
.
.
.
.
.
.
.
.
.
.
.
.
.
.
.
.
.
.
.
.
.
.
9
9
9
9
9
9
Using Your Phone
10
• Making and Receiving Calls . . . . . . . . . . . . . . . . 10
• Storing a Number in Memory . . . . . . . . . . . . . . . 10
• Entering a Pause in Memory Dialing . . . . . . . . . . 11
• Storing Mixed Tone/Pulse Numbers . . . . . . . . . . . 11
• Dialing a Stored Number . . . . . . . . . . . . . . . . . . 11
• Chain Dialing . . . . . . . . . . . . . . . . . . . . . . . . . . 12
• Erasing a Stored Number . . . . . . . . . . . . . . . . . . 12
• Mute . . . . . . . . . . . . . . . . . . . . . . . . . . . . . . . . 12
• Replacing a Stored Number . . . . . . . . . . . . . . . . 12
• Selecting a Different Channel . . . . . . . . . . . . . . . 13
• Using the Flash Button . . . . . . . . . . . . . . . . . . . . 13
• Using the Page/Find Feature . . . . . . . . . . . . . . . . 13
• Traveling Out of Range . . . . . . . . . . . . . . . . . . . 13
Troubleshooting
14
Installing the Beltclip
15
• To Attach the Beltclip . . . . . . . . . . . . . . . . . . . . 15
• To Remove the Beltclip . . . . . . . . . . . . . . . . . . . 15
Headset Installation
15
TRU241_2.4GHz
5/22/00
4:39 PM
INTRODUCTION
INTRODUCTION
Page 1
The Uniden ® 2.4 GHz cordless phones are designed and engineered to exacting standards for
reliability, long life, and outstanding performance.
Digital Spread Spectrum Technology utilizes a “wider frequency band” vs. a “single narrow band”
used in standard digital transmissions. The 2.4 GHz frequency range was recently released to
commercial communications. It provides secure conversation with the clarity of digital sound,
extended range, and reduced interference.
FEATURES
•
•
•
•
•
•
•
•
•
•
•
•
•
2.4 GHz Digital Spread Spectrum
30 Channel Autoscan
10-Number Memory Dialing
Desk or Wall Mountable
Tone/Pulse Dialing
Handset Volume Control
32 Digit Redial
Page/Find
AutoTalk™
AutoStandby™
6 Hour Talk Time
7 Day Standby Time
Hearing Aid Compatible
The TRU 241 features include AutoTalk and AutoStandby.
AutoTalk allows you to answer a call by just removing the handset from the base so you don’t have to
waste time pushing buttons or flipping switches. AutoStandby allows you to hang up by simply
returning the handset to the base.
INTRODUCTION
[ 1 ]
TRU241_2.4GHz
5/22/00
4:39 PM
Page 2
The UltraClear Plus™ true compander circuitry virtually eliminates background noise. This innovative
technology, together with 30 different channels, provides you with the best possible reception during
all your conversations.
To protect you against misbilled calls which might result from your phone being activated by other
equipment, the TRU 241 has Random Code™ digital security which automatically selects one of over
65,000 digital security codes for the handset and base.
Also, the AutoSecure™ feature electronically locks your phone when the handset is in the base.
To get the most from your phone, please read this owner’s manual thoroughly. Also, be sure to
complete the product registration form and mail it in.
Be sure to visit our web site at: www.uniden.com.
RECYCLING
NICKEL-CADMIUM BATTERIES
NICKEL-CADMIUM BATTERIES
MUST BE DISPOSED OF PROPERLY.
Nickel-cadmium cells are used in the battery pack.
Please take your used nickel-cadmium battery packs
to a store that recycles nickel-cadmium batteries.
Uniden® is a registered trademark of Uniden America Corporation.
AutoTalk, AutoStandby, Random Code, UltraClear Plus, and AutoSecure are trademarks of Uniden America Corporation.
[ 2 ]
INTRODUCTION
TRU241_2.4GHz
5/22/00
INCLUDED
4:39 PM
WITH
Page 3
YOUR
TRU
241
PHONE
Base
INCLUDED WITH YOUR TRU241
Rechargeable Battery
AC Adapter
Handset
Also included:
• This Owner’s Manual
• Other Printed Material
• Precautions and Important Safety Instructions
• Memo Sticker
If any of these items are missing or damaged, contact
the Uniden Parts Department at (800) 554-3988, 7:00 a.m.
to 5:00 p.m. Central, Monday through Friday, or contact us
on the web at www.uniden.com.
Beltclip
Telephone Cords
INCLUDED WITH YOUR TRU 241 PHONE
[ 3 ]
TRU241_2.4GHz
5/22/00
CONTROLS
4:39 PM
AND
Page 4
FUNCTIONS
1. memory – Enters or recalls numbers
in memory
2. talk – Answers or places calls
3. tone – Switches to tone dialing in pulse
dial mode
4. redial – Redials the last number
5. pause – Adds a timed pause in a memory
dialing sequence
6. talk/battery low LED – indicates when phone
is in use or the battery is low
7. mute – Turns off the handset microphone while
you are using the phone
8. flash – Accesses call waiting (if available)
9. volume – Sets both the ringer and earpiece
volumes
10. channel – Selects another channel for clearer
reception
11. handset retainer – Holds handset in base for
wall mounting.
12. status LED – Indicates the phone is in use or
the handset is charging
13. page/find – Locates the handset
[ 4 ]
CONTROLS AND FUNCTIONS
TRU241_2.4GHz
5/22/00
4:39 PM
Page 5
INSTALLATION
Charging the Battery Pack
The rechargeable nickel-cadmium battery pack must be fully charged before using your phone for the
first time. Before plugging the phone line into your new phone, you must charge the battery for
approximately 15 hours without interruption.
1. Remove the handset battery cover.
2. Plug the battery cable into the handset and place the battery
pack inside the battery compartment.
3. Replace the battery cover.
▼ Charging the Handset
Place the handset on the base to charge. (The handset can charge
in either the face-up or face-down position.)
The plastic
connectors will fit
together only one
way. Make sure the
battery’s connector
is properly aligned.
Use only the Uniden
battery pack
(model BT-905).
▼ Low Battery Indicator
INSTALLATION
When the battery pack in the handset is low and needs to be
charged, the talk/battery low indicator flashes.
If this occurs while you are on the phone, you will hear an alert
tone. Complete your call as quickly as possible and return the
handset to the base for charging.
INSTALLATION
[ 5 ]
TRU241_2.4GHz
5/22/00
4:39 PM
Page 6
▼ Cleaning the Battery Contacts
To maintain a good charge,it is important to clean all battery
contacts on the handset and base about once a month.
Use a dry cloth or pencil eraser, if necessary.
Do not use any liquids or solvents.
contacts
A continuous power
outlet is an AC
outlet which does
not have a switch to
interrupt its power.
Selecting a Location
Before choosing a location for your new phone, there are some
important guidelines you should consider:
• The location should be close to both a phone jack and
continuous power outlet.
• Keep the base unit and handset away from sources of
electrical noise such as motors or fluorescent lighting.
• Be sure there is sufficient space to rotate the base unit
antenna to a vertical position.
Do not place the
power cord in an
area where it may
create a trip hazard
or become chafed
and create a fire or
electrical hazard.
P
Setting the Dial Mode Switch
Place the switch in the T position for tone dialing, or the P
position for pulse dialing.
[ 6 ]
INSTALLATION
T
TRU241_2.4GHz
5/22/00
4:39 PM
Page 7
Mounting the Base Unit on a Wall
▼ Standard Wall Plate Mounting
1
This phone can be mounted on any standard telephone wall plate.
1. Snap the wall mount adapter into the notches on the base.
2. Plug the telephone line cord to the TEL LINE jack and the AC
adapter to the DC IN 9V jack.
3. Plug the telephone line cord into the telephone outlet.
4. Wrap the AC adapter cord inside the molded wiring channel.
Then wrap the cord around the strain relief notch.
Wall
plate
5. Plug the AC adapter into a standard 120V AC wall outlet.
6. Raise the antenna to a vertical position.
7. Align the mounting slots on the base with the mounting posts
on the wall. Push in and down until the phone is
firmly seated.
AC adapter
AC outlet
INSTALLATION
8. On the base unit, pull the handset retainer out of the slot.
Rotate it clockwise 180 degrees.
9. Flip the retainer from front to back. Slide it back into the slot
so that the lip of the retainer is up and the oval is down. The
retainer holds the handset in place.
INSTALLATION
[ 7 ]
TRU241_2.4GHz
5/22/00
4:39 PM
Page 8
Direct Wall Plate Mounting
If you don’t have a standard wall plate, you can mount your phone
directly to the wall. Before doing this, consider the following:
• Avoid electrical cables, pipes, or other items behind the
mounting location that could cause a hazard when inserting
screws into the wall.
• Try to mount your phone within 10-15 feet of a working phone
jack to avoid excessive cord lengths.
• Make sure the wall material is capable of supporting the weight
of the base and handset.
• Use #10 screws (minimum length of 1-3/8 inches) with anchoring
devices suitable for the wall material where the base unit will
be placed.
1. Insert two mounting screws into the wall, (with their appropriate
anchoring device), 3-15/16 inches apart. Allow about 3/16 of an
inch between the wall and screwheads for mounting the phone.
2. Refer to steps 1 through 9 as in the “Mounting the Base Unit on a
Wall” section. (See page 7.)
[ 8 ]
INSTALLATION
TOP
3/16
in.
3-15/16
in.
TRU241_2.4GHz
5/22/00
UP
Page 9
YOUR
SETTING UP YOUR PHONE
SETTING
4:39 PM
PHONE
Raising the Antenna
Before using your phone, be sure to raise its antenna to the vertical position.
Connect the base unit
If you want to install the base unit on the wall, see page 7.
1. Connect the telephone line cord to the TEL LINE
jack and to a telephone outlet.
2. Connect the AC adapter to the DC IN 9V jack and
to a standard 120 V AC wall outlet.
3. Set the base unit on a desk or tabletop and place
the handset on the base unit. Then raise the
antenna to a vertical position.
Route the cord
To AC outlet
To DC IN 9V
AC adapter(supplied)
To telephone outlet
To TEL LINE
Telephone line cord
(supplied)
Place the power
cord so it does not
create a trip hazard
or where it could
become chafed and
create a fire or
electrical hazard.
Adjusting Ringer/Volume Controls
▼ Ringer Tone and Volume
1. While the phone is not in use, press volume
.
2. The phone has two ringer tones, each with two volume levels.
Press volume
again until you hear the ringer tone and volume level you want.
▼ Setting the Handset Earpiece Volume
1. While you are on a call, press volume
.
2. The phone has four receiver volume levels, Low, Medium, High, and Maximum. Press volume
again until you hear the volume level you want.
When you hang up, the phone keeps the last volume setting selected.
SETTING UP YOUR PHONE
[ 9 ]
TRU241_2.4GHz
5/22/00
4:39 PM
Page 10
USING
YOUR
PHONE
Making and Receiving Calls
Handset on Base
When the phone rings,
Answer call
remove the handset from the base. (AutoTalk)
1. Remove the handset from the base and press talk.
2. The talk/battery low LED lights.
Make call
3. Listen for the dial tone.
4. Dial the number.
Return handset to the base, (AutoStandby) or
Hang up
press talk.
1. Remove the handset from the base and press talk.
2. Listen for the dial tone.
Redial
3. Press redial to dial the last number dialed.
Handset off Base
Press any key.
1. Pick up the handset and press talk.
2. The talk/battery low LED lights.
3. Listen for the dial tone.
4. Dial the number.
Press talk.
1. Pick up the handset and press talk.
2. Listen for the dial tone.
3. Press redial to dial the last
number dialed.
Storing a Number in Memory
• You have 20 seconds
after pressing
memory to enter
the number you
wish to store.
Otherwise, an error
tone will sound.
• Write down stored
numbers on the
supplied memo
sticker.
[ 10 ]
Your TRU 241 phone has 10 memory locations for storing important telephone numbers.
1. Remove the handset from the base and press memory. The talk/battery low LED flashes.
2. Enter the phone number you want to store (up to 20 digits).
3. Press memory and enter a number (0-9) on the keypad for the memory location you want to use.
You hear a long beep and the talk/battery low LED goes out indicating the number has been
stored successfully.
If you select any keys other than 0-9, the handset will beep rapidly and no number will be stored.
USING YOUR PHONE
TRU241_2.4GHz
5/22/00
4:39 PM
Page 11
Entering a Pause in Memory Dialing
If you would like to use a phone number stored in memory to access voice mail, for example, you can
store a pause in the phone number sequence.
To use this function, follow steps 1 and 2 in “Storing a Number in Memory”, then press the pause
button on the handset to place a pause in the phone number sequence.
Follow the remaining steps in the “Storing a Number in Memory” section to complete the operation.
If your phone is set up for pulse dialing, you can store a mixed mode number (up to 20 digits) to easily
access long distance services.
1. Remove the handset from the base and press memory. The talk/battery low LED flashes.
2. Enter the number to be dialed in pulse mode.
3. Press the tone button on the handset. The tone button counts as one digit and enters a pause.
4. Enter the number(s) to be dialed in tone mode.
5. Press memory and a number (0-9) on the keypad for the memory location you wish to use. You hear
a long beep and the talk/battery low LED goes out.
Dialing a Stored Number
To dial a phone number stored in memory, press talk, then press memory and the memory
location (0-9). Your phone will dial the stored number.
• If you select a
memory location
that does not have
a stored number,
the handset will
beep rapidly and
the phone will
not dial.
USING YOUR PHONE
[ 11 ]
USING YOUR PHONE
Storing Mixed Tone/Pulse Numbers
• Remember, the
phone number you
wish to store cannot
have more than 20
digits, including the
pause. (The pause
button counts as
one digit.)
TRU241_2.4GHz
5/22/00
4:39 PM
Page 12
Chain Dialing
After dialing a number you may be requested to enter a special access code, for example, when
performing a banking transaction.
1. Store the access code into one of the memory locations (0-9).
2. Dial the main number.
3. Press memory and the memory location of the access code at the appropriate time.
Erasing a Stored Number
1. Remove the handset from the base.
2. Press memory twice.
3. Press the memory location number (0-9) you want to erase. You hear a long beep confirming that
you have erased the number.
Mute
You can temporarily turn off the handset microphone so that the person you are talking with cannot
hear you. During a telephone call, press mute to turn off the microphone. To cancel mute, press
mute or talk.
Replacing a Stored Number
Remember, your TRU 241 phone has 10 memory locations represented by the numbers 0-9 on the
keypad. If you store a phone number in one of these locations, then attempt to store a different
number in the same location later, the new number will replace the previous one.
[ 12 ]
USING YOUR PHONE
TRU241_2.4GHz
5/22/00
4:39 PM
Page 13
Selecting a Different Channel
Using the Flash Button
Use the flash button for accessing services such as call waiting.
If you receive a call during your conversation, press the flash button on the handset. Press the flash
button again to return to the previous call.
Using the Page/Find Feature
The Page/Find feature sends a signal from the base to the handset causing it to beep. This is useful for
locating the handset when it is away from the base. To use this feature, press page/find on the base.
The handset beeps for 5 seconds. (Press and hold the page/find button for more than 2 seconds, to get
a continuous beep for a minute.)
If you hold down page/find more than a minute, the handset beeps until you release page/find.
On the handset press talk to end the page. Press talk again if you do not wish to make a call.
The paging feature
does not work when
the phone is in use.
Traveling Out of Range
When you begin to move too far from the base, you will first hear a clicking sound. As you travel
further out of range, the voice transmission will begin to break up. If you pass the range limits of
the base, your call will terminate.
USING YOUR PHONE
[ 13 ]
USING YOUR PHONE
If you encounter interference while using your phone, you can manually change the phone’s channel for
clear operation. Interference can come from appliances or other phones in your home. This function
works only when the phone is in use.
The channel button on the handset allows you to choose between 30
factory set channels. During the course of a conversation, if you hear
static or noise which makes it difficult to hear, press channel. The
talk/battery low LED flashes, indicating the phone is changing to
another channel.
TRU241_2.4GHz
5/22/00
4:39 PM
Page 14
TROUBLESHOOTING
If your TRU 241 cordless telephone is not performing to your expectations, please try these simple steps. If you are still unable to resolve
the problems, contact your place of purchase or call customer service at (800) 297-1023.
Caution: Do not attempt to service this unit yourself. Servicing must be performed by qualified personnel.
Problem
The status LED won’t come
on when handset is placed
in base
The audio sounds weak
and/or scratchy
Can’t make or receive calls
Suggestion
•
•
•
•
•
•
•
•
•
•
•
•
Handset doesn’t ring
or receive a page
•
•
•
•
•
Severe noise interference
•
•
[ 14 ]
TROUBLESHOOTING
Make sure the AC adapter is plugged into the base and wall outlet.
Make sure the handset is properly seated in the base.
Make sure the rechargeable battery pack is properly connected in the handset.
Make sure that the charging contacts on the handset and on the base are clean.
Make sure that the base antenna is in the vertical position.
Interference by other electronic equipment such as TVs. computers, microwave ovens, etc.
You may have gone too far from the base.
Press channel to help eliminate background noise.
Check both ends of the telephone line cord.
Make sure the AC adapter is plugged into the base and a wall outlet.
Disconnect the AC adapter for a few minutes, then reconnect it.
Reset the security code by placing the handset back on the base for a few seconds.
The status LED will blink indicating that the phone has been reset.
The nickel-cadmium battery pack may be weak.
Charge the battery for 15 hours.
The handset may be too far away from the base.
Place the base away from appliances or metal objects.
Reset the security code by placing the handset back on the charging cradle for a few seconds.
The status LED will blink indicating that the phone has been reset.
Keep the handset away from microwave ovens, computers, remote control toys, wireless
microphones, alarm systems, intercoms, room monitors, fluorescent lights, and electrical appliances.
Move to another location or turn off the source of interference.
TRU241_2.4GHz
5/22/00
4:39 PM
INSTALLING
THE
Page 15
BELTCLIP
To Attach the Beltclip
To Remove the Beltclip
Insert the beltclip into the
holes on each side of the
handset.
Press down until it clicks.
Pull both sides of the beltclip
to release the tabs from the
holes.
If you have wall
mounted the base,
you cannot place
the handset with
the keypad facing
inside.
HEADSET
INSTALLATION
Headset
jack
INSTALLING THE BELT CLIP / HEADSET INSTALLATION
[ 15 ]
BELT CLIP/HEADSET
Your phone may be used with an optional headset, the Uniden
HS910. To use this feature, simply plug the headset plug into the
headset jack on the handset. Your phone is ready for hands-free
conversation.
TRU241_2.4GHz
5/22/00
MEMO
[ 16 ]
MEMO
4:39 PM
Page 16
TRU241_2.4GHz
5/22/00
4:39 PM
Page 17
MEMO
MEMO
[ 17 ]
TRU241_2.4GHz
5/22/00
4:39 PM
THANK
YOU
Page 18
FOR
PURCHASING
YOUR
UNIDEN
CORDLESS
Covered under one or more of
4,511,761 4,523,058 4,595,795
5,434,905 5,491,745 5,533,010
5,661,780 5,663,981 5,671,248
5,787,356 5,838,721 5,864,619
5,929,598 5,930,720 5,960,358
PHONE.
the following U.S. patents:
4,797,916 5,381,460 5,426,690
5,574,727 5,650,790 5,660,269
5,717,312 5,754,407 5,768,345
5,893,034 5,912,968 5,915,227
5,987,330
®2000 Uniden America Corporation
All rights reserved
UCZZ01702BZ