1
AFTER SALES SERVICE
•
Before you call the After Sales Service
• Make sure that you cannot solve the problem yourself
following the points described in chapter
“Troubleshooting Guide”.
If after the above checks the fault still occurs, get in
touch with the nearest After Sales Service.
Please give:
•
a short description of the fault;
•
the exact type and model of hob;
service number (i.e., the number that follows the word
SERVICE on the rating plate under the hob itself). The
service number is also indicated on the guarantee
booklet;
•
your full address;
•
your telephone number.
If any repairs are required, please contact an authorised
After Sales Service (to guarantee that original spare parts
will be used and repairs carried out correctly).
Failure to comply with these instructions may
compromise the safety and quality of the product.
•
Declaration of conformity
•
•
This hob is suitable for contact with foodstuffs and
complies with EEC (CE) Regulation n. 1935/2004.
This hob has been designed to be used only for cooking.
Any other use (such as heating a room) is improper and
dangerous.
This hob has been designed, constructed and marketed
in compliance with:
- safety objectives of the “Low Voltage” Directive
2006/95/CE (which replaces 73/23/CEE and
subsequent amendments);
- protection requirements of EEC Directive “EMC”
2004/108/EC;
INSTALLATION
Recommendations
Important: Disconnect the hob from the mains before
carrying out any installation work or servicing.
•
All electrical connections must be made before
connecting the appliance to the power supply.
•
Installation must be carried out by a qualified technician
in accordance with the manufacturer's instructions and
in compliance with local regulations.
•
Unpack the hob and make sure that the appliance has
not been damaged during transport. If you are not
sure contact the dealer or the nearest service
centre.
Preparing the housing unit
•
Cut the worktop to fit before installing the appliance.
Carefully remove any shavings or sawdust that could
prevent the appliance from running properly.
Attention: to install the hob on other surfaces than wood
(marble, plastic, ceramic, marble, stone, etc.) remember to
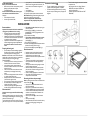
ask After Sales Service for the fixing plates (fig. 2)
Code 4819 404 78697.
•
The hob must be fitted in a worktop with a minimum
thickness of 20 mm and a maximum of 50 mm.
•
Insert a separator panel at a minimum distance of
90 mm from the bottom of the hob, so that it cannot be
accessed by the user.
•
If there is an oven under the hob, make sure that it is
manufactured by us and equipped with a cooling
system.
•
There must be nothing between the hob and the oven
(e.g. cables, insulating material, etc.).
•
An adjacent column unit must be installed at least
100 mm from the edge of the hob.
•
Cut an opening in the worktop of the given dimensions.
•
We recommend you seal the internal edges of the
worktop with wood glue or silicone.
•
If not already in place, apply the supplied seal to the
hob, after cleaning the adhesive surface thoroughly.
•
1.
2.
•
1.
2.
3.
If the worktop is made of wood, use the spring clips
and screws provided.
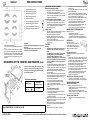
Secure the spring clips (A) (fig. 1) with the screws
provided (B) (fig. 1) as shown, paying attention to the
specified distances.
Fit the hob into the worktop.
If the worktop is made of marble, plastic, ceramic,
stone, etc., the hob must be secured with special
brackets (C) (fig. 2).
Fit the hob into the worktop (fig. 1).
Place the 4 brackets (C) in position in accordance with the
thickness of the worktop as shown in fig. 2.
Fasten the 4 screws (D) in the positions (E) (fig. 2).
Fig. 1
Electrical connection
•
•
•
•
•
•
•
Regulations require that the appliance be earthed.
Connection to the mains must be carried out by a
qualified technician in accordance with the
manufacturer's instructions and in compliance with local
regulations.
The installer is responsible for connecting appliances
correctly to the mains and for observing the safety
regulations.
The hob power cable must be long enough to connect
the built-in appliance to the mains.
Observance of safety directives requires that a multipole switch with a minimum contact gap of 3 mm be
used for the installation.
Do not use multiple plug adapters or extension leads.
After the hob has been installed, the electrical
components must be inaccessible.
Connecting the hob to the power supply
Note: the yellow/green earth wire must be connected to the
screw with the symbol
.
•
Strip approx. 70 mm of the cable sheath from the
power supply cable (G).
•
Strip approx. 10 mm of sheath from the conductors.
Insert the cable (G) through the opening in the lid (F).
Glass-ceramic hob
•
Insert the cable into the cable clamp and connect the
Important: remove any protective film before installing
conductors to the terminal block as indicated in the
the hob.
diagram printed on the lid.
Make sure that that the opening in the worktop for the hob is •
Secure the power cable (G) by means of the cable
cut according to the dimensions given in the drawing, paying
clamp.
attention to the tolerance range.
•
Refit the protection lid (F).
The hob should not be forced into the worktop. Forcing the •
After the electrical connection, fit the hob from the top
glass-ceramic top may cause it to crack (even at a later date)!
and hook it to the fixing springs, according to the
illustration.
Fig. 2
Fig. 3