1
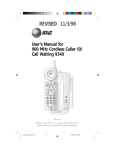
972_00_1ATT BOOK
12/4/01
1:36 PM
Page ii
USER’S MANUAL
Part 2
Caller ID Telephone 972
DRAFT
12/4/01
Please also read
Part 1 — Important
Product Information
AT&T and the globe symbol are registered trademarks of AT&T Corp. licensed to Advanced American Telephones.
972_00_1ATT BOOK
12/4/01
1:36 PM
Page iii
© 2001 Advanced American Telephones. All rights reserved.
Printed in China. Issue 1AT&T 12/01
972_00_1ATT BOOK
12/4/01
1:36 PM
Page v
CONTENTS
BEFORE YOU BEGIN ...................1
TELEPHONE MEMORY ...............17
About Softkeys .....................................1
About Home and Local Area Codes......2
About Caller Identification ...................3
Headset Jack .........................................3
Data Port...............................................3
One-Touch Dialing..............................17
Two-Touch Dialing .............................17
Storing Numbers in Memory..............17
Dialing Memory Numbers ..................18
Erasing Memory Numbers..................18
Viewing Memory Contents ................18
Storing Numbers from
Call History in Memory ..................19
Storing a Pause or Wait in a
Memory Number ............................19
INSTALLATION ..........................4
Battery Installation ...............................4
Table/Desk Installation .........................5
Wall Installation ....................................8
PROGRAMMING OPTIONS...........10
Phone Options ...................................10
Voice Message Options ......................11
Caller ID Options ...............................12
TELEPHONE OPERATION.............13
Make a Call .........................................13
Answer a Call......................................13
End a Call............................................13
Base Ringer Volume ............................13
Handset/Speakerphone/Headset
Volume............................................13
Change Time and/or Date ................. 13
Hold ....................................................13
Redial..................................................13
Mute ...................................................14
Flash ...................................................14
Automatic Line Selection....................15
Automatic Redial ................................15
Switching Between Lines
During a Call...................................15
Conference Calls ................................16
Conference Call Options ....................16
CALLER ID OPERATION ..............20
Review Call History............................20
Remove Call Records
from History ...................................20
Setting Display Screen Options......... 21
Display Screen Messages ................... 21
Message Waiting and
NEW CALL Lights ...........................22
Call Screening.....................................22
Call History.........................................23
Repeat Calls ........................................23
Display Dial ........................................24
Display Dial Options ..........................24
Call Waiting.........................................24
IN CASE OF DIFFICULTY .............25
972_00_1ATT BOOK
12/4/01
1:36 PM
Page 1
BEFORE YOU BEGIN
About Softkeys
This telephone has been designed with your convenience in mind, offering
you many features which you can access using the four “softkeys.”
Softkeys
PHONE
VOICE MSG
Select options
area to change.
CALL ID
Softkeys
Indicate
additional
options
Scroll through commands
By pressing the softkey next to the operation indicated on the display
screen, you select that operation. Softkey prompts are always underlined
on the display.
When there are too many features to fit on the screen at one time, the
and characters are shown. Use the arrow keys below the screen
to scroll through to the additional commands.
1
972_00_1ATT BOOK
12/4/01
1:36 PM
Page 2
BEFORE YOU BEGIN
About Home Area Code and Local Area Codes
Always program your Home Area Code, and, if you need them, up to four
Local Area Codes. (See “Program Home Area Code”on page 7 for
information about the Home Area Code). Programming these area codes
changes how numbers are displayed in the call history, and allows for
correct operation of the Display Dial feature.
Refer to the chart below to determine whether you will need to program
Local Area Codes after you install your phone.
If for
You dial
Then enter
All calls outside
11 digits
your Home Area Code (1 + area code
+ phone number)
No Local Area Codes
Some calls outside
10 digits
your Home Area Code (area code
+ phone number)
Area codes that do
not require a “1”
If you dial 10 digits (area code plus phone number) for calls within
your own area code, include your area code as a Local Area Code.
Use the softkeys to select the area code you want to program
(LOCAL1–LOCAL4), then use the keypad to enter each area code.
Use the softkey to select DONE.
If you don’t program your Home Area Code, the system will continue
to display the Home Area Code entry screen, and will be unable to display
Caller ID information. If you try to exit area code programming without
entering a Home Area Code, you will hear an error tone.
2
972_00_1ATT BOOK
12/4/01
1:36 PM
Page 3
BEFORE YOU BEGIN
About Caller Identification (Caller ID)
This unit keeps a record of the names and numbers of the last 99 calls,
whether you answer the phone or not.
For each call that comes in, the screen displays the following information
between the first and second rings:
•
•
Your caller’s name (15 letters are sent by your telephone company);
The caller’s area code and telephone number (the area code is not
displayed if it is programmed as the Home Area Code);
• The time and date of the call; and
• The position of the call in call history.
If you answer a call before the information appears on the screen, it
will not be in the call history.
Headset Jack
You can use this telephone hands-free when
you install any industry standard 2.5 mm
headset, purchased separately. For best
results, use an AT&T 2.5 mm headset.
Plug the headset into the jack. Do not
force the connection, but make sure the
plug fits securely.
Data Port
If you want to connect another device (such as a modem, fax machine,
answering system, or cordless extension phone) to a wall jack used by this
phone, you can use the jack on the back of the phone labeled DATA L2.
The data port uses Line 2; a call picked up on Line 2 at another extension
may interrupt data, fax, or message transmission.
3
972_00_1ATT BOOK
12/4/01
1:36 PM
Page 4
INSTALLATION
Battery Installation
Before using the telephone, install a 9V battery (not included). In case
of a power failure, you will be able to use the phone normally if a fresh
9V battery is installed, but Caller ID information will not be displayed. This
phone has a Memory Loss protection feature and will store your caller ID
information, memory and programmed settings until power is restored.
When battery power is low, LOW BATT shows on the display to alert you.
Replace batteries promptly.
CAUTION: Always disconnect all cords and remove base before
installing new batteries.
1
2
3
4
5
6
7
Remove the label covering the display screen.
Turn the telephone upside down.
Remove the base (Figure 1).
Place your thumbs in the two openings at the large end of
the base. Push down with your thumbs, and lift the base up
and away from the phone.
Open the battery compartment door (Figure 2).
Press on the tabs and remove the door.
Install one new 9V battery (Figure 3).
Replace the battery compartment door.
Turn to Step 1 in “Table/Desk Installation” or “Wall Installation”.
Figure 2
Figure 1
4
Figure 3
972_00_1ATT BOOK
12/4/01
1:36 PM
Page 5
INSTALLATION
Table/Desk Installation
Note: Be sure to follow the steps below in order. Do not plug the phone
into electrical power until all the cords are properly connected to the
phone.
1
2
3
The base.
Turn the base so the larger end is toward the top of the telephone.
Attach the base by inserting the tabs into the slots. Push down on
the large end of the base to lock it into place.
Connect the line cord(s) to the telephone.
• If you have a two-line jack, use only a line cord with clear
modular plugs on each end. Plug one end into the jack
labeled L1 OR L1/2 on the back of the telephone.
• If you have two separate jacks, use two line cords. Insert
one end of a cord with blue plugs into the jack labeled L1
OR L1/2 on the back of the telephone. Insert one end of
the cord with clear plugs into the jack labeled L2 on the
back of the telephone.
Connect the line cord(s) to your modular jack(s).
• If you have a two-line jack, plug the free end of the line cord
into a modular wall jack. Make sure the cord snaps firmly
into place.
Two-line
Modular
Jack
Telephone Line
Cord with clear
modular plugs
AC
Adapter
Power
Cord
5
972_00_1ATT BOOK
12/4/01
1:37 PM
Page 6
INSTALLATION
•
If you have two separate jacks, plug the free end of the cord
with the blue plugs into the modular wall jack for Line 1.
Plug the free end of the cord with the clear plugs into the
modular wall jack for Line 2. Make sure the cords snap firmly
into place.
Modular
Jack for
Line 1
Telephone Line
Cord with blue
modular plugs
Modular
Jack for
Line 2
AC
Adapter
Telephone Line Cord with
clear modular plugs
Power
Cord
4
5
6
7
8
6
Connect the handset to the telephone.
Plug the coiled cord into the handset jack on the side of the
phone. Plug the other end of the coiled cord into the handset, and
then hang up.
Connect the power cord.
CAUTION: Use only the power cord supplied with this phone.
If you need a replacement cord, call 1 800 222-3111.
Fit the power cord behind the strain relief tab. Then plug the
smaller end of the power cord into the jack labeled POWER at
the back of the system. Plug the power cord into a standard
electrical outlet not controlled by a wall switch.
Check for dial tone.
Press L, then lift the handset or press S and listen for a
dial tone. Then press l and listen for a dial tone. If you do not
hear a dial tone, see IN CASE OF DIFFICULTY.
Confirm Lines 1 and 2.
Press L and call one of your phone numbers. If you hear a
busy signal, you called Line 1. If you hear a ringing signal in the
receiver, then you called Line 2.
Select Display Language.
The screen displays ENGLISH (flashing) and ESPANOL. The flashing
language is the selected language. Use CALL LIST + or CALL LIST
- to select the other language, then use the softkey to select OK.
972_00_1ATT BOOK
12/4/01
1:37 PM
Page 7
INSTALLATION
9
Program Home Area Code.
You must program your area code so your phone can properly
recognize and dial calls.
If for calls
within your
own area code
You dial
7 digits
(phone number, no area code)
Enter
Your area
code
10 digits
(area code + phone number)
— OR —
11 digits
(1 + area code + phone number)
000
NOTE: You must program a Home Area Code, or the screen
will continue to display the Home Area Code entry screen, and
will be unable to display Caller ID Information. If you try to
exit area code programming without entering a Home Area
Code, you will hear an error tone.
Use the softkey to select HOME (the screen displays Enter Area
Code and ---), then use the keypad to enter your Home Area
Code. If you make a mistake, select ERASE and re-enter the correct
digits. Use the softkey to select DONE.
10 Select Primary Line.
LOCAL1
LOCAL2
If Automatic Line Selection is off, the
Change which
primary line (preset to Line 1) is the
area code?
line that will be selected when you lift
HOME
DONE
the handset, press S, or press
h if you do not manually choose a line. If Automatic Line
Selection is on, the primary line is the line that will be selected if
both lines are idle, both are ringing, or both are busy. To select
Line 2, use the softkey to select LINE 2, then select OK.
11 Set Automatic Line Selection.
You can choose whether the system will automatically select an
idle or ringing line when you make or answer a call. Use the
softkey to select ON to turn this feature on, or select OFF to turn
the feature off. Then select OK.
12 Select Automatic Mode.
You can choose whether the system will automatically select the
headset or speakerphone when the handset is not an option. This
phone comes set to speakerphone. To change the setting use the
softkey to select SPEAKER or HEADSET, then select OK.
7
972_00_1ATT BOOK
12/4/01
1:37 PM
Page 8
INSTALLATION
Wall Installation
Note: Be sure to follow the steps below in order. Do not plug the phone
into electrical power until all the cords are properly connected to the
phone.
1 Connect the line cord(s) to the telephone.
• If you have a two-line jack, use only the line cord with the
clear modular plugs on each end. Plug one end into the
jack labeled L1 OR L1/2 on the back of the telephone.
• If you have two separate jacks, use both line cords. Leave
the cord with the blue plugs bundled. Insert one end of
this cord into the jack labeled
L1 OR L1/2 on the back of the
telephone. Unbundle the cord
with the clear plugs. Insert
one end of this cord into the jack
labeled L2 on the back of the
telephone.
2 Wrap the line cord(s) as shown.
3
4
Attach the base.
Reverse the handset tab.
Hold down the switchhook, and slide the tab up and out of its slot.
Turn the tab so that the end with the “hook” is up, then insert the
tab back into its slot.
Figure 1
8
Figure 2
Figure 3
972_00_1ATT BOOK
12/4/01
1:37 PM
Page 9
INSTALLATION
5
6
7
8
9
Connect the power cord to the phone.
Fit the power cord behind the strain relief tab. Then plug the
smaller end of the power cord into the jack labeled POWER at
the back of the system.
Connect the line cord(s) to your modular jack(s) and
mount the phone onto the wall.
• If you have a two-line jack, plug the free end of the line cord
into the modular wall jack. Make sure the cord snaps firmly
into place. Place the phone on the wall jack mounting studs
and pull down until it is held securely.
• If you have two separate jacks, plug the free end of the cord
with blue plugs into the modular wall jack for Line 1. Plug the
free end of the cord with clear plugs into the modular wall
jack for Line 2. Make sure the cords snap firmly into place.
Place the phone on the mounting studs of one wall jack and
pull down until it is held firmly in place.
Connect the handset to the telephone.
Plug the coiled cord into the handset jack on the side of the
phone. Plug the other end of the coiled cord into the handset,
and then hang up.
Plug the power cord into an AC outlet not controlled by
a wall switch.
Follow Steps 6 through 12 in “Table/Desk Installation.”
9
972_00_1ATT BOOK
12/4/01
1:37 PM
Page 10
PROGRAMMING OPTIONS
See the following list of options which are programmable for this product:
Select for
phone
options
Select for
Caller ID
options
PHONE
VOICE MSG
Select options
area to change.
CALL ID
Select for
voice
message
options
Phone Options
To change the Language, Area Code, Primary Line, Automatic Line or
Automatic Mode Selection settings you programmed during installation,
press O, then select PHONE and continue to select OK or DONE to
reach the setting you want to change. For additional options, see CALLER
ID OPERATION.
See INSTALLATION for more information on the following phone options:
OPTION
LANGUAGE
AREA CODE
PRIMARY LINE
DEFAULT
ENGLISH
- - LINE 1
AUTOMATIC LINE
ON
DESCRIPTION
Select ENGLISH or SPANISH.
Enter area codes for both lines.
Choose whether LINE 1 or
LINE 2 will be selected
automatically when Automatic
Line Selection is on: you select
line manually when
Automatic Line Selection is off.
Select either ON or OFF.
AUTOMATIC MODE
SPEAKER
Select SPEAKER or HEADSET.
Note: Although this phone allows you to enter up to four Local Area
Codes in addition to your Home Area Code, only the Home Area Code
is required.
10
972_00_1ATT BOOK
12/4/01
1:37 PM
Page 11
PROGRAMMING OPTIONS
Voice Message Options
Voice mail signals are sent in two different ways (FSK or Stutter). This
phone automatically detects and uses the method used by your voice mail
service. (Your service provider can give you more information about your
service.) If you move or change service providers, you may need to use
the RESET or RESET & LOCK softkeys as described below to avoid missing
messages.
Occasionally the system will receive a false voice mail signal from your
provider and the NEW CALL light will flash. To turn off the light, follow
the directions below to use the LIGHT OFF softkey.
1 After selecting VOICE MSG, use the softkey to select the line
whose light is incorrect.
2
Select OK to move to the screen with the LIGHT OFF softkey.
Select LIGHT OFF.
3
Use the softkey to turn message waiting ON or OFF for the line you
selected. Choosing ON will advance to the options choices below.
(If you choose OFF the system returns to the main menu).
OPTION
LIGHT OFF
RESET
RESET & LOCK
OK
DESCRIPTION
Turns off the flashing NEW CALL light.
Turns on stutter dial tone detection for selected
line. (Disabled when FSK signal is received.)
Turns on stutter dial tone detection for selected
line. (Will not disable when FSK signal is received.)
Exit to main options menu.
11
972_00_1ATT BOOK
12/4/01
1:37 PM
Page 12
PROGRAMMING OPTIONS
Caller ID Options
You can customize how the Caller ID features of this phone work.
Select DONE or select OK until the screen displays the option you want to
customize. Options are described below in the order they appear in the
phones menu.
See CALLER ID OPERATION for more information on the following options:
OPTION
Call History
DEFAULT
ALL CALLS
Repeat Calls
COMBINED
Caller ID with ON
Call Waiting
DESCRIPTION
Select whether or not to
store all calls in call history.
Select whether to store repeat calls
as combined or separate entries.
Select whether or not to
use Caller ID with Call Waiting.
NOTE: In order for the Call History and Repeat Calls features to work,
you must subscribe to Caller ID, Caller ID with Call Waiting, or Call
Waiting Deluxe service from your local telephone company. To use the
Caller ID with Call Waiting feature, you must subscribe to that service or
to Caller ID Deluxe. If you are not subscribed to the appropriate service,
you should not program the feature.
Date and Time
The date and time will updated automatically with incoming Caller ID
calls. You can also set the date and time manually.
When the screen displays the date and time, press the softkey next to the
time/date. The screen displays the time/date selection screen. Follow the
prompts to use the softkeys and dial pad to enter new date and/or time.
12
972_00_1ATT BOOK
12/4/01
1:37 PM
Page 13
TELEPHONE OPERATION
Change Time
and/or Date
Use the softkeys
next to the
displayed time
or date to access
the time or date
entry screens.
Make a Call
Press a LINE
button and lift
the handset
— OR —
Press K
— OR —
Press h,
then dial the
call.
Answer a Call
Press a LINE
button and lift
the handset
— OR —
Press K
— OR —
Press h.
End a Call
Hang up
— OR —
Press K
(if on Speakerphone
call)
— OR —
Press h(if on
headset call).
Line in Use Lights
Red on: line in use
Red flashing slowly: line on hold
Red flashing rapidly: line ringing
Green on: line selected
Hold
Press to put a
line on hold.
You can
hang up the
handset.
To return to
the call, lift
the handset
— OR —
Press h
and press the
appropriate
LINE button
— OR —
Press K
and press the
appropriate
LINE button
— OR —
Lift the handset
of an extension
phone on the
same line.
Handset/
Speakerphone/
Headset Volume
While on a
call press
VOLUME +
to increase,
VOLUME - to
decrease
Appropriate light goes on when
volume.
headset or speakerphone is in use.
Base Ringer
Redial
Volume
Lift the handset
When not on an a
— OR —
call press a LINE
Press K
button, then press
— OR —
VOLUME + to
Press h,
increase,VOLUME
then press A
- to decrease
to call the last number (up to
volume of the
24 digits) dialed on the phone.
ringer for that line.
13
972_00_1ATT BOOK
12/4/01
1:37 PM
Page 14
TELEPHONE OPERATION
Flash
Press F instead of pressing the
switchhook to activate services such as Call
Waiting or 3-Way Calling. You may have to
press other buttons before or after F as
explained in the custom calling instructions
provided by your local telephone company.
Light is on
when MUTE is
active.
Mute
Press to prevent
the other party
from hearing
you. Press again
to return to
conversation.
14
972_00_1ATT BOOK
12/4/01
1:37 PM
Page 15
TELEPHONE OPERATION
Automatic Line Selection
Automatic Line Selection is preset to be active. This means the system is
preset to select a line for you when you lift the handset or press S.
The system will automatically select a ringing line before an idle line, and
an idle line before the primary line. If both lines are idle or ringing, the
primary line is selected. If you have manually selected a line, the selection
is active for five seconds and overrides automatic selection.
When Automatic Line Selection is off, the primary line will be selected
unless you select a line manually.
Automatic Redial
This phone can automatically and repeatedly redial the last number you
called. Press L or l, then press A without lifting the
handset, pressing K or pressing h. You will hear the numbers
being dialed. When the call is answered, you must either lift the handset or
press K to talk.
If the called line is busy, the phone will redial every 40 seconds up to
10 times (timing begins when the phone is on hook).
To stop automatic redialing at any time, press A again. Lifting
the handset or pressing h or K will also cancel automatic redial.
NOTE: This feature works only when the handset is on hook.
Switching Between Lines During a Call
During a call on one line, you can make or answer a call on the other line
by pressing H. You can use the H and LINE buttons to switch back
and forth between calls as often as necessary.
Example: While using Line 1, Line 2 rings:
1 Press H to hold Line 1.
2 Press l to answer the other call.
3 Press L to hang up Line 2 and return
to your first call
— OR —
Press H to hold Line 2, and press L
to return to your first call.
15
972_00_1ATT BOOK
12/4/01
1:37 PM
Page 16
TELEPHONE OPERATION
Conference Calls
You can use both lines at the same time to set up a three-way
conference call.
1 Make or answer a call and press H.
2 Establish a call on the other line.
3 Press C.
4 Hang up to end a conference call.
If one caller hangs up during a conference call, you might hear a dial tone.
Press the LINE button of the remaining call to disconnect the other line
and eliminate the dial tone.
NOTE: Under certain circumstances, the far-end parties on a conference
call may not hear one another clearly.
Conference Call Options
To place a conference call on Hold:
1 Press H to hold both lines.
2 Press C to release Hold and continue
your conference call.
To talk privately with one caller:
1
2
Press H.
Press the LINE button of the person with whom you want to
speak privately.
3 Press C to continue your conference call.
To disconnect one party from a conference call and keep the other
on the line, press the LINE button of the call you want to continue.
16
972_00_1ATT BOOK
12/4/01
1:37 PM
Page 17
TELEPHONE MEMORY
Directory Card
Remove the plastic cover and the directory card.
Write your telephone numbers in the spaces provided,
and write the telephone numbers (or names) that you
want to store in each memory location. Replace the
card and plastic cover in the space provided.
One-Touch
Dialing
The 9 white
spaces on the
directory card are
one-touch memory locations. You can
dial one of these numbers by pressing
the memory button next to the
number.
Two-Touch
Dialing
The 9 gray
spaces on the
directory card are
two-touch memory locations. To dial
one of these numbers you must
press W, then the memory
button next to the number.
Storing Memory Numbers
1
2
3
4
5
Press P.
Enter the telephone number you want to store (up to 24 digits).
The number is displayed as you enter it.
To enter a space in the number display, use the softkey to select
SPACE when entering the telephone number. If you make a
mistake, use the softkey to select BKSPACE, and re-enter the digit.
Press the one-touch (white space) location where you want to
store the number (you will hear a confirmation tone)
— OR —
Press W, and the two-touch (gray space), location.
Repeat Steps 2-4 to store another number
— OR —
Press P to exit.
17
972_00_1ATT BOOK
12/4/01
1:37 PM
Page 18
TELEPHONE MEMORY
Dialing Memory Numbers
1
2
Lift the handset
— OR —
Press K
— OR —
Press h and listen for dial tone.
Press and release a one-touch memory location
— OR —
Press and release W then a two-touch memory location.
The system dials the number automatically and the number is
displayed on the screen.
Erasing Memory Numbers
To remove a number from memory, enter another number in the
same location.
To clear a memory location and leave it empty, press P, then press
the button of the memory location you want to clear.
Viewing Memory Contents
You can review the number stored in a memory location while the phone
is on hook by pressing the button(s) for the number you wish to review.
While the number is displayed you can use the softkeys to edit or dial this
number.
18
972_00_1ATT BOOK
12/4/01
1:37 PM
Page 19
TELEPHONE MEMORY
Storing Numbers from Call History in Memory
While reviewing Caller ID information, you can store information from
Caller ID call history in telephone memory.
1
2
3
4
Use + or - to scroll through the call history.
Press O to see choices of how the number can be dialed.
For example,
555-1212
1-555-1212
1-908-555-1212
The flashing number is the currently selected format. Use + or to select another format.
When the screen displays the information you want to store in
memory, press P.
Press the one-touch location where you want to store
the information
— OR—
Press W and the two-touch location
Storing a Pause or Wait in a Memory Number
You may want to store a two-second “pause,” or a 30-second “wait,” in the
sequence of digits you store as a memory number. When storing numbers
in memory, use the softkey to select PAUSE where you want dialing to
pause. The screen displays P where the pause occurs during dialing.
A pause or a wait each count as one digit when sorting numbers.
To enter more than one pause in a row, select PAUSE, SPACE, BKSPACE,
then PAUSE again.
To insert a 30-second wait, select PAUSE, then select PAUSE again. The
screen displays W (replacing the P) where the wait occurs during dialing.
When you are using the memory location to place a call, you can shorten
the wait by pressing any one-touch (white space) key.
19
972_00_1ATT BOOK
12/4/01
1:37 PM
Page 20
CALLER ID OPERATION
Time and date (set automatically
with first incoming call)
Dial a
number
stored in
call history
when
displayed
on screen
Blinking:
new message(s)
waiting in
voice mail
service,
On steadily:
unreviewed
calls in history
Review Call History
To review latest calls:
1 Press CALL LIST - to
review calls for both lines,
— OR —
Press L or l, then press
CALL LIST - to see only calls
for the selected line.
2 To advance through the call
history from an earlier call,
press CALL LIST +. The screen
displays END OF LIST at the
end or the beginning of the
call history to indicate you have
reviewed all calls.
Access
features
menu
Blinking:
new message(s)
waiting in
voice mail
service,
On steadily:
unreviewed
calls in history
Remove Call Records from History
Use CALL LIST + or CALL LIST - to find
the record you want to remove. Press
r to erase a displayed call record.
The screen displays CALL REMOVED.
To remove all calls from history, press
r when the screen is showing the
call history summary. The screen
prompts “To remove all calls press
remove.” Press r again.
NOTE: You must subscribe to Caller ID and Call Waiting service with
your local telephone company for this system to work. Contact your
local telephone company for information about service availability.
Different telephone service providers may call these services by different
names.
20
972_00_1ATT BOOK
12/4/01
1:37 PM
Page 21
CALLER ID OPERATION
Time call
was received
Date call
was received
Caller’s name
Indicates
unreviewed call
information
Caller’s telephone
number
Indicates
repeat call
Position of call
in call history
Indicates line on which
call was received
Setting Display Screen Options
You can customize how the Caller ID features of this product work.
See “Caller ID Options” on page 12 for instructions.
Display Screen Messages
Screen Displays:
When:
PRIVATE NAME
The other party is blocking name information.
PRIVATE #
The other party is blocking number information.
PRIVATE CALLER
The other party is blocking name and number
information.
UNKNOWN NAME
Your phone company is unable to receive
information about this caller’s name.
UNKNOWN CALLER
Your phone company is unable to receive
information about this caller’s name and number.
21
972_00_1ATT BOOK
12/4/01
1:37 PM
Page 22
CALLER ID OPERATION
Message Waiting and NEW CALL Lights
There is a NEW CALL light for each line. The NEW CALL light will stay on
steadily when you have new calls in the call log. The light will turn off
after you have reviewed all new calls. If you subscribe to a telephone
company voice mail service, this light flashes if you have unretrieved
messages waiting.
At times, the system will occasionally receive a false signal and the
NEW CALL light will flash. To turn off the light:
Press O, then select VOICE MSG.
Use the softkeys to select the line whose light is incorrect.
Select OK to move to the screen with the LIGHT OFF softkey.
Select LIGHT OFF.
4 Press O when done.
Voice mail signals are sent in two different ways; this set automatically
selects the method which is used by your voice mail service. (Your service
provider can provide you with more information about your service.) If
you move or change service providers, you may need to use the RESET
softkeys shown on the above menus to avoid missing messages.
1
2
3
Call Screening
You can see who’s calling before you answer the phone. The screen
displays the name and number of your caller, if the information is available.
If both lines have calls, the top two lines of the screen display information
about Line 1, and the bottom two lines on the screen display information
about Line 2.
22
972_00_1ATT BOOK
12/4/01
1:37 PM
Page 23
CALLER ID OPERATION
Call History
This telephone assigns each incoming call a number from 1 to 99. The
most recent call will have the highest number. For example, if two calls
have been received, call number 2 is the most recent. When the memory
is full, the oldest call information is automatically deleted to make room
for the new incoming call information. New (unreviewed) calls in the
call history are displayed in the order in which they were received,
followed by previously reviewed calls, also in the order in which they
were received. Calls are not renumbered as they are reviewed, so the
call number may appear out of sequence.
1
2
3
Press O, then select CALL ID.
Use CALL LIST + or CALL LIST - to select one of the
options below:
ALL CALLS
system stores and displays all calls
received, in order
NO CALLS
system stores and displays no call history
Use the softkey to select OK when your selection is flashing.
Press O again to exit.
Repeat Calls
You can choose whether you want repeat calls listed separately, or each
repeat call combined with the original call (for unreviewed calls only).
Combined calls include the repeat count, the time/date reflects the
most recent call, and the call history is reordered (if necessary).
1
2
3
Press O, then select CALL ID and press OK until you
reach the Repeat Calls screen.
Use CALL LIST + or CALL LIST - to select one of the options
shown below:
COMBINED ENTRY
repeat call is combined with the original
SEPARATE ENTRIES
repeat call is listed separately
Use the softkey to select OK when your selection is flashing.
23
972_00_1ATT BOOK
12/4/01
1:37 PM
Page 24
CALLER ID OPERATION
Display Dial
As you review calls in history, you can dial a displayed phone number.
If the call information came from the Home Area Code you programmed
at installation, the screen displays only the seven-digit number (without
an area code). When you use Display Dial, the system dials the seven
displayed digits. (See INSTALLATION for instructions to program up to
four other Local Area Codes.)
1 Locate the number in call history.
2 Press and release d. The speakerphone is automatically
activated.
—OR—
Lift the handset, press S or press h, then press
d to place the call.
If you are dialing a long-distance call, the leading “1” will automatically
be pre-dialed. The screen shows the number being called.
Display Dial Options
Use this feature if you want to check and/or change the way a number
in call history is dialed.
1
2
Press + or - to locate the number you want to call.
Press O to see choices of how the number can be dialed.
For example,
555-1212
1-555-1212
1-908-555-1212
The flashing number is the currently selected method. Use
CALL LIST + or CALL LIST - if you need to select another
choice, then press d to make the call.
Call Waiting
This feature only works if you have subscribed to Caller ID service with
your local telephone company. You must subscribe to Caller ID with Call
Waiting as a single, combined service with your telephone service provider
for your phone to display Caller ID information for Call Waiting calls.
Press F to connect to the Call Waiting call without losing the first call.
24
972_00_1ATT BOOK
12/4/01
1:37 PM
Page 25
IN CASE OF DIFFICULTY
If you have difficulty operating this phone, try the suggestions below.
For Customer Service, visit our website at www.telephones.att.com or call
1 800 222–3111. Please retain your receipt as your proof of purchase.
No Dial Tone
•
•
•
•
Make sure all plugs are connected properly. Inspect the line cord
connections at the modular jack and at the telephone. Also inspect
the coiled handset cord connection at both ends.
Check to make sure the phone is not on hold.
In the event of a power failure when there is not a charged 9V
battery installed, Line 2 cannot be used. Use Line 1 to make your call.
Unplug the telephone and connect it to another modular jack. If it
still does not work and other telephones in your home are working,
the problem is with this phone.
An Error Tone Sounds During Area Code Programming
If you try to exit area code programming without entering a Home Area
Code, you will hear an error tone. Follow the instructions to “Program
Home Area Code” under “Table/Desk Installation” in the INSTALLATION
section of this manual.
Call Cannot Be Dialed or is Dialed Slowly
In the event of a power failure, a charged 9V battery must be installed for
the phone to dial out or receive calls. If no battery is installed the phone
will not ring, but can be used to make a call on Line 1.
Difficulty Storing Numbers in Memory
Make sure you are pressing the correct sequence of buttons for storing
numbers in one-touch and two-touch locations.
Telephone Does Not Ring
•
•
Make sure the ringer volume is not turned off.
If there are several other telephones on the same line, try
disconnecting some of the other telephones. Having too many
telephones connected can also create problems such as low ringer
volume or impaired sound quality during calls.
25
972_00_1ATT BOOK
12/4/01
1:37 PM
Page 26
IN CASE OF DIFFICULTY
Problems with Line-In-Use Lights
Make sure all plugs are connected properly. Inspect the line cord
connections at the modular jack and at the telephone. Also inspect
the coiled handset cord connections at both ends.
NEW CALL Light Flashes
Make sure you have reviewed all of the new calls in call history. If you
have reviewed the entire call history and the NEW CALL light remains lit
but is flashing, your phone may have received a false signal from your voice
mail service provider. If you have no new voice mail messeage follow the
directions to turn the light off under “Message Waiting and NEW CALL
Lights” in the CALLER ID OPERATION section of this manual.
Low Battery Indicator is Displayed
•
•
Make sure the battery is installed correctly.
Replace the battery.
Speakerphone Does Not Work
If the other person cannot hear you, make sure the MUTE light is off.
26