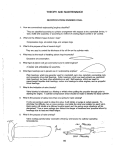
1
428-217 1
A little history...
Ice cream as we know it today probably came into existence in the middle of the 17th century
when a chef employed by Charles I of England developed a technique of shaking flavored cream
in a dish of ice. It became so popular that the king actually continued to keep the formula a “Royal
Secret”. Slowly the secret got out and many ice cream parlors began to spring up around Europe
in the early 1800’s.
However, it was in the United States where its manufacture and popularity soared. In fact,
we know that George Washington purchased a “cream machine for making ice” and spent the
unheard of sum of $200 making ice cream all summer!
It was not until 1846, however, that a woman named Nancy Johnson, in New York, made life
easier for all of us ice cream lovers by inventing a crude, but easy-to-use, hand crank ice cream
maker. Remarkably, she never patented the device!
White Mountain Freezers
The RIVAL Company
Sedalia, MO 65301
Read carefilly before using your White Mountain Ice Cream Maker
IMPORTANT SAFEGUARDS
using elechical appliances, basic safety precauticms should always be followed:
1. Readallinstructions.
2 HOUSEHOLD USE ONLY.
3. No user serviceable parts inside. Refer servicing to qualified servicing personnel.
4. To pmtect against risk of ele&ical shock, do not put motorking uniis in water or other liquid.
5. Close supervision is necesary when any appliance is used by or near childnm.
6. Unplug from outlet when not in use, before putting on or taking off parts and before cleaning.
7. Avoid contxting moving parts.
8. Do not operate any appliance with a damaged cord or plug, or after the appliance malfunctions, or is dmpped or damaged in any
manner. Return appliance to nearest authorized service facility for examination, qair or electrical or mechanical adjustme&.
9. The use of attachments not recommended by the appliance manufacturer may cause fire, electrical shcck or injq
10. Ekctric kezers have not been investigated for outdoor use.
11. Do not let cord hang over edge of table or counter, or touch hot surfaces.
When
SAVE THESE INSTRUCTIONS
Polarized Plug
with a polarized plug. This type of plug has one blade wider than the other As a safety feature this plug will fit in an ektrical outlet only one way. If you are unable to fit the plug into the outlet, reverse the plug. If the plug still does not fit, contact a qualified ek&ician. Do
not attempt to defeat this safety feature.
This appliance is esuipped
Welcome to Your White Mountain
Ice Cream Freezer
Congratulations
You have purchased the finest ice cream freezer in the
world. Remember the old-time church social, as
Grandma’s back yard picnic was highlighted by that
creamy, cool and delicious dessert? Well, you can still do
it... right in your own home, school or church. All you
need is your favorite ice cream recipe, ice, rock salt and,
of course, your White Mountain Freezer!
With your own White Mountain Freezer, you can
bring back those old time family values and good-time
family fun. You’ll be proud to host your special family
get togethers and friendly parties producing the best ice
cream anywhere!
Let’s begin by preparing your favorite ice cream
This book will give you plenty of basic ideas.
Kfzthis is completed, put it in your refrigerator to chill.
Ice cream is made by freezing - while stirring - a pasteurized, homogenized mixture of cream, milk, sugar
and other ingredients and flavorings to produce an infinite variety of possible ice cream confections.
The freezing is accomplished easily It takes place in
the White Mountain Freezer using rock salt and ice as the
refrigerant. Rock salt forces the ice surrounding the can
of ice cream mix to melt. The “brine solution” or liquid
that forms in the wooden bucket absorbs heat from the
mix and gradually lowers the temperature of the mix
until it begins to freeze.
If there were no salt added to the ice, it would melt at
32 degrees Fahrenheit and eventually the ice water and
mix would come to equilibrium at 32 degrees. The ice
cream mix, however, does not begin to freeze until its
temperature falls below 27 degrees. Therefore, for our
purposes, we need a salt concentration, or a ratio of 5
cups of ice to 1 cup of salt, to create a good brine. At this
concentration, our brine temperature should remain constant at 8 to 12 degrees F. This will give us the rapid cooling and freezing that is essential to making smooth,
creamy ice cream.
Making Your First Batch
First, have all your ingredients chilIing in the refrigerator.
Second, prepare your ice by filling a cloth bag and
breaking it into coarse pieces using a mallet or hammer.
Third, place your stainless steel cream can into the
wooden tub so that it rests easily on the metal tub center
in the bottom of the tub. Insert your dasher in the can
making sure that the protrusion on the bottom of the
cream can fits into the socket of the dasher.
Fourth, pour your recipe into the cream can, never filling the can more than half full. Assemble the can cover
and turn the dasher stem with your fingers until it turns
freely.
Fifih, place the gearframe into position by grasping the
gearframe and engage the dasher stem into the socket of
the gearframe. If you have a handcrank freezer, slide the
cranking end into the tub ear. The opposite end of the
gearframe fits into the tub latch. Gently push the thumb
latch down until the gearframe is snug. If you own an
electric unit, be sure to hold the unit with the label facing
you. Insert the right side of the unit into the steel ear and
the left side (marked latch end) fits into the latch. Gently
push the thumb latch down until unit is secure.
Finally, it is time to fill the wooden tub with ice. Fill
your tub to the top of the can with ice. Crank or run your
motor for about 2 minutes so that the can chills evenly.
Add 2 cups of rock salt to the top of the ice. As the ice
melts down 2 to 3 inches, add more ice and 2 more cups
of salt.
-2-
The amount of ice and rock salt you use will vary
according to the ambient air temperature. Do not
increase your salt usage until you have churned the fxeezer for 10 minutes. After 10 minutes, you should notice
the cream becoming firmer. At this point, if too much salt
is used, the result will be excessive freezing to the extent
that a crust of frozen cream wilI form on the inside edge
of the can while the middle will remain liquid. If this
occurs, allow the brine to warm up and thereafter
decrease the amount of salt added when you add ice.
NOTE: Occasionally, your dasher blade screws may
loosen allowing the blades to move more than l/8” from
the dasher. Simply screw the blades down to l/8” and
resume freezing.
Do not plug hole in side of freezer tub - this is for
draining excess brine and should be kept open at all time.
Discontinue Churning
When your ice cream mix has been churned sufficiently (usually about 20-25 minutes) and becomes the
consistency of soft ice cream, it is ready for packing or
eating. The time can best be determined when it becomes
difficult to turn the crank handle, or the motor begins to
sound like it is really straining. Manually unplug your
motor unit when you hear it straining, further churning
will not improve the quality of the ice cream.
Now, remove the can cover. Take the dasher out and
scrape off excess ice cream with a wooden spoon. Your
ice cream is now ready to eat and enjoy!
l%e Old-Fashioned Way
You can pack your cream for hardening right in your
White Mountain Freezer by scraping it back into the
cream can. Place a sheet of waxed paper across the top of
the can, press the can cover down over waxed paper and
plug the hole in the cover with either a cork stopper or
tape. Drain off water, repack freezer with 5 parts of ice
and 1 part salt, until entire can and can lid are covered
with ice and salt mixture. Next, cover with burlap bag or
some suitable material for insulation. Then let stand until
frozen hard. We recommend this “old fashioned”
method.
Helpful Hints
This booklet is only a guide... an easy to follow collection of hints and recipes that we have discovered in
the last 140 years that make homemade ice cream so special. Here are some helpful suggestions:
CAUTION: DO NOT FILL THE FREEZER MORE
THAN TWO THIRDS FULL OF MIXTURE TO BE
FROZEN. EXAMINE CONTENTS AFTER
FREEZER HAS BEEN IN OPERATION APPROXIMATELY 15 MINUTES TO SEE IF MIXTURE IS
SUFFICIENTLY FROZEN.
Protect all working surfaces with newspaper. Salt
is corrosive. Be careful not to kill valuable back
yard grass when making ice cream outdoors in the
good old summer time with the handcrank freezer.
I-I-I rubber gloves to protect hands from cold and
Do not use this freezer for commercial purposes.
Use a glass or plastic measuring cup for rock salt,
since salt pits metals.
Use a wooden spoon for stirrin and repacking ice
cream to retard melting (wood % oes not conduct
heat).
It is best to make a cooked recipe the night before
so it has plenty of time to chill.
Make sure your wooden scraper blades are l/8”
away from the metal dasher. These screws are set
at the factory and should be loose, but never more
than l/8” or the end result may be freezing around
the can while the middle remams liquid.
Freezing should not be too slow or too fast. A
greater amount of salt will melt the ice faster,
causing the ice cream to freeze faster. A too rapid
freezing time does not allow for sufficient a itation
and produces a coarse texture. An extende J? period
of freezing causes a spongy, buttery texture.
-3-
You lose the delectable taste and good texture of
homemade ice cream if it stores too long. It can be
kept up to a month if properly packaged for freezing.
The salt used in making homemade ice cream is
rock salt. It is a course salt and should be used
instead of regular table salt.
You can hasten the hardening process by lacing the
entire can containing the ice cream mix (aKer initial
churning) in the freezer unit of your refrigerator.
To our vanilla based mixtures, consider adding
sueK flavor pick-ups as crumbled cookies or
candies, granola, instant coffee mixes, small
chocolate bits or even dabs of jams, jellies and
peanut butter.
Fold in ingredients such as fresh or thawed frozen
fruit slices about about 20 minutes after removing
the dasher from the churned ice cream mixture.
Try filling re-cooked pie shells with ice cream
before fina7 hardening or orange and lemon shells
with orange and lemon sherberts. Fill ice cream
puff shells with ice cream and top off with sauce.
Fill parfait glasses with vanilla ice cream, add
een creme de menthe and top with ice cream.
ust
y use your imagination. There are endless
leasures in store for you with the aid of your
Kh ite Mountain Freezer.
lf you have any questions or need assistance,
please feel free to con tact our
Cus tamer Service Department - Z-800-343-0065
Recipes
Vanilla Ice Cream
2 cat.
4 cat.
2 cup
3 c.
1 cup
1% c.
dash
w tsp.
2 c.
1 cup
1% teaspoons 1 T.
1 cups
3 c.
5 Qt.
6 Qt.
3% c.
2% c.
w tsp.
2% c.
1HT.
4 c.
4 c.
2% c.
3/r tsp.
3 c.
2T.
5 c.
Milk
Sugar
Salt
Half and Half
Vanilla Extract
Whipping Cream
Scald milk until bubbles form around edge. Remove from heat. Add sugar and salt. Stir until
dissolved. Stir in half and half, vanilla and whipping cream. Cover and refrigerate 30 minutes. Freeze as directed.
Strawberry: Add pureed strawberries (1% cups for 2 quart, 4 cups for 4 quart, 5 cups for 5
quart, or 6 cups for 6 quart) to chilled mixture before freezing.
Banana: Add mashed bananas (1% cups for 2 quart, 3 cups for 4 quart, 3% cups for 5 quart, or 4
cups for 6 quart) to chilled mixture before freezing.
Peach: Add pureed peaches (14: cups for 2 quart, 4 cups for 4 quart, 5 cups for 5 quart, or 6
cups for 6 quart) to chilled mixture before freezing.
Cookie Stir In:
Add crumbled chocolate sandwich cookies (or any cookie of your choice) to the mixture during
the last 5-10 minutes of the mixing.
20 cookies - 4 qt.
30 cookies - 6 qt.
10 cookies - 2 qt.
Candy Stir-In:
Add your favorite chocolate candy during the last 5 to 10 minutes of mixing.
l/2 cup - 2 qt.
1 cup - 4 qt.
2cups-6qt.
Chocolate Ice Cream
2 Qt.
1% cups
1 tablespoon
% teaspoon
3 cups
2
3 squares
4 Qt.
5 Qt.
6 Qt.
2% c.
2 T.
w tsp.
6 c.
4
6 sq.
3% c.
2?4 T.
H tsp.
7% c.
5
7% sq.
4 c.
3 T.
% tsp.
9 c.
6
9 sq.
1?4 c.
2 c.
2 tsp.
1% c.
2% c.
2% tsp.
2 c.
3 c.
1 T.
(1 ounce each)
% cup
1 cup
1 teaspoon
Sugar
Cornstarch
Salt
Milk
Eggs, beaten
Semisweet
Chocolate
(melted)
Half and Half
Whipping Cream
Vanilla Extract
Combine sugar, cornstarch and salt in a saucepan. Gradually stir in milk. Cook over medium
heat until mixture begins to simmer, stirring constantly Gradually stir about 1 cup of the hot
mixture into the beaten eggs. Add to remaining hot mixture, stirring constantly. Cook and stir
over low heat until slightly thickened (about 2 minutes). Stir in melted chocolate. Beat with a
whisk until mixture is smooth. Stir in half and half, whipping cream and vanilla. Cover and
refrigerate 2 hours. Freeze as directed.
-4-
P
Recipes
Frozen Pina Colada Yogurt
2 Qt.
4 Qt.
4 cups
H cup
1 can
6 c.
1 c.
2 cans
W can
1 can
‘x cup
1 c.
5 Qt.
6 Qt.
Vanilla Yogurt
12 c.
1!4 c.
Sugar
3 cans Crushed Pineapple
undrained, 15% oz.
1% cans 1% cans Cream of Coconut
15 oz. can
1% c.
Whipping Cream
1% c.
10 c.
1% c.
2% cans
Thoroughly combine yogurt and sugar in mixing bowl. Stir in remaining ingredients. Cover
and refrigerate 30 minutes. Freeze as directed.
Strawberry Ice
2 Qt.
4 Qt.
5 Qt.
6 Qt.
1 quart
2 qt.
2% qt.
3 qt.
% cup
1 cup
1 tablespoon
1 c.
2 c.
2 T.
1% c.
1!4 c.
2% c.
3 c.
2 T. plus 3 T.
1% t.
Fresh or Frozen
Strawberries, thawed
Sugar
Water
Lemon Juice
Puree strawberries and combine with sugar. Let stand 2 hours. Add water and lemon
juice. Cover; refrigerate 30 minutes. Freeze as directed.
i
b
-5-
WHITE MOUNTAIN HAND CRANK ICE CREAM FREEZERS
MODELS F64302, F64304, F64306, F64308, F64310, F64320, AND F74304
Parts List
LATCH
(U) TUB WIT+, HARDWARE
(VCAN
,
PART
NO.
1
4
6
7
a
HANDLES COYPLET
1
(10) GEAR SHAFT WlTH
(201) TUB CENTER
ia
(23) TUB CENTE
A f- (10) DASHER SEARING
(7) DASHER
(4) CAN LID
_.
20) LOWER BEARING
(11) SCRAPER BAR
GEARFRAME
,a*
.a
(22) SHA.FT GEAR
(32) PIiT$ SCREWS
(ZSA) FRAME
EUlT N
9
7
9
11
11 a
13
14
16
17
8
?L
19
20
21
22
23
24
25
26
27
28
26a
29b
30
31
32
33
Description
Can
Can, Cover
Crank
Dasher, Single Piece
Dasher, Outer with Scrapers
Dasher, Inner
Dasher, Scrapers (pair)*
Dasher, Scraper, Holder, each’
Gear-frame, Complete with gears
Gear-frame, Skeleton, no gears
Gear-frame, Crank Shaft
Gear-frame, Clutch Only, each*
Gear-frame, Gear Shaft & Clutch
Gear-frame, Crank Shaft & Clutch
Gear-frame, Lower Bearing
Gearframe, Bottom Gear
Gearframe, Shaft Gear
Gearframe, Top Gear
Tub, Complete with fittings
Tub Bail Handle with wood grip
Tub Center
Tub Ear (steel)
Tub, Frame Button
Tub, Frame Button Holder
Tub, Frame Button Back Plate
Tub, Latch (steel)
Tub, Hanger (tub)
Tub, Hanger Pivot Screws, each
Tub, Handle Comp-each
INSTRUCTIONS FOR ORDERING HAND CRANK FREEZER PARTS
For our Parts Department to adequately serve you,
it is a must that you do the following:
NOTE:
1.
1. Order parts by number and description.
2.
3.
Specify the quart capacity of the freezer.
Example: 4-quart, 6-quart, or 8-quart, etc.
Cans (part number 1) will be shipped without can
covers. If a can cover (part number 4) is desired,
please order separately.
2. No C.O.D. Shipments
Turn the gear frame (part number 13) over and
advise us what the pattern number is on the
underside of the frame unit.
WHEN ORDERING PARTS PLEASE FURNISH FRAME NUMBER AND COVER NUMBER
NOTE: You may order a No. 401 motorizing unit for your 6-Qt. hand freezer.
WHITE MOUNTAIN FREEZERS, THE RIVAL CO., SEDALIA, MO 65301
I-800-343-0065
-6-
WHITE MOUNTAIN ELECTRIC ICE CREAM FREEZERS
MODELS F69204, F69206 AND F79204
Parts List
PART
NO.
Description
1
4
8
9
11
24
25
26
27
30
Can
Can Cover Lid (aluminum)
Dasher, Outer with Scrapers
Dasher, Inner
Dasher, Scrapers (pair)
Tub, complete with fittings
Tub Bail Handle with wood grip
Tub Center
Tub Ear (steel)
Tub Latch (steel)
401
402
403
404
405
Motorizing Unit Complete
Motor
Unit Frame Blank
Unit Gear Housing
Unit Steel Hood
406
407
408
409
410
411
412
Top and Cluster Gear
Top Retaining Ring
Stud for Top and Cluster Gear
Main Drive Gear
Intermediate Gear with Pinion Rod
Dasher Hub Section Holder
Dasher Holder Steel Strap
INSTRUCTIONS FOR ORDERING ELECTRIC FREEZER PARTS
:
For our Parts Department to adequately serve you,
it is important that you do the following:
NOTE:
1.
0
1.
Order parts by number and description.
2.
Specify the quart capacity of the freezer.
Example: 4-quart, 6-quart, or 8-quart, etc.
3.
Cans (part number 1) will be shipped without can
covers. If a can cover (part number 4) is desired,
please order separately.
2. No C.O.D. Shipments
Turn the gear frame (part number 13) over and
advise us what the pattern number is on the
underside of the frame unit.
WHEN ORDERING PARTS PLEASE FURNISH FRAME NUMBER AND COVER NUMBER.
WHITE MOUNTAIN FREEZERS, THE RIVAL CO., SEDALIA, MO 65301
l-800-343-0065
-7-
This product is warranted against defect in materials or workmanship for one (1) year from date of original purchase. If your defective product is delivered prepaid during that period to Rival Service Division,
217 East 16th St., Sedalia, MO 65301, your product will be repaired or replaced (at our option) at no
charge. You may also write to us at this same address, or call us at l-800-343-0065 (U.S. only) should
you have any questions or need further assistance.
This warranty does not apply to commercial use, or to damage to the product (not resulting from defect
or malfunction) while in the possession of the consumer.
This warranty gives you specific legal rights, and you may also have rights which vary from state to
state.
IMPORTANT CARE FOR YOUR FREEZER TUB
When not being used continuously, the wooden tub of your freezer will become dried out after it has
been stored away for any length of time. Therefore, you should put 3” to 4” of water in the tub each
time before using (especially when using it for the first time) giving it a chance to swell up again so that
the salt brine will not leak out during the freezing process. Storing in a cool location will help to
increase the life of your freezer.
CAUTION
Occassionally, your dasher blades screws may loosen allowing the blades to move more than l/8” from
the iron dasher. Simply screw the blades down to l/8” and resume freezing.
Do not plug hole in side of freezer tub - this is for draining the excess brine and should be kept
open at all times.
IF YOU NEED ADDITIONAL ASSISTANCE CALL:
CUSTOMER SERVICE l-800-343-0065
-8-