1
PW1600
Operating Instructions and Parts List
PW1600
Please read and save these instructions. Read carefully before attempting to assemble,
install, operate or maintain the product described. Protect yourself and others by
observing all safety information. Failure to comply with instructions could result in
personal injury and/or property damage! Retain instructions for future reference.
Notes
Notas
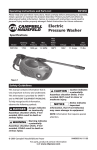
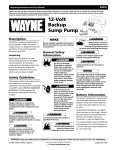
Electric Pressure
Washer
BUILT TO LAST
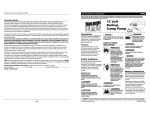
Specifications
Model
PW1600
Cleaning
Power
Maximum
Pressure
Maximum
Inlet
Maximum Water
Capacity
Temp. Voltage
2400
1600 psi
1.5 GPM
100˚F
120V
Unit
Amperage Weight
14 Amps
22 lbs.
Safety Guidelines
This manual contains information that
is very important to know and
understand. This information is
provided for SAFETY and to PREVENT
EQUIPMENT PROBLEMS. To help
recognize this information, observe the
following symbols.
Warning indicates
a potentially
hazardous situation which, if not
avoided, COULD result in death or
serious injury.
Caution indicates a
potentially
hazardous situation which, if not
avoided, MAY result in minor or
moderate injury.
Figure 1
36
© 2007 Campbell Hausfeld/Scott Fetzer
NOTE or NOTICE: Information that
requires special attention.
For parts, product & service information
visit www.chpower.com
IN468700AV 2/07
Operating Instructions and Parts List
PW1600
Important Safety Instructions
! IMPORTANT !
This pressure washer is equipped with a
microswitch sensitive to water flow. This
Instant Start/Stop switch (ISS) senses
water flow in the pump. When the trigger is released, water stops flowing
through the pump. The ISS then automatically turns the motor off to protect
pump from overheating.
OPERATION
1. Pull trigger on gun.
2. Turn the “ON/OFF” switch to “ON”.
3. Release trigger. The pressure washer
motor will stop running.
4. To spray again, pull trigger and motor
and pump will restart.
Note: Occasionally the motor may run
for a short time to bring fresh, cool
water into the pump even if trigger is
released. This is part of normal operation and will not damage the unit.
Always turn the
“ON/OFF” switch
to “OFF” then trigger gun to release
hose pressure before unplugging
power cord.
Risk of equipment
damage. Always
make sure the “ON/OFF” switch on the
unit is “OFF” and unit is unplugged
prior to storage.
Risk of Injection.
Unit will start
spraying when trigger is squeezed if
ON/OFF switch is in “ON” position.
Always point gun in safe direction.
Call 1-800-330-0712
for Technical Service
SAVE THESE INSTRUCTIONS
PW1600
Notes
Notas
When using this product, basic
precautions should always be followed,
including the following:
1. Read all instructions before using the
product.
2. ALWAYS disconnect power before
disassembling or repairing the unit.
3. Follow all safety codes as well as the
Occupational Safety and Health Act
(OSHA).
4. Ensure safety devices are operating
properly before each use. DO NOT
remove or modify any part of the gun
or unit.
5. Know how to stop this product and
bleed pressure quickly. Be thoroughly
familiar with the controls.
6. Stay alert – watch what you are doing.
7. Do not operate the product when
fatigued or under the influence of
alcohol or drugs.
8. Keep operation area clear of all
persons.
9. Do not overreach or stand on
unstable support. Keep good footing
and balance at all times.
10. Follow the maintenance instructions
specified in the manual.
11. This product is provided with a ground
fault circuit interrupter, GFCI, be sure
to inspect cord and GFCI prior to use.
Any repair or replacement of the
power cord must be performed by a
qualified (licensed or certified)
electrical technician.
12. Never use an extension cord with this
product.
2
www.chpower.com
35
Instrucciones de montaje y lista de piezas
PW1600
Garantía Limitada
1. DURACIÓN : A partir de la fecha de compra por parte del comprador original del modo siguiente : Un año.
2. QUIÉN OTORGA ESTA GARANTÍA (GARANTE) : Campbell Hausfeld / Scott Fetzer Company, 100 Mundy Memorial
Drive, Mt. Juliet, TN, 37122, Teléfono: (800) 330-0712
3. QUIÉN RECIBE ESTA GARANTÍA (COMPRADOR) : El comprador original (sin fines de reventa) de la lavadora a
presión Campbell Hausfeld.
4. QUÉ PRODUCTOS ESTÁN CUBIERTOS POR ESTA GARANTÍA : Toda lavadora a presión Campbell Hausfeld
proporcionada o fabricada por el Garante.
5. QUÉ ESTÁ CUBIERTO POR ESTA GARANTÍA : Defectos importantes en el material y en la mano de obra que
ocurran durante la duración del período de garantía con las excepciones que se detallan a continuación. La
garantía cubre también los artículos de desgaste normal por un período de 90 días de la fecha de compra
original contra defectos de material y mano de obra. Estos artículos de desgaste normal incluyen mangueras de
alta presión, sellos de agua y aceite, anillos en O, válvulas, lanzas y boquillas de rociado.
6. QUÉ NO ESTÁ CUBIERTO POR ESTA GARANTÍA :
A. Las garantías implícitas, incluyendo aquellas de comercialización y APTITUD PARA UN PROPÓSITO ESPECÍFICO,
ESTÁN LIMITADAS DESDE LA FECHA DE COMPRA ORIGINAL SEGÚN SE ESTABLECE EN LA DURACIÓN. Si esta
lavadora a presión es empleada para uso comercial, industrial o alquiler, la garantía será aplicable durante 90
(noventa) días a partir de la fecha de compra. En algunos estados no se permiten las limitaciones a la duración
de una garantía implícita, por lo cual las limitaciones antedichas pueden no ser aplicables en su caso.
B. CUALQUIER PÉRDIDA, DAÑO O GASTO INCIDENTAL, INDIRECTO O CONSECUENTE QUE PUEDA RESULTAR DE
CUALQUIER DEFECTO, FALLA O MAL FUNCIONAMIENTO DE LA LAVADORA A PRESIÓN CAMPBELL HAUSFELD.
En algunos estados no se permiten la exclusión ni la limitación de los daños incidentales o consecuentes, por
lo cual la limitación o exclusión antedichas pueden no ser aplicables en su caso.
C. Cualquier fallo que sea el resultado de daños de envío, accidente, abuso, negligencia por parte del comprador
o si éste no instala y hace funcionar la lavadora a presión de acuerdo con las instrucciones proporcionadas en
el (los) manual(es) del propietario que se entrega(n) con el producto.
D. Servicio previo a la entrega, es decir, armado, aceite o lubricantes y ajuste.
E. Artículos o servicios que normalmente se necesitan para el mantenimiento de la lavadora a presión.
F. El motor a gasolina y sus componentes que están expresamente excluidos de la cobertura según esta garantía
limitada. Dichos componentes deben ser devueltos por el comprador al fabricante original o a sus estaciones
de reparación autorizadas para servicio.
G. Artículos adicionales no cubiertos por la garantía:
1. Cepillos del motor (solo modelos eléctricos).
2. Defectos estéticos que no interfieren con la funcionalidad.
3. Componentes oxidados.
4. Desgaste de la bomba o daños de las válvulas causados por el uso de un aceite inadecuado, contaminación
del aceite o por no seguir las pautas de mantenimiento de lubricación adecuadas.
7. RESPONSABILIDAD DEL GARANTE EN VIRTUD DE ESTA GARANTÍA : Según elija el Garante, la reparación o el
reemplazo de la lavadora a presión o los componentes que estén defectuosos, que hayan funcionado en forma
inadecuada o que no hayan cumplido con su función dentro de la duración del período de la garantía.
8. RESPONSABILIDAD DEL COMPRADOR EN VIRTUD DE ESTA GARANTÍA :
A. Proporcionar comprobante de compra fechado y registros de mantenimiento.
B. Entregar o enviar la lavadora a presión o el componente Campbell Hausfeld al Centro de servicio autorizado
Campbell Hausfeld más cercano. Los costos de flete, si los hubiera, correrán por cuenta del comprador.
C. Emplear un cuidado razonable para el manejo y el mantenimiento de la lavadora a presión, según se describe
en el (los) manual(es) del propietario.
9. EN QUÉ CASOS EL GARANTE PROPORCIONARÁ REPARACIÓN O REEMPLAZO EN VIRTUD DE ESTA GARANTÍA : La
reparación o el reemplazo serán establecerán y se llevarán a cabo de acuerdo con el flujo de trabajo normal en
la instalación de servicio, y dependerá de la disponibilidad de piezas de repuesto.
Esta garantía limitada se aplica únicamente en los EE.UU., Canadá y México, y le proporciona derechos legales
específicos. Puede que también tenga otros derechos que pueden variar de un estado a otro, o de un país a otro.
34 Sp
Operating Instructions and Parts List
PW1600
13. The power cord on this product
contains chemicals, including lead,
known to the State of California to
cause [cancer and] birth defects or
other reproductive harm. Wash hands
after handling.
14. To reduce the risk of injury, close
supervision is necessary when a
product is used near children.
• Discharge pressure – When ‘on/off’
switch is in “off” position, pressure may
still exist in unit. To discharge pressure,
point gun is safe direction and squeeze
trigger.
Risk of electrocution
• Inspect cord before using - Do not use if
cord is damaged.
• Keep all electrical connections dry and
off the ground.
• Do not touch plug with wet hands.
• This product is provided with a ground
fault circuit interrupter built into the
power cord plug. If replacement of the
plug or cord is needed, use only
identical replacement parts.
• Do not spray electrical apparatus and
wiring.
Risk of injection or sever injury
• High pressure. Keep clear of nozzle. Do
not discharge streams at persons or
animals.
• Never put hand or fingers over spray tip
while operating the unit.
• Never try to stop or deflect leaks with
any body part.
• Always engage the trigger safety latch
in the safe position when spraying is
stopped even if only for a few moments.
• Point gun in safe direction. Unit will
start spraying when trigger is squeezed
if “on/off” switch is in “ON” position.
Risk of explosion
• Do not spray flammable liquids.
• Never use in areas containing
combustible dust, liquids, or vapors.
• High pressure - Gun kicks back – Hold
gun with both hands.
• Keep hose away from sharp objects.
Bursting hoses may cause injury.
Examine hose regularly and replace if
damaged. Do not attempt to mend a
damaged hose.
NOTICE
• Use only detergents specifically
formulated for pressure washers. Always
follow detergent manufacturer’s label
recommendations for proper use of
detergents. Always protect eyes, skin,
and respiratory system from detergent.
• For either indoor or outdoor use. Store
indoors and where temperature stays
above freezing.
• Unplug unit when not in use.
• Pressure washer is not meant to pump
hot water. Do not connect to hot water
supply.
• Never leave the unit unattended while
it is plugged in.
• Always turn water supply “ON” before
turning pressure washer “ON.” Running
pump dry causes damage.
3
www.chpower.com
Operating Instructions and Parts List
Servicing of a DoubleInsulated Appliance
In a double-insulated product, two systems of insulation are provided instead of
grounding. No grounding means are provided for a double-insulated product, nor
should grounding means be added to the
product. Servicing a double-insulated
product requires extreme care and knowledge of the system, and should be done
only by qualified service personnel.
Replacement parts for a double-insulated
product must be identical to the original
parts. A double-insulated product is
marked with the words “Double
Insulation” or “Double Insulated.”
Product may also be marked with symbol
shown below.
Double Insulated symbol
Do not use pressure
that exceeds the operating pressure of
any of the parts (hoses, fittings, etc.) in
the pressurized system. Ensure all
equipment and accessories are rated to
withstand the maximum working
pressure of the unit.
Explosion hazard.
• NEVER spray flammable liquids or use
pressure washer in areas containing
combustible dust, liquids or vapors.
• Never operate this machine in a closed
building or in or near an explosive
environment
PW1600
Do not spray
electrical apparatus and wiring.
• Never disconnect the high pressure
discharge hose from the machine while
the system is pressurized. To
depressurize machine, turn power and
water supply off, then press gun trigger
2-3 times.
• Never permanently engage the trigger
mechanism on the gun.
• Never operate the machine without all
components properly connected to the
machine (handle, gun/wand assembly,
nozzle, etc.).
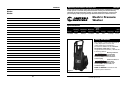
Instrucciones de montaje y lista de piezas
Lista de Repuestos
Para Ordenar Repuestos o Asistencia Técnica,
sírvase llamer al 1-800-330-0712
(En los Estados Unidos, o llame a su distribuidor local)
Sírvase proporcionar la siguiente información:
- Número de modelo
- Número de serie (si lo hubiera)
- Descripción y número del repuesto,
según se indica en la lista de repuestos.
8
11
Dirija toda la correspondencia a:
Campbell Hausfeld
Attn: Customer Service
100 Mundy Memorial Drive
Mt. Juliet, TN 37122 U.S.A.
4
www.chpower.com
15
7
9
10
6
5
Equipment damage.
• ALWAYS turn water supply “ON” before
turning pressure washer “ON.” Running
pump dry causes serious damage.
• Do not operate the pressure washer
with the inlet water screen removed.
Keep screen clear of debris and
sediment.
• NEVER operate pressure washer with
broken or missing parts. Check
equipment regularly and repair or
replace worn or damaged parts
immediately.
• Use only the nozzle supplied with this
machine.
• Never leave the wand unattended while
the machine is running.
• Never attempt to alter factory settings.
Altering factory settings could damage
the unit and will void the warranty.
• Always hold gun and wand firmly when
starting and operating the machine.
• NEVER allow the unit to run with the
trigger released (off) for more than one
(1) minute. Resulting heat buildup will
damage pump.
PW1600
4
12
13
15
2
1
14
3
No. de
Ref.
Descripción
Número del
Repuesto
1
2
3
4
5
6
7
8
9
10
11
12
13
14
15
Adaptador de pivote
Filtro
Entrada
Interruptor
Soporte de la pistola
Limpiador de puntas
Lanza de rociado en abanico ajustable
Pistola
Manguera
Soporte para la manguera
Mango
Soporte del cable eléctrico
Salida
Botella para detergente
Anillo en O
PM350100SV
PM350101SV
N/A
N/A
PM350111SV
PM008500AV
PM350104SV
PM350109SV
PM350110SV
PM350112SV
PM350114SV
PM350113SV
N/A
PM350105AV
PM232200SV
33 Sp
Ctd.
1
1
1
1
1
1
1
1
1
1
1
1
1
1
3
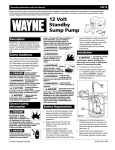
Instrucciones de montaje y lista de piezas
PW1600
Interruptor de
encendido/apagado (ON/OFF)
Lanza
Entrada
de agua
Pistola
Enchufe
GFCI
Manguera
de alta
presión
Salida
de agua
Adaptador
de pivote
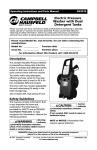
Figure 6
Manguera
de jardín
Operating Instructions and Parts List
• Pressure washer is not meant to pump
hot water. NEVER connect it to a hot
water supply as it will significantly
reduce the life of the pump.
• NEVER store the pressure washer
outdoors or where it could freeze. The
pump will be seriously damaged.
• Release trigger when changing from
high to low pressure modes. Failure to
do so could result in damage
Keep hose away from
sharp objects. Bursting hoses may cause
injury. Examine hoses regularly and
replace if damaged. Do not attempt to
mend a damaged hose.
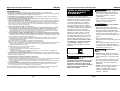
Garden Hose Connection
Instructions
Notas
1. Attach swivel adapter to pump water
inlet, if not already attached. Notice
the swivel adapter is marked with the
words pump and hose. Make sure to
connect pump side of adapter to pump
water inlet to prevent damage to the
threads.
2. Attach garden hose to swivel adapter
side marked hose.
PW1600
3. The spray gun should be locked into the
"OFF" position by locating the safety
trigger lock just above the trigger of
the gun. Activate the lock by holding
the gun and push the lock from left to
right. Squeeze trigger to make sure the
trigger does not move. The safety trigger lock should be locked at all times
when pressure washer is not in use.
Power Cord
1. Plug the power cord into a grounded
120V outlet and press the reset
button as shown in Figure 3.
2. THIS MUST BE DONE EACH TIME THE
UNIT IS PLUGGED IN AN OUTLET.
Reset
Figure 3 - Grounded plug/reset button
Swivel
Adapter
Garden
Hose
Figure 2 - Garden Hose Connection
32 Sp
5
www.chpower.com
Operating Instructions and Parts List
PW1600
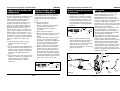
How to Avoid Damaging
Surfaces
System Connection
1. Insert lance into the gun and turn
clockwise to positive stop as shown in
Figure 4.
Directions for Use
Damage to cleaning surfaces occurs
because the impact force of the water
exceeds the durability of the surface. You
can vary the impact force by controlling
the nozzle’s fan pattern, the nozzle’s
angle to the cleaning surface, and the
nozzle’s distance from the cleaning
surface. Never use a narrow high impact
stream or a turbo nozzle on a surface that
is susceptible to damage. Avoid spraying
windows with a narrow high impact
stream or turbo nozzle. Doing so may
break the window. The surest way to
avoid damaging surfaces is to follow these
steps:
1. Before triggering the gun, adjust the
nozzle to a wide fan pattern.
2. Place the nozzle approximately
4-5 feet away from the cleaning
surface. Then hold the nozzle at a 45°
angle to the cleaning surface. Trigger
the gun.
3. Vary the fan pattern spray angle and
the distance to the cleaning surface
until optimum cleaning efficiency is
achieved without damaging the
surface.
Figure 4 - Gun/Lance Connection
2. Attach the high pressure hose onto the
gun by turning clockwise and tighten
with a wrench.
3. Be sure that the power switch is in the
“OFF” position.
4. Attach the high pressure hose onto the
pump water outlet by turning clockwise
and hand tightening.
5. Connect garden hose as explained
under Garden Hose Connection
Instructions.
6. Plug the power cord into a grounded
120V outlet.
7. Turn water on.
8. Unlock trigger lock by moving lock
right to left.
9. Depress and hold the trigger on the
gun for one minute to release pressure
and remove any air trapped in the system.
10.Turn the “ON/OFF” switch to the “ON”
position.
www.chpower.com
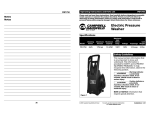
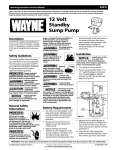
Nozzle Cleaning Instructions
A clogged or partially clogged nozzle can
cause a significant reduction of water
coming out of the nozzle and cause the
unit to pulsate while spraying.
To clean out the nozzle:
• Turn off unit.
• Turn off water supply. Relieve any
pressure trapped in the hose by
squeezing trigger 2-3 times.
6
Instrucciones de montaje y lista de piezas
DETERGENTES
PW1600
Operación
El uso de detergentes puede reducir
radicalmente el tiempo de limpieza y
ayudar a eliminar las manchas resistentes.
Algunos detergentes han sido diseñados
específicamente para usar con lavadoras
a presión en tareas de limpieza
específicas. Estos detergentes tienen una
densidad aproximadamente igual a la del
agua. El uso de detergentes más espesos,
como jabón para vajilla, obstruirá el
sistema de inyección de productos
químicos y evitará la aplicación del
detergente.
La potencia de limpieza de los
detergentes depende de su aplicación
a una superficie y el tiempo de espera
para que los productos químicos actúen
sobre la suciedad y el tizne. Los
detergentes funcionan mejor cuando se
aplican a baja presión.
La combinación de la acción de los
productos químicos y el enjuague de alta
presión es muy eficaz. En superficies
verticales, aplique el detergente
comenzando desde abajo y avanzando
hacia arriba. Esto evitará que el
detergente se escurra hacia abajo dejando
marcas. El enjuague de alta presión
también se debe realizar desde abajo
hacia arriba. En manchas particularmente
resistentes, puede ser necesario usar un
cepillo conjuntamente con los detergentes
y el enjuague de alta presión.
1. Durante el funcionamiento, la presión
afecta la lanza: téngala firmemente con
ambas manos y apunte la boquilla hacia
el suelo.
2. Accione jalando el gatillo de la pistola
pulverizadora/mango.
3. Ajuste la distancia de la superficie a
limpiar, lo cual actúa también sobre la
presión de la boquilla.
4. Refiérase al manual del producto para
el funcionamiento, la limpieza de la
superficie, y cómo evitar daños a las
superficies y otros asuntos.
Figura 5 - Ajuste de pulverización
CONCLUSIÓN DEL TRABAJO
1. Presione el interruptor ON/OFF de la
lavadora de presión en la posición
“OFF”.
2. Desconecte el enchufe del suministro de
corriente.
3. Cierre el suministro de agua.
4. Accione el mango pulverizador para
aliviar la presión de la máquina.
5. Trabe el gatillo en la posición “OFF”.
31 Sp
Instrucciones de montaje y lista de piezas
CÓMO EVITAR DAÑAR LAS
SUPERFICIES
PW1600
INSTRUCCIONES PARA
LIMPIAR LA BOQUILLA
Instrucciones de uso
El daño a las superficies de limpieza ocurre
porque la fuerza de impacto del agua
supera la durabilidad de la superficie.
Puede variar la fuerza de impacto
controlando el patrón en abanico de la
boquilla, el ángulo de la boquilla con
respecto a la superficie de limpieza y la
distancia entre la boquilla y la superficie
de limpieza. Nunca utilice un chorro
angosto de alto impacto ni una boquilla
turbo sobre una superficie propensa a ser
dañada. Evite rociar las ventanas con un
chorro angosto de alto impacto o con una
boquilla turbo. Hacer esto puede quebrar
la ventana. La forma más segura de evitar
daños a las superficies es seguir estos
pasos:
1.Antes de apretar el gatillo, ajuste la
boquilla en un patrón en abanico
amplio.
2.Coloque la boquilla aproximadamente a
4-5 pies de distancia de la superficie de
limpieza. Luego sostenga la boquilla en
un ángulo de 45° grados con respecto a
la superficie de limpieza. Dispare la
pistola.
3.Varíe el ángulo de rociado del patrón en
abanico y la distancia a la superficie de
limpieza hasta lograr una óptima
eficiencia de limpieza sin dañar la
superficie.
Una boquilla obstruida o parcialmente
obstruida puede provocar una reducción
significativa del agua que sale por la
boquilla y hacer que la unidad vibre al
rociar.
Para limpiar la boquilla:
• Apague la unidad.
• Cierre el suministro de agua. Libere
toda la presión atrapada en la
manguera apretando el gatillo
2 ó 3 veces.
• Quite la lanza de la pistola.
• Gire la boquilla a la posición de chorro
angosto. Esto abre las paletas de la
turbina.
• Usando el limpiador de puntas que se
incluye, o un sujetador de papeles
desdoblado, introduzca el alambre en
el orificio de la boquilla y muévalo
hacia adelante y hacia atrás hasta
quitar la obstrucción (vea la figura 5).
• Quite las obstrucciones adicionales
pasando agua en dirección inversa a
través de la boquilla. Para hacer eso,
quite la boquilla de la pistola, ponga
un extremo de la manguera de jardín
(con el agua abierta) en la punta de la
boquilla para expulsar agua y residuos
por el orificio trasero de la lanza.
Operating Instructions and Parts List
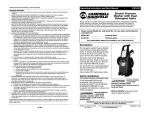
Nozzle Cleaning Instructions
(Continued)
• Separate lance from gun.
• Rotate nozzle to the narrow stream
setting. This opens up the fan blades.
• Using the included tip cleaner, or an
un-folded paper clip, insert wire into
the nozzle hole and move back and
forth until debris is dislodged (refer to
Figure 5).
Nozzle
Tip Cleaner
Figure 5
• Remove additional debris by backflushing water through the nozzle. To
do this, remove the lance from the
gun, place end of a garden hose (with
water running) to tip of nozzle
pushing water and debris out the back
opening of the lance.
PW1600
Detergents
The use of detergents can dramatically
reduce cleaning time and assist in the
removal of difficult stains. Some
detergents have been customized for
pressure washer use on specific cleaning
tasks. These detergents are approximately
as thick as water. The use of thicker
detergents, such as dish soap, will clog the
chemical injection system and prevent the
application of the detergent.
The cleaning power of detergents comes
from applying them to a surface and
giving the chemicals time to break down
the dirt and grime. Detergents work best
when applied at low pressure.
The combination of chemical action and
high pressure rinsing is very effective. On
vertical surfaces, apply the detergent
starting at the bottom and work your way
upward. This will prevent the detergent
from sliding down and causing streaks.
High pressure rinsing should also progress
from the bottom to top. On particularly
tough stains, it may be necessary to use a
brush in combination with detergents and
high pressure rinsing.
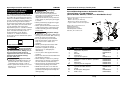
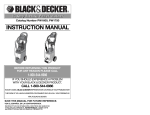
ON/OFF
switch
Water
inlet
Lance
Gun
GFCI
Plug
Boquilla
Limpiador de puntas
High
pressure
hose
Water
outlet
Figure 5
Swivel
Adapter
Figure 6
30 Sp
7
Garden
hose
www.chpower.com
Operating Instructions and Parts List
PW1600
END OF OPERATION
1. Press the ON/OFF switch to “OFF” on
the pressure washer.
2. Disconnect the plug from the power
source.
3. Shut off the water supply.
4. Activate the spray handle to relieve the
machine of pressure.
5. Lock the trigger into the “OFF”
position.
Operation
1. The lance is affected by pressure during
operation; therefore hold it firmly with
both hands and point the nozzle
toward the ground.
2. Activate by pulling the trigger of the
gun/spray handle.
3. Adjust the distance to the cleaning surface, which will also adjust your pressure of the nozzle.
4. Spray pattern shape and intensity can
be changed by twisting the spray
adjuster at the end of the lance. Keep
hands clear of the front of the lance to
prevent injury. See figure 7.
Instrucciones de montaje y lista de piezas
Cable de Corriente Eléctrica
Conexión del Sistema
1. Enchufe el cable de corriente eléctrica
a un tomacorriente con tierra de 120V
y presione el botón de reposición como
se muestra en la Figura 3.
1. Inserte la lanza en la pistola y gírela en
el sentido de las agujas del reloj hasta
que llegue a su tope, como se muestra
en la Figura 4.
Dispositivo
de reposición
Reset
Figura 4 - Conexión de la pistola y lanza
Figura 3 - Enchufe con tierra/botón de
reposición
2. SE DEBE HACER ESTO CADA VEZ QUE
LA UNIDAD SE ENCHUFE EN UN
TOMACORRIENTE.
Figure 7 - Spray Adjust
Notes
www.chpower.com
PW1600
8
2. Conecte la manguera de alta presión a
la pistola girando en sentido horario y
apriete con una llave.
3. Verifique que el interruptor esté en la
posición "OFF" ("APAGADO").
4. Conecte la manguera de alta presión al
orificio de salida del agua de la bomba
girando en sentido horario y apretando
a mano.
5. Conecte la manguera de jardín según se
explica en Instrucciones de conexión de
la manguera de jardín.
6. Enchufe el cordón de corriente en un
tomacorrientes de 120 V con conexión a
tierra.
7. Abra la llave del agua.
8. Suelte el cierre del gatillo deslizando el
cierre de la derecha a la izquierda.
9. Oprima el gatillo y manténgalo presionado por 1 minuto para liberar la presión
y liberar el aire atrapado en el sistema.
10.Coloque el interruptor "ON/OFF"
(“ENCENDIDO/APAGADO”) en la posición "ON" ("ENCENDIDO").
29 Sp
Instrucciones de montaje y lista de piezas
PW1600
Conexión de la Manguera de
Jardín
PARA REPARAR UN
APARATO DE DOBLE
AISLAMIENTO (Continuación)
• Use solamente la boquilla suministrada
con esta máquina.
• Nunca deje la lanza sola mientras la
máquina esté funcionando.
• Nunca intente alterar los ajustes de
fábrica. La alteración de los ajustes de
fábrica podría dañar la unidad y
anulará la garantía.
• Siempre sujete firmemente la pistola y
lanza cuando inicie el funcionamiento y
opere la máquina.
• NUNCA permita que la unidad funcione
por más de un (1) minuto con el gatillo
suelto (off). El calor producido durante
ese tipo de funcionamiento dañará la
bomba.
• La lavadora a presión no está diseñada
para bombear agua caliente. NUNCA la
conecte a un suministro de agua
caliente ya que reduciría
significativamente la vida de la bomba.
• NUNCA guarde la hidrolavadora a la
intemperie o donde se pueda congelar.
La bomba se dañaría seriamente.
• Suelte el gatillo cuando vaya a cambiar
de alta a baja presión. De no hacerlo
podría dañar la boquilla.
1. Conecte el adaptador de pivote al
orificio de entrada de agua de la
bomba, si ya no está conectado. Fíjese
que el adaptador de pivote está
marcado con las palabras “pump”
(bomba) y “hose” (manguera).
Asegúrese de conectar el lado de la
bomba del adaptador al orificio de
entrada de agua de la bomba para
prevenir un daño a la rosca.
2. Conecte la manguera de jardín al lado
del adaptador de pivote marcado con
“hose” (manguera).
3. La pistola pulverizadora debe estar
trabada en la posición “OFF”
(apagado) por medio del cierre de
seguridad del gatillo ubicado arriba del
gatillo de la pistola. Accione el cierre
teniendo la pistola y empujando el
cierre de la izquierda a la derecha.
Apriete el gatillo para asegurarse que
el mismo no se mueva. El cierre de
seguridad del gatillo debe quedar
siempre trabado cuando la lavadora de
presión no se esté usando.
Mantenga la
manguera lejos de objetos filudos.
Las mangueras que se revientan pueden
ocasionar lesiones. Examine las
mangueras con regularidad y cámbielas
si están dañadas. No intente reparar una
manguera dañada.
Adaptador
de pivote
Manguera
de jardín
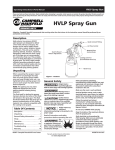
Operating Instructions and Parts List
PW1600
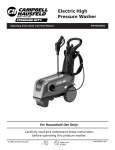
Replacement Parts List
For Replacement Parts or Technical
Assistance, Call 1-800-330-0712
Please provide following information:
- Model number
- Serial number (if any)
- Part description and number as
shown in parts list
8
11
15
7
Address parts correspondence to:
Campbell Hausfeld
Attn: Customer Service
100 Mundy Memorial Drive
Mt. Juliet, TN 37122 U.S.A.
9
10
6
5
4
12
13
15
2
1
14
3
Ref.
No.
Description
Part
Number
1
2
3
4
5
6
7
8
9
10
11
12
13
14
15
Swivel Adapter
Filter
Pump Inlet
Switch
Gun Holder
Tip Cleaner
Adjustable Fan Lance
Gun
Hose
Hose Holder
Handle
Power Cord Holder
Pump Outlet
Detergent Bottle
O-Ring
PM350100SV
PM350101SV
N/A
N/A
PM350111SV
PM008500AV
PM350104SV
PM350109SV
PM350110SV
PM350112SV
PM350114SV
PM350113SV
N/A
PM350105AV
PM232200SV
Qty.
1
1
1
1
1
1
1
1
1
1
1
1
1
1
2
Figura 2 - Conexión de la manguera de jardín
28 Sp
9
www.chpower.com
Operating Instructions and Parts List
PW1600
Limited Warranty
1. DURATION: From the date of purchase by the original purchaser as follows: One Year.
2. WHO GIVES THIS WARRANTY (WARRANTOR): Campbell Hausfeld / Scott Fetzer Company, 100 Mundy
Memorial Drive, Mt. Juliet, TN, 37122, Telephone: (800) 330-0712
3. WHO RECEIVES THIS WARRANTY (PURCHASER): The original purchaser (other than for purposes of
resale) of the Campbell Hausfeld pressure washer.
4. WHAT PRODUCTS ARE COVERED UNDER THIS WARRANTY: Any Campbell Hausfeld Pressure Washer
supplied or manufactured by the Warrantor.
5. WHAT IS COVERED UNDER THIS WARRANTY: Substantial defects on material and workmanship which
occur within the duration of the warranty period with the exceptions noted below. Warrantor will
also cover normal wear items for a period of 90 days from the date of original purchase against
defects in material and workmanship. These wear items include high pressure hoses, water and oil
seals, o-rings, valves, lances, and spray tips.
6. WHAT IS NOT COVERED UNDER THIS WARRANTY:
A.Implied warranties, including those of merchantability and FITNESS FOR A PARTICULAR PURPOSE
ARE LIMITED FROM THE DATE OF ORIGINAL PURCHASE AS STATED IN THE DURATION. If this
pressure washer is used for commercial, industrial or rental purposes, the warranty will apply for
ninety (90) days from the date of purchase. Some States do not allow limitation on how long an
implied warranty lasts, so the above limitations may not apply to you.
B. ANY INCIDENTAL, INDIRECT, OR CONSEQUENTIAL LOSS, DAMAGE, OR EXPENSE THAT MAY RESULT
FROM ANY DEFECT, FAILURE, OR MALFUNCTION OF THE CAMPBELL HAUSFELD PRESSURE WASHER.
Some States do not allow the exclusion or limitation of incidental or consequential damages, so the
above limitation or exclusion may not apply to you.
C. Any failure that results from shipping damage, accident, purchaser’s abuse, neglect or failure to
install and operate pressure washer in accordance with instructions provided in the owner’s
manual(s) supplied with product.
D.Pre-delivery service, i.e. assembly, oil or lubricants and adjustment.
E. Items or service normally required to maintain the pressure washer.
F. Gasoline engine and components are expressly excluded from coverage under this limited warranty.
Such components should be returned by the purchaser to the original manufacturer or to its
authorized repair stations for service.
G.Additional items not covered under the warranty:
1. Motor brushes (Electric models only).
2. Cosmetic defects that do not interfere with functionality.
3. Rusted components.
4. Pump wear or valve damage caused by using improper oil, oil contamination or by failure to
follow proper oil maintenance guidelines.
7. RESPONSIBILITIES OF WARRANTOR UNDER THIS WARRANTY: Repair or replace, at Warrantor’s option,
pressure washer or component which is defective, has malfunctioned and/or failed to conform within
duration of the warranty period.
8. RESPONSIBILITIES OF PURCHASER UNDER THIS WARRANTY:
A.Provide dated proof of purchase and maintenance records.
B. Deliver or ship the Campbell Hausfeld pressure washer or component to nearest Campbell Hausfeld
Authorized Service Center. Freight costs, if any, must be borne by the purchaser.
C. Use reasonable care in the operation and maintenance of the pressure washer as described in the
owner’s manual(s).
9. WHEN WARRANTOR WILL PERFORM REPAIR OR REPLACEMENT UNDER THIS WARRANTY: Repair or
replacement will be scheduled and serviced according to the normal work flow at the servicing
location, and depending on the availability of replacement parts.
This Limited Warranty applies in the U.S., Canada and Mexico only and gives you specific legal rights.
You may also have other rights which vary from state to state or country to country.
www.chpower.com
10
Instrucciones de montaje y lista de piezas
FORMA DE REPARAR UN
APARATO DE DOBLE
AISLAMIENTO
PW1600
Peligro de Explosión.
• NUNCA rocíe líquidos inflamables, ni
use la hidrolavadora en áreas donde
haya residuos líquidos o vapores
combustibles.
• Nunca opere esta máquina en un
edificio cerrado o en un ambiente
explosivo o cerca del mismo.
Los productos de doble aislamiento
contienen dos sistemas de aislamiento en
lugar de una conexión a tierra. No hay
forma de conectar a tierra un producto
con doble aislamiento, ni se le debe
instalar ninguna forma de hacerlo. La
reparación de un producto con doble
aislamiento requiere un gran cuidado y
conocimiento del sistema y se debe hacer
solamente por personal de servicio
debidamente calificado. Las piezas de
repuesto para un producto con doble
aislamiento deben ser idénticas a las
piezas que van a substituir. Un producto
con doble aislamiento, fabricado en los
Estados Unidos, está marcado con las
palabras “DOUBLE INSULATION” (DOBLE
AISLAMIENTO) o “DOUBLE INSULATED”
(AISLADO DOBLEMENTE). El símbolo
también puede estar marcado sobre el
producto.
No rocíe artefactos
ni alambres eléctricos.
• Nunca desconecte la manguera de
descarga de alta presión de la máquina
mientras el sistema esté presurizado.
Para despresurizar la máquina, cierre los
suministros de electricidad y agua, y
luego, presione 2-3 veces el gatillo de la
pistola.
• Nunca enganche de manera
permanente el mecanismo del gatillo de
la pistola.
• Nunca opere la máquina sin que todos
los componentes estén debidamente
conectados a ella. (Mango, conjunto de
pistola/vara, boquilla, etc.)
DAÑOS EN EL
EQUIPO
Símbolo de aislamiento doble
No aplique presiones
que excedan la presión de
funcionamiento de ninguna de las partes
(mangueras, acoples, etc...) del sistema
de presión. Asegúrese de que todo el
equipo y los accesorios estén clasificados
para resistir la presión máxima de
trabajo de la unidad.
• SIEMPRE abra el suministro de agua
antes de la hidrolavadora. La operación
de la bomba en seco causa daños muy
serios.
• No opere la lavadora a presión con el
filtro de la entrada de agua removido.
Mantenga el filtro libre de basura y
sedimento.
• NUNCA opere la lavadora a presión con
piezas rotas o que faltan. Revise el
equipo con regularidad y repare o
cambie inmediatamente las piezas
gastadas o dañadas.
27 Sp