1
Chapter 2 – Installation
Cabling Procedure
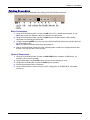
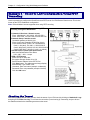
Make the proper connections as illustrated in this drawing of the RouteFinder back panel.
Basic Connections
1. Using an RJ-45 Ethernet cable, connect the LAN jack to a PC, internal network switch, or hub.
Note: Use a cross-over Ethernet cable if connecting to a single device.
2. Using an RJ-45 Ethernet cable, connect the WAN 1 jack to a cable modem or DSL modem
connected to an Internet Service Provider.
3. Using the supplied POWER cord, plug one end into the RouteFinder power plug, and the other end
into a live power outlet.
Note: The status LED blinks continuously after power-up.
4. Wait for the RouteFinder to beep five times, indicating that it is ready to be configured with a Web
browser. This may take two or three minutes.
Optional Connections
1. Using an RJ-45 Ethernet cable, connect the WAN /DMZ jack to a network or DMZ device. For
example, a Voice over IP gateway.
2. Using a DB-9 cable, connect COM 1 port to a mouse or the COM port on a PC.
3. Using a DB-15 DSUB cable, connect the VIDEO port to a monitor.
4. Connect the Keyboard jack to a keyboard.
5. Using a USB connector, connect a memory stick, a floppy drive, a CD-ROM drive, a keyboard,
mouse, etc.
Multi-Tech Systems, Inc. RouteFinder RF850/860 Quick Start Guide (82100051L)
7