1
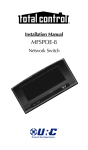
Owner's Manual
THZ-100
Thermostat
THZ-100 Owner’s Manual ©2012-2014 Universal Remote Control, Inc.
The information in this owner’s manual is copyright protected. No part of this
manual may be copied or reproduced in any form without prior written consent
from Universal Remote Control, Inc.
UNIVERSAL REMOTE CONTROL, INC. SHALL NOT BE LIABLE FOR OPERATIONAL, TECHNICAL OR EDITORIAL ERRORS/OMISSIONS MADE IN
THIS MANUAL.
The information in this owners manual may be subject to change without prior
notice.
URC - Control the Experience is a registered trademark of Universal Remote
Control, Inc.
Total Control is a registered trademark of Universal Remote Control, Inc.
All other brand or product names are trademarks or registered trademarks
of their respective companies or organizations.
Universal Remote Control,Inc.
500 Mamaroneck Avenue, Harrison, NY 10528
Phone: (914) 835-4484 Fax: (914) 835-4532
TABLE OF CONTENTS
Welcome To Your THZ-100 Thermostat
1
Installing Your THZ-100 Thermostat
2
Wiring Your THZ-100 Thermostat
3
Definitions
3
Single Stage Furnace and Single Stage A/C
3
Dual Stage Furnace and Dual Stage A/C
4
Single Stage Heat Pump with Reversing Valve O
4
Single Stage Heat Pump with Reversing Valve B
5
Dual Stage Heat Pump with Reversing Valve O
5
Dual Stage Heat Pump with Reversing Valve B
6
Boiler and A/C with Separate Transformers
6
First Stage Radiant Floor Heat, Second Stage Furnace with
Single Stage Cooling and External Pilot Duty Relay
7
Operation For Your THZ-100 Thermostat
8
Thermostat Display Information
8
Changing the Mode (Cool, Heat, Auto, Off)
9
Changing the Heating Temperature
(Temperature Override)
9
Changing the Cooling Temperature
(Temperature Override)
11
Auxiliary Heat
11
Emergency Heat
12
Intelligent Comfort Recovery
12
Password Protection
13
Programs
14
TABLE OF CONTENTS
Changing to Vacation Mode
14
Selecting Hold
15
Selecting Hold for Time
16
Returning to Schedule Mode
17
Options
18
Climate Modes
18
Changing the Fan Modes
22
Accessing Temperature Sensor Information
24
Turning Emergency Heat On or Off
25
Changing the Auxiliary Heat Offset Temperature
26
Changing the 2nd Stage Offset Temperature
26
Resetting the Filter Reminder
29
Turning the Password Protect Feature On or Off
30
Changing the LCD Screen Options
31
Viewing THZ-100 Thermostat Information
34
Setting the Date and Time
34
Discovery Mode
35
Troubleshooting Thermostat On-Screen Notifications
36
Limited Warranty Statement
37
End User Agreement
39
Specifications
40
Federal Communication Commission
Interference Statement
41
Regulatory Information to the user
42
Declaration of Conformity
43
THZ-100 THERMOSTAT
Welcome To Your THZ-100 Thermostat
Congratulations on your purchase of this THZ-100 Thermostat from
URC. Enjoy the full functionality of a stand-alone thermostat coupled
with the ability, when used with a Total Control system, to be controlled
from any user interface in the system. No more shivering under the
covers, dreading to dare the inevitable cold on the way to the shower;
grab the remote and make it nice and toasty, before removing the
blanket!
Some of the advanced, and unique features found on the THZ-100 are:
Optional Wired Sensor
Easily add an additional sensor to the thermostat by purchasing the
optional wired sensor. With the ability to temperature average between
the sensor and the main unit, or simply take the place of the main
unit’s on-board sensor, you can increase both efficiency and accuracy of
temperature readings.
Intelligent Comfort Recovery
Every good thermostat has the ability to set heating and cooling schedules,
but if you wake up at 7:30am, setting your heat to come on at 7:30am
means waking up to an uncomfortable home while your system reaches
your desired temperature. With Intelligent Comfort Recovery, the THZ100 monitors the current temperature of your home and determines the
amount of time it will take to reach your desired temperature at the
desired time. Then, it slowly and more efficiently heats or cools to the
new set point.
Security Code
Perfect for most commercial uses, and even for some homes where
people have the need to ensure that only authorized people should
have access to the THZ-100. Easily program your new thermostat
with a 4-digit security code to make sure that only people with the
code can access the thermostat.
Total Control Peripheral
Perhaps the best benefit is the THZ-100's complete integration into
a Total Control home system. When used with URC’s Total Control
system, the thermostat control can be accessed from any of the system’s
interfaces (dependent upon the system programmer). With the ability
to control all of the THZ-100s in the home, it is also easy to incorporate
heat/cool set points into various Automation Activities. Although the
possibilities are endless, imagine a Goodnight button that would turn
off your theater, turn off all the lights and bring the THZ-100 to the
chosen set point!
Page 1
THZ-100 THERMOSTAT
Installing Your THZ-100 Thermostat
Adding an optional wired sensor can be a benefit if the thermostat
location is not the optimal location for temperature measurement,
or if temperature averaging is desired.
• A wired sensor can be connected to the S+ and S- terminals
on the back of the unit
• This can be added to any of the wiring options detailed in the
next pages
For optimum performance, mount the THZ-100 thermostat and/or
remote sensor
• In an open living area where there is good air circulation
• On an inside wall
• Away from outside doors or windows
• At a height about 5 feet from the floor
Avoid installing the THZ-100 thermostat and/or remote sensor
• In direct sunlight
• Above radiators or air vents
• Near fans or portable heating units
• Near lamps or other incandescent lighting
• Near other heat generating electric appliances such as
televisions, audio video equipment, refrigerators, freezers,
ovens, cooktops, etc.
Other precautions when installing the THZ-100 thermostat and/or
remote sensor
• Make sure the cutout for the HVAC wiring is no larger than
needed to make proper connections to the thermostat
• If there is a large air gap in the cutout for the HVAC wiring,
insulate around the wire and close off the air gap
• Make sure the air vents in the THZ-100 thermostat and/or
remote sensor are clear of dirt, dust, or any construction
material.
Page 2
THZ-100 THERMOSTAT
Wiring Your THZ-100 Thermostat
Definitions
• RH – Heating System 24VAC
• RC – Cooling System 24VAC
• C – 24VAC Transformer Common
• G – Indoor Unit Fan Connection
• W1 – 1st Stage Heat
• W2 – 2nd Stage Heat
• Y1 – 1st Stage Cooling
• Y2 – 2nd Stage Cooling
• B - Reversing Valve (Heating)
• O - Reversing Value (Cooling)
• S+ - Wired Sensor
• S- - Wired Sensor
Single Stage Furnace and Single Stage A/C
Page 3
THZ-100 THERMOSTAT
Dual Stage Furnace and Dual Stage A/C
Single Stage Heat Pump with Reversing Valve O
Page 4
THZ-100 THERMOSTAT
Single Stage Heat Pump with Reversing Valve B
Dual Stage Heat Pump with Reversing Valve O
Page 5
THZ-100 THERMOSTAT
Dual Stage Heat Pump with Reversing Valve B
Boiler and A/C with Separate Transformers
Page 6
THZ-100 THERMOSTAT
First Stage Radiant Floor Heat, Second Stage Furnace
with Single Stage Cooling and External Pilot Duty Relay
Page 7
THZ-100 THERMOSTAT
Operation For Your THZ-100 Thermostat
Your THZ-100 thermostat has been programmed by the MRX Advanced
Network System Controller system with your custom HVAC schedule of
heat and cool set points for the selected time periods for each day of the
week. In addition, the thermostat has been programmed by the MRX
Advanced Network System Controller for the type of HVAC equipment,
conventional or heat pump, the number of auxiliary heat and/or cool
stages, any remote sensors, and any pass code lockout code if desired.
Thermostat Display Information
Your THZ-100 thermostat features a color backlit LCD display with all the
information you need for easy operation. The top left of the screen has the
fan mode information while the top right of the screen has the current
system mode such as Heat or Cool.
The center of the screen displays the current temperature with different
backgrounds dependent upon whether the thermostat is in Heating,
Cooling or Idle mode. The small letter F or C at the lower right of the current
temperature indicates the temperature scale.
Directly above the current temperature is the name of the program mode
that is currently running: Morning, Day, Evening, Night, Vacation, Override,
Hold, or Hold to <time>. When the system is OFF there is no text in this
area.
Directly below the current temperature is information on the current comfort
range and the set points. This area is also used for notifications such as
Check Wireless, Check Network, or Check Filter which alternates on screen
with the set point information.
Page 8
THZ-100 THERMOSTAT
At the bottom of the screen is a smart-key label to identify the current
function of the push button located directly below.
Changing the Mode (Cool, Heat, Auto, Off)
To change the mode of your HVAC system equipment between Cooling,
Heating, Auto (system will automatically change between cooling and
heating) or OFF enter the Options menu then access the Climate Modes
sub menu as described below.
Changing the Heating Temperature (Temperature Override)
To change the current heating temperature, press the Up or Down arrow
key on the thermostat. The thermostat screen shows the current temperature
on the left side and the desired temperature on the right side of the display.
Press the Up and Down arrow keys to set your new desired heating
temperature to override the programmed value. To save the new desired
value, press the key below the Set Tempkey label in the smart-key labeled
Set Temp at the bottom right of the display. You can also save the new
desired temperature by simply allowing the display to time out while the
current and desired override temperatures are displayed.
If you decide to cancel the operation, press the key below the Cancel key
label in the smart-key label at the bottom left of the display.
This places the thermostat in the Override mode. While in this mode, the
thermostat holds your new temperature selection until the next regularly
scheduled time period in your pre-programmed HVAC schedule.
Page 9
THZ-100 THERMOSTAT
When the override set point is met, the information containing the
desired override temperature transitions to information including the
desired temperature and the heat and cool set points based on the
override temperature.
Page 10
THZ-100 THERMOSTAT
Changing the Cooling Temperature (Temperature Override)
To change the current cooling temperature, press the Up or Down arrow
key on the thermostat. The screen now shows the current temperature on
the left side and the desired temperature on the right side of the display.
Press the Up and Down arrow keys to set your new desired cooling
temperature to override the program value. To save the new desired value,
press the key below the Set Temp key label in the smart-key label at the
bottom right of the display. You can also save the new desired
temperature by simply allowing the display to time out while the current
and desired override temperatures are displayed.
If you decide to cancel the operation then press the key below the Cancel
key label in the smart-key label at the bottom left of the display.
This places the thermostat in the Override mode. In the Override mode,
the thermostat holds your new temperature selection until the next regularly
scheduled time period in your pre-programmed HVAC schedule.
When the override set point is satisfied the information containing the
desired override temperature with transition to information including the
desired temperature and the heat and cool set points based on the override
temperature.
Auxiliary Heat
Auxiliary heat consists of additional stages of conventional gas, or electric
heat, capacity included with most heat pump systems. The auxiliary heat
stages are automatically selected by the system when the outside temperature
is too cold for the heat pump to heat your home effectively. The staging of
the auxiliary heat is based on the information selected in the MRX
Advanced Network System Controller setup of your thermostat.
Page 11
THZ-100 THERMOSTAT
Emergency Heat
Emergency heat is conventional gas, or electric heat, capacity included
with most heat pump systems. Emergency heat is selected by the user
from the Options menu as described below when additional heat capacity
is desired. Emergency heat reduces the energy efficiency of the heat pump
system. When in emergency heat, the display indicates this state in the
upper right of the display.
Intelligent Comfort Recovery
When there are significant set point differences between programmed
set points of different program time periods your THZ-100 anticipates
the change in advance and begins to ramp the current set point to the
next programmed set point to give you a smooth comfort transition.
During this comfort recovery period the thermostat indicates Comfort
in place of Heat, Cool, or Idle in the upper right of the display window.
In addition, the display background changes to indicate whether the
system is heating or cooling during this transition.
Page 12
THZ-100 THERMOSTAT
Password Protection
If your THZ-100 thermostat was initially setup through the MRX Advanced
Network System Controller with the Use Pass Code Lockout feature enabled
on the Advanced Thermostat Settings then an Enter Password Below displays
any time a key is pressed after a period of inactivity. Otherwise, this item
does not display.
This screen displays the number 9 four times across the center of the
screen followed by the word Done. The number 9 on the left side of the
display is highlighted with small arrows above and below the number. At
the bottom of the screen are three smart-key labels. The left button is
Cancel, the center button is a left arrow, and the right button is a right
arrow.
To enter your password, use the Up and Down arrow keys to enter a number
between 0 and 9, then use the left or right arrow smart-keys at the bottom of
the page to select the next digit to be entered. The displayed number of 9999
can not be used as a password since it is the default password. When you
have entered all four digits of your password, use the right arrow smart-key
to move the highlight to the word Done. At this point, the right smart-key
changes from a right arrow to Enter. Press the key below Enter to enter your
password. If you enter the password correctly the LCD screen changes back
to the thermostat Main screen; otherwise, the display maintains the password entry screen.
To turn the password protection OFF go to the Password screen in the
thermostat Options as described below.
Page 13
THZ-100 THERMOSTAT
Programs
On the main thermostat display, there are three smart-key labels at the
bottom of the screen identifying the operation of the three keys below the
display. The left button is Options, the center key is Programs, and the
right key is Hold. To change between the programmed schedules press the
Programs key.
The screen updates to show a list of program options as described below.
Changing to Vacation Mode
If you are going to be away from your home and would like to use the
Vacation mode override settings for additional energy savings, use the arrow
keys to move the highlight bar to Vacation Mode.
Press the key below the OK key label in the smart-key label at the bottom
right of the display to select this new mode. If you decide to cancel the
operation then press the key below the Go Back key label in the smart-key
label box at the bottom left of the display.
Alternately, if you let the Programs screen time out with Vacation Mode
highlighted it will automatically be selected.
On the main screen, Vacation displays above the current temperature
information.
Page 14
THZ-100 THERMOSTAT
Selecting Hold
If you desire to hold a particular desired temperature indefinitely, use
the arrow keys to move the highlight bar to Hold.
Press the key below the OK key label in the smart-key label at the bottom
right of the display to select this new mode. If you decide to cancel the
operation then press the key below the Go Back key label in the smart-key
label at the bottom left of the display.
Alternately, if you let the programs screen time out with Hold highlighted,
by the highlight bar, the hold mode is selected.
On the main screen, Hold displays above the current temperature
information. In addition, a Hold Off short cut key is displayed in the
smart-key label at the bottom right of the display. Pressing the Hold
Off key turns the hold mode off.
The main screen also has the short cut key on the bottom right to activate
the Hold mode without having to go to the Programs screen. This key
toggles between Hold and Hold Off.
Page 15
THZ-100 THERMOSTAT
Selecting Hold for Time
If you desire to hold a particular desired temperature for a specific
period of time, use the arrow keys to move the highlight bar to Hold
for Time.
Press the key below the OK key label in the smart-key label at the bottom
right of the display to select this new mode. If you decide to cancel the
operation then press the key below the Go Back key label in the smart-key
label at the bottom left of the display.
If you select Hold for Time, the screen updates to the Set Hold-To Time
display with the current time displayed. Use the Up or Down arrows to set
the time period that you want to hold the desired temperature. The Up
and Down arrows changes the time in 30 minute increments. The maximum
hold time is 24 hours.
When you have selected the desired time press the key below the Enter
key label in the smart-key label at the bottom right of the display to select
this new mode. If you decide to cancel the operation then press the key
below the Cancel key label in the smart-key label at the bottom left of the
display.
Alternately, if you let the programs screen time out with Hold for Time
highlighted, by the highlight bar, the hold mode is selected and the screen
updates to the Set Hold-To Time display.
On the main screen Hold to with the desired hold to time is displayed
above the current temperature information.
Page 16
THZ-100 THERMOSTAT
Returning to Schedule Mode
To return the thermostat to the normal program schedule, use the
arrow keys to move the highlight bar to Schedule Mode.
Press the key below the OK key label in the smart-key label at the
bottom right of the display to select this new mode. If you decide
to cancel the operation then press the key below the Go Back key
label in the smart-key label at the bottom left of the display.
Alternately, if you let the Programs screen time out with Schedule
Mode highlighted by the highlight bar the schedule mode is selected.
On the main screen, the name of the current normally scheduled
time period (Morning, Day, Evening, Night) is displayed above the
current temperature information.
Page 17
THZ-100 THERMOSTAT
Options
On the main thermostat display, there are three smart-key labels at the
bottom of the screen identifying the operation of the three keys below the
display. The left button is Options, the center key is Programs, and the right
key is Hold. To change between various thermostat options, press the
Options key.
The screen updates to show the list of available options as described
below.
Climate Modes
If you desire to change the HVAC system equipment mode between
Cooling, Heating, Auto (system will automatically change between
cooling and heating) or OFF enter the Options menu then access the
Climate Modes sub menu as described below. The current state
of the system is displayed in the right column.
Press the key below the OK key label in the smart-key label at the
bottom right of the display to select this new mode. If you decide
to cancel the operation then press the key below the Go Back key
label in the smart-key label at the bottom left of the display.
Page 18
THZ-100 THERMOSTAT
Selecting the Cooling Mode
If you desire to change the HVAC system equipment mode to cooling
mode then use the arrow keys to move the highlight bar to Cool.
Press the key below the OK key label in the smart-key label at the bottom
right of the display to select this new mode. If you decide to cancel the
operation then press the key below the Cancel key label in the smart-key
label at the bottom left of the display.
If the Climate Modes screen times out and goes back to the main screen
without pressing the OK button, no change is made to the climate mode.
In Cool mode, the thermostat activates the system equipment to cool your
home per the programmed schedule or hold temperature.
The thermostat does not activate the system equipment to heat your home
while in the Cool mode.
Page 19
THZ-100 THERMOSTAT
Selecting the Heating Mode
If you desire to change the HVAC system equipment mode to heating
mode then use the arrow keys to move the highlight bar to Heat.
Press the key below the OK key label in the smart-key label at the bottom
right of the display to select this new mode. If you decide to cancel the
operation then press the key below the Cancel key label in the smart-key
label at the bottom left of the display.
If the Climate Modes screen times out and goes back to the main screen
without pressing the OK button, no change is made to the climate mode.
In Heat mode, the thermostat activates the system equipment to heat your
home per the programmed schedule or hold temperature. The thermostat
does not activate the system equipment to cool your home while in the
Heat mode.
Page 20
THZ-100 THERMOSTAT
Selecting the Auto Changeover Mode
If you desire for your HVAC system equipment to automatically switch
between the cooling and heating modes as needed to maintain the desired
comfort level in your home, use the arrow keys to move the highlight bar
to Auto.
Press the key below the OK key label in the smart-key label at the bottom
right of the display to select this new mode. If you decide to cancel the
operation then press the key below the Cancel key label in the smart-key
label at the bottom left of the display.
If the Climate Modes screen times out and goes back to the main screen
without pressing the OK button, no change is made to the climate mode.
In Auto mode, the thermostat activates the system equipment to cool or
heat your home per the programmed schedule or hold temperature. The
system automatically changes between cooling and heating as needed.
Page 21
THZ-100 THERMOSTAT
Turning the Thermostat Off
If you desire to turn the HVAC system equipment off then use the arrow
keys to move the highlight bar to Climate Control Off.
Press the key below the OK key label in the smart-key label at the bottom
right of the display to select this new mode. If you decide to cancel the
operation then press the key below the Cancel key label in the smart-key
label at the bottom left of the display.
If the Climate Modes screen times out and goes back to the main screen
without pressing the OK button, no change is made to the climate mode.
In the Climate Control Off mode, the thermostat does not activate the system
equipment to cool or heat your home.
Changing the Fan Modes
If you desire to change the system fan mode between on continuously,
periodic cycling, or automatically on when heating or cooling is on, use
the arrow keys to move the highlight bar to Fan Modes. The current state
of the fan displays in the right column.
Press the key below the OK key label in the smart-key label at the bottom
right of the display to select this new mode. If you decide to cancel the
operation then press the key below the Go Back key label in the smartkey label at the bottom left of the display.
Selecting Fan On Continuously
If you desire the system fan to operate continuously then use the arrow
keys to move the highlight bar to On.
Press the key below the OK key label in the smart-key label at the bottom
right of the display to select this new mode. If you decide to cancel the
operation then press the key below the Cancel key label in the smart-key
label at the bottom left of the display.
Page 22
THZ-100 THERMOSTAT
If the Fan Modes screen times out and goes back to the main screen without
pressing the OK button, no change is made to the fan mode.
In On mode the fan operates continuously regardless of the equipment
operation.
Selecting the Fan to Cycle Periodically
If you desire the system fan to cycle on and off periodically then use the
arrow keys to move the highlight bar to Cycle.
Press the key below the OK key label in the smart-key label at the bottom
right of the display to select this new mode. If you decide to cancel the
operation then press the key below the Cancel key label in the smart-key
label at the bottom left of the display.
If the Fan Modes screen times out and goes back to the main screen without
pressing the OK button, no change is made to the fan mode.
In Cycle mode, the fan cycles on for 10 minutes then off for 10 minutes.
If the system turns on for a heating or cooling cycle then the fan stays on
for that complete cycle then turns off for 10 minutes and back on for 10
minutes until the next cooling or heating cycle.
Selecting the Fan On Only with HVAC Equipment
If you desire the system fan to turn on only when the HVAC system equipment
is on then use the arrow keys to move the highlight bar to Auto.
Press the key below the OK key label in the smart-key label at the bottom
right of the display to select this new mode. If you decide to cancel the
operation then press the key below the Cancel key label in the smart-key
label at the bottom left of the display.
If the Fan Modes screen times out and goes back to the main screen without
pressing the OK button, no change is made to the fan mode.
In Auto mode, the fan turns on any time the heating or cooling system
cycles on and turns off when the system turns off and has gone through
any required cool down time.
Page 23
THZ-100 THERMOSTAT
Accessing Temperature Sensor Information
If you desire to view the status of all temperature sensors used in
your system then use the arrow keys to move the highlight bar to
Sensors.
Press the key below the OK key label in the smart-key label at the
bottom right of the display to select this new information screen. If
you decide to cancel the operation then press the key below the Go
Back key label in the smart-key label at the bottom left of the
display.
If you select OK then the display changes to a list of temperature
sensors used in your system. The first list entry is the thermostat’s
onboard sensor. The right side of the screen shows the current
reading for that sensor.
The second list entry is any wired sensor in the system. The name
of the sensor is displayed with the current reading to the right. If
there is no wired sensor in your system then this line is not displayed.
The last list entry is any local temperature information accessed
from the internet. The name of the sensor is displayed with the current
reading to the right. If there is no internet temperature available to
your system, then N/A is displayed.
Page 24
THZ-100 THERMOSTAT
Turning Emergency Heat On or Off
Emergency is staged electric or gas heating included with most heat
pump systems. Emergency Heat is activated by a malfunction in the
heat pump system or when the user manually selects the option. If
you do not have a heat pump system then the Emergency Heat feature
is not displayed in the options menu list.
If you desire to turn the emergency heat either on or off then use the
arrow keys to move the highlight bar to Emergency Heat. The current
state of the emergency heat is displayed in the right column.
If emergency heat was off then the screen displays “Are you sure you want
to turn on emergency heating?” If the emergency heat was on then the
screen displays “Are you sure you want to turn off emergency heating?”
Press the key below the Turn On or Turn Off key label in the smart-key
label at the bottom right of the display to change the state of the emergency
heat. If you decide to cancel the operation then press the key below the
Cancel key label in the smart-key label at the bottom left of the display.
Page 25
THZ-100 THERMOSTAT
Changing the Auxiliary Heat Offset Temperature
In heat pump systems, the Auxiliary Heat Offset temperature is the
temperature difference at which the auxiliary heat is activated. For single
stage systems, it is the difference from the set point; for two stage systems,
it is the difference from the second stage offset.
If you desire to change the Auxiliary Heat Offset temperature then use the
arrow keys to move the highlight bar to Aux Heat Offset. If you do not
have a heat pump system then the Aux Heat Offset feature is not displayed
in the options menu list.
Press the key below the OK key label in the smart-key label at the bottom
right of the display to select this option. If you decide to cancel the operation
then press the key below the Go Back key label in the smart-key label at
the bottom left of the display.
After pressing OK, the screen updates to a screen that says Aux Heat
Offset at the top of the screen and the current offset temperature in the
center of the screen. Use the arrow keys to adjust the temperature up or
down to the value you desire.
Press the key below the Set Temp key label in the smart-key label at the
bottom right of the display to save your new offset value. If you decide to
cancel the operation then press the key below the Cancel key label in the
smart-key label at the bottom left of the display.
The initial value is established when the thermostat is initially setup through
the MRX Advanced Network System Controller.
Changing the 2nd Stage Offset Temperature
In multi-stage systems, the 2nd Stage Offset temperature is the temperature
difference from the set point where the equipment second stage is activated.
There is a setting for both heating and cooling. If you do not have a multi-stage
system then the 2nd Stage Offset feature is not displayed in the options
menu list.
If you desire to change the 2nd Stage Offset temperature then use the arrow
keys to move the highlight bar to 2nd Stage Offset.
Press the key below the OK key label in the smart-key label box at the bottom
right of the display to select this option. If you decide to cancel the operation
then press the key below the Go Back key label in the smart-key label box
at the bottom left of the display.
After pressing OK, the screen updates to a new screen where you choose
to set either the heating second stage offset or the cooling second stage
offset.
Page 26
THZ-100 THERMOSTAT
How To Set The Heating 2nd Stage Offset
If you desire to change the heating 2nd stage Offset temperature then use
the arrow keys to move the highlight bar to Heating (2nd Stage Offset). If
you do not have a multi-stage heating system then the Heating (2nd Stage
Offset) feature is not displayed in the menu list.
Press the key below the OK key label in the smart-key label at the bottom
right of the display to select this option. If you decide to cancel the operation
then press the key below the Cancel key label in the smart-key label at
the bottom left of the display.
After pressing OK the screen updates to a screen that says Heating 2nd
Stage Offset at the top of the screen and the current offset temperature in
the center of the screen. Use the arrow keys to adjust the temperature up or
down to the value you desire.
Press the key below the Set Temp key label in the smart-key label at the
bottom right of the display to save your new offset value. If you decide to
cancel the operation then press the key below the Cancel key label in the
smart-key label at the bottom left of the display.
The initial value is established when the thermostat is initially setup through
the MRX Advanced Network System Controller.
Page 27
THZ-100 THERMOSTAT
How To Set The Cooling 2nd Stage Offset
If you desire to change the cooling 2nd stage Offset temperature
then use the arrow keys to move the highlight bar to Cooling (2nd
Stage Offset). If you do not have a multi-stage cooling system then
the Cooling (2nd Stage Offset) feature is not displayed in the menu
list.
Press the key below the OK key label in the smart-key label at the
bottom right of the display to select this option. If you decide to
cancel the operation then press the key below the Cancel key label
in the smart-key label at the bottom left of the display.
After pressing OK the screen updates to a screen that says Cooling
2nd Stage Offset at the top of the screen and the current offset
temperature in the center of the screen. Use the arrow keys to
adjust the temperature up or down to the value you desire.
Press the key below the Set Temp key label in the smart-key label at
the bottom right of the display to save your new offset value. If you
decide to cancel the operation then press the key below the Cancel
key label in the smart-key label at the bottom left of the display.
The initial value is setup when the thermostat is initially setup
through the MRX Advanced Network System Controller. The default
value is 50F or 2.50C.
Page 28
THZ-100 THERMOSTAT
Resetting the Filter Reminder
If a filter reminder time was setup through the MRX Advanced
Network System Controller when your thermostat was initially
setup, then you will periodically get a Check: Filter message on the
main screen of the thermostat.
To clear the Check: Filter message from the thermostat screen after
the filter has been replaced; use the arrow keys to move the
highlight bar to Filter Reminder.
Press the key below the OK key label in the smart-key label at the
bottom right of the display to select this new information screen. If
you decide to cancel the operation then press the key below the Go
Back key label in the smart-key label at the bottom left of the
display.
The display updates to show Filter Reminder Reset at the top of the
screen and the following message in the center of the screen Your
filter reminder is going to be reset. You will be notified in <X
Months> to change it again. The X displays the number of months
designated at the initial thermostat setup.
A graphic, adjacent to the Filter Reminder, appears to signify that the
Filter Reminder has gone off.
Press the key below the OK key label in the smart-key label at the
bottom right of the display to reset the reminder. If you decide to
cancel the operation then press the key below the Cancel key label
in the smart-key label at the bottom left of the display.
Page 29
THZ-100 THERMOSTAT
Turning the Password Protect Feature On or Off
If your THZ-100 thermostat was initially setup through the MRX Advanced
Network System Controller with the Use Pass-Code Lockout feature enabled
on the Advanced Thermostat Settings then Password shows as an item in
the Options screen. The current state of the password protection, whether
on or off, is displayed on the right side of the display. Otherwise, this item
does not display.
Entering your password toggles this feature on and off. If you desire to toggle
the state of the password protection then use the arrow keys to move the
highlight bar to Password.
Press the key below the OK key label in the smart-key label at the bottom
right of the display to select this option. If you decide to cancel the operation
then press the key below the Go Back key label in the smart-key label at
the bottom left of the display.
After selecting OK, the LCD screen displays either Turn ON Password
Protection or Turn OFF Password Protection at the top of the screen as
appropriate. The number 9 appears four times across the center of the
screen followed by the word Done. The number 9 on the left side of the
display is highlighted with small arrows above and below the number.
At the bottom of the screen are three smart-key labels for the three buttons
located below the LCD display. The left button is Cancel, the center button
is a left arrow, and the right button is a right arrow.
To enter your password, use the Up and Down arrow keys to enter a number
between 0 and 9, then use the left or right arrow smart-keys at the bottom
of the page to select the next digit to be entered.
When you have entered all four digits of your password then use the right
arrow smart-key to move the highlight to the word Done. At this point, the
right smart-key changes from a right arrow to Enter. Press the key below
Enter to enter your password. If you enter the password correctly then the
LCD screen changes back to the thermostat main screen; otherwise, the display maintains the password entry screen.
Page 30
THZ-100 THERMOSTAT
Changing the LCD Screen Options
If you desire to change any of the LCD screen settings such as
brightness, timeout or auto dimming then use the arrow keys to
move the highlight bar to LCD Screen.
Press the key below the OK key label in the smart-key label at the
bottom right of the display to select these options. If you decide to
cancel the operation then press the key below the Go Back key
label in the smart-key label at the bottom left of the display.
After pressing OK, the screen updates to give you a list of the LCD
screen parameters that you can change.
Page 31
THZ-100 THERMOSTAT
Adjusting the LCD Brightness
If you desire to change the brightness of your thermostat LCD display
then use the arrow keys to move the highlight bar to LCD Brightness.
Press the key below the OK key label in the smart-key label at the bottom
right of the display to select this option. If you decide to cancel the operation
then press the key below the Cancel key label in the smart-key label at the
bottom left of the display.
After pressing OK, the screen updates to a screen that says LCD Screen
Brightness at the top of the screen and the current brightness level in the
center of the screen. Use the arrow keys to adjust the brightness percentage
to the value you desire. As you change the value of the brightness in the
center of the display the brightness changes to correspond to the level displayed.
When you are satisfied with your brightness level selection then press the
key below the Set Level key label in the smart-key label box at the bottom
right of the display to save your new value. If you decide to cancel the
operation then press the key below the Cancel key label in the smart-key
label at the bottom left of the display.
Page 32
THZ-100 THERMOSTAT
Adjusting the LCD Time Out Time
The time out time for your thermostat LCD display is the time from the last
activity using the buttons to the time the LCD screen turns off.
If you desire to change the time out time of your thermostat LCD display
then use the arrow keys to move the highlight bar to LCD Timeout.
Press the key below the OK key label in the smart-key label at the bottom
right of the display to select this option. If you decide to cancel the operation
then press the key below the Cancel key label in the smart-key label at
the bottom left of the display.
After pressing OK, the screen updates to a screen that says LCD Screen
Timeout (Sec.)\ at the top of the screen and the current timeout time in
the center of the screen. Use the arrow keys to adjust the timeout time to
the value you desire. The value changes in 5 second increments and can
be set between 5 seconds and 120 seconds.
When you are satisfied with your timeout time selection then press the
key below the Set Time key label in the smart-key label at the bottom right
of the display to save your new value. If you decide to cancel the operation
then press the key below the Cancel key label in the smart-key label at
the bottom left of the display.
The third option at the bottom of the screen is Always On. If you select
the button below Always On, the thermostat returns to the main screen
and the LCD display remains on continuously.
If you enter the LCD Screen Timeout (Sec.) screen with always on previously
selected then the current timeout time display as three empty boxes in the
center of the screen and Always On is not be an option at the bottom of
the screen.
Page 33
THZ-100 THERMOSTAT
Selecting Auto Dimming
If auto dimming is turned on, then the bottom item in the list on this
screen shows, Auto Dimming ON. If auto dimming is turned off then the
bottom item in the list on this screen shows, Auto Dimming OFF.
If you desire to change the auto dimming state of your thermostat LCD display then use the arrow keys to move the highlight bar to Auto Dimming
to toggle this option.
Press the key below the OK key label in the smart-key label at the bottom
right of the display to select this option. If you decide to cancel the operation
then press the key below the Cancel key label in the smart-key label at the
bottom left of the display.
Viewing THZ-100 Thermostat Information
The Information selection in the Options screen is used to display various
THZ-100 thermostat parameters to indicate how the thermostat was setup
as well as some wireless signal strength information. This information is not
used in normal operation.
Setting the Date and Time
If your THZ-100 has lost wireless communication with the MRX Advanced
Network System Controller main unit, the Options list includes an option
to set the date and time. If you desire to set the date and/or time then use
the arrow keys to move the highlight bar to Date & Time.
Press the key below the OK key label in the smart-key label at the bottom
right of the display to change your settings. If you decide to cancel the
operation then press the key below the Go Back key label in the smart-key
label at the bottom left of the display.
After pressing OK, the screen updates to give you a list of the date and
time entries that you can change. The left column displays Month, Day,
Year, Hour, and Minute. The right column displays the current value. Use
the arrow keys to move the highlight bar to value you wish to change.
in the smart-key label at the bottom right of the display to select this option.
If you decide to cancel the operation then press the key below the Cancel
key label in the smart-key label at the bottom left of the display.
Page 34
THZ-100 THERMOSTAT
Press the key below the OK key label in the smart-key label at the
bottom right of the display to change your settings. If you decide to
cancel the operation then press the key below the Go Back key
label in the smart-key label at the bottom left of the display.
The new screen display shows the value that you have selected to
change. Use the Up and Down arrow keys to the right of the
display to select your new value. When you are satisfied with your
new selection, press the key below the Set <parameter> key label
Discovery Mode
The Discovery Mode selection in the Options screen is used to
establish communications between the THZ-100 thermostat and the
MRX Advanced Network System Controller unit for initial setup of
the thermostat and any required updates. This is not used in normal
operation.
Page 35
THZ-100 THERMOSTAT
Troubleshooting Thermostat On-Screen
Notifications
There are notifications on screen for checking the filter, wireless.
If you receive a Check Filter notification then replace the furnace filter
and reset the filter notification as outlined above.
If you receive a Check Wireless notification then check the signal strength
of the THZ-100. If the strength is not excellent then
contact your dealer for more assistance.
If the display shows "Wait..." flashing during the operation of the HVAC system,
the Compression Protection has been activated. Once Compression Protection
cycles, the system can operate as normal. This will help prevent your
HVAC's compressor from turning ON and OFF too quickly.
If the THZ-100 shows a normal Idle state, but the current temperature is
outside the desired temperature, then the Maximum Cycles per hour have
been reached.
In addition, pairing to the MRX Advanced Network System Controller
base unit will be erased and the thermostat will need to go through the
discovery mode to re-establish communications.
Page 36
THZ-100 THERMOSTAT
Limited Warranty Statement
1. Limited Warranty and Disclaimers
Universal Remote Control, Inc. (“URC”) warrants that the URC equipment
shall be free from defects in material and workmanship under normal usage
for two (2) years from purchase when such is purchased from URC. This
limited warranty is valid only in the United States of America. URC warrants
that the software will substantially conform in any material respect to its
functional specifications at the time of delivery. URC SHALL NOT BE LIABLE
FOR OPERATIONAL, TECHNICAL OR EDITORIAL ERRORS AND/OR
OMISSIONS MADE IN THE URC DOCUMENTATION. URC DOES NOT
WARRANT THAT THE URC SOFTWARE IS BUG-FREE OR ERROR FREE
OR THAT THERE ARE NO ERRORS/BUGS IN THE URC SOFTWARE.
URC warrants that at the time of purchase the URC equipment and the URC
software complied with all applicable regulations and policies of the Federal
Communications Commissions (“FCC”) regarding electromagnetic
interference caused by electronic/computing devices and to the extent that the
URC equipment and/or the URC software fails to so comply, URC shall, at its
own expense, take all reasonable measures to promptly cause such to
comply.
URC equipment purchases from other than an authorized URC dealer or
distributor are without warranty.
THIS LIMITED WARRANTY DOES NOT COVER TECHNICAL ASSISTANCE
FOR HARDWARE OR SOFTWARE USAGE EXCEPT AS EXPRESSLY
PROVIDED FOR HEREIN, THE EQUIPMENT, SOFTWARE AND
DOCUMENTATION OF URC ARE SUPPLIED “AS IS” WITHOUT ANY
WARRANTY, EXPRESS, STATUTORY OR IMPLIED, OF ANY KIND. TO
THE MAXIMUM EXTENT PERMITTED BY APPLICABLE LAW, URC
EXPRESSLY DISCLAIMS ALL WARRANTIES, EXPRESS, STATUTORY OR
IMPLIED, INCLUDING BUT NOT LIMITED TO THE WARRANTIES OF
MERCHANTABILITY AND FITNESS FOR A PARTICULAR PURPOSE. URC
DOES NOT WARRANT, GUARANTEE, OR MAKE ANY
REPRESENTATIONS REGARDING THE USE OF, OR THE RESULTS OF THE
USE OF, THE EQUIPMENT, SOFTWARE OR DOCUMENTATION IN
TERMS OF CORRECTNESS, ACCURACY, RELIABILITY OR OTHERWISE.
EXCEPT AS EXPRESSLY PROVIDED FOR HEREIN, TECHNICAL SERVICES
ARE SUPPLIED “AS IS”, WITHOUT ANY WARRANTY, EXPRESS,
STATUTORY OR IMPLIED, OF ANY KIND. TO THE MAXIMUM EXTENT
PERMITTED BY APPLICABLE LAW, URC EXPRESSLY DISCLAIMS ALL
WARRANTIES, EXPRESS, STATUTORY OR IMPLIED, INCLUDING BUT
NOT LIMITED TO THE WARRANTIES OF QUALITY OR REASONABLE
Page 37
THZ-100 THERMOSTAT
SKILL AND CARE, OR OUTCOME OR RESULTS.
WITHOUT IN ANY WAY LIMITING THE GENERALITY OF THE OTHER
PROVISIONS HEREIN, WARRANTY DOES NOT COVER: (I) DAMAGE
FROM MISUSE, NEGLECT OR ACTS OR NATURE, (II) MODIFICATIONS,
(III) INTEGRATION WITH THIRD PARTY CONTENT (IV) BEYOND THE
WARRANTY PERIOD AND/ OR FAILURE TO FOLLOW URC WARRANTY
CLAIM PROCEDURE.
The warranty limitations and warranty disclaimers may not apply to end user
in whole or in part, where such are restricted or excluded by applicable law
and such shall apply to the maximum extent permitted by applicable law.
In the event of any warranty claim, URC will, at its sole option, repair the URC
equipment using new or comparable rebuilt parts, or exchange the URC
equipment for new or rebuilt equipment. In the event of a defect, these are
the end user’s exclusive remedies.
All the URC equipment returned for service, exchange or repair require an
RGA number. To obtain an RGA number, you must complete a Return
Request Form which you may obtain by calling (914) 835-4484 or contacting
URC at [email protected]. To obtain warranty service, end
user must deliver the URC equipment, freight prepaid, in its original packaging
or packaging affording adequate protection to URC at 420 Columbus Avenue,
Valhalla, NY 10595. It is end user’s responsibility to backup any macro
programming, artwork, software or other materials that may have been
programmed into the unit. It is likely that such data, software, or other
materials will be lost during service and URC will not be responsible for any
such damage or loss. A dated purchase receipt, bill of sale, installation contract
or other verifiable proof of purchase is required. For the URC equipment
support and other important information, please visit URC's website available
at www.universalremote.com or call the Customer Service Center at (914)
835-4484.
This limited warranty only covers the URC equipment issues caused by
defects in material or workmanship during ordinary consumer use. It does not
cover product issues caused by any other reason, including but not limited to
product issues due to commercial use, acts of God, third-party installation,
misuse, limitations of technology, or modification of or to any part of the URC
equipment. This limited warranty does not cover the URC equipment sold as
used, as is, refurbished, so called "B stock" or consumables (such as batteries).
This limited warranty is invalid if the factory applied serial number has been
altered or removed from the URC equipment. This limited warranty
specifically excludes the URC equipment sold by unauthorized resellers.
With the exception of URC’s IR-only, broad-based consumer remotes, none of
Page 38
THZ-100 THERMOSTAT
URC’s PC programmable remotes or any of our Total Control® whole-house
equipment are authorized for online internet sales. Buying URC’s PC
programmable remotes or any of our Total Control® whole-house equipment
online means buying equipment that does not have a URC’s limited warranty.
Such equipment is not eligible for URC tech support or software support,
either.
2. URC’S Limitations of Liability
IN NO EVENT SHALL URC BE LIABLE FOR INDIRECT, SPECIAL,
INCIDENTAL, EXEMPLARY, PUNITIVE OR CONSEQUENTIAL DAMAGES
OF ANY KIND OR LOSS OF PROFITS OR BUSINESS OPPORTUNITY,
EVEN IF URC IS ADVISED OF THE POSSIBILITY OF SUCH DAMAGES.
IN NO EVENT SHALL URC BE LIABLE FOR LOSS OF OR DAMAGE TO
DATA, COMPUTER SYSTEMS OR COMPUTER PROGRAMS.
URC’S LIABILITY, IF ANY, FOR DIRECT DAMAGES OF ANY FORM SHALL
BE LIMITED TO ACTUAL DAMAGES, NOT IN EXCESS OF AMOUNTS
PAID BY END USER FOR THE URC EQUIPMENT.
IN NO EVENT SHALL URC BE LIABLE FOR ANY EVENTS BEYOND ITS
CONTROL, INCLUDING ANY INSTANCE OF FORCE MAJEURE.
IN NO EVENT SHALL URC BE LIABLE FOR THE ACTS OR OMISSIONS OF
END USER OR ANY THIRD PARTY.
THE LIMITATIONS OF LIABILITY MAY NOT APPLY TO END USER IN
WHOLE OR IN PART, WHERE SUCH ARE RESTRICTED LIMITED OR
EXCLUDED BY APPLICABLE LAW AND SUCH SHALL APPLY TO THE
MAXIMUM EXTENT PERMITTED BY APPLICABLE LAW.
URC SHALL NOT BE HELD RESPONSIBLE FOR THE STATEMENTS MADE
BY OTHERS.
SOME STATES OR JURISDICTIONS DO NOT ALLOW THE EXCLUSION
OR LIMITATION OF INCIDENTAL OR CONSEQUENTIAL DAMAGES, OR
ALLOW LIMITATIONS ON HOW LONG AN IMPLIED WARRANTY
LASTS, SO THE ABOVE LIMITATIONS OR EXCLUSIONS MAY NOT APPLY
TO END USER. THIS LIMITED WARRANTY GIVES END USER SPECIFIC
LEGAL RIGHTS AND END USER MAY HAVE OTHER RIGHTS WHICH
VARY FROM STATE TO STATE OR JURISDICTION TO JURISDICTION.
End User Agreement
The terms and conditions of the End User Agreement available at
www.universalremote.com/eua.php shall apply.
Page 39
THZ-100 THERMOSTAT
Specifications
Microprocessor: ARM Cortex-M3
Memory: 128 Kbytes of SRAM, 512 Kbytes of Flash memory
LCD: 2 inch (220x176)
RF Range (radio frequency): 50 to 100 feet, depending upon the environment
RF Frequency: 2.405 ~ 2.480GHz
Weight: 3.47 oz
Size: 3.15”H x 4.13”W x 0.93”D
Power: 24VAC
Page 40
THZ-100 THERMOSTAT
Federal Communication Commission
Interference Statement
This equipment has been tested and found to comply with the limits for a
Class B digital device, pursuant to part 15 of the FCC Rules. These limits are
designed to provide reasonable protection against harmful interference in a
residential installation. This equipment generates, uses and can radiate radio
frequency energy and, if not installed and used in accordance with the
instructions, may cause harmful interference to radio communications.
However, there is no guarantee that interference will not occur in a particular
installation. If this equipment does cause harmful interference to radio or
television reception, which can be determined by turning the equipment off
and on, the user is encouraged to try to correct the interference by one more
of the following measures:
u Reorient or relocate the receiving antenna.
u Increase the separation between the equipment and receiver.
u Connect the equipment into an outlet on a circuit different from
that to which the receiver is connected.
u Consult the dealer or an experienced radio/TV technician for
help.
Warning!
Changes or modifications not expressly approved by the manufacturer could
void the user's authority to operate the equipment.
Note : The manufacturer is not responsible for any Radio or TV interference
caused by unauthorized modifications to this equipment. Such modifications
could void the user's authority to operate the equipment.
FCC Caution
This device complies with Part 15 of the FCC Rules. Operation is subject to the
following two conditions: (1) this device may not cause harmful interference,
and (2) this device must accept any interference received, including interference
that may cause undesired operation.
Any changes or modifications not expressly approved by the party responsible
for compliance could void the authority to operate equipment.
Federal Communication Commission (FCC) Radiation Exposure Statement
The device and the antenna for this device must be installed to ensure a minimum separation distance of 20 cm more from a person's body. Other operating
configurations should be avoided.
Page 41
THZ-100 THERMOSTAT
Regulatory Information to the user
n CE Conformity Notice
Products with “CE” marking comply with the R&TTE Directive
1995/5/EC, EMC Directive 2004/108/EC and Low Voltage
Directive 2006/95/EEC issued by the commission of the European
Community.
1) R&TTE Directive
lEMC
: EN 55022
lRF
: ETSI EN 300 220-1,2
: ETSI EN 300
: ETSI EN 301 489-1, 3
2) EMC Directive
lEmission
: EN 55022
lImmunity
: EN 55024
lPower
: EN-61000-3-2, 3
Certification
Type No.(Model No.)
Batch/Serial No.
Power Rating
Frequency band
THZ-100
AC 24V
2.405~2.480GHz
Page 42
THZ-100 THERMOSTAT
Declaration of Conformity
Company Name
:
Universal Remote Control Inc.
Company Address
:
Contact Information
:
Brand Name
:
500 Mamaroneck Avenue, Harrison, NY 10528, U.S.A
www.universalremote.com
Phone: (914)835-4484 Fax: (914)835-4532
UNIVERSAL remote control
Product Name
:
Two-way Thermostat
Model Name
:
THZ-100
This product herewith complies with the requirements of EMC Directive (2004/108/EC)
and R&TTE Directive(1995/5/EC) issued bythe Commission of the European Community
Compliance with these directives implies conformity to the following European
Community
n EMC Directive
l EN 55022
l EN 55024
l EN 61000-3-2
l EN 61000-3-3
n R&TTE Directive
l ETSI EN 301-489-1,3
l ETSI EN 300 220-1,2
l ETSI EN 300
List of test reports and/or certificate verified compliance with the standards above
n EMC Directive
l Report No.
l Testing Laboratory
: Gumi College EMC Center
n R&TTE Directive
l Certificate No.
l Certificate Body
: SIEMIC (No. 2200)
Date of issue
:
Name and signature of authorized person
:
Page 43
December 1, 2011
James Novak
Senior Product Manager
Universal Remote Control Inc.
NOTE
Page 44
NOTE
Page 45
NOTE
Page 46
NOTE
Page 47
500 Mamaroneck Avenue, Harrison, NY 10528
Phone: (914) 835-4484 Fax: (914) 835-4532
www.universalremote.com
OCE-0118A Rev 02