1
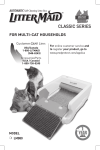
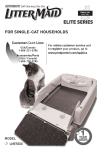
2000_9_8_30_LIT
2/2/01
4:47 PM
Page 1
SAVE THIS MANUAL
Self-Cleaning Litter Box
INSTALLATION AND OPERATION MANUAL
IMPORTANT INFORMATION INSIDE!
Please read prior to product installation and operation.
2000_9_8_30_LIT
2/2/01
4:47 PM
Page 2
WELCOME TO THE LITTERMAID BRAND FAMILY!
IMPORTANT SAFEGUARDS
■ Not intended for use with kittens under six months, unless they are capable of
jumping in and out of the litter box on their own.
■ Not intended for use by handicapped, incapacitated or very old cats that might
experience difficulty in entering or leaving the litter box.
■ For cat use only! The LitterMaid Self-Cleaning litter box is intended
solely for the safe elimination of cat waste. DO NOT ATTEMPT TO USE THIS
PRODUCT FOR ANY OTHER PURPOSE.
■ PREGNANT WOMEN and IMMUNE-DEFICIENT PEOPLE should avoid contact with
cat waste at all times.
■ CAUTION: THIS IS NOT A TOY. LitterMaid Self-Cleaning litter box is a precisionoperated appliance. Should the rake become jammed during cleaning, THIS UNIT
CONTAINS A MECHANISM THAT WILL AUTOMATICALLY STOP, REVERSE AND
RESTART THE CLEANING OPERATION.
■ Never allow small children to play in or around this device.
Please read all directions in this manual carefully prior to operating this product.
SAVE THESE INSTRUCTIONS
QUICK SETUP INSTRUCTIONS
■
■
■
■
■
■
■
■
■
Fill only with premium clumping litter just below the full line.
Do not overfill or unit will not operate properly.
Do not use crystal or pearl-like types of litter.
Unpack power supply and cord from carton.
Unpack paw cleaning ramp (optional) and brush from cardboard at top of unit.
No tools required, unit is fully assembled.
Peel off protective tape which holds litter tray closed.
Cut to remove restraints on both ends of the rake.
Attach power cord to unit and plug into outlet or insert 8 D cell batteries (batteries
not included).
■ Attach the paw cleaning ramp (optional) by inserting one pin into one of the side
holes, at the waste receptacle end, then stretch the other pin to insert in the other
side hole. (For further information, see Installing Paw Cleaning Ramp).
■ Install a waste receptacle by lifting the waste receptacle compartment cover
area and inserting a waste receptacle as described in the Waste Receptacle
Installation instructions.
■ Turn the unit on and let it cycle once to smooth out the newly poured litter.
■ Acclimate the cat to LitterMaid litter box!
NOTE: Wipe sensor lenses (located inside of the side panels) with a soft cloth to keep
sensors dust free (Fig. 5).
ACCLIMATING YOUR CAT
Cat enters the unit, triggering the sensor, setting the timer for the cleaning cycle.
After 10 minutes, the raking cycle begins and scoops out clumps.
Rake opens lid and deposits clumps into waste receptacle.
Seated waste receptacle allows for safe and easy disposal of waste when full.
If your cat needs to acclimate to the new LitterMaid Self-Cleaning litter box, follow
these instructions:
1. Place the LitterMaid unit next to your old litter box.
2. Set it to run automatically.
3. Do not clean out the old litter box. (Cats prefer to use a clean box and the LitterMaid
litter box will always be clean.)
• If your cat is shy then do not operate the LitterMaid litter box automatically for
2-3 days.
• Manually activate the LitterMaid litter box 2-3 times a day for the first 2 to 3 days
to let your cat get used to going in the LitterMaid litter box before you set it to
clean automatically.
4. As soon as your cat is acclimated to the LitterMaid litter box, set it to clean
automatically and remove the old litter box.
Note: Do not place the LitterMaid litter box product in a wet environment or in direct
sunlight.
1
2
HOW THE LITTERMAID SELF-CLEANING
LITTER BOX WORKS:
■
■
■
■
2000_9_8_30_LIT
2/2/01
4:47 PM
Page 4
TROUBLESHOOTING
A. Improper operation.
Probable Cause:
■ Too much litter or dusty sensors.
1. Check to make sure litter in tray is not above the FULL LINE.
2. DO NOT OVER FILL.
3. Wipe each lens cover with a soft dry cloth to remove dust from sensors.
B. Unit does not completely clean litter box.
Probable Cause:
■ Low-quality clumping litter.
1. Do not use crystal/pearl-like types of litter.
2. Use only a premium grade of clumping litter.
C. Unit does not operate when power switch is switched On.
Probable Cause:
■ Incorrectly installed or dead batteries
■ Faulty AC adapter
■ Faulty or non-activated outlet
■ Power outage
To determine cause:
1. IF UNIT WAS RUNNING ON BATTERY POWER:
a. Turn On/Off switch to Off.
b. Open battery compartment and check that battery is installed correctly.
c. Try to operate the unit. It should perform a complete cleaning cycle.
d. If unit does not operate, replace batteries and try again.
e. If unit fails to operate with fresh batteries, try it with the AC adapter.
f. If unit STILL fails to operate, call Customer Service at
1-800-LIT-MAID (548-6243) for additional assistance.
2. IF UNIT WAS OPERATING WITH AN AC ADAPTER AND FAILS TO FUNCTION:
a. Turn unit off and check the following:
1. The adapter plug is inserted fully into the input jack.
2. The power outlet is operating. (You may wish to double-check by plugging
unit into another outlet.)
b. Wait a few seconds and turn unit On again. The unit should perform
a complete cleaning cycle.
c. If unit still does not operate, turn unit Off and unplug adapter.
d. Operate the unit on battery power ONLY.
1. If it does not operate, call Customer Service at 1-800-LIT-MAID (548-6243)
for additional assistance.
D. Waste clumps adhered to the surface of litter tray.
Probable Cause:
■ Soiled litter tray surface.
1. If necessary, remove litter tray and clean with mild detergent, rinse and dry.
3
2. For future use, spray litter tray surface with a silicon spray and wipe with
a soft, damp cloth. This will help difficult-to-remove waste clumps from
adhering to the surface.
NEVER SPRAY WITH WATER OR IMMERSE MAIN CASING IN WATER.
E. Light fails to come on when unit is activated.
Probable Cause:
■ Power outage or batteries incorrectly installed.
1. Slide On/Off switch to Off and then back to On.
2. Make sure you have power to the unit and/or batteries are properly installed.
F. Light blinks slowly and continuously.
Probable Cause:
■ Rake has encountered an obstacle it cannot remove.
1. Be sure to dispose or empty receptacle when full, so as not to jam raking
mechanism.
2. Make sure rake teeth are clean and free of litter. See instructions under
ALARMS.
G. Light blinks quickly
Probable Cause:
■ Batteries need replacing.
H. Light is off completely.
Probable Cause:
■ No AC power is reaching unit or batteries are dead.
See procedure 1 or 2 under Problem C.
I. More help and information are available by calling
Applica Customer Service at 1-800-LIT-MAID (548-6243).
4
2000_9_8_30_LIT
2/2/01
4:47 PM
Page 6
INSTRUCTIONS FOR USE
INSTALLATION OF WASTE RECEPTACLE
PRODUCT MAY VARY SLIGHTLY FROM ILLUSTRATIONS
Safety Bar
(not shown)
Battery Compartment
(batteries not included)
Restraints
Rake
Sensors
Red Power
Indicator Light
AC Adapter
Power Jack
Litter Tray
On/Off Switch
Side Panels
Waste Receptacle
Compartment Cover
Latch
Cleaning
Brush
FIG. 2
FIG. 3
FIG. 1
UNPACKING:
■ Remove unit from carton.
■ Remove all tape wrapped around battery compartment and waste receptacle
compartment.
■ Remove the unit including insert that protects the rake during shipping.
■ Using scissors or wire cutters, carefully remove restraints around rake assembly.
PLEASE NOTE: Remove protective strips of clear tape from the unit.
5
1. Insert waste receptacle into disposal area of
the unit.
2. Be sure the two notched corners on the bottom
of the waste receptacle rest on the horizontal
posts of the unit.
3. Slip the edge of the waste receptacle
5 TABS
UNDERNEATH the ridged tabs of the unit, making
sure it snaps in place securely. (See inset Fig. 4.)
INSTALLING LID:
1. Lift the waste compartment cover and position the
waste receptacle lid with its two round “fasteners”
FIG. 4
extending downward.
2. Insert the two raised areas into the two round openings in the waste receptacle
compartment cover.
3. PUSH each raised area of the lid into its corresponding opening. (See inset Fig. 4.)
4. Close cover.
The raised areas on waste receptacle lid should extend through the waste compartment
cover by approximately 1/2 inch.
REMOVING WASTE RECEPTACLE
See instructions under CARE AND CLEANING.
INSTALLING (OPTIONAL) PAW CLEANING RAMP
The paw cleaning ramp has two pivot pins. The unit has two holes located on the sides
of the waste receptacle end of the unit.
1. Position the paw cleaning ramp with fabric side facing up.
2. Point the pivot pins toward the waste receptacle end of the unit.
3. Lift the paw cleaning ramp and insert one of the pivot pins into one of the holes.
4. Slightly stretch the other pivot pin to reach the other hole, then insert (Fig. 1).
Be careful not to overstretch. Tug slightly on paw cleaning ramp to assure ramp
is secure.
SET UP INSTRUCTIONS
WARNING: This unit does not require as much litter as a non-automated litter box.
DO NOT OVER-FILL! Add more litter when the level drops to the "ADD LITTER" line.
1. Fill the litter box to the “FULL LINE” line with premium clumping litter. Do not pack
litter down.
NOTE: It is extremely important that only a premium brand of clumping litter is used for
proper operation.
2. Slide Power Switch to the Off position.
3. Plug in the AC power adapter (Fig. 2) or install 8 D-cell batteries. (Batteries not
included) (Fig. 3).
a. Open battery compartment by pressing release tabs on compartment edge.
b. Remove the top of the compartment.
6
2000_9_8_30_LIT
2/2/01
4:47 PM
Page 8
c. Install batteries as indicated on diagram inside compartment. Close battery
compartment (Fig. 3).
Should an AC power failure occur with batteries installed, the unit will operate normally.
If operated solely on batteries, power should last approximately 1 to 2 months,
depending on number of cats and frequency of use.
4. Make sure Disposable Waste Receptacle is secured (Fig. 4).
5. Wipe sensor lenses with a soft cloth to keep sensors dust free (Fig. 5).
Sensors
➛
➛
FIG. 5
OPERATING INSTRUCTIONS
■
■
■
■
Slide the power switch to the On position, red light will illuminate.
Rake will automatically undergo one complete cleaning cycle.
Unit is ready for use!
Complete cleaning cycle will begin 10 minutes after sensor is triggered.
Note: Unit will not start a cycle when cat is in the box.
SAFETY FEATURES AND ALERTS
■ If the cat re-enters and leaves the litter box before the initial 10 minutes have
elapsed, the timer will automatically reset and delay the beginning of the cleaning
cycle for an additional 10 minutes.
■ Rake will stop and reverse if the safety bar touches and object that has gotten behind
the rake while it is returning to its home position.
ALARMS: Battery operated: Fast blinking red light indicates batteries require
replacement. Light will continue to blink until batteries are removed or completely dead.
If the rake cannot move an obstacle during the cleaning cycle, the unit will rake up to
five times in an attempt to clear the obstacle. If unsuccessful, the rake will return to its
home position, and the red light will blink slowly (approximately every second) indicating
that the rake has encountered an obstacle it cannot move. If this happens, remove the
obstacle, then slide the switch to the Off position for 5 seconds and back to the On
position.
The rake will then undergo a complete cleaning cycle. When cycle is finished, unit is
ready for use.
7
CARE AND CLEANING
SENSOR COVERS: After changing or adding litter, always wipe each sensor cover with a
soft, dry cloth to remove dust. The two sensors located on the interior side panels (Fig.
5) are protected by sensor covers that need to be kept dust-free.
PAW CLEANING RAMP (Optional):
1. Remove the paw cleaning ramp by gently pulling on the fabric strip provided.
2. Clean by using a vacuum cleaner.
3. To return it to its original position, slide the fabric under the tabs. It is not necessary
to remove the plastic ramp to clean the mat
Do not use soaps or chemical cleaners, as they may be harmful to your cat.
LITTER BOX: Use ONLY premium-quality clumping litter. Other litter quality will impair
performance.
Litter tray can be easily detached from unit for trouble-free complete cleaning and
refilling.
To empty and refill litter tray:
1. Check to make sure rake is in home position (close to the battery box).
2. Slide the On/Off switch to the Off position.
3. Unplug and remove batteries to prevent accidental activation of unit while it is
being cleaned.
4. Pull out the lower part of the latches on both sides of unit (Fig. 6) and, using the
handles on the top assembly, lift up. This will separate the tray from the main
housing (Fig. 7).
5. Dispose of the clumping litter and wipe the tray with a damp cloth. If further
cleaning is necessary, the litter tray can be fully immersed in water and washed
with a mild detergent.
To ensure proper disposal of clumping litter, follow manufacturer’s instructions on
litter package.
IMPORTANT: Do not soak or immerse the main housing in water. Dry the unit
completely before reassembly.
Tray
FIG. 6
FIG. 7
Main Housing
6. Before replacing litter tray, spray litter tray surface with a silicon spray or baby oil
and wipe with a soft, dry cloth. This will help to prevent difficult-to-remove waste
clumps from adhering to the surface of the tray.
7. Refill litter tray to the “FULL LINE” with premium clumping litter only.
8. To reassemble, place the litter tray on a flat surface. Lower the main housing onto
the litter tray carefully. Engage the two locks by pressing the lower part of each
8
2000_9_8_30_LIT
2/2/01
4:47 PM
Page 10
latch firmly against tabs on litter pan until a click is heard to indicate that both
sections are locked in place.
9. IMPORTANT: Wipe any dust off the two sensors.
10. Plug in the AC power adapter and/or replace batteries.
11. Slide the On/Off switch to the On position to reactivate automatic operation.
REMOVING WASTE RECEPTACLE:
1. Depress the two raised areas extending through the openings in the compartment
cover.
2. Detach the disposable waste receptacle lid from the cover of the waste receptacle
compartment.
3. Lift the compartment cover, exposing the closed waste receptacle assembly.
4. Pull the waste receptacle compartment cover edge free from tabs holding it in place
and lift out.
5. To dispose of waste receptacle compartment cover, press in on four corners of lid to
secure lid to the waste receptacle, and dispose.
6. If you wish to reuse the waste receptacle compartment cover, remove it for cleaning
and reinstall after cleaning.
Avoid contact with any waste material. We recommend wearing rubber or latex gloves
while handling used waste receptacle.
Disposable waste receptacles are available in packages of 12 and may be purchased
through your local retailer or by visiting us at our web site at www.littermaid.com
or calling us at 1-800-LIT-MAID. We will be happy to assist you in any way we can.
RAKE REMOVAL FOR CLEANING
OR REPLACEMENT
RAKE : The rake can be removed for cleaning or replacement. NOTE: We suggest
wearing rubber or latex gloves while handling the soiled rake.
1. Flip waste receptacle compartment cover open
Screws
(Fig.8).
2. With AC power adapter plugged in, or batteries
installed, turn unit On.
3. Rake will automatically undergo the initial
cleaning pass.
4. As rake climbs up the incline near the waste
receptacle compartment cover, quickly move
FIG. 8
the On/Off switch to the Off position and unplug
the AC power adapter and remove batteries.
5. Place fingers on underside of the rake and gently pull the rake up and out toward
waste receptacle compartment cover. Notches on rake bar detach from screws on
the rake assembly housing (Fig. 8).
6. If rake fails to unsnap, use a Phillips screwdriver to loosen screws on underside
of the rake assembly. Loosen no more than 1/8 of a turn.
7. Unsnap rake.
9
8. Clean rake with a soft cloth using warm water and a mild detergent. Do not use
scouring pads or harsh or abrasive chemicals. Spray rake lightly with a silicon spray
or baby oil before reinstalling.
Note: Use the cleaning brush to clean the rake quickly and easily.
REINSTALLING RAKE
1. Align the 4 slots on the rake with the screws on the rake assembly housing and push
to snap in place. Press firmly at the base of the rake, so that it clicks onto the rake
assembly housing, indicating the rake has been properly installed.
2. Rake needs to be snapped in completely. There should be no space between the
edge of the rake and the rake assembly housing. If necessary retighten screws no
more than 1/8 of a turn.
3. If using with an adapter, plug unit in, batteries may be reinstalled.
4. Switch the power switch to the On position.
5. Unit is ready to resume initial cleaning pass and is ready for operation.
Need Help?
For service, repair, or any questions regarding your appliance, call the appropriate “800”
number listed below. Do NOT return the product to the place of purchase. Do NOT mail
the product back to the manufacturer nor bring it to a service center. You may also want
to consult the website listed below.
FULL ONE-YEAR WARRANTY
Applica warrants this product against any defects that are due to faulty material or
workmanship for a one-year period after the original date of consumer purchase. This
warranty does not include damage to the product resulting from accident, misuse, or
repairs performed by unauthorized personnel. If the product should become defective
within the warranty period, or you have questions regarding warranty or service, call
Customer Service and Information listed below.
This warranty gives you specific legal rights and you may also have other rights which
vary from state to state or province to province.
CUSTOMER SERVICE
If you should have any questions regarding the installation, operation or use of this
product, visit our web site, www.littermaid.com, call or write to:
Applica Consumer Products
Consumer Assitance
6 Armstrong Road
Shelton, CT 06484
1-800-LIT-MAID
(548-6243)
When calling, be sure to press the appropriate prompt regarding your concerns.
10
2000_9_8_30_LIT
2/2/01
Distributed by:
4:47 PM
Page 12
Pub No.175282-00RV01
6 Armstrong Road
Shelton, CT 06484
Printed in Hong Kong
R12000/9-8-30
LM500 (LIT/SPE)
LM600
LM700
LM750
LM800
LM900
LM950