1
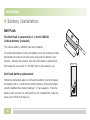
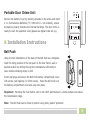
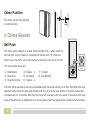
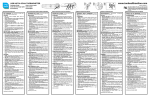
Wireless MP3 USB
Door Chime Kit
Model:
User Manual
SC379
Contents
Before you start
3
Kit Components
Safety Precautions
3
3
Installation
4
Battery Installation
4
Bell Push
Portable Door Chime Unit
Installation Instructions
4
4
5
Bell Push
Chime Position
5
6
Chime Sounds
6
Setting Up
7
Programming Proceedure
7
Download
a) Auto-Run
b) Editing
c) Build up the Play List
d) Play or Delete in the Play List
2
7
7
7
8
8
e)
f)
g)
h)
Synchronize
Memory
Disconnect
Tune/chime sound selection
Digital Code Set Up
1 First Time Operation
8
9
9
9
9
9
2 Interference from a similar unit
operating nearby
10
3 Front and back Door Bell Push operation
10
Operation
11
Door Chime Operation
11
Mode Selection
Adjust the Sound Volume
Low Battery Indicator
11
11
12
Troubleshooting
13
Specification
14
Technical Specification
Disposal
14
15
Before you start
■ Unpacking
Unpack your chime kit and identify the following parts:
•
•
•
•
•
•
Chime Unit
Bell Push
4 x Push Inserts (1 x each white, black, silver, brass colour)
USB Cable
Fixings
User Manual
■ Safety Precautions
Before proceeding with the installation please note the following safety warnings:
• Always follow the manufacturer’s advice when using power tools and wear suitable protective
equipment (e.g. safety goggles) when drilling holes, etc.
• Before drilling holes in walls, check for hidden electricity cables and water pipes, the use of a
cable/pipe locater may be advisable if in doubt.
3
Installation
■ Battery Installation
Bell Push
The Bell Push is operated by 1 x 3volt CR2032
Lithium battery (included)
The Lithium battery (CR2032) has been installed.
To activate the battery remove the battery cover by inserting a small
flat-bladed screwdriver into the recess and push the battery cover
forward. Remove the isolation strip from the battery compartment,
then snap the cover back on. The Bell Push is now ready to use.
Bell Push battery replacement
Follow the instructions above to remove the battery cover and replace
the battery with 1 x 3volt CR2032 Lithium battery. Ensure the battery
polarity matches the internal markings (“+” face upward). Press the
battery down so that it is sitting firmly in its compartment. Snap the
back cover of Bell Push back on.
4
Portable Door Chime Unit
Remove the battery cover by pushing upwards on the arrow and insert
2 x 1.5volt alkaline batteries (“C”, UM2 & R14 – not included), ensure
the battery polarity matches the internal markings. The door chime is
ready to learn the operation code (please see Digital Code set up).
Mode
Volume
“C”, LR14
“C”, LR14
■ Installation Instructions
Bell Push
Using the two indentations of the back of the Bell Push as a template,
mark the fixing position of the bell push on the door frame, wall or
desired location by drilling through the indentations sufficiently to
leave marks indicating where to drill.
Insert wall plugs and secure the Bell Push battery compartment cover
with screws (self-tapping 3 x 16mm screw). Place the Bell Push over
the battery compartment cover and snap into place.
Important: Mounting the Push Button unit on the UPVC doorframes or a metal surface will reduce
the transmission range.
Note: The Bell Push can be fixed in position using sticky pads if preferred.
5
Chime Position
The chime can be free standing
or wall mounted.
3mm
■ Chime Sounds
Bell Push
The chime sound selector is located inside the Bell Push, a small switch on
the top right corner of battery compartment marked with “S”. Press the
switch once, the chime sound will change to play the next tune on the list.
The 8 pre-stored tunes are:
1) Westminster
2) Ding Dong
3) Ding-Dong-Ding
4) Tubular – 1
5) Orchestra
6) Tubular – 2
Chime sound
selector
7) Trumpet
8) Dog Barking
The Door Chime can also be set up to sequentially play the stored chimes, to do this: Hold down the tune
selection button inside the bell push marked with the (S) and the push button on the bell pushes face
simultaneously for 5 seconds. After this the chime will now play each tune saved in sequence after each
press of the bell push. To disable this so it will only play a fixed tune again simply repeat the same process.
6
Setting Up
■ Programming Proceedure
Download: The programme supports: Windows 2000, XP, Vista and Windows 7.
Firstly create a folder to store your music/chime sounds in MP3 or WAV format and save to your “Desktop”.
Connect the USB cable between the chime unit and your computer. The program will auto-run. Your
computer will show the download programme display.
Note: If the program does not start, it may be blocked by virus protection, if this is the case then
please disable the virus protection programme/software. Double click “MY COMPUTER” then double
click CDROM (with earth logo), execute the “MusicPlayer.exe”. (Please remember to enable the virus
protection programme/software once installation is complete).
a) Auto-Run: The program will auto-run and your computer will display the download programme.
The ‘My Computer’ column will show your ‘Desktop’ programme/files.
Note: If the programme does not start automatically then double click ‘My Computer’ followed by a
double click on the CDROM logo.
b) Editing: Click your music/chime sound folder twice; the music/chime sound will be listed in the
“Music” column.
Select the music/chime sound that you want to edit by clicking on it once, the tune/chime sound
sound-wave will be displayed. Hold the left button on your mouse at the start of the selected section
7
and drag your mouse to the end of selected section, then release the left button, the window at
bottom right corner of the soundwave bar will show the duration time of this section. You can play
the selected section by pressing the play button on the bottom left corner of the sound wave bar.
Note: The music/chime sound duration time used as a door chime sound should be 8-15 seconds.
c) Build up the Play List: After editing the music/chime sound, you can transfer it to the play list by
clicking the large “Green Arrow” button in the centre once, the edited sound is imported to the Play
List and displayed.
You can build up a total of 8 different music/chime sounds on the Play List to replace the pre-stored
chime sounds.
Note: Only 8 chime sounds can be stored at any one time. Delete 1 or more chime sounds from the
Play List before transferring the edited/new sounds to the Play List.
Important: If a chime sound is deleted it cannot be retrieved.
d) Play or Delete in the Play List: You can play or delete the edited music/chime sound in the play
list. Click the music/chime sound once, the “Play”, “Stop” and “Delete” buttons will appear at the
bottom of the Play List column, then click the “Play” or “Delete” button once to play or delete this
music/chime sound.
Note: You can have up to 8 different sounds within the playlist to a total maximum file size of 8MB.
e) Synchronize: After the 8-chime sounds Play List is built, synchronize it to the door chime by
clicking the “Sync” button in the centre once and the door chime will store the music/chime sound on
8
the Play List in the memory. The “Synchronize is finished” icon will pop up for confirmation.
Note: Always synchronize your door chime before disconnecting the USB cable.
f) Memory: The door chime has 8 MB of memory and will store approximately 8-9 minutes of
music/chime sounds. The memory bar shows the percentage of memory used.
g) Disconnect: Disconnect the USB cable, the door chime is ready for use.
h) Tune/chime sound selection: Press the tune/chime sound selector switch inside the Bell Push to
select the chime sounds on your play list that you wish to play as your door chime sound. The Door
Chime will now play selected tune/chime sound.
■ Digital Code Set Up
The Door Chime Kit is equipped with an advanced random and self-learning operation coding ability
therefore no set up is required. Read the following instructions before use.
1 First time operation:
After battery installation on both Bell Push and Door Chime units, press the Bell Push Button once to
generate a new operation code randomly. The Door Chime unit will sound to indicate that a new
operation code is registered and held in the memory.
Note: The chime unit has 2 minutes to learn the operation code after batteries are installed.
9
2 Interference from a similar unit operating nearby (i.e. the chime sounds when the Bell
Push has not been operated):
a) Remove the batteries from the Bell Push and Door Chime units and rest for 10 seconds, this will
erase the memory.
b) Insert the batteries into the Bell Push and Door Chime units, the chime unit is now ready for the
new code registration.
c) Press the Bell Push once to generate a new operation code randomly, the Door Chime unit will
sound to indicate that a new operation code is registered and held in the memory.
3 Front and back Door Bell Push operation (2nd Bell Push not included):
a) Remove the batteries from the Bell Pushes (both Front & Back Door) and Door Chime Unit(s) and
rest for 10 seconds, this will erase the memory.
b) Insert the batteries into the Bell Push and Door Chime units, the chime unit is ready for the new
code registration.
c) Press the front Bell Push button once to generate a new operation code randomly, the Door Chime
unit will sound to indicate that a new operation code is registered and memorised.
d) After, (within 2 minutes) press the back door Bell Push button once to generate a new operation
code randomly, the door chime unit will sound to indicate that a new operation code is registered
and memorised.
10
e) It is important to remember that when you replace your chime batteries that you will need to
follow the same procedure of pairing the devices as above.
Important: Repeat this procedure after changing the Push Button battery.
Note: If the Chime Unit sounds for no reason during the digital code setting, it is indication that
there is interference by other similar door chime unit(s) nearby, reset the digital code as (2) above.
Operation
■ Door Chime Operation
Mode Selection
Using the function “mode” selector located at the back of the unit, press to select one of the 3
following functions:
a) Sound Only: Door Chime Unit will sound
b) Sound and Light: The Door chime will sound and the Super Bright LED Light will flash
c) Illumination only (no sound): The Super Bright LED Light on the Door Chime Unit will flash
Adjust the Sound Volume
Press the “+” & “—” button on the back of Door Chime Unit to adjust the sound level.
11
Low Battery Indicator
The red LED indicator on the Door Chime Unit will flash when the chime batteries need replacing.
Important:
a) If mounting the Bell Push onto a metal surface or a UPVC door frame the operation range will be
reduced. Always test the operating range prior to fixing the Bell Push into its permanent position.
b) Do not mount either Unit close to a heat source or expose to high temperature.
c) Do not use a different type of batteries, or mix up old and new batteries.
d) Ensure batteries are installed correctly as per the internal markings (caution: danger of leakage
or damage to product if batteries are incorrectly installed or replaced).
e) Always use alkaline batteries. Please dispose of old, defective batteries in an environmentally
friendly manner in accordance with the relevant legislation.
f) Make sure there are no naked flame sources nearby or placed on the Chime Unit,
such as light candles.
g) The Chime Unit must not be exposed to liquids dripping or splashing. No objects filled with liquids,
such as vases, should be placed close to the Chime Unit.
h) There are no serviceable parts in the units, do not attempt repair.
12
Troubleshooting
If the door chime unit does not sound, please check the following:
a) Batteries in the Bell Push and Door Chime
units, if flat change the batteries.
e) Units are out of range - operate the Chime
Unit within the operation range.
b) Wrong battery polarity in either Bell Push or
Door Chime units – reinsert the batteries.
f) Cannot store music in the Play List – only 8
tunes/chime sounds can be stored at any one
time and you must to delete 1 or more
tunes/chime sounds from the Play List to
free up space before transferring a new file.
c) Both Push Button and Door Chime units are
not on the same operation codes – reset the
code (see digital code set up).
d) Bell Push and Door Chime did not register
the operation code after replacing the
batteries – reset the code (see digital code
set up).
Note: The Play list can only store 8
tunes/chime sounds (max) at any one time
with a maximum file size of 8MB.
g) No tunes/chime sounds are stored in the
Door Chime unit - synchronize your door
chime before disconnecting the USB cable.
13
Specification
■ Door Chime Operation
Operating Temperature: 0C to +35C
Operating Distance:
Up to 100 metres (330ft approx. in open field & at suitable conditions)
The Chime Unit can be mounted or portable for use around the home,
workshop, office or garden. The transmission range of the wireless signal
will be reduced if the signal is transmitted through a number of walls or
ceilings. Metal and UPVC doorframes will also reduce the operating range.
Selectable Tune:
Total Eight (8) pre-set tunes available
Digital Code:
Pre-set: one of two hundred fifty six (256) possible digital codes,
non-selectable.
Memory Size:
8 MB Memory
14
Tunes/chime sounds:
a) Supports all MP3 format (All i-Pod MP-3 files cannot be supported)
V1 – MPEG Version 1, V2 – MPEG Version 2 & Version 2.5,
L1 – Layer I, L2 – Layer II, L3, Layer III.
Sampling rate frequency index (values are in Hz) bits:
MPEG1
44,100
48,000
32,000
MPEG2
22,050
24,000
16,000
MPEG2.5
11,025
12,000
8,000
(b) Support all WAV files.
Batteries:
Bell Push: Power:
Door Chime unit:
1 x 3volt CR2032 Lithium battery (included)
2 x 1.5volt alkaline batteries
(“C”, UM2 & R14 – not included)
■ Disposal
Requires separate disposal for electrical and electronic equipment.
15
Telephone Helpline:
0845 373 1353
Local Rate Call
Response Electronics Limited, Roman House, Lysons Avenue, Ash Vale, GU12 5QF
www.responseelectronics.com
SC379 Ed.1