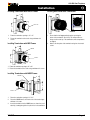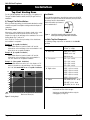
1
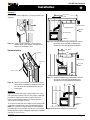
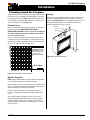
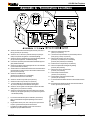
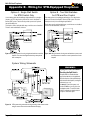
C42-DV Gas Fireplace
®
Installation
4.
5.
Place the top logs in position as shown in figure 24b, place the
centre log down first, then the right and left logs.
Log 'D'
Log 'E'
Start the fireplace. If the flame appears satisfactory, replace the
glass door and door cover.
Embers
Flame Shaper
Figure 23c. Removing the door.
Re-installing the door:
To re-install the door, tilt the top edge towards you and line up the tabs
of the bottom of the door with the slots on the fireplace. Place the tabs
into the slots, and tilt the top of the door back towards the fireplace as
far as it will go. Close the latches by hooking Part B onto the groove at
the top of the door and pushing Part A down completely.
Figure 24b.Proper log placement.
NOTES:
n If logs are not placed properly, excessive sooting will result.
Installing the Log Set
Installing the Logs:
The C42-DV is supplied with five ceramic fibre logs. Unpack the
logs and handle them very carefully.
1.
Remove the door cover and the glass door.
2.
Place the Back log onto the back log rest as shown below in figure
24a. The log has lip on the bottom which fits into the slot on the log rest.
3.
Place the Front log onto the front log rest as shown in figure 24a.
Center theLog
log'C'
from side to side, and
push
Log
'B' it against the back of
the log rest. Carefully push the log onto the metal spikes on the log rest.
n The surface of the logs will crack due to the heat from the
flames. This is a normal occurance.
Installing the Trim & Baffle
The fireplace is shipped with 6 horizontal trim pieces (3 upper and 3
lower), which must be field-installed.
Install the trim by placing the top edge of the trim over to the
retainer clips on either side of the fireplace. Push the bottom edge
firmly inwards and the trim will snap on. (See figure 25) Remember to
slide the baffle into the top trim piece . (See Inset)
Note: Baffle should rest on top of the tabs.
Log 'A'
Inset. Slide in baffle
before installing top trim.
Figure 24a. Positioning for the front and back logs.
Part No. XG0119B
Figure 25. Installing the horizontal trim pieces.
Page 13