1
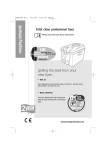
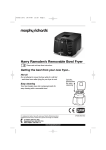
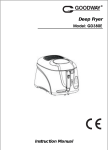
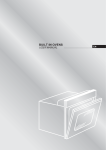
DF45425M Rev 1
14/6/04
4:12 PM
Page 1
Removable bowl fryer
Please read and keep these instructions
getting the best from your
new fryer...
• Hot oil
Don’t attempt to move the fryer while it is still hot - wait two
hours after frying for your fryer to cool.
• Easy cleaning
Your fryer breaks down into component
parts for easy cleaning with a removable
bowl.
www.morphyrichards.co.uk
DF45425M Rev 1
14/6/04
4:12 PM
Page 2
Personal safety
Important safety
instructions
•
The use of any electrical appliance
requires the following common sense safety
rules.
Primarily there is danger of injury or
death and secondly the danger of damage
to the appliance. These are indicated in the
text by the following two conventions:
WARNING: Danger to the person!
IMPORTANT: Damage to the appliance!
In addition we offer the following safety
advice.
•
•
•
•
Location
•
•
•
•
•
Place the appliance on a horizontal, flat
and stable surface away from a heating
source and where it cannot be splashed
by water.
Allow adequate air space above and on
all sides for air circulation.
Do not use your fryer under cupboards
or shelves.
Do not use outdoors.
•
•
Product safety
•
Mains lead
•
•
•
•
•
The mains lead should reach from the
socket to the base unit without straining
the connections.
Do not let the cord hang over the edge
of the table or the counter and keep it
away from any hot surface.
Do not let the lead run across an open
space eg. between a lower socket and
table.
•
The fryer body must never be immersed
in water.
When unpacking the fryer, make sure all
packing material is removed.
Never connect the fryer to the electricity
supply without oil in the tank.
Never operate with the oil level below
minimum mark (2.0 litres) or above
maximum mark (2.5 litres).
Scalds
•
Children
•
WARNING: Never attempt to move
your fryer until it is completely cool.
This can take up to three hours.
Use the carrying handles. Î
WARNING: To protect against the
risk of electric shock do not
immerse the fryer body in water or
other liquid.
Unplug from the electrical outlet when
not in use and before cleaning. Allow to
cool before putting or taking off parts,
and before cleaning the appliance.
Never leave the fryer unattended when
connected to the electricity supply.
Never lean over the fryer when it is in
use.
When opening the lid, stand back as
some hot steam may be released.
Always use oven gloves when removing
or replacing lid during use.
Be careful not to touch those surfaces of
the fryer which become hot when in use.
Run cold water over the affected area
immediately. Do not stop to remove
clothing, seek medical help immediately.
Other safety considerations
Never allow a child to operate this
appliance. Teach children to be aware of
dangers in the kitchen, warn them of the
dangers of reaching up to areas where
they cannot see properly or should not
be reaching.
•
2
Do not operate any appliance with a
damaged cord or plug or after the
appliance malfunctions or has been
damaged in any manner. Telephone the
helpline number (the telephone number
can be found on the front cover) for
advice on examination and repair.
DF45425M Rev 1
•
•
•
•
14/6/04
4:12 PM
Page 3
Do not use the fryer for anything other
than its intended purpose.
The use of attachments or tools not
recommended or sold by Morphy
Richards may cause fire, electric shock or
injury.
Always dry food before frying eg. chips
which are too wet can cause the hot oil to
froth excessively.
Never pour oil out of the fryer with the
bowl in position.
Electrical requirements
Check that the voltage on the rating plate
of your appliance corresponds with your
house electricity supply which must be A.C.
(Alternating current).
For appliances with fitted plug.
If the socket outlets in your home are not
suitable for the plug supplied with this
appliance the plug should be removed and
the appropriate one fitted.
WARNING : The plug removed from
the mains lead, if severed, must be
destroyed as a plug with bared flexible
cord is hazardous if engaged into a live
socket outlet.
Should the fuse in the 13 amp plug
require changing a 13 amp BS1362 fuse
must be fitted.
WARNING: This appliance must be
earthed.
Features
⁄
¤
‹
›
fi
fl
‡
·
‚
„
‰
Â
Ê
Á
Ë
È
Í
Î
Ï
Ì
Spring lifting removable lid
Lid location guides (not shown)
Viewing window
Steam vents
Lid release button
Basket
Basket handle
Handle release button
Basket rest
Lid lock catch
Basket handle rest position
Removable bowl
Bowl lifting lip
Power on light (red)
Temperature ready light (orange)
Variable temperature control
Min and max oil levels inside bowl
Carrying location
Non slip feet on base
Fryer body
‹
fl
⁄
·
›
‡
Ê
¤
‚
Â
„
Î
‰
Ì
Á
Min
fi
Ï
È
3
Ë
Í
Max
DF45425M Rev 1
14/6/04
4:12 PM
Page 4
In the upper position the lid will lift out of
its guides at the back for easy cleaning. To
replace, locate in the guides and slide back
into position. B
Close the lid by pressing down in the
centre and ensure locking catch „ is fully
engaged.
Before first use
Refer to the assembly sequence page 5.
When unpacking the fryer, make sure all
packaging material is removed.
WARNING: make sure that your
fryer is disconnected from the
electricity supply.
Please note : Remove the filter from the
lid before washing lid.
Remove the frying basket, non stick
bowl, lid, body and wash these by hand in
hot soapy water. Please note: do not leave
in water to soak for a long period of time.
Dry all parts of your fryer thoroughly and
replace the, bowl, basket and lid.
Replace the bowl with the max/min lines
to the rear. (Please follow the cleaning
instructions).
Basket operation
Pull the basket handle to the horizontal
position to raise the basket. C
Location of basket to drain
The basket can be raised into the
rest/drain position or removed completely.
Take the basket out of the fryer and
place the required amount of food in the
basket. (Refer to page 8 for quantities).
Lift the basket back into the rest/drain
position then close the lid. D
Operation
Lid operation
Press the lid release button down and
in, the lid is spring loaded and will rise up
on its own. A
A
C
B
D
4
DF45425M Rev 1
14/6/04
4:12 PM
Page 5
Assembly/Disassembly
sequence
Cord reduction
To reduce the length of the cord wind
the excess onto the cable wind at the rear
of the fryer. G
The fryer has to be disassembled and
assembled following this procedure.
• Open the lid and remove.
• Remove the basket.
• Lift out the tank.
Assembly is the reverse of the above
process.
Filling with oil
Ensure bowl contacts are dry before
replacing. E Ensure max and min lines on
the bowl are at the back of the fryer.
Pour oil into the tank up to the
maximum level indicated (approx 2.5 litres
of oil).
Lightly smear the inside of the viewing
window with the oil to inhibit any
condensation which could reduce visibility.
• Use good quality liquid vegetable oil,
see getting the best from your fryer
page 6.
Filter
Cooking
Press the locking tab back and lift out
the panel. F The filter cannot be cleaned
and should be replaced after 15 frying
sessions. Always replace with the black
side facing upwards. Remove the filter
before washing the lid.
WARNING: Never operate the fryer
without oil in the bowl.
1 Lower the basket and close the lid.
2 Plug into the mains and switch the
power on at the socket and switch on
the fryer to position I.
3 The red power light and orange
temperature light will illuminate.
4 Set the variable temperature control to
the required setting see ‘frying times and
temperature section’.
Replacing the bowl
E
F
G
5
DF45425M Rev 1
14/6/04
4:12 PM
Page 6
Cooking home-battered foods
5 The fryer is now pre-heating the oil, the
orange temperature light may go out
and come back on once or twice during
pre-heat. After approx 15 minutes the oil
will be at the correct temperature.
6 Lift the lid.
• Do not over fill the basket when frying,
the food must be covered with the
bubbling hot oil, depending on the size
and shape of the food to be cooked.
There are two methods of cooking in
your fryer; one general method for most
food types and another for home battered
products.
This method allows for the fact that if
wet batter is placed in the basket prior to
cooking the food may stick.
1 Leave the basket in the down position.
2 Coat the raw food in the batter and
allow it to drain slightly to get rid of the
excess coating.
3 Very carefully, slowly lower the coated
food into the hot oil, using a suitable
implement or tongs. This allows the
batter to become solid and prevents it
sealing to the mesh of the basket.
WARNING: Take care as the oil may
spit as the food is added.
General cooking method
1 Place the basket in the raised position.
The basket should always be in the
raised position when it is to be filled with
food.
2 Place the food, which should be dry as
possible, into the raised basket. When
frying frozen food, avoid adding ice
particles to the hot oil. Remove the
basket from the fryer, add the frozen
food and shake the basket to remove
excess ice and frost. The oil temperature
and oil life expectancy will be improved.
3 Lower the basket onto basket rest ‚.
4 Lower the lid.
5 Lower the basket to the frying position.
• You can observe the cooking process by
raising the lid or looking through the
viewing window to observe progress.
6 When the food is cooked, raise the lid,
lift the basket out of the oil, give it a
shake, and place it in its raised rest
position for a one minute to drain.
7 Lift the basket out and shake the fried
food into a dish with oil absorbing
kitchen paper.
8 After use, disconnect from the mains
supply and allow to cool. Wipe any spilt
oil from the fryer body.
• You can store the basket in the oil.
Getting the best from
your fryer
Oil
•
Always ensure that you use good quality
oil for deep frying. We recommend liquid
vegetable oils, alternatively use corn,
groundnut or rapeseed oil. Avoid mixing
oils of different types and quality.
• Solid fat (lard) and solid oil can be used,
this should be first melted in a pan until
softened, then carefully transferred into
the fryer bowl.
• Change the oil when it becomes brown
or cloudy in colour, usually after frying
15 times. This will be the appropriate
time to change the filter.
IMPORTANT: Do not switch the fryer on
until the fryer bowl is filled with oil or solid
oil or lard.
6
DF45425M Rev 1
14/6/04
4:12 PM
Page 7
Cooking
•
•
•
•
•
•
•
•
Emptying and cleaning
Your food must always be completely dry
in order to avoid overflowing, to prolong
the use of the oil and to give a crispier
finish to the food.
Pieces of food should be of the same size
and thickness.
As a general guide pre-cooked foods
need a higher cooking temperature than
raw foods.
Do not overload the basket as it may
cause a drop of temperature that may
leave the food greasy.
Cook your food thoroughly. Remember
that your food may begin to turn golden
brown before it is cooked through.
Avoid leaving food to drain for too long in
the basket as the food may become soft
and lose its crunchiness.
Select your cooking utensils with care. Do
not use utensils that may melt. Metal
utensils become hot and therefore should
have insulated handles. When using metal
utensils, take care not to damage the
non-stick coating of the bowl.
All foodstuffs contain moisture. When
lowered into the hot oil the water turns to
steam. Most of the steam escapes
harmlessly through the lid vent, but
trapped steam may escape when opening
the lid - so care is needed.
WARNING: Cleaning should only be
carried out with the plug removed from
the socket. The fryer should have
completely cooled. Allow 3 hours for
cooling.
1 Remove the lid.
2 Remove the basket.
3 Lift out the bowl. H
4 Pour out the oil through fine muslin or
absorbent paper placed in a suitable
funnel into a container.
5 Wash the lid, basket, handle and the
inside of the tank by hand with hot soapy
water.
• The lid can be washed in a dishwasher.
• The basket and bowl should NOT be
washed in a dishwasher.
6 Clean the body of the fryer with a warm
moistened cloth, washing up liquid can
be used.
7 Dry all parts of your fryer thoroughly and
reassemble all parts with the max and min
at the back of the bowl. Refer to the
assembly sequence.
• The outside of the bowl is not non-stick
coated, if care is taken, it is unlikely to
become dirty. If oil does drip down the
exterior when the oil is being emptied out,
make sure that it is hand washed
thoroughly. The exterior may appear
discoloured, this is quite normal and will
not detract from the performance of the
fryer.
Chips
•
•
Old potatoes are ideal for making chips.
Your chips should be evenly sized so that
they cook evenly. They should be rinsed
in a colander under a cold tap and dried
using a kitchen towel or absorbent paper.
For best results fry your chips for 10-12
minutes; shaking the basket at intervals to
ensure chips get an overall browning.
For best results, we recommend no more
than 800g of frozen chips or 1000g of
fresh chips are fried.
H
7
DF45425M Rev 1
14/6/04
4:12 PM
Page 8
Frying times and temperature chart
These frying times are intended as a guide only and should be adjusted to suit quantity or
thickness of food and your own taste. Times listed are normally the maximum time required.
Fresh cut chips
190˚C
1.2kg
10-12 mins
Frozen chips
190˚C
1kg
12-15 mins
Fresh cod or haddock
300g/400g 2 or 3 pieces
190˚C
8-10 mins
Frozen cod or haddock
300g/400g 2 or 3 pieces
170˚C
10-15 mins
Frozen plaice
1x150g piece
190˚C
5-6 mins
Whitebate just enough to cover base of basket
190˚C
1-2 mins
Scampi frozen in crumbs
170˚C
3-5 mins
Just enough to cover base of basket.
Beefburgers*
150˚ or 170˚C
2oz/55g 4 pieces
4oz/110g 2 pieces
4-6 mins
5-10 mins
Fresh or defrosted chicken portions in crumbs*
2 x 200g pieces
170˚C
20-25 mins
Frozen chicken portions in crumbs*
2 x 200g pieces
170˚C
25-30 mins
Mushrooms
200g
190˚C
2-3 mins
Weights stated are maximum advised.
*Chicken and beef burgers taint the oil leaving a taste you may not want when frying other
foods, if so change the oil.
8
DF45425M Rev 1
14/6/04
4:12 PM
Page 9
Helpline
If you have any difficulty with your
appliance, do not hesitate to call us.
We are more likely able to help than the
store from where you bought it.
Please have the following information
ready to enable our staff to deal with your
query quickly.
• Name of the product
• Model number as shown on the
underside of the appliance.
9
DF45425M Rev 1
14/6/04
4:12 PM
Page 10
Your two year guarantee
It is important to retain the retailers
receipt as proof of purchase. Staple your
receipt to this back cover for future
reference.
Please quote the following information if
the product develops a fault. These numbers
can be found on the base of the product.
Model no.
Serial no.
All Morphy Richards products are
individually tested before leaving the factory.
In the unlikely event of any appliance proving
to be faulty within 28 days of purchase it
should be returned to the place of purchase
for it to be replaced.
If the fault develops after 28 days and
within 24 months of original purchase, you
should contact the Helpline number quoting
Model number and Serial number on the
product, or write to Morphy Richards at the
address shown.
You will be asked to return the product (in
secure, adequate packaging) to the address
below along with a copy of proof of
purchase.
Subject to the exclusions set out below
(see Exclusions) the faulty appliance will then
be repaired or replaced and dispatched
usually within 7 working days of receipt.
If for any reason this item is replaced
during the 2 year guarantee period, the
guarantee on the new item will be calculated
from original purchase date. Therefore it is
vital to retain your original till receipt or
invoice to indicate the date of initial
purchase.
Morphy Richards products are intended for
household use only.
Morphy Richards has a policy of continuous
improvement in product quality and design.
The company, therefore reserves the right
to change the specification of its models at
any time.
To qualify for the 2 year guarantee the
appliance must have been used according to
the manufacturers instructions. For example
kettles should have been regularly descaled.
EXCLUSIONS
Morphy Richards shall not be liable to
replace or repair the goods under the terms
of the guarantee where:
1 The fault has been caused or is
attributable to accidental use, misuse,
negligent use or used contrary to the
manufacturers recommendations or where
the fault has been caused by power
surges or damage caused in transit.
2 The appliance has been used on a
voltage supply other than that stamped
on the products.
3 Repairs have been attempted by persons
other than our service staff (or authorised
dealer).
4 Where the appliance has been used for
hire purposes or non domestic use.
5 Morphy Richards are not liable to carry
out any type of servicing work, under the
guarantee.
6 Plastic filters for all Morphy Richards
kettles and coffee makers are not covered
by the guarantee.
This guarantee does not confer any rights
other than those expressly set out above and
does not cover any claims for consequential
loss or damage. This guarantee is offered as
an additional benefit and does not affect your
statutory rights as a consumer.
• This guarantee is valid in the UK and
Ireland only.
The After Sales Division
Registered address
Morphy Richards Ltd, Mexborough
South Yorkshire, England, S64 8AJ
Helpline (office hours)
UK 0870 060 2613
Republic of Ireland 1800 409119
DF45425M UK Rev 1 06/04