1
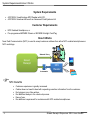
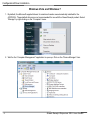
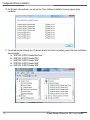
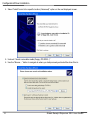
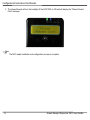
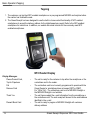
Green
Receipt
Dispenser
NFC
User Guide
VERSION 0.1
MIRANO
www.mirano.ca
System Requirements/How It Works
System Requirements
• ACR1222L VisualVantage NFC Reader with LCD.
• ACR1222L Smartcard drivers from Advanced Card Systems Ltd.
Customer Requirements
• NFC Enabled Smartphone, or
• Pre-programmed MIFARE Classic or MIFARE Ultralight Card/Tag
How It Works
Near Field Communication (NFC) is used to accept customer address from either NFC enabled smartphones or
NFC cards/tags.
Manual Entry
Green
Receipt
NFC
Reader
Automatic
NFC Benefits
•
•
•
•
•
•
2
Customer experience is greatly increased.
Cashier does not need to deal with requesting sensitive information from the customer.
No typing errors or fake entries.
No additional delays in the checkout process.
Ease of use.
No additional requirement for customers with NFC enabled smartphones.
Green Receipt Dispenser NFC User Guide
Configuration/Driver Installation
NFC Reader Installation
USB
1. The ACR1222L NFC reader requires the correct Smartcard drivers to be installed on the POS computer
for it to operate correctly with the Green Receipt product.
2. Before you begin with the installation process, familiarize yourself with the driver installation steps outlined
in this document.
3. Obtain the ACR1222L Smartcard driver package from Advanced Card Systems Ltd and place the driver
package on the POS computer. The download link for the Smartcard driver package is provided below.
http://www.acs.com.hk/drivers/eng/ACR1222_Driver_Win_1003_P%20(Beta).zip
4. Extract the contents of the above compressed package onto the hard drive of the POS computer.
5. Plug in the USB based NFC reader into a spare USB port
on the POS computer. The NFC
reader obtains it power from the USB port and does not require a separate power adaptor.
6. For Windows Vista and Windows 7 based POS computer, follow the steps outlined in the Windows Vista
and Windows 7 section of this document
7. For Windows XP based POS computer, follow the steps outlined in the Windows XP section of this
document.
3
Green Receipt Dispenser NFC User Guide
Configuration/Driver Installation
Windows Vista and Windows 7
1. By default, the Microsoft supplied drivers for smartcard reader are automatically installed for the
ACR1222L. These default drivers are not recommended for use with the Green Receipt product. Select
“Manage” by right-clicking on the “Computer” menu.
2. Wait for the “Computer Management” application to open up. Click on the “Device Manager” item.
4
Green Receipt Dispenser NFC User Guide
Configuration/Driver Installation
3. On the right panel, expand the “Smart card readers” group. You will see one of the following depending on
how up to date the version of Windows Vista/7 is on the POS computer:
a. No default driver has been installed. Continue to Step 4.
b. The default “Microsoft Usbccid Smartcard Reader (WUDF)” has been selected and installed for the
reader. Continue to Step 4.
4. Right click on the “Microsoft Usbccid Smartcard Reader (WUDF)” item to select the “Update Driver
Software…” option.
5
Green Receipt Dispenser NFC User Guide
Configuration/Driver Installation
5. Select the second option “Browse my computer for driver software”.
6. Use the “Browse…” button to navigate to where you had previously extracted the driver files to.
6
Green Receipt Dispenser NFC User Guide
Configuration/Driver Installation
7. In some cases you will be prompted to verify the source of the driver. Select “Install” if you are certain that
you obtained the installation program from the manufacturer.
8. Follow the instructions on the screen to complete the installation.
9. Wait for the drivers to be installed.
7
Green Receipt Dispenser NFC User Guide
Configuration/Driver Installation
10. On Windows Vista and later, you will see the “Driver Software Installation” screens appear during
installation.
11. You should see the following five (5) devices listed in the Smart car readers group if the driver installation
was successful:
a. “ACR1222 3S PICC Reader Bus Driver”
b. “ACR1222 3S PICC Reader PICC”
c. “ACR1222 3S PICC Reader SAM”
d. “ACR1222 3S PICC Reader SAM”
e. “ACR1222 3S PICC Reader SAM”
8
Green Receipt Dispenser NFC User Guide
Configuration/Driver Installation
Windows XP
1. On Windows XP, you will see a different set of screens from the above. The “Found New Hardware”
message will pop up in the bottom right corner of the screen.
2. On Windows XP, the “Found New Hardware Wizard” will be displayed.
3. Select “No, not this time” option.
9
Green Receipt Dispenser NFC User Guide
Configuration/Driver Installation
4. Select “Install from a list or specific location (Advanced)” option on the next displayed screen.
5. Uncheck “Search removable media (floppy, CD-ROM…)”
6. Use the “Browse…” button to navigate to where you had previously extracted the driver files to
10
Green Receipt Dispenser NFC User Guide
Configuration/Driver Installation
7. On Windows XP, the Windows Logo testing warning message will appear. Click on “Continue Anyway” to
install the driver.
8. The above steps will be repeated for each of the four (4) remaining devices. You should see “Found New
Hardware Wizard” repeated for the following four (4) additional devices:
a.
b.
c.
d.
“ACR1222 3S PICC Reader PICC”
“ACR1222 3S PICC Reader SAM”
“ACR1222 3S PICC Reader SAM”
“ACR1222 3S PICC Reader SAM”
9. On Windows XP, the “Found New Hardware” message will pop up again on the bottom right of the screen
to let you know that the new hardware is installed and ready for use.
11
Green Receipt Dispenser NFC User Guide
Configuration/Driver Installation
10. You should see the following five (5) devices listed in the Smart car readers group if the driver installation
was successful:
a.
b.
c.
d.
e.
12
“ACR1222 3S PICC Reader Bus Driver”
“ACR1222 3S PICC Reader PICC”
“ACR1222 3S PICC Reader SAM”
“ACR1222 3S PICC Reader SAM”
“ACR1222 3S PICC Reader SAM”
The driver installation process is complete.
Green Receipt Dispenser NFC User Guide
Configuration/Contactless Card Reader
Contactless Card Reader
1. The contactless card reader is used for Near Field Communication (NFC) functionality and needs to be
enabled. Use the “Reader” configuration area to select the “ACR1222L (USB)” reader. The
“Communication” settings are not applicable and should be ignored for the ACR1222L (USB) reader.
“Select
ACR1222L”
2. You will be prompted to restart the system after you make changes and save the configuration. You can
choose to defer the restarting of the system at a later time after all the required changes have been made.
The choice whether to defer or not is a personal choice.
13
Green Receipt Dispenser NFC User Guide
Configuration/Contactless Card Reader
3. The Green Receipt will turn the backlight of the ACR1222L to ON and will display the “Please Present
Card” message.
14
The NFC reader installation and configuration process is complete.
Green Receipt Dispenser NFC User Guide
Basic Operation/Tapping
Tapping
1. The customer can tap their NFC enabled smartphone or a pre-programmed MIFARE card anytime before
the cashier has finalized the sale.
2. The Green Receipt has been designed to use the built-in share contact functionality of NFC enabled
smartphones to accept the delivery address for the digital/paperless receipt. Refer to the NFC enabled
smartphone for instructions. In addition, our website has some tutorials for the commonly used NFC
enabled smartphones.
NFC Reader Display
Display Messages
15
Please Present Card,
Tap for Paperless
-
The unit is ready for the customer to tap either the smartphone or the
contactless card to the reader.
Fail
Remove Card
-
Thank You
-
Present Blank Card
-
The contactless card is not correctly programmed to operate with the
Green Receipt or smartphone does not support NPP or SNEP.
For “Write Tag” - The contactless card is not a MIFARE Ultralight or
the MIFARE Ultralight is not writable.
The unit has accepted the v-card information from the smartphone or
the contactless card. The next receipt will be sent to the email address
identified in the v-card
The unit is ready to program a MIFARE Ultralight with customer
delivery address
Green Receipt Dispenser NFC User Guide
Basic Operation/Programming MIFARE Ultralight
Programming MIFARE Ultralight
1. The Green Receipt has a built-in feature that allows you to program MIFARE Ultralight cards/tags with
customer delivery address for those customers who do not have NFC enabled smartphones.
2. Select the Write Tag… menu from the Green Receipt tray icon.
3. Please note that the Write Tag window will not allow the cashier to enter an email address if the system is
not configured correctly and the Status on the control panel is reporting the “Error” message.
4. Enter a valid email address and click on Write.
5. The NFC Reader will beep and display “Present Blank Card”. Please note that it could take up to 5
seconds for this message to appear. Tap a blank or writable MIFARE Ultralight and wait for the “Thank
You” message from the reader. The MIFARE Ultralight is now ready for use by the customer and can be
attached to the back of his/her smartphone.
16
Green Receipt Dispenser NFC User Guide
Basic Operation/Summary
Near Field Communication (NFC)
Supported Standards
Customer Contact
-
NFC Data Exchange Format (NDEF)
-
NFC Simple NDEF Exchange (SNEP)
-
NDEF Push Protocol (NPP)
-
NFC Forum Tags
-
• V-CARD (text/vcard)
o EMAIL
• MECARD (text/vcard)
o EMAIL
• NFC URI type “mailto”
• NFC Forum well-known type
o URI (U)
o Smart Poster (Sp)
• Media-type as defined in RFC 2046
o text/vcard
Andriod 4.x (ICS) smartphones
• Google Galaxy Nexus
Android 2.x smartphones
• Google Nexus S
• Mifare Classic
o Mifare Application Directory (MAD)
• Mifare Ultralight
Technical Support
Mirano’s website contains the latest user documentation and software updates for Mirano products. U.S and
Canadian customers can contact Mirano Technical Support through our website.
World Wide Web
http://support.mirano.ca
17
Green Receipt Dispenser NFC User Guide