1
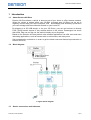
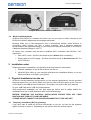
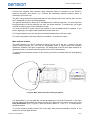
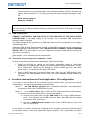
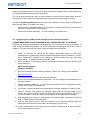
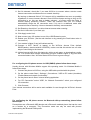
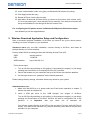
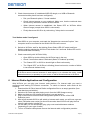
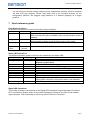
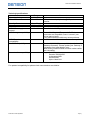
Wi-Drive Installation Manual
Installation Manual
Document version: 1.01
October 2009
Dension Wi-Drive
Version: WID11GEN
(Firmware 1.01)
The installation procedure of Wi-Drive is a relatively simple process, however
the end result is strongly depends on the details.
So please read carefully and follow the instructions of this document.
© Dension Audio Systems
1(15)
Wi-Drive Installation Manual
1 Introduction
1.1
About Dension Wi-Drive
Dension Wi-Drive allows a vehicle to become part of your home or office wireless network.
When the vehicle is parked within your WLAN's coverage area, Wi-Drive can be set to
regularly connect with your home computer, and automatically and wirelessly synchronize
your car's storage with the multimedia content on your home PC.
By plugging in a 3G USB dongle, or via your 3G Phone, your car can become an Access
Point, giving Internet access to any wireless device in the vehicle. Passengers can check
their email, kids can surf the net; the world is literally at your fingertips.
Based on the Dension Wi-Drive platform new software applications can offer more and more
interesting applications, such as Internet radio, e-mail access, and many more.
Visit www.dension.com/widrive in order to get the latest news and feature improvements on
Dension Wi-Drive.
1.2
Block diagram
1. Figure: Block diagram
1.3
Device connections and indicators
© Dension Audio Systems
2(15)
Wi-Drive Installation Manual
2. Figure: Device connections and indicators
1.4
Wi-Drive Utility Software
Wi-Drive Utility (WDU) is a software tool which runs on your home or office computer to set
Wi-Drive connection parameters and manage downloads.
Normally WDU runs in the background, and it automatically detects, when Wi-Drive is
connecting. WDU informs you with a popup message, and it performs automatic
synchronization with specified folders, or you can perform manual downloads to Wi-Drive as
a Network Attached Storage or via FTP.
Of course your computer must be able to establish Wi-Fi connection with Wi-Drive. Your
options are:
•
Use a Wi-Fi router - Wi-Drive should be set as a Station (like a notebook)
•
Directly with your Wi-Fi laptop - Wi-Drive should be set as an Access Point (AP, like
a Wi-Fi Router).
2 Installation order
Please execute the installation in the following order and follow the instructions:
1. Physical installation of the Wi-Drive device into the car
2. Install Wi-Drive Utility on your computer and follow the Installation Wizard, or use the
Advanced Setup to configure your system.
3 Physical Installation into the car
Wi-Drive is usually installed in the glove box or in the armrest compartment. Use the provided
fastening tapes to fix your device. Make sure that you have sufficient space on the front and
on the back for the USB devices (Flash drive, 3G modem, etc.) and for the Wi-Fi antenna.
for your USB Flash drive, USB 3G modemantenna
With professional installation you can hide away the device and its cables behind the
dashboard, and use an USB extension cable for the USB storage.
BEFORE STARTING THE PHYSICAL INSTALLATION PLEASE TURN OFF YOUR
IGNITION AND TURN OFF YOUR CAR RADIO.
PLEASE DO NOT CONNECT THE CAR USB CONNECTOR TO THE CAR YET!
3.1
Temporary installation (DIY) for powering
If you don’t want to install the Wi-Drive permanently in your car, you can use the cigarette
lighter connector to power it. Depending on the vehicle, there are several options:
© Dension Audio Systems
3(15)
Wi-Drive Installation Manual
A. If the cigarette lighter gives continuous 12V, just use the cable included in the
package. However please note, that in this case the Wi-Drive can not “sense” the
ignition key, and will not start operation on that. Instead you need to start the engine,
and the elevated voltage level will start and stop Wi-Drive operation. Of course the
regular wake-up and Wi-Fi connection and download functionality is not effected by
this.
B. If the cigarette lighter gives switched 12V, than there is no power in the cigarette
lighter when the car is parked, therefore Wi-Drive cannot wake up for regular Wi-Fi
connections. In this case you have the following options:
o
Install Wi-Drive permanently (the best option anyway!)
o
Purchase an Accu-Pack accessory from Dension, which can power Wi-Drive
even if the car is switched off.
o
Use Wi-Drive only as an Access Point, when the car is on.
You can test the cigarette lighter functionality of your car with Wi-Drive, as well:
1. Connect Wi-Drive to the cigarette lighter cable, and turn on the ignition.
2. The Status LED on Wi-Drive should indicate activity.
3. Turn off the ignition, close the car and wait until the car goes to sleep (i.e. all the other
displays and lights in the car go off (in some cars it takes 2-3 minutes!).
4. If the Status LED on Wi-Drive is still active, then you can use powering option “A”. If it
goes off with the other elements of the car, than use option “B”.
Notes:
Wi-Drive will go to sleep mode after 5 minutes anyway, so be quick by starting Wi-Drive and
closing the car.
Some new cars feature a 5V level cigarette lighter connection. This is not enough for WiDrive, so its Status LED will not turn on at all. In this case the only choice is the permanent
installation.
3.2
Permanent installation for powering
Use the included power harness, and connect the 3 power leads:
Red:
+12V Battery (continuous 12V)
Purple:
+12V Switched (ACC or ignition)
Black:
GND
PLEASE DO NOT CONNECT THE POWER CONNECTOR TO WI-DRIVE YET!
PLEASE DO NOT CONNECT THE CAR USB CONNECTOR TO THE CAR YET!
To connect the power leads to the right points of the vehicle you need certain expertise and
tools. If you are not familiar with these, please contact a professional installation shop.
3.3
Wi-Fi antenna connection and placement
The Wi-Drive package includes two Wi-Fi antennas (a main antenna with cable and a
secondary without cable) since the device is capable of dual antenna operation (2 MIMO
technology).
© Dension Audio Systems
4(15)
Wi-Drive Installation Manual
Connect the supplied main antenna (with extension cable) to Antenna1 of the Wi-Drive
antenna connector and screw it on. Connect the secondary antenna (without cable) to
Antenna 2 and screw it on.
The Wi-Fi range and performance depends on many things, both at the vehicle side, and the
Wi-Fi installation at your home/office/garage.
The general practices for home Wi-Fi installations are valid here as well. You can reach the
best performance if the car antenna can “see” the home antenna. To achieve this, you might
consider modifying your home installation as well.
You may put the Wi-Fi router near to the window, or use an additional Wi-Fi repeater. If you
park in a garage, you might install a dedicated router there too.
For longer distances you can use special orientated antennas on the home side.
For more hints please visit www.dension.com/widrive, or consult an expert.
Main antenna location
The ideal location for a Wi-Fi antenna would be on the top of the car – however this will
require drilling through the roof and an acceptable level of signal should be possible
elsewhere, however it will be a compromise. The metal body of the car will cause reflection of
signal and result in a specific direction profile for the Wi-Fi transmission.
To select the best antenna location in the vehicle you have to consider also the usual parking
conditions.
Wi-Drive in the glovebox
Antenna
3. Figure: Main antenna location and signal pattern
It is always best, if you can park the car facing toward your home Wi-Fi antenna. In this case
the best compromise location for the car’s main Wi-Fi antenna is the lower center part of the
front windscreen (see 3. Figure). Place the antenna about 4 - 5 cm (1.5 - 2 inches) above
the dash surface.
To fix the antenna, please remove the cover tape, and press the adhesive surface of the
antenna to a clean glass surface.
© Dension Audio Systems
5(15)
Wi-Drive Installation Manual
Adjust the antenna cable to the fittings of the dashboard. Please avoid bending the cable too
sharply; this might destroy Wi-Fi performance.
If generally you park your car with the rear facing the home antenna, then use the same
position on the back windscreen. For this you will need some antenna extension cables.
If you want to have better reception profile both to the front and to the back of the car, than
install two (main) antennas accordingly.
Alternatively you may use the inside surface of the front or the back plastic bumpers, or the
housing of the side mirrors, These locations normally provide better directional signal
strength, and allow “invisible” installation, but require antenna extension cables, and some
installation expertise. Furthermore, the external antenna location will result somewhat lower
signal strength inside the cabin, when you use Wi-Drive as an in-vehicle Internet Access
Point. In most cases the signal strength will be enough due to the short distance; however it
is worth testing before finalizing the installation.
If your car has metallic content in the windscreen, than the inside antenna installation will not
work for external connectivity; you have to use the plastic bumpers or the side mirrors as
installation locations. In this case the externally placed antennas may not cover the cabin for
in-vehicle Internet Access Point application. For this situation install two antennas: one
inside, the other outside. The inside antenna location is now not as critical, and should not be
attached to the windscreen, rather the glove box, as a directly attached antenna stick.
Secondary antenna location
The secondary antenna is a stick antenna directly screwed on the antenna connector of WiDrive so it is located with the device. Please consider a location where you have enough
space to have the antenna in a vertical position.
Tips:
Try out the Wi-Fi performance before fixing the antenna and the cables. Use some temporary
adhesive tape to fix the antenna to the selected position, and test the signal strength by
connecting to the home computer.
If you use a notebook, establish connection with Wi-Drive first within a short, visible distance.
Than increase the distance, and continuously monitor the signal strength.
If the signal is still low, you can try to relocate your WLAN router. Put it to the window
temporarily, and adjust its antenna direction parallel to the car antenna.
You may also install an external antenna to the router.
In order to help the installation, Wi-Drive features an approximate signal strength indication in
Station mode (Signal LED). For details, see chapter 6.
3.4
Finish and Test your physical Installation - Part1
PLEASE CONNECT THE POWER CONNECTOR TO WI-DRIVE NOW!
DO NOT CONNECT CAR USB CONNECTOR TO THE CAR YET!
In order to test the successful device installation, check the followings:
1. Power on Wi-Drive by turning on the ignition (permanent power or Accu-Pack
installation) or by starting the engine (continuous cigarette lighter installation). The WiDrive “Status LED” should turn on Orange for a few seconds (boot up), than blink
green slowly – to indicate Access Point (AP) mode.
2. Insert an USB Flash drive into the “USB Storage” port.
© Dension Audio Systems
6(15)
Wi-Drive Installation Manual
With a notebook you should be able to see the factory default Wi-Drive Access Point
and be able to connect to it. This way you also can check the signal strength on your
PC.
SSID: dension-widrive
Passkey: 12345678
Note:
You can restore the factory default settings, by pressing the Wi-Drive Push button for longer
than 10 seconds.
3.5
USB connections
CONNECT THE PIGTAIL CAR USB PLUG TO THE USB PORT OF THE CAR’S AUDIO
SYSTEM NOW. If the cable length is not enough, use a standard USB male-female
extension cable (included).
The USB storage device (pen-drive or USB hard disk) must be connected to the (single)
“USB Storage” slot.
Additional USB devices (like Bluetooth dongle or 3G/UMTS modems) can be connected to
any of the (double) “USB Extension” slots. PLEASE DO NOT CONNECT YOUR 3G MODEM
DEVICE YET! (The 3G modem is not yet configured, connection trials with the wrong PIN
may lock your modem.)
(See chapter 1.3 for references for the connections)
3.6
Finish and Test your physical Installation – Part2
In order to test the successful device installation, check the following:
1. Power on Wi-Drive by turning on the ignition (permanent power or Accu-Pack
installation) or by starting the engine (continuous cigarette lighter installation). The WiDrive “Status LED” should turn on Orange for a few seconds (boot up), than blink
green slowly – to indicate Access Point (AP) mode.
2. Insert a USB Flash drive (containing some music files) into the “USB Storage” port,
and select the USB playback on the radio, the music playback should function as
normally.
4 In-vehicle Internet Access Point Application, 3G configuration
If you want to use Wi-Drive as an in-vehicle Internet Access Point, you need an Internet
access device. You have several options to provide that:
Option 1. 3G USB Modem (dongle) with a dedicated SIM-card, and subscription
connected to one of the “USB Extension” ports.
Option 2. Your mobile phone, with it’s built in (3G) Internet access and subscription.
To connect your phone with Wi-Drive you have two options:
A. Connect your phone with a simple USB cable to one of the “USB Extension”
ports - if your phone has a USB connector. Note, the USB cable will charge
your phone, while connected.
B. Connect a USB-Bluetooth dongle to one of the “USB Extension” ports, and
pair it to your phone.
In any option you select, the Internet accessing device (modem or phone) should be placed
to a location, where it can have good radio signal reception. This is practically the same
© Dension Audio Systems
7(15)
Wi-Drive Installation Manual
position recommended for the main Wi-Fi antenna: the front middle center of the dashboard.
Use standard USB extension cable if necessary.
The 3G Internet access may work in other locations as well (as your phone does anyway),
but optimum location reduces Internet dropouts, and maximises the quality of service.
In case of metallic windscreens you face the same problem, as you want to make phone
calls from the cabin. The options you have:
o
Use the factory installed phone kit (if you have) to access the Internet, and share the
connection with Wi-Drive via Bluetooth.
o
Install a 3G modem externally, i.e. in the housing of the side mirror.
For configuring the 3G USB modem (dongle) please follow these steps:
PLEASE MAKE SURE YOUR 3G MODEM IS NOT CONNECTED YET TO WI-DRIVE!
Wi-Drive may contain a configuration not suitable for your 3G service provider and modem. In
order to prevent SIM lockup situations, if Wi-Drive detects a wrongly given PIN code, it will be
disabled. The user must set the correct PIN code using the web interface.
1. Power on Wi-Drive by turning on the ignition (permanent power or Accu-Pack
installation) or by starting the engine (continuous cigarette lighter installation). The WiDrive “Status LED” should turn on Orange for a few seconds (boot up), than blink
green slowly – to indicate Access Point (AP) mode.
2. With a notebook you should be able to see the factory default Wi-Drive Access Point
and connect to it.
SSID: dension-widrive
Passkey: 12345678
3. Start your Internet browser (Internet Explorer, Firefox, etc.) and go to this address:
http://192.168.10.1
You have to be connected to Wi-Drive web interface.
4. Sign in with the default password: “password”. You can change this password later on
the web interface.
5. Once successfully signed in, you will see several tabs with the configuration details.
Please click on the “3G Internet” tab.
6. If you have a factory defined entry please delete it first by clicking the “Delete” button.
7. Click on “Choose from presets or add new” drop down list and according to your
country and service provider locate and select the entry we pre-defined in Wi-Drive. If
you do not find the entry you need you will have to set the parameters manually.
8. After selecting from the list (or manual entry), the Name, APN, Username, Password,
DNS1, DNS2, Gateway fields are filled.
9. Click on Add next to the list. Now you will have a line with the settings under the
parameters and click the Active button at the beginning of the entry.
10. In the “Authentication code” entry type your modem’s PIN number or leave it blank if
your modem does not use one.
© Dension Audio Systems
8(15)
Wi-Drive Installation Manual
11. Set On demand: check this if you want Wi-Drive to connect when a device needs
Internet connection and disconnect on network inactivity.
By leaving on-demand field off, 3G internet will be established as soon as possible
regardless of current internet demand. Since Wi-Drive keeps running as long as 3G
connection is up, this can lead to battery exhaust - of course within the limits of
internal battery protection scheme. There are chances that your 3G modem
automatically drops the 3G connection even if it's not in on-demand mode after
several minutes of inactivity. Here on-demand is definitely recommended.
12. Set Roaming: check this if you allow Internet access when roaming.
13. Set Limit: leave this 0 (not used yet).
14. Click Apply under Limit.
15. Now connect your 3G modem to one of the USB Extension ports.
16. Reboot your Wi-Drive. (Via the web interface or by pressing the Push button twice in
one second.)
17. Your modem’s lights (if any) will indicate activity.
18. Connect a Wi-Fi device (a laptop) to the Wi-Drive Access Point (default
SSID/Passkey: dension-widrive/12345678), make sure that this device has no other
ways of connecting to the Internet.
19. Initiate Internet traffic from this laptop by visiting a web page, or downloading e-mails,
etc. You should have Internet connection and your modem’s lights (if any) will show
connected status. Also, Wi-Drive Status LED will turn to green-orange.
For configuring the 3G phone access via USB (RNDIS) please follow these steps:
Usually phones with Windows Mobile support this operating mode. On Windows Mobile 6
follow these steps.
1. Connect the phone to Wi-Drive, using the USB cable provided with the phone.
2. On the phone under Start / Settings / Connections / USB to PC select (checkbox)
“Enable advanced network functionality”.
3. On the phone launch Start / Internet sharing application.
4. For “PC Connection” select “USB”, for “Network Connection” select your configured
3G connection.
5. Click Connect.
Your Internet connection will be active and available for use through the Wi-Drive’s Access
Point.
For configuring the 3G phone access via Bluetooth dial-up-networking please follow
these steps:
Prerequisites are a Bluetooth USB dongle and a Bluetooth enabled phone that can be used
as a modem by a computer. This connection mode can only be used with phones
implementing the Bluetooth DUN profile.
© Dension Audio Systems
9(15)
Wi-Drive Installation Manual
1. Power on Wi-Drive by turning on the ignition (permanent power or Accu-Pack
installation) or by starting the engine (continuous cigarette lighter installation). The WiDrive “Status LED” should turn on Orange for a few seconds (boot up), than blink
green slowly – to indicate Access Point (AP) mode.
2. With a notebook you should be able to see the factory default Wi-Drive Access Point
and connect to it.
SSID: dension-widrive
Passkey: 12345678
3. Start your Internet browser (Internet Explorer, Firefox, etc.) and go to this address:
http://192.168.10.1
You have to be connected to Wi-Drive web interface.
4. Sign in with the default password: “password”. You can change this password later on
the web interface.
5. Upon successful sign in you will see several tabs with the configuration details.
Please click on the “3G Internet” tab.
6. If you have a factory defined entry please delete it first by clicking the “Delete” button.
7. Click on “Choose from presets or add new” drop down list and according to your
country and service provider locate and select the entry we pre-defined in Wi-Drive. If
you do not find the entry you need you will have to set the parameters manually.
8. After selecting from the list (or manual entry), the Name, APN, Username, Password,
DNS1, DNS2, Gateway fields are filled.
9. Click on Add next to the list. Now you will have a line with the settings under the
parameters and click the Active button at the beginning of the entry.
10. In the “Authentication code” entry type your modem’s PIN number or leave it blank if
your modem does not use one.
11. Set On demand: check this if you want Wi-Drive to connect when a device needs
Internet connection and disconnect on network inactivity.
12. Set Roaming: check this if you allow Internet access when roaming.
13. Set Limit: leave this 0 (not used yet).
14. Click Apply under Limit.
15. Click on the “Bluetooth” tab.
16. If you have a factory defined entry please delete it first by clicking the “Delete” button.
17. Connect your USB Bluetooth dongle to one of the USB extension ports.
18. Enable Bluetooth connection on your phone; make sure the phone is “visible to other
devices”. Consult your phone's user manual for instructions.
19. Click on the Bluetooth tab again, and wait while the page is loaded (“Loading, please
wait…”). Wi-Drive now scans for nearby (visible) Bluetooth devices; this might take
about 10 seconds. If the Phone list is shown immediately then click on the Bluetooth
tab again until you have the “Loading, please wait…” message up for several
seconds.
20. After a successful scan the “found” Bluetooth devices are listed in the dropdown list
(“Choose one or add new…”). Select the Phone you want to use for Internet
connection and click Add.
21. Click Apply below the Phone list.
© Dension Audio Systems
10(15)
Wi-Drive Installation Manual
22. In the “Authentication code” entry type your Bluetooth PIN number for pairing.
23. Click Apply below this entry.
24. Restart Wi-Drive (use the Service tab).
25. After about 30 seconds Wi-Drive will try to connect to your phone (with a name “wid”).
If it is not yet paired, pair it now with the PIN you entered. Your internet connection will
be up and available for use through Wi-Drive’s Access Point.
For configuring the 3G phone access via Bluetooth PAN please follow these steps:
Not released yet, will be supported later.
5 Wireless Download Application Setup and Configuration
After a successful physical installation of Wi-Drive you have to set up the whole system,
including your home computer or your notebook.
Advanced users may use their notebooks, connect directly to Wi-Drive, and make all
settings directly on it’s web-interface.
Factory default Wi-Drive setting provides the following Access Point (AP):
SSID:
dension-widrive
KEY:
12345678
WEB-interface:
http://192.168.10.1
Follow these steps:
1. Turn on Wi-Drive by switching on the ignition (or by starting the engine), or just simply
pressing the Push button on a sleeping Wi-Drive for 2 seconds.
2. Launch the browser on your computer and go to Wi-Drives web interface address.
3. On the login screen use: “password” as the default password.
Please change factory settings, otherwise others may access to your system.
Standard setup steps:
1. Make sure that Wi-Drive is in sleep mode (see Push button operation in chapter 7)
and the car radio is switched-off.
2. Insert a USB pen drive to the “USB Storage” slot (single) of Wi-Drive.
Turn on Wi-Drive by switching on the ignition (or by starting the engine), or just simply
pressing the Push button on Wi-Drive. Wi-Drive will write a configuration file to the
pendrive. It is important, that your head unit is switched off.
You will see a short blinking of the LED on the pen-drive (if it has), while Wi-Drive is
writing. This takes a few seconds only (wait 30 seconds), than remove the pen-drive
and take it to you computer.
© Dension Audio Systems
11(15)
Wi-Drive Installation Manual
3. Install and start Wi-Drive Utility (WDU) software on your PC. Microsoft Windows XP or
Vista OS and 6 MB free disk space is required. (We recommend Windows XP if you
have the choice).
Download the latest version WDU install package from: www.dension.com/widrive
Run the downloaded install package and follow the Setup Wizard instructions, answer
Yes where needed, and enable network access for WDU, if you have a firewall.
For automatic synchronization the install package also includes the Rsync utility for
Windows, please allow its installation also!
Launch Wi-Drive Utility. At first time running and if no devices are configured the
Installation Wizard will start. If one (or more) devices are configured it starts in tray
mode, look for the Wi-Drive logo
, and double-click to open it.
4. Insert the pen-drive to your PC containing Wi-Drive configuration file (from Step 2),
and select the drive when the Install Wizard asks for it.
5. Follow all installation pages, and change settings, as necessary.
6. On the last page the Install Wizard will write a new configuration file to the pen-drive.
Disconnect safely the pen-drive from the PC, and insert it again to Wi-Drive’s “USB
Storage” port and turn-on Wi-Drive.
Wi-Drive learns the new configuration data, reboot itself, and will work accordingly.
Now your Wi-Drive system is set up and ready to work. You can re-configure your WiDrive anytime with this method.
Notes:
Each time Wi-Drive wakes up, it writes its configuration out to the USB storage found.
5.1
Test your system setup
Test Access Point (AP) mode if configured:
1. Start WDU on your computer, and mark the “Keep device connected” option.
2. Switch-on Wi-Drive.
3. Look for the preset AP name on your notebook and make connection.
•
Perform the network search manually, automated Windows recognition can be
extremely slow!
•
Connect manually to the Wi-Drive AP.
4. Check connectivity with Wi-Drive Utility.
•
Open WDU by double clicking the Wi-Drive logo in the tray.
•
Check if connection status is indicated (Status: IP Address provided).
•
The “Status LED” on Wi-Drive should light on Green continuously.
© Dension Audio Systems
12(15)
Wi-Drive Installation Manual
5. Check Internet access (if a dedicated USB 3G dongle, or a USB or Bluetooth
connected mobile phone has been configured).
•
Pair your Bluetooth phone, if it was installed
•
Check Internet access on your notebook. Make sure, that the notebook does
not have any alternative Internet access channel.
•
When Internet access is established, the Status LED on Wi-Drive blinks
Green-Orange (except when WDU is connected).
•
Finally disconnect Wi-Drive by unchecking ““Keep device connected”
Test Station mode if configured:
1. Start WDU on your computer, and mark the “Keep device connected” option. Your
computer must be connected to the WLAN. Wi-Drive will connect.
2. Switch-on Wi-Drive, wait for the blinking Green Status LED (AP mode) and force
Station mode by pressing the Wi-Drive Push button for 2 seconds. Status LED on WiDrive should blink Red slowly.
3. Check connectivity with Wi-Drive Utility.
•
Open WDU by double clicking the Wi-Drive logo in the tray.
•
Check if connection status is indicated (Status: IP Address provided).
•
The “Status LED” on Wi-Drive should light on Red continuously.
•
The “Signal LED” on Wi-Drive is blinking (three levels exist, number of blinks
in two seconds indicate level)
Notes:
If Wi-Drive cannot connect because of weak signal, try to relocate the router, install
external antenna (or repeater) on your router, or add a second antenna to Wi-Drive.
6 Internet Radio Application and Configuration
With Wi-Drive you can play your Internet radio stations. For Internet radio you need a
configured and working 3G Internet connection. To switch to Internet radio mode do the
following:
1. Download the Wi-Drive Internet Radio configuration files to an empty pendrive (from
www.dension.com/widrive).
2. Switch on Wi-Drive and start playing music from the USB Sorage memory.
3. Make sure that your 3G Internet connection is up and working.
4. Plug in the Wi-Drive Internet Radio configuration pendrive to one of the USB
Extension ports.
5. After a few seconds Wi-Drive will switch to Internet radio mode, you will hear a pre-set
noise (FM station scan noise) for about 30 seconds, than Wi-Drive will play the first
Internet radio station (playlist file)
6. On the radio you can use browse, play, play next to switch between stations
(depending on your type of radio)
7. To turn off Internet radio please remove the Internet radio configuration pendrive.
© Dension Audio Systems
13(15)
Wi-Drive Installation Manual
You can copy your favorite Internet radio list to the configuration pendrive. Wi-Drive supports
.pls and .m3u type playlists. Please copy these files to the /netradio directory on the
configuration pendrive. We suggest using maximum of 5 stations (playlists) on a single
pendrive.
7 Quick reference guide
Push Button functions:
Wi-Drive’s Push button has useful functionality during installation.
Press
Duration
Function
Short
1..2 sec
Equals to a Car on / Car off cycle.
Start 5 minutes AP mode (if enabled), than 2 minutes Station mode (if
enabled)
Long
2..6 sec
Forced switch from AP to Station mode.
When pressed in Station mode Wi-Drive goes to sleep mode.
Very long
8..16 sec
Restore all factory default settings
Double
Short
2 press in 1
second
Manual reboot from AP and Station modes.
Status LED indications:
The different operation modes of Wi-Drive are indicated by the Status LED.
Color
Blinking
Status
Orange
Fast
Wi-Drive operating system is booting up
System firmware update is in progress. Do not disconnect
Orange
Steady
Wi-drive’s power line!!!
Red
Short pulse
Wi-Drive is in Standby (sleeping) mode.
Red
Slow
Station mode, connection trial is in progress.
Red
Fast
Station mode, connected to an Access Point.
Red
Steady
Station mode, connection established with WDU.
Green
Slow
AP mode is provided, but no clients connected.
Green
Fast
AP mode is provided, and at least one client is connected.
Green
Continuous
AP mode is provided, connection established with WDU.
Green-Orange
Fast
AP mode is provided, and 3G Internet access is active.
During WDU connection, the Internet status is not indicated.
Green-Orange
Slow
AP mode is provided, and 3G Internet access is active.
Signal LED indications:
The number of blinks in two seconds of the Signal LED indicates the signal strength of the actual
Wi-Fi connection in Station mode. Three blinks indicates the strongest, one blink is the weakest
signal reception. This functionality is active only when Wi-Drive is connected.
© Dension Audio Systems
14(15)
Wi-Drive Installation Manual
Technical specifications
Parameter
Operating Voltage
Active Current
Standby Current
Operating temperature
Battery protection level
USB device supply
current
USB Storage compatibility
USB 3G modem
compatibility
Car USB compatibility
Internet radio compatibility
Range
10V - 16V
Max 400 mA
Max 100 uA
-20 C - +65 C
11.7 V
Min 1.5A
Comment
Without external peripherals, @1 Mbps data
transfer
Sum of all the 3 USB ports
Most of the Kingston, Transcend, SanDisk
memories are compatible. Some “noname” pendrives may not work.
Long USB extension cable may cause problems.
Most Huawei and Novatel modems are compatible.
Dension GW300-500 is compatible (use the latest
Gateway firmware!). Please update your Gateway if
necessary from www.dension.com
Most factory installed USBs and after market radios
are compatible.
Supported USB ports:
Dension GW300-500
Volkswagen MDI
Renault USR
Alpine Head Unit
For updated compatibility list please check www.dension.com/widrive.
© Dension Audio Systems
15(15)