1
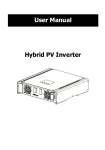
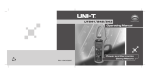
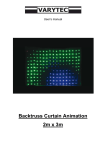
~
INSTRUCTION MANUAL
BETJENINGSVEJLEDNING
BRUKSANVISNING
BEDIENUNGSANLEITUNG
~
MANUAL DE INSTRUCOES
MCA - 150
www.denver-electronics.com
Copyright. All rights reserved.
DENVER MCA-150 INSTRUCTION MANUAL
WARNING
TO REDUCE THE RISK OF FIRE OR ELECTRIC SHOCK, DO NOT EXPOSE
THIS APPLIANCE TO RAIN OR MOISTURE.
CAUTION
Use of controls or adjustments or performance of procedures
other thanthose specified herein may result in hazardous
radiation exposure.
This Compact Disc player is classified as CLASS 1 LASER product.
CLASS 1 LASER PRODUCT
KLASSE 1 LASER PRODUKT
LUOKAN 1 LASER LAITE
KLASS 1 LASER APPARAT
CAUTION!
Invisible laser radiation when open and interlocks defeated. Avoid
exposure to beam.
FOR SAFE AND EFFICIENT OPERATION
- Do not damage the mains lead.
When not in use, disconnect the mains lead from the outlet. Grasp the plug, not the mains lead,
when disconnecting the unit.
- If water should enter the unit, electrical shock or a malfunction may result. Use in an area where
there is low humidity and little dust.
- Do not disassemble or alter the unit in any way.
¡£
- Do not use the unit in areas where extremes in temperature occur (below 5 C o r e xceeding
¡£
35 C), or where it may be exposed to direct sunlight.
- Because of the CD player's extremely low noise and wide dynamic range, there is a tendency
to turn the volume on the amplifier higher than necessary. Doing so may produce an
excessively high output from the amplifier which can cause damage to your speakers. Please
be careful in this regard.
- Sudden changes in the surrounding temperature can cause dew to form on the optical
pickup lens inside the unit. Under this condition the unit may be unable to operate properly.
If this should occur, remove the disc and allow the player to adjust to the surrounding
temperature.
- This unit must be operated in a horizontal position.
- Please use the original CD software, and any copy discs are not recommendable for use.
- The apparatus shall not be exposed to dripping or splashing.
Do not install the equipment in a confined spaces, such as a book case or built-in cabinet.
THIS UNIT SHOULD NOT BE ADJUSTED OR REPAIRED BY ANYONE EXCEPT PROPERLY
QUALIFIED SERVICE PERSONNEL.
English-1
POWER SUPPLY
R
L
ANTENNA
AM
LOOP
RESET
FM
OHMS
~ AC IN
AC power operation
Connect one end of the mains lead to the (AC
~IN) socket and the other end to an AC outlet.
The unit is not disconnected from the mains
unless the mains lead is unplugged from the AC
outlet.
RESET BUTTON OPERATION
When mistake operation occurs, for example
don't display " D:00 ",disconnect the AC CORD
to turn off the unit, press " RESET " button with
a small tool. Then turn on the unit, display "0:00".
English-2
Note: When press the "RESET" button, the
previous memories invalidate, need reset.
1
2
3
4
5
23
23
6
11
7
8
9
12
13
14
23
23
10
15 16
19
25
17 18
LIGHT POWER
ANTENNA
ON OFF
21
AM
LOOP
FM
OHMS
20
24
RESET
~ AC IN
22
English-3
R
L
CONTROLS
1. Volume button (VOLUME )
2. Volume button (VOLUME )
3. LCD display (back light)
4. CD function button (CD)
5. Tuner function button (TUNER)
6. Disc tray
7. CD/RW Repeat button (REPT/M-UP)
8. Power button (POWER)
9. P-EQ button (P-EQ )
10. Phone jack (PHONE)
11. IR remote sensor
12. M/CLKADJ button (M/CLKADJ)
13. CD Open/close (OPEN/CLOSE)
14. Random button (RANDOM)
15. Play/Pause button (PLAY/ PAUSE
)
16. CD/RW Skip / Tuning up button (
SKIP)
17. CD/RW Skip / Tuning down button (
SKIP)
18. Stop / Band button ( /BAND)
19. FM 75 ohms aerial terminal
20. Speaker terminal
21. AM aerial earth terminal
22. AC input socket (AC~IN)
23. Strip type blue power level indicator
24. Reset button (RESET)
25. Light power switch ( LIGHT POWER)
REMOTE CONTROL
Controls
1
2
3
4
5
6
1. Power button (POWER)
2. M/clk adj button (M/CLK ADJ)
3. EQ button (EQ)
4. Rept/m-up button (REPT/M-UP)
5. Function button (FUNCTION)
6. 0-,1-, 2- Direct key button (OVER)
7. SKIP / Tuning down button (
)
8. Play/ Pause button (
)
9. Volume button (
)
10. SKIP / Tuning up button (
)
11. Volume button (
)
12. Stop / Band button ( /BAND)
13. Direct 10 key buttons (1~10)
8
7
9
10
11
12
13
There are some discs which do not have all command signal.
While these discs playing, the above various play may not be operated.
English-4
CONTROL OPERATION
NO.
1.
2.
Button Name
Volume down button
( VOLUME
)
Volume up button
( VOLUME
)
Operation
Press the VOLUME
MAXIMUM
80db
Press the VOLUME
40db
42db
44db
key to decrease the volume.
70db
4db
2db
0db
key to Increase the volume.
78db
80db
MAXIMUM
4.
CD function button
( CD )
Press CD key to CD function.
5.
Tuner function button
( TUNER )
Press TUNER key to Radio function.
7.
Repeat / memory button
( REPT/M-UP )
At CD mode: press REPT/M-UP button, display
flash "REPEAT", repeat the current track continuously.
Again press REPT/M-UP button, display "REPEAT",
to repeat the entire disc.
At radio mode: press REPT/M-UP button, memory
numeric radio number up display.
8.
Power button
( POWER )
Press POWER button to be on and standby power.
9.
Equalizer button
( P-EQ )
There are 4 deferent equalizing mode, FLAT\
CLASSIC\ROCK and POP . The user can select one
of them by pressing the EQ key.
12.
Memory/Program button
( M/CLKADJ )
NORMAL
POP
CLASSIC
ROCK
(A)
1. In CD mode, press M/CLKADJ key one time to
make the "MEMORY" display flash during the CD
is stop.
2. Specify a track to play by pressing
or
key.
3. Pressing M/CLKADJ one time, then track is stored
into the program.
(B)
1. IN tuner mode, press M/CLKADJ key one time,
to make the " MEMORY " display flash.
2. Press
or
key, radio auto stop.
3. Press REPT/M-UP again, then the desired station
is stored in channel 1.
4. Press M/CLKADJ key again.
* Up to a maximum CD: 20 \ FM:10 \ AM:10
English-5
CONTROL OPERATION
NO.
Button Name
Operation
13.
OPEN/CLOSE button
( OPEN/CLOSE )
Press the OPEN/CLOSE button to open and close
the disc tray.
14.
Random button
( RANDOM )
Press the RANDOM button, the tracks on the disc can
be played in random order automatically.
15.
Play/ Pause button
(
)
CD Play back start and Pause (temporary stop)
function.
PLAY PAUSE in sequently during playing back.
16.
Fast backward skip/search
button (
)
1. In CD mode, press "
" key to choose desired
track during the CD is stop.
2. Each press will change the track number by one.
3. In tuner mode, when the "
" key is pressed for
more than 0.5 seconds, scanning will start
automatically and the tuner will stop at the first
receivable broadcast station.
NOTE:
Under playing, press "
"button, it's can't return
to last song from first song. We can choose any
song under stopping.
17.
Fast forward skip/search
button (
)
1. In CD mode, press "
" key to choose desired
track during the CD is stop.
2. Each press will change the track number by one.
3. In tuner mode, when the "
" key is pressed for
more than 0.5 seconds, scanning will start
automatically and the tuner will stop at the first
receivable broadcast station.
NOTE:
Under playing, press "
"button, it's can't return
to last song from first song. We can choose any
song under stopping.
18.
CD stop play/radio band
button (
/BAND )
Press the
/BAND key to the stop the disc playing.
During tuner mode, press /BAND key to select the
desired reception band AM or FM.
English-6
OPERATION OF REMOTE HANDSET
NO.
Button Name
1.
2.
3.
4.
7.
8.
9.
10.
11.
12.
Power button
M/clk adj button
EQ button
Rept/m-up button
SKIP / Tuning down button
Play/ Pause button
Volume button
SKIP / Tuning up button
Volume button
Stop / Band button
Operation
PREFERENCES CONTROL OPERATION.
5.
Function button
( FUNCTION
CD/TUNER )
There are 2 deferent function mode, CD and TUNER.
The user can select one of them by pressing the
FUNCTION key .
6.
Over button
( OVER )
Press OVER button, and press numeric keys,
select " 0- , 1- , 2- "
13.
Over button
( 1~0 )
Numeric keys.
English-7
GENERAL OPERATION
To open and close the power
Compact discs
- Both 8cm and 12cm discs can be played in
this unit.
NOTE: Place only one disc at a time in the CD
compartment.
- Only discs bearing the logo as shown can be
played in this unit.
POWER
To control the sound
C O M PA C T
VOLUME
DIGITAL AUDIO
Display on LCD
Press and release repeatedly
Press the VOLUME button to adjust the
sound.
DISPLAY NOTES:
- If a disc is loaded upside down, " No disc "
will be displayed.
- If no disc is loaded, " No disc " will be
displayed.
- Opening the CD compartment lid while a
is playing could scratch the disc. Always
press the STOP button and wait for the
disc to stop rotating before opening the
CD compartment lid.
Using headphones
When the headphones are plugged in, the
speakers are automatically disconnected.
- Always place the compact disc in the CD
compartment with the label facing up.
Compact discs can be played on only one
side.
- Fingerprints and dust should be carefully
wiped off the disc's signal surface (opposite
the label side) with a soft cloth. Gently wipe
in a straight motion from the inside to the
outside of the disc.
- Discs should be returned to their case after
use to avoid serious scratches which could
cause the player to skip.
- Do not expose a disc to direct sunlight, high
humidity, or high temperatures for extended
periods of time to prevent warping the disc.
- Do not apply paper or write anything on the
surface of the disc.
- Do not use cleaners or antistatic sprays on
discs, such as those used for phonograph
recorder.
PHONE
IMPORTANT NOTE:
Stereo headphone
(not included)
If an abnormal display indication, audio
or an operating problem occurs, please
press the POWER button to OFF position,
then disconnect the mains lead and all
cables. Wait at least 5 seconds, then
reconnect all cables to correct position.
Reconnect the mains lead.
English-8
SPEAKER CONNECTION
There is no distinction between the right and the left speakers.
Right speaker
Left speaker
R
L
INPUT
INPUT
Red
Black
Caution:
Do not mistake the right and the left channels. the right speaker is the one on the right side
when you face the unit.
Do not let the bare speaker wires touch each other.
Do not allow any objects to fall into or to be placed in the bass reflex ducts.
Do not stand or sit on the speakers. You may be injured.
AERIAL CONNECTION
ANTENNA
AM loop aerial
AM
LOOP
FM
75 OHMS
FM aerial
Supplied FM aerial:
Connect the FM aerial wire to the FM 75 OHMS terminal and position the FM aerial wire in
the direction where the strongest signal can be received.
Supplied AM loop aerial:
Connect the AM loop aerial wire to the AM LOOP socket. Position the AM loop aerial for
optimum reception. Place the AM loop aerial on a shelf, etc., or attach it to a stand or a
wall with screws (not supplied).
English-9
COMPACT DISC OPERATION
CD PLAY
4
3
2
1
3 Press the "PLAY" button
to play.
4 To control the sound.
VOLUME
1
OPEN/
CLOSE
Open the disc tray
Press and release repeatedly
/BAND
Label facing up
OPEN/
CLOSE
Press STOP.
Close the disc tray
2 TO CD
CD
POWER
TUNER
To OFF
English-10
PAUSE
/BAND
1. Press the PLAY/PAUSE button during play. Play
will temporarily stop, and PAUSE indicator will
show.
2. Press the PLAY/PAUSE button again to resume
play. Pause indicator will go off.
TRACK SKIP
1. Press and release the
or
SKIP button
repeatedly during play to quickly locate the
beginning of a track.
2. The CD track number display will show the
number of the selected track. Play will continue
from the beginning of the new track.
Press and release repeatedly
English-11
PROGRAMMED PLAY
With programmed play, up to 20 tracks on
a disc can be memorized and played in any
order.
For example to program track 7, 12
1 In stop state, Press M/CLKADJ button,
the MEMORY indicator will flash.
Display on LCD
Press the
or
3 Press PLAY/PAUSE button and
programmed play starts automatically.
SKIP button.
Press M/CLKADJ button, the
" MEMORY " indicator will show.
2 Press the
Press M/CLKADJ button, the
" MEMORY " indicator will show.
4 To cancel the programmed play, press
STOP button and then M/CLKADJ
button once, press STOP button again.
SKIP button.
Display on LCD
English-12
RADIO OPERATION
4
3 2
1
In tuner mode, when the TUNING button
is pressed for more than 0.5 seconds,
scanning will start automatically and the
tuner will stop at the first receivable
broadcast station.
1 To RADIO.
CD
3 Tune in a station.
TUNER
4 To control the sound.
VOLUME
2 Select a band.
Press and release repeatedly
/BAND
POWER
To OFF
English-13
CLOCK OPERATION
After connecting the power, press " M/CLKADJ " button and at the some time,
display " 24H " indicator will flash, Press "
" or "
" button to select "12H" or "24H",
again press " M/CLKADJ " button, and pressthe "
" or "
"button the current time
is set.
M/CLKADJ
English-14
SPECIFICATIONS
(CD Section)
Channels
: 2 channels 4 speaks
S/N ratio
70 dB
: Undetectable
Wow & Flutter
Sampling frequency : 44.1 kHz
Quantization
:16 bits linear/ch
Pick up light source : Semi-conductor laser
Pick up wave length : 790mm
Laser output
: Continuous wave max.
0.6mW
(General)
Power output
: 30W(15W+15W)
( 10%. T.H.D. )
Terminals - Output: Headphones, speaks
Power source
: AC: 230V/50Hz
Dimensions
: 150 x 292 x 128 mm
(W) x (D) x (H)
weight (approx) : 3.9kg
(Speaker)
Speaker
Dimensions
: 92mm x 2 (8 ohms)
: 126 x 246 x 238 mm
(W) x (D) x (H)
weight (approx) : 4.3kg
(Radio Section)
Tuning ranges : FM : 87.5-108MHz
AM : 522-1620KHz
Aerials
: FM wire ANT
AM loop ANT
Specifications subject to change without notice.
CAUTION
RISK OF ELECTRIC SHOCK
DO NOT OPEN
www.denver-electronics.com
English-15
SUBJECT TO MODIFICATION WITHOUT NOTICE!