Transcript
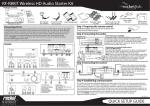
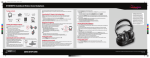
RF-RBKIT Wireless HD Audio Starter Kit
Package contents
Wireless sender
Connecting the wireless sender
3.5 mm stereo cables (2)
(for wireless sender)
Note: If you already had your speakers connected to the back of your
home theater system, you will need to disconnect them before you
can set up your wireless sender and wireless receiver.
AC power cable
(for wireless receiver)
AC power adapter
(for wireless sender)
Cable spool
(for wireless receiver)
Wireless receiver
Remote control
3.5 mm to RCA adapters (2)
(6 inches/15.25 cm)
(for wireless sender)
Speaker cable (4)
3 ft (91.5 cm)
User Guide
1 Connect the Right Surround speaker terminals of your
home theater system to the right speaker terminals of the
wireless sender on the Input A side. Use red speaker wire
to connect the red (+) terminals and black speaker wire to
connect the black (-) terminals. Repeat to connect the Left
Surround speaker terminals.
2 Plug one end of the AC power adapter into the wireless
sender and plug the other end of the cord into an AC
power outlet.
Right
Surround
Left
Surround
Back of home theater system
Home theater system
Note: Your home theater system may vary in appearance.
Refer to your home theater system manual.
Quick Setup Guide
Connecting the wireless receiver
Initial setup
1 Unpack the package contents.
2 Enable the remote control battery.
Remove the tab from the bottom
of the remote control.
3 Set up the Wireless HD Audio Starter Kit.
The diagram shows a typical Wireless HD
Audio Starter Kit application for 5.1
home theater wireless surround
sound. For more information on
how to set this kit up for use with
a TV or MP3 player, additional
room audio, or a 7.1 home theater
setup, see your User Guide.
The wireless sender is connected
to the rear sound speaker outputs
of your home theater system and
the wireless receiver is connected
to the rear sound speakers.
See the following steps for further
setup details.
Back of wireless sender
1 Connect the Right Surround speaker to the right speaker-out terminals on the wireless receiver.
Use a red speaker wire to connect the red (+) speaker-out terminal and black speaker wire to
connect the black (-) speaker-out terminal. Repeat to connect the Left Surround speaker.
2 Plug one end of the AC power cord to the AC IN jack on the back of the wireless receiver, then
plug the other end of the cord into into an AC power outlet. The Standby indicator turns on.
TV
Home theater
system
Left Surround speaker
Back of wireless receiver
Right Surround speaker
SPEAKER-O UT (4-8 O hm )
Wireless sender
A C IN
Establishing communication
The wireless sender and wireless receiver packaged together with the Wireless HD Audio Starter Kit
were pre-paired so they will communicate with each other right out of the box. If you need to re-pair
the wireless sender and wireless receiver, use the following steps, otherwise you may skip this section
and go to, Using your wireless sender and receiver.
1 Set the HUB STATUS switch on the wireless sender to ENABLE if this is your first Rocketboost
product set.
• The power indicator turns green when the HUB STATUS switch is set to ENABLE.
• The power indicator turns blue when the HUB STATUS switch is set to DISABLE.
2 Press and hold on the wireless sender for more than three seconds to put it into pairing mode.
The power indicator starts blinking rapidly and the unit will stay in pairing mode for 30 seconds.
3 Press and hold on the wireless receiver for more than three seconds so the wireless sender and
wireless receiver enter pairing mode.
• The power indicator lights steadily if pairing was successful.
• The power indicator blinks slowly if pairing was not successful.
If you already have other Rocketboost devices, you need to pair both the wireless sender and wireless
receiver to your existing hub device. See your User Guide for detailed instructions on how to do this.
Rocketboost network notes:
Every Rocketboost network must contain
one hub device, which helps devices join
the network. The network can have only
one hub, which you can enable using the
hub switch on the back of all Rocketboost
wireless senders and wireless
sender/receivers. If this is your first
Rocketboost product, you should make this
device the hub, if you already have
Rocketboost products, you should disable
hub mode on this device.
Important: Hub devices must always have
power for your network to operate. The hub
device can be in standby (power-saving)
mode, but must stay plugged in.
Using your wireless sender and wireless receiver
1 Turn on the wireless sender and wireless receiver. The power indicator LEDs should light steadily. If
they are blinking, you need to rejoin the wireless sender and wireless receiver. See the Establishing
communication above.
2 Turn on the audio source connected to the wireless sender. Make sure the volume of the audio
source is not muted, otherwise no audio will be sent over the Rocketboost network.
3 Press the SOURCE A button on the wireless sender to turn on the source to the A input. The LED
around the source button turns on to show that the source is enabled.
4 Adjust the audio level on the wireless receiver.
1 2 0 V ~ ,6 0 H z
R
L
Wireless receiver
QUICK SETUP GUIDE
© 2011 BBY Solutions, Inc., All Rights Reserved. Distributed by Best Buy Purchasing, LLC, 7601 Penn Avenue South, Richfield, MN USA 55423-3645
ENGLISH 10-1332