Transcript
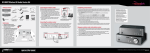
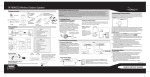
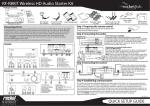
RF-RBWHP01_10-0801_QSG_V1_ENG.eps 1 7/30/2010 1:09:52 PM
RF-RBWHP01 Rocketboost Wireless Stereo Headphones
same color jacks together (the white to the white and the red to the red).
Package contents
Note: If your audio source has only a 3.5 mm “phones” or “line out” jack, use the supplied 3.5 mm-to-RCA adapter
cable.
AC power adapter
Rechargeable
batteries (2)
Headphones
Docking station
Connecting the AC adapter to the docking station
Caution: To avoid risk of fire and to prevent damage, only use the AC adapter supplied with your wireless
headphones. Make sure that the power supply outlet matches the AC adapter’s 120V before making the
connection.
1 Connect the AC adapter connector to the docking station’s DC IN jack.
2 Connect the AC adapter plug to an AC power outlet. The STANDBY indicator lights red steadily
when the docking station is plugged in.
3.5 mm-to-RCA
adapter cable
Caution: Plug the AC adapter into the power outlet only after all other connections are completed.
RCA audio cable
C
M
Y
CM
MY
CY
CMY
K
Quick Setup Guide
User Guide
Important: Before using the wireless headphones for the first time, make sure the batteries are fully charged for at
least 16 hours. This will help provide a longer operating lifetime for the batteries.
Installing the headphone batteries
Place the headphones onto the docking station. Make sure
that the headphone charging contacts and the docking
station charging pins make contact.
• The docking station charging indicator turns red to
indicate the headphones are charging.
• When the headphones are fully charged (which takes
about eight to nine hours), the docking station charging
indicator turns green.
The headphones are powered by two AA rechargeable
batteries. Each earpiece houses one battery.
Notes:
• Do not install non-rechargeable batteries.
• Make sure that all batteries are installed correctly.
1 With an earpiece cushion facing you, unlock and remove
left and right earpiece cushions by slightly rotating them clockwise, then
pulling them away from the headphones.
2 Insert one AA rechargeable battery into each battery compartment. Make
sure to align the + and - symbols on the batteries with the symbols in the
battery compartments.
3 Replace the left and right cushions.
Using the supplied RCA audio cable, connect the audio
output jacks of your audio source to the AUX INPUT jacks
of the docking station. Make sure that you connect the
R
Turning on the system
Caution: To prevent damage to your system, make sure all components are turned off before making connections.
Audio source
Docking station
back panel
To connect the docking station to your audio
source:
L
Headphone
charging
contact
Docking station charging pin
Notes:
• The batteries will last up to ten hours with continuous use
(depending on the headphone volume level and distance from the docking station).
• The headphones can be charged even if the docking station or headphones are turned off.
Connecting the system to an audio source
In a typical user installation, the docking station is
connected to the audio output of a TV. Other devices
with audio outputs could be used as well.
Charging the headphones
RCA cable (supplied)
QUICK SETUP GUIDE
1 Set the POWER switch on the left earpiece of headphones to ON.
2 Press the POWER button on the docking station.
Establishing communication
The headphones and docking station must be "joined" or wirelessly connected to each other so that
audio can be sent from the docking station to the headphones.
Since the headphones and docking station are pre-joined at the factory, you can skip this step and go
to the Listening through the headphones step. Follow this procedure only if you need to rejoin the
headphone and docking station. For information on how to use this product with an existing
Rocketboost network, see your User Guide.
To join the headphones to the docking station:
1 Set the HUB STATUS switch on the docking station to ENABLE if this is your first Rocketboost
product set.
• The power indicators turn green when the HUB STATUS switch is set to ENABLE.
• The power indicators turn blue when the HUB STATUS switch is set to DISABLE.
2 Press and hold the CONNECT button on the docking station for more than three seconds to put it
into joining mode. The power indicator starts blinking rapidly and the unit will stay in joining mode
for 30 seconds.
3 Press and hold the CONNECT button on the headphone for more than three seconds so the
docking station and headphone enter joining mode.
• The power indicator lights steadily if the joining was successful.
• The power indicator blinks slowly if the joining was not successful.
For more information, see your User Guide.
Listening through the headphones
Rocketboost network notes:
Every Rocketboost network must contain
one hub device, which helps devices join
the network. The network can have only
one hub, which you can enable using the
hub switch on the back of all Rocketboost
senders and se
sender/receivers. If this is your
first Rocketboost
Rocketboo product, you should make
the docking sta
station the hub, if you already
have Rocketboost
Rocketbo products, you should
disable hub mo
mode on the docking station.
Important: Hub
Hu devices must always have
power for your network to operate. The hub
device can be in
i standby (power-saving)
mode,
must stay plugged in.
m
mod
e, but mus
1 Set the headphone’s volume level to the minimum.
2 Turn on the headphones and docking station. Make sure that your docking station and headphones
are wirelessly “joined.”
The power indicators light steadily if the docking station and headphones are joined and blink
slowly if they are not. If they are not joined, see “Establishing Communication” above or in the User
Guide.
3 Put your headphones on your head. Adjust the angles of the left and right ear pieces until you feel
comfortable.
4 Turn on your audio source and begin playback.
If there are multiple sources in the Rocketboost network, press the SOURCE button on the
headphones to find the source you want to listen to. The TX indicator on the docking station (if it is a
hub) blinks several times, indicating that the current audio source is changing.
5 Adjust the headphone volume to your normal listening level.
Caution: Continuous use at high volume may permanently damage your hearing.
Note: If the system is connected to an A/V receiver with an external amplifier, turn off the amplifier to prevent
hearing sound from the amplifier speakers.
Turning off the system
1 Set the POWER ON/OFF switch located on the headphone’s left earpiece to OFF.
2 Press and hold the POWER button on the docking station. The power indicator on the docking
station goes off.
© 2010 BBY Solutions, Inc., All Rights Reserved. Distributed by Best Buy Purchasing, LLC, 7601 Penn Avenue South, Richfield, MN USA 55423-3645
ENGLISH 10-0801