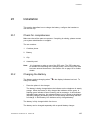
1
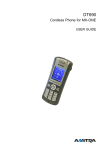
DT690
MD Evolution Communication Platform
USER GUIDE
Copyright
© Copyright Aastra Telecom Sweden AB 2008. All rights reserved.
Disclaimer
No parts of this publication may be reproduced, stored in retrieval systems, or
transmitted in any form or by any means, electronic, mechanical, photocopying,
recording or otherwise, without prior written permission of the publisher except
in accordance with the following terms.
When this publication is made available on Aastra media, Aastra gives its
consent to downloading and printing copies of the content provided in this file
only for private use and not for redistribution. No parts of this publication may
be subject to alteration, modification or commercial use. Aastra will not be liable
for any damages arising from use of an illegal modified or altered publication.
1424-EN/LZT 103 090 Uen A1 2008-10-24
Contents
Contents
1
Welcome
1
2
Important User Information
3
2.1
Safety Instructions
5
2.2
Intrinsic Safety
9
2.3
Preparing for Use
9
2.4
IPEI Code
10
2.5
System Version
10
2.6
PIN Code
10
2.7
Accessibility and Voice Quality
11
3
Description
13
3.1
Functions and Accessories
14
3.2
Display Information
16
3.3
Menu Structure
20
4
Switching On and Off
29
4.1
Switching on
29
4.2
Switching off
29
5
Profiles
31
5.1
Add new profile
31
5.2
Delete profile
31
6
Contacts
33
6.1
Call contact
33
6.2
Add contact
33
6.3
Edit contact
34
6.4
Delete Contact
34
6.5
Central Phonebook
34
7
Short cuts
37
7.1
Defining Soft Keys
37
7.2
Defining Hot Keys
37
7.3
Defining Navigation Keys
38
7.4
Defining Multi-function button
38
1424-EN/LZT 103 090 Uen A1 2008-10-24
DT690
8
My Favourites
39
8.1
Add a Favourite
39
8.2
Delete a Favourite
39
9
Settings
41
9.1
Sound & Alerts
41
9.2
Display
43
9.3
Time and Date Settings
44
9.4
Changing Answering Methods
45
9.5
Modifying the Size of Messages
46
9.6
Language
47
10
Connections
49
10.1
Headset
49
10.2
Bluetooth
49
10.3
System
50
10.4
In Charger
51
11
Incoming Calls
53
11.1
Answering Calls
53
11.2
Call List-Up Individual
55
11.3
Missed Calls
55
11.4
Call Time
55
11.5
Call Services
55
11.6
Call list
57
12
Outgoing Calls
59
12.1
Pre-dial
59
12.2
Dial Using a Pre-programmed Hot key or Soft key
59
12.3
Dialling a Number from the Call List
59
12.4
Dialling a Number from a Message
60
12.5
Dialling a Number from the Local Phonebook
60
12.6
Dialling a Number from the Central Phonebook
60
12.7
Dialling a Name from the Central Phonebook
61
13
During Calls
63
13.1
Start a New Call during Conversation
63
13.2
Dialling during a call
63
13.3
Transfer a Call/Retrieve the Call
63
1424-EN/LZT 103 090 Uen A1 2008-10-24
DT690
13.4
Blind Transfer
64
13.5
Put a Call on Hold
64
13.6
Adjust the Volume during a Call
64
13.7
Mute Microphone
64
13.8
Loudspeaking Function
65
13.9
Call Diversion
65
13.10
Conference
65
14
Messaging
67
14.1
Message List
67
14.2
Receiving a Message
67
15
Voice Mail Services
71
15.1
Receiving a Voice Mail
72
15.2
Checking the Voice Inbox
72
15.3
One Key Voice Mail Access
72
15.4
Voice Mailbox Modes
72
15.5
Call Forwarding to Voice Mailbox
73
15.6
Voice Mailbox Greeting Messages
74
15.7
Voice Mailbox Messages Internal Notification
74
15.8
Voice Mailbox Messages External Notification
75
15.9
Voice Mailbox Internal Access
75
15.10
Voice Mailbox External Access
75
15.11
Voice Mailbox Managing
76
15.12
Automatic Call-Back from Voice Mailbox Message
79
15.13
Additional personal assistant services
79
15.14
Voice Mailbox Personalization Services
80
15.15
Voice Mailbox for Hunt Group
82
15.16
Voice Mailbox for Mailing List
82
15.17
Voice Mailbox for Attendants
84
15.18
Integrated Web Server and Unified Messaging
84
16
Phonebook
87
16.1
Phonebook Access
87
16.2
Making Calls with Phonebook
87
16.3
Add Names or Numbers
88
16.4
Edit Names or Numbers
88
16.5
Delete Names and Numbers
88
1424-EN/LZT 103 090 Uen A1 2008-10-24
DT690
16.6
Write Text
89
17
Call Forwarding Services
93
17.1
Variable Call Forwarding
95
17.2
Call Forwarding Cancellation
96
17.3
Call Forwarding on Mini-Message
96
17.4
Follow-Me Service
98
18
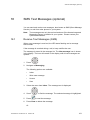
SMS Text Messages (optional)
101
18.1
Receive Text Messages (SMS)
101
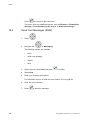
18.2
Send Text Messages (SMS)
102
19
Group Services
103
19.1
Hunt Groups
103
19.2
Call Pick-up in Hunt Group
104
19.3
Standby status in Hunt Group
105
19.4
Hunt Group Opening / Closing
106
19.5
Personal Group Services
106
19.6
Mobile Extension Service
107
20
More Features on your Extension
109
20.1
Appointment Reminder
109
20.2
Calls Re-routing to Attendants Protection
110
20.3
Secret of identity
111
20.4
Account codes
111
20.5
Key Lock
112
20.6
Phone Lock
113
20.7
Change Owner ID
114
20.8
Password Programming
114
20.9
Call Statistics
115
20.10
Secondary Attendant Services
116
20.11
General Call Acceptance
116
20.12
Door Phone Service
117
20.13
Call Pick-up for General Ringing Call
117
20.14
Other Secondary Attendant Services
118
20.15
Automated Attendant
119
21
Audible Signals
121
22
MD Evolution Standard Services Prefixes
123
1424-EN/LZT 103 090 Uen A1 2008-10-24
DT690
23
Installation
125
23.1
Check for completeness
125
23.2
Charging the Battery
125
23.3
Charging Spare Batteries
126
23.4
Replacing the Battery
126
23.5
Chargers
127
23.6
Headset
128
23.7
Hinge-type Clip
128
23.8
Swivel-type Clip
129
23.9
Bluetooth Headset
129
23.10
Portable Device Manager
133
24
Useful Hints
135
25
Reference
137
25.1
Terminology
137
25.2
Phone Signals
137
25.3
Maintenance
138
25.4
Technical Specifications
138
25.5
Spare parts and Accessories
143
26
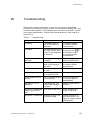
Troubleshooting
145
27
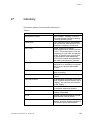
Glossary
149
28
Telephony Service Prefixes
151
1424-EN/LZT 103 090 Uen A1 2008-10-24
DT690
1424-EN/LZT 103 090 Uen A1 2008-10-24
Welcome
1
Welcome
Welcome to the user guide for the DT690 cordless phone. This guide describes
the available features of the telephone when it is connected to MD Evolution
Communication Platform from Aastra.
The User Guide describes the facilities of the MD Evolution Communication
Platform and the Cordless phone DT690 with a default programming. There
may be some differences in the way your phone is programmed. Please consult
your system administrator if you need further information. The latest version of
this user guide can be downloaded from: http://www.aastra.com
1424-EN/LZT 103 090 Uen A1 2008-10-24
1
DT690
2
1424-EN/LZT 103 090 Uen A1 2008-10-24
Important User Information
2
Important User Information
WARRANTY
AASTRA MAKES NO WARRANTY OF ANY KIND WITH REGARD TO
THIS MATERIAL, INCLUDING, BUT NOT LIMITED TO, THE IMPLIED
WARRANTIES OF MERCHANTABILITY AND FITNESS FOR A PARTICULAR
PURPOSE. Aastra shall not be liable for errors contained herein nor for
incidental or consequential damages in connection with the furnishing,
performance or use of this material.
TRADEMARK
Aastra is a registered trademark of Aastra Technologies Limited. All other
trademarks mentioned herein are the property of their respective owners.
DECLARATION OF CONFORMITY
Hereby, Aastra Telecom Sweden AB, SE-126 37 Hägersten, declares that this
telephone, is in conformity with the essential requirements and other relevant
pros of the European R&TTE directive 1999/5/EC. Details to be found at:
http://www.aastra.com
FCC Statement
This equipment has been tested and found to comply with the limits for a Class
B digital device, pursuant to Part 15 of the FCC rules.
These limits are designed to provide reasonable protection against harmful
interference in a residential installation. This equipment generates, uses and
can radiate radio frequency energy and, if not installed and used in accordance
with the instructions, may cause harmful interference to radio communications.
However, there is no guarantee that interference will not occur in a particular
installation. If this equipment does cause harmful interference to radio or
television reception, which can be determined by turning the equipment off and
on, the user is encouraged to try to correct the interference by one or more of
the following measures:
•
Reorient or relocate the receiving antenna.
•
Increase the separation between the equipment and receiver.
•
Connect the equipment into an outlet on a circuit different from that to which
the receiver is connected.
•
Consult the dealer or an experienced radio/TV technician for help.
1424-EN/LZT 103 090 Uen A1 2008-10-24
3
DT690
Privacy of communications may not be ensured when using this phone.
This equipment complies with FCC radiation exposure limits set forth for an
uncontrolled environment. This device complies with FCC SAR limit of 1.6
W/kg. The maximum SAR value measured when used at the ear is 0.104
W/kg. The telephone has also been tested when worn on the body using
belt clip, maximum measured SAR value in this configuration is 0.029 W/kg.
This device must not be collocated or operating in conjunction with any other
antenna or transmitter.
•
This equipment complies with Part 68 of the FCC rules and the
requirements adopted by the ACTA. On the rear side, underneath the
battery of this equipment is a label that contains, among other information,
a product identifier in the format US:AAAEQ##TXXXX. If requested, this
number must be provided to the telephone company.
•
REN is N/A as this product is intended to be connected behind a FCC
Part 68 compliant PBX system. It is not intended for direct connection
to telephone network.
•
If this equipment cause harm to the telephone network, the telephone
company will notify you in advance that temporary discontinuance of
service may be required. But if advance notice isn't practical, the telephone
company will notify the customer as soon as possible. Also, you will be
advised of your right to file a complaint with the FCC if you believe it is
necessary.
•
The telephone company may make changes in its facilities, equipment,
operations or procedures that could affect the operation of the equipment.
If this happens, the telephone company will provide advance notice in order
for you to make necessary modifications to maintain uninterrupted service.
•
If trouble is experienced with this equipment, for repair or
warranty information, please contact your Aastra business partner
http://www.aastra.com. This equipment is not intended to be repaired by
the customer (user). If the equipment is causing harm to the telephone
network, the telephone company may request that you disconnect the
equipment until the problem is resolved.
•
Connection to party line service is subject to state tariffs. Contact the
state public utility commission, public service commission or corporation
commission for information.
•
If your home has specially wired alarm equipment connected to the
telephone line, ensure the installation of this equipment that it does not
disable your alarm equipment. If you have questions about what will disable
alarm equipment, consult your telephone company or qualified installer.
Electrical Safety Advisory
Electrical surges, typically lightning transients, are very destructive to customer
terminal equipment connected to AC power sources. Customer is thus
recommended to use a surge arrestor for the equipment that requires AC power.
4
1424-EN/LZT 103 090 Uen A1 2008-10-24
Important User Information
2.1
Safety Instructions
Note:
2.1.1
When using your telephone or connected equipment, the following
basic safety precautions should always be followed to reduce risk of
fire, electrical shock and other personal injury.
Recommendations
•
Always keep and handle your products with care and keep them in a clean
and dust-free place. Proper use and care will prolong the products life. Use
a soft absorbent tissue or cloth to remove dust, dirt or moisture.
•
Always ensure that the phone, battery and charger are used and operated
in the environment for which they are designed.
•
Operate the phone in temperatures between 0°C to +40°C (32°F to 104°F).
•
Do not expose your products to liquid, moisture, humidity, solvents,
strong sunlight, harsh environments or extreme temperatures, never above
+60°C (+140°F), unless the product has been specifically designed and
officially approved for such environments.
•
Exposure to heat may cause batteries to leak, overheat or explode,
resulting in fire, burns or other injuries.
•
Do not put the product in the microwave oven: This may cause damage
to either the oven or the product.
•
Do not attempt to disassemble or alter any part of the phone, the
charger(s) or the battery-pack. Disassembly or alteration may result in
electrical shock or irreversible damage to the equipment. Only a qualified
service personnel or an authorized Aastra partner should conduct internal
inspections, alterations and repairs.
•
Do not expose your product to open flames or lit tobacco products.
•
Do not drop, throw or bend your products. This may cause malfunction
or electric shock.
•
Do not paint your product.
•
Do not use your product in an area where a potentially explosive
atmosphere exists, unless the product has been specifically designed and
officially approved for such environments
•
To avoid hearing impairment, accept the call before holding your product
(or portable handsfree device) to your ear.
1424-EN/LZT 103 090 Uen A1 2008-10-24
5
DT690
Warning!
The handset may retain small magnetic objects around the mouthcap or earcap
region. Please check and remove before use.
2.1.2
Disposal of the product
Your product should not be placed in municipal waste. Please check local
regulations for disposal of electronic products.
2.1.3
Power supply
Available power adapters (Suppliers Designation) are:
•
Art.No.DC3: 130160 Power supply unit AC/5V DC/0.65A -Europe
•
Art.No.DC3: 130166 Power supply unit AC/5V DC/1A -USA, Canada,
AUS, and U.K.
•
Art.No.DC4: 130161 Power supply unit AC/5V DC/2A
Precautions:
6
•
Connect the AC power supply to the desktop battery charger only to the
designated power sources as marked on the charger.
•
Make sure the AC power supply is positioned so that it will not be subjected
to damage or stress.
•
To reduce risk of electrical shock, unplug the chargers from any power
source before attempting to clean or move it.
•
The AC power adapters must not be used outdoors or in damp areas.
•
Never modify the cord or plug. If the plug will not fit into the outlet, have a
proper outlet installed by a qualified electrician.
•
Limit the distance between the mains socket and the cordless phone when
charging for easy accessibility.
•
As an energy saving measure, disconnect the charger from the main
socket after charging.
•
When unplugging the mains adapter from the power outlet, make sure
that your hands are dry and ensure that you hold the solid portion of the
mains adapter.
1424-EN/LZT 103 090 Uen A1 2008-10-24
Important User Information
•
2.1.4
Do not pull on cables.
Charging and batteries
This product should only be used with the following battery:
•
Art.No.: 660190 Battery
Single chargers shall only be connected with power adapters supplied by the
manufacturer, see list above.
Precautions:
Please read carefully the following important precautions before the first time
use of the batteries. Make sure to understand and observe all cautionary
instructions stated, so as to avoid any possible safety hazards that are caused
by any misuse, misapplication or damage to batteries.
•
Only use batteries, mains adapters or desk and rack chargers which have
been specifically designed for use with your product.
•
Use of power sources not explicitly recommended may lead to overheating,
reduced battery performance, distortion of the equipment and fire or other
damages.
•
The phone is equipped with Li-Polymer/Li-lon battery. In a complex
infrastructure, the talk- and standby time may differ, due to the consequence
of the increase in signaling.
•
The battery must always be completely charged (minimal 4 hours) before
first time use.
•
The battery in your product is designed to withstand many charge cycles.
•
Use only the recommended charging equipment.
•
Improper charging can cause heat damage or even high pressure rupture.
•
Observe proper charging polarity.
•
Do not solder lead wires directly onto the battery.
•
Do not allow water to come into contact with the battery, this could
short-circuit and damage the battery.
•
If the handset has been exposed for water or condense, remove the battery
immediately and let it dry completely before reinserting the battery.
•
Remove the battery before cleaning the telephone to reduce risk of electric
shock.
•
Unplug the battery charger from a power source before cleaning the
handset to reduce risk of electric shock.
1424-EN/LZT 103 090 Uen A1 2008-10-24
7
DT690
•
The battery is replaceable, however it is not the intention to do this
frequently.
•
Only charge the battery when placed in the phone.
•
Use only the specified battery-packs for your product.
•
Never heat or dispose of the battery into a fire, which, or else, may cause
leakage, burst or fire.
•
Remove the carrying case from the product while in charger.
•
Do not cover the product while being charged. Do not charge the phone
in a closed cabinet or drawer. The charging of the battery is a chemical
process and causes the battery to become warm during charging. Make
sure the environment in which the phone is charged, is well vented.
•
The cordless phone can be charged either when switched on or off.
•
Do not connect the battery's positive and negative leads altogether in any
circumstances.
•
Do not strike or drop the battery. It may cause damage to the battery.
•
Do not charge the battery below +5°C (+41°F). Be sure to charge the
battery between +5°C and +40°C (+41°F and 104°F). Charging beyond
these conditions may impair the battery performance and shorten the life
cycle.
•
Do not use battery packs from different types, brands or of different
capacities.
•
The battery is to be stored in a dry cool place, with the ambient temperature
of approximately +25°C (+77°F) for best performance.
•
The battery continues to discharge a minimal portion of its power, even if
the product is switched off or the battery is removed.
•
Dispose the battery in accordance with all local regulations, applicable
in your country.
Warning!
Smoke or fumes
Stop operating the products and turn off immediately in case of smoke
or fumes. Unplug the mains adapter and remove the batteries from the phone
immediately. Continued operation may result in fire or electrical shock.
8
1424-EN/LZT 103 090 Uen A1 2008-10-24
Important User Information
Warning!
LCD
If the liquid crystal display breaks, avoid injury by not allowing the liquid crystal
to come into contact with eyes, skin or mouth. Prevent the liquid crystal from
leaking out of the broken glass.
2.1.5
Bluetooth Qualified Design ID
Bluetooth QD ID: B014317
2.1.6
2.2
Preventing malfunction
•
Never place the equipment in close proximity of electric motors, welding
equipment or other devices generating strong (electro) magnetic fields.
Exposure to strong (electro) magnetic fields may cause malfunction and
corrupt the communication.
•
Moving the equipment rapidly between warm and cold temperatures
may cause condensation (water droplets) to form on its internal and
external surfaces. Water droplets may cause malfunction of the equipment
and corrupt or end communication or damage the equipment. When
condensation is noticed, stop using the equipment. Switch off the phone,
remove the battery and unplug the mains adapter from the power outlet.
Wait until the moisture evaporates from the equipment before putting it in
operation again.
•
Avoid accidental drop of the phone. Use the clip, security clip or carrying
case specified for carrying purposes of the phone.
•
Avoid squeezing the phone between furniture and your body when carrying
the phone in your pocket or attached to clothing.
Intrinsic Safety
The DT690 cordless phone is not specified as intrinsically safe, so do not use it
in areas with a danger of explosion.
2.3
Preparing for Use
Before using your phone for the first time, you have to charge and connect the
battery, see Section 23 on page 125.
1424-EN/LZT 103 090 Uen A1 2008-10-24
9
DT690
Note:
2.4
Place the phone in the charger and charge it for at least one hour
before using it the first time.
IPEI Code
Your phone has an International Portable part Equipment Identity (IPEI)
code. This code is unique for each phone, and it is needed for your system
administrator to enable network subscription of your phone. It is also needed if
the user has entered the wrong phone lock code three times.
To look up the IPEI code, do the following:
•
Enter *#06# when phone is in idle mode.
A message box with the text IPEI followed by the IPEI number (13 digits) is
shown.
−
If the phone lock is on, Enter PIN code is shown.
−
Enter the PIN code.
Note:
2.5
Write down the IPEI code for future use. If you cannot retrieve the IPEI
code, please contact your system administrator. Keep the IPEI code
secret to prevent misuse of your phone.
System Version
To view the telephone’s software version:
•
2.6
Enter *#34# in standby mode.
PIN Code
To change PIN code, do the following:
1. Enter Settings from the main menu.
2. Select Locks.
3. Select Phone lock.
4. Select Change PIN code.
5. Enter old PIN code (default is 0000) and press OK.
6. Enter new PIN code.
7. Confirm the new PIN code and press Save.
A message saying New PIN code saved is displayed.
10
1424-EN/LZT 103 090 Uen A1 2008-10-24
Important User Information
2.7
Accessibility and Voice Quality
The base network is not always available. If you do not get in contact with
your system, contact your system administrator. For best voice quality, avoid
positioning near computer, radio or similar equipment.
2.7.1
Operating area
You can use your cordless telephone in the area that is covered by the network.
Outside this area you will lose contact with the telephone network. The signal
strength icon,
2.7.2
, will disappear and No network will be displayed.
Out of Range
When you leave the system coverage area you will hear a short beep and see
a lamp indication, and the text Searching will appear in the display. The out
of range beep will be repeated every minute for 30 minutes. It is possible to
. When reentering the coverage area it
switch off this beep by pressing
can take a couple of minutes before the phone automatically has registered
into the system.
2.7.3
Frequency Range
The handset is a radio transmitter and receiver. When it is on, it receives
and sends out radio frequency (RF) energy. The handset operates on
different frequency ranges depending on market and employs commonly used
modulation techniques:
•
EU 1880 - 1900 MHz
•
U.S. 1920 - 1930 MHz
•
L.A. 1910 - 1930 MHz
1424-EN/LZT 103 090 Uen A1 2008-10-24
11
DT690
12
1424-EN/LZT 103 090 Uen A1 2008-10-24
Description
3
Description
This section describes the DT690 telephone, display information, menus and
structures. A picture of the cordless telephone is shown in Page 13.
1
15
2
4
3
16
6
5
7
8
10
9
11
12
14
13
1
Multifunction button
This button can be used as a short cut to functions; long or double
press modes.
2
Volume Up
To increase the speaker volume.
3
Volume Down
To decrease the speaker volume.
4
Headset connector
The headset connector is for connecting a headset. The
connector is protected against dust by using the headset
connector cover.
5
Left Soft key
(1)
Can be pre-programmed or used with GUI.
6
Middle Soft key
Can be pre-programmed or used with GUI.
7
Right Soft key
Can be pre-programmed or used with GUI.
1424-EN/LZT 103 090 Uen A1 2008-10-24
13
DT690
8
Hook-off
To answer a call, to pre-dial a number, and as a short cut to the
Call list.
9
Five-way navigation key
Navigation key with Left, Right, Up, Down, and Confirmation (in
the middle). The navigation key can be programmed, the Up is
by default a short cut to the Inbox, and Down is a short cut to
Call contact. During a call it is possible to increase/decrease
the volume by pressing Up and Down. The middle key is for
confirmation and in standby mode it is by default a short cut to
the main menu.
10
Hook-on; Power on/off
Combined button; to end a call, to return to standby mode, and
to switch the handset on/off by long press.
11
Voice mail access
To listen to a voice mail.
12
Key lock and Upper/Lower case
Combined key lock and Upper/Lower Case.
13
Space
To add space between text.
14
Mute
Turn off/on audible signals in idle mode, silencing the ring signal at
incoming call, and also to turn the microphone on/off during a call.
15
LED
Indicates incoming call, messaging, low battery, and charging.
16
Display
The full graphic type display is 128 pixels wide and 160 pixels
high. The display has multiple colours and backlighting.
(1) Soft keys are explained further in Page 17
Note:
3.1
The phone may retain small magnetic particles around the earpiece
region.
Functions and Accessories
Functions and accessories for the phone are presented in Figure 1 on page 15.
See Page 15 for the complete list.
14
1424-EN/LZT 103 090 Uen A1 2008-10-24
Description
Functions
DT690
Local phonebook (250 contacts)
Central phonebook
Vibrator
Headset connector
Microphone on/off during call
Loudspeaking function
SMS (Short Message Service)
Voice mail access
Centralized Management
Easy replaceable battery
Bluetooth (optional)
Yes
Yes*
Yes
Yes
Yes
Yes
Yes*
Yes*
Yes*
Yes
Yes
Accessories
* System dependent
Figure 1
Yes
Yes
Yes
Yes
Yes
Yes
Yes
Yes
Yes
Yes
Yes
Yes
Yes
001
Desktop charger Basic
Desktop charger Advanced
Charging rack
Battery pack charger
Leather case
Belt Clip
hinge-type
swivel-type
Security chain
Headset with microphone on boom
Headset with microphone on cable
Bluetooth Headset
CPDM
PDM Windows Version
Functions and accessories
Case
The plastic cover parts are made of durable PC/ABS
material.
Antenna
The antenna is integrated inside the phone.
Loudspeaker
The cordless telephone has a separate loudspeaker for
the loudspeaking function. It is placed on the back side
of the cordless telephone.
Microphone
The microphone is placed on the front bottom side of
the phone.
Clip
There are three different belt clip options to the cordless
telephone; a hinge-type clip (standard), a swivel-type
clip, or no clip which makes it possible to use the
1424-EN/LZT 103 090 Uen A1 2008-10-24
15
DT690
cordless telephone without any clip on. Use the clip to
attach the phone to a belt or similar.
The battery is a rechargeable Li-Pol/Li-lon battery,
placed under a battery cover. The battery is fully
charged within four hours. The battery can be charged
separately with a special battery charger.
Battery
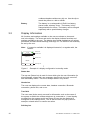
3.2
Display Information
All functions and settings available to the user are shown as icons and
text in the display. The icons and text in the display indicate functions and
settings available to the user. The display gives visual feedback on all actions
performed, and also textual warnings, see Page 16. The owner ID can manually
be set by the user.
Note:
If a name is available it is displayed instead of, or together with, the
number.
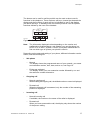
11:00
Status bar
05/12/2007
Header bar
System A
Active area
709040
Soft key bar
004
Menu
Figure 2
Example of a display configuration in standby mode
Status bar
The top row (Status bar) is used for icons which give the user information for
signal strength, missed call, new message, phone lock, key lock, sound off,
time and battery status. This row is always visible in any screen.
Header bar
The next row displays the current date, headset connection, Bluetooth
connection, phone lock, and so on.
Text field
The next rows (Active area) are used for information such as the name of
the system to which the cordless telephone is connected to. A user identity
provided from the system and/or an Owner ID can also be displayed if
configured in the Settings menu. This is also the area for pop up text for
example, missed calls or to confirm an action.
Soft key bar
16
1424-EN/LZT 103 090 Uen A1 2008-10-24
Description
The bottom row is used for soft keys which can be used as short cuts for
functions in the telephone. There are three soft keys, located just beneath the
display and the functions of each soft key is indicated by text in the display
just above the keys. In standby mode, the soft keys can be used for specific
functions defined by the user of the handset.
Soft keys
Figure 3
Note:
List
003
Call
Softkeys
The information displayed varies depending on the version and
configuration of the exchange, and whether you use the phone in a
DECT or an IP DECT system. Consult your system administrator to
find out which type of system your phone is used in.
Depending on the state and setting of your phone, different information can be
shown, see the following list:
•
•
•
Idle phone
−
Normal
The display shows the programmed name of your network, your name
and extension number, time, date, and so on, see Page 16.
−
Follow-me activated
The display shows your own extension number followed by a > and
the extension number diverted to.
Outgoing call
−
Normal outgoing call
When making an outgoing call, the dialled number or name is displayed.
−
Diverted call
When the diverted call is answered, only the number of the answering
position is displayed.
Incoming call
−
Normal incoming call
If available, the number or the name of the caller is displayed.
−
Diverted call
When you have answered the call, the display only shows the number
of the person calling.
1424-EN/LZT 103 090 Uen A1 2008-10-24
17
DT690
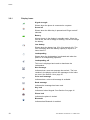
3.2.1
Display Icons
Signal strength
Shown when the phone is connected to a system.
Sound off
Shown when the Mute key is pressed and Ringer muted?
selected.
Battery
Always shown in the display in standby mode. When the
level is low, the icon is empty or flashing. It is time to charge
the battery.
Low battery
Shown when the battery has 10% of its capacity left. The
icon is flashing when the battery capacity is equal to or
lower than 5%.
Loudspeaking
Shown when the loudspeaker is activated and when the
phone is in loudspeaking operation.
Loudspeaking off
This icon is displayed and used to deactivate the
loudspeaker.
New message
Indicates that a new text message has arrived. The icon
remains in the display until all new messages in the inbox
are read. See Section 14 on page 67.
Voice mail message
Indicates that a voice mail message is available.
Read message
Indicates the message has been read.
Key lock
Indicates a locked keypad. See Section 9 on page 41
Phone lock
Indicates the phone is locked.
Bluetooth
Indicates that Bluetooth is enabled.
18
1424-EN/LZT 103 090 Uen A1 2008-10-24
Description
Bluetooth Headset
Indicates that a headset is connected to the phone. See
Section 23.6 on page 128.
Headset
Indicates that a headset is connected to the phone.
Outgoing call
Added in front of outgoing calls in the Call list.
Incoming call
Added in front of answered calls in the Call list.
Missed call
Added in front of missed calls in the Call list.
System connection
Indicates that the phone is connecting to a system.
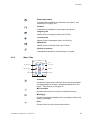
3.2.2
Menu Tabs
13:00
Messaging
Calls
Connections
Short cuts
My favourites
Settings
Profiles
Contacts
Select
Back
Contacts
Contains all names and numbers in the personal phonebook.
It is also possible to access a central phonebook from this
(1)
menu. See Section 16 on page 87.
My Favourites
Contains menu short cuts used to customized a menu.
Messaging
Contains all message handling such as reading, writing, and
sending messages.
Calls
Contains call lists, call services and call time.
1424-EN/LZT 103 090 Uen A1 2008-10-24
19
DT690
Connections
Contains Bluetooth connection with headset selection.
Settings
Contains personal phone settings, such as changing the
ringer volume, selecting language, and so on. See Section 9
on page 41.
Short cuts
Contains short cuts to the message menu and to the call list.
Profiles
Contains a normal editable profile, and possibility to add
four different profiles.
(1) This menu function requires that the corresponding code has been downloaded to your phone
using the PC program Portable Device Manager. Please contact your system administrator.
3.3
Menu Structure
The available phone and network functions can be accessed through the
menus.
Press
to enter the menus.
From the menu, it is possible to select the submenus described in the following
sections:
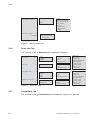
3.3.1
Calls Tab
The overview of the
20
Calls tab is displayed in Page 21.
1424-EN/LZT 103 090 Uen A1 2008-10-24
Description
• Call list
—> • Call
01:30
03:35
• More
05:26
• Back
20-Oct-03
>
—> • Time of call
• Edit number
• Save number
• Send message
• Delete
• Delete all
>
>
>
>
>
>
—> • Call
7682 05:26
7845 23-Sep-03
• More
• Back
—> Total call time:
03:47:06
Last call:
00:00:07
>
—> • Time of call
• Edit number
• Save number
• Send message
• Delete
• Delete all
>
>
>
>
>
>
—>
7891
7827
7682
7845
• Missed calls —>
• Call time
• Call services —> • Absence*
• Divert calls*
—> • Deactivate
• Lunch
• Meeting
• Trip
• Vacation
• Out
• Absence 1
• Absence 2
• Absence 3
• Absence 4
>
>
>
>
>
>
>
>
>
>
—> • Internal
• External
• No reply
• When busy
>
>
>
>
* Visible if defined in the PDM
Figure 4
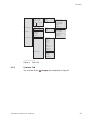
3.3.2
Calls Tab
Contacts Tab
The overview of the
1424-EN/LZT 103 090 Uen A1 2008-10-24
Contacts tab is displayed in Page 22
21
DT690
• Call contact
——>
• Search
• From contact list
• Add contact
——>
• Edit contact
——> • Search
• From contact list
• Delete contact
• New
• From Call list
——> • Search
• From contact list
• Central phonebook* ——> • Search by name
• Search by number
• Last result
>
——> • Name
• Work number
>
• Mobile number
• Other number
• Ring signal
>
>
>
>
>
——> • Name
• Work number
• Mobile number
• Other number
• Ring signal
>
>
>
>
>
>
>
——>
• Call
• More
• Back
>
——>
>
• View contact
• Add to contacts >
• Send message
>
>
* System dependent
Figure 5
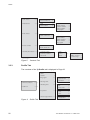
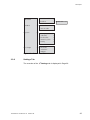
3.3.3
Contacts Tab
Profile Tab
The overview of the
Profile tab is displayed in Page 22
• Name
• Volume
——> • Internal call
• Extrernal call
• Call back
>
>
>
>
• Vibrating alert
——> • On
• Off
• On if silent
>
>
>
• Key sound
——> • Silent
• Click
• Tone
>
>
>
• Ring signal
• Normal (example)
• Add new
——>
>
>
• Message alert
——>
• Answering behaviour ——> • Automatic
• Loudspeaker
Figure 6
22
>
>
Profile Tab
1424-EN/LZT 103 090 Uen A1 2008-10-24
Description
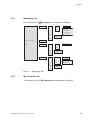
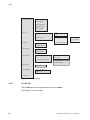
3.3.4
Messaging Tab
The overview of the
Messaging tab is displayed in Page 23.
——> Message List —> • View —> • Reply ——> • Enter text >
• Inbox
• More ——> • Delete
• Forward
• Call sender
• Call no. in text
• Save number
• More —>
>
• Delete
• Delete all >
>
>
>
>
>
• Close
• Back
• Write new message
——> • Enter text >
• Unsent
——> Message List —> • Edit
—> • Send ——> • Enter number >
• Clear
• Back
• More —>
>
• Delete
• Delete all >
• Back
• Sent
——> Message List —> • View —> • Forward —> • Enter text >
• More
• Close
• More —>
—> • Delete
• Call no. in text
• Save number
>
>
>
• Delete
• Delete all
• Back
Figure 7
3.3.5
Messaging Tab
My Favourites Tab
The overview of the
1424-EN/LZT 103 090 Uen A1 2008-10-24
My Favourites tab is displayed in Page 24.
23
DT690
• No favourites added ——>
• Add new
• Back
• Favourites added
——>
(example)
——> • Inbox
• Write new message
• Central phonebook
>
• Call contact
• Call list
• Call absence*
• Call diversion*
• Profiles
• Write new message >
• Central phonebook >
(short-cuts)
* Defined in the PDM
Figure 8
3.3.6
My Favourites Tab
Short cuts Tab
The overview of the
Shortcuts tab is displayed in Page 24.
• Soft Keys
——>
• Left
• Middle
• Right
——>
——>
——>
• Hot Keys
——>
• 0, 2 - 9
——> • Function
• Value
• Control question
• Navigation Keys
——> • Upp
• Down
• Left
• Right
• Multifunction button ——>
• Long press
• Multi press
Figure 9
3.3.7
——>
——>
——>
——>
• Function
——>
——>
• Function
• Value
• Control question
• Value
• Control question
• Not used
• Phone call
• Contact list
• Central phonebook
• Message inbox
• Send message
——> • Change profile
• Open a menu
>
>
• Call absence
>
——>
>
>
——> • Not used
• Phone call
>
• Contact list
• Central phonebook
>
• Message inbox
• Send message
——> • Change profile
• Open a menu
>
>
• Call absence
Short cuts Tab
Connections Tab
The overview of the
24
• Name
• Function
• Value
• Control question
Connections tab is displayed in Figure 10 on page 25.
1424-EN/LZT 103 090 Uen A1 2008-10-24
>
>
>
>
>
>
>
>
>
>
>
>
>
>
>
>
>
>
Description
—> • Enable / Disable
• Bluetooth
• Headset
>
—> • Add new
>
—> • Mic on boom
• Headset
• Mic on cable
• System
—>
• Change system
• Subscribe
• Unsubscribe
• Rename system
• Priority
>
>
>
>
>
—> • No action
• In charger
• Switch off
• Redirect
Figure 10
3.3.8
Connections Tab
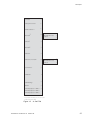
Settings Tab
The overview of the
1424-EN/LZT 103 090 Uen A1 2008-10-24
Settings tab is displayed in Page 26.
25
DT690
• Sound & Alerts —> • Volume
>
• Ring signals
>
• Message alert >
• Locks
• Vibrator alert
>
• Key sound
>
—> • Automatic key lock
—>
• Brightness
—> • On
• On in charger
• Off
• Change PIN code >
—> • Auto phone lock
• Phone lock
• Display
—> • On
• Off
>
• Screen saver >
• Time & Date
—>
• Answering
–>
• Time format >
• Date format >
• Answering key
—> • Hook-off
• Any key
• Answering behaviour —>
• Messages
• Automatically
>
• Loudspeaking
>
>
• *Language
—> Dansk, Nederlands,
English, etc.
• Owner ID
>
Figure 11
3.3.9
–> • Text Size
>
>
Settings Tab
In Call Tab
The In Call tab can be reached during a call from More.
See Page 27 for an overview.
26
1424-EN/LZT 103 090 Uen A1 2008-10-24
Description
• Contacts
>
• Microphone on/off
>
• Audio transfer**
>
• New call *
—>
• Switch *
>
• End call *
>
• Transfer*
>
• Transfer to new call*
• Call
• Phonebook access
• Cancel
>
—> • Call
• Phonebook access
• Cancel
>
• Conference*
>
• Call back*
>
• Call waiting*
>
• DTMF
>
>
>
>
>
• General purpose 1 Name* >
• General purpose 2 Name*
• General purpose 3 Name*
**Only available when Bluetooth connection is active.
* Visible if defined in the PDM
Figure 12
In Call Tab
1424-EN/LZT 103 090 Uen A1 2008-10-24
27
DT690
28
1424-EN/LZT 103 090 Uen A1 2008-10-24
Switching On and Off
4
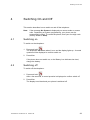
Switching On and Off
This section describes how to switch on and off the telephone.
Note:
4.1
If the message No System is displayed you cannot make or answer
calls. Depending on system programming, your phone can be
automatically locked. To unlock the phone, enter your four-digit code
(factory default is 0000).
Switching on
To switch on the telephone:
.
1. Press and hold
The telephone will vibrate when it is on and the display lights up. A control
question will be displayed to confirm switch on.
2. Press Yes.
If the phone does not switch on, or the Battery icon indicates low level,
charge the battery.
4.2
Switching off
To switch off the telephone:
.
1. Press and hold
After a few seconds, a control question is displayed to confirm switch off.
2. Press Yes.
The display turns blank and your phone is switched off.
1424-EN/LZT 103 090 Uen A1 2008-10-24
29
DT690
30
1424-EN/LZT 103 090 Uen A1 2008-10-24
Profiles
5
Profiles
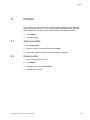
It is possible to set up a profile for incoming calls, message alerts, vibrating
alerts, key sound and so on. This can be useful when many users have the
same telephone. It is then easy to switch between the different profiles.
1. Press Menu.
2. Navigate to
5.1
.
Add new profile
1. Press Add new.
2. Enter the name of the profile and select Save.
3. Select the profile from list and change profile as wanted.
5.2
Delete profile
1. Select a profile from the list.
2. Press More.
3. Navigate with
and press Delete.
4. Press Yes to confirm.
1424-EN/LZT 103 090 Uen A1 2008-10-24
31
DT690
32
1424-EN/LZT 103 090 Uen A1 2008-10-24
Contacts
6
Contacts
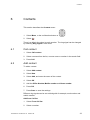
This section describes the Contacts menu.
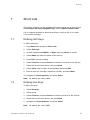
1. Select Menu, or the confirmation button on
2. Select
.
.
There is a default ring signal to each number. The ring signal can be changed
by selecting Ring signal in edit mode.
6.1
Call contact
1. Select Call contact.
2. Select a contact from the list, or enter name or number in the search field.
3. Press Call.
6.2
Add contact
To add a contact:
1. Select Add contact.
2. Select New.
3. Select Add, and enter the name of the contact.
4. Select OK.
5. Add the Office Number,Mobile number and Home number.
6. Press OK.
7. Press Save to save the settings.
Different ring signals can be set to distinguish for example, work number and
mobile number.
Add from Call list
1. Select From Call list.
2. Select a number.
1424-EN/LZT 103 090 Uen A1 2008-10-24
33
DT690
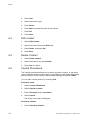
3. Press Add.
4. Select the number type.
5. Press Select.
6. Press Add and enter the name of the contact.
7. Press OK.
8. Press Save.
6.3
Edit contact
1. Select Edit contact.
2. Select the contact and press Edit twice.
3. Select Name, and press OK.
4. Press Save.
6.4
Delete Contact
1. Select Delete contact.
2. Select the contact, and press Delete.
3. Press Yes to confirm.
6.5
Central Phonebook
The Central phonebook allows you to search by name, number, or the latest
result. When the search result is ready, it is possible to view contact information,
add the number to new contact, and to send a message by selecting More.
You can also call the number by selecting Call.
Search by name
1. Select Central Phonebook.
2. Select Search by name.
3. Enter First name and/or Last name.
4. Select Search.
The search result will be displayed.
Search by number
1. Select Search by number.
34
1424-EN/LZT 103 090 Uen A1 2008-10-24
Contacts
2. Enter the phone number and select Search.
The search result is displayed.
Last result
Select Last result to display the last result only.
1424-EN/LZT 103 090 Uen A1 2008-10-24
35
DT690
36
1424-EN/LZT 103 090 Uen A1 2008-10-24
Short cuts
7
Short cuts
This section explains how the predefined functions can be set as short cuts for
the Soft keys, Hot keys, Navigation keys, and the Multi-function button.
It is for example possible to define the soft key to make a call or as a short
cut to send a message.
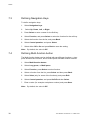
7.1
Defining Soft Keys
To define soft keys:
1. Press Menu and navigate to Short cuts.
2. Select Soft keys.
3. Choose between Left, Middle, or Right and press Select to confirm.
4. Select Name and enter the name of the soft key.
5. Press OK to save the setting.
6. Select Function, and press Select to choose the function for the soft key.
7. Select the function from the list, and press Back.
8. Select Value (only for some of the functions) and press Edit.
9. Enter a value (for example a telephone number), and press Back.
10. Navigate to Control question, and press Select.
Note:
7.2
By default, the value is Off.
Defining Hot Keys
To define hot keys:
1. Select Hot keys.
2. Select 0 to 9.
3. Select Function, and press Select to select the function for the soft key.
4. Select the function from the list, and press Back.
5. Navigate to Control question, and press Select.
Note:
By default, the value is Off.
1424-EN/LZT 103 090 Uen A1 2008-10-24
37
DT690
7.3
Defining Navigation Keys
To define navigation keys:
1. Select Navigation keys.
2.
Select Up, Down, Left, or Right.
3. Press Select to enter a name for the Soft key.
4. Select Function, and press Select to select the function for the soft key.
5. Select the function from the list, and press Back.
6. Select Control question, and press Select.
7. Select either Off or On and press Back to save the setting.
Note:
7.4
By default, the value is Off.
Defining Multi-function button
The Multi-function button can be defined with two different functions: a long
press activates one function, and a double press activates another function.
1. Select Multi-function button.
2. Select Long press, or Multi press.
3. Select Function, press Select to select function.
4. Select a function from the list, press Select and then press Back.
5. Select Value (only for some of the functions), and press Edit.
6. Select Control question, and press On/Off and then Select.
7. Enter a value (for example a telephone number) and press Save.
Note:
38
By default, the value is Off.
1424-EN/LZT 103 090 Uen A1 2008-10-24
My Favourites
8
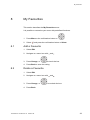
My Favourites
This section describes the My Favourites menu.
It is possible to customize your menu with predefined.functions:
1. Press Menu or the confirmation button on
2. Select
8.1
.
and press the confirmation button or Select.
Add a Favourite
1. Select Edit.
2. Navigate to a menu box with
3. Press Change, or
and
to check the box.
4. Press Back to save the setting.
8.2
Delete a Favourite
1. Select Edit.
2. Navigate to a menu box with
3. Press Change, or
and
to uncheck the box.
4. Press Back.
1424-EN/LZT 103 090 Uen A1 2008-10-24
39
DT690
40
1424-EN/LZT 103 090 Uen A1 2008-10-24
Settings
9
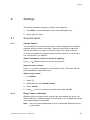
Settings
This section describes settings to configure your telephone.
1. Press Menu, or the confirmation button on the Navigation key.
2. Select
in the menu.
9.1
Sound & Alerts
9.1.1
Volume Control
You can adjust the volume in the ear piece, of the loudspeaker for handsfree
speaking and the volume of the ringer. Use the volume keys to adjust the
volume, see Section 3 on page 13 for the location of the volume controls.
To turn the microphone, ringing sound and warning sound on or off during a
call, see Section 13 on page 63.
Adjust loudspeaker volume for handsfree speaking
Press
or
buttons to adjust the volume during a call.
Adjust ear piece volume
Press or buttons to adjust the volume during a call. The phone will now
store and keep the new volume level.
Adjust ringer volume
1. Press Menu.
2. Select
.
3. Select the menu item Sound & Alerts.
4. Select Volume.
5. Press
9.1.2
to turn the volume up or down and confirm with OK.
Ringer Tones or Melodies
Different signals for internal calls, external calls and callback can be set. By
default, there are 14 different signals in the telephone, and 10 additional signals
can be downloaded to the handset.
Note:
Ask your system administrator on how to download additional signals
to your phone.
1424-EN/LZT 103 090 Uen A1 2008-10-24
41
DT690
To set the sound for a ringing type
.
1. Press
2. Select
.
3. Select the menu item Sound & Alerts and confirm.
4. Select the menu item Ring signals and press Select to confirm.
5. Select the ringing signal type: Internal, External, or Callback and press
Select to confirm.
6. Select the desired sound by pressing Play.
The selected sound is played.
7. Press Select to confirm and save the settings.
9.1.3
Message Alert
You can select different signals for mail and voice messages. By default,
there are 16 different signals in the telephone, and additional signals can be
downloaded to the handset.
To set the sound for Message Alert
1. Press
2. Select
.
.
3. Select the menu item Sound & Alerts and press Select to confirm.
4. Select the menu item Message alert and press Select to confirm.
5. Select the message alert type and confirm with Select.
9.1.4
Vibrator Alert
If you do not want to be disturbed by the ringing of your phone, but still get
the call indication, or if you are in a noisy environment, you can activate the
Vibrator alert.
1. Press
42
.
1424-EN/LZT 103 090 Uen A1 2008-10-24
Settings
2. Select
.
3. Select the menu item Sound & Alerts and press Select to confirm.
4. Select the menu item Vibrating alert and confirm.
The following options are available:
•
On for Vibrator alert.
•
On if silent for Vibrator alert when the ringer is permanently off. See
Section 9.1.1 on page 41.
•
Off for no Vibrator alert.
5. Select the desired option and press Select to confirm.
9.1.5
Key Sound
Key sound is the sound you hear each time you press a key. This feature
can be enabled and disabled.
1. Press
.
2. Select
3. Select the menu item Sound & Alerts and press Select to confirm.
4. Select the menu item Key sound and press Select to confirm.
5. Select one of the following options:
•
Click to have a Key sound with each key press.
•
Tone to have a Key sound with each key press.
•
Silent for no Key sound.
6. Press Select to confirm and save the settings.
9.2
Display
9.2.1
Display Brightness
Your phone has a display which is illuminated when a key is pressed. The
illumination automatically goes off after a while, unless you press a key.
1424-EN/LZT 103 090 Uen A1 2008-10-24
43
DT690
1. Press
.
2. Select
3. Select the menu item Display
4. Select Brightness.
The following options are available:
•
Normal
•
Power save
The current setting is indicated.
5. Select one of the options:
6. Press Back to confirm and save the settings.
9.2.2
Screen saver
You can decide to display or turn off time and status information when the
phone is not used.
1. Press
.
2. Select
3. Select the menu item Display
4. Select Screen saver.
The following options are available:
•
Information
•
Black
The current setting is indicated.
5. Choose between one of these two options and press Select.
6. Press Back to save the setting.
9.3
Time and Date Settings
The time and date information is updated automatically by the system.
44
1424-EN/LZT 103 090 Uen A1 2008-10-24
Settings
Set time format
1. Select Time & Date and press Select.
2. Select Time format.
The following options are available:
•
12 hour
•
24 hour
3. Press Select to save the setting.
Set date format
1. Select the menu item Time & Date and press Select.
2. Select Date format and press Select.
The following options are available:
•
DD/MM/YYYY, that is, 17/09/2007 (also called Europe)
•
MM/DD/YYYY, that is, 09/17/2007 (also called US)
•
YYYY-MM-DD, that is, 2007-09-17 (ISO 8601)
•
MMM DD YYYY, that is, Sept 17 2007
•
DD MMM YY, that is, 17 Sept 07
•
DD.MM.YYYY, that is, 17.09.2007
•
DD-MM-YYYY, that is, 17-09-2007
3. Press Select to choose the setting and then Back to save it.
9.4
Changing Answering Methods
The phone can be set to answer a call automatically when a headset is used, or
to answer a call by a press on any key.
9.4.1
Normal Answering
The answering behavior is by default set to Hook-off. It can be set to any key
by doing the following:
1. Enter
.
2. Navigate to Answering, and select Answering key.
3. Select Any key and press Back to save the setting.
1424-EN/LZT 103 090 Uen A1 2008-10-24
45
DT690
9.4.2
Automatic answer
Note:
The automatically answer mode is only relevant when a headset or a
Bluetooth headset is connected.
To set the phone to answer automatically, do the following:
1. Enter
.
2. Select Answering and then select Answer behaviour.
3. Select Automatically and press Change to activate the automatic mode.
4. Press Back to save the setting.
All incoming calls will be connected automatically when this behavior is
selected.
To remove the setting, press Change.
9.4.3
Automatic Loudspeaker
To set the phone to automatically answer with loudspeaker, do the following:
1. Enter
.
2. Select Answering and then Answering behaviour.
3. Select Loudspeaking and press Change to activate the loudspeaking
mode.
4. Press Back to save the setting.
All incoming calls will be connected in loudspeaking mode when this
behavior is selected.
To remove the setting, press Change.
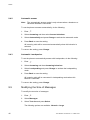
9.5
Modifying the Size of Messages
To modify the text size of messages:
1. Enter
.
2. Select Messages.
3. Select Text size and press Select.
The following options are available: Normal or Large.
46
1424-EN/LZT 103 090 Uen A1 2008-10-24
Settings
4. Select the size and press Back to save the setting.
9.6
Language
The display messages are available in 18 languages: Brazilian Português
(Brazilian Portuguese), (Czech), Dansk (Danish), Deutsch (German), English,
Español (Spanish), Français (French), (Greek), (Hungarian), Italiano (Italian),
Nederlands (Dutch), Norska (Norwegian), (Polish), (Russian), (Slovakian),
Soumi (Finish), Svenska (Swedish), and (Turkish). To switch menu language,
do the following:
1. Press
2. Select
.
3. Select the menu item *Language.
4. Select the desired language and press Select to confirm.
Wait for the phone to change language and connect to the network again.
Note:
•
The telephone will need to search the system while switching
menu language.
•
If, by mistake, you changed the language, the * before
Language will allow you to easily find where in the menu to
switch languages.
1424-EN/LZT 103 090 Uen A1 2008-10-24
47
DT690
48
1424-EN/LZT 103 090 Uen A1 2008-10-24
Connections
10
Connections
This section describes the Connections menu.
To access the Connections menu:
1. Press Menu, or the confirmation button on
2. Select
10.1
.
, and press the confirmation button or Select.
Headset
The following options are available:
•
Microphone on boom
•
Microphone on cable
To change the option:
1. Select Headset.
2. Navigate to the desired option and press Select.
3. Press Back to save the setting.
10.2
Bluetooth
Enable Bluetooth connection
1. Select Bluetooth.
2. Select Enable.
A Bluetooth connection icon
is displayed.
Disable Bluetooth connection
1. Select Bluetooth.
2. Select Disable.
Connect Bluetooth Headset
This can only be done if a Bluetooth connection is enabled.
1. Select Headset.
1424-EN/LZT 103 090 Uen A1 2008-10-24
49
DT690
2. Select Add new.
The information text Put headset in Pairing mode is displayed.
3. Press OK.
It will now search for a Bluetooth headset for connection.
4. Press Pair once the headset is found.
5. Enter the PIN code.
6. Press OK.
If the pairing mode is successful, the Successful pairing message is
displayed.
10.3
System
Only available systems are displayed. It is possible to switch between the
systems if they are configured by system administrator in the Central Portable
Device Manager (CPDM) or the Desk PDM.
Subscribe System
The cordless telephone can subscribe up to eight different systems.
To subscribe a new system the PARK (Portable Access Right Key) and Ac
(Authentication code) related to the system you are going to log on to are
needed. Contact your system administrator for more information.
1. Enter System name.
2. Press Next.
3. Enter the PARK code.
4. Enter the AC code and press Next.
An information text Protection on? is displayed.
5. Select Yes/No, if the new system is to be protected or not.
6. Press OK.
A searching mode starts.
Unsubscribe System
1. Select Unsubscribe to delete a System subscription.
2. Select Delete.
Note:
50
It is not possible to delete a protected subscription.
1424-EN/LZT 103 090 Uen A1 2008-10-24
Connections
Rename System
If there are different location areas that are using the same System, it is
possible to change the name of the system in the telephone for easier location
of the telephone, for example; System A (Herrljunga), System A (Gothenburg).
1. Select Rename System.
2. Select the system to rename and press Edit.
3. Enter the new name.
4. Select Save.
Priority
The default order of priority is the order of entered subscriptions. This means
that the first subscribed system has the highest priority. This list can be edited
by the user. It is possible to set the systems in priority by moving them up or
down in the list. It is also possible to get priority information by selecting Info.
1. Select Priority.
2. Change the priority if needed by selecting Up or Down. The priority will
be saved when Back is selected.
10.4
In Charger
10.4.1
Redirecting Calls and Messages from Charger
Calls can be redirected to another extension when the cordless telephone is
placed in the DC4 charger and the Rack charger. The function is automatically
cancelled when the phone is removed from the charger.
1. Select In charger mode and press Select.
2. Navigate to Redirect and press Select to save the setting.
10.4.2
Detaching from system while charging
When the cordless telephone is placed in the charger the phone can be
detached from the system but still be switched on and charging.
1. Select In charger mode and press Select.
2. Select Switch off and press
1424-EN/LZT 103 090 Uen A1 2008-10-24
to save the setting.
51
DT690
52
1424-EN/LZT 103 090 Uen A1 2008-10-24
Incoming Calls
11
Incoming Calls
The flashing LED, accompanied by a ring signal and/or a vibrating handset,
indicates an incoming call. The ring type can tell if the call is an internal,
external or callback call. Both ring signal and vibrator can be disabled. The
calling party’s number, name, or both, is displayed. The name of the caller will
be shown if the calling party’s phone number is stored in the local or central
phonebook.
When a headset is connected to the handset, the answering button on the
headset can be used to answer the call.
Other answering methods can also be set. This is done in the Settings
menu, see Section 9 on page 41. The answering methods are:
•
Automatically
•
Loudspeaking
When Automatically is enabled, an incoming call will be answered
automatically after about one second. The answer behavior is enabled and
disabled in the Settings menu..
The 25 last received phone numbers are stored in the Call list, together with
the latest dialled and missed phone numbers, see Section 12.3 on page 59.
11.1
Answering Calls
To answer a call, press
Note:
11.1.1
.
Calls can be answered at any time, even during programming, or
keying in a number, and so on. When the phone is in idle mode, you
can change the answering method.
Mute ring signal temporarily
If the phone rings at an inconvenient moment:
1. Press
for several seconds to suppress the ringing.
All alert signals, except the vibrator, will silence for this specific call.
2. Press
1424-EN/LZT 103 090 Uen A1 2008-10-24
to answer the call.
53
DT690
11.1.2
Switch ring signal on/off
You can set your phone to Silent Ringing, when your phone is in idle mode:
Press
for several seconds to switch the ringer on or off. When switched
is shown. All alert signals will silence until the ring signal is switched
off, the
on again. If the vibrator is set to On when silent, it will alert you of new calls,
messages and alarms.
11.1.3
Reject a call
If you do not want to take the call, when the phone rings:
to reject the call.
Press
The call is disconnected.
11.1.4
Loudspeaking
An incoming call can be connected with loudspeaking function active by
pressing the left Soft key. During a call, a press on the left Soft key activates
the loudspeaking function. Press the left Soft key again to turn it off.
11.1.5
End the call
To end a call:
Press
.
The display shows the duration of the call.
11.1.6
On another extension
To answer a call to a phone in another room:
1. Call the ringing extension and press
.
You will hear a busy tone.
2. Press 8.
Note:
54
France press 4; Sweden press 6.
1424-EN/LZT 103 090 Uen A1 2008-10-24
Incoming Calls
11.2
Call List-Up Individual
When your extension is idle, you can also answer a call that is ringing for
another extension, without having to change extensions.
1. Dial the1 3 for the call pick-up service.
2. Directly dial the directory number that is ringing.
3. Press
Note:
11.3
to call the selected number.
Some extensions may possibly be equipped with permanent protection
against call pick-up. If this is the case, this service will obviously be
refused on these extensions (and the other way round).
Missed Calls
1. Select Missed calls, and step with
and
to scroll in the list.
2. Press Call to call back.
The More soft key allows you to view the time/date of the call, edit the entry,
add to contacts, send message, delete an entry, and delete all entries.
11.4
Call Time
To display the total time of the previous call and last call:
1. Press Menu.
2. Go to the Calls menu with
and press the confirmation button or Select.
3. Select Call time.
11.5
Call Services
Note:
These functions are system dependent. The parameters are set up in
the CPDM or Desk PDM by system administrator.
Absence Handling
1. Go to the Call services menu with
Select.
and press the confirmation button or
2. Select Absence.
3. Select Activate.
If the cordless telephone is preprogrammed, a number of absence reasons
can be displayed.
1424-EN/LZT 103 090 Uen A1 2008-10-24
55
DT690
For example Lunch, Meeting, or Trip.
Press Select, enter time or date, when present again (use
AM and PM) and press Select.
Note:
to switch between
It might take several seconds for the phone to dial and send the code
to the PBX.
Deactivate the absence setting
1. Enter Call services.
2. Select Deactivate.
3. Press Select.
Divert calls
To divert calls to another extension:
1. Go to the Call services menu with
the Select.
and press the confirmation button or
2. Select Divert calls.
A list with predefined extension names/numbers will appear if the cordless
telephone is preprogrammed through the Central Portable Device Manager.
Divert Internal/External calls
1. Select Internal/External.
2. Select Activate.
3. Enter the number to divert.
4. Press OK.
To stop diversion select Deactivate and press the confirmation button or OK.
Divert Calls if No reply
1. Select No reply.
2. Select Activate and press OK.
3. Enter number to divert to.
4. Press OK.
To stop diversion select Deactivate and press the confirmation button or OK.
56
1424-EN/LZT 103 090 Uen A1 2008-10-24
Incoming Calls
11.6
Call list
Select Call list, and move with
and
to scroll in the list.
View the time of a call
1. Press More.
2. Select Time of call.
The time and date is displayed.
Edit number from Call list
1. Press More.
2. Select Edit.
Save number
1. Press More.
2. Select Add contacts.
Send message
1. Press More.
2. Select Send message.
Delete entry from the Call list
1. Press More.
2. Select the entry to delete.
3. Select Delete.
4. Press Yes to delete the entry from the list.
Delete all entries from the Call list
1. Press More.
2. Select Delete all.
3. Press Yes to delete all the entries from the list.
1424-EN/LZT 103 090 Uen A1 2008-10-24
57
DT690
58
1424-EN/LZT 103 090 Uen A1 2008-10-24
Outgoing Calls
12
Outgoing Calls
If you make a call but the person is not available, the following functions will
help you to establish contact with the called party.
To make a call through the phonebook, see Section 16 on page 87.
12.1
Pre-dial
To use pre-dial:
1. Enter the number and press
to get the line.
The number is shown on the display while dialling.
2. If needed, press Clear to erase a digit.
By using the navigation key, it is possible to step and add or delete a digit
in the middle of a number.
12.2
Dial Using a Pre-programmed Hot key or Soft key
A Hot key can be programmed to give access to frequently used functions such
as dialling a specific telephone number, a shortcut on the menu, or sending an
SMS. Any key "0", "2" - "9" can be set to a Hot Key. A long press on any of
these digits in standby mode are by default a shortcut to the Call contact list.
Press the pre-programmed Hot key, Soft key or multifunction button to dial the
number. The call will automatically be connected.
12.3
Dialling a Number from the Call List
The 25 last received, dialled and missed phone numbers are stored in the Call
list. If Clock and Date function is set, it is possible to see the time for the calls
made or received that day.
The following day, the time stamp is changed to a date stamp. For more
information on time and date settings, see Section 9.3 on page 44.
To dial a number stored in the Call list, do the following:
1. Press
.
2. Step in the Call list and select the number to dial.
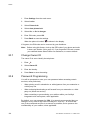
1424-EN/LZT 103 090 Uen A1 2008-10-24
59
DT690
3. Press
or Call.
The number can be edited before the call is started, to do this, do the
following:
•
Press More.
•
Select Edit.
•
Change the number and press
Note:
12.4
or Call.
If a number occurs more than once, the last time stamp together with
the total number of occurrences, is shown.
Dialling a Number from a Message
It is possible to dial a number included in a received message located in the
Messaging menu.
To dial from a message:
1. Enter the Messaging menu.
2. Select Inbox.
3. Select the number from the list.
4. Select View.
5. Select More.
6. Select Call sender.
12.5
Dialling a Number from the Local Phonebook
1. Enter the Contacts menu.
2. Select Call contacts.
3. Select the contact from the list, or search name/number by entering
characters.
4. Press Call or the Hook-off button to make the call.
12.6
Dialling a Number from the Central Phonebook
1. Enter the Contacts menu.
2. Select Central Phonebook.
3. Select Search by number.
60
1424-EN/LZT 103 090 Uen A1 2008-10-24
Outgoing Calls
4. Enter the first name and/or the last name and press Search.
5. Press Call or
12.7
to make the call.
Dialling a Name from the Central Phonebook
1. Enter Contacts.
2. Select Central phonebook.
3. Select Search by name.
4. Enter the first/last name and press Search.
5. Press Call or
1424-EN/LZT 103 090 Uen A1 2008-10-24
to make the call.
61
DT690
62
1424-EN/LZT 103 090 Uen A1 2008-10-24
During Calls
13
During Calls
The MD Evolution Communication Platform allows you to handle calls in many
different ways.
You can transfer the call, put a call on hold or do a blind transfer.
13.1
Start a New Call during Conversation
1. Press More during the call.
2. Select New Call.
3. Press Select.
4. Dial the number and press
13.2
.
Dialling during a call
When calling interactive teleservices, for example telephone banks, you need
to use Dual Tone Multi Frequency (DTMF) signals. If the phone exchange is not
already programmed to automatically convert entered digits into DTMF signals,
this function needs to be activated during the call.
To dial digits during a connected call, do the following:
1. Press 9 or More.
2. Dial the required digits.
Entered digits are transferred as DTMF signals.
Note:
13.3
In Finland, press 1 and dial the required digits.
Transfer a Call/Retrieve the Call
1. Press More during the call.
2. Select Transfer.
3. Press Select.
4. Dial the number of the person you want to transfer the call to.
5. Press
1424-EN/LZT 103 090 Uen A1 2008-10-24
to transfer the call.
63
DT690
13.4
Blind Transfer
1. Press More during the call.
2. Select Transfer to new call.
3. Press Select.
4. Dial the number of the person you want to transfer the call to.
5. Press
13.5
to transfer the call.
Put a Call on Hold
An ongoing call can temporarily be put on hold. Calls put on hold can be
resumed to your own or on another phone. To put a call on hold, do the
following:
1. Press Options during the call.
2. Mark Hold: (No.) and press Select.
The call is put on hold and the text On hold (No.) is displayed.
To retrieve the call press Options” once again and mark Retrieve. The call is
retrieved and the text disappears from the display.
13.6
Adjust the Volume during a Call
Press the Volume up button to increase the volume, and the Volume down
button to decrease the volume. The phone will now store and keep the new
volume level.
It is also possible to use the navigation key
13.7
, and
to adjust the volume.
Mute Microphone
To mute the microphone during an ongoing conversation, do the following:
1. Press More during the call.
2. Select Microphone off and press Select:
The
icon indicates a silenced microphone: the other part in an ongoing
call cannot hear you.
64
1424-EN/LZT 103 090 Uen A1 2008-10-24
During Calls
To turn the microphone back on, press More during the call, and select
Microphone on and then Select. It also possible to turn the microphone off/on
by a long press on
13.8
.
Loudspeaking Function
How to activate the loudspeaking function is dependent of the choice of
answering method.
An incoming call can be connected with the loudspeaking function active by
pressing the left Soft key. During a call, a press on the left Soft key activates
the loudspeaking function. Press the left Soft key again to turn it off. You can
also activate this function by selecting another answering method. For the
loudspeaking function you have two choices in the menu:
13.9
•
Automatically. All incoming calls will be connected automatically.
•
Loudspeaking. All incoming calls will be connected in loudspeaking mode.
Call Diversion
All calls (internal calls, external calls, calls when busy, or calls at no answer)
can be diverted to another telephone number. The diversion is made through
Calls -Call services - Divert calls.
13.10
Conference
When having an ongoing conversation and want to establish a telephone
conference, do the following:
1. Press More, mark New call and press Select.
2. Dial the number and press
,.
When the third party has answered, continue with the following to establish
a conference.
3. Press More, mark Conference and press Select.
Note:
You can also press 3.
4. Repeat the procedure to add more conference members.
1424-EN/LZT 103 090 Uen A1 2008-10-24
65
DT690
Note:
66
A tone burst is heard each time a participant enters or leaves the
conference. When the conference leader leaves the conference,
the conference will continue with the other included parties. The
conversation is changed back to a normal two party connection when
there is only two parties left.
1424-EN/LZT 103 090 Uen A1 2008-10-24
Messaging
14
Messaging
This section describes the Messaging menu.
14.1
Message List
The thirty last messages are stored in a list. The message list is located in the
Messaging menu. Time and date information is included in the message.
14.2
Receiving a Message
When a text message is received, the LED starts flashing and the message
alert signal sounds. The New message icon is displayed. The icon will remain
in the display until all new messages are opened. If the message is received
during a call a beep notifies the user.
The message can be read by selecting
, and reply/forward the message
or call the sender. It is also possible to or read the message later by selecting
No. The message will in both cases be stored in the Inbox.
14.2.1
Reading a Stored Message
To read a stored message:
1. Enter the Messaging menu.
2. Select Inbox .
3. Select the stored message and press View to read the message.
14.2.2
Replying to a Message
To reply to the message:
1. Press Yes.
2. Press Reply.
3. Enter the message and press Send.
4.
14.2.3
Enter the number and press Send.
Deleting a Message
To delete the message:
1424-EN/LZT 103 090 Uen A1 2008-10-24
67
DT690
1. Enter Messaging.
2. Select Inbox.
3. Select the message to delete and press More.
4. Select Delete and press Yes for confirmation.
The message is deleted.
14.2.4
Forwarding a Message
To forward the message to another telephone:
1. Enter Messaging.
2. Select Inbox - Message - View.
3. Press More and select Forward.
4. Press Send, enter number, and press Send to forward the message.
14.2.5
Calling the Sender of the Message
To call the sender of the message:
1. Enter Messaging.
2. Select Inbox.
3. Select the message and press More.
4. Select Call sender.
14.2.6
Calling a Telephone Number included in a Message
If the sender wrote a telephone number in the message it is possible to call
the number without dialling it.
1. Select View - More.
2. Select Call (No. in text) and select Call.
14.2.7
Writing and Sending a Message
1. Enter the Messaging menu.
2. Select Write new message.
Keys 0-9, *, or # can be used. Key 0 and 1 contains special characters, see
Section 16.6.1 on page 90 to see all characters. The maximum message
length is 160 characters.
68
1424-EN/LZT 103 090 Uen A1 2008-10-24
Messaging
Note:
Some characters require 2 bytes in the final message, therefore the
user will sometimes not be able to enter 160 characters.
The first character entered will be an upper level character followed by lower
level characters unless the *, key is pressed before entering the character.
When pressing a key, the first available character on that specific key is
displayed, see Section 16.6.1 on page 90.
To get any of the other characters on that key, press the key until that character
appears in the display.
To get the character E, press key 3 twice.
"E" appears in the display and is selected
after a timeout or when another key is pressed.
To delete a character, press "Clear".
Press "Send", enter the call number and
press "Send" to send the message.
Example 1
14.2.8
Opening a Sent Message
To open a sent message:
1. Enter the Messaging menu.
2. Select Inbox or Sent and select the message.
3. Press View to send the message.
14.2.9
Sending to Another Destination
1. Enter the Messaging menu.
2. Select Inbox or Sent and select the message.
3. Press More and select Forward.
4. Press Send.
5. Enter the number and press Send.
1424-EN/LZT 103 090 Uen A1 2008-10-24
69
DT690
70
1424-EN/LZT 103 090 Uen A1 2008-10-24
Voice Mail Services
15
Voice Mail Services
Depending on its configuration, your facility may have an integrated voice mail
system, which may or may not be associated with an automated attendant
service.
If this is the case, you then have normal access to a personal mailbox.
You may then program your extension to forward your calls to this mailbox
when you do not answer, if you are busy, or if you are temporarily absent.
According to the operating mode attributed to your mailbox, your parties will
simply be informed of your absence, and then you will have the option of either
leaving a voice message for you, or having their call redirected to an assistant
or any other extension you may have defined.
Whenever a new voice message is left in your mailbox, you will be automatically
notified by an icon displayed on your extension. You may also program the
system to notify an external number as well.
Calling the integrated voice mail service then permits you to consult each new
voice message that was left, and then you may either delete it or archive it, as
you deem necessary. You may consult your mailbox from your extension, from
any other extension in the facility, or from an external network.
You also have mailbox management options, such as recording a personalized
greeting, programming an external notification upon reception of voice mail, or
programming an assistant's number, as the case may dictate.
If you are part of (a) hunt group(s) (see Section 19 on page 103), you will also
receive voice mail that may be left for the hunt group in general when no one
answers, if the group is congested or when it is closed. These messages may
also be consulted directly from your individual mailbox.
Besides your individual mailbox, you may also be assigned to a common
mailbox for distribution purposes, which may also be shared between different
extensions in your facility.
This allows calling parties, or even you, to leave a voice message in this
common mailbox that will then be distributed to all of the members who share
this mailbox.
Note:
This is also true, of course, of all the other extensions in your facility.
Everyone then, has the liberty of leaving voice mail in any available
individual or common mailbox.
1424-EN/LZT 103 090 Uen A1 2008-10-24
71
DT690
15.1
Receiving a Voice Mail
A new voice mail is indicated by
15.2
. Information is stored in the Voice inbox.
Checking the Voice Inbox
1. Enter the Messaging menu.
2. Select Inbox.
The voice mail will be displayed in the inbox list.
The
icon followed by the total number of new voice mails in the users
mailbox is displayed.
3. Select Voice Mail and press View and then Call.
15.3
One Key Voice Mail Access
If the mailbox extension number is downloaded to the phone, a long press on
1 when in standby mode will call the mailbox. If the extension number is not
available an error beep is generated.
15.4
Voice Mailbox Modes
Your individual mailbox may be managed according to one of the following
three operating modes:
•
In answering mode: Your mailbox only plays an absence message that
you may manage yourself. Calling parties who are directed to your mailbox
hear your message, however they are not able to leave a message for you.
•
In recording mode: Your mailbox plays a greeting that you may manage
yourself. Then, calling parties who are directed to your mailbox hear your
message, and then may leave a voice message for you that you may
subsequently consult.
•
In personal assistant mode: Your mailbox plays a greeting that you may
manage yourself. Then, calling parties who are directed to your mailbox
may either leave a voice message, or if they so desire, be redirected to
your assistant, to another extension you previously designated, or to your
facility's attendants.
The selection of an operating mode for each mailbox is usually overseen by
your system administrator. The mode usually used is the recording mode
(which is assumed in the rest of this guide).
72
1424-EN/LZT 103 090 Uen A1 2008-10-24
Voice Mail Services
15.5
Call Forwarding to Voice Mailbox
Forwarding calls to your individual mailbox may be effective according to one of
the following types of call forwards:
•
Call forward on no-answer condition: Your calling parties will be
re-directed to your mailbox, whenever you do not answer, typically after a
20-second delay.
•
Call forward on busy condition: Your calling parties are immediately
re-directed to your mailbox whenever your extension is busy.
•
Call forward on no-answer and busy conditions: Your calling parties
are re-directed to your mailbox when there is no answer and when your
extension is busy.
•
Immediate call forward: All calls are immediately re-directed to your
mailbox.
This may consist of a fixed call forward on no-answer condition, on busy
condition, or a call forward on no-answer and busy conditions that was defined
by your system administrator. This is applied by default whenever you do not
define a variable call forward for your calls. This is often the case when a facility
uses as an integrated voice mail service, which - by default - receives your calls
encountering a no-answer or busy condition.
You may also program the call forwarding to your mailbox yourself. This
variable call forward takes precedence over a possible fixed call forwards.
The operating modes for these different services are identical to the other call
forwarding services - See Section 17 on page 93.
The recipient number for your call forward is the internal access number for
your facility's integrated voice mail system.
For Call Forwarding to your Voice Mailbox when your extension is idle:
1. Dial the prefix that corresponds to the desired type of call forward.
Usually, you will dial one of the following:
6 1 To activate an immediate call forward.
6 2 To activate a call forward on no-answer condition.
6 3 To activate a call forward on busy condition
6 9 To activate a call forward on no-answer condition and busy condition.
2. Dial 8 8 4
This is the usual access number for a system's integrated voice mail
system. If you need more information, contact your system administrator.
1424-EN/LZT 103 090 Uen A1 2008-10-24
73
DT690
3. Press
to activate the service.
4. Wait for the Service Acceptance Tone.
5. Press
15.6
to finish the procedure.
Voice Mailbox Greeting Messages
Once a call forward to your mailbox has been programmed, parties directed to
your mailbox will first receive a greeting message.
By default, the greeting message is: Welcome in the called extension
mailbox. In the case where the call forward is on busy condition, it is preceded
by the following system message: The requested extension is busy.
You may personalize this greeting as you wish. Until you have personalized
the greeting, the system will offer you this option whenever you consult your
mailbox.
A new system message then prompts the party to leave a voice message after
the beep (except in cases of where the mailbox is set to answering mode only).
The standard configuration allows a voice message to last up to 30 minutes,
with up to a total of 100 messages that may be saved in your mailbox,
depending on the voice mail system's capacity.
Note:
Messages lasting less than 3 seconds are not taken into account. An
8-second silence will automatically terminate a voice message.
This is also the case when you are directed to your calling party's
mailbox.
15.7
Voice Mailbox Messages Internal Notification
Whenever a new message is left in your mailbox, you will be immediately
notified by an icon displayed on your extension.
Voice message
Voice message received and unread.
This notification status remains until you have consulted the new message, or if
there are any unread messages in your mailbox.
Received messages are divided into the following categories:
•
74
New messages (not heard); indicated by a vocal message and a special
dial tone.
1424-EN/LZT 103 090 Uen A1 2008-10-24
Voice Mail Services
•
15.8
Stored messages; not indicated.
Voice Mailbox Messages External Notification
You may also program your extension to automatically notify you at an external
number whenever a new voice message is left in your mailbox.
Typically, this number could be your GSM mobile phone when you are out
of the office.
When a new message is left in your mailbox, a call is then automatically emitted
to each external number that you have defined.
If you answer this automatic call, you will be transferred directly to your mailbox.
You will then be prompted to enter your user password in order to consult your
new voice message.
If you do not answer within a certain timeframe (typically, 30 seconds), the
automatic call process will be repeated with up to 5 consecutive attempts,
executed at 45-minute intervals (typical values).
Note:
15.9
External notifications of new voice messages left in your mailbox is
usually restricted to business hours between 9 a.m. and 6 p.m., based
on your facility's local time.
Voice Mailbox Internal Access
Access the mailbox from your own extension
1. Enter the directory number of the mailbox system.
Listen and follow the voice announcements in the main menu.
Consulting voice messages left in your mailbox is usually carried out from
the extension that was notified.
Depending on the configuration, you might be asked for your password
before you can enter your mailbox:
2.
Enter your user password.
By default, your user password is 1234, however you may have modified
it. (See Section 20.8 on page 114)
15.10
Voice Mailbox External Access
Normally, it is also possible for you to access your voice mail from a DTMF
analogue extension or a GSM mobile phone that supports DTMF end-to-end
dialling mode on an external network.
1424-EN/LZT 103 090 Uen A1 2008-10-24
75
DT690
Access is then gained through the automated attendant usually implemented
and associated with a system's integrated voice mail, even when an automated
attendant's functions are not effectively used.
Access is gained as follows:
1. Dial the DID number for your company's automated attendant (AA).
Usually, the internal number for the automated attendant is 885. This is
associated with DID numbers relating to your facility. Contact your system
administrator for more information.
You are then connected to the automated attendant's voice menu.
2. Dial * in order for your call to be transferred to voice mail.
* is the code used by default to consult voice mail through the automated
attendant. It may have been replaced by #. You are then connected to
the voice mail system and are prompted to dial the mailbox number you
wish to access.
3. Dial your extension number, which is also your mailbox number.
As with internal consultation, a system message prompts you to enter your
user password.
4. Enter your user password.
By default, your user password is 1 2 3 4, however you may have modified
it. (See Section 20.8 on page 114). You are now connected to your
mailbox's consultation menu.
Note:
Interaction with the voice mail system or automated attendant is carried
out through the exchange of DTMF codes. For an internal call, the
transition to DTMF end-to-end dialling is automatic. It is also the
default from an external analogue DTMF extension. From a GSM
mobile phone, transition to DTMF end-to-end dialling may necessitate
a specific operation, depending on the GSM mobile phone involved.
The above method is also applicable for consulting your voice mail from
a third party set within your facility. Simply begin by dialling the internal
number - typically 885 - for the automated attendant.
An alternative solution for accessing your mailbox from outside your
facility is dialling your DID number. If your extension is successfully
connected to the voice mail system, the rest of the procedure is
identical to that described.
15.11
Voice Mailbox Managing
Whether you consult your voice mailbox from your own extension, from a
third party set, or from an external network, once you are connected to your
76
1424-EN/LZT 103 090 Uen A1 2008-10-24
Voice Mail Services
mailbox's consultation menu, the services offered to you for processing your
messages are always the same.
This also is true of the personalization services for your mailbox, accessed
in the same manner.
Initially, your mailbox will indicate how many voice messages were recorded,
according to one of the following two system message forms:
•
You have X new messages and Y old messages.
•
You have no message. Please hang-up or dial * to customize your mailbox.
The voice mail system distinguishes new messages that have not been
heard from those that have already been heard and that were subsequently
automatically archived, unless you specifically erased them.
These are organized into two distinct lists, where each type of message is
sorted in chronological order from the oldest to the newest.
Next, the consultation menu will indicate the various services that are available
for managing your messages. You may listen to it in its entirety, or interrupt it at
any time by dialling a service code.
Note:
The consultation menu is repeated up to 3 times if you do not execute
an action when it is being played. It is also automatically repeated
when a service has been successfully completed.
The services available for listening to voice messages are as follows:
Dial 3 to listen to the next message
Initially, you will hear the oldest new message, and then each following
message, in the chronological order described above.
Dial 1 to listen to the previous message
You then will hear the messages in the opposite chronological order of the
one described above.
Dial 2 to listen to the previously selected message
The message is repeated from the beginning.
Dial 4 to rewind within the current message
The message is rewound to the point 10 seconds prior to the current point.
Dial 5 to listen to pause or restart the current message
Pressing the pause code the first time will suspend the play of the message at
the current point. Pressing the same code a second time restarts the message
1424-EN/LZT 103 090 Uen A1 2008-10-24
77
DT690
from this same point; play will be automatically restarted after a 15-second
pause.
Dial 6 to listen to fast-forward within the current message
The message is fast-forwarded to the point 10 seconds past to the current
point. You may also request the date and time stamping for the message to
which you are currently listening. To do so:
Dial 7 to obtain the date and time stamping for the current message
Depending on whether the message was left on that same day or a previous
day, the day/month (DDMM) and hour/minute (HHMM) data concerning when
your message was left are transmitted vocally on your extension (according to
one of the forms described below), and then your current message is restarted.
•
Message received at HHMM today.
•
Message received at HHMM on DDMM.
Once you have listened to your messages in whole or in part, you may then
individually erase each message, or request that your entire mailbox be erased.
To do so:
Dial 8 to listen erase the current message
This can be carried out immediately following the message, or while it is being
played.
Dial 8 # to erase all of the messages in your mailbox
This pertains to both new and archived messages in your mailbox, even if the
former have not been heard. In either case, a system message will prompt you
to confirm erasing the current message or all of your mailbox messages. At any
time, you may exit the voice mail system. To do so:
Dial 9 to end your call
Pressing the pause code the first time will suspend the play of the message at
the current point. Pressing the same code a second time restarts the message
from this same point; play will be automatically restarted after a 15-second
pause.
Press
to end this service.
Your extension returns to idle status. The non-consulted messages remain
classified as new messages, while consulted messages are automatically
archived. The icon indicating new messages will still be displayed on your
extension if any non-consulted voice messages remain. On the other hand,
if you have consulted all of your mailbox messages, your extension is
automatically un-notified.
78
1424-EN/LZT 103 090 Uen A1 2008-10-24
Voice Mail Services
Note:
15.12
Typically, new messages are saved for a period of 30 days. Archived
messages are typically saved for 7 days, after which they are
automatically erased.
Automatic Call-Back from Voice Mailbox Message
When you are consulting a voice message, you also have the option of
automatically calling the number that the system automatically saved when
the caller left the message.
This may consist of an internal or external calling party, according to his/her
identification provided by the ISDN network (or equivalent).
To do this, while listening to a message:
Simply dial 0
The person who left the message is then automatically called and the call is
established just as if you had manually dialled the internal or external party's
number.
15.13
Additional personal assistant services
If your mailbox is set to personal assistant mode, you offer your calling parties
the option of leaving voice messages that you may subsequently process as
previously described.
They also have the option of being directed to the personal assistant you
designated - typically your secretary's extension or your facility's attendants.
To do so, after your greeting is played, the system message is played and
prompts each caller to leave a voice message after a beep, and also offers
them the following alternative options:
Dial 0 to be connected to your personal assistant
The call is then directly connected to the designated internal extension, or by
default - if you had not defined it - to the attendants.
Dial 9 to be connected to the attendants
The call is directly routed to the attendants. If neither of the two preceding codes
is dialled within a 3-second delay, the call is directed to your mailbox, by default
Note:
The number for a personal assistant may possibly be an external
number.
This is also the case when you are directed to your calling party's
mailbox that is set to personal assistant mode.
1424-EN/LZT 103 090 Uen A1 2008-10-24
79
DT690
15.14
Voice Mailbox Personalization Services
Whether you consult your voice mailbox from your own extension, a third party
set, or from an external network, once you are connected to your mailbox's
consultation menu, the services offered to you for personalizing your mailbox
are always the same.
To do so, while listening to your mailbox consultation menu:
Dial *. You will then hear the personalization menu for your mailbox.
This menu will present the various services that are available for personalizing
your mailbox. You may listen to it in its entirety, or interrupt it at any time by
dialling a service code.
Note:
The personalization menu is repeated up to 3 times if you do not
execute an action when it is being played. It is also automatically
repeated when a service has been successfully completed.
The services available for personalizing your mailbox are as follows:
Dial 1 to manage your greeting message. This applies no matter what
operating mode your mailbox is set to, and allows you to manage the first
message that callers who are directed to your mailbox will hear.
A new menu is therefore played, which prompts you to:
•
Dial 1 to listen to the greeting that is currently saved.
•
Dial 2 to record your new greeting. The maximum length for a greeting is 3
minutes. You may end the recording by dialling any code, or by remaining
silent for 8 seconds.
•
Dial 3 to erase the greeting that is currently saved. It is then replaced by
the default greeting proposed by the voice mail system, until you record
a new one.
•
Dial 9 to return to the main mailbox personalization menu.
Dial 5 to manage your answering message
This especially applies if your mailbox is managed in answering mode. If that is
the case, this command enables you to manage the message that is typically
an absence message played after your greeting message for callers directed to
your mailbox. A new menu is then played, offering you the same services as for
recording your greeting message, as described above.
Dial 6 to manage your personal assistant service
This especially applies if your mailbox is managed in personal assistant mode.
A new menu is therefore played, which prompts you to:
80
1424-EN/LZT 103 090 Uen A1 2008-10-24
Voice Mail Services
•
Dial 1 to hear the number currently saved for your personal assistant. This
information is played back for you through voice synthesis, one digit at a
time
•
Dial the sequence: 2 < #to save your personal assistant's number>. It
may consist of an internal or external number, containing up to 18 digits,
including the external network access prefix.
•
Dial 4 to erase the number currently saved for your personal assistant. It is
then replaced by a number for a facility attendant.
•
Dial 9 to return to the main mailbox personalization menu.
Dial 2 to manage a possible external notification for messages left in
your mailboxThis especially applies if your mailbox is managed in recording
or personal assistant mode.
A new menu is therefore played, which prompts you to:
•
Dial 1 to hear the number currently saved for external notification. This
information is played back for you through voice synthesis, one digit at
a time.
•
Dial the 2 # sequence: to save your external notification recipient number.
It may contain up to 18 digits, including the network access prefix.
•
Dial 3 to activate or de-activate the external notification service. If
the service was initially inactive, it will be activated, and vice versa.
Deactivating the service has no impact on the recipient number for the
service that is reputed and remains programmed.
•
Dial 4 to erase the number currently saved for external notification.
•
Dial 9 to return to the main mailbox personalization menu.
Dial 4 to manage your user password
Your user password is the some as the one to access your mailbox and activate
or deactivate certain services from your extension. (See Section 20.8 on page
114). By default, it is set to 1234. You may replace it with any other 4-digit code.
Dial 3 to protect your extension from calls sent from an automated
attendant (AA).
If the service was initially inactive, it will be activated, and vice versa.
This is only applicable if your facility is equipped with an automated attendant
that enables the general directing of calls to be managed in lieu of your facility's
attendants. In this case, you may usually be contacted through this automated
attendant. This service is to prevent any calls from being presented on your
extension by the automated attendant. An internal or external calling party
trying to contact you through the automated attendant is then automatically
directed to your mailbox.
1424-EN/LZT 103 090 Uen A1 2008-10-24
81
DT690
Once the personalization of your mailbox is completed:
Dial 9 to end personalization
You will then be returned to your mailbox consultation menu.
Note:
Each time something new is programmed, the system will provide
confirmation. If a service is activated or deactivated, the confirmation
clearly states that the service is activated or the service is
deactivated, as the case may be.
In relation to your user password, it is very important that you modify
it, to ensure the confidentiality of your mailbox. If you ever forget your
password, you can request that it be re-initialized, either by a system
attendant, or by the system administrator.
15.15
Voice Mailbox for Hunt Group
If you are part of a hunt group with the purpose of distributing calls, a common
mailbox may be associated with the group.
This common mailbox may then receive calls from parties requesting the group
when their calls remain unanswered from the group member allocated to each
call, or when their calls encounter a congested or closed hunt group status.
Callers may then leave a voice message that is, in this case, distributed and
notified to each member of the hunt group, in usual fashion.
You may consult this voice message from your individual mailbox. This is
carried out in the same way as you would access a message destined for you
personally, with the same processing services available. There is no distinction
in your mailbox between individual messages and group messages.
A voice message left for a group is automatically un-notified on your extension,
as soon as you consult it, just as it would for an individual message.
The only particularity is that a global denotification of a common message
of this type will only take place after each member of the hunt group has
consulted it.
15.16
Voice Mailbox for Mailing List
Independent of any hunt group notion, you or your internal calling parties may
be assigned to a common mailbox for a mailing list in addition to your (their)
individual mailbox.
This enables a user to initiate a voluntary distribution of a voice message to the
members associated with the common mailbox for a mailing list.
For example, a common mailbox associated with a department would enable
the department manager, any other member of the department, or even a third
82
1424-EN/LZT 103 090 Uen A1 2008-10-24
Voice Mail Services
party to voluntarily distribute a voice message to all department members, to,
for example, call a meeting.
Access to this type of common mailbox for a mailing list is gained through the
automated attendant usually implemented and associated with a system's
integrated voice mail system, even when an automated attendant's functions
are not effectively used.
Access is gained as follows:
1. Dial the number for your company's automated attendant (AA).
Usually, the internal number for the automated attendant is 885. If you
need more information, contact your system administrator.
2. Press
.
3. Wait for the Service Acceptance Tone You are then connected to the
automated attendant's voice menu
4. Dial 8 in order for your call to be transferred to voice mail. 8 is the code used
to access the area for leaving voice mail through the automated attendant.
5. Dial the number for the common mailbox for a mailing list you wish to
access.
Always beginning with a 0, the number for a common mailbox may vary from
0002 to 0999. You may then leave your message before ending your call.
As with a message addressed to a hunt group, this message will then be
distributed and notification will be sent to all of the members associated with the
common mailbox for a mailing list, in usual fashion.
Each member may then consult it through his/her individual mailbox. This
is carried out in the same way as for an individual message, with the same
processing services available.
There is no distinction in your mailbox between individual messages and
mailing list messages.
A mailing list voice message is automatically un-notified on each e*tension, as
soon as each member consults it, just as with an individual message.
Once again, the only particularity is that a global denotification of a mailing list
message of this type will only take place after each member of the common
mailbox has consulted it.
1424-EN/LZT 103 090 Uen A1 2008-10-24
83
DT690
Note:
On a standard system, there may be up to 16 common mailboxes, each
with the capacity to include up to 32 members or individual mailboxes.
One individual internal user may be associated with several common
mailboxes. The procedure is applicable from an external network;
instead of dialling 885, you would dial the DID number for the
automated attendant. It is also applicable for leaving a message in an
individual mailbox, without having to call the party.
15.17
Voice Mailbox for Attendants
Your facility's attendants also have a common mailbox dedicated specifically to
them, which they share.
Its purpose is to receive - when the attendants are absent - call forwards of
general calls that are ordinarily processed by the attendants, typically when
your facility is set to night mode.
This common mailbox is also accessible voluntarily. Its number is 0001.
This common mailbox is distinct due to the fact that when a voice message is
left, all of the attendants' extensions are notified; however, when one of them
consults the message, all of the extensions are globally un-notified.
15.18
Integrated Web Server and Unified Messaging
According to the configuration of your telephone facility, you may also have
access to three PC applications that offer even more user-friendly management
of your integrated voice mail services.
•
The first application, called Integrated Web Server, opens the integrated
voice messaging system for your telephone installation within your
company's IT network.
In practice, this enables you to consult the messages left in your mailbox
directly from your Multimedia desktop PC. The characteristics for each
voice mail left are displayed in real time.
You may also listen to each voice message using your Multimedia PC
sound card, and then erase the voice message after you've listened to it.
You also have access to all of your mailbox's personalization services
directly from your desktop PC, including its general operating mode. All of
this is carried out completely interactively with the integrated voice mail
system.
Note:
84
Access to your Integrated Web Server is controlled by entering
your extension number and user password.
1424-EN/LZT 103 090 Uen A1 2008-10-24
Voice Mail Services
•
The second additional application is called Unified Messaging. Its purpose
is to merge your facility's integrated voice mail system with the E-mail
system that is usually present within your company's IT network.
In practice, this application provides an E-mail notification to your desktop
PC each time a voice message is left in your mailbox, in addition to the
usual notification methods on your telephone extension.
With this application as well, you may listen to a voice message through
your Multimedia desktop PC sound card. You may also use your PC to
control your telephone extension to process each voice message, or even
to return a call to someone who left you a voice message.
You then have access to all of the methods available for personalizing
your use of Unified Messaging. Most notably, you may manage the voice
message E-mail notification address, which on occasion could be a laptop
remotely connected through the Internet.
•
The third additional application is Click Dialling. This application may
offer your access to the internal and external directories for your company,
through your desktop PC. With just one click of the mouse, you can place
calls to anyone.
To perform Click Dialling from the web server:
1. Select Information.
2. Select Address Book.
3. Select the wanted name.
4. Click to distant: your DECT terminal is ringing.
5. Press to make the call.
Note:
Note:
Click dialling is not supported when using the phone in an IP DECT
system.
Whenever necessary, contact your system administrator for more
information concerning the availability of one or all of these applications
for your telephone facility.
1424-EN/LZT 103 090 Uen A1 2008-10-24
85
DT690
86
1424-EN/LZT 103 090 Uen A1 2008-10-24
Phonebook
16
Phonebook
Your phone is equipped with an integrated phonebook with up to 250 entries.
The phonebook lists all names in alphabetical order, where three numbers can
be added for each contact; work number, mobile number, and other number.
A company phonebook with up to 1000 entries can be downloaded to the
phone. In your phonebook, the local and company phonebook names appear in
the same list, in alphabetical order. However, the company phonebook names
are indicated by a Keys locked icon in front of the name.
Note:
Numbers stored in the phonebook have a maximum of 24 digits and
names have a maximum of 48 characters.
Please ask your system administrator if a company phonebook is
available.
16.1
Phonebook Access
Access the names and numbers of the phonebook.
1.
Access the phonebook.
2. Use
16.2
to select the desired option.
Making Calls with Phonebook
You can search for a name and number in the phonebook.
You can search for a name and number in the Phonebook. When you have
accessed the Phonebook:
1. Press Menu.
The Contacts menu is available.
2. Press to confirm the selected menu item Call contact.
A list of all entries in the Phonebook is displayed.
The names in the Phonebook are shown in alphabetical order (alternating
with the associated numbers).
3. Scroll down until you find the desired name.
Or
1424-EN/LZT 103 090 Uen A1 2008-10-24
87
DT690
Enter the first letters of the name.
The first name beginning with those letters is displayed. For information on
how to write text, see Section 16.6 on page 89
4. Scroll down until you find the desired name.
5. Press Call to initiate a call.
The number is dialled and Calling is displayed.
16.3
Add Names or Numbers
You can use the Add contact option to enter names and numbers in the
phonebook. When you have accessed the phonebook:
1. Enter the Contacts menu.
2. Select Add contact and press Select.
3. Select New or From call list and press Select.
Note:
16.4
If New is chosen, enter the name, press Select and enter the call
number.
Edit Names or Numbers
With the Edit contact option, you can change the names and numbers in the
phonebook.
1. Enter the Contacts menu.
2. Select Edit contact and press OK.
The names from the Contacts list are shown in alphabetical order.
To search in the list, enter the first character(s) in the name, or step with .
Change the name/number and press Save to save the entry
16.5
Delete Names and Numbers
You can also delete names and associated numbers from the phonebook.
1. Enter the Contacts menu.
2. Select Delete contact and press Select.
The names in the Contacts menu are shown in alphabetical order, step with
and select Name/Number.
88
1424-EN/LZT 103 090 Uen A1 2008-10-24
Phonebook
To search in the list, enter the first character(s) in the name, press Search.
The name/number is displayed: press Delete, and then Yes to delete the
entry.
16.6
Write Text
When writing text messages and adding/editing or searching for names in the
phonebook, the keys 0 to 9, *, or # can be used.
The first character entered will be an upper level character followed by lower
level characters unless the *-key is pressed before entering the character.
When pressing a key, the first available character on that specific key is
displayed.
To get the following characters, press the key repeatedly. Key 0 and 1 contain
special characters. The marked character is selected after a time-out (3
seconds) or when another key is pressed.
Pressing key 1 adds space between the characters and pressing the *-key
switches between upper and lower case.
(to write Smith):
7 7 7 7 Press for S
6 Press for m.
4 4 4 Press for i.
8 Press for t.
4 4 Press for h.
Example 2
Control keys
While entering a name or a number, you can use the following keys for control
and navigation:
1. Press
Note:
to the left to move to the left.
Moves to the beginning of the text if held longer.
2. Press the navigation key
Note:
to the right to move to the right.
Moves to the end of the text if held longer.
3. Press * twice time to enable a upper case letter, and one time * to get a
number digit
Note:
Pressed for more than one second will add a dial tone pause.
1424-EN/LZT 103 090 Uen A1 2008-10-24
89
DT690
4. Press 0 to enter a space.
5. Press Clear to correct a wrong entry.
16.6.1
Alpha Numeric Keys
ABCabcæàâç2
DEFdefèéêë3
, .? ! - ‘ ” 1
JKLjkl5
GHIghiîï4
MNOmnoñôöœ6
PQRSpqrs7
W X Y Z w x y z wˆ yˆ 9
TUVtuvû8
#
006
Space + * 0
Figure 13
Note:
Available characters
Depending on the selected menu language, other characters can be
available. This means that the character order can differ from the table
above.
In standby, and number input mode
•
A short press on a key enter the digits 0 - 9 and characters * or #.
•
Enter + in number input mode by a long press on key 0.
•
Enter a pause in number input mode by a long press on
indicated P in the display.
•
A long press on
. A pause is
changes the tone sender on/off.
Tone sender on is indicated T in the display.
In text input mode
90
•
A press on one of the keys 0-9, * or #, displays the first available character
on that specific key. The marked character is selected after a timeout, or
when another key is pressed.
•
To change to upper/lower case for one letter, press
entering the character.
•
To add space in the text, make a short press on key 0.
twice before
1424-EN/LZT 103 090 Uen A1 2008-10-24
Phonebook
•
The first character entered in a message, or when adding/editing a name in
the Contacts menu, will be an upper level character followed by lower level
characters unless the * key is pressed before entering the character.
1424-EN/LZT 103 090 Uen A1 2008-10-24
91
DT690
92
1424-EN/LZT 103 090 Uen A1 2008-10-24
Call Forwarding Services
17
Call Forwarding Services
Your extension also offers you various call forwarding services that enable you
to direct incoming calls to another internal or external destination, whenever
you are absent and/or busy, travelling, or when you simply would rather not be
disturbed. The following different types of services are available:
•
Call forward on no-answer condition:
Your calling parties will be redirected to the predefined call forward recipient,
whenever you do not answer their calls, typically after a 20-second delay.
•
Call forward on busy condition:
Your calling parties are immediately redirected to the predefined call
forward recipient whenever your extension is busy.
•
Call forward on no-answer and busy conditions:
Your calling parties are redirected to the predefined call forward recipient in
both cases.
•
Immediate call forward:
All incoming calls are immediately redirected to the predefined call forward
recipient. Typically, this could be your secretary's internal number, or your
external mobile phone number when you are travelling.
•
Do not disturb call forward:
Your extension is unavailable, and no call forwarding services were
activated. Your internal party's calls are immediately disconnected, and
your Do not disturb status is displayed on extensions that feature a display
screen. Calls from your external parties are immediately redirected to your
facility's attendants.
•
Call forward on mini-message:
Your extension is unavailable, and no call forwarding services were
activated. Your internal and external parties receive an Absent message
that you have prerecorded.
The number to which a call forward may be directed could be an internal party's
individual extension, a hunt group, another user's personal group, or even
the access number for an integrated voice mail system that your facility may
use. (See Section 15 on page 71).
It may also consist of an external number containing up to 18 digits, including
the network access prefix. This may be an external number that is accessible
through abbreviated dialling. You may use fixed call forward defined by
1424-EN/LZT 103 090 Uen A1 2008-10-24
93
DT690
your system administrator. This may consist of a call forward on no-answer
condition, a call forward on busy condition, or a call forward on no-answer
and busy conditions.
This fixed call forward is applied by default whenever you do not define a
variable call forward for your calls. This is often the case when your facility
uses the integrated voice mail service, which - by default - receives your calls
encountering a no-answer or busy condition.
You may define all of the types of call forwards listed above, on your own. This
is referred to as a variable call forward that takes precedence over a possible
fixed call forward.
In any case, only one call forward applies at any given moment. Defining a
new variable call forward automatically cancels any definition that previously
existed. A variable call forward is defined on a case by case basis before you
leave your extension. If you forget to define the call forward, you may ask the
attendants to remotely define it for you. You may also define your call forward
from an internal extension other than your DT690 that will be the recipient of
your call forwards. This is the Follow me service.
Note:
When any type of call forward is defined on your extension, you still
have the option of placing calls and activating any type of service from
your extension.
When you have defined any type of call forward to an internal recipient,
the latter has the option of calling you without any restrictions.
When a call forward on busy condition is defined on your extension, no
more incoming calls will be presented to you when you have an ongoing
call. In the same way, the services of consulting and answering a new
call are deactivated.
For any call forward defined to be directed to an external recipient,
forwarding of calls issued from external parties may take place either
through your facility's resources or directly at the ISDN network level,
according to your facility's configuration.
You may program a call forward from your extension to itself. This
enables you to bypass any fixed call forward that is applicable to your
extension. Your extension is therefore available normally.
Serial call forwards between different users are authorized.
Your extension may also be subject to call forwarding from third party
sets. Certain extensions (such as yours) may possibly be equipped
with permanent protection against receiving call forwards from third
party sets. Obviously, this service will be denied on these extensions
(and vice versa).
94
1424-EN/LZT 103 090 Uen A1 2008-10-24
Call Forwarding Services
17.1
Variable Call Forwarding
Defining a variable call forwarding on a case-by-case basis is carried out within
the framework of your extension's service programming functions.
When your extension is idle:
1. Dial the prefix that corresponds to the desired type of call forward (see list
below).
•
6 1 (to activate an immediate call forward).
•
6 2 (to activate a call forward on no-answer condition).
•
6 3 (to activate a call forward on busy condition).
•
6 9 (to activate a call forward on no-answer condition and busy
condition).
•
6 4 (to activate a do not disturb call forwarding).
For the first four cases:
2. Dial the internal or external number that will be the recipient of your call
forwards.
As previously indicated, the recipient's number may contain up to 18 digits,
including the network access prefix. An external number may be one that is
accessible through abbreviated dialling.
Note:
An external number is composed of the external access 0 prefix
followed by the actual external Directory number.
# To Dial only in case of an external Directory number. Needed to mark the
end of an external Directory number.
For every case:
3. Press
to confirm.
Wait for the Service Acceptance Tone.
4. Press
to finish the procedure.
Your extension returns to idle status.
The variable call forward that you have just defined is effective immediately.
1424-EN/LZT 103 090 Uen A1 2008-10-24
95
DT690
17.2
Call Forwarding Cancellation
1.
Dial 6 0 for Call Forward Cancellation.
2. Press
3.
Wait for the Service Acceptance Tone.
4. Press
17.3
.
to finish the procedure.
Call Forwarding on Mini-Message
An alternative to all other available variable call forwarding services (referred
to above), you may also redirect your extension to a mini-messaging or call
forward on absence service.
Mini-Messages are predefined messages, they are usable for your incoming
calls in case of No Answer or Busy conditions to inform the callers. This does
not consist of a call forward in its truest sense your incoming calls are not
redirected. Rather, the absence message that you selected when defining
the call forward will be automatically transmitted to all internal and external
parties who are trying to reach you, in the form of an ISDN mini-message, as
long as that party's phone is compatible with the service. His/her call will be
disconnected once the message has been played.
By default, the messages available for each circumstance are the following
messages, identified by the corresponding number.
Predefined Text
96
Completing Information
0
HAS CALLED YOU BACK
1
WILL CALL YOU BACK
2
WOULD LIKE TO SEE YOU
3
IN A MEETING UP TO
HH:MM (hour, minute)
4
ABSENT UNTIL
MM-DD (month, day)
5
IN CASE OF EMERGENCY CALL
NNNN (phone number)
6
PLEASE CALL BACK IN A FEW
MINUTES
8
BUSY - RETURN TIME
HH:MM
9
ABSENT - RETURN DATE
MM-DD
1424-EN/LZT 103 090 Uen A1 2008-10-24
Call Forwarding Services
Note:
The table lists the Mini-Messages provided by MD Evolution system.
The number and contents of the Mini-Messages can be modified by
the system administrator.
Please ask your system administrator for the available Mini-Messages.
Some of the predefined messages include time information to be completed.
If you are not in the office for a certain period of time (for example meeting,
vacation, lunch, illness), this feature allows you to inform your callers when
you will be back.
To define a call forward on absence on your extension, from your idle extension:
1. Dial 6 1
2. Press *
3. Press #
4. Dial the number of the Mini-Message.
If needed, enter the numerical information (such as the hour and minutes,
date and time, or telephone number) to complete the message.
5. Press *
6. Press
.
7. Wait for the Service Acceptance Tone.
8. Press
to finish the procedure.
Internal callers will receive the information on the display (or as spoken
information to callers without display phone). External callers will be routed to
the operator who also has access to your absent information.
An internal party who attempts to contact you from an extension capable of
receiving mini-messages will immediately receive your absence message.
This may also be the case for an external ISDN party that is compatible with
the mini-messaging service, assuming that he/she is in fact an ISDN network
user, and that he/she also uses an ISDN terminal that is compatible with
the mini-messaging service. This also assumes that your extension is not
specifically and permanently protected against the use of this call forward on
absence service for external parties.
In the opposite case, a call issued from an incompatible external party will
be redirected to your facility's attendants, who will see your message that is
automatically displayed on their extension, and will be able to accurately inform
your external calling parties.
1424-EN/LZT 103 090 Uen A1 2008-10-24
97
DT690
Note:
1.
2.
3.
4.
5.
6.
7.
8.
9.
A call forward on mini-message is cancelled in the same manner as
any other type of variable call forward.
Press 6 1
Press *
Press #
3 Enter the Mini-Message number
1 6 3 0 Enter hours and minutes
Press *
Press Yes to confirm
Wait for the Service Acceptance Tone
Press No to finish the procedure
Example 3
17.4
Mini-Message sending: “IN A MEETING UP TO 16:30”
Follow-Me Service
In the case you have forgotten to define your variable call forward before leaving
your extension, you may ask the attendants to define it for your account. This
refers to the third party call forward service that is reserved specifically for them.
As the case may dictate, you may also remotely define your call forward
recipient from his/her internal extension. This is the Follow me service.
The call forward remotely defined is always an immediate call forward.
If your DT690 phone is not available, you can still answer your calls by
forwarding them from an other DT690 phone. The call forwarding can be done
to the phone (only internal position) from which you activate the “Follow-me”
service or to an other phone (internal or external position).
Activating Follow-Me from the DT690 phone the calls are forwarded to
This is activated as described below, from an idle, remote extension, which will
be your call forward recipient:
1. Dial 6 5 assigned to the Follow me service.
2. Dial your own extension number, and press
.
3. Enter your user password.
By default, your user password is 1234, however you may have modified
it. (See Section 20.8 on page 114).
4. Press
98
to activate the service.
1424-EN/LZT 103 090 Uen A1 2008-10-24
Call Forwarding Services
The third party set confirms your service programming and/or plays the
service acceptance tone.
5. Wait for the Service Acceptance Tone.
The third party set confirms your service programming and/or plays the
service acceptance tone.
to finish the procedure.
6. Press
In the opposite case, a call issued from an incompatible external party will
be redirected to your facility's attendants, who will see your message that is
automatically displayed on their extension, and will be able to accurately inform
your external calling parties.
You may then cancel this call forward from your extension, in the same way as
you would a variable call forward activated directly from your own extension.
You may also cancel it from the receiving extension according to the previously
described procedure, or by dialling 6 6 that is assigned to cancelling the Follow
me service, which should always be followed by your own extension number
and user password.
You may also repeat the procedure from a new recipient extension, in which
case, your calls would follow you as you move from office to office.
This is activated as described below, from an idle, remote extension, which will
be your call forward recipient:
Deactivating Follow-Me service from the DT690 it was activated
1.
Dial 6 6, assigned to cancel the Follow me service.
2. Dial your own extension number, and press
.
3. Enter your user password.
Note:
In terms of the rights assigned to your extension and each recipient
extension, it is possible that access to the follow me service is
restricted. Therefore, you always have the option of requesting that
a facility attendant define a remote call forward for your account.
4. Press
.
Wait for dial tone.
5. Wait for the Service Acceptance Tone.
1424-EN/LZT 103 090 Uen A1 2008-10-24
99
DT690
6. Press
to finish the procedure.
Activating Follow-Me from a DT690 phone the calls are not forwarded to
1.
Dial 6 5 *
2. Dial your number and press *.
3. Dial the new number to where incoming calls should be diverted.
# To Dial only in case of an external position. Needed only for an external
position to mark the end of the Directory number.
Note:
4. Press
An external number is composed of the external access 0 followed
by the actual external Directory number.
.
5. Enter a password.
6. Press
to activate the service.
The third party set confirms your service programming and/or plays the
service acceptance tone.
7. Wait for the Service Acceptance Tone.
8. Press
100
to finish the procedure.
1424-EN/LZT 103 090 Uen A1 2008-10-24
SMS Text Messages (optional)
18
SMS Text Messages (optional)
You can send and receive text messages, also known as SMS (Short Message
Service), to and from other phones in your system.
Note:
18.1
Text messages can only be received and sent if the Aastra Integrated
Messaging Server is installed in your system. Please contact your
system administrator.
Receive Text Messages (SMS)
When a text message is received, the LED starts flashing and a message
tone sounds.
If the message is received during a call, a beep notifies the user.
The message is stored in the message list. The New message icon is shown
in the display. The icon will remain in the display until all new messages are
opened.
1. Press
.
2. Navigate to Messaging.
The following options are available:
•
Inbox
•
Write new message
•
Unsent
•
Sent
3. Select the menu item Inbox. The message text is displayed.
4. Scroll
5. Press
to find the message. The selected message is highlighted.
to read the message.
6. Press Clear to delete the message.
Or
1424-EN/LZT 103 090 Uen A1 2008-10-24
101
DT690
Press
to proceed to the next menu.
This menu gives you additional options, such as Remove or Forward the
message, to Call (Numbers in the text) or to Read next message.
18.2
Send Text Messages (SMS)
1. Press
.
2. Navigate with
to Messaging.
The following options are available:
•
Inbox
•
Write new message
•
Unsent
•
Sent
3. Select the menu item Send and press
to confirm.
4. Select New.
5. Enter your message and confirm.
For information on how to write text, see Section 16.6 on page 89.
6. Enter the phone number.
7. Press
102
to send the message.
1424-EN/LZT 103 090 Uen A1 2008-10-24
Group Services
19
Group Services
Most of the time, you will be working as a team - within a department, for
example. Your extension offers you different additional services designed
specifically for working as a team.
First of all, it provides the option of supervising your colleagues' extensions,
thus ensuring comprehensive call coverage. You may also call a colleague or
intercept calls for each other.
Secondly, your extension may also be part of a hunt group - within your
department or another department - that calling parties may call whenever
they need to, not just to contact you personally, but to contact someone within
your department.
Your extension provides a simplified call pick-up service within a hunt group. It
also offers you the option of managing your own participation in this service
within the group. This is also referred to as the In/Out status management
within a group.
If you have been designated as the supervisor of a hunt group, you have
the ability to open and close the hunt group according to your department's
business hours.
Finally, while it's not really a group service, you also have access to a personal
group, which is designed for grouping various extensions that may be assigned
to you - for example, your DT690 extension, and another phone. It could be
your Mobile Extension (See Section 19.6 on page 107). Different services are
then provided for you to process your calls as efficiently as possible within a
personal group.
19.1
Hunt Groups
Your extension may be part of a hunt group for which the purpose is to distribute
calls among the members of your department or other group.
A call received on your hunt group number will then be automatically directed
to an extension within the group that is free - such as your own - according to
predefined distribution criteria. Generally, this criteria is established to ensure
even distribution of calls between the various members of the group.
The presentation of an incoming call for your group is therefore carried out just
as it would for an individual call presented on your extension.
As a result, you have access to all the same processing services as you would
for your personal calls.
1424-EN/LZT 103 090 Uen A1 2008-10-24
103
DT690
If you do not answer your hunt group call within a typical 30-second timeframe,
it may be presented to a different extension in your group that is free. The call
may also be directed to a third party set or other overflow group, such as your
facility's attendants. Depending on the definition for each hunt group, the call
may also be re-directed to a dissuasion message.
If all of your hunt group's members are busy, a call that is presented, as the
case dictates, may be directed to a third party set or other overflow group,
such as your facility's attendants. Alternatively, depending on the definition of
each group, the call may be placed in a call waiting queue to await a member
of the group to be free, or directed to a dissuasion message. This extension,
overflow group or dissuasion message may also be solicited when your group
is closed. In practice, you may be part of several hunt groups. One hunt group
is then established as your primary group, while the others are considered
to be secondary.
Your primary group has a processing priority feature. Therefore, when there
are several different calls presented on the various groups of which you are a
part, those for your primary group will take precedence.
The calls presented on your secondary groups are also automatically managed
by the system, but without any particular priority.
Note:
It is your system administrator's job to define how each hunt group will
operate. It is also the system administrator's responsibility to define to
which hunt group(s) you will be assigned, and which one will be your
primary group.
Your facility may contain up to 16 hunt groups.
19.2
Call Pick-up in Hunt Group
When you belong to one or several hunt group(s), you have access to the
same call processing services for calls bound for these groups as you would
for managing your personal calls. Your extension also offers a simplified call
pick-up service within each hunt group, which enables you to answer any call
that is ringing on an extension that belongs to one of your groups, without
having to move to that extension or dial its extension number.
1. Dial 14 to pick up a call presented on your primary group.
Or
Dial the appropriate prefix to pick up a call presented on any of your
secondary groups
2.
Press
.
In either case, you are now directly connected to the party calling the
other extension.
104
1424-EN/LZT 103 090 Uen A1 2008-10-24
Group Services
Note:
The simplified call pick-up described above applies only if the call
that is picked up is for the group involved, or a personal call for a
member of the involved group.
If several calls are ringing within the same group, the oldest call
will be automatically selected. If several calls are ringing within
different secondary groups, the call that is picked up will be
automatically selected by the system.
Your extension may also be subject to call pick-up from third party
sets that belong to the same group as you. The call pick-up access
prefix within secondary groups differs from one facility to another.
19.3
Standby status in Hunt Group
When you belong to one or several hunt groups, you may also manage your
availability for answering calls that are directed to your group(s).
This standby service enables you to temporarily withdraw from a hunt group.
Therefore, you would only receive personal calls, or those that are directed to
the groups from which you have not withdrawn.
Once again, the system distinguishes your position in relation to your primary
group as well as your secondary groups.
To manage your group standby status, from an idle extension:
1. Dial 6 8 to proceed to standby within your primary group.
2. Press
.
3. Wait for the Service Acceptance Tone.
If your extension was active within your primary group, it will now be on
standby. On the other hand, if your extension was on standby, it will now
be active within your primary group.
In relation to your secondary groups, your extension's active or inactive
status is changed for all of them at the same time. In either case the service
acceptance tone is played.
4. Press
to finish the procedure.
Your extension returns to idle status.
1424-EN/LZT 103 090 Uen A1 2008-10-24
105
DT690
Note:
The prefix for accessing the standby service within secondary groups
differs from one facility to another.
You may place your extension on standby at any time, even if you are
the last active member of a group. Your status is managed completely
independently from the opening and closing of traffic for a specific
group, which is the sole responsibility of the hunt group supervisor.
19.4
Hunt Group Opening / Closing
You may be designated as a supervisor for one or several hunt groups,
regardless of whether or not you are a member of it (them). This is established
by a right that is assigned specifically to you by your system administrator.
In relation to this (these) hunt group(s) for which you are in charge, it is your
responsibility to open and close traffic for each one, according to its members'
business hours.
To open or close traffic to a hunt group, from an idle extension:
1. Dial the prefix to open/close hunt groups.
This varies from one facility to another.
2. Dial the internal number for the involved hunt group.
3. Press
and wait for the Service Acceptance Tone.
4. Press
to end this service.
If the hunt group was previously open to traffic, it then progresses to a closed
status, and will no longer accept calls.
Calls to this group will then be directed to an overflow extension or group,
or a dissuasion message that may be pre-defined in terms of each group's
configuration.
On the other hand, if the hunt group was previously closed to traffic, it then
progresses to an open status, and will now accept calls.
Note:
19.5
Only a supervisor may manage this open or closed group status.
Personal Group Services
While it is not really a group service, you also have access to a personal group,
which is designed for grouping various extensions that may be assigned to you
(up to 5 extensions).
The specific services offered to you are as follows:
106
1424-EN/LZT 103 090 Uen A1 2008-10-24
Group Services
•
You can be contacted through just one number, common to your entire
personal group.
•
When you place a call to any party, you are identified by your personal
group number, no matter what extension you use to place your call.
•
An incoming call is presented on all of your personal group's extensions,
allowing you to answer it on any of them. If all extensions in your personal
group are free, they will all ring simultaneously. If you have an ongoing call
on any given extension, the call is presented to you on that extension in the
usual way (call waiting tone, and so on.) On each of the other extensions when it is possible - the call will be presented with silent ringing, and the
usual call information will be displayed on the screen.
•
You have the option of carrying out a simplified call transfer between
extensions within your personal group (other than from your DT690
extension). To do so, simply place your current call on hold and hang up.
The call is then represented on all of your personal group extensions;
therefore you may pick it up on any of them.
Note:
19.6
It is your system administrator's responsibility to define your personal
group. Contact him/her as needed.
Mobile Extension Service
If you frequently travel outside the office, you will generally have a GSM mobile
phone in addition to your DT690 extension.
Once again, without truly being a group service, the Mobile Extension service
may be of use to you. Its purpose is to allow external users of GSM mobile
phones most particularly to access your company's network, and thus be able
to use the system as if they were internal users.
In practice, a Mobile Extension terminal is managed in the same way as a
dummy internal user associated with the external GSM mobile number.
To process these calls, the GSM mobile telephone connects to a specific
DID number for the facility, which accesses the Mobile Extension server. By
connecting through the public ISDN network, the GSM mobile telephone is
then automatically authenticated by its external calling number. By default,
authentication can be carried out by manually dialling the dummy internal
number associated as well as the corresponding user's password.
Once authenticated, the GSM mobile telephone user may call any internal
or external number, just as if he/she were dialling from the internal dummy
extension. The user's identity that is transmitted to the called parties is the
information for the internal dummy extension.
The mobile GSM telephone user may, in the same way, gain access to all
telephone services to which the internal dummy extension has authorization to
access. The GSM mobile telephone may also be directly called through the
number associated with the internal dummy extension. This may be used in
1424-EN/LZT 103 090 Uen A1 2008-10-24
107
DT690
conjunction with a personal group. However, the GSM mobile telephone will
still retain its regular number.
Note:
108
The Mobile Extension service is also totally applicable to your
residential extension connected to the public ISDN network. Whenever
necessary, contact your system administrator for more information
concerning the availability of this specific service for your telephone
facility.
1424-EN/LZT 103 090 Uen A1 2008-10-24
More Features on your Extension
20
More Features on your Extension
Depending either on the rights assigned to your extension or on your facility's
configuration, your extension also offers or may offer other different services
with the purpose of improving your productivity, or making it even more
enjoyable to use your telephone.
One of the main features is the Appointment Reminder service, where you can
ask the system to remind you of a meeting or other appointment at a specific
time.
Your extension may also provide you with the means to control how your
external ISDN call costs are allocated.
20.1
Appointment Reminder
The appointment reminder service enables you to ask the system to
automatically remind you at a specified time that you define within 24 hours
of your appointment.
The phone can be set to remind you at any time within the next 24 hours
(multiple settings are allowed).
Activate reminder service
1. Dial 7 1, assigned to the appointment reminder service.
2. Enter the hour (00-23) and minutes (00-59) for your appointment reminder.
3. Press
to confirm and wait for the Service Acceptance Tone.
4. Press
to finish the procedure Your extension returns to idle status.
Note:
If you receive busy tone, your extension does not have the
authority to set a Reminder.
At the set time for your reminder, your extension will automatically ring.
5. Press
to answer the call in the usual manner.
A confirmation voice message is then heard. By default it is: It's time for
your appointment.
1424-EN/LZT 103 090 Uen A1 2008-10-24
109
DT690
Note:
You have 30 seconds to answer the appointment reminder. After
this timeframe, the reminder will be automatically cancelled. If your
line is busy when the appointment reminder comes through, it is
presented to you just as a normal call would be, or if that is not
possible, it is automatically cancelled.
An appointment reminder automatically overrides any call forward
on your extension.
Verify reminder service
You may verify whether or not an appointment is currently programmed on your
extension by dialling the following sequence:
1. Dial 7 1 8, assigned to the appointment reminder verify service.
2. Enter the hour (00-23) and minutes (00-59) for your appointment.
3. Press
If the time you specified is indeed scheduled as an appointment reminder,
you will hear the service acceptance tone; if it is not, you will hear the busy
tone.
Cancel reminder service
1. Dial 719, assigned to the appointment reminder service.
2. Press
and wait for the Service Acceptance Tone.
All settings are cancelled.
3. Press
20.2
to finish the procedure.
Calls Re-routing to Attendants Protection
Usually, your external calling parties can contact you from external network(s),
directly through your direct calling numbers, or DID numbers (Direct Inward
Dialling).
They may also contact you through your facility's general number. In this case,
your incoming external calls are directed through your facility's attendants.
An external call is presented to you whether your extension is free or busy. If it
is busy, it will usually be automatically placed on camp-on for your extension
(unless your extension is equipped with specific protection against such).
110
1424-EN/LZT 103 090 Uen A1 2008-10-24
More Features on your Extension
If you do not respond to an external call, after a typical delay of 30 seconds, the
call is directed (or returned) to your facility's attendants for processing.
Following the specific rights assigned to your extension, you may have
access to protection against your external calls being directed to your facility's
attendants.
This protection may be manifested by:
•
Restricted protection on no-answer condition: external calls presented
on your extension when its status is free will then ring continuously, without
a time limit, until you answer it, or the caller ends the call.
•
Restricted protection on busy condition: external calls presented on
your extension when its status is busy will remained on camp-on, without a
time limit, until you answer it, or the caller ends the call.
•
Extended protection: this combines the two previous cases.
In all cases, this protection against the re-direction of your calls to the
automated attendant is never dependant upon any action on your part.
20.3
Secret of identity
When your facility is connected to the ISDN network, your identity is usually
transmitted to your external calling parties, and vice versa.
According to the specific right assigned to your extension, it is possible that
your identity not be divulged to your external ISDN network calling parties.
This is therefore systematically valid for all of your outgoing ISDN network calls,
without any specific action on your part.
Your identity is divulged, however, for your internal calls, and you still receive
the information concerning your external incoming calling parties.
20.4
Account codes
When a call is placed on the public ISDN network, the network transmits the
charges for the current call, which are then accounted to a charge counter
associated with your extension.
According to your working mode, you may wish to impute the cost of your
external calls to different accounts. Your telephone system can do this through
account codes that you simply enter when placing outgoing external calls.
To establish an outgoing external call using an account code:
1. Dial the network access prefix adapted to this service.
1424-EN/LZT 103 090 Uen A1 2008-10-24
111
DT690
Generally, this consists of a network access prefix that is reserved for
placing outgoing external calls that are subject to account codes. Ask your
system administrator for this prefix
2. Dial the account code to which your external call should be imputed.
Account code formats are a fixed length. All account codes are typically 4
digits, however they may reach up to 15 digits in length. Generally, they
end with # which acts as a separator. In all cases, account codes are
defined by your system administrator.
3. Dial the desired external phone number.
.
4. Press
Your outgoing external call is then transmitted over the public network, just
as an external call without an account code would be.
Thus, the call detailed record will not only contain the date, time, number
called, length, and cost of the call, but also the account code that you
entered. This then can be used to invoice your clients.
Note:
The implementation of this specific service assumes that your
facility uses the Least Cost Routing (LCR) method for external
calls. It also assumes that, at the very least, these outgoing calls
are subjected to call detailed records that are managed within an
external charging server. Contact your system administrator for
more information. He/she will also provide you with the accepted
account code format.
As indicated, your extension is equipped with a charge counter
that accrues a cumulative total of the charges for your outgoing
calls. Your system administrator or facility's attendants have the
ability to consult any charge counter. If necessary, contact them
for more details.
Your extension may also be subject to call detailed records. This
usually involves your outgoing external calls, however they may
also refer to your internal and incoming calls. These records save
the details for each involved call: number called, date and time,
length, and so on. These records are generally used by your
system administrator to monitor your telephone facility's invoicing.
If necessary, contact your system administrator for more details.
20.5
Key Lock
To prevent accidentally pressing keys, you can have them locked by using
the Automatic Key lock option.
To lock the keypad
112
1424-EN/LZT 103 090 Uen A1 2008-10-24
More Features on your Extension
Press
and then the Lock softkey.
To unlock the keypad
Press
Note:
20.6
and then the Yes softkey.
It is possible to call an emergency call and to answer/close an incoming
call while the keypad is locked.
Phone Lock
The keypad can be locked to prevent keys to be pressed by mistakes. The
phone can be locked to be protected from unauthorized use. When the phone
lock function is activated, a PIN code must be entered at power on.
20.6.1
Activating Automatic Key Lock
The keypad can be set to lock 20 seconds after it was last used. When in
idle mode a locked keypad is indicated by
lock, do the following:
. To activate the automatic key
1. Enter Settings from the main menu.
2. Select Locks and press Select.
3. Select Automatic key lock and press Select.
4. Select On and press Back to save the setting.
20.6.2
Activating Manual Key Lock
It is recommended to always have the automatic lock on, but it is possible to
manually lock and unlock the keypad as well. To lock the keypad manually:
•
20.6.3
Press
The
.
indicates that the keypad is locked.
Activating Phone Lock
Activating Phone lock will protect the phone from unauthorized use. When
this function is activated, the PIN code has to be entered at power on. When
activating Phone lock the PIN code that must be entered. The PIN code is
by default (0000) but it can be changed to any 4-8 digit code, see Section
2.6 on page 10.
To activate the phone lock, do the following:
1424-EN/LZT 103 090 Uen A1 2008-10-24
113
DT690
1. Enter Settings from the main menu.
2. Select Locks.
3. Select Phone lock.
4. Select Auto phone lock.
5. Select On, or On in charger.
6. Enter PIN code, press OK.
7. Press Back to save the settings.
When the phone is locked,
is shown in the display.
If forgotten, the PIN code can be removed by your distributor.
Note:
20.7
Before using this feature, look up the IPEI code of your phone and write
it down, see Section 2.4 on page 10. If you forget the PIN code, contact
your certified Aastra Sales Partner for assistance, to reset to default.
Change Owner ID
The owner ID is set to identify the telephone.
1. Enter
.
2. Select Owner ID.
3. Enter the identity.
4. Press Save to save the setting.
20.8
Password Programming
You will be prompted to enter your user password when accessing certain
services, most particularly
•
When placing a call in substitution or with signature from your extension or
a third party set.
•
When activating/deactivating a call forward from your extension or a third
party set (follow me service).
•
When consulting or personalizing your mailbox within your facility's
integrated voice mail system, when applicable.
By default, your user password is 1234. It is strongly recommended that you
change it to any other 4 digit code including the * or # key - to ensure that
use of the mentioned services is as secure as possible, and to preserve the
confidentiality of your mailbox, when applicable.
114
1424-EN/LZT 103 090 Uen A1 2008-10-24
More Features on your Extension
To do so, from your idle extension:
1. Dial the 7 9 assigned to the user password management service.
2. Enter your current user password.
3. Enter your new user password.
4. Press
to confirm and wait for the Service Acceptance Tone.
5. Press
to finish the procedure.
Your extension returns to idle status.
Note:
20.9
If you ever forget your password, you can request it be re-initialized,
either by a facility attendant, or by the system administrator. It will
then be reset to 1234 until you change it once again.
Call Statistics
Your phone can tell you the duration of your last call and display the total
time of all calls.
To see the time spent on your last call and on all outgoing calls
1. Press
.
2. Navigate to the Calls tab
The following options are available:
•
Call list
•
Missed calls
•
Call time
•
Call services
3. Select Call time .
The length of the last call but also the duration of all calls is displayed in
hours, minutes and seconds.
1424-EN/LZT 103 090 Uen A1 2008-10-24
115
DT690
20.10
Secondary Attendant Services
Besides the services that are accessible or that may be assigned to a DT690
extension, additional services are also available for the system's attendants.
Within this context, the following services are offered:
•
General calls acceptance: This service enables attendants to control
their active or inactive status for processing a system's general calls, in
relation to their shifts.
•
Door phone service: Your facility may be equipped with a door phone;
calls from this extension are usually processed by the attendants.
•
Call pick-up for general ringing calls: Your facility may be equipped with
a common bell that receives general calls when the attendants' lines are
congested, or when they are absent.
According to the specific rights assigned to your extension, you may also have
access to these attendant-based services.
Attendants also have access to the following services:
20.11
•
Call offer or intrusion: This service allows attendants to interrupt an
ongoing call to present an urgent call.
•
Do not disturb override service: Similarly, this service allows the
attendant to override the Do not disturb status to present an urgent call.
•
Complete third party call forward service: This service allows attendants
to program any type of call forward for a user's account, without restrictions.
General Call Acceptance
The general call acceptance service is usually used by your facility's attendants
who are in charge of processing your system's general calls - most often the
external calls received on your facility's general phone number, or external calls
redirected when the internal users do not answer or are busy.
Similar to the standby status that is available when you belong to hunt groups,
the general calls acceptance service enables attendants to control their active
or inactive status for processing a system's general calls, in relation to their
vacation periods.
According to the rights assigned to your extension, you may also have access
to the general calls acceptance service. This is generally the case. When
necessary, this allows you to assist the attendants by answering calls when
their lines are congested or when they are temporarily absent.
When you activate this general calls acceptance service on your extension, not
only will you receive your personal calls, but also your facility's general calls.
116
1424-EN/LZT 103 090 Uen A1 2008-10-24
More Features on your Extension
These will be presented to you in the same way as usual, with the external
calling party's information displayed on your screen. You may then process
each call just as you would one of your personal calls.
To activate or deactivate the general calls acceptance service on your
extension, from an idle extension:
1. Dial 6 7, assigned to the general calls acceptance service.
2. Press
to confirm and wait for the Service Acceptance Tone.
If your extension was inactive in relation to the general calls acceptance
service, it now becomes active.
The opposite is also true - if your general calls acceptance status was
previously active, it will become inactive. Your extension will then only
receive your personal calls.
3. Press
to end the management of this service. Your extension returns
to idle status.
Note:
20.12
Your rights to the general calls acceptance service depend on your
facility's different private and public networks.
Door Phone Service
Your telephone facility may be equipped with a door phone, the calls from
which are usually processed by the attendants, just as the general calls are for
your facility.
According to a right assigned to your extension, you may be allowed to answer
calls from a door phone. This is generally the case.
The general calls acceptance service previously described, also manages your
ability to assist the attendants by accepting or declining door phone calls.
A door phone call is presented exactly as any other incoming call would be.
Note:
20.13
The presentation of a door phone call usually lasts no more than 30
seconds. After this timeframe, the door phone call will be automatically
disconnected. A door phone call may not be placed on hold, nor may it
be transferred. The door phone is usually logged on by an electrical
mechanism independent from your telephone facility.
Call Pick-up for General Ringing Call
Your telephone installation may feature a common bell that will be heard when
your facility's general calls are not answered by an attendant, within a specified
timeframe.
1424-EN/LZT 103 090 Uen A1 2008-10-24
117
DT690
Typically, this delay is 60 seconds when attendants are present, or 1 second in
night mode, when the attendants are absent.
If you wish, you may pick-up a general call on your extension.
To do so, from an idle extension:
1. Dial 1 5 to pick up a call ringing on the common bell.
2. Press to
confirm and wait for the Service Acceptance Tone.
The service acceptance tone will be played.
You are now directly connected to the party who placed the general call.
Note:
20.14
If several general calls are ringing simultaneously, the oldest call
will be automatically selected.
Other Secondary Attendant Services
As indicated, your facility's attendants may establish you as the target for any of
the following services:
•
Call offer or intrusion: When you are in the middle of an ongoing call, this
service enables them to interrupt your call to present an urgent call for you.
When the attendant activates a call intrusion, you may find yourself in a
3-person conference call with your first caller and the attendant. Usually, a
warning tone is heard at a regular frequency during this conference call to
remind the parties that they are still under call intrusion status.
The attendant may then speak to you, but not privately.
•
Do not disturb override service: When your extension has a Do not
disturb status, (see Section 17 on page 93), this service also enables the
attendants to override the Do not disturb status in order to present an
urgent call for you. When the Do not disturb status is overridden by the
attendant, his/her call is presented just as a normal call would be, and
which you may answer normally.
Note:
Certain extensions (such as yours) may possibly be equipped with
permanent protection against call intrusion.
Depending on the configuration for your facility defined by your system
administrator, these services may be used from specific extensions
that are duly authorized, without any warning tones being emitted. This
refers to the Silent call monitoring service.
118
1424-EN/LZT 103 090 Uen A1 2008-10-24
More Features on your Extension
20.15
Automated Attendant
The Automated Attendant feature sends voice instructions to external and
internal callers, informing them of all possible options they can choose. Voice
instructions lead the callers step by step to the desired destination.
1. Enter the Automated Attendant directory number. Please ask your system
administrator for the automated attendant directory number.
2. Press
1424-EN/LZT 103 090 Uen A1 2008-10-24
and follow the voice instructions.
119
DT690
120
1424-EN/LZT 103 090 Uen A1 2008-10-24
Audible Signals
21
Audible Signals
Over and above visual information displayed on your extension's screen and
LED, there are also various tones, voice announcements and ring tones that
signal the status of your extension, or certain associated services. The tones
heard are applicable under the following conditions and with the following
timing and frequency:
Internal Dial tone Heard each time the handset is picked up from your
extension (excluding all activated special services)
330 Hz, Continuous
Ringback tone Heard when you call an extension that is free.
424 Hz, 1.5 sec. On / 3.5 sec. Off
Call on-hold or Call camp-on tone Heard when you call an extension that is
busy and your call has been placed on automatic camp-on, or when your call is
placed on-hold by a third party set.
424 H, 2 consecutive beeps, repeated every 5 seconds.
Busy tone Heard when you call an extension that is busy, but automatic
camp-on is not possible for your call, or when a service request on your
extension is refused.
424 Hz, 0.5 sec. On / 0.5 sec. Off
Call Waiting Presentation tone Heard when you receive a new call, when
your extension is already busy.
Only 1 ring signal, not repeated
Intrusion or Call Offer tone Heard when a third party - typically an attendant intervenes during your current call.
424 Hz, 2 consecutive beeps, repeated every 1.4 seconds.
Service Acceptance tone
Heard when a request for service is accepted on your extension. Multi-toned
melody, continuous
Appointment Reminder notification
Heard following your response to an appointment reminder, this announcement
indicates the nature of this automatic system call. See Section 20 on page 109.
Message: It’s time for your appointment.
1424-EN/LZT 103 090 Uen A1 2008-10-24
121
DT690
122
1424-EN/LZT 103 090 Uen A1 2008-10-24
MD Evolution Standard Services Prefixes
22
MD Evolution Standard Services Prefixes
The following table lists the MD Evolution Standard Services Prefixes.
Table 1
Prefix
Description
Austria EBN
Italy
Norway UK
US
Standard
Abbreviated
Numbers
6
6
#2
6
2
Appointment
Reminder
Activate
*32
*32#
#71
*32
71
Appointment
Reminder Verify
*328
*32#8
#718
*328
718
Appointment
*329
Reminder Cancel
*32#9
#719
*329
719
6*
**6
Call Forward
Immediate
*21
*21*
*21#
#61
*21*
*2*
61
Call Forward
No-Answer
*22
*211
*22#
#62
*211
*21
62
Call Forward
Busy
*23
*212
*23#
#63
*212
*22
63
Call Forward
No-Answer and
Busy
*26
*26#
#69
*26
69
Call Forward Do
Not Disturb
*24
*27*
*24#
#64
*27*
*24
64
Call Forward
Cancel
#21
#21#
#21#
#60
#21#
#21
60
Follow-Me
Activate
*25
*5*
*25#
#65
*5*
*25
65
Follow-Me
Cancel
#25
#25#
#66
#25
66
Call Parking
*10
*10#
#10
*10
10
Call Pick-Up
General Ringing
*88
*73*
#15
*88
15
Call Pick-Up
Hunt Group
2
2
#14
2
14
1424-EN/LZT 103 090 Uen A1 2008-10-24
*88
*88
123
DT690
124
Call Pick-Up
Individual
*8*
*8*
*8*
#13
*8*
*8*
13
Call Substitution
*75
*75*
*75*
#75
*75*
*75
75
Call Temporary
Protection
*74
*74#
#74
*74
74
General Call
Acceptance
Status
*9#
*9#
*9#
#67
*9#
*9#
67
Access Locking
*72
*76*
*72#
#78
*76*
*72
78
Access
Unlocking
#72
#76#
#72#
#78
#76#
#72
78
Password
Programming
*73
*74*
#*72
#79
*74*
*73
79
Redial Last
External Number
**
***
***
#11
***
**
11
Standby Status
in Hunt Group
*91
*91#
#68
*91
68
1424-EN/LZT 103 090 Uen A1 2008-10-24
Installation
23
Installation
This section describes how to charge the battery, configure the headset or
use the belt clip.
23.1
Check for completeness
Make sure that all the parts are present. If anything is missing, please contact
your system administrator or supplier.
The set contains:
1. Cordless phone
2. Battery
3. Clip
4. Assembly card
Note:
23.2
It is important to make a note of the IPEI code. The IPEI code may
be needed for unblocking the Cordless phone if an incorrect PIN code
has been entered three times. See Section 2.4 on page 10 for further
details.
Charging the Battery
The battery requires charging when
charge the battery:
•
in the display indicates low level. To
Place the phone in the charger.
The battery is being charged when the indicator on the telephone is steady
orange. When the battery is fully charged the indicator will be green. A
flashing green indicator means incoming call or message. A red indicator
indicates battery warning. An animated battery icon is shown in the display,
indicating charging be starting with its current charge and ending with the
full charge. A filled battery icon indicates a fully charged battery.
The battery is fully charged within four hours.
The battery can be charged separately with a special battery charger.
1424-EN/LZT 103 090 Uen A1 2008-10-24
125
DT690
23.3
Charging Spare Batteries
Spare batteries can be charged with a separate battery pack charger. The
battery pack charger can charge six batteries at the same time.
23.4
Replacing the Battery
If the standby time for the cordless telephone becomes too low, replace the
battery with a new one. Contact your system administrator or your certified
Aastra Sales partner for information on new batteries. Attach the battery as in
Figure 14 on page 126. The battery is easy to replace. It is attached inside
the battery lid and is connected to the cordless telephone in such a way that
no miss-contact is possible.
To replace the battery, do the following:
1. Open the battery compartment and remove the battery.
2. Disconnect the battery cable, and replace with a new battery.
Figure 14
Note:
Easy replaceable battery, unlock the lid and remove the battery.
After replacing the battery with a new one, the battery icon can indicate
an empty battery even though it is fully charged. Charge the battery for
at least one hour to get the correct reading.
To avoid fatigue of the phone's battery connector, use the charger instead of
repeatedly replacing an empty battery with a new one.
126
1424-EN/LZT 103 090 Uen A1 2008-10-24
Installation
23.5
Chargers
23.5.1
Desktop Charger
There are two desktop chargers available, one basic and one advanced, see
Figure 15 on page 127.
Charging only
Advanced
Charging, software download, and synchronizing of
parameters.
Advanced
Figure 15
Basic
002
Basic
Desktop chargers
The desktop charger is delivered with a plug-in power supply and is connected
into an ordinary wall socket.
Note:
Only use the chargers within the temperature range of 5 - 40º C.
Advanced desktop charger
To use the advanced desktop charger for software download and synchronizing
parameters, the charger must be connected to a PC with Portable Device
Manager (PDM) software installed. For a description of PDM, see Section
23.10 on page 133.
The charger is connected to a PC through the USB or one of the network
connectors, see Figure 16 on page 127. When connecting the charger with a
PC through one of the network connectors the charger acts as a switch, which
makes it possible to connect the other connector to the LAN.
Figure 16
Note:
Network and USB Connectors
Network and USB connectors are used to connect the desktop charger
to a PC running the PDM (not for charging).
1424-EN/LZT 103 090 Uen A1 2008-10-24
127
DT690
23.5.2
Rack Charger
Note:
See also the separate Installation Guide, supplied together with your
phone.
The charging rack is used for charging handsets, to synchronize parameters,
and for software download. The built in power supply can charge up to six
cordless telephones. It can be wall mounted or placed on a desk.
23.5.3
Battery Pack Charger
The battery charger is used for charging up to six spare batteries.
23.5.4
Power adapters
The article number is:
23.6
•
Art.No.DC3: 130160 Power supply unit AC/5V DC/0.65A - Europe
•
Art.No.DC3: 130166 Power supply unit AC/5V DC/1A - USA, Canada,
AUS, and UK
•
Art.No.DC4: 130161 Power supply unit AC/5V DC/2A
Headset
A headset is recommended if you frequently use the phone and/or want to
have both hands free.
The handset has a special waterproof headset connector.
The headset comes with:
•
Microphone integrated in the cable
•
Microphone on a boom
In order to achieve optimal audio quality with the different headset types it is
recommended that the Headset type SIM parameter is altered to match the
headset type being used. The default setting for this parameter is a microphone
boom.
23.7
Hinge-type Clip
To attach the clip:
1. Attach the hinge-type belt clip.
128
1424-EN/LZT 103 090 Uen A1 2008-10-24
Installation
2. Screw the hinge-type clip into position
23.8
Swivel-type Clip
To attach the clip:
1. Attach the swivel-type belt clip.
2. Screw the swivel-type clip into position.
23.9
Bluetooth Headset
The Bluetooth technology replaces the cord between the cordless telephone
and the headset. This allows the user to move more freely and eliminates the
risk of a headset cord getting stuck.
1424-EN/LZT 103 090 Uen A1 2008-10-24
129
DT690
Bluetooth is optional to the cordless telephone to use a Bluetooth headset.
Bluetooth is factory-mounted on the cordless telephone’s circuit board.
The supported functions are:
23.9.1
•
Pairing the cordless telephone with its headset.
•
Choosing the device to use when making a call.
•
Playing a ring signal through the Bluetooth headset.
•
Answering and connecting sound to the Bluetooth Headset when answering
with the headset button.
•
Ending a call with the Bluetooth headset button.
•
Transferring audio to/from the Bluetooth headset during a call, using the
menu in the cordless telephone.
•
Increasing/decreasing the volume in the Bluetooth headset with the volume
buttons on the cordless telephone.
Using Bluetooth Headset
For optimal performance, place the Bluetooth headset and the telephone on
the same side of your body. The best audio quality in the headset is achieved
when there is no obstructions between the headset and the cordless telephone.
Note:
The Bluetooth headset functions may vary. Refer to the Bluetooth
headset Manual.
Add another Bluetooth headset
Up to four headsets can be paired to the telephone, but only one at a time
can be active.
To pair another headset follow the instructions given inConnect a Bluetooth
headset section. The paired headsets are displayed by a default name in the
Headset menu.
Activate a Bluetooth headset
To activate a Bluetooth headset:
1. Go to Bluetooth, Headset.
2. Use the navigation key and press Yes.
3. Select Connect and press Yes.
The headset is now active. Note: The current active headset must be
deactivated before another headset can be activated.
130
1424-EN/LZT 103 090 Uen A1 2008-10-24
Installation
Deactivate a Bluetooth headset
To deactivate the active Bluetooth headset:
1. Go to Bluetooth, Headset.
2. Use the navigation key and press Yes.
3. Select Disconnect and press Yes.
The headset is deactivated but is still paired and can be found in the
headset menu.
Remove a headset
1. Go to
.
2. Select Bluetooth and then Headset.
3. Step with the navigation key, or to the headset to be removed and press
More.
4. Select Delete.
5. Confirm with Select.
Change the name of Bluetooth headset
To change the headset name:
1. Go to Bluetooth, Headset.
23.9.2
Calling with a Bluetooth Headset
Make a call
1. Dial the number and press Yes.
2. When Transfer call to phone? is displayed, press No or ignore the
message to use the Bluetooth.
3. Press Yes to use the telephone.
Answer a call
A ring signal sounds in both the active Bluetooth headset and the telephone to
signal an incoming call.
•
To answer the call from the Bluetooth headset, press the headset button.
•
To answer the call from the telephone, press Yes.
End a call
1424-EN/LZT 103 090 Uen A1 2008-10-24
131
DT690
To end the call, press the headset button or No on the telephone.
23.9.3
Volume/Mute Control
Adjust the Volume during a Call
Depending on the Bluetooth headset, it is possible to adjust the volume on
the headset:
Press the upper Volume button on the upper left side to increase the volume
and the lower Volume button to decrease the volume in the headset.
Turn the microphone On/Off during a Call
Mute the headset and the telephone with the Mute button on the telephone.
Messaging
The Bluetooth headset beeps when a text message is received.
23.9.4
Transferring a call
Transfer a call to the telephone
To transfer a call to the telephone from the Bluetooth headset:
1. Step with the navigation key to the Ongoing call menu.
2. Select Audio transfer and press More.
3. Select To phone and press Select.
Transfer a call to the Bluetooth headset
To transfer the call to the Bluetooth headset:
1. Step with the navigation key to the Ongoing call menu.
2. Select Audio transfer and press More.
3. Select the headset and press Select.
It is also possible to transfer a call to the Bluetooth headset by pressing
the button on the Bluetooth headset.
23.9.5
Switching to a headset with cord
If a headset with a cord is connected during a call, the call is automatically
transferred to the headset.
132
1424-EN/LZT 103 090 Uen A1 2008-10-24
Installation
23.9.6
Operation notice
Accessibility and Voice quality
Bluetooth uses the frequency of 2.45 GHz. WLan, microwave oven and other
devices that use the same frequency can disturb the use of a Bluetooth headset.
Operation Area
Maximum distance between the headset and the telephone is 10 metres
according to standard 1.2. The communication distance between the handset
and headset may vary considerably due to the environment and disturbances
from other 2.45 GHz equipment. Different headsets can also give different
communication distances.
Out of Range
If a connection cannot be made with the connected Bluetooth headset the call
is transferred automatically to the telephone. If the Bluetooth headset and
the telephone get out of range from each other the connection is temporarily
lost. The connection is automatically established again when a call is made
or received.
23.10
Portable Device Manager
It is possible to upgrade software and synchronize parameters in your DT390
cordless phone with the Portable Device Manager (PDM) software. PDM
exists as a Windows version (Desk PDM) and as a System version (CPDM),
and is most often used by system administrators only. Desk PDM can be
used together with the advanced desktop charger. The advanced desktop
charger is connected to the PC with PDM software through the network or USB
connectors at the back of the charger, see Figure 17 on page 133.
Figure 17
For more information on PDM or upgrading of your cordless phone, contact
your system administrator.
1424-EN/LZT 103 090 Uen A1 2008-10-24
133
DT690
134
1424-EN/LZT 103 090 Uen A1 2008-10-24
Useful Hints
24
Useful Hints
This section gives details about external calls.
Connections between external lines
With your MD Evolution Communication Platform, you can establish an external
call diversion or a conference with more than one external party or transfer an
external call to another external destination (for example a mobile phone).
These features are very useful for everyday business life.
Note:
When these features are used, your MD Evolution Communication
Platform will occupy at least two external lines.
However, there may be disadvantages in connecting to several external lines.
We would therefore like to draw your attention to the following:
•
Please do not transfer external calls to an external mailbox, to
information systems or to external parties before they have answered.
•
If you are connected to two external lines, cancel one call by pressing
“R” and “1”.
If the external parties are not persons (mailbox, automated information or
attendant systems, and so on.), connections on external lines can last a long
time, which can be costly. Moreover, such calls may occupy two of your
system’s external lines. You can restrict connections between the external
lines by reprogramming your system.
Please ask your system administrator or contact our service center for more
information.
1424-EN/LZT 103 090 Uen A1 2008-10-24
135
DT690
136
1424-EN/LZT 103 090 Uen A1 2008-10-24
Reference
25
Reference
This section describes the terminology used on the display, the phone
communication signals, guidelines, technical specifications, spare parts and
accessories.
25.1
Terminology
The list below explains the terms which may appear on the display
25.1.1
25.2
Terminology used on Display
Term
Meaning
DTMF
Dual Tone Multi Frequency or touch tone, for dialling.
IPEI
International Portable part Equipment Identity, unique
identity assigned to your Cordless phone by the
manufacturer.
PIN
Personal Identification Number for security.
Phone Signals
The Cordless phone signals certain events audibly and visually as described
below
Signal
Meaning
Red warning light Incoming call.
Message waiting.
Battery almost empty.
Cordless phone out of range or not connected
The Cordless phone also generates audible ringing signals, alarm signals and
warning tones, and key clicks
Sound
Meaning
Ringing signal
Incoming call.
4 short beeps every 30 seconds: battery almost empty. 4
short beeps every 2 minutes: Cordless phone out of range
or not connected.
1424-EN/LZT 103 090 Uen A1 2008-10-24
137
DT690
25.3
Key click
You hear this each time you press a key (when selected).
Warning tone
You pressed a key which has no function.
Maintenance
Consider these suggestions and guidelines to keep your phone in good shape
and working properly.
Note:
The phone does not contain user serviceable parts. If your phone
requires service, you should return it to the supplier or retailer from
whom it was bought.
Intrinsic safety
Do not use the phone and charger in conditions where there is a danger of
electrically ignited explosions.
Battery disposall
Defective batteries must be returned to a collection point for chemical waste
disposal.
Treatment
Do not expose the phone and charger to direct sunlight for long periods. Keep
the phone and charger away from excessive heat and moisture.'
Cleaning
Clean your phone with a soft cloth moistened with water only. The use of soap
and other cleaning products can discolor and damage the phone. Clean the
battery contacts using ethanol or isopropyl alcohol.
25.4
Technical Specifications
DECT GAP/CAP
The Cordless phone has the unique advantages of DECT GAP/CAP (Digital
Enhanced Cordless Telecommunications Generic Access Profile/CTM Access
Profile). This means that no one can eavesdrop on your calls and that the
quality of speech is as good as that of conventional fixed telephones. DECT
GAP/CAP enables interoperability with other manufacturers’ products.
Cordless phone
138
1424-EN/LZT 103 090 Uen A1 2008-10-24
Reference
Table 2
Physical
Dimensions (l × w × d):
134 x 53 x 26 mm
Weight:
130 g (battery and clip included)
Material:
Case: PC-ABS, Key pad: PC, Clip:
PPA
Color:
Grey
Display (w x h):
28 x 35 mm, CSTN display
Clip:
Hinge-type (standard) or swivel type
Battery
Type:
Li-polymer/Li-Ion
Speech time:
20 h
Stand-by time:
240 h
Speech time with Bluetooth option:
13 h with Bluetooth headset in use
Stand-by time with Bluetooth option:
120 h1
Charge time:
< 4 hours
Discharge/charge cycles:
>=80% capacity left after 400 full
charge/discharge cycles
(1)
Connectors
Multi-purpose connector:
For battery charging, software
download, and configuration
Headset connector:
Standard 2.5 mm
User interface
Display (w × h):
Multiple colors with high resolution,
more than 65k individual colors. 128
× 160 pixel LCD with white LED
backlight
Indicator:
LED on top/front for visual indication
of incoming call, message. The LED
may also be used for visual indication
of normal function.
Vibrator:
Incoming call/message
1424-EN/LZT 103 090 Uen A1 2008-10-24
139
DT690
Keypad:
• Soft keys (3)
• Hook off
• On hook and Power On/Off
(Symbol) on the same key
• Five way navigation key (“OK” in
the centre of key)
• Numerical keys
• Volume up/down
• Multifunction button
Audio
Ring signal:
Adjustable in 8 steps
Earpiece:
Adjustable in 8 steps of 3dB each.
Maximum sound Ring signal level:
88 dBA at 10cm
Loudspeaker:
Duplex loud speaking function.
Settings
Languages:
18 (Danish, Dutch, English, Finnish,
French, German, Italian, Norwegian,
Portuguese (Brazilian), Spanish,
Swedish, Polish, Greek, Czech,
Hungarian, Russian, Slovakian and
Turkish).
Central Phonebook
Maximum name and number length:
40 characters in a name and 20 digits
in a number
Local Phonebook
Storage of contacts:
• 48 character name
• 24 digit work number
• 24 digit mobile phone number
• 24 digit other number
• A selectable ring tone
Telephony
140
Indication:
14 ring signals, flashing LED and
vibrator.
Answer call:
Button press or auto answer
1424-EN/LZT 103 090 Uen A1 2008-10-24
Reference
Call list storage capacity:
25 received, dialled and missed calls
with time stamp
Messaging
Maximum message length:
160 characters
Storage capacity:
30 received/sent messages (> 20 000
characters)
Radio
Receiver sensitivity:
-93 dBm
Compliance to DECT GAP standard:
EN 301 406 and TBR 22 test
Automatic DECT protocol detection:
Automatic detection and configuration
for US DECT and EU DECT at first
registration.
Frequency range:
• EU: 1880-1900 MHz
• U.S.: 1920-1930 MHz
• L.A.: 1910-1930 MHz
Modulation:
GFSK
Channel spacing:
1.728 MHz
Antenna:
Integral
Sensitivity:
-93 dBm
Radiated power:
EU : +25 dBm EIRP
U.S.: +22 dBm EIRP
Environmental
Operating temperature:
(2)
0°C to +40°C
Storage temperature :
-20°C to +60°C
Enclosure protection:
IP44, IEC EN60529
Immunity to electromagnetic fields:
3V/m EN61000-4-3
Immunity to ESD:
4 kV contact discharge and 8kV air
discharge (EN61000-4-2)
Free fall test, standard product:
IEC 60068-2-32, procedure 1,
dropped 12 times from 1 metre.
Aastra approves 12 drops from 1.5
metre.
Option
Bluetooth radio:
add-on from factory
Radio spectrum:
ISM 2.4000-2.4835 MHz
Bluetooth QD ID:
B014317
1424-EN/LZT 103 090 Uen A1 2008-10-24
141
DT690
Compliance to European regulations
and standards
EU directives:
1999/5/EC (R&TTE)
Product marking:
DECT Radio:
EN 301 406, TBR22
SAR (Specific Absorption Rate)*:
EN50360
Safety:
EN60950-1
EMC:
EN301489- 6, EN 301 489-1
Compliance to US regulations and
standards
Product marking:
FCC ID: BXZEICA
US: 9FVW4NANEICA HAC
SAR (Specific Absorption Rate):
FCC/OET Bulletin 65 Supplement C
(2001) and IEEE Std. 1528-2003,
December 2003 / ANSI/IEEE Std.
C95.1-1999 Normal operation X W/kg
(X gram) Body worn operation X
W/kg (X gram)
Safety:
IEC 60950-1
EMC/Radio:
FCC Part 15 D
Hearing Aid Compliance:
47 CFR Part 68, Subpart D and
TIA-968-A
Compliance to Canadian regulations
and standards
Product marking:
IC:3724C-xxxx
EMC/Radio:
RSS-210
Safety:
IEC 60950-1
SAR (Specific Absorption Rate):
IEEE Std C95.3-1999
Normal operation x.xxx W/kg (1
gram)
Body worn operation x.xxx W/kg (1
gram)
Hearing aid:
Compliance to Australian regulations
and standards
Product marking:
Radio:
142
CS-03
@>
According to ENxxxxxx
1424-EN/LZT 103 090 Uen A1 2008-10-24
Reference
Safety:
IEC xxxxx-x
EMC:
xxx
SAR (Specific Absorption Rate):
ENxxxxx, x.xx mW/g
(1) Stand-by time is without activated screen saver
(2) Storing Li-Ion batteries at high temperature dramatically reduces their capacity. For example,
storage at maximum temperature reduces capacity with 20% within a month.
25.5
Spare parts and Accessories
Use only approved spare parts and accessories. The operation of non-approved
parts cannot be guaranteed and may even cause damage. Contact your
supplier for more information.
•
Leather case
•
Swivel type clip
•
Security chain
•
Desktop charger, Basic
•
Desktop charger, Advanced
•
Charging Rack
•
Separate battery charging (BCP)
•
Headset with microphone on cable, DTX-9016
•
Headset with microphone on boom, DTX-9017
•
Bluetooth Headset (10 supported)
−
SonyEricsson HBH-PV702
−
SonyEricsson HBH-GV435
−
SonyEricsson HBH-IV835
−
Plantronics Voyager510
−
Plantronics Explorer665
−
Nokia BH-201
−
Jabra BT8010
−
Motorola H350
−
Motorola H670
−
Samsung WEP410
1424-EN/LZT 103 090 Uen A1 2008-10-24
143
DT690
•
144
Central Portable Device Manager (CPDM) and Desk PDM
1424-EN/LZT 103 090 Uen A1 2008-10-24
Troubleshooting
26
Troubleshooting
This section contains information on how to solve common operational
problems, and warnings you may receive. Go through the following lists if you
encounter any problems. If this checklist does not solve the problem, contact
your system administrator. If others have similar problems, there may be a
system error.
Table 3
Troubleshooting
Fault
Probable cause
Action or comment
No display
The battery level is
low or the phone is
defective.
Charge the battery
or contact system
administrator.
No ringing
The sound off icon is on,
,
Long press on
or ringer volume set to
silent, or the telephone or increase volume,
or contact system
is defective.
administrator
“Connect battery” is
displayed
Battery not properly fit
or defect
Check battery or contact
system administrator
Signal strength icon off
Out of system coverage
area or the phone is
defective.
Enter coverage area
or contact system
administrator.
Low battery icon on
Battery capacity equal
to 10%
Charge battery
Low battery icon flashes Battery capacity equal
to or lower than 5%
Charge battery
4 short beeps every 2
minutes
Out of coverage area or
not connected
Enter coverage area
or contact system
administrator
“Phonebook Full” is
displayed
Phonebook full, you
cannot add names or
numbers
Delete a name and a
number
“Enter XXX” is displayed IPEI code or PIN code
(where XXX=IPEI or
PIN)
Enter required IPEI
code or PIN code
“No access” is displayed Network in range, but
no access rights
Switch telephone off
and then switch it on
again or contact system
administrator.
1424-EN/LZT 103 090 Uen A1 2008-10-24
145
DT690
“NO NETWORK” is
displayed
Cannot connect to
selected network or out
of range
Select another network,
subscribe, get back
within range or contact
system administrator
No system
The telephone is out of
coverage or telephone
is defective.
Stop the beep with
The telephone is
defective.
Select reset option on
the middle soft key if
available or if no reset
option is available or
fault does not resolve
the telephone needs
repair.
Enter PIN code
The telephone’s lock is
activated.
Enter the required PIN
code. If PIN code lost
enter new via PDM or
do a factory reset via
PDM.
“PIN Blocked Unblock?”
is displayed
Phone blocked, wrong
PIN code entered three
times
See Section 2.4 on page
10
The telephone beeps
once a minute (during
max 30 minutes) with
a low tone followed by
a high tone (if enabled,
the vibrator also follows
the beeps).
(1)
SERVICE NEEDED
Parameters corrupt
and go into
range. When reentering
the coverage area it
can take a couple of
minutes before the
telephone automatically
has registered into the
system.
Phonebook is not
The phonebook does
Try again later. If fault
available at the moment. not respond, not
persists, contact your
available at the moment. system administrator to
do a factory reset.
Voice mail number not
defined
There is no Voice mail
number defined in the
telephone.
Define a Voice mail
number via PDM.
No headset found
Headset is turned off
Turn on headset
Headset is turned off
Charge headset
Headset is out of range
Move headset closer to
phone
Headset is not in pairing Turn headset into
mode
pairing/ discoverable
mode (see headset
manual for details)
146
1424-EN/LZT 103 090 Uen A1 2008-10-24
Troubleshooting
Pairing fails
Headset is not in pairing/ Turn headset into
pairing/ discoverable
discoverable mode
mode (see headset
manual for details)
Incorrect PIN entered
Connecting fails/Failed
to connect headset
Headset can not
connect to phone
(see headset manual
for details on how to
connect)
Try again and enter
correct PIN (see
headset manual for
details)
Headset is not turned on Turn on headset
Headset is out of range
Move headset closer to
phone
Link key in headset has
been deleted
Repeat pairing
procedure
Headset is already
connected to another
phone
Disconnect headset
from the other phone
Too close to a WLAN
area and headset is not
supporting Bluetooth
standard v1.2
Shut down WLAN
equipment
Phone is not turned on
Turn on phone
Phone is out of range
Move phone closer to
headset
Bluetooth module is
disabled
Enable Bluetooth chip in
Bluetooth menu
Another headset is
already connected to
the phone.
Disconnect the
connected headset
Link key is missing in
Repeat pairing
either headset or phone. procedure
Too close to a WLAN
area and headset is not
supporting Bluetooth
standard v1.2
Shut down WLAN
equipment
(1) This display message is only shown in English.
Contact your system administrator if one of these error messages is displayed:
•
System List Error
1424-EN/LZT 103 090 Uen A1 2008-10-24
147
DT690
148
•
Buzzer Data Error
•
User Data Error
•
User Phonebook Error
•
Error xx (where xx = any number)
1424-EN/LZT 103 090 Uen A1 2008-10-24
Glossary
27
Glossary
This section gives a list of frequently used terms.
Table 4
Ac
Authentication code.
Abbreviated number
Short number. Initiating a call to a
pre-programmed number by dialling
a code or pressing a key.
Conference
If you have an ongoing conversation
you can include other persons and
establish a telephone conference.
DECT/GAP
Digital Enhanced Cordless
Telecommunication/ Generic Access
Profile. This means that no one can
eavesdrop on your calls and that the
quality of speech is as good as that
of conventional fixed telephones.
DECT/GAP enables interoperability
with other manufacturers’ products.
Directory number
Number with 1-8 digits which is
assigned to an extension or external
line or as a common abbreviated
number.
DTMF tone
Dual Tone Multi Frequency or touch
tone, for dialling.
Exchange
Switch. Your telephone switching
system.
Extension number
All telephones connected to the PBX
have a unique internal number (up to
8 digits). You can see your number
on the display.
GAP
Generic Access Profile, a standard
for cordless telephone systems.
Idle mode
The state your phone is in when
nothing is activated.
IP call
Internal call sent through an internal
data network (LAN or WAN).
IPEI Code
International Portable part Equipment
Identity, a unique identity assigned to
your phone by the manufacturer.
1424-EN/LZT 103 090 Uen A1 2008-10-24
149
DT690
150
ISDN
Integrated Services Digital
Network. Provides your system
with supplementary services from the
public net.
Least Cost Routing
A function that automatically selects
the cheapest way to connect your
external call.
Li-Ion battery
A battery made from Lithium ions.
Li-Ion batteries are light-weight and
have a very high energy density. This
makes them ideal for use in portable
equipment, such as cordless phones.
Park
Portable Access Right Key, unique
identity assigned to your network.
PBX
Private Branch Exchange. Your
telephone switching system
(for example MD Evolution
Communication Platform).
PIN Code
Personal Identification Number for
security.
Speed dialling number
Abbreviated number or short number,
used for making frequently used
numbers faster to dial.
SW
Here you can see which version of
the phone software you have.
Tandem configuration
The tandem configuration is a unit
consisting of two phones using the
same directory number.
Third party
A third connection (person), which
can be included in an ongoing two
person conversation. The connection
can be internal or external. See
Section 13 on page 63.
1424-EN/LZT 103 090 Uen A1 2008-10-24
Telephony Service Prefixes
28
Telephony Service Prefixes
This section describes the country specific service prefixes that are relevant for
the DT690 phone used in the MD Evolution environment.
The following markets are concerned: Australia, Austria, Belgium, Brazil,
China, Denmark, Export, Finland, France, Germany, Hong Kong A-law, Hong
Kong My-law, Indonesia, Ireland, Italy, Malaysia, Mexico, The Netherlands,
New Zealand, North America, Norway, Saudi Arabia, Singapore, South Africa,
South Korea, Spain, Standard, Sweden, Switzerland, and United Kingdom.
Service codes are activated with * service prefix #, and deactivated with #
service prefix #.
Table 5
Standard and Alternative Prefixes
Service
Standard
Alternative
Abbreviated Numbers
2
Austria: 6
Italy: 6
Norway: #2
U.K. and EBN: **6
North America: 6
Denmark: 1
Sweden: 1
Appointment Reminder Activate
71
Austria: *32
Italy: *32#
Norway: #71
North America: *32
Denmark: *71
Sweden: *71
Appointment Reminder Verify
718
Austria: *328
Italy: *32#8
Norway: #718
North America: *328
Denmark: *718
Sweden: *718
Appointment Reminder Cancel
719
Austria: *329
Italy: *32#9
Norway: #719
North America: *329
Denmark: *719
Sweden: *719
1424-EN/LZT 103 090 Uen A1 2008-10-24
151
DT690
152
Call Forward Immediate
61
Austria: *21
Italy: *21#
Norway: #61
U.K. and EBN: *21*
North America: *2*
Denmark: *211
Sweden: *211
Call Forward No-Answer
62
Austria: *22
Italy: *22#
Norway: #62
U.K. and EBN: *211
North America: *21
Denmark: *212
Sweden: *212
Call Forward Busy
63
Austria: *23
Italy: *23#
Norway: #63
U.K. and EBN: *212
North America: *22
Denmark: *213
Sweden: *213
Call Forward No-Answer and
Busy
69
Austria: *26
Italy: *26#
Norway: #69
North America: *26
Denmark: *214
Sweden: *214
Call Forward Do Not Disturb
64
Austria: *24
Italy: *24#
Norway: #64
U.K. and EBN: *27*
North America: *24
Denmark: *64#
Sweden: *64#
Call Forward Cancel
60
Austria: #21
Italy: #21#
Norway: #60
U.K. and EBN: #21#
North America: #21
Denmark: #21#
Sweden: #21#
1424-EN/LZT 103 090 Uen A1 2008-10-24
Telephony Service Prefixes
Follow-me Activate
65
Austria: *25
Italy: *25#
Norway: #65
U.K. and EBN: *5*
North America: *25
Denmark: *215
Sweden: *215
Follow-me Cancel
66
Austria: #25
Italy: #25#
Norway: #66
North America: #25
Denmark: #215
Sweden: #215
Call Parking
10
Austria: *10
Italy: *10#
Norway: #10
North America: *10
Denmark: *10
Sweden: *10
Call Pick-Up General Ringing
15
Austria: *88
Italy: *73*
Norway: #15
U.K. and EBN: *88
North America: *88
Denmark: *15
Sweden: *15
Call Pick-Up Hunt Group
14
Austria: 2
Italy: 2
Norway: #14
North America: 2
Denmark: 6#
Sweden: 6#
Call Pick-Up Individual
13
Austria: *8*
Italy: *8*
Norway: #13
U.K. and EBN: *8*
North America: *8*
Call Substitution
75
Austria: *75
Italy: *75*
Norway: #75
U.K. and EBN: *75*
North America: *75
Denmark: *75*
Sweden: *75*
1424-EN/LZT 103 090 Uen A1 2008-10-24
153
DT690
154
Call Temporary Protection
74
Austria: *74
Italy: *74#
Norway: #74
North America: *74
Denmark: *74
Sweden: *74
General Call Acceptance Status
67
Austria: *9#
Italy: *9#
Norway: #67
U.K. and EBN: *9#
North America: *9#
Denmark: *8
Sweden: *8
Access Locking
78
Austria: *72
Italy: *72#
Norway: #78
U.K. and EBN: *76*
North America: *72
Denmark: *72#
Sweden: *72#
Password Programming
79
Austria: *73
Italy: #*72
Norway: #79
U.K. and EBN: *74*
North America: *73
Denmark: *72*
Sweden: *72*
Redial Last External Number
11
Austria: **
Italy: ***
Norway: #11
U.K. and EBN: ***
North America: **
Denmark: ***
Sweden: ***
Standby Status in Hunt Group
68
Austria: *91
Italy: *91#
Norway: #68
North America: *91
Denmark: *29#
Sweden: *29#
1424-EN/LZT 103 090 Uen A1 2008-10-24