1
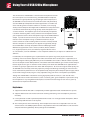
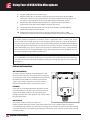
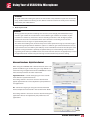
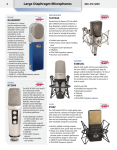
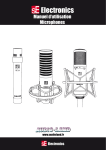
USB2200a
Microphone Manual
Electronics
USB2200a Technical Manual
SE Electronics Microphone Manual
Thank you for purchasing this SE Electronics microphone, which was hand built in one of the most
advanced microphone manufacturing facilities in China. Designed by a team of extremely experienced
engineers and verified by extensive listening tests. Each model utilises gold sputtered, ultra-light mylar
diaphragms in an advanced capsule design. Your microphone was constructed using the finest quality
Japanese electronic components and extensively tested to provide you with years of trouble-free
operation.
Technical Specifications - USB2200A
Frequency Response: 20Hz-20KHz
Technical parameters:
Sensitivity: 14.1mV/Pa -37 ± 1.5dB
1. USB 2.0 USB1.x compatible
Polar Pattern: Cardioid
2. Stereo D/A and A/D conversion
Impedance: ≤ 150 Ohms
3. Zero latency Headphone monitoring
Equivalent Noise Level: 12dB(A weighted)
4. Gain Control built in
Max SPL for 0.5% THD@1000Hz: 130dB
5. At THD > -90db, SNR 96db (D/A conversion)
Power Requirement: Phantom power 48V±4V or USB
6. At THD > -90db, SNR 92db (A/D conversion)
Connector: 3-pin
7. Adaptive 44.1 to 48KHz sampling frequency
* Note: The USB2200a will lock to 88.2 and 96 K clocks on most software, writing files as 16 bit and, with
the automatic conversion (bit stuffing), 24 bit files. Therefore users who have sessions at different rates
and want to use the mic, in most cases, can.
Pickup Patterns
There are two basic microphone directional patterns, omnidirectional, which picks up sound
equally from all directions and figure-of-eight, which picks up from both the front and rear of
the microphone but not from the sides. Combining these two basic patterns creates a cardioid
or directional response, which simply means the microphone is most sensitive in one particular
direction. By varying the way in which the omnidirectional and figure-of-eight patterns are
combined, varying widths of cardioid pattern can be created.
Cardioid
The USB2200a microphone utilises a Cardioid polar pattern. Cardioid pattern microphones are
popular for general-purpose recording as they can be directed at the wanted sound source while
offering a measure of rejection to sounds approaching the microphone from the rear, and to a
lesser extent, the sides. This is the polar pattern of the USB2200a.
Where several musicians are playing together, this reduces the amount of crosstalk between the
microphones. Cardioid pattern microphones also pick up less of the ‘room sound’, which results
in a clearer, less ‘coloured’ recording. Note that cardioid microphones belong to the category of
‘pressure gradient’ microphone as their output signal depends on the differences in air pressure
between the front and rear of the capsule.
All pressure gradient microphones exhibit some degree of proximity effect, which simply means that there is a significant rise in their bass response if they are used very close to the sound source. If desired this can be countered by using the low-cut switch on the microphone or microphone preamplifier.
USB2200a Technical Manual
Using Your sE USB2200a Microphone
All sE mics come complete with a precision-built flexible shock mounting system to minimise the
effect of floor-borne vibrations reaching the microphone through the stand. In the case of the
USB2200a this shock system is pre-attached to the mic itself in the form of a ‘C’ shaped cradle. When
recording vocals at close range, you should use an external mesh pop screen to prevent low frequency
thumps caused by air expelled from the mouth on certain syllables. Your popscreen should be placed
midway between the singer’s mouth and the microphone for close-miked vocals but should not be
necessary when using the microphone to record voices more than 1 metre from the microphone
or when recording musical instruments. A typical close-miked vocal distance is 200mm where the
microphone should be set up away from hard walls and surfaces.
Care and Maintenance
Though capacitor microphones are now far more rugged than in the era of the so-called ‘classic’
models, care must still be taken with all capacitor models to avoid damp conditions, humidity or
excessive dust and cigarette smoke. Microphones brought into a warm studio from a cold vehicle,
for example, may suffer condensation on the diaphragm and circuitry, which will compromise the
performance of the microphone until it has completely dried out. It is also important not to subject
the microphone to excessive shocks, such as dropping it onto a hard surface.
Microphones may be cleaned using a damp cloth but solvents or thinners should not be used. It
is also important not to use contact cleaners or other aerosols close to the capsule as this may impair
operation.
Mic cables and connectors should be checked regularly for damage.
If a capacitor microphone produces intermittent noise or spluttering sounds, it is probably suffering
from condensation and should be dried out in a warm place before further use. Do not attempt to
service a microphone yourself as this will void the warranty and may cause serious damage. These
considerations apply to all capacitor microphones.
Pad Switch
Where a pad switch is fitted as on the USB2200a, this should only be used when the microphone
is being used to record exceptionally loud sound sources that risk overloading the microphone
preamplifier to which the microphone is connected, even when set to its minimum gain setting.
Low Cut
The Low Cut switch activates a high-pass filter that reduces the amount of low frequencies in the
output signal from the microphone. Low Cut may be used to reduce the amount of bass boost caused
by the proximity effect when working very close to the microphone or to to exclude low frequency
signals, such as traffic and floor vibrations where the signal being recorded has little or no deep bass
content.
USB2200a Technical Manual
Using Your sE USB2200a Microphone
The SE electronics sE USB2200a is a dual function microphone based on
the same capsule as our award winning SE2200A Studio microphone.
Based around a gold sputtered, large diaphragm cardioid capsule, the
sE USB2200a can be connected via its XLR connection and powered by
standard 48Volt phantompower for studio applications. For mobile use
or for recording where no other hardware is available, it can also plug
directly into the USB port ofan Apple Mac or Windows PC computer where
it combines the functionality of a high quality studio microphone and
an audio interface. A headphone jack on the side of body microphone
is used for monitoring while a rotary control on the microphone allows
you to adjust the balance of the microphone signal to the DAW software’s
output. In practical terms this means you are able to both record and
monitor via the microphone using no additional hardware. All you
need is some basic audio recording software and this is often provided
with the computer as standard (such as Apple’s Garage Band), though
the sE USB2200a is also fully compatible with Pro DAW (Digital Audio
Workstation) applications such as Cubase, Traktion, Reason, Ableton
Live, Logic Express/Pro, Sonar, Cool Edit Pro, Digital Performer and so
on. Furthermore, as the sE USB2200a is a class compliant USB2 device, it requires no additional driver
software.
In USB mode, the microphone gain is optimised for close speech or general purpose instrument
recording, and can be further adjusted via the Mac or PC Audio device control panel. Apple Macs and
PCs handle digital audio slightly differently so the sE USB2200a also includes a Mac/PC switch to provide
the correct output level for both platforms. The combination of the MAC/PC gain switch and the ability to
further adjust the mic gain via the Mac and PC control panel allows the USB2200a to be applicable for a
far wider range of pro applications than other USB microphones. To ensure the highest audio quality, the
sE USB2200a uses extremely advanced, proprietary voltage conditioning technology to ensure that the
noise and distortion performance is not compromised by the quality of the USB port power supply. When
used in XLR analogue mode, the gain is fully adjustable using your mixer or microphone preamplifier.
Though the sE USB2200a is suitable for creating high quality Podcast audio, it is also ideal for voice
overs, studio vocals and for instrument use, such as acoustic guitar, guitar amplifiers or percussion. Using
the microphone is very straightforward but please read this manual through at least once as you may
otherwise miss important information.
Key Features
1. Support for USB 2.0 with USB 1.x compatibility on both Apple Macintosh and Windows PC systems.
2. Supports both stereo D/A and A/D conversion allowing monitoring via the headphone jack on the mic body.
3. Can be powered via USB or phantom powered when used as an analogue studio microphone. When powered by USB Phantom is not required.
4. Zero Latency ‘direct source’ monitoring. The microphone monitor level is adjustable via the on-mic volume control. The DAW playback volume is adjusted from within the DAW software. This allows for complete monitoring flexibility directly though the sE USB2200a.
USB2200a Technical Manual
Using Your sE USB2200a Microphone
5. Integral -10dB pad and LF roll-off switches..
6.
Output record path is 16 bit mono / playback stereo and 24 bit stereo Playbacks(D/A conversion). We use a high quality 24 bit A/D converter to provide the 16 bit output. (16 bit support is the highest bit rate presently supported by all the public drivers.)
7.
Adaptive 44.1Khz to 48KHz sampling frequency. Higher bit rate compatibility is supported by many Mac and PC software packages, but not all)
8.
Compatible with: Mac:OS versions 10.x or higher; PC Windows 98SE/ME/2000/XP
9.
Simultaneous output via XLR and USB
10. USB dual stream means that this mic is ideal for reporters who require a -10dB simultaneous record stream in case of corruption or peaks in their primary recording.
IMPORTANT:
All studio capacitor microphones should be used in conjunction with a suitable pop screen
when used for close miking vocals to prevent thumping sounds when B, P and M consonants are
pronounced. Any metal or nylon mesh screen placed midway between the mouth and microphone
will work though we recommend the sE Pop and Dual Pro Pop as they will not affect the tonality
of the microphone in any way as may be the case with less sophisticated screens. Foam pop filters
that slip over the mic are not recommended as they offer little protection against popping and may
seriously compromise high frequency performance.
IMPORTANT:
The sE USB2200a is a cardioid or unidirectional microphone, so it is imperative that the sound being
recorded faces into the side of the microphone bearing the SE Logo, not into the rear or end of the
microphone.
Controls and Connections:
0dB/-10dB Pad Switch:
For normal speech recording, use the 0dB position, but
where the sound source is loud enough to cause clipping
or overloading, switch to the -10db position which reduces
the output level by 10dB. In the unlikely event that the
signal is still too high, reduce the level of the source or
move the microphone further away from the source.
A/P Switch:
Set to A for use with Apple Macintosh computers or P for
use with Windows PC machines. This ensures the correct
signal level for both platforms. An intermediate gain
setting is provided at the “dot” position, and may be useful
for some applications.
Low cut switch:
This switch introduces a filter to remove low
frequencysounds below the normal range of the human voice, such as traffic rumble or vibrations
transmitted through the floor. For most vocal recording, set the switch to its right hand position to bring
in the filter. However, when recording low frequency instruments, such as basses, set the switch in its left
hand flat position.
USB2200a Technical Manual
Using Your sE USB2200a Microphone
Balance Control:
This control sets the headphone volume of the microphone
capsule. The playback volume of the DAW software is
adjusted in your audio software’s main stereo mix output
control. Once your playback volume is set you can then vary
the direct output from the mic capsule until the desired
balance is achieved. As the microphone signal is monitored
at source, there is no audible delay as may be the case
when monitoring via audio software. To avoid hearing an
echo (due to both the direct microphone sound and DAW
monitored version being audible at the same time), mute or
turn down the monitor level for the track being recorded
within your DAW software or switch off software monitoring
in your DAW software.
Where your DAW has adequately low latency and you wish to hear some plug-in effects while
recording, use your DAWs software monitoring facility and set the microphone balance control to fully
DAW only. You can then adjust the mix of what you hear within your DAW in the usual way.
USB Port:
Use the supplied USB cable to connect the sE USB2200a to the USB port of your computer. We
recommend where possible that you connect your sE USB2200a directly to the computer rather than
via a hub as the data bandwidth may be inadequate if other devices are operating at the same time.
For applications requiring a longer USB cable, a USB extension cable can be used and found at most
computer supply stores.
Headphone Jack:
accepts a standard 3.5mm stereo jack for feeding personal headphones or earphones. Using a suitable
adaptor cable, it may also be connected to the line (aux) input of a stereo sound system for playback
over loudspeakers.
XLR Socket:
Accepts a standard balanced microphone cable and standard 48 Volt phantom power must be
supplied when using the microphone in analogue mode. Never use unbalanced cables as they cannot
supply the Phantom power required by the mic. Note: If phantom power is not provided, there will be
no output.
Analogue Use
1. Connect to your mixer or microphone preamplifier via a balanced XLR cable and switch on the phantom power after connecting the microphone.
2. Position the microphone using the integral swivel stand mount and set up a pop screen if recording vocals.
3.
While speaking or performing into the microphone, adjust the input gain of your mixer or microphone preamplifier until the signal meter in your DAW software shows peak level of around -10dB. This is high enough to maintain optimal audio quality while leaving adequate safety margin (headroom) in case of unexpected level increases. Once the gain is set, you are ready to record as you would with any conventional studio microphone.
USB2200a Technical Manual
Using Your sE USB2200a Microphone
USB Connection
1.
Connect the microphone to the computer via the supplied USB cable. The microphone will automatically be recognised as a USB2 device and will be identified as sE USB2200a by the OS. You may then choose the sE USB2200a as your input/output device within your DAW software. The sE USB2200a will appear within the list of available audio devices alongside built-in audio and any other audio interface or soundcard you have installed. Note that sample rates of 44.1kHz and 48kHz are supported but although many Mac and PC programs will have no trouble creating 88.2kHz, 96kHz files, this feature is not official certified by sE. 88.2kHz, 96kHz and above. The sample rate should be selected within your DAW software’s audio setup or preferences menu.
NOTE:
Where the OS and DAW software permits, and where you have a separate audio interface
soundcard you wish to use for playback, you can simply select the sE USB2200a as the audio input
source while still using your usual audio interface for monitoring. *If your DAW software only
permits you to select the same device for audio input and output, then select the sE USB2200a and
monitor via headphones plugged into your sE USB2200a while recording. You may then re-select
your original audio interface/soundcard for playback once recording is complete. While some
operating systems allow you to set up composite audio drivers capable of accessing two or more
audio devices simultaneously, some of these significantly increase audio latency through your
DAW so it may be simpler to switch between audio devices beween recording and final playback.
* not supported when using the Apple “core audio “ driver.
2.
Select an audio track with the sE USB2200a designated as the audio source. This appears as a stereo source (audio 1 and 2) but may be recorded in mono by selecting only input 1 or input 2 as both channels carry identical signals.
3.
Place the track into record ready mode and check that the meter indicates the correct level when you speak or sing into the microphone. The output is at 16-bit resolution so providing your peaks reach a minimum of -10dB or thereabouts, the audio quality will be excellent. In USB mode, the gain of the internal preamplifier is optimised for typical close speech or singing, though very loud rock vocalists may need to switch in the -10dB pad to avoid overloading the DAW input. You can also adjust the recording level by changing your distance from the microphone slightly.
Tip:
To avoid the reverberation of your room making your vocal sound muddy, use an optional sE Reflexion filter placed behind the microphone and stand or sit with you back to a soft surface such as curtains, soft furnishing, acoustic foam or folded blankets. The quality that can be achieved this way rivals that of even a professional vocal booth.
4. Connect your headphones to the sE USB2200a and when overdubbing, adjust the balance control to hear the correct mix of the backing tracks and your live vocals. Counter-clockwise decreases
the level of the microphone signal with only the DAW signal audible in the fully counter-clockwise
position. Moving the Balance control clockwise adjusts the balance in favour of the microphone
signal (The “Balance” control controls the level of signal directly off the capsule with no effect on
DAW playback. The playback is controlled via the DAW.) with only the mic signal audible in the fully
clockwise position. If recording vocals where there is no backing track, the balance control can be
used as a mic level monitor control.
USB2200a Technical Manual
Using Your sE USB2200a Microphone
IMPORTANT:
To avoid echoes when doing this (unless the mix control is fully clockwise so you hear the live mic
only), disable software monitoring or turn down the monitor level for the track you are recording
onto within your DAW software.
5. Record your track!
IMPORTANT:
Always get the best possible recording level at source, even though your DAW software may
include a gain control. The reason for this is that software gain controls can’t restore any lost
resolution or remove any noise that is due to recording at too low a level. All digital systems
produce the least noise and distortion when their converters are working at close to their
maximum level as the signal is represented by more ‘steps’.
The lower the recording level, the fewer ‘steps’ are used to represent the signal, and so the higher
the percentage of quantization distortion. If you use a software gain control to boost the level, or
if you normalise the level within your DAW, any noise and distortion will be increased by the same
amount. Leaving headroom is perfectly acceptable but try to avoid recording with peak levels
registering to far below your DAW’s meters. Ensure that the A/P switch is set appropriately as users
of Apple Macintosh machines may find the signal level too low if they use the P setting.
Advanced Functions - Digital Gain Control:
When using the USB2200a with a USB connection, there is the
option of additional gain control. The gain range offered can
extend the range of applications for the USB2200a to include
more distant placements or softer instruments.
Apple/Macintosh – Control the digital gain in the “Sound”
menu found in “System Preferences”.
The settings shown in this screen shot are ideal for most
typical applications but can be adjusted to your preferences
and applications.
PC – Control the digital gain using the “Sounds and Audio
Devices Properties” menu found in the “Control Panel” folder.
The settings shown in this screen shot are ideal for most typical
applications but can be adjusted to your preferences and
applications.
USB2200a Technical Manual
Using Your sE USB2200a Microphone
Additional DAW information
PC Windows
Audition/Cool Edit Pro
To select the sE USB2200a as an output device in Audition/Cool Edit Pro, go to ‘Option’, then ‘Choose
Device Properties’ to reach the audio attributes window. Click on ‘Wave Out’ then choose sE USB2200a
by clicking ‘Use this device’ in Edit View (left) panel.
To select the sE USB2200a as an input device in Audition/Cool Edit Pro, click on ‘Wave In’ labels, choose
SE sE USB2200a, then click ‘Use this device’ in Edit View in Edit View (left) panel.
When complete, click ‘OK’ after end of installation and close ‘Device Properties’ Dialogue Box.
Cakewalk/SONAR
Click on the ‘Option’ menu, choose Audio and open ‘Audio Options’.
Click ‘Advanced’. The Driver for Playback and Recording should be WDM/KS
Click ‘Drivers’. ‘Input Drivers’ and ‘Output Drivers’ should be set to ‘USB Audio Device’.
Cubase/Nuendo
Install the driver software ASIO4ALL from Download site: http://www.asio4all.com/
USB2200a Technical Manual
Electronics
www.seelectronics.com