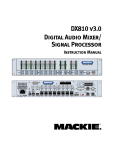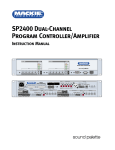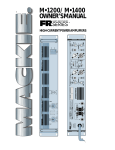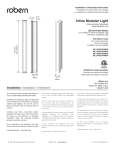
1
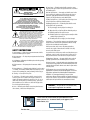
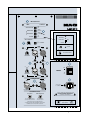
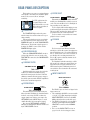
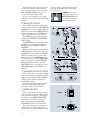
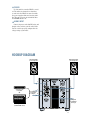
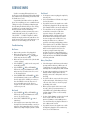
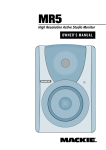
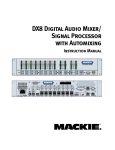
HRS150
HIGH RESOLUTION
POWERED SUBWOOFER
OWNER’S MANUAL
STANDARD SETTINGS
INPUT/OUTPUT
SUBSONIC FILTER
POWER
SUB BYPASSED
FILTER BYPASS
FLAT
15Hz
SUBSONIC FILTER
(
BYPASS FILTER SELECT
FILTER BYPASS
FILTER IN
FULL RANGE
FILTER SELECT
VARIABLE
110Hz ELIPTICAL
5.1)
LFE GAIN
LFE GAIN
INPUT SENSITIVITY
POLARITY
NORMAL
0dB
LFE GAIN
+10dB
SUB
SAT
80Hz
INPUT SENSITIVITY
CROSSOVER CONTROLS
0°
180°
OFF
POLARITY
NORMAL
LEFT
SUB
(MONO)
IN
SAT
OUT
THX PM3 SETTINGS
80Hz
SUBSONIC FILTER
55Hz
FILTER BYPASS
110Hz
CROSSOVER
(N/A)
BYPASS FILTER SELECT
L
L
IN
OUT
LFE GAIN
INPUT SENSITIVITY
POLARITY
R
SUB
NORMAL
R
SUB
SAT
SAT
80Hz
80Hz
55Hz
CROSSOVER CONTROLS
110Hz
CROSSOVER
IN
OUT
RIGHT
ON
SLAVE/MASTER
SLAVE
IN
MASTER
OUT
S
POWER
M
POLARITY &
INPUT SENSITIVITY ACTIVE
PROCESSED
SIGNAL
SUBWOOFER BYPASS
FOOTSWITCH
REMOTE INDICATOR
OPEN - SUB ON, L/R BASS MANAGED
CLOSED - SUB DEFEAT, L/R FULL RANGE
*MAX OPEN CIRCUIT 24V
*MAX CLOSED CIRCUIT 1A
120 VAC, 60 Hz,
950 WATTS
REMOTE INDICATOR CIRCUIT CLOSED WHEN SUB BYPASSED
"MACKIE", "FR SERIES", AND THE "RUNNING MAN" FIGURE
ARE REGISTERED TRADEMARKSOF MACKIE DESIGNS, INC.
"THX PM3" AND "LUCASFILM" ARE TRADEMARKS OF
LUCASFILM, LTD. USED BY PERMISSION
*TO INSURE PRODUCT SAFETY, POWER SUPPLIES MEETING CLASS-2 INSULATION
REQUIREMENTS SHOULD ONLY BE USED WITH THIS CONNECTOR
CAUTION
CAUTION
HEATSINK SURFACE HOT
AVOID CONTACT
HEATSINK SURFACE HOT
AVOID CONTACT
CAUTION
RISK OF ELECTRIC SHOCK
DO NOT OPEN
™
WARNING: TO REDUCE THE RISK OF FIRE OR ELECTRIC SHOCK, DO NOT EXPOSE THIS
EQUIPMENT TO RAIN OR MOISTURE. DO NOT REMOVE COVER. NO USER SERVICEABLE PARTS INSIDE.
REFER SERVICING TO QUALIFIED PERSONNEL.
INTERNAL AMPLIFICATION
1050W
AVIS: RISCQUE DE CHOC ÉLECTRIQUE — NE PAS OUVRIR
SERIAL NUMBER
MANUFACTURING DATE
DESIGNED BY MACKOIDS IN WOODINVILLE, WA, USA
©2002 MACKIE DESIGNS INC. ALL RIGHTS RESERVED
PATENTS PENDING
R
HIGH RESOLUTION
LISTED COMMERCIAL
AUDIO EQUIPMENT
9Z39
CAUTION
AVIS
RISK OF ELECTRIC SHOCK
DO NOT OPEN
RISQUE DE CHOC ELECTRIQUE
NE PAS OUVRIR
CAUTION: TO REDUCE THE RISK OF ELECTRIC SHOCK
DO NOT REMOVE COVER (OR BACK)
NO USER-SERVICEABLE PARTS INSIDE
REFER SERVICING TO QUALIFIED PERSONNEL
ATTENTION: POUR EVITER LES RISQUES DE CHOC
ELECTRIQUE, NE PAS ENLEVER LE COUVERCLE. AUCUN
ENTRETIEN DE PIECES INTERIEURES PAR L'USAGER. CONFIER
L'ENTRETIEN AU PERSONNEL QUALIFIE.
AVIS: POUR EVITER LES RISQUES D'INCENDIE OU
D'ELECTROCUTION, N'EXPOSEZ PAS CET ARTICLE
A LA PLUIE OU A L'HUMIDITE
The lightning flash with arrowhead symbol within an equilateral
triangle is intended to alert the user to the presence of uninsulated
"dangerous voltage" within the product's enclosure that may be
of sufficient magnitude to constitute a risk of electric shock to persons.
Le symbole éclair avec point de flèche à l'intérieur d'un triangle
équilatéral est utilisé pour alerter l'utilisateur de la présence à
l'intérieur du coffret de "voltage dangereux" non isolé d'ampleur
suffisante pour constituer un risque d'éléctrocution.
The exclamation point within an equilateral triangle is intended to
alert the user of the presence of important operating and maintenance
(servicing) instructions in the literature accompanying the appliance.
Le point d'exclamation à l'intérieur d'un triangle équilatéral est
employé pour alerter les utilisateurs de la présence d'instructions
importantes pour le fonctionnement et l'entretien (service) dans le
livret d'instruction accompagnant l'appareil.
SAFETY INSTRUCTIONS
1. Read Instructions — All the safety and operation instructions should be
read before this Mackie product is operated.
2. Retain Instructions — The safety and operating instructions should be kept
for future reference.
3. Heed Warnings — All warnings on this Mackie product and in these operating
instructions should be followed.
4. Follow Instructions — All operating and other instructions should be
followed.
5. Water and Moisture — This Mackie product should not be used near water
– for example, near a bathtub, washbowl, kitchen sink, laundry tub, in a wet
basement, near a swimming pool, swamp or salivating St. Bernard dog, etc.
6. Cleaning — Clean only with a dry cloth.
7. Ventilation — This Mackie product should be situated so that its
location or position does not interfere with its proper ventilation. For
example, the Component should not be situated on a bed, sofa, rug, or
similar surface that may block any ventilation openings, or placed in a
built-in installation such as a bookcase or cabinet that may impede the
flow of air through ventilation openings.
8. Heat — This Mackie product should be situated away from heat sources
such as radiators, or other devices which produce heat.
9. Power Sources — This Mackie product should be connected to a power
supply only of the type described in these operation instructions or as marked
on this Mackie product.
10. Power Cord Protection — Power supply cords should be routed so that
they are not likely to be walked upon or pinched by items placed upon or
against them, paying particular attention to cords at plugs, convenience
receptacles, and the point where they exit this Mackie product.
11. Object and Liquid Entry — Care should be taken so that objects do not
fall on, and liquids are not spilled into, this Mackie product.
12. Damage Requiring Service — This Mackie product should be serviced
only by qualified service personnel when:
A. The power-supply cord or the plug has been damaged; or
B. Objects have fallen, or liquid has spilled into this Mackie product; or
C. This Mackie product has been exposed to rain; or
D. This Mackie product does not appear to operate normally or exhibits
a marked change in performance; or
E. This Mackie product has been dropped, or its chassis damaged.
13. Servicing — The user should not attempt to service this Mackie product
beyond those means described in this operating manual. All other servicing
should be referred to the Mackie Service Department.
14. To prevent electric shock, do not use this polarized plug with an
extension cord, receptacle or other outlet unless the blades can be fully
inserted to prevent blade exposure.
Pour prévenir les chocs électriques ne pas utiliser cette fiche polariseé avec un
prolongateur, un prise de courant ou une autre sortie de courant, sauf si les
lames peuvent être insérées à fond sans laisser aucune pariie à découvert.
15. Grounding or Polarization — Precautions should be taken so that the
grounding or polarization means of this Mackie product is not defeated.
16. Power Precaution — Unplug this Mackie product during lightning storms
or when unused for long periods of time. Note that this Mackie product is not
completely disconnected from the AC mains service when the power switch is
in the OFF position.
17. This apparatus does not exceed the Class A/Class B (whichever is
applicable) limits for radio noise emissions from digital apparatus as set out in the
radio interference regulations of the Canadian Department of Communications.
ATTENTION —Le présent appareil numérique n’émet pas de bruits
radioélectriques dépassant las limites applicables aux appareils numériques de
class A/de class B (selon le cas) prescrites dans le règlement sur le brouillage
radioélectrique édicté par les ministere des communications du Canada.
WARNING — To reduce the risk of fire or electric shock,
do not expose this appliance to rain or moisture.
• Please write the serial number for your HRS150 here for
future reference (i.e., insurance claims, tech support, return
authorization, etc.):
Purchased at:_______________________________ Date of Purchase:_________________
2
Lend Me Your Ears
Exposure to extremely high noise
levels may cause permanent hearing
loss. Individuals vary considerably in
susceptibility to noise-induced hearing loss, but nearly everyone will lose
some hearing if exposed to sufficiently
intense noise for a period of time. The U.S.
Government’s Occupational Safety and Health Administration (OSHA) has specified the permissible
noise level exposures shown in this chart.
Duration Per Day
In Hours
Sound Level dBA,
Slow Response
8
6
4
3
2
1.5
1
0.5
0.25 or less
90
92
95
97
100
102
105
110
115
INTRODUCTION
Thank you for choosing Mackie Designs’
HRS150 Powered Subwoofer. We realize that
monitors are a critically important tool whether
your application is studio recording, audio/video
post production, hi-fi, or home theater, and the use
of a subwoofer not only improves low-frequency
accuracy for stereo monitoring and playback, but is
absolutely necessary for surround sound applications.
The HRS150 complements our line of studio
reference monitors and, like our HR824 and HR624,
meets all THX™ requirements for mixing and
monitoring multi-channel programs.
In order to achieve a seamless integration between
the subwoofer and the main speakers in the system,
speaker placement is very important. The characteristics of the room and the location of the speakers,
including the subwoofer, relative to the walls and
your listening position can have a drastic effect on
the accuracy of the sound. We’ve provided a section
on positioning the subwoofers, offering tips on how to
find the best placement for your particular application.
What is it? The Advantages...
The HRS150 is a high-resolution powered
subwoofer employing an internal variable 4th-order
Linkwitz-Riley crossover system with a down-firing
RCF Precision 15“ woofer and two side-firing massloaded passive radiators. Whew! There are many
benefits to integrating an active crossover, power
amplifier, and drivers into a single cabinet, and
we’ve taken full advantage of these benefits in the
design of the HRS150.
• The crossover point is variable so that the highpass output can be programmed to match the
frequencies the main speakers are best able to
reproduce.
Part No. 0006805 Rev. B 5/03
©2003 Mackie Designs Inc. All Rights Reserved.
According to OSHA, any exposure in excess of
these permissible limits could result in some hearing loss. To ensure against potentially dangerous
exposure to high sound-pressure levels, it is recommended that all persons exposed to equipment
capable of producing these levels use hearing protectors while this unit is in operation. Ear plugs or
protectors in the ear canals or over the ears must
be worn when operating this amplification system
in order to prevent a permanent hearing loss if
exposure is in excess of the limits set forth here.
Typical
Example
Duo in small club
Subway Train
Very loud classical music
The HRS150
can produce a
maximum SPL of
122 dB @ 1 m
Patrice screaming at Ron about deadlines
Loudest parts at a rock concert
• The amplifier is designed to provide maximum
acoustic output from the speaker, yet minimize
the danger of speaker damage due to overdriving.
• The connecting wire between the amplifier
output and the low-frequency driver is kept to an
absolute minimum, so the damping factor of the
amplifier isn’t compromised by the resistance of
long speaker cables.
In short, all the complex interconnected components in the system are designed to work in harmony
with each other to produce the best possible sound.
The Transducers...
The subwoofer features a bottom-firing 15-inch
die-cast frame woofer and a 15-inch passive radiator
in the front.
The unique passive radiator design provides a
smooth response down to 19 Hz—an astounding
accomplishment for a cabinet of this size! And since
the radiator is complementing and adding to the output at the lowest frequencies, there is very little
distortion generated from the woofer because its cone
movement stays well within its maximum excursion.
The Cabinet...
The cabinet is made of black oak veneered MDF
wood. Extensive internal bracing further increases
the strength and rigidity (stiffness) of the box.
The box is packed with an adiabatic polyester-fill
material to absorb internal reflections and dampen
standing waves.
FR Series Power Amplifiers...
What better way to power the subwoofer than
with our acclaimed FR Series “Fast Recovery” power
amplifiers. Our Fast Recovery design uses low negative feedback, yet allows the amplifier to maintain low
distortion and stability even when driven into clipping.
The low-frequency amplifier produces up to 950
watts continuous (1050 watts peak) before clipping.
3
QUICK START
We realize that you can’t
wait to hook up your new
Mackie Designs HRS150
High Resolution Powered
Subwoofer and try it out.
Nevertheless, please take the time to read this
page NOW, and the rest can wait until you’re
good and ready.
The HRS150 has its own built-in power amplifier. You should turn the INPUT SENSITIVITY
control on the back of the cabinet down
(fully counterclockwise) before turning on the
HRS150 for the first time. Also be sure to set
on the rear panel off
the power switch
(down). This will prevent you from accidentally
connecting a hot signal source to the subwoofer
and getting a rude surprise.
There are a number of other settings you
can make on the back of the HRS150, and you
can read about them later on in this manual so
you really know what they do. For now, just
leave all the switches out, and the CROSSOVER controls set to the center position (80 Hz).
For stereo applications:
1. Connect the left and right line-level signal
from your mixer, preamp, or other signal
jacks
source to the LEFT and RIGHT IN
on the HRS150 (XLR or RCA).
2. Connect the LEFT and RIGHT OUT
jacks on the HRS150 (XLR or RCA) to the
inputs of the left and right main powered
speakers (or to the inputs of the amplifiers
powering the left and right main speakers).
3. Connect the supplied AC power cord to the
on the back of the
IEC socket
subwoofer. Plug the other end into an AC
outlet properly configured with the correct
voltage for your particular model.
For surround sound applications:
1. Connect the LFE (Low-Frequency Effects)
or subwoofer line-level signal from your
mixer, preamp, or other signal source to the
LEFT (MONO) IN
jack on the HRS150
(XLR or RCA).
switch to the
2. Set the FILTER BYPASS
FULL RANGE position (pushed in).
3. Connect the supplied AC power cord to the
on the back of the
IEC socket
subwoofer. Plug the other end into an AC
outlet properly configured with the correct
voltage for your particular model.
4
For stereo and surround sound applications:
switch on the rear
4. Set the POWER
panel to the ON position. The red POWER
LED will turn on.
5. Turn on the power to the other components
in the system.
6. Start your signal source (tape deck, CD, DAW,
or whatever), but leave the master volume
control on your mixer or preamp down.
7. Adjust the master volume on your mixer or
preamp to a comfortably loud
listening level.
8. Slowly turn up the INPUT SENSITIVITY
control on the back of the HRS150 to its
fully clockwise position (NORMAL), or until
you achieve a balance between the
subwoofer and the other speakers in
the system.
9. Enjoy the authoritative, commanding lows
of the HRS150.
Then read the rest of this manual...
especially the following (see page 6):
Contents
SAFETY INSTRUCTIONS ............................ 2
Lend Me Your Ears ................................... 3
INTRODUCTION ....................................... 3
QUICK START .......................................... 4
PLACEMENT ............................................ 6
REAR PANEL DESCRIPTION ...................... 8
POWER LED ........................................ 8
SUB BYPASSED LED ............................. 8
SUBSONIC FILTER ................................ 8
FILTER BYPASS ................................... 8
FILTER SELECT ..................................... 8
LFE GAIN ............................................ 8
INPUT SENSITIVITY ............................. 8
POLARITY ........................................... 9
LEFT AND RIGHT INPUTS ..................... 9
LEFT AND RIGHT OUTPUTS .................. 9
CROSSOVER ....................................... 9
MASTER OUT/SLAVE IN .................... 10
SUBWOOFER BYPASS FOOT SWITCH . 10
REMOTE INDICATOR ......................... 10
POWER ............................................ 11
MAINS INPUT ................................... 11
HOOKUP DIAGRAM ............................... 11
PROTECTION CIRCUITS .......................... 12
CONNECTIONS....................................... 12
SERVICE INFO ....................................... 13
TECHNICAL INFORMATION ..................... 15
COLOPHON ........................................... 18
HRS150 LIMITED WARRANTY ................ 19
INPUT/OUTPUT
POWER
SUB BYPASSED
FLAT
15Hz
SUBSONIC FILTER
FILTER BYPASS
FILTER IN
FULL RANGE
FILTER SELECT
VARIABLE
110Hz ELIPTICAL
THX PM3 SETTINGS
SUBSONIC FILTER
0dB
LFE GAIN
+10dB
FILTER BYPASS
INPUT SENSITIVITY
FILTER SELECT
0°
180°
OFF
LFE GAIN
POLARITY
INPUT SENSITIVITY
NORMAL
LEFT
SUB
(N/A)
POLARITY
(MONO)
IN
SAT
NORMAL
OUT
80Hz
SUB
SAT
80Hz
CROSSOVER CONTROLS
55Hz
110Hz
CROSSOVER
SUB
L
L
IN
OUT
R
R
SAT
ON
80Hz
POWER
55Hz
110Hz
CROSSOVER
IN
OUT
RIGHT
SLAVE/MASTER
SLAVE
IN
MASTER
OUT
S
M
120 VAC, 60 Hz,
950 WATTS
POLARITY &
INPUT SENSITIVITY ACTIVE
PROCESSED
SIGNAL
SUBWOOFER BYPASS
FOOTSWITCH
REMOTE INDICATOR
OPEN - SUB ON, L/R BASS MANAGED
CLOSED - SUB DEFEAT, L/R FULL RANGE
*MAX OPEN CIRCUIT 24V
*MAX CLOSED CIRCUIT 1A
REMOTE INDICATOR CIRCUIT CLOSED WHEN SUB BYPASSED
*TO INSURE PRODUCT SAFETY, POWER SUPPLIES MEETING CLASS-2 INSULATION
REQUIREMENTS SHOULD ONLY BE USED WITH THIS CONNECTOR
"MACKIE", "FR SERIES", AND THE "RUNNING MAN" FIGURE
ARE REGISTERED TRADEMARKSOF MACKIE DESIGNS, INC.
"THX PM3" AND "LUCASFILM" ARE TRADEMARKS OF
LUCASFILM, LTD. USED BY PERMISSION
CAUTION
HEATSINK SURFACE HOT
AVOID CONTACT
5
PLACEMENT
AN IMPORTANT NOTE
ON HRS150 BASS
RESPONSE AND YOUR
CONTROL ROOM OR
LISTENING ROOM
You’ve heard it before. “Low-frequencies are
non-directional, so it doesn’t matter where you
place the subwoofer.” Although it is true that frequencies below about 100 Hz are
non-directional, it is also true that a lot of factors can conspire to thwart the HRS150’s
extended low frequency — including room
shape, room volume, and acoustical treatment.
This is not a cop-out or an apology. It’s plain
old physics in action. Here are some tips to help
you find the best placement for your HRS150
and optimize the low-frequency response in
your particular room. Consider the following:
Room acoustics and bass-handling ability
Nobody likes to buy a subwoofer and a new
set of speakers and then be told that they
should spend extra bucks on bass traps or a remodeling job. But the simple fact is, “standard”
rooms, i.e., rectangular rooms in conventional
business or residential structures, are rarely if
ever conducive to optimal low bass reproduction without some modifications.
However, understanding what can cause
degradation of the low-frequency response in
a room can help in choosing a location that
can minimize the problems associated with
poor bass response most notably interference
and resonance.
Interference is caused when the reflected
wave from the surrounding walls arrive out-ofphase with the direct sound. This can weaken
or even cancel the sound. Keeping the distance
between the subwoofer driver and any adjacent
walls no longer than 1/8 of a wavelength (20 in.
or 51 cm at 80 Hz) can minimize interference.
Room resonance is caused by the reinforcement of certain frequencies between 20 Hz and
200 Hz, which creates “standing waves” or
room modes. These resonant frequencies are
determined by the dimensions of the room.
The bass response is sharply boosted for a narrow band near resonance, and then appears to
be attenuated between resonances.
6
Corner or Center Placement
Placing the subwoofer in a corner (corner
loading) excites the most room modes in the
room, which tends to smooth the individual
peaks and dips caused by each standing wave.
Moving the subwoofer outward from the corner
along the wall results in fewer standing waves,
but may result in noticeable peaks at
certain frequencies.
Some people prefer to place the subwoofer
between the left and right main speakers, so
that all the sound is coming from the same
plane. Some prefer to use two subwoofers and
place one with the left speaker and the other
with the right speaker. The Master Out/Slave
In connections on the HRS150 allow you to do
this quite easily.
Another benefit of corner placement is increased efficiency and lower distortion. The
energy that is reflected off the walls reinforces
the direct sound, putting less of a demand on
the power amplifier to reach higher sound
pressure levels.
It is important that the corner has good
structural strength, or the low-frequency energy
can cause rattling and other distracting vibrations.
Experiment with the orientation of the
subwoofer. The driver in the HRS150 faces
downward toward the floor while the passive
radiators face out the sides. It may be helpful
to play steady-state tones or pink noise while a
partner moves the subwoofer (perhaps on a
small wheeled cart), to make it easier to hear
the differences in the sound as the changes in
placement and orientation are made.
Principle of Reciprocity
One trick that has been used successfully to
find the best location for a subwoofer is placing
the subwoofer in your listening position. The
principle of reciprocity says that you can find
the best location for the subwoofer by switching
places between the listening position and the
subwoofer position. It is important that the cabinet be raised off the ground and at the same level
as your ears. If that’s not possible, at least put the
subwoofer in the same location as your listening
position to achieve a close approximation.
Play music with a good strong bass line and
crawl on the floor on your hands and knees until
you find a spot where the bass sounds the best,
with a smooth, tight response. Your ears need
to be at the same height that the subwoofer’s
driver will be when it is sitting on the floor. If
you have access to a real-time analyzer (RTA),
play pink noise over the system and use the
RTA to find a location that exhibits the flatest
bass response. Once you’ve found the place
where the bass sounds the best, put the
subwoofer there and it should sound just as
good from your listening position.
Polarity
The setting of the polarity switch can affect
how the low frequencies sound in relation to the
main speakers. Listen to bass-heavy music with
the polarity switch in and out. In one position
the low frequencies should sound full, while in
the other position they may sound hollow and
thin. Choose the position that yields the fullest
low-frequency sound.
Feel free to experiment
In many respects, every room is unique in
terms of its acoustics. Even after you’ve placed
your subwoofer where you think it’ll sound
best, try moving it around. You might be pleasantly surprised.
Additional Tidbits of Wisdom
• Avoid using EQ to compensate for dips in
the frequency response caused by room
modes. It is better to place the subwoofer in
a position where dips are minimized and
use the EQ to smooth out any peaks.
• Provide at least six inches clearance
around the heatsink to allow air to get at it.
• Provide at least three feet clearance from a
TV, computer monitor, or any form of
magnetic media (video and audio recording
tapes, computer disks, etc.), to prevent the
HR150’s powerful magnet from distorting the
video screen or erasing the magnetic media.
• When you shut down your equipment, turn
off the HRS150 powered subwoofer first
(and any other powered speakers in the
system) to prevent thumps and other
noises generated by any upstream equipment from coming out the speakers. When
powering up, turn on the powered speakers
and subwoofer last.
• Save the shipping box! You may need it
someday, and you don’t want to have to pay
for another one.
• Save your sales receipt in a safe place.
• Also record the HRS150 serial number in the
space provided on the inside front cover,
along with where and when you bought it.
A Few Words About THX™ pm3™
Certification
Nearly two decades ago, George Lucas
turned a passion for great sound into the
world’s most accepted and trusted solution for
achieving it. The standard was named THX
(for Tomlinson Holman, who developed the
THX Sound System when he was the research
and technical director at Lucasfilm Ltd.™ in
the early 80s), and today, with hundreds of
thousands of home theater customers and
more than 3000 THX Certified movie theaters
enjoying its benefits, the THX name has become nothing short of legendary. Simply put:
when it comes to premium sound, no other
name so closely defines ‘quality’ for millions of
movie-goers and home theater enthusiasts alike.
Today, a new landscape is emerging. A landscape comprised of hundreds of small,
professional multi-channel facilities, whose
need for differentiation, expert technical and
marketing support, and a true, multi-channel
standard is becoming a competitive fact of life.
Again, THX has a singular solution and this
time it’s called THX pm3 Certification.
All facilities involved with mixing and/or monitoring of multi-channel material should have the
option to use pm3. THX pm3 Certification is ideal
for DVD mastering, sweetening, and mixing; and
is also perfect for facilities doing work in broadcast, music, or multi-media applications.
HRS150 THX pm3 Certification
Anyone seeking THX Certification for their
studio, or striving to maintain THX standards,
can use the HRS150s and rest assured that
their facility is in full compliance.
7
REAR PANEL DESCRIPTION
This is where you connect your signal inputs
and outputs to the subwoofer, and make adjustments to the crossover, filters, and input
sensitivity.
For THX applications, the
rear panel switches and
controls should be set to the
THX positions as indicated
on the rear panel.
POWER LED
The POWER LED lights when the power
switch is turned on and the subwoofer is operating normally.
If there is no signal present for several minutes, the HRS150 goes into bypass mode, the
POWER LED turns off, and the SUB BYPASSED
LED turns on. The instant a signal appears at
its input, the HRS150 comes to life and the
POWER LED lights again.
SUB BYPASSED LED
When the SUBWOOFER BYPASS circuit is
activated by either the auto-off circuit or the
FOOTSWITCH connection, the SUB BYPASSED
LED lights.
SUBSONIC FILTER
SUBSONIC FILTER
FLAT
15Hz
THX = FLAT
Push this switch in to engage the 3rd-order
18 dB/octave Butterworth subsonic filter,
which rolls off frequencies below 15 Hz. This
eliminates unwanted low-frequency energy so
that all the power from the HRS150 amplifier is
dedicated to useful low frequencies.
FILTER SELECT
VARIABLE
110Hz ELLIPTICAL
FILTER SELECT
This switch selects either the built-in 4th-order
24 dB/octave Linkwitz-Riley variable crossover
or the 7th-order 42 dB/octave 110 Hz elliptical
low-pass filter for the subwoofer.
Use the elliptical filter when mixing for surround sound applications with a LFE channel.
This steep filter emulates the “brick-wall” lowpass filter used in AC-3 and DTS formats.
Use the variable crossover filter for normal
playback of stereo sound.
LFE GAIN
0dB
LFE GAIN
+10dB
THX = 0 dB
For Surround Sound Mixing: Push this
switch in to add 10 dB of gain to the subwoofer
signal. This allows you to record the LFE channel at –10 dB relative to the other channels, as
specified by AC-3 encoding standards. Note
that 10 dB of gain is added back when decoding the LFE channel.
For Playback: Push this switch in to add 10
dB of gain to the subwoofer signal. This is useful for home theater applications where the
LFE channel requires additional gain to balance with the other channels in the surround
sound system.
INPUT SENSITIVITY
INPUT SENSITIVITY
FILTER BYPASS
OFF
FILTER BYPASS
FILTER IN
FULL RANGE
THX = FULL RANGE
This switch bypasses the built-in low-pass
filters (variable and elliptical). Push this switch
in when connecting an LFE or subwoofer
output signal from a mixer or preamp to the
LEFT(MONO) and/or RIGHT inputs, to avoid
“double-filtering” the low-frequency signal.
Note that the LEFT(MONO) and RIGHT
OUTputs are still high-pass filtered and affected
by the CROSSOVER controls.
8
NORMAL
THX = NORMAL
The HRS150 expects a line-level signal at its
input connectors.
• The sensitivity is 89 dB SPL at one meter with
a 100 mV (–17.8 dBu) input signal, with the
INPUT SENSITIVITY control set to its NORMAL position (in other words, wide open).
• The HRS150 is designed to operate with a
nominal +4 dBu signal when the INPUT
SENSITIVITY control is in the NORMAL
position.
• Refer to the QUICK START section on
page 4 for the level-setting procedure.
POLARITY
0°
180°
POLARITY
THX = 0˚
This switch reverses the polarity of the signal going to the subwoofer amplifier by 180º.
It has no effect on the signal at the LEFT and
RIGHT OUT or the MASTER OUT.
There is no right or wrong setting for this
switch. Listen to the overall blend of the
subwoofer with the rest of the system, and select
the switch position that gives you the best sound.
INPUT/OUTPUT
POWER
SUBSONIC FILTER
FILTER IN
FULL RANGE
FILTER BYPASS
FILTER BYPASS
FILTER SELECT
VARIABLE
110Hz ELIPTICAL
FILTER SELECT
INPUT SENSITIVITY
+10dB
POLARITY
NORMAL
INPUT SENSITIVITY
SUB
SAT
80Hz
55Hz
110Hz
CROSSOVER
0°
180°
OFF
CROSSOVER CONTROLS
POLARITY
NORMAL
LEFT
SUB
(MONO)
IN
SAT
OUT
80Hz
55Hz
110Hz
CROSSOVER
SUB
L
L
IN
OUT
R
R
SAT
80Hz
55Hz
110Hz
CROSSOVER
IN
OUT
RIGHT
SLAVE/MASTER
SLAVE
IN
MASTER
OUT
S
M
POLARITY &
INPUT SENSITIVITY ACTIVE
PROCESSED
SIGNAL
SUBWOOFER BYPASS
FOOTSWITCH
REMOTE INDICATOR
OPEN - SUB ON, L/R BASS MANAGED
CLOSED - SUB DEFEAT, L/R FULL RANGE
*MAX OPEN CIRCUIT 24V
*MAX CLOSED CIRCUIT 1A
REMOTE INDICATOR CIRCUIT CLOSED WHEN SUB BYPASSED
THX = 80 Hz
This adjusts the crossover frequency for the
built-in 24 dB/octave Linkwitz-Riley variable
crossover. The crossover frequency can be adjusted from 55 Hz to 110 Hz.
SAT
80Hz
CROSSOVER
SUB
(N/A)
LFE GAIN
0dB
LFE GAIN
LEFT AND RIGHT OUTPUTS
Balanced XLR male and unbalanced RCA female connectors are provided for the line-level
left and right high-pass outputs. Connect these
to the inputs of the main speakers (if they are
powered speakers) or to the inputs of the amplifier powering the main speakers.
The signal at the left and right outputs is
post-crossover. The low-pass output from the
crossover goes to the internal power amplifier
in the HRS150, while the high-pass output goes
to these output jacks.
THX PM3 SETTINGS
SUBSONIC FILTER
LEFT AND RIGHT INPUTS
Balanced XLR female and unbalanced RCA
female connectors are provided for the left and
right inputs. Connect the full-range line-level
signal from the mixer or preamplifier to one of
these input jacks.
The connectors are wired as follows (per
the AES/IEC standard):
XLR
RCA
Hot (+)
Pin 2
Tip
Cold (–)
Pin 3
—
Shield (Ground)
Pin 1
Shield
If connecting a single subwoofer or LFE output to the HRS150, use the LEFT (MONO)
input with the FILTER BYPASS switch pushed in.
SUB BYPASSED
FLAT
15Hz
*TO INSURE PRODUCT SAFETY, POWER SUPPLIES MEETING CLASS-2 INSULATION
REQUIREMENTS SHOULD ONLY BE USED WITH THIS CONNECTOR
9
Frequencies below the crossover frequency
are sent to the subwoofer, and frequencies
above the crossover frequency are sent to the
LEFT and RIGHT OUTputs, which are connected to the main/satellite speakers.
Set the crossover frequency to the lowest
frequency response rating of the main/satellite
speakers.
across the tip/sleeve when the internal relay is
open, and a maximum 1 amp of current when
the relay is closed.
CAUTION: There is an internal 1A fuse to protect the
REMOTE INDICATOR circuit.
Exceeding 1A of current may
blow the internal 1A fuse.
MASTER OUT/SLAVE IN
Balanced XLR and unbalanced RCA female
connectors are provided for the MASTER OUT/
SLAVE INputs. Use these for daisy-chaining two
HRS150s by connecting the MASTER OUT jack
from the first subwoofer to the SLAVE IN jack
on the second subwoofer (see note below).
The SLAVE IN bypasses all filtering, but is
affected by the POLARITY and INPUT SENSITIVITY settings.
The MASTER OUT is post-filtering (variable
and elliptical crossover, subsonic filter, and
LFE gain) and pre- POLARITY and INPUT
SENSITIVITY.
Note: You cannot daisy-chain more than one
additional subwoofer using these connections.
If SLAVE IN is used as an input, the MASTER
OUT has no signal present. To connect more
subwoofers, connect the MASTER OUT from
the first subwoofer to the LEFT (MONO) INput
of the second subwoofer with the FILTER BYPASS switch pushed in. Then connect the
MASTER OUT of the second subwoofer to the
LEFT (MONO) INput of the third subwoofer,
and so on.
SUBWOOFER BYPASS FOOT SWITCH
This is a 1/4" jack for connecting a normallyopen footswitch. When the switch is closed, the
subwoofer is muted and the LEFT and RIGHT
OUTputs pass the full-range signal to the
main/satellite speakers.
This is useful for making a quick comparison between the HRS150 enhanced and
non-enhanced low-frequency playback.
LEFT
SUB
10
OUT
80Hz
55Hz
110Hz
CROSSOVER
SUB
L
L
IN
OUT
R
R
SAT
80Hz
55Hz
110Hz
CROSSOVER
IN
OUT
RIGHT
SLAVE/MASTER
SLAVE
IN
MASTER
OUT
S
M
POLARITY &
INPUT SENSITIVITY ACTIVE
PROCESSED
SIGNAL
SUBWOOFER BYPASS
FOOTSWITCH
REMOTE INDICATOR
OPEN - SUB ON, L/R BASS MANAGED
CLOSED - SUB DEFEAT, L/R FULL RANGE
*MAX OPEN CIRCUIT 24V
*MAX CLOSED CIRCUIT 1A
REMOTE INDICATOR
This is a 1/4" jack for connecting a remote
indicator to indicate when the subwoofer is bypassed. An internal relay closes, shorting the
tip and sleeve of the REMOTE INDICATOR
jack whenever the subwoofer is in bypass
mode, either triggered manually with the
FOOT SWITCH or by the auto-off function.
This can be used to turn on a remote, lowvoltage lamp. Note that this jack does not
provide power. It accepts a maximum of 24 VDC
(MONO)
IN
SAT
ON
POWER
120 VAC, 60 Hz,
950 WATTS
POWER
Use this switch to turn the HRS150 on and
off. The subwoofer is muted for about three
seconds after the HRS150 is turned on while
the power supply and internal circuitry stabilize. The auto on/off circuit is disabled when
the POWER switch is off.
MAINS INPUT
Connect the power cord to this IEC socket, and
plug the other end into your AC outlet. Make
sure the outlet is properly configured for the
voltage rating of your model.
HOOKUP DIAGRAM
Left Main/Satellite
Powered Speaker
Right Main/Satellite
Powered Speaker
STANDARD SETTINGS
INPUT/OUTPUT
SUBSONIC FILTER
POWER
L
SUB BYPASSED
FILTER BYPASS
FLAT
15Hz
SUBSONIC FILTER
(
BYPASS FILTER SELECT
FILTER BYPASS
FILTER IN
FULL RANGE
FILTER SELECT
VARIABLE
110Hz ELIPTICAL
LFE GAIN
5.1)
LFE GAIN
INPUT SENSITIVITY
POLARITY
NORMAL
0dB
LFE GAIN
+10dB
SUB
SAT
80Hz
INPUT SENSITIVITY
CROSSOVER CONTROLS
0
180
OFF
POLARITY
NORMAL
LEFT
SUB
R
(MONO)
IN
SAT
OUT
THX PM3 SETTINGS
80Hz
SUBSONIC FILTER
55Hz
FILTER BYPASS
110Hz
CROSSOVER
(N/A)
BYPASS FILTER SELECT
Surround Sound
Preamplifier
OR
L
From Mixer or
Preamplifier
Outputs
R
L
L
IN
OUT
R
R
LFE GAIN
INPUT SENSITIVITY
POLARITY
SUB
NORMAL
SUB
SAT
SAT
80Hz
80Hz
55Hz
CROSSOVER CONTROLS
110Hz
CROSSOVER
IN
OUT
RIGHT
ON
SLAVE/MASTER
SLAVE
IN
MASTER
OUT
S
POWER
M
POLARITY &
INPUT SENSITIVITY ACTIVE
PROCESSED
SIGNAL
SUBWOOFER BYPASS
FOOTSWITCH
REMOTE INDICATOR
OPEN - SUB ON, L/R BASS MANAGED
CLOSED - SUB DEFEAT, L/R FULL RANGE
*MAX OPEN CIRCUIT 24V
*MAX CLOSED CIRCUIT 1A
120 VAC, 60 Hz,
950 WATTS
REMOTE INDICATOR CIRCUIT CLOSED WHEN SUB BYPASSED
*TO INSURE PRODUCT SAFETY, POWER SUPPLIES MEETING CLASS-2 INSULATION
REQUIREMENTS SHOULD ONLY BE USED WITH THIS CONNECTOR
CAUTION
"MACKIE", "FR SERIES", AND THE "RUNNING MAN" FIGURE
ARE REGISTERED TRADEMARKSOF MACKIE DESIGNS, INC.
"THX PM3" AND "LUCASFILM" ARE TRADEMARKS OF
LUCASFILM, LTD. USED BY PERMISSION
CAUTION
HEATSINK SURFACE HOT
AVOID CONTACT
HEATSINK SURFACE HOT
AVOID CONTACT
To Optional
2nd HRS150
Slave Input
CAUTION
™
RISK OF ELECTRIC SHOCK
DO NOT OPEN
WARNING: TO REDUCE THE RISK OF FIRE OR ELECTRIC SHOCK, DO NOT EXPOSE THIS
INTERNAL AMPLIFICATION
1050W
EQUIPMENT TO RAIN OR MOISTURE. DO NOT REMOVE COVER. NO USER SERVICEABLE PARTS INSIDE.
REFER SERVICING TO QUALIFIED PERSONNEL.
AVIS: RISCQUE DE CHOC ÉLECTRIQUE — NE PAS OUVRIR
SERIAL NUMBER
MANUFACTURING DATE
DESIGNED BY MACKOIDS IN WOODINVILLE, WA, USA
©2002 MACKIE DESIGNS INC. ALL RIGHTS RESERVED
PATENTS PENDING
Mixing Console
(1604-VLZ PRO shown)
11
PROTECTION CIRCUITS CONNECTIONS
There are several protection mechanisms
designed into the HRS150 to safeguard the
loudspeaker and amplifier from inadvertent
damage.
Peak Limiter
A peak limiter is located at the input to the
power amplifier section. It monitors both the
amplifier output signal and the power supply
voltages to guard against clipping and overloading the amplifier. This allows for loud and
punchy bass performance without distortion,
ensuring long-term reliability.
Thermal Protect
All amplifiers produce heat. The HRS150
is designed to be efficient both electrically
and thermally.
• If for some reason the heatsink or power
transformer gets too hot, a thermal switch
activates, placing the HRS150 into Standby
mode.
• Should this happen, make sure that airflow
to the rear of the cabinet is not restricted.
• When the heatsink or power transformer
cools down to a safe temperature, the switch
resets and normal operation resumes.
Note: The POWER LED remains lit if the thermal protection circuit is activated.
12
Input and Output Signal Wiring
You should use high-quality, shielded cable
to connect the signal source to the LEFT and
RIGHT IN
and OUT
jacks on the HRS150.
• Foil shielded cables, such as Belden 8451,
8761, or 9501 are commonly used for
studio wiring.
• Microphone cables work well.
• The better the shield, the better the
immunity from externally induced noise
(like EMI and RFI). Route the cable away
from AC power cords and outlets. These are
common sources for hum in an audio signal.
Wall warts and line lumps are especially
insidious hum inducers!
You can purchase quality cables from your
Mackie dealer.
• In certain home theater applications, it
may be necessary to connect the speaker
outputs from a stereo receiver to the inputs
of the HRS150s, if the receiver doesn’t have
preamp outputs or other line-level output
connections.
CAUTION: Do not attempt
to connect a speaker output
directly to the input of the
HRS150! Speaker levels are
much higher than line
levels and can damage the input circuitry
in the HRS150.
You can, however, insert a speaker-level to
line-level signal attenuator between the
receiver’s speaker output and the HRS150’s
input. Your Mackie dealer may be able to
help you find one, or you can build your
own. Contact our tech support department
for more information.
SERVICE INFO
Details concerning Warranty Service are
spelled out on the Warranty Card included with
your subwoofer (if it’s missing, let us know and
we’ll rush one to you).
If you think your subwoofer has a problem,
please do everything you can to confirm it before
calling for service, including reading through
the following Troubleshooting section. Doing
so might save you from deprivation of your
monitor and the associated suffering.
Of all Mackie products returned for service
(which is hardly any at all), roughly 50% are
coded “CND” — Could Not Duplicate, which
usually means the problem lay somewhere else
in the system. These may sound obvious to you,
but here are some things you can check:
Troubleshooting
No Power
• Our favorite question: Is it plugged in?
• Make sure the power cord is securely
and plugged
seated in the IEC socket
all the way into the AC outlet.
• Make sure the AC outlet is live (check with
a tester or lamp).
• Is the POWER
switch on the rear panel
in the ON position?
LED or BYPASSED
• Is the POWER
LED on the rear panel illuminated? If not,
make sure the AC outlet is live. If so, refer
to “No Sound” below.
LED
• If the POWER LED or BYPASSED
is not illuminated, and you are certain that
the AC outlet is live, it will be necessary to
have the HRS150 serviced. There are no
user-serviceable parts inside. Refer to
“Repair” at the end of this section to find
out how to proceed.
No Sound
• Is the POWER
LED or BYPASSED
LED on the rear panel illuminated? If not,
refer to “No Power” above.
control
• Is the INPUT SENSITIVITY
turned up?
• Is the signal source turned up? Make sure
the signal level from the mixing console (or
whatever device immediately precedes the
subwoofer) is high enough to produce sound.
Bad Sound
• Is the input connector plugged completely
into the jack?
• Is it loud and distorted? Reduce the signal
level at the mixer.
• If possible, listen to the signal source with
headphones plugged into the preamp stage.
If it sounds bad there, it’s not the subwoofer.
• Too much bass or not enough bass? Move
around the room and see if the bass
response changes. It’s possible your
listening position coincides with a room
mode where the low frequencies either
become exaggerated or nulled. If so, try
moving the subwoofer to a different
position, or moving your listening position.
• If the signal source is an LFE or subwoofer
output from a home theater preamplier,
make sure the signal level for the lowfrequency output is turned up in the
preamp. If you have connected the lowfrequency signal to the LEFT (and RIGHT)
INput, make sure the FILTER BYPASSED
switch is pushed in.
Noise/Hum/Buzz
• Check the signal cable between the mixer/
preamp and the subwoofer. Make sure all
connections are secure. These problems
usually produce crackling noises, hum, or buzz.
• If connecting an unbalanced output to the
HRS150 balanced input, make sure the
shield is connected to both pins 1 and 3 on
the XLR.
• If a CATV cable is connected to the system,
try disconnecting it. If the hum goes away,
call your cable carrier to check for proper
grounding of the cable.
• Make sure the signal cable is not routed
near AC cables, power transformers, or
other EMI sources (including wall warts
and line lumps!). These sources usually
produce hum.
• Is there a light dimmer or other triac-based
device on the same AC circuit as the
monitor? Dimmers cause buzzing noises.
Use an AC line filter or plug the subwoofer
into a different AC circuit.
• If possible, listen to the signal source with
headphones plugged in. If it sounds noisy
there, it’s not the subwoofer.
13
Repair
Service for the U.S. versions of the HRS150
is available only from our factory service center
located in sunny Woodinville, Washington. Service outside the United States can be obtained
through local dealers or distributors.
If your HRS150 needs service, follow
these instructions:
1. Review the preceding troubleshooting
suggestions. Please.
2. Call Tech Support at 1-800-258-6883, 7 am
to 5 pm PST, to explain the problem and
request an RA (Return Authorization)
number. Have your subwoofer’s serial
number ready. You must have an RA number
before you can obtain service at the factory.
3. Set aside the power cord, owner’s manual,
or anything else that you’ll ever want to see
again. We are responsible for the return of
the subwoofer only.
4. Pack the subwoofer in its original packing
box. This is very important. When you call
for the RA number, please let Tech Support
know if you need new packaging. Mackie is
not responsible for any damage that occurs
due to non-factory packaging.
5. Include a legible note stating your name,
shipping address (no P.O. boxes), daytime
phone number, RA number, and a detailed
description of the problem, including how
we can duplicate it.
6. Write the RA number in BIG PRINT on top
of the box.
14
7. Ship the subwoofer to us. We suggest
insurance for all forms of cartage. Ship to
this address:
Mackie Designs
SERVICE DEPARTMENT
16220 Wood-Red Road NE
Woodinville, WA 98072
8. We’ll try to fix the subwoofer in three to five
business days. Ask Tech Support for current
turnaround times when you call for your RA
number. The product MUST be packaged in
its original packing box and have the RMA
number appear on the box. Once it is
repaired, we’ll ship it back the same way in
which it was received. This paragraph does
not necessarily apply to non-warranty service.
3
2
3
2
3
2
MACKIE DESIGNS
HRS150 THX
BLOCK DIAGRAM
(#061702JW)
OUT
HPF FROM CROSSOVER AT LEFT AND RIGHT OUTPUTS
SUBWOOFER ACTIVE
REMOTE INDICATOR SWITCH OPEN
FULL-RANGE SIGNAL FROM INPUTS AT LEFT AND RIGHT OUTPUTS
SUBWOOFER MUTED
REMOTE INDICATOR SWITCH CLOSED
OUTPUT IS INACTIVE WHEN NO SIGNAL IS PRESENT AND
BECOMES ACTIVE AFTER SIGNAL RETURNS.
OUTPUT REMAINS ACTIVE FOR SEVERAL MINUTES AFTER
SIGNAL IS REMOVED.
WHEN SIGNAL IS PRESENT THE OUTPUT IS ACTIVE.
IN
INPUT SIGNAL DETECTOR
110Hz
42 dB/OCT ELLIPTICAL
LPF (FOR AC-3/DTS)
FULL RANGE
(THX)
FILTER IN
110Hz
ELLIPTICAL
FILTER
BYPASS
FILTER
SELECT
55Hz-110Hz
OPEN =
CROSSOVER
FREQ
55Hz-110Hz
24 dB/OCT LINKWITZ-RILEY
CENTER POSITION (80Hz) FOR THX
CROSSOVER
FREQ
CLOSED =
"POLARITY" AND "INPUT SENSITIVITY"
ONLY ARE ACTIVE ON THIS INPUT.
NOTE: WHEN USED AS A SLAVE,
THE MASTER OUTPUT OF THE FIRST
SUB DRIVES THIS INPUT.
1
1
1
SUBWOOFER
BYPASS
FOOTSWITCH
SLAVE
INPUT
RIGHT
LINE INPUT
LEFT/MONO
LINE INPUT
POWER
15Hz
18 dB/OCT
BUTTERWORTH
LPF
15Hz
FLAT (THX)
SUBSONIC
FILTER
Av = 10 dB
+10 dB
0 dB (THX)
LFE
GAIN
SUB
BYPASSED
A
B
CTL
A
B
CTL
A
B
CTL
+5V
OUT
OUT
OUT
180º
0º (THX)
POLARITY
POWER SUPPLY TRACKING/
PEAK POWER LIMITER
FAST ATTACK/SLOW RELEASE
COMPRESSOR
INPUT
SENSITIVITY
(CW = THX)
IN
ACE-BASS EQ
OUT
FUSE
POWER
AMPLIFIER
2
1
3
2
1
SUBWOOFER
3
1
THE POTENTIAL ON THESE TERMINALS MUST BE
FLOATING OR REFERENCED TO SAFETY GROUND
MAXIMUM CURRENT ALLOWED THROUGH
CLOSED SWITCH = 1A
MAXIMUM VOLTAGE ALLOWED ACROSS
OPEN CONTACTS = 24V
CLOSED WHEN SUBWOOFER IS MUTED
SENSE
RESISTOR
–15V
–90V
–100V
+100V
+90V
+15V
2
3
SUBWOOFER
BYPASS
REMOTE
INDICATOR
MASTER
OUTPUT
RIGHT
LINE OUTPUT
LEFT/MONO
LINE OUTPUT
TECHNICAL INFORMATION
HRS150 Block Diagram
15
Specifications
Transducers
Acoustic Section
Low-frequency driver
Diameter:
15 in/381 mm
Acoustic Frequency Response:
20 Hz to 150 Hz, ±1.5 dB
Sensitivity:
96 dB SPL (1 W, 1 M)
–3 dB points:
19 Hz, 250 Hz
Maximum SPL:
122 dB @ 1 meter
Residual Noise:
< 8 dBA SPL
Nominal Impedance:
8 ohms
Voice Coil Diameter:
4 in/100 mm
Power Handling (Long Term/Program):
400/1000 watts
Frequency Range:
20 Hz to 500 Hz
Frame:
Die Cast
Magnet:
Ferrite
Power Amplifier Section
Rated Power Output (1% THD at 100 Hz):
950 watts rms into rated 8Ω load
Peak Power Output (100 Hz sine, Per RS-490):
1050 watts
THD (20 Hz to 300 Hz from 1 W to –1 dBr = 750 W):
< 0.05% (typically 0.007%)
Passive Radiators (2)
Rated Load Impedance: 8 Ω
Diameter:
Signal-to-Noise Ratio: 107 dBr (0 dBr = 750 W)
12 in/305 mm mass-loaded
System Specifications
Crossover Type:
Linkwitz-Riley, 24 dB/octave,
variable 55 Hz to 110 Hz
Input Type:
Balanced Differential (XLR),
Unbalanced (RCA)
Input Impedance:
20 kΩ (Bal) , 10 kΩ (UnBal)
Input Sensitivity:
89 dB SPL with a 100 mV (–17.8 dBu)
input signal level (LFE gain set to 0 dB)
Input Protection:
RFI and Level Protected
Maximum Input Level:
+20 dBu
Signal Sense Threshold:
–74 dBu (0.155 mV)
Power Bandwidth (at 750 W):
–0.5 dB at 10 Hz
–3.0 dB at 55 kHz
Damping factor (referenced to 8 Ω):
> 1000
Turn-On delay:
3-4 Seconds
Cooling:
Convection
Line Input Power:
US
Europe
Japan
Korea
Materials:
Subsonic Filter:
15 Hz, 3rd-Order Butterworth HPF
Output Type:
Balanced (XLR), Unbalanced (RCA)
Internal Volume:
Height (w/ feet):
Width:
Depth:
Weight:
Over-Excursion Prevention:
Subsonic Filter
(Flat Position: 2nd-Order HPF,
15 Hz Position: 5th-Order HPF)
Driver Protection:
Power Supply Tracking Peak Limiter
Thermal Protection: Heatsink and Transformer
Temperature, Auto Reset
23.6 in/599 mm
22.0 in/558 mm
60 Hz
50 Hz
50-60 Hz
60 Hz
950 W
950 W
950 W
950 W
Physical Properties
High-Cut Filter (LFE):
110 Hz, 7th-order Elliptical Filter
Output Impedance: 240 Ω (Bal) , 120 Ω (Unbal)
120 VAC
240 VAC
100 VAC
220 VAC
0.75“ MDF construction with black
oak veneer
3.88 cu ft/110 liters
24.0 in/609 mm
23.7 in/601 mm
23.6 in/599 mm
117 lb/53 kg
Operating Temperature Range:
–10°C to 30°C
Mackie Designs is always striving to improve our products
by incorporating new and improved materials, components
and manufacturing methods. Therefore, we reserve the right
to change these specifications at any time without notice.
23.7 in/601 mm
HRS150
WEIGHT
117 lb/
53 kg
24.0 in/
609 mm
22.0 in/
559 mm
HIGH RESOLUTION
16
Graphs
HRS150 Crossover Filter Response
+10
+8
+6
+4
+2
-0
-2
-4
-6
-8
-10
-12
-14
dBr
-16
-18
-20
-22
-24
-26
-28
-30
-32
55Hz
80Hz
110Hz
-34
-36
-38
-40
10
20
50
100
200
500
1k
2k
5k
10k
20k
Hz
HRS150 Elliptical Filter Response
+10
+8
+6
+4
+2
-0
-2
-4
-6
-8
-10
-12
-14
dBr
-16
-18
-20
-22
-24
-26
-28
-30
-32
-34
-36
-38
-40
20
50
100
200
500
1k
2k
5k
10k
20k
Hz
HRS150 Free-Field Frequency Response (THX pm3 setting)
+10
+8
+6
+4
+2
+0
-2
-4
-6
-8
-10
-12
-14
dBr
-16
-18
-20
-22
-24
-26
-28
-30
-32
-34
-36
-38
-40
20
30
40
50
60
70
80
90 100
200
300
400
500
Hz
17
COLOPHON
The text is a compilation based on input
from a number of sources including Cam Jones,
Terry Wetherbee, Marcelo Vercelli, and Keith
Olsen. Dave Franzwa and Jayney Wallick produced this manual using the following tools:
Initially written in Microsoft® Word 98 for
the Macintosh, the text was imported into
Adobe PageMaker® 6.5. Illustrations were produced in Adobe Illustrator® 9.0. Most of the
work was done on two Power Macintosh® G4
computers with Mac OS 9.1 installed. These
machines have PowerPC G4 processors; 384MB
of RAM; a 10GB, and a 28.62GB internal hard
drive, respectively; an internal Matshita DVDROM drive, and an internal Sony CD-RW drive,
respectively; and one internal Iomega Zip™
Drive for backup and transfer of files. A
Hewlett-Packard LaserJet 5000N with a duplex
tray installed (to save trees) was used to print
out laser proofs. PDF files were created with
Acrobat™ Distiller 4.0 and 5.0, respectively. A
wind-driven open window provided muchneeded relief as the production deadline
approached. This entire manual was written
and produced while sitting in a comfy chair,
which was actually more comfy than the one
used while producing the HR824 manual.
The following are trademarks or registered
trademarks of Mackie Designs Inc.: The Mackie
logo, HR Series, and the Running Man.
THX pm3 and Lucasfilm are trademarks of
Lucasfilm Ltd. Used by permission.
This manual also contains names and
marks of other companies which belong to
those respective companies, and are hereby
acknowledged.
©2003 Mackie Designs Inc.
All Rights Reserved.
18
HRS150 LIMITED WARRANTY
Please keep your sales receipt in a safe place.
A. Mackie warrants all materials, workmanship and
proper operation of this product for a period of three
years from the original date of purchase. If any defects are found in the materials or workmanship or if
the product fails to function properly during the applicable warranty period, Mackie, at its option, will
repair or replace the product. This warranty applies
only to equipment sold and delivered within the
U.S. by Mackie or its authorized dealers.
B. Failure to register online or return the product
registration card will not void the 3-year warranty.
C. Service and repairs of Mackie products are to
be performed only at the factory (see D below).
Unauthorized service, repairs, or modification will
void this warranty.
D. To obtain factory service:
1. Call Mackie at 800/258-6883, 8AM to 5PM
Monday through Friday (Pacific Time) to get a
Return Authorization (RA). Products returned
without an RA number will be refused.
2. Pack the product in its original shipping carton. If you do not have the carton, just ask for
one when you get your RA number, and we’ll
send a shipping carton out promptly. More information on packing can be found in the Service
section of this manual. Do not use “packing peanuts,” shredded newspapers, or other material
with small particles, old underwear, or socks.
Please seal the Mackie product in a plastic bag.
3. Also include a note explaining exactly how to
duplicate the problem, a copy of the sales receipt
with price and date showing, and your return
street address (no P.O. boxes or route numbers,
please!). If we cannot duplicate the problem at
the Mackie Factory or establish the starting date
of your Limited Warranty, we may, at our option,
charge for service time.
4. Ship the product in its original shipping carton, freight prepaid to:
Mackie Designs
Service Department
16220 Wood-Red Rd. NE
Woodinville, WA 98072 USA
IMPORTANT: Make sure that the RA number is
plainly written on the shipping carton.
F. Mackie reserves the right to inspect any products
that may be the subject of any warranty claims before repair or replacement is carried out. Mackie and
Mackie Authorized Service Centers may, at their option, require proof of the original date of purchase in
the form of a dated copy of the original dealer’s invoice or sales receipt. Final determination of
warranty coverage lies solely with Mackie Designs
Inc. or its Authorized Service Centers.
G. Any Mackie product deemed eligible for repair or
replacement under the terms of this warranty will be
repaired or replaced within thirty days of receipt by
Mackie. Mackie may use refurbished parts for repair
or replacement of any product. Products returned to
Mackie that do not meet the terms of this Warranty
will be repaired and returned C.O.D. with billing for
labor, materials, return freight, and insurance. Products repaired under warranty at Mackie’s factory will
be returned freight prepaid by Mackie to any location
within the boundaries of the USA.
H. Mackie warrants all repairs performed for 90 days
or for the remainder of the original warranty period.
This warranty does not extend to damage resulting
from improper installation, misuse, neglect or abuse,
or to exterior appearance. This warranty is recognized only if the inspection seals and serial number
on the unit have not been defaced or removed.
I. This warranty is extended to the original purchaser
and to anyone who may subsequently purchase this
product within the applicable warranty period.
J. This is your sole warranty. Mackie does not authorize
any third party, including any dealer or sales representative, to assume any liability on behalf of Mackie
Designs or to make any warranty for Mackie Designs.
K. THE WARRANTY GIVEN ON THIS PAGE IS
THE SOLE WARRANTY GIVEN BY MACKIE AND
IS IN LIEU OF ALL OTHER WARRANTIES,
EXPRESS AND IMPLIED, INCLUDING THE
WARRANTIES OF MERCHANTABILITY AND
FITNESS FOR A PARTICULAR PURPOSE. THE
WARRANTY GIVEN ON THIS PAGE SHALL BE
STRICTLY LIMITED IN DURATION TO ONE
YEAR FROM THE DATE OF ORIGINAL PURCHASE FROM AN AUTHORIZED MACKIE
DEALER. UPON EXPIRATION OF THE APPLICABLE WARRANTY PERIOD, MACKIE SHALL
HAVE NO FURTHER WARRANTY OBLIGATION
OF ANY KIND. MACKIE SHALL NOT BE LIABLE
FOR ANY INCIDENTAL, SPECIAL, OR CONSEQUENTIAL DAMAGES THAT MAY RESULT
FROM ANY DEFECT IN THE MACKIE PRODUCT OR ANY WARRANTY CLAIM. Some states
do not allow exclusion or limitation of incidental,
special, or consequential damages or a limitation
on how long warranties last, so some of the above
limitations and exclusions may not apply to you.
This warranty provides specific legal rights and you
may have other rights which vary from state to state.
19
Mackie Designs Inc.
16220 Wood-Red Road NE • Woodinville, WA 98071 • USA
US and Canada: 800.898.3211
Europe, Asia, Central and South America: 425.487.4333
Middle East and Africa: 31.20.654.4000
Fax: 425.487.4337 • www.mackie.com
E-mail: [email protected]