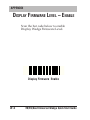
1
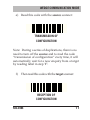
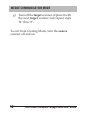
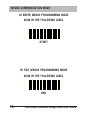
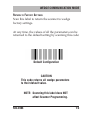
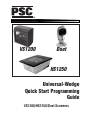
VS1200
Duet
HS1250
Universal-Wedge
Quick Start Programming
Guide
VS1200/HS1250/Duet Scanners
PSC Scanning, Inc.
959 Terry Street
Eugene, Oregon 97402-9120
Telephone: (541) 683-5700
Toll Free: (800) 547-2507
Telefax: (541) 686-1702
PSC and the PSC logo are registered trademarks of PSC INC.
VS1200, HS1250 and Duet are trademarks of PSC INC.
All rights reserved. No part of the contents of this documentation or the
procedures described therein may be reproduced or transmitted in any form
or by any means without the prior written permission of PSC Inc. Owner's
of PSC Inc.'s products are hereby granted a non-exclusive, revocable license
to reproduce and transmit this documentation for the purchaser's own
internal business purposes. Purchaser shall not remove or alter any
proprietary notices, including copyright notices, contained on this documentation and shall ensure all such notices appear on any reproductions of
the documentation.
Disclaimer
Reasonable measures have been taken to ensure that all
information contained in this manual is complete and accurate. However, PSC reserves the right to change any specification at any time without prior notice.
Table of Content
INTRODUCTION ................................................... 1
MANUAL OVERVIEW ............................................................. 2
HOW TO USE THIS MANUAL ........................................... 3
WEDGE PROGRAMING MODE O VERVIEW ................................... 4
SCANNER P ROGRAMMING MODE OVERVIEW ............................... 5
SECTION – 1 KEYBOARD-WEDGE P ROGRAMMING ................. 7
INTRODUCTION .................................................................... 8
COMMUNICATION CABLE ................................................. 8
CLONNING MODE ....................................................... 10
KEYBOARD-WEDGE COMMUNICATIONS MODES .......................... 13
KEYBOARD-WEDGE PROGRAMMING ................................ 13
RS-232 INTERFACE CONFIGURATION .............................. 31
SECTION– 2 SCANNER PROGRAMMING MODE .................... 49
INTRODUCTION .................................................................. 50
PROGRAMMING YOUR SCANNER ............................................ 51
SCANNER P ROGRAMMING MODE ........................................... 52
RETURN TO FACTORY SETTINGS ..................................... 53
PROGRAMMABLE SPEAKER FEATURES .............................. 55
LABEL TRANSMIT FORMAT CONFIGURATION ITEMS .............. 59
SETTING LABEL I.D. ................................................... 60
UPC OPTIONS ........................................................ 63
APPENDIX
DISPLAY FIRMWARE LEVEL .................................................. A2
UNIVERSAL WEDGE ENABLE ................................................. A3
Blank Page
INTRODUCTION
INTRODUCTION
This section provides an overview of programming the scanner with bar code labels in both the
Wedge Mode, and the Scanner Programming Mode,
and provides instruction on how to use this
manual.
SECTION 1 – WEDGE PROGRAMMING
This section provides procedures and bar codes
needed to program interface parameters for the
Wedge Mode.
SECTION 2 – SCANNER PROGRAMMING MODE
This section provides procedures and programming bar codes to change the parameters of your
scanner (speaker volume/tone, UPC-A/UPC-E
Checkdigits, NSD, and Label Identifier Control).
For information on more programmable features
consult PSC'c Advanced Programming Guide,
P/N: R44-2007, available from your PSC dealer or
distributor.
R44-2006
1
INTRODUCTION
MANUAL OVERVIEW
This manual is divided into two sections. Each
section presents one of the two programming
features for your scanner – Wedge Programming, and
Scanner Programming.
Wedge Programming – The Wedge programming
includes:
• Interface selection (Keyboard or RS-232)
• Keyboard emulation selection
• RS-232 Wedge interface parameters setting
• End of Message Characters
• Activation of the Cloning Mode.
Scanner Programming – The programmable
features of the scanner includes:
• Speaker Tone/Volume control
• UPC-A/UPC-E CheckDigit
• NSD and Label Identifier control
The Default Wedge Interface is keyboard communications for PC/AT.
2
VS/HS/Duet Universal-Wedge Quick Start Guide
INTRODUCTION
Additional terminal programming support is
available from your PSC Dealer or Distributor, or
PSC Customer Support.
Additional scanner features such as Symbology
control, Motor/Laser Timeouts, and Label Data
Editing, are available in PSC Advanced Programming
Guide (R44-2007), available from your PSC Dealer or
Distributor.
To program your scanner for the Wedge or Scanner
features, follow the general procedures on the
following pages.
HOW TO USE THIS MANUAL
Each section in this manual presents a brief
description of the programmable feature and the
bar code labels required. Many pages contain two
bar code labels to conserve resources and reduce
the size of the manual.
NOTE
Since the scanner can perform only one programming function
at a time, it is important to expose only the bar code intended
for programming. Cover the other bar code with and opaque
object, or your hand.
R44-2006
3
INTRODUCTION
WEDGE PROGRAMING MODE OVERVIEW
To program your scanner with the Wedge features
go to Section 1 – Wedge Programming, and follow
these procedures:
1. To enable Wedge Programming Mode,
scan the START bar code on page 14.
(The green LED indicator lamp will flash
continuously from BRIGHT to DIM,
indicating the scanner has entered the
Wedge Programming Mode).
2. Scan the desired bar codes labels in the
Wedge programming section of this
guide, pages 16 through 47. (The scanner
will emit a "good read" beep to indicate
each successful bar code read).
3. After all desired programming parameters have been entered using the bar
codes, exit the Wedge Programming
Mode by scanning the END bar code on
page 14. (The scanner LED then transitions to a steady ON light to indicate the
scanner is operational).
4
VS/HS/Duet Universal-Wedge Quick Start Guide
INTRODUCTION
SCANNER PROGRAMMING MODE OVERVIEW
To change the features on your scanner, go to
Section 2 – Scanner Programming and scan the
desired bar codes, using these procedures:
• Enable the Scanner Programming Mode by
scanning the SWITCH bar code on page
52. (The LED indicator lamp will flash
continuously ON and OFF to indicate the
scanner has entered the Scanner Programming Mode).
• Scan the bar code labels on pages 55
through page 70, to enable or disable the
desired features. (The VS and HS scanners
will beep once at each scan to indicate a
"good read", whereas, the Duet will emit
multiple beep tones).).
• Scan the SWITCH bar code on page 52 a
second time to Exit the Scanner Programming Mode. (The scanner will reset, emit
a single power-up beep, and the LED
transitions to a steady ON condition).
R44-2006
5
INTRODUCTION
NOTE
Wedge programming bar code labels
use Code 39 symbology (C39). Factory
configuration has C39 enabled as a
default. If C39 has been disabled in the
scanner configuration, you must reenable C39 in order to program the
wedge interface.
OTHER FEATURES
The wedge interface is able to support multiple
functions such as Editing Mode, which allows the
bar code data to be altered before sending it to the
host terminal. This feature can be set to require
certain conditions be present in the bar code data
(matching characters), and allows the addition of
preambles and/or postambles.
These features are supported in the Advanced
Keyboard Wedge Programming Guide, (R44-2007),
available from your PSC dealer or distributor.
6
VS/HS/Duet Universal-Wedge Quick Start Guide
WEDGE COMMUNICATION MODE
SECTION – 1
WEDGE PROGRAMMING
This section provides instructions to configure your
scanner using Wedge Programming.
R44-2006
7
WEDGE COMMUNICATION MODE
KEYBOARD-WEDGE PROGRAMMING
INTRODUCTION
In Keyboard-Wedge Mode the scanner is connected
between the keyboard and the computer (or terminal). Data is emulated by the scanner as if it was
typed on the keyboard.
COMMUNICATION CABLE
Before Keyboard-Wedge programming can begin, a
special cable must be installed between the scanner
and the computer or Host Terminal. Follow the
procedures, below, to install this cable:
1. Turn off power to your computer or
terminal.
2. Unplug your keyboard cord from your
computer or terminal and plug it into the
female connector of the short branch of
the Y cable. (See Figure 1).
8
VS/HS/Duet Universal-Wedge Quick Start Guide
WEDGE COMMUNICATION MODE
Label with ref. #
Indicates the computer
or terminal side.
Keyboard
input
PC OR
TERMINAL
Keyboard
Long branch
of Y cable
Short branch
of the Y cable
Base Cables:
VS/HS: 8-0203-01
DUET: 8-0455-01
To Scanner
Note: Your cable may differ from illustration
based on your Host Terminal.
Figure 1. Keyboard-Wedge Cable Connections.
3
4
5
6
Plug the long branch, marked "Terminal,"
of the Y cable into the keyboard input of
your computer or terminal.
Plug the 25 pin connector of the Y cable
into the 25 pin connection of the base
scanner cable.
Turn on the computer or the terminal.
Turn on the scanner. A power-up beep or
a sequence of beeps (depending on the
scanner type) will be emitted.
R44-2006
9
WEDGE COMMUNICATION MODE
CLONING MODE
This mode can be very useful when a number of
scanners have to be programmed with the same
parameter values.
It permits a quick duplication of a complete
configuration from an operational scanner
(source) to a scanner which has to be programmed
(target).
INSTALLATION
To install the Cloning Mode feature follow these
procedures:
a) Program and test a scanner on your application to set up a scanner-source then
disconnect it from the application.
b) Connect the cable of the target scanner
with the cable of the source scanner using
cable P/N:6015-0487.
c) Plug a DC power supply adaptor into
each scanner (source and target).
d) Turn on the two scanners.
10
VS/HS/Duet Universal-Wedge Quick Start Guide
WEDGE COMMUNICATION MODE
e) Read this code with the source scanner:
TRANSMISSION OF
CONFIGURATION
Note: During a series of duplications, there is no
need to turn off the source and to read the code
“transmission of configuration” every time, it will
automatically wait for a new enquiry from a target
by reading label in step "f".
f)
Then read this code with the target scanner:
RECEPTION OF
CONFIGURATION
R44-2006
11
WEDGE COMMUNICATION MODE
g) Turn off the target scanner, replace it with
the next target scanner and repeat steps
"b" thru "f".
To exit from Cloning Mode, turn the source
scanner off and on.
12
VS/HS/Duet Universal-Wedge Quick Start Guide
WEDGE COMMUNICATION MODE
WEDGE PROGRAMMING MODE
Wedge Programming Mode is initiated by scanning
the START label on page 14, and terminated using
the END label found on the same page. When in
Wedge Programming Mode, the scanner indicator
lamp will flash from dim to bright. If you make a
mistake while in this mode, scan the END label,
then the DEFAULT label on page 15 and re-attempt
to configure the wedge.
NOTE
Scanning DEFAULT will reset any previous
changes made to wedge configuration.
Additional PC/Terminal I.D.s may be obtained by calling PSC
Customer Support at: 1-800-547-2507
R44-2006
13
WEDGE COMMUNICATION MODE
TO ENTER WEDGE PROGRAMMING MODE
SCAN IN THE FOLLOWING LABEL
START
TO EXIT WEDGE PROGRAMMING MODE
SCAN IN THE FOLLOWING LABEL
END
14
VS/HS/Duet Universal-Wedge Quick Start Guide
WEDGE COMMUNICATION MODE
RETURN TO FACTORY SETTINGS
Scan this label to return the scanner to wedge
factory settings.
At any time, the values of all the parameters can be
returned to the default setting by scanning this code:
Default Configuration
CAUTION
This code returns all wedge parameters
to their default value.
NOTE: Scanning this label does NOT
affect Scanner Programming.
R44-2006
15
WEDGE COMMUNICATION MODE
KEYBOARD-WEDGE
The default communication mode (factory settings)
is PC/AT. Use the codes on these pages (16 to 21) to
activate the Keyboard-Wedge Mode and select the
I.D. corresponding to your computer or terminal.
Keyboard-Wedge Mode Activated
The following is a list of terminal settings to use
when connecting to the most common terminal
types:
PC or Terminal
Keyboard I.D.
PC XT
10
PC AT, PS2
11 (Default)
MAC
25
16
VS/HS/Duet Universal-Wedge Quick Start Guide
WEDGE COMMUNICATION MODE
KEYBOARD-WEDGE
Enter the I.D. corresponding to your computer or
terminal using this bar code numeric pad.
1
2
Note: Expose only the bar code intended for programming. Cover the other bar code with and
opaque object, or your hand.
R44-2006
17
WEDGE COMMUNICATION MODE
KEYBOARD-WEDGE
3
4
Note: Expose only the bar code intended for programming. Cover the other bar code with and
opaque object, or your hand.
18
VS/HS/Duet Universal-Wedge Quick Start Guide
WEDGE COMMUNICATION MODE
KEYBOARD-WEDGE
5
6
Note: Expose only the bar code intended for programming. Cover the other bar code with and
opaque object, or your hand.
R44-2006
19
WEDGE COMMUNICATION MODE
KEYBOARD-WEDGE
7
8
Note: Expose only the bar code intended for programming. Cover the other bar code with and
opaque object, or your hand.
20
VS/HS/Duet Universal-Wedge Quick Start Guide
WEDGE COMMUNICATION MODE
KEYBOARD-WEDGE
9
0
Note: Expose only the bar code intended for programming. Cover the other bar code with and
opaque object, or your hand.
R44-2006
21
WEDGE COMMUNICATION MODE
KEYBOARD-WEDGE
Use the following pages to adjust the parameters
of the keyboard-wedge communication.
END OF MESSAGE CHARACTER
One of the following characters can be systematically emulated by the scanner as the end of
message character:
RETURN
This is a default setting.
Note: Expose only the bar code intended for programming. Cover the other bar code with and
opaque object, or your hand.
22
VS/HS/Duet Universal-Wedge Quick Start Guide
WEDGE COMMUNICATION MODE
KEYBOARD-WEDGE
END OF MESSAGE CHARACTER
ENTER
CR/LF
Note: Expose only the bar code intended for programming. Cover the other bar code with and
opaque object, or your hand.
R44-2006
23
WEDGE COMMUNICATION MODE
KEYBOARD-WEDGE
END OF MESSAGE CHARACTER
FIELD ADVANCE
FIELD EXIT
Note: Expose only the bar code intended for programming. Cover the other bar code with and
opaque object, or your hand.
24
VS/HS/Duet Universal-Wedge Quick Start Guide
WEDGE COMMUNICATION MODE
KEYBOARD-WEDGE
END OF MESSAGE CHARACTER
TAB+
LF
Note: Expose only the bar code intended for programming. Cover the other bar code with and
opaque object, or your hand.
R44-2006
25
WEDGE COMMUNICATION MODE
KEYBOARD-WEDGE
END OF MESSAGE CHARACTER
No Character
26
VS/HS/Duet Universal-Wedge Quick Start Guide
WEDGE COMMUNICATION MODE
KEYBOARD-WEDGE
UPPER/LOWER CASE OPTIONS
UPPER CASE/CAPS –ENABLE
This is a default setting.
LOWER CASE/SMALL– ENABLE
Note: Expose only the bar code intended for programming. Cover the other bar code with and
opaque object, or your hand.
R44-2006
27
WEDGE COMMUNICATION MODE
KEYBOARD-WEDGE
TYPES OF NUMERIC CHARACTERS
This function allows the emulation of the
numeric characters of the NUMERIC PAD or those
located on top of the keyboard.
Use this function if trouble occurs with upper/lower
case keyboard modes.
NUMERICS LOCATED OVER THE
ALPHANUMERIC PAD
This is a default setting.
28
VS/HS/Duet Universal-Wedge Quick Start Guide
WEDGE COMMUNICATION MODE
KEYBOARD-WEDGE
TYPES OF NUMERIC CHARACTERS
NUMERIC PAD
Note: If the option “numeric pad” is
chosen, the numeric pad of the keyboard must be also turned on (or locked)
for correct operation. [NUM LOCK]
R44-2006
29
WEDGE COMMUNICATION MODE
BLANK P AGE
30
VS/HS/Duet Universal-Wedge Quick Start Guide
RS-232 COMMUNICATION MODE
RS-232 INTERFACE
CONFIGURATION
This following pages provides instructions to
configure the wedge for RS-232 Interface communications options.
This interface will connect to a PC or host which
supports an RS-232 port.
R44-2006
31
RS-232 COMMUNICATION MODE
RS-232 INTERFACE CONFIGURATION
The programming bar codes in this section pertain
only to POS terminals with an RS-232 communication interface. In order for the POS terminal and
scanner to communicate, the scanner's configuration
must match the communication settings of the POS
terminal. The scanner's factory default configuration has been preset to 9600, 8, N, 1.
RS-232 Interface communication options are:
• Baud Rate
• Parity
• Data Bits
• Stop Bits
• End of Message Character
•Timeout Between Characters
• ACK/NAK Protocol
• Xon/Xoff Protocol
NOTE: The RS-232 interface must first be selected on page 34 before
you can set the RS-232 options in this section.
32
VS/HS/Duet Universal-Wedge Quick Start Guide
RS-232 COMMUNICATION MODE
RS-232 PROTOCOLS
Xon/Xoff – Software flow control. The Host
System can control the data flow coming
from the scanner. Xon (11hex) – host
ready to receive data, Xoff (13 hex) – host
is busy.
ACK/NAK – Software flow control. The
scanner waits for acknowledgement from
the host. Ack (06 hex) – host received data
correctly. Nak (15 hex) – scanner resends
data when NAK is received.
R44-2006
33
RS-232 COMMUNICATION MODE
RS-232 ACTIVATION
Scan this bar code to activate
(enable) the RS-232 feature.
RS-232 – Enable
34
VS/HS/Duet Universal-Wedge Quick Start Guide
RS-232 COMMUNICATION MODE
RS-232: BAUD RATE = 1200
Use this bar code to set the RS-232
baud rate to 1200.
Baud Rate: 1200
RS-232: BAUD RATE = 2400
Use this bar code to set the RS-232
baud rate to 2400.
Baud Rate: 2400
Note: Expose only the bar code intended for programming. Cover the other bar code with and
opaque object, or your hand.
R44-2006
35
RS-232 COMMUNICATION MODE
RS-232: BAUD RATE = 4800
Use this bar code to set the RS-232
baud rate to 4800.
Baud Rate: 4800
RS-232: BAUD RATE = 9600
Use this bar code to set the RS-232
baud rate to 9600.
Baud Rate: 9600
Note: Expose only the bar code intended for programming. Cover the other bar code with and
opaque object, or your hand.
36
VS/HS/Duet Universal-Wedge Quick Start Guide
RS-232 COMMUNICATION MODE
RS-232: BAUD RATE = 19200
Use this bar code to set the RS-232
baud rate to 19200.
Baud Rate: 19200
RS-232: BAUD RATE = 38400
Use this bar code to set the RS-232
baud rate to 38400.
Baud Rate: 38400
Note: Expose only the bar code intended for programming. Cover the other bar code with and
opaque object, or your hand.
R44-2006
37
RS-232 COMMUNICATION MODE
RS-232: PARITY = ODD
Use this bar code to set parity to
Odd.
Parity: Odd
RS-232: PARITY = MARK
Use this bar code to set parity to
Mark.
Parity: Mark
Note: Expose only the bar code intended for programming. Cover the other bar code with and
opaque object, or your hand.
38
VS/HS/Duet Universal-Wedge Quick Start Guide
RS-232 COMMUNICATION MODE
RS-232: PARITY = SPACE
Use this label to set parity to
Space.
Parity: Space
RS-232: PARITY = EVEN
Use this label to set parity to
Space.
Parity: Even
Note: Expose only the bar code intended for programming. Cover the other bar code with and
opaque object, or your hand.
R44-2006
39
RS-232 COMMUNICATION MODE
RS-232: DATA BITS = 7
Use this bar code to set the RS-232
data format to seven bits.
Data Bits: 7
RS-232: DATA BITS = 8
Use this bar code to set the RS-232
data format to eight data bits.
Data Bits: 8
Note: Expose only the bar code intended for programming. Cover the other bar code with and
opaque object, or your hand.
40
VS/HS/Duet Universal-Wedge Quick Start Guide
RS-232 COMMUNICATION MODE
RS-232: STOP BITS = 1
Use this bar code to set the
number of stop bits to one.
Stop Bits: 1
RS-232: STOP BITS = 2
Use this bar code to set the
number of stop bits to two.
Stop Bits: 2
Note: Expose only the bar code intended for programming. Cover the other bar code with and
opaque object, or your hand.
R44-2006
41
RS-232 COMMUNICATION MODE
RS-232: END OF MESSAGE CHARACTER
Use this bar code to set the End of
Message Character to NONE
NONE
RS-232: END OF MESSAGE CHARACTER
Use this bar code to set the End of
Message Character to SUITE (MINITEL).
SUITE (MINITEL)
Note: Expose only the bar code intended for programming. Cover the other bar code with and
opaque object, or your hand.
42
VS/HS/Duet Universal-Wedge Quick Start Guide
RS-232 COMMUNICATION MODE
RS-232: END OF MESSAGE CHARACTER
Use this bar code to set the End of
Message Character to CR.
CR
RS-232: END OF MESSAGE CHARACTER
Use this bar code to set the End of
Message Character to LF.
LF
Note: Expose only the bar code intended for programming. Cover the other bar code with and
opaque object, or your hand.
R44-2006
43
RS-232 COMMUNICATION MODE
RS-232: END OF MESSAGE CHARACTER
Use this bar code to set the End of
Message Character to HT.
HT
RS-232: END OF MESSAGE CHARACTER
Use this bar code to set the End of
Message Character to EOT.
EOT
Note: Expose only the bar code intended for programming. Cover the other bar code with and
opaque object, or your hand.
44
VS/HS/Duet Universal-Wedge Quick Start Guide
RS-232 COMMUNICATION MODE
RS-232: END OF MESSAGE CHARACTER
Use this bar code to set the End of
Message Character to STX...ETX.
STX...ETX
RS-232: END OF MESSAGE CHARACTER
Use this bar code to set the End of
Message Character to CR/LF.
CR/LF
Note: Expose only the bar code intended for programming. Cover the other bar code with and
opaque object, or your hand.
R44-2006
45
RS-232 COMMUNICATION MODE
RS-232: ACK/NAK PROTOCOL —ENABLE
Scan this bar code to enable the
ACK/NAK feature.
ACK/NAK – Enable
RS-232: ACK/NAK PROTOCOL —DISABLE
Scan this bar code to disable the
ACK/NAK feature.
ACK/NAK – Disable
Note: Expose only the bar code intended for programming. Cover the other bar code with and
opaque object, or your hand.
46
VS/HS/Duet Universal-Wedge Quick Start Guide
RS-232 COMMUNICATION MODE
RS-232: XON/XOFF PROTOCOL — ENABLE
Use this bar code to enable Xon/
Xoff feature.
Xon/Xoff – Enabled
RS-232: XON/XOFF PROTOCOL — DISABLE
Use this bar code to disable Xon/
Xoff feature.
Xon/Xoff – Disable
Note: Expose only the bar code intended for programming. Cover the other bar code with and
opaque object, or your hand.
R44-2006
47
RS-232 COMMUNICATION MODE
BLANK P AGE
48
VS/HS/Duet Universal-Wedge Quick Start Guide
SECTION – 2
SCANNER
PROGRAMMING
MODE
This section provides procedures and bar code labels
to configure the parameters (speaker volume/tone,
UPC-A/UPC-E CheckDigit, NSD and Label Identifier
Control) of your scanner.
R44-2006
49
Indicators
SCANNER PROGRAMMING MODE
Indicators
SCANNER PROGRAMMING MODE
SCANNER PROGRAMMING MODE
INTRODUCTION
The remainder of this programming guide contains
programming bar codes for programming the
parameters of your scanners.
PRE-PROGRAMMING
Before programming your scanner:
1. Turn off power to your computer
or terminal.
2. Unplug your keyboard cord from your
computer or terminal and plug it into
the female connector of the short
branch of the Y cable. (See Figure 1,
page 9).
3 Plug the long branch, marked "Terminal," of the Y cable into the keyboard
input of your computer or terminal.
4 Plug the 25 pin connector of the Y
cable into the 25 pin connection of the
base scanner cable.
50
VS/HS/Duet Universal-Wedge Quick Start Guide
5
6
Turn on the computer or the terminal.
Turn on the scanner or plug scanner
into power supply. A power-up beep
or a sequence of beeps (depending on
the scanner type) will be emitted.
PROGRAMMING YOUR SCANNER
OVERVIEW
To change the parameters of your scanner scan the
desired bar codes using these general procedures:
• Enable the Scanner Programming Mode
by scanning the SWITCH bar code on
page 52. (The LED indicator lamp will
flash continuously ON and OFF to
indicate the scanner has entered the
Scanner Programming Mode).
• Scan the bar code labels on pages 55
through page 70, to enable or disable
the desired features. (The VS/HS
scanners will beep once at each scan to
indicate a "good read." The Duet
scanner will emit a multiple beep tones).
R44-2006
51
Indicators
SCANNER PROGRAMMING MODE
Indicators
SCANNER PROGRAMMING MODE
• When you have finished programming
the desired parameters, scan the
SWITCH bar code (below) a second
time to Exit the Scanner Programming
Mode and enter the operational mode.
(The scanner will reset, emit a single
power-up beep, and the LED transitions
to a steady DIM condition).
QUICK START SCANNER PROGRAMMING MODE
Scan the Switch label below to start the Scanner
Programming Mode.
Switch
52
Label
VS/HS/Duet Universal-Wedge Quick Start Guide
RETURN TO FACTORY SETTINGS
Scan this label to return the scanner to the Factory
setting.
NOTE
Any settings you have selected in a previous programming session will be lost.
Scanning this label does NOT affect Wedge
Programming settings.
6 500000 000009
R44-2006
53
Indicators
SCANNER PROGRAMMING MODE
Indicators
SCANNER PROGRAMMING MODE
ADDITIONAL FEATURES
For information on more programmable features
consult the Advance Programming Guide, PN: R442007, available from your PSC dealer or distributor.
54
VS/HS/Duet Universal-Wedge Quick Start Guide
PROGRAMMABLE SPEAKER FEATURES
The speaker has three programmable features:
• Good Read Tone Length can be
adjusted to one of three different
settings.
• Good read Volume can be set to one
of three levels.
• Speaker Tone (pitch/frequency) can
be programmed to sound at one of
three settings.
SPEAKER VOLUME = LOW
Use this bar code to set the speaker
volume to low.
6 400025 000001
R44-2006
55
Indicators
SCANNER PROGRAMMING MODE
Indicators
SCANNER PROGRAMMING MODE
SPEAKER VOLUME = MEDIUM
Use this bar code to set the speaker
volume to medium.
6 400025 000018
SPEAKER VOLUME = HIGH
Use this bar code to set the speaker
volume to high.
6 400025 000025
Note: Expose only the bar code intended for programming. Cover the other bar code
with and opaque object, or your hand.
56
VS/HS/Duet Universal-Wedge Quick Start Guide
SPEAKER TONE = LOW
Use this bar code to set the speaker
tone to low.
6 400020 000006
SPEAKER TONE = MEDIUM
Use this bar code to set the speaker
tone to medium.
6 400020 000013
Note: Expose only the bar code intended for programming. Cover the other bar code
with and opaque object, or your hand.
R44-2006
57
Indicators
SCANNER PROGRAMMING MODE
Indicators
SCANNER PROGRAMMING MODE
SPEAKER TONE = HIGH
Use this bar code to set the speaker
tone to high.
6 400020 000020
Speaker Tone = High
58
VS/HS/Duet Universal-Wedge Quick Start Guide
LABEL TRANSMIT
FORMAT CONFIGURATION ITEMS
If you need to send information in addition to label
data, the scanner can be configured to transmit
symbology specific identifier characters (Label I.D.).
Label transmit options are:
• Transmit Label I.D. as Prefix
(Preamble)
• Transmit Label I.D. as Suffix
(Postamble)
• Disable Label I.D.
R44-2006
59
Indicators
SCANNER PROGRAMMING MODE
Indicators
SCANNER PROGRAMMING MODE
SETTING LABEL I.D.
Label identifiers consist of one or two ASCII
characters that can precede or follow barcode label
data as it is transmitted to the host. The host uses
these characters as a means of distinguishing
between symbologies.
The established industry standards used are symbology-specific label identifiers, and are listed in
the table below.
UPC-A ..........................
UPC-E ..........................
EAN-8 ...........................
EAN-13 .........................
UPC-A (2 add-on) .......
UPC-A (5 Add-on) .......
UPC-A (8 Add-on) .......
UPC-E (2 add-on) .......
UPC-E (5 Add-on) .......
UPC-E (8 Add-on) .......
EAN-8 (2 add-on) .......
'A'
'E'
'FF'
'F'
'A'
'A'
'A'
'E'
'E'
'E'
'FF'
EAN-8 (5 Add-on) ......... 'FF'
EAN-8 (8 Add-on) .......... 'FF'
EAN-13 (2 add-on) ......... 'F'
EAN-13 (5 Add-on) ......... 'F'
EAN-13 (8 Add-on) .......... 'F'
Code 39 .......................... '*'
Codabar .....................
'%'
Interleaved.2 of 5 ............. 'i'
Code 93 .....................
'&'
Code 128 ......................... '#'
MSI/Plessey .................. '@'
NOTE
Enabling Label I.D's to be transmitted will not allow programming
of the Wedge. You must disable Label I.D. (If previously enabled)
before programming the Wedge Interface.
60
VS/HS/Duet Universal-Wedge Quick Start Guide
TRANSMIT LABEL I.D. AS PREFIX
Scan this bar code to transmit the label
I.D. as a prefix.
6 400517 000014
TRANSMIT LABEL I.D. AS SUFFIX
Scan this bar code to transmit the label
I.D. as a suffix.
6 400517 000021
Note: Expose only the bar code intended for programming. Cover the other bar code
with and opaque object, or your hand.
R44-2006
61
Indicators
SCANNER PROGRAMMING MODE
Indicators
SCANNER PROGRAMMING MODE
TRANSMIT LABEL I.D. — DISABLE
(Don't Send)
Scan this bar code to disable transmission
of the label I.D. (prefix and/or suffix).
6 400517 000007
62
VS/HS/Duet Universal-Wedge Quick Start Guide
UPC OPTIONS
UPC symbology options, Check Digit Transmission, and Number System Digit Transmission,
are contained on the following several pages.
To use options available in this section:
1. Place the scanner in Programming
Mode (see Programming Your Scanner
at the front of this Section).
2. Scan the bar codes in this section to
modify the desired UPC options.
3. After programming all the chosen
features, exit Programming Mode
(reference Programming Your Scanner
at the front of this Section).
R44-2006
63
Indicators
SCANNER PROGRAMMING MODE
Indicators
SCANNER PROGRAMMING MODE
UPC/EAN CHECK DIGIT TRANSMISSION
The following pages contain the programming bar
codes for enabling and disabling the transmission
of UPC and EAN check digits.
•
UPC-A Check Digit Transmission
•
UPC-E Check Digit Transmission
•
EAN-8 Check Digit Transmission
•
EAN-13 Check Digit Transmission
•
UPC-A Number System Digit (NSD)
Transmission
UPC-E Number System Digit (NSD)
Transmission
•
64
VS/HS/Duet Universal-Wedge Quick Start Guide
UPC-A CHECK DIGIT TRANSMISSION — ENABLE
Use this bar code to enable sending
the UPC-A check digit to the host.
6 400183 000011
UPC-A CHECK DIGIT TRANSMISSION — DISABLE
Use this bar code to disable sending
the UPC-A check digit to the host.
6 400183 000004
Note: Expose only the bar code intended for programming. Cover the other bar code
with and opaque object, or your hand.
R44-2006
65
Indicators
SCANNER PROGRAMMING MODE
Indicators
SCANNER PROGRAMMING MODE
UPC-E CHECK DIGIT TRANSMISSION — ENABLE
Use this bar code to enable sending
the UPC-E check digit to the host.
6 400064 000017
UPC-E CHECK DIGIT TRANSMISSION — DISABLE
Use this bar code to disable sending
the UPC-E check digit to the host.
6 400064 000000
Note: Expose only the bar code intended for programming. Cover the other bar code
with and opaque object, or your hand.
66
VS/HS/Duet Universal-Wedge Quick Start Guide
EAN-8 CHECK DIGIT TRANSMISSION — ENABLE
Use this bar code to enable sending
the EAN-8 check digit to the host.
6 400184 000010
EAN-8 CHECK DIGIT TRANSMISSION — DISABLE
Use this bar code to disable sending
the EAN-8 check digit to the host.
6 400184 000003
Note: Expose only the bar code intended for programming. Cover the other bar code
with and opaque object, or your hand.
R44-2006
67
Indicators
SCANNER PROGRAMMING MODE
Indicators
SCANNER PROGRAMMING MODE
EAN-13 CHECK DIGIT TRANSMISSION — ENABLE
Use this bar code to enable sending
the EAN-13 check digit to the host.
6 400185 000019
EAN-13 CHECK DIGIT TRANSMISSION — DISABLE
Use this bar code to disable sending
the EAN-13 check digit to the host.
6 400185 000002
Note: Expose only the bar code intended for programming. Cover the other bar code
with and opaque object, or your hand.
68
VS/HS/Duet Universal-Wedge Quick Start Guide
UPC-A NUMBER SYSTEM DIGIT TRANSMISSION — ENABLE
Use this bar code to enable sending the UPCA Number System Digit (NSD) to the host.
6 400211 000013
UPC-A NUMBER SYSTEM DIGIT TRANSMISSION — DISABLE
Use this bar code to disable sending the UPC-A
Number System Digit (NSD) to the host.
NOTE: Disabling this feature may cause
potential data duplication.
6 400211 000006
R44-2006
69
Indicators
SCANNER PROGRAMMING MODE
Indicators
SCANNER PROGRAMMING MODE
UPC-E NUMBER SYSTEM DIGIT TRANSMISSION — ENABLE
Use this bar code to enable sending the UPC-E
Number System Digit (NSD) to the host.
6 400584 000016
UPC-A NUMBER SYSTEM DIGIT TRANSMISSION — DISABLE
Use this bar code to disable sending the UPC-E
Number System Digit (NSD) to the host.
6 400584 000009
Note: Expose only the bar code intended for programming. Cover the other bar code
with and opaque object, or your hand.
70
VS/HS/Duet Universal-Wedge Quick Start Guide
APPENDIX
APPENDIX
R44-2006
A-1
APPENDIX
DISPLAY FIRMWARE LEVEL – ENABLE
Scan the bar code below to enable
Display Wedge Firmware Level.
Display Firmware Enable
A-2
VS/HS/Duet Universal-Wedge Quick Start Guide
APPENDIX
UNIVERSAL WEDGE – ENABLE
(DUET Only)
Scan the bar code below to enable
Wedge Interface.
Note: This label is only required for
units which have been upgraded to
support the Universal Wedge Interface.
6 400030 000614
Universal Wedge Enable
R44-2006
A-3
APPENDIX
NOTES
A-4
VS/HS/Duet Universal-Wedge Quick Start Guide
Blank Page
Asia Pacific
PSC Hong Kong
Hong Kong
Telephone: [852]-2-584-6210
Telefax: [852]-2-521-0291
Italy
PSC S.r.l.
Vimercate (MI), Italy
Telephone: [39] (0) 39/62903.1
Telefax: [39] (0) 39/6859496
Australia
PSC Asia Pacific Pty Ltd.
North Ryde, Australia
Telephone: [61]0(2)9878 8999
Telefax: [61]0(2)9878 8688
Japan
PSC Japan K.K.
Shinagawa-ku, Tokyo, Japan
Telephone: [81] (0)3 3491 6761
Telefax: [81] (0)3 3491 6656
France
PSC Sarl
LES ULIS Cedex, France
Telephone: [33].01.64.86.71.00
Telefax : [33].01.64 46.72.44
Latin America
PSC S.A., INC.
Miami, Florida, USA
Telephone: (305) 539-0111
Telefax: (305) 539-0206
Germany
PSC GmbH
Darmstadt, Germany
Telephone: [49] (0) 61 51/93 58 0
Telefax: [49] (0) 61 51/93 58 58
United Kingdom
PSC Bar Code Ltd.
Watford, England
Telephone: [44] (0) 1923
809500
Telefax: [44] (0) 1923 809 505
Corporate Headquarters
675 Basket Road
Webster, NY 14580-9787
Telephone: (716) 265-1600
Toll Free: (800) 828-6489
Telefax: (716) 265-6400
www.pscnet.com
PSC Scanning, Inc.
959 Terry Street
Eugene, OR 97402-9150
Telephone: (514) 683-5700
Toll Free: (800) 547-2507
Telefax: (541) 345-7140
PRINTED WITH
SOY INK
Printed on recycled paper
©1999 PSC INC.
R44-2006 (Rev B)
Printed in USA (1/99)