1
47076 Rev3b:x 13/11/2009 10:43 Page 6
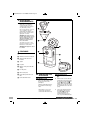
CONTROL PANEL
will vary. Ensure the filter is
sitting properly in the filter
holder and do not fill above the
mesh line.
4
Close the reservoir lid.
5
Slide the jug into the coffee
maker ensuring it sits correctly
on the hot plate fi. The jug lid
must be in place during the
brewing process, otherwise the
non-drip valve ‡ will not open,
causing the filter to flood.
6
Plug the filter coffee maker in at
the wall socket and switch ON.
The LCD display fl will
illuminate to show the coffee
maker is working.
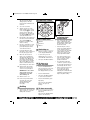
BUTTONS KEY
A
Adjustable
warming plate
temperature
•
This coffee maker gives you the
option of adjusting the Stay
Warm Setting to slightly reduce
the temperature of the coffee
after it has brewed.
•
When brewing the coffee, a
steady orange light will appear
on the ‘warmer’ button. In
order to reduce the Stay Warm
setting, push the ‘warmer’
button once, and the steady
orange light will then blink.
•
This setting should be used
when the carafe is half full or
less, to ensure the coffee
quality is maintained.
•
The Stay Warm setting will
continue to operate as long as
the unit is ON and will shut off
automatically after two hours.
•
When you begin to brew a new
pot of coffee, the steady
orange light will reappear,
indicating the Coffeemaker will
maintain the temperature of the
higher Stay Warm Setting.
ON/OFF
Auto timer
7
8
9
Press the on/off button to start
the brewing process. The red
power light will glow and the
coffee will start to brew.
Hot water will start to flow
through the coffee grounds and
into the glass jug as coffee.
When the coffee has been
made, serve as required. The
anti-drip valve will prevent any
remaining coffee dripping onto
the hot plate. Ensure that the
jug is replaced on the hot plate
after serving. While the coffee
maker is switched ON, the hot
plate will keep the coffee warm.
10 Switch off the coffee maker
Warmer
Switching on
•
When the machine is switched
on, the display will illuminate.
•
To set the time, press the
HOUR button. It is a 24 hour
clock with AM or PM denoted.
•
To brew at a
pre-set time
•
when the jug is empty or the
coffee is no longer required.
WARNING: The coffee maker
and hot plate are hot and
remain hot for some time
after switching off.
•
Press the HOUR button.
•
Then press the MINUTE button
to set the desired start time.
•
Press the AUTO button (green
light glows).
and empty the used coffee
grounds. Wash the filter
immediately and dry
thoroughly.
Note: Press the AUTO button
again to cancel pre-set
brewing.
Refilling
•
Switch off the coffee maker and
allow 3 minutes to cool before
refilling with cold water.
Press the PROGRAM button.
Note: If no buttons are pressed,
the display will revert to the
time display within 10 seconds.
11 Allow the unit to cool.
12 Remove the permanent filter
Then press the MINUTE button.
To brew manually
•
Press the ON/OFF button (red
light glows).
Note: Press the ON/OFF button
again to cancel brewing.
UK Helpline 0844 871 0946
Replacement Parts 0844 873 0712
Ireland Helpline 1800 409 119
4