1
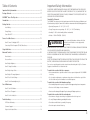
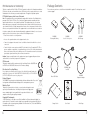
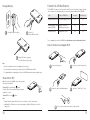
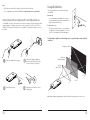
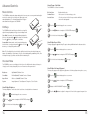
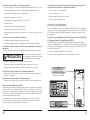
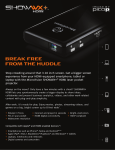
MICROVISION
SHOWWX
™
L A S E R P I CO P R OJ E CTO R
User Guide
Table of Contents
Important Safety Information
Important Safety Information................................................................................... 3
PLEASE READ, UNDERSTAND AND FOLLOW ALL SAFETY INFORMATION IN THIS USER GUIDE
BEFORE YOU USE THIS PROJECTOR. FAILURE TO PROPERLY SET UP, USE, AND CARE FOR THIS
PROJECTOR CAN INCREASE THE RISK OF INJURY, OR DAMAGE TO THE PROJECTOR. KEEP THIS
USER GUIDE FOR FUTURE REFERENCE.
Package Contents..................................................................................................... 7
SHOWWX™ Laser Pico Projector............................................................................... 8
Introduction.............................................................................................................. 9
Getting Started......................................................................................................... 9
Install Battery...........................................................................................................................9
Charge Battery.......................................................................................................................10
Power ON or OFF...................................................................................................................10
Connect to a Video Source...................................................................................... 11
How To Connect To An Apple iPod®. ......................................................................................11
Connecting To Other Composite (TV-Out) Video Sources.......................................................... 12
Usage Guidelines................................................................................................... 13
Advanced Controls................................................................................................. 14
Intended Use Statement
The SHOWWX™ laser pico projector is designed to operate with the Microvision-specified battery and
Microvision battery charger in a normal office and home environment within the following parameters:
» Operating Temperature: 10°- 30° C, ( 50° - 86° F)
» Storage Temperature: non-operating: -20°- 60° C, (-4°- 140° F) with battery
» Humidity: 10 - 85% relative humidity (without condensation)
» Altitude: -152M - 4572M (500 - 15,000 ft.)
Warning
Indicates a potentially hazardous situation, which if not
avoided, may result in death or serious injury and/or
property damage.
AS WITH ANY BRIGHT LIGHT SOURCE, DO NOT STARE INTO THE BEAM. STARING INTO THE BEAM
COULD CAUSE EYE DISCOMFORT AND IMPAIR VISION.
AS WITH ANY PRODUCT CONTAINING LASERS, DO NOT DISASSEMBLE THE PROJECTOR FOR ANY
REASON. DISSASSEMBLING THE PROJECTOR MAY RESULT IN HAZARDOUS LASER RADIATION
EXPOSURE.
Menu Controls........................................................................................................................14
Onscreen Menu......................................................................................................................14
How To Adjust Brightness......................................................................................................14
How To Change Color Mode...................................................................................................15
For service or repair the product must be returned to an authorized repair facility. See Customer
Support section within this User Guide for details.
How To Adjust Aspect Ratio...................................................................................................15
To avoid risks associated with laser exposure:
How To Adjust The Image Alignment.....................................................................................15
How To Reset Default Settings...............................................................................................16
How To Check Remaining Battery Life..................................................................................16
Care & Maintenance
How To Clean The Window.....................................................................................................16
How To Store & Transport......................................................................................................16
How To Use the Audio Jack...................................................................................................16
EXCEPT FOR OPENING THE BATTERY DOOR AS DIRECTED IN THIS USER GUIDE TO REPLACE THE
BATTERY, THERE ARE NO USER SERVICABLE PARTS INSIDE THE PROJECTOR.
» Not recommended for use by children under 14 unless supervised by an adult. The SHOWWX
is not a toy.
» Use of controls or adjustments or performance of procedures other than those specified in
this User Guide may result in hazardous laser radiation exposure
To avoid risks associated with hazardous voltage:
» Do not modify this product in any way. Use only Microvision approved replacement components.
» Do not use the AC adapter in a wet environment.
» No not use with a damaged AC adapter. Replace damaged AC adapter prior to use.
To avoid risks associated with fire and explosion:
» Do not immerse the projector or battery in any liquid or allow either to get wet.
Troubleshooting .................................................................................................... 17
» Use only AC adapter and battery provided by Microvision.
LED Status & Meaning...........................................................................................................18
» Do not disassemble the battery or modify it in any way.
Customer Support..................................................................................................................18
» Do not attempt to short out the battery.
Register Your Product Online.................................................................................................18
3
» Do not expose the battery to temperatures under -20°C or above 60°C.
» Do not crush the battery.
Safety Labels
» Do not overcharge or rapidly discharge the battery.
The SHOWWX™ Laser Pico Projector is a CLASS 2 LASER PRODUCT as defined in IEC 60825-1,
2007-03. Microvision has designed the SHOWWX to be safe for general use as a mobile projector.
» Do not dispose of the battery by incineration or fire.
IEC and CDRH Statements of Compliance
» Do not expose the projector or battery to direct sunlight in a closed space such as a vehicle.
To avoid risks of other injuries:
» Do not handle a damaged or leaking battery pack.
» Do not handle a battery that has been handled in an inappropriate or dangerous manner.
The SHOWWX complies with IEC 60825-1, 2007-03. The device also complies with 21 CFR 1040.10
and 1040.11 except for deviations pursuant to Laser Notice No. 50 dated June 24, 2007.
The following safety labels are affixed at the factory.
These labels contain important safety information. Do not remove them.
To avoid risks associated with driver distraction in a moving vehicle:
CAUTION
CLASS 3B VISIBLE AND INVISIBLE
LASER RADIATION WHEN OPEN
AVOID EXPOSURE TO THE BEAM
» Do not use this projector in a moving vehicle in a manner that may distract the driver.
CAUTION
Indicates a potentially hazardous situation, which if not
avoided, may result in minor or moderate injury and/or
property damage.
Located inside the SHOWWX. Do
not attempt to disassemble
the SHOWWX.
» Do not point the projected image at people, vehicles, or aircraft.
» Risk of explosion if battery is replaced by an incorrect type.
» Dispose of used batteries according to the instructions contained within this guide.
To avoid risks associated with environmental contamination:
» Dispose of all system components in accordance with applicable government regulations.
To avoid risks associated with tripping and falling:
» Position the charging cord and data cables so that they can not be tripped over.
Photosensitive Seizure Warning
A very small percentage of people may experience seizures or blackouts that are triggered by
exposure to light flashes or certain visual images including flashing lights or patterns that may
appear in video games or other video images. Even people who have no history of seizures or
blackouts could experience “photosensitive epileptic seizures” while watching some video images.
Bottom View
Laser Specifications
Immediately stop watching projected video images and consult a physician if you experience symptoms such as lightheadedness, altered vision, eye or face twitching, convulsions, disorientation,
confusion or momentary loss of awareness.
Laser
Color
Red
Blue
Green
Taking the following precautions while watching video may help reduce the risk of
photosensitive epileptic seizures.
Laser
Type
AlGalnP
laser diode
GaN
laser diode
Frequency doubled
IR laser diode
90 mW
50 mW
60 mW
» Avoid use while tired or fatigued.
» Take frequent breaks.
» Look away from the screen from time to time.
» Sit further away from the projected image.
4
Max CW
Output
Divergence
Slow-Axis
7°, FWHM
13°, FWHM
4°, FWHM
15°, FWHM
5°,1/e2
10°,1/e2
Divergence
Fast-axis
16°, FWHM
24°, FWHM
15°, FWHM
25°, FWHM
12°, 1/e2
18°, 1/e2
Wavelength
635 nm
645 nm
440 nm
460 nm
526 nm
537 nm
5
FCC Declaration of Conformity
This device complies with Part 15 of the FCC Rules. Operation is subject to the following two conditions:
(1) this device may not cause harmful interference (2) this device must accept any interference received
including interference that may cause undesired operations. This applies to all product options.
Package Contents
+
-
Please make sure you have received all items included with the product. For missing items contact
customer support.
FCC Radio Frequency Interference Statement
Note: This equipment has been tested and found to comply with the limits for a Class B digital device,
pursuant to Part 15 of the FCC Rules. These limits are designed to provide reasonable protection
against harmful interference in a residential installation. This equipment generates, uses and can
radiate radio frequency energy and, if not installed and used in accordance with the instructions, may
cause harmful interference to radio communications. However, there is no guarantee that interference
will not occur in a particular installation. If this equipment does cause harmful interference to radio or
television reception, which can be determined by turning the equipment off and on, the user is encouraged to try to correct the interference by one or more of the following measures:
» Reorient or relocate the receiving antenna.
» Increase the separation between the equipment and receiver.
+
-
SHOWWX
Rechargable Battery
SHOWWX
Laser Pico Projector
SHOWWX
Wall Charger
» Connect the equipment into an outlet on a circuit different from that to which the receiver is
connected.
» Consult the dealer or an experienced radio/TV technician for help. To comply with FCC RF exposure compliance requirements, a separation distance of at least 20 cm must be maintained
between the antenna of this device and all persons. This transmitter must not be collocated or
operating in conjunction with any other antenna or transmitter.
B
Caution: Changes or modifications to this equipment not expressly approved by manufacturer
could void the user’s authority to operate this equipment.
CE Statement
This product complies with the requirements of the Low Voltage Directive 2006/95/EC and
the EMC Directive 2004/108/EC and carries the CE mark accordingly.
SHOWWX Cable
for iPod®
Directions for Recycling Battery
Recycle battery in accordance with local laws. In the United States and Canada, visit
www.call2recycle.org or call 1-800-8-BATTERY (1-800-822-8837) or 1-877-2-RECYCLE
(1-877-273-2925) for the nearest recycling center.
SHOWWX
Composite Adapter
Micro-USB Cable
Product Disposal
The SHOWWX™ laser pico projector should not be placed in household waste bins. Please check
local regulations for information about the disposal of electronic products in your area.
Made for iPod®
“Made for iPod” means that an electronic accessory has been designed to connect
specifically to iPod and has been certified by the developer to meet Apple performance standards. Apple is not responsible for the operation of this device or its
compliance with safety and regulatory standards.
MICROVISION
SHOWWX
™
L A S E R P I CO P R OJ E CTO R
User Guide
Copyright & Trademarks
© 2009 Microvision, Inc. All rights reserved. iPod, and Made for iPod are trademarks of Apple, Inc.,
registered in the U. S. and other countries. Apple is not responsible for the operation of this device or
its compliance with safety and regulatory standards. The Microvision “swirl”, PicoP and SHOWWX are
trademarks of Microvision, Inc.
6
Storage Pouch
User Guide
Wrist Strap
7
SHOWWX™ Laser Pico Projector
Introduction
MICROVISION
Thank you for purchasing the Microvision SHOWWX™ laser pico
projector. The SHOWWX projects big, bright, and colorful images that
are always in focus, yet is small enough to fit in your pocket. Connect
the SHOWWX to a video output-capable device to spontaneously
share photos and videos, presentations and more, in a big screen
experience.
SHOWWX
™
L A S E R P I CO P R OJ E CTO R
What is the PicoP® Display Engine?
The PicoP display engine is the world’s first ultra miniature laser-based
projector engine. It uses red, green and blue laser light sources, electronics, optics, and a unique, tiny mirror-like device that “paints” the image
line-by-line on the projection surface.
Getting Started
Install Battery
Window
Down/Hot Key 2
1
2
Up/Hot Key 1
1
Remove Battery Door
1
2
Power Button
2
2
Insert Battery
1
Menu/Select Button
LED Indicators
Micro-USB/Power Input
Video Input
Wrist Strap Holder
8
3.5 mm Audio Jack
3
Close Battery Door
» Make sure the projector is OFF and unplugged before replacing battery.
» Do not force the battery in. Make sure the battery + / - symbols are lined up.
9
Connect to a Video Source
Charge Battery
The SHOWWX™ can connect to a variety of devices with TV-out such as an iPod®, a laptop, cell phone,
camera, and more. The following describes the connectivity options available with the SHOWWX.
1
Plug Wall Charger Into Outlet
2
Connect To
Micro-USB/Power Input
Cable
Connect SHOWWX to…
Included
Sold Separately
SHOWWX Cable for iPod
iPod with Component TV-out
Yes
Yes
SHOWWX Composite Video
Adapter (NTSC/PAL)
Any device with a male
RCA Video out connection
Yes
Yes
SHOWWX VGA Dock
Laptop and PC devices
No
Yes
To see compatible devices with the SHOWWX visit http://www.microvision.com/showwx/learn.html
How to Connect to an Apple iPod®
3
Orange LED: Battery charging
Green LED: Battery fully charged
Note:
1
» Allow for a minimum of 4 hours charging before first time use.
2
Power on the projector
» The wall charger will not charge the battery while the SHOWWX is powered ON.
Connect the cable to the projector
Read
y To
» The supplied battery is designed specifically for the SHOWWX and no other battery should be used.
Use
Power ON or OFF
Note: Do not have the SHOWWX connected to any video
device before turning ON.
Turning ON: Press and hold the
button.
3
The blue LED will come on and the image will appear
in about 15 seconds.
Turning OFF: Press the
Note:
Connect the cable to the iPod (already on)
4
Wait to see “Ready To Use” alert
button.
Read
y To
Use
» During startup the image will flash with a series of different colors. This is normal.
» A blinking Blue LED indicates the unit is starting up. A solid Blue LED indicates the unit is
ready for use.
10
5
Select Picture or Video content and Press play on iPod
Read
y To
Read
y To
Use
Use
11
Note:
» While connected to an iPod, the Audio Jack on the iPod can also be used.
» To see compatible devices with the SHOWWX visit http://www.microvision.com/showwx/
Usage Guidelines
There are two main factors to consider when using
the SHOWWX.
Ambient light
Connecting to Other Composite (TV-out) Video Sources
The SHOWWX can connect to other video sources that have Composite (TV-out) using the included
Composite adapter. To display content, make sure the source device has TV-out set to “ON” or
“Enabled”. To learn if your video source device is capable of TV-out and how to enable, refer to its
User Guide.
» It is recommended to shut blinds, close curtains
and turn lights down to make the room dark so the
projected image looks the best.
Distance from screen
» The projector distance from the screen will impact
the appearance of the image brightness. The closer
to the screen the brighter the image will appear.
The following is a guideline of what image sizes are possible under various lighting
conditions:
Complete Darkness
1
Connect the adapter to the projector
2
Connect the Composite adapter to
the yellow video RCA connector that
is connected to your TV-out device
Semi-Dark
Dimmed Lighting
Semi-Lit
Home / Office
70”-100”
<12”
3
4
Power on the projector
Read
y To
24”-36”
Enable video out from source device
and play video
Use
Note: Image diagonal is approximately equal to the distance from the projector to the screen.
12
13
Advanced Controls
How to Change Color Mode
Menu Controls
Brilliant Colors:
Bright and vivid colors.
The SHOWWX was designed as a plug-and-play device, however, some users may want to make adjustments to the settings such as change colors, adjust aspect ratio,
and adjust brightness. The following information will help you
understand how to fully operate the SHOWWX.
Standard Colors:
More accurate flesh tones and grey scales.
Inverted Colors:
All colors are inverted. Useful for presentations with black text on white backgrounds.
The SHOWWX has 3 default color modes.
Hot Keys
The SHOWWX includes two hot keys to allow the user to quickly
adjust the image depending on the type of content being shown.
3
Color Mode: Color mode can be changed without going into the
Menu screen by pressing the button to change the color mode.
Press the button to cycle through the color modes.
Onscreen Menu
The SHOWWX has an onscreen display to allow the user the ability to make advanced changes to
the projector. All settings changed by the user will remain even when powered off.
System:
Image Alignment / Color Alignment / Properties / Reset Defaults
How To Adjust Brightness
The image brightness can be reduced for close distance viewing in darker environments.
2
3
14
Use the
buttons to navigate to COLOR MODE and press
Select the desired setting and press
1
Press the
2
Use the
3
Select the desired setting and press
.
to accept.
button to bring up the on screen menu.
or
buttons to navigate to aspect ratio and press
.
to accept.
How To Adjust the Image Alignment
1
Brilliant (default) / Standard / Inverted / Gamma
Widescreen (default) / Normal / Zoom
Press the
or
The image may appear to be slightly fuzzy. Adjustment of the image alignment may be necessary.
High (default) / Medium / Low
Aspect Ratio:
1
Use the
button to bring up the on screen menu.
The image may appear cropped or skinny. The aspect ratio may be different from the video source device.
Note: The Color Mode hot key also includes the ability to invert the image. Inverting the image may
improve the readability of certain images. Also, if the content background is predominately white, then
inverting the image (e.g., white becomes black) will extend battery life.
Color Mode: Press the
How To Adjust Aspect Ratio
Gamma Mode: Gamma mode can be changed without going
into the Menu screen by pressing on the button. Press the
button to cycle through the gamma modes.
Brightness:
1
2
2
3
4
Press the
Use the
button to bring up the on screen menu.
or
buttons to navigate to SYSTEM and press .
Navigate to IMAGE ALIGNMENT and press
Press the
or
.
buttons to adjust the image until all vertical lines appear sharp and clear.
button to bring up the on screen menu.
or
buttons to navigate to BRIGHTNESS and press
Select the desired setting and press
.
to accept.
15
Troubleshooting
How To Reset Default Settings
To reset all user selectable settings to factory defaults.
1
2
Press the
button to bring up the on screen menu.
Use the
or
buttons to navigate to SYSTEM and press
3
Use the
or
4
Press the
or
.
buttons to navigate to RESET DEFAULTS and press
buttons to select YES and press
.
.
How to Check Remaining Battery Life
Follow these instructions to view how much battery life is remaining.
1
Press the
2
Use the
or
3
Use the
or
buttons to navigate to PROPERTIES and press
4
Use the
or
buttons to navigate to BATTERY INFORMATION and press
Problem
Cause
Solution
The projector does not
turn on.
Battery not inserted
correctly.
Make sure the battery is
correctly inserted.
Battery not charged.
Make sure the battery is fully charged.
The projector colors
look incorrect.
Different Color Mode
may be selected.
Change to preferred Color Mode.
The projector randomly
turns off but the Blue
LED stays on.
The projector may be
out of the recommended operating range.
Make sure the projector is well ventilated and within the operating temperature
range. Turn off for 5 minutes and restart.
Not working with my
iPod.
Incompatible iPod,
Make sure the iPod has TV-out functionality
and is enabled.
button to bring up the on screen menu.
buttons to navigate to SYSTEM and press
.
.
.
Care & Maintenance
How To Clean the Window
Fingerprints and other debris may impact the image quality. Keep the window clean for best image quality.
1
Apply a non-abrasive camera lens cleaner to a soft, dry cloth.
2
Lightly wipe the cleaning cloth over the window until clean.
Note:
» Do not attempt to use solvents or other harsh chemicals as it may damage the window.
» Make sure cleaning cloth is free of dust or debris to avoid scratching the window.
Incorrect video mode.
Make sure the SHOWWX video mode is
correct for the cable being used.
The projector won’t turn
off or on and the Blue
LED stays on.
System is frozen.
Press and hold the Power button for 20
seconds. If this does not work, remove
battery. Then re-insert and turn on.
I can’t connect to my
laptop.
SHOWWX VGA Dock
sold separately.
Purchase the SHOWWX VGA Dock.
The projector doesn’t
work with my cell
phone.
Not all cell phones
have the TV-out
feature.
Refer to your cell phone manufacturer’s
user guide if TV-out is available and how
to configure.
The image looks a little
fuzzy.
Debris on Window,
- OR Image is misaligned.
Clean the Window,
-ORAdjust Image Alignment.
The green LED keeps
blinking while charging.
The battery is not correctly inserted in the
SHOWWX.
Make sure battery is correctly inserted
into the SHOWWX.
The red LED is blinking.
Out of operating range.
Temporary problem.
Turn projector off. Remove battery.
Re-insert and power on.
Battery doesn’t charge.
Battery may not be
capable of holding a
charge.
Install new battery.
The red LED is constantly
on even after trying to
restart.
System failure.
Contact Customer Support.
How to Store & Transport
Proper care should be taken to safely store and transport the projector. To store and transport the
SHOWWX use the included storage pouch. Use care and do not drop the SHOWWX or spill liquids on it.
How to Use the Audio Jack
- OR –
The audio jack on the SHOWWX works only when the Audio signal is is combined with the Video signal.
The Audio Jack is for output only.
16
17
INFORMACIÓN IMPORTANTE DE SEGURIDAD
LED Status & Meaning
LEA, ENTIENDA Y SIGA TODA LA INFORMACIÓN DE SEGURIDAD CONTENIDA EN ESTA GUÍA DEL
USUARIO ANTES DE USAR ESTE PROYECTOR. NO CONFIGURAR, USAR Y CUIDAR EN FORMA
ADECUADA ESTE PROYECTOR PUEDE INCREMENTAR EL RIESGO DE PRODUCIR DAÑOS O DETERIOROS EN EL PROYECTOR. CONSERVE ESTA GUÍA DEL USUARIO PARA REFERENCIA FUTURA.
LED Status
Meaning
Solid Blue
SHOWWX is powered on
Blinking Blue
SHOWWX is powering up
Solid Orange
Battery is charging
Solid Green
Battery is fully charged
Blinking Orange
Battery is low
Blinking Red
Temporary problem
» Temperatura de funcionamiento: 10 °C a 30 °C,
(50 °F a 86 °F)
Solid Red
System failure
»Temperatura de almacenamiento: sin funcionamiento:
-20 °C a 60 °C, (-4 °F a 140 °F) con batería
Declaración de uso previsto
El proyector SHOWWX™ Laser Pico ha sido diseñado para operar con la batería Microvision especificada y el cargador de baterías Microvision, en el entorno propio de la casa o la oficina dentro de
los siguientes parámetros:
»Humedad: 10% a 85% de humedad relativa (sin condensación)
Customer Support
For Technical Questions, service and support please visit us online at
http://www.microvision.com/showwx/support/
Please have your Serial Number and purchase information available. You can find the Serial
Number located under the battery.
Register your Product Online
Registering your new Microvision product online is quick and easy. Your registration will allow us to
serve you better over the lifetime of your product. Being a registered owner also keeps you informed of
important product notifications and helps us continue to design products that meet your needs. Please
plan to have the Product Serial Number.
www.microvision.com/showwx/register
» Altitud: 152 a 4572 m (500 a 15,000 pies)
Advertencia
Indica una situación de peligro potencial, que
de no ser evitada, puede ocasionar la muerte o
graves daños o deterioros a la propiedad.
COMO CON CUALQUIER FUENTE DE LUZ BRILLANTE, NO VEA FIJAMENTE EL RAYO. VER FIJAMENTE EL RAYO PUEDE CAUSAR MOLESTIAS EN LOS OJOS Y VISIÓN DEFECTUOSA.
COMO CON CUALQUIER PRODUCTO QUE CONTENGA LÁSERES, NO DESENSAMBLE POR NINGUNA RAZÓN EL PROYECTOR. DESENSAMBLAR EL PROYECTOR PUEDE OCASIONAR QUE SE
EXPONGA A LA PELIGROSA RADIACIÓN LÁSER.
CON LA EXCEPCIÓN DE LA APERTURA DE LA PUERTA DE LA BATERÍA, COMO SE INDICA EN LA
GUÍA DEL USUARIO, PARA REEMPLAZARLA, NO HAY PIEZAS QUE EL USUARIO PUEDA REPARAR
ADENTRO DEL PROYECTOR.
Para reparar o darle mantenimiento, el producto debe enviarse a un establecimiento autorizado
de reparación y mantenimiento. Consulte la sección de Servicio al Cliente de esta Guía del usuario
para obtener más información.
Para evitar los riesgos asociados con la exposición al láser:
» No se recomienda el uso del producto por niños menores de 14 años, a menos que estén
supervisados por un adulto. El SHOWWX no es un juguete.
» El empleo de controles, ajustes o procedimientos que no estén especificados en esta Guía del
Usuario puede producir exposición a la peligrosa radiación láser.
Para evitar los riesgos asociados con voltaje peligroso:
» No modifique este producto de ningún modo. Use sólo piezas de reemplazo aprobadas por
Microvision.
» No use el adaptador de corriente alterna en un ambiente húmedo.
» No use un adaptador de corriente alterna dañado. Reemplace el adaptador de corriente
alterna dañado antes de usarlo.
18
19
Para evitar riesgos asociados con incendios y explosiones:
» No sumerja el proyector o la batería en ningún líquido ni permita que alguno de ellos se moje.
Tomar las siguientes precauciones al observar vídeos puede ayudar a reducir el
riesgo de presentar convulsiones epilépticas fotosensitivas.
» Use sólo el adaptador de corriente alterna y la batería proporcionados por Microvision.
» No lo use cuando esté cansado o fatigado.
» No desensamble ni modifique la batería de ningún modo.
» Tome descansos frecuentes.
» No intente poner la batería en cortocircuito.
» Aparte la mirada de la pantalla de vez en cuando.
» No exponga la batería a temperaturas bajo -20 °C o sobre 60 °C.
» Siéntese lejos de la imagen proyectada.
» No aplaste la batería.
» No sobrecargue ni descargue rápidamente la batería.
» No elimine la batería a través de incineración o fuego.
» No exponga el proyector ni la batería a la luz solar directa en una espacio cerrado, como en un
vehículo.
Para evitar los riesgos asociados con otros daños:
» No manipule una batería dañada o que presenta una filtración.
» No manipule una batería que ha sido manipulada de una manera inadecuada o peligrosa.
Para evitar los riesgos asociados con la distracción del conductor en un vehículo en
movimiento:
» No use este proyector en un vehículo en movimiento de forma que pueda distraer al conductor.
PRECAUCIÓN
Indica una situación de peligro potencial, que de
no ser evitada, puede ocasionar lesiones de poca
o mediana gravedad o daños a la propiedad.
ETIQUETAS DE SEGURIDAD
El proyector SHOWWX™ Laser Pico es un PRODUCTO LÁSER DE CLASE 2, de acuerdo a la definición contenida en la norma 60825-1 (marzo de 2007) de la Comisión Electrotécnica Internacional
(IEC). Microvision ha diseñado el SHOWWX de modo que sea seguro para el uso general de un
proyector portátil.
Declaraciones de conformidad con la Comisión Electrotécnica Internacional (IEC) y
el Centro para Dispositivos y Salud Radiológica (CDRH)
El SHOWWX cumple con la norma 60825-1 (marzo de 2007) de la IEC. El dispositivo también
cumple con las disposiciones de las secciones 1040.10 y 1040.11 del Título 21 del Código de Reglamentos Federales (CFR), excepto por las desviaciones sujetas a la Notificación para Láser N° 50
fechada el 24 de junio de 2007.
Las siguientes etiquetas de seguridad se colocan en la fábrica.
Estas etiquetas contienen importante información de seguridad. No las remueva.
» No apunte la imagen proyectada sobre personas, vehículos o aviones.
» Existe riesgo de explosión al reemplazar la batería por un tipo de batería incorrecto.
» Elimine las baterías usadas según las instrucciones contenidas dentro de esta guía.
Para evitar los riesgos asociados con la contaminación ambiental:
» Elimine todos los componentes del sistema de conformidad con la reglamentación gubernamental que corresponda.
CAUTION
CLASS 3B VISIBLE AND INVISIBLE
LASER RADIATION WHEN OPEN
AVOID EXPOSURE TO THE BEAM
Localizada dentro del SHOWWX.
No intente abrir el SHOWWX.
Para evitar los riesgos asociados con caídas y tropezones:
» Coloque el cable de carga y los cables de datos de modo que no se pueda tropezar con ellos.
Advertencia sobre epilepsia fotosensitiva:
Un porcentaje muy pequeño de personas puede sufrir convulsiones o desmayos desencadenados
por destellos de luz o ciertas imágenes visuales, incluidas las luces o patrones centelleantes que
pueden aparecer en juegos de vídeo u otras imágenes de vídeo. Incluso las personas que no tienen
antecedentes de convulsiones ni desmayos pueden sufrir “convulsiones epilépticas fotosensitivas”
mientras miran algunas imágenes de vídeo.
De inmediato deje de observar las imágenes de vídeo proyectadas y consulte a un médico si
presenta síntomas, como mareos, visión alterada, espasmos faciales u oculares, convulsiones,
desorientación, confusión o pérdida temporal del conocimiento.
20
21
ESPECIFICACIONES DEL LÁSER
Color de láser
Rojo
Tipo de láser
Diodo láser de AlGalnP
Salida máx. de
onda continua
(CW)
Este transmisor no debe colocarse u operarse en conjunto con cualquier otra antena o transmisor.
Azul
Diodo láser de GaN
90 mW
PRECAUCIÓN: Los cambios o modificaciones realizados a este equipo que no hayan sido expresamente aprobados por el fabricante pueden anular la autoridad del usuario para operar este equipo.
Verde
Diodo láser IR de doble
frecuencia
50 mW
60 mW
Este producto cumple con los requisitos de la Directiva 2006/95/EC sobre bajo voltaje
y la Directiva 2004/108/EC sobre compatibilidad electromagnética, y por consiguiente
lleva la marca CE.
Instrucciones para reciclar la batería
Divergencia en
el eje lento
7°, FWHM
13°, FWHM
4°, FWHM
15°, FWHM
5°,1/e2
10°,1/e2
Divergencia en
el eje rápido
16°, FWHM
24°, FWHM
15°, WHM
25°, FWHM
12°, 1/e2
18°, 1/e2
635 nm
645 nm
Longitud de
onda
Declaración de conformidad con la marca CE (Conformidad Europea)
440 nm
460 nm
526 nm
537 nm
Declaración de conformidad con la Co-misión Federal de
Comunicaciones (FCC)
Este dispositivo cumple con la Parte 15 de las normas de la Comisión Federal de Comunicaciones.
La operación está sujeta a las dos condiciones siguientes: (1) este dispositivo no puede causar
interferencia perjudicial; (2) este dispositivo debe aceptar cualquier interferencia recibida, incluida
la interferencia que pueda causar operaciones no deseadas. Esto afecta a todas las opciones de
productos.
Declaración de interferencia de radiofrecuencia de la Comisión Federal de Comunicaciones (FCC)
Recicle la batería de conformidad con las leyes locales. En los Estados Unidos y en
Canadá, visite www.call2recycle.org o llame al 1-800-8-BATTERY (1-800-822-8837) o al
1-877-2-RECYCLE (1-877-273-2925) para conocer el centro de reciclaje más cercano.
Eliminación del producto
El proyector SHOWWX™ Laser Pico no debe colocarse en los contenedores de basura
domésticos.
Examine la reglamentación local para obtener información acerca de la eliminación de
productos electrónicos en su área.
Fabricado para iPod® (Made for iPod®)
“Fabricado para iPod” significa que un accesorio electrónico ha sido diseñado
para conectarse específicamente a un iPod y que ha sido certificado por el
desarrollador para cumplir con los estándares de desempeño de Apple. Apple no
es responsable de la operación de este dispositivo o de su cumplimiento con los
estándares reglamentarios y de seguridad.
Derechos de autor y marcas registradas
© 2009 Microvision Incorporated. Todos los derechos reservados. El “remolino” de Microvision,
SHOWWX™ y PicoP® son marcas registradas de Microvision Inc. Todas las otras marcas
registradas son de propiedad de sus respectivos dueños.
Nota: Este equipo ha sido probado y se ha encontrado que cumple con los límites para un dispositivo digital de Clase B, de conformidad con la Parte 15 de las Normas de la Comisión Federal
de Comunicaciones (FCC). Estos límites han sido diseñados para proporcionar una protección
razonable contra la interferencia perjudicial en una instalación residencial. Este equipo genera,
usa y puede irradiar energía de radiofrecuencia y, si no se instala y se usa de acuerdo con las
instrucciones, puede causar interferencia perjudicial a las comunicaciones de radio. Sin embargo,
no se garantiza que no habrá interferencia en una instalación particular. Si este equipo causara
interferencia perjudicial a la recepción de la radio o la televisión, lo cual puede ser determinado al
apagar y encender el equipo, se recomienda al usuario intentar corregir la interferencia con uno o
más de las siguientes medidas:
» Reorientar o relocalizar la antena receptora.
» Aumentar la separación entre el equipo y el receptor.
» Conectar el equipo a un tomacorriente ubicado en un circuito diferente al circuito donde el
receptor está conectado.
» Solicitar ayuda al distribuidor o a un técnico en radio o televisión con experiencia. Para
cumplir con los requisitos de cumplimiento referentes a la exposición a radiofrecuencia de la
Comisión Federal de Comunicaciones (FCC), debe mantenerse una distancia de separación de
al menos 20 cm entre la antena de este dispositivo y todas las personas.
22
23
6222 185th Avenue NE
Redmond, WA 98052 USA
www.microvision.com
DA0125977-001 Rev. A (US)