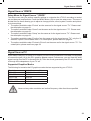
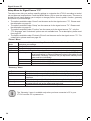
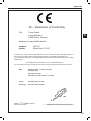
1
hb-cover_lcd-tv_2310_lb6_1002.qxd:Layout 1 23.02.2010 10:12 Uhr Seite 1 HOME TECH LCD TV GB IE service information Mat-No: 1523480 CY User manual and TARGA GmbH Lange Wende 41 D-59494 Soest www.silvercrest.cc 6 LT 2310 hb-cover_lcd-tv_2310_lb6_1002.qxd:Layout 1 23.02.2010 10:12 Uhr Seite 1 HOME TECH LCD TV GB IE service information Mat-No: 1523480 CY User manual and TARGA GmbH Lange Wende 41 D-59494 Soest www.silvercrest.cc 6 LT 2310 hb-cover_lcd-tv_2310_lb6_1002.qxd:Layout 1 23.02.2010 10:12 Uhr Seite 4 Table of Contents Important Safety Instructions..................................................................................3 Introduction...............................................................................................................6 Package Contents....................................................................................................6 Ta- Getting Started..........................................................................................................7 ble Connecting the Power Cord...................................................................................................... 7 Inserting the Batteries into the Remote Control..................................................................... 7 of Connectors and Controls........................................................................................8 EN Front View................................................................................................................................... 8 Rear Panel................................................................................................................................... 8 Right Panel............................................................................................................................... 11 Connecting the Devices.........................................................................................12 Connecting the Antenna.......................................................................................................... 12 Connecting External Equipment with SCART (Euro AV) connector................................... 13 Connecting External Equipment with AV Output.................................................................. 13 Connecting External Equipment with Components Outputs............................................... 14 Connecting External Equipment with S-Video Output......................................................... 14 Connecting External Equipment with HDMI Interface.......................................................... 15 Connecting a PC...................................................................................................................... 15 Remote control......................................................................................................................... 16 Powering the TV Set On/Off.................................................................................................... 18 Powering On.......................................................................................................................... 18 Powering Off.......................................................................................................................... 18 Getting Started......................................................................................................................... 19 Automatic Channel Search.................................................................................................... 19 Selecting the Signal Source.................................................................................................... 19 Signal Source “TV”................................................................................................20 Setup Menu for Signal Source „TV“....................................................................................... 20 Navigating the Setup Menu.................................................................................................... 20 “Picture” Menu......................................................................................................................... 21 “Sound” Menu.......................................................................................................................... 22 “Setup” Menu........................................................................................................................... 23 “Function” Menu...................................................................................................................... 24 “Channel” Menu....................................................................................................................... 26 “Picture-in-Picture” Menu (PIP).............................................................................................. 28 Channel List............................................................................................................29 Managing Channels................................................................................................30 Signal Source SCART1 .........................................................................................32 Setup Menu for Signal Source “SCART1”............................................................................. 32 Signal Source SCART2..........................................................................................32 Setup Menu for Signal Source “SCART2”............................................................................. 32 Signal Source YPBPR............................................................................................33 Setup Menu for Signal Source “YPBPR”............................................................................... 33 1 Table of Contents Signal Source PC...................................................................................................33 Supported Graphics Modes.................................................................................................... 33 Setup Menu for Signal Source “PC”...................................................................................... 34 “Picture” Menu....................................................................................................................... 34 “Geometry” Menu................................................................................................................... 34 Signal Sources HDMI1 / HDMI2.............................................................................35 Setup Menu for Signal Sources “HDMI1” or “HDMI2”.......................................................... 35 Signal Source AV....................................................................................................35 Setup Menu for Signal Source “AV”....................................................................................... 35 Signal Source SVideo............................................................................................36 Setup Menu for Signal Source “SVIDEO”.............................................................................. 36 Remote Control Function Buttons........................................................................37 Picture and Audio Settings..................................................................................................... 37 Selecting the Audio Channel................................................................................................... 37 Sleep Timer............................................................................................................................... 37 Recalling the Last Watched Channel..................................................................................... 37 Displaying Information about the Current Signal Source.................................................... 37 Advanced Functions..............................................................................................38 Teletext...................................................................................................................................... 38 Picture Settings........................................................................................................................ 38 Audio Settings.......................................................................................................................... 38 Displaying Information............................................................................................................ 38 Troubleshooting.....................................................................................................39 General Problems.................................................................................................................... 39 Unable to power the TV set on.............................................................................................. 39 The remote control doesn’t work............................................................................................ 39 No picture............................................................................................................................... 39 TV Reception Problems........................................................................................................... 39 No picture............................................................................................................................... 39 Bad picture quality................................................................................................................. 39 No sound................................................................................................................................ 39 No colour................................................................................................................................ 39 Problems During Playback from External Devices............................................................... 40 No sound................................................................................................................................ 40 Sound is distorted or humming.............................................................................................. 40 Wall-Mounting.........................................................................................................41 Technical Specifications........................................................................................42 Warranty Information.............................................................................................43 Appendix.................................................................................................................45 Pixel Error Classes.................................................................................................................. 45 2 Important Safety Instructions Important Safety Instructions Before you use this device for the first time, please read the following notes in this manual and heed all warnings, even if you are familiar with handling electronic devices. Keep this manual safe for future reference. Keep it near the product. If you sell the device or pass it on, it is essential you hand over this manual also. EN This icon denotes important information for the safe operation of the product and for the user’s safety. This symbol denotes further information on the topic. Warning: Notice on Mains Separation The main power switch does not fully disconnect the device from the mains. Furthermore, the device consumes electricity in the Standby mode. In order to completely disconnect the device from the mains, the power plug must be pulled out from the wall outlet. For this reason, the device should be positioned in such a way that assures unobstructed access to the wall outlet so that the power plug can be immediately pulled out in an emergency situation. To avoid the danger of fire if the device is not going to be used for a long while (e.g. during holidays), it should always be disconnected from the power socket. Before stormy weather when there is the danger of lightning, disconnect the device from the power supply and pull out the antenna plug. Warning: Batteries Insert the batteries with the correct polarity. Never try to recharge the batteries and under no circumstances throw them into fire. Do not mix batteries (old and new or carbon and alkaline, etc.). Remove batteries when the device is not to be used for a long time. Non-intended use may cause explosion and danger to life. Respect the environment. Old batteries do not belong in with domestic waste. They must be handed in to a collection point for old batteries. Warning: Cables Always hold cables by the plug and never pull on the cable itself. Never place the device, heavy objects or furniture on the cable and take care that the cord does not become trapped, especially at the plug and socket. Never make knots in the cable and do not tie it together with other cords. All cables should be positioned so that nobody can trip over them or be obstructed by them. Never use adapter plugs or extension cables that do not comply with the current safety regulations in your country, and do not modify any of the cables yourself. Danger: Children and Persons with Disabilities Electrical appliances do not belong in the hands of children. People with disabilities should only use electrical devices in appropriate circumstances. Do not allow children or persons with disabilities to use electrical devices when not under supervision. These may not comprehend the presence of potential risks. Batteries and small parts represent potential choking hazards. Keep the batteries in a safe place. If a battery is swallowed, seek medical help immediately. Keep the packaging away from children and persons with disabilities too as there is danger of suffocation. 3 Important Safety Instructions Important: Repairs Danger: Never open the housing of the device. By opening the housing you endanger your life through risk of electric shock. Repairs are required when this device has been damaged in any way, for example, when the device housing is damaged, when liquid has been spilled on the product, when objects have fallen into the product, when the product has been exposed to rain or moisture, when the product does not work normally or if the product has been dropped. If you notice any smoke, unusual noise or strange smells, switch off the device immediately and disconnect the corresponding cable from power supply. In these cases the device should not be used further and should be inspected by authorized service personnel. Please contact qualified personnel when servicing is needed. Only use a clean, dry cloth for cleaning. Never use any corrosive liquids. Do not attempt to open the housing of the device otherwise you will void your warranty. Be careful when the display is broken. The broken pieces are sharp and you may injure yourself. When removing the broken pieces, always wear gloves. Dispose of the broken display according to the local environmental regulations. If any liquids escape from the broken display, wipe it carefully with a dry cloth. Also wear protective gloves when performing this task. Warning: Risk of Hearing Damage When using headphones at extremely high volume levels, permanent damage to the ears may occur. Important: Operating Environment Position the device on a stable, even surface and do not place any objects on the device. The device is not for use in environments with high temperatures or humidity (e.g. bathrooms), and must be kept free of dust. Operating temperature and operating humidity: 5 ºC to 35ºC, max. 85 % RH. Always make sure that: • there is free circulation of air (do not place the device on shelves, on a thick carpet, on a bed, or anywhere that obstructs the ventilation slots, and leave at least 10 cm clearance on all sides); • no direct heat sources (e.g. heating) can affect the device; • no direct sunlight or bright artificial light reaches the device; • contact with sprayed and dripping water and abrasive liquids must be avoided and the device should never be operated near water. It must especially never be immersed (do not place any recipients containing liquids such as beverages, vases, etc. onto or next to the device); • the device is never placed in the immediate vicinity of magnetic fields (e.g. loudspeakers); • no fire sources (e.g. burning candles) are placed on or near the device; • no foreign bodies are introduced into the device; • the device is not subject to any great temperature changes as this may cause moisture through condensation and short-circuit; • the device should not be subject to excessive shocks and vibrations. Important: Intended Use This is a consumer electronics device. It has been designed for receiving TV programmes. It may only be used for private use, not industrial or commercial purposes. In its default configuration, this product has not been designed for medical, lifesaving, rescue or life-maintaining purposes. Furthermore, the device may not be used in tropical climates. Only connection cables and external devices may be used that comply with safety standards and the electromagnetic compatibility and shielding quality of this device. This device fulfils all that relates to CE Conformity, relevant norms and standards. Any modifications to the equipment other than recommended changes by the manufacturer 4 Important Safety Instructions may result in these directives no longer being met. The manufacturer is not liable for any damage or interference caused by unauthorized modifications. Only use the accessories recommended by the manufacturer. Do not use this device for purposes other than those indicated and do not modify it in any way. Any use other than that mentioned above does not correspond to the intended use. If you are not using the device within the Republic of Germany, you must observe the regulations and laws in the country of use. Important: Disposal EN Waste Electric and Electronic Equipment The icon of a crossed-out waste bin means that this product is subject to the European Guideline 2002/96/EC. All electric and electronic devices must be disposed of separately from household waste at established bodies. With the proper disposal of old devices you avoid damage to the environment and your personal health. For further information about proper disposal, contact your local government, disposal bodies or the shop where you bought the device. Packaging Material Recycle the packaging material properly also. Cardboard packaging can be taken to paper recycling containers or public collection points for recycling. Any films or plastic contained in the packaging should be taken to your public collection points. Batteries Old batteries do not belong in with domestic waste. They must be handed in to a collection point for old batteries. Important: Storing When Not Using the Product When left unused for a long period of time, unplug the power cord from the mains and remove the batteries from the remote control. Also make sure that the storage temperature is maintained between 5 °C and 40 °C. The humidity must not exceed 90% relative humidity. Important: Transport and Packaging If you have to transport the product some day, use the original packaging for safe shipment. This will protect it sufficiently. Conformity This device fully complies with the basic and other relevant requirements of the EMC Directive 2004/108/EC and the Low-Voltage Directive 2006/95/EC. The signed Declaration of Conformity can also be found at the end of this User’s Manual. Furthermore it fulfills all requirements regarding ecological design criteria according to the Commission Regulation 2009/125/EC. Copyright The entire content of this User’s Manual is copyrighted and is provided to the reader for information purposes only. Copying data and information without the prior written and explicit authorization from the author is strictly forbidden. This also applies to any commercial use of the contents and information. 5 Introduction Introduction Thank you for choosing this high-end TV set LT 2310. This elegant product with a black piano-gloss finish is like a modern piece of furniture suitable for any living room and offers crystal-clear TV contents playback in wide-screen format. Its built-in speakers boost powerful stereo sound, and if you are a PC user you can even use it as PC monitor. Package Contents First check that the package contents are complete. Power cord SilverCrest LT 2310 Remote control 6 2 batteries type AAA, 1.5 V User‘s Manual Getting Started Getting Started Connecting the Power Cord 1. Connect one end of the AC power cord to the AC inlet (6) on the back panel (see page 8). 2. Connect the other end to a wall outlet. 3. Toggle the main power switch (5) on the back panel of the device to On (position “I”). Inserting the Batteries into the Remote Control EN Turn the remote control over with its underside facing upwards and slide the battery compartment cover downwards with your thumb. Insert the supplied batteries (size AAA) into the remote control. Be sure to respect the polarity. The polarity is indicated with the symbols + and – on the batteries and in the battery compartment on the remote control. Remove the batteries from the remote control when you are not going to use the device for a long period of time. Otherwise the remote control may become damaged by leaking batteries. 7 Connectors and Controls Connectors and Controls Front View (1) Status indicator (2) Infrared sensor for remote control (3) Speaker (4) Stand The status indicator (1) lights green when the TV set is powered on. It turns orange when you switch the device to standby mode. Rear Panel On the back there is an interface connectors panel offering multiple ports for the TV antenna and different external AV equipment. 8 Connectors and Controls The following table lists the available terminals: (5) (6) (7) (8) (9) (10) (11) (12) (13) (14) (15) (16) Description Main power switch (On/Off) Use this swivel-type switch to completely power off your TV set so that it fully stops consuming any energy at all. The power indicator (1) on the front panel stops lighting after you power it off. AC IN terminal To connect the power cord. USB port You may not connect any external USB devices to this port. It is reserved for servicing purposes only. PC Audio input If you want to use your TV set as a PC monitor and the PC is connected to the input jack (19), you can input the PC audio signal here. Then the sound generated by the PC can be listened to through the loudspeakers of your TV set. Component Video input (Y, Pb/Cb, Pr/Cr) Here you can connect external devices that feature Component Video output connectors (for instance a DVD player or other high-end playback equipment, etc.). To do this you’ll need a Component Video cable (not included in the package). Component audio input You will need to connect the audio cable from external devices (such as a DVD player or other playback equipment) to these terminals if you are going to input the video signal via the Component Video input terminals (9). Then the sound can be listened to through the loudspeakers of your TV set. Audio Output The audio signal is available for output here. For instance, you can connect your TV set to an amplifier or stereo home cinema to enjoy the sound over the external sound system. Headphones output Here you can connect headphones to enjoy superior listening without disturbing other people. Antenna input Here you connect your TV antenna (indoor or outdoor antenna or cable TV network cable). SCART2 Here you can connect external devices that also feature a SCART connector (for instance a VCR, DVD player etc.). To do this you’ll need a SCART cable (not included in the package). SCART1 Here you can connect external devices that also feature a SCART connector (for instance a VCR, DVD player etc.). To do this you’ll need a SCART cable (not included in the package). Audio Input Here you can input the audio signal from external devices (for instance a DVD player or other playback equipment). Then the sound can be listened to through the loudspeakers of your TV set. EN No. 9 Connectors and Controls (17) (18) (19) (20) (21) 10 Video input Here you can connect external devices that also feature an AV connector (for instance a VCR, camcorder etc.). To do this you’ll need an AV cable (not included in the package). This normally has 3 plugs (yellow, red and white). S-Video input Here you can connect external devices that also feature an S-Video connector (for instance a VCR, DVD player etc.). To do this you’ll need an S-Video cable (not included in the package). Connector for PC If you want to use your TV set as a PC monitor you can use a conventional VGA cable (not supplied) to connect this port to the PC’s graphics adapter output. HDMI2 You can connect a second HDMI-compatible device to this port in order to obtain a highend, full-digital picture and audio transmission. HDMI1 You can connect an HDMI-compatible device to this port in order to obtain a high-end, fulldigital picture and audio transmission. Connectors and Controls Right Panel EN On the right panel of the TV set there are several buttons that let you control the most important functions even without the remote control. The following table lists the available controls: No. (22) (23) (24) (25) Description INPUT/MENU buttons Press the INPUT button to display or hide the signal source selection menu. Then press the CH+/CH- buttons to select the desired signal source. The menu will disappear automatically after a few seconds and the signal source will be displayed. For instance, this allows you to conveniently toggle between TV programme reception, your VCR and PC. Press the MENU button to show or hide the on-screen menu. VOL+/VOL- buttons During TV programme reception: Press VOL+ to raise the audio volume. Press VOL- to reduce the audio volume. While a menu is displayed: Press VOL+ to increase the value of the selected function. Press VOL- to decrease the value of the selected function. CH + / CH - buttons During TV programme reception: Press CH+ to switch to the next channel. Press CH- to switch to the previous channel. While a menu is displayed: Press CH+ to move upwards through the menu items. Press CH- to move downwards through the menu items. On/Standby button Press this button to power on the device or to set it on power-saving Standby. 11 Connecting the Devices Connecting the Devices The interface connector panel on the back panel of the housing (see page 8) offers multiple connection options for a wide variety of AV and even HDMI equipment. If you only want to watch TV it is sufficient to connect the antenna. But if you also want to connect additional devices (e.g. satellite receiver, VCR, camcorder, etc.) you may also use the other interface connectors. Once cabled-up, you can easily toggle between the different equipment by using the remote control and without having to disconnect and re-connect any more cables. Connecting the Antenna Signal source: TV Here you can connect the antenna cable of an outdoor or indoor antenna or the cable TV wire. 75-Ohm coaxial cable 12 Connecting the Devices Connecting External Equipment with SCART (Euro AV) connector EN Signal source: SCART1, SCART2AV or SCART2SV You can use a Scart cable (not included) to connect other devices (e.g. a VCR or a satellite receiver) to the LT 2310. The device has the interface connectors (14) and (15) for this purpose. SCART (Euro AV) cable SCART (Euro AV) cable Connecting External Equipment with AV Output Signal source: AV You can use an AV cable (not included) to connect other devices (e.g. a camcorder or a game console) to the LT 2310. The device has the jacks (17) for the video (yellow) and (16) for the audio signal (red, white). AV-cable 13 Connecting the Devices Connecting External Equipment with Components Outputs Signal source: YPBPR Use a triple-Cinch cable (not included) to connect this input to a high-end video source. Connect the green, blue and red cables to the corresponding receptacles of your playback device and the LT 2310. Please note that the audio signal must be transmitted to the separate Audio connector (10). To do this you’ll need a Cinch audio cable (not included in the package). Component video cable Cinch audio cable (red, white) Connecting External Equipment with S-Video Output Signal source: S-VIDEO or SCART2SV To transmit video signals to other devices with S-Video output. Please note that the audio signal must be transmitted to the separate Audio connector (16). To do this you’ll need a Cinch audio cable (not included in the package). S-Video cable 14 Cinch audio cable (red, white) Connecting the Devices Connecting External Equipment with HDMI Interface EN Signal source: HDMI HDMI is the abbreviation for “High Definition Multimedia Interface” and allows the digital transmission of both audio and video signals. Use an HDMI cable (not included) to connect the output of a playback device (e.g. a digital satellite receiver, DVD or Blu-Ray player) to any of the HDMI inputs (20) or (21) of your LT 2310. HDMI cable HDMI cable Connecting a PC Signal source: PC Use a VGA cable (not included in the package) to connect the graphics adapter output of a PC or notebook with the VGA input (19) of your LT 2310. Please note that only the picture signal will be transferred via this connector. In order to be able to listen to the sound transmitted by the computer, use a 3.5 mm jack-type audio cable (not included) to connect the audio output (Line Out) of your computer to the PC Audio In connector (8) of your LT 2310. VGA cable Audio cable (3.5mm jack) 15 Connecting the Devices Remote control An illustration of the remote control can be found on the fold-out page of this User’s Manual cover. Please fold-out the title page and read the following descriptions. This will enable you to have the real-size figure always visible permitting a better understanding of the location and functions of the different buttons. (26) (27) (28) (29) (30) (31) (32) (33) (34) (35) (36) (37) (38) (39) (40) (41) (42) (43) (44) 16 POWER 1 button Press this button to toggle the TV set on or to standby. AV button Press this button to switch to the AV channel. You will need this function when you have connected a device such as a VCR to the AV video input (17) and want to playback a video cassette. MUTE % button Press this button to mute the sound. Press it again to resume the sound output. PC button Press this button to directly switch to the signal source “PC”. SLEEP button Press this button multiple times to program the countdown for the power-off timer. Numeric buttons During TV programme reception: select the desired channel directly by entering its channel number. During Teletext display: select the desired Teletext page by entering the corresponding number. button Press this button while watching TV to toggle to the last-viewed channel. INPUT button Press this button and then or to toggle between the different signal sources connected (e.g. antenna, VCR, game console, etc.). Then press the or button to confirm. ASPECT button Press this button multiple times to select the desired picture aspect ratio. Direction buttons / OK Press these buttons to select and confirm an option from the displayed menus. EXIT button Press this button to hide any displayed on-screen menu. PC AUTO button While PC is selected as signal source: press this button to adjust the picture parameters automatically. CH + / CH - buttons Press these buttons to switch to the next or previous channel. PG.UP button During Teletext display: press this button to skip to the previous available Teletext page. PG.DOWN button During Teletext display: press this button to skip to the next available Teletext page. REVEAL button During Teletext display: press this button to show hidden text (e.g. the solutions for TV quiz shows). Press it again to hide the text. SUBPAGE button During Teletext display: press this button to display Teletext subpages. Yellow button During Teletext display: press this button to execute the function currently assigned to it (see the on-screen indication). Blue button During Teletext display: press this button to execute the function currently assigned to it (see the on-screen indication). (45) (46) (47) (48) (49) (50) (51) (52) (53) (54) (55) (56) (57) (58) Red button During Teletext display: press this button to execute the function currently assigned to it (see the on-screen indication). Green button During Teletext display: press this button to execute the function currently assigned to it (see the on-screen indication). INDEX button During Teletext display: press this button to display the Teletext index page. SIZE button During Teletext display: Press this button to zoom the Teletext page view. TEXT button During TV programme reception: press this button to show or hide Teletext. HOLD button During Teletext display: press this button to freeze the current Teletext screen and therefore avoid that the page keeps scrolling automatically. – w + buttons Press these buttons to adjust the audio volume. AUDIO button During analogue TV programme reception: press this button multiple times to toggle between the available audio channels. Some programmes broadcast a second language or information for blind people on the second audio channel. MENU button Press this button to show setup menu for picture, sound, setup, function, channel and picture-in-picture settings. DISPLAY button Press this button to display information about the currently selected signal source. -/-- button Press this button to toggle between one-digit, two-digit and three-digit numeric input for direct channel selection. P.MODE button Press this button multiple times to toggle between the available preset picture modes. S.MODE button Press this button multiple times to toggle between the available preset sound modes. TV button Press this button to directly switch to the signal source “TV” (TV channel reception). EN Connecting the Devices 17 Connecting the Devices Powering the TV Set On/Off Powering On Check that the LT 2310 is in Standby mode. The power indicator (1) on the front panel should light orange. If this is not the case, first power the device on by toggling the main power switch (5). To power the LT 2310 on, either press the On/Standby button (25) on the device’s control panel or press the POWER button (26) on the remote control. When the device is powered on, the front panel power indicator (1) will light green. Switching standby To switch the LT 2310 to standby mode, either press the On/Standby button (25) on the device’s control panel or press the POWER button (26) on the remote control. This will turn the LT 2310 to Standby mode and the power indicator (1) on the front panel will light orange. In order to turn off the Standby mode also, use the main power switch button (5). The power indicator will stop lighting. If no input signal is available (no TV reception or no playback from external devices) the device automatically goes into standby. You will be advised of this process by a countdown. 18 Connecting the Devices Getting Started When powering on the device for the first time, you may not watch TV yet as no channels have been stored for your location. First you have to specify your location and perform an automatic channel search in order for the available channels to be saved. Automatic Channel Search 1. 2. 3. 4. Select the signal source “TV”. See page 19 – Selecting the Signal Source. Press the MENU button (53) on the remote control to display the setup menu. Press the button (35) on the remote control four times to display the “CHANNEL” menu. Press the direction buttons or (35) on the remote control and select the “Program area” option. Select your location with the or buttons (35) on the remote control. 5. Press the MENU button (53) on the remote control to return one menu level up. 6. Press the direction buttons or (35) on the remote control, select “Auto Tuning” and press (35) on the remote control to start the automatic channel search. It will take several minutes until all frequency bands have been scanned and the available channel have been found. During channel search, a thumbnail view of the found channels will appear, displaying a live preview of 9 channels simultaneously. EN First connect your TV antenna (indoor or outdoor antenna) or the cable network box to the antenna receptacle (13) before you perform the following steps, otherwise no or only a few channels will be found during channel search. To cancel the channel search at any time, press MENU (53) on the remote control. Selecting the Signal Source 1. Press the INPUT button (33) to display the signal source selection menu. 2. Press the direction buttons or (35) on the remote control to select the desired signal source. 3. Press the OK button (35) on the remote control to confirm. The device will switch to the selected signal source. 19 Signal Source “TV” Signal Source “TV” The built-in receiver allows you to watch terrestrial analogue TV shows via an outdoor or indoor antenna as well as analogue TV shows from the cable TV network. To do this, connect the corresponding antenna cable to the RF input (see page 8, item 13) on the back panel of your LT 2310. When using the device for the first time you must program the channels or perform an automatic channel search (see page 19 – Automatic Channel Search). Setup Menu for Signal Source „TV“ The setup menu lets you perform specific settings to customise the LT 2310 according to technical and personal requirements. Press the MENU button (53) to open the setup menu. The menu is divided into six items allowing you to adjust or change picture, sound, system, function, channel and picture-inpicture settings. Navigating the Setup Menu To open or exit the setup menu, press the MENU button (53) on the remote control. Press or (35) on the remote control to select an item, then press or (35) on the remote control to select an option. Adjust the desired value with the or buttons (35) on the remote control. To save the settings and return, press the MENU button (53) on the remote control again or press EXIT (36). You can also perform menu settings via the buttons located on the side panel of your LT 2310. To open or exit the menu, press the MENU button (22) on the side panel and press the buttons VOL+ (23) (right), VOL- (23) (left), CH+ (24) (up) or CH- (24) (down) to navigate the menu. When you exit the menu by pressing the MENU button (22), all settings will be saved automatically. 20 Signal Source “TV” EN “Picture” Menu Picture Mode Select one of the picture settings Standard, Dynamic or Movie. Select “Personal” to customize your settings. Contrast * Brightness * Tint * Colour * Sharpness * Color temp To adjust the contrast. To adjust the brightness. To adjust the colour hue/tint (available only for the SECAM TV system). To adjust the colour. To adjust the picture sharpness. Choose either Warm (more red), Cold (more blue) or Normal (balanced colours) according to your preferences. Here you can set the desired picture aspect ratio. You can choose between Full, Zoom1, Zoom2, 4:3, Panorama, 14:9 and Auto. If necessary, you can enable a noise filter in order to optimise the picture quality. This will reduce small interference. Select one of the options Low, Middle or High. Or select Off to disable this function. Aspect ratio 3DNR * These options are only available after choosing the “Personal” picture mode. 21 Signal Source “TV” “Sound” Menu Sound Mode Bass * Treble * Balance Auto volume Select between the default settings for Standard, News and Music. Select “Personal” to customize your settings. Increases or decreases the volume of the lower frequencies. Increases or decreases the volume of the higher frequencies. To adjust the volume balance between the left and right speaker. This item allows you to enable the automatic volume compensation. Private TV channels usually raise the sound volume during advertising breaks. Enable this option to attenuate the increased volume of the broadcasting station. * These options are only available after choosing the “Personal” sound mode. 22 Signal Source “TV” EN “Setup” Menu Language Here you select the menus’ display language. OSD duration Select the display time for the OSD menu between 5 and 60 seconds. OSD halftone Select a density for the OSD menu background. Set a lower value to obtain a darker background for the OSD menu. Set a higher value in order to better distinguish it from the TV picture displayed in background. Information Select this option to display which signal source is currently selected for the main picture and which signal source is currently selected for the subpicture in picture-inpicture mode. Furthermore, the firmware version will also be displayed. Reset Select this option to delete all personal settings including all TV channels and reset the factory-default values. Lock The child lock lets you protect the device against being powered-on. It will only be possible to operate the device after entering the correct password. This factory-default password is “0000”. New password Enter the new password if you want to change the old one. Confirm For security reasons, confirm the password entered into the “New password” field. Lock Select the “On” option to enable the system lock. After this, operating the TV set will only be possible after entering the correct password. Or select “Off” to disable the lock. 23 Signal Source “TV” “Function” Menu 24 Sleep Timer Allows programming the auto power-off after 15, 30, 45 or 60 minutes. Select “Off” to disable the auto-off function. TTX language Optimises the character set for Western or Eastern European Teletext. 9 windows Your LT 2310 can show a preview of 9 channels at the same time. Enable this option to enable this preview. During the preview display, press the CH+ or CH(38) buttons on the remote control to preview more channels. Each press of the buttons will scroll down or up one channel. To exit the preview, press the MENU button (53), repeat the above procedure and select “Off”. Signal Source “TV” This menu allows you to set the time as well as program a time at which the device will automatically power off or power on. Current time Here you must set the current time otherwise the time-controlled features will not work properly. Press the direction buttons or (35) to move the highlight to the hours or minutes field. Press the or buttons (35) to adjust the desired value. When ready, press the MENU button (53) to save the changes and to return one menu level up. Off time You can set a specific time at which the device will power off automatically. Press the direction buttons or (35) to move the highlight to the hours or minutes field. Press the or buttons (35) to adjust the desired value. When ready, press the MENU button (53) to save the changes and to return one menu level up. Then you must set the following “Time mode” option in order for the device to power off at the set time. On time You can set a specific time at which the device will power on automatically. Press the direction buttons or (35) to move the highlight to the hours or minutes field. Press the or buttons (35) to adjust the desired value. When ready, press the MENU button (53) to save the changes and to return one menu level up. You must then set the following “Time mode” option in order for the device to power on at the set time. Time mode Here you set if and how often the above programmed timers should be executed. Select “Once” if you want the device to power on or off only once. Select “Every” if you want it to happen daily. Or select “Off” to disable the timer functions. EN Time After you have finished all settings, press the MENU button (53) on the remote control to save. Later you can make further settings, if necessary. DLC (Dynamic Contrast) Dynamic contrast produces a greater difference between the brightest and darkest scenes. You can enable or disable this function. For movies with very dark scenes it is recommended that you disable this feature as it would darken them even more. 25 Signal Source “TV” “Channel” Menu Auto tuning Starts the automatic channel search. See page 19 - Automatic Channel Search. Press the direction buttons or (35) on the remote control to fine-tune the frequency. This lets you optimise the picture and sound quality. Press the MENU button (53) to exit the fine tuning. Manual Search Press the direction buttons or (35) on the remote control to perform a manual search starting from the current frequency. This lets you optimise the picture and sound quality. Press the MENU button (53) to exit the fine tuning. Channel Here you select the channel that you want to tune-in manually. This is the channel preset where the channel is currently stored. Manual Search Press the direction buttons or (35) on the remote control to start scanning the current frequency band to increase or decrease frequencies. As soon as a new station has been found, the scan will stop. Frequency This displays the currently tuned-in frequency. This value cannot be edited directly: it must be done from the “Manual Search” field. Save Select this option and press the button (35) on the remote control to save your changes. After you have finished all settings, press the MENU button (53) on the remote control to return to the previous menu. If required, you can make further adjustments for other channels. Programme edit Opens the channel list where you can edit your TV channels. See page 29 – Channel List. Fine Tuning Color system 26 Choose the correct TV system for your location. Normally PAL is the TV system in Europe (exception: France uses the SECAM TV system). Signal Source “TV” Sound system MTS Choose the correct sound system for your location. Normally the BG sound system is used. This option lets you determine how the output from the left and right audio channels should be. Stereo: outputs the sound in stereo. Mono: outputs the sound in mono. Dual I: outputs the left channel audio information on both speakers. Program area Choose your location from the list. This setting determines the TV colour system and the frequency band for channel search. Skip You can set the current channel to be skipped when switching channels by using the CH+ and CH- buttons (38). For example, this lets you skip commercial-only channels when switching channels. EN Dual II: outputs the right channel audio information on both speakers. Dual AB: mixes both audio channels (left + right) and outputs the result on both speakers in mono. 27 Signal Source “TV” “Picture-in-Picture” Menu (PIP) Your LT 2310 allows you to display the picture of two different signal sources at the same time. For instance, you can work on the PC while watching the current football game at the same time. Picture-in-picture Sub source Size Position Set where you want the secondary window to appear: L-up, L-down, R-down, R-up. This option is available only if the “picture-in-picture” function is enabled and have selected “PIP”. Border color Set the desired colour for the border that limits the secondary popup window. You can choose between Black and Blue. This option is available only if the “picturein-picture“ function is enabled. Determine if the sound output from the device will be the sound of the main window (Main) or the sound of the secondary window (Sub) signal source. This option is available only if the “picture-in-picture” function is enabled. Sound source Swap 28 Select one of the following options to watch two signal sources simultaneously: The option “PIP” will display a small popup window containing the second signal source in a corner above the main window. The option “POP full” will tile the screen into two halves. Please note that the aspect ratio may not match the original picture after selecting “POP full”. Select “Off” to disable the “picture-in-picture” function. Select the signal source that you want to watch in the secondary popup window. This option is available only if the “picture-in-picture” function is enabled. Decide if you want the secondary window to be Small, Middle or Large. This option is available only if the “picture-in-picture” function is enabled and you have selected “PIP”. Select this option to swap the signal sources of the main and secondary windows. This option is available only if the “picture-in-picture” function is enabled. Channel List Channel List 001 011 021 002 012 022 003 013 023 004 014 024 005 015 025 006 016 026 007 017 027 008 018 028 009 019 029 010 020 030 x Rename x Delete x Insert EN The channel list is accessible via the “Channel” menu. To display it, select the “Programme edit” option from the “Channel” menu. 29 Managing Channels Managing Channels Your LT 2310 offers multiple features for managing channels. For example, you can change the channel order, delete channels or insert channels. Renaming a Channel You can name a channel with any name containing up to five characters. Proceed as follows: 1. In channel list, press or (35) on the remote control to select the channel preset that stores the channel you want to rename. 2. Press the red button (45) on the remote control to select the existing name. The first character will be highlighted. 3. Press or (35) on the remote control to select the desired character. 4. Press the direction buttons or (35) on the remote control to move the highlight to the input field for the next character. 5. Repeat the above process until the desired name has been written. 6. Press the red button (45) on the remote control to save the name. Or press the green button (46) to cancel and to restore the previous name. Deleting Channels You can remove any undesired channel from the channel list. Proceed as follows: 1. In the channel list, press or (35) on the remote control to select the channel that you want to delete. 2. Press the green button (46) to mark the current channel for deletion. Next press the red button (45) to delete it from the channel list. Or press the red button (46) to cancel. 3. Press the MENU (53) or EXIT (36) button on the remote control to finish editing. Press the MENU button (53) to cancel the above process at any time. Moving Channels If a channel appears at an undesired position in the channel list, you can move it. 1. In the channel list, press or (35) on the remote control to select the channel preset that stores the channel you want to move. 2. Press the blue button (44) to mark the current channel that has to be moved. 3. Press or (35) on the remote control to move the highlight to the channel preset where you want to move the channel to and press the red button (45) to move it to the new position. 4. Press the MENU (53) or EXIT (36) button on the remote control to finish editing. Press the MENU button (53) to cancel the above process at any time. 30 Managing Channels EN Skipping Channels You can set specific channels to be skipped when switching channels by using the CH+ and CHbuttons (38). For example, this lets you skip commercial-only channels when switching channels. 1. In the channel list, press CH+ or CH- (38) on the remote control to select the channel that you want to skip. 2. Press the MENU button (53) on the remote control to display the setup menu. 3. Press the direction buttons or (35) on the remote control to select the “CHANNEL” menu. Next press or (35) on the remote control to navigate to the “Skip” option. 4. Press the direction buttons or (35) on the remote control and select “On”. 5. Press the MENU (53) or EXIT (36) button on the remote control to finish editing. From now on, when switching channels, this channel will be skipped. Disabling the Skip function for a Channel To make a channel marked for skipping available again for normal channel switching, proceed as follows: 1. Press the MENU button (53) on the remote control to display the setup menu. 2. Press the direction buttons or (35) on the remote control to select the “CHANNEL” menu. Next press or (35) on the remote control to navigate to the “Programme edit” option. 3. Press the direction buttons or (35) to show the channel list. 4. In the channel list, press or (35) on the remote control to select the channel preset that stores the channel you want to make available again for normal channel switching. 5. Press the MENU button (53) on the remote control to return to the “CHANNEL” menu. 6. Press or (35) on the remote control to navigate to the “Skip” option. 7. Press the direction buttons or (35) on the remote control and select “Off”. The channel will be available again when switching channels by using the CH+/CH- (38) buttons on the remote control. 31 Signal Source SCART1 Signal Source SCART1 Setup Menu for Signal Source “SCART1” The setup menu lets you perform specific settings to customise the LT 2310 according to technical and personal requirements. Press the MENU button (53) to open the setup menu. The menu is divided into five items allowing you to adjust or change picture, sound, system preferences, function and picture-in-picture settings. The options available under “Picture” are the same as for the signal source “TV”. Please read the description on page 21. The options available under “Sound” are the same as for the signal source “TV”. Please read the description on page 22. The options available under “Setup” are the same as for the signal source “TV”. Please read the description on page 23. The options available under “Function” are the same as for the signal source “TV”: only the “9 windows” option is not available here. For a description, please read from page 24. Signal Source SCART2 Setup Menu for Signal Source “SCART2” The setup menu lets you perform specific settings to customise the LT 2310 according to technical and personal requirements. Press the MENU button (53) to open the setup menu. The menu is divided into five items allowing you to adjust or change picture, sound, system, function and picturein-picture settings. The options available under “Picture” are the same as for the signal source “TV”. Please read the description on page 21. The options available under “Sound” are the same as for the signal source “TV”. Please read the description on page 22. The options available under “Setup” are the same as for the signal source “TV”. Please read the description on page 23. The options available under “Function” are the same as for the signal source “TV”: only the “9 windows” option is not available here. For a description, please read from page 24. The options available under “Picture-in-Picture” are the same as for the signal source “TV”. For a description, please read from page 28. 32 Signal Source YPBPR Signal Source YPBPR The setup menu lets you perform specific settings to customise the LT 2310 according to technical and personal requirements. Press the MENU button (53) to open the setup menu. The menu is divided into five items allowing you to adjust or change picture, sound, system, function and picturein-picture settings. The options available under “Picture” are the same as for the signal source “TV”. Please read the description on page 21. The options available under “Sound” are the same as for the signal source “TV”. Please read the description on page 22. The options available under “Setup” are the same as for the signal source “TV”. Please read the description on page 23. The options available under “Function” are the same as for the signal source “TV”: only the “9 windows” option is not available here. For a description, please read from page 24. The options available under “Picture-in-Picture” are the same as for the signal source “TV”. For a description, please read from page 28. EN Setup Menu for Signal Source “YPBPR” Signal Source PC If you want to use your TV set as a PC monitor you can use a conventional VGA cable (not supplied) to connect the port (19) to the PC’s graphics adapter output. Furthermore, you can input the audio signal coming from the PC to the terminal (8). Then the sound generated by the PC can be listened to through the loudspeakers of your TV set. Supported Graphics Modes The following list contains the PC graphics modes that are supported by your LT 2310. Resolution 640 x 480 800 x 600 1024 x 768 1280 x 1024 1920 x 1080 Vertical frequency (Hz) 60.00 Hz 60.00 Hz 60.00 Hz 60.00 Hz 60.00 Hz Never set any other resolution and vertical frequency other than those specified. 33 Signal Source PC Setup Menu for Signal Source “PC” The setup menu lets you perform specific settings to customise the LT 2310 according to technical and personal requirements. Press the MENU button (53) to open the setup menu. The menu is divided into six items allowing you to adjust or change picture, sound, system, function, geometry and picture-in-picture settings. The options available under “Sound” are the same as for the signal source “TV”. Please read the description on page 22. The options available under “Setup” are the same as for the signal source “TV”. Please read the description on page 23. The options available under “Function” are the same as for the signal source “TV”, only the “TTX language” and “9 windows” options are not available here. For a description, please read from page 24. The options available under “Picture-in-Picture” are the same as for the signal source “TV”. For a description, please read from page 28. “Picture” Menu Picture Mode Contrast * Brightness * Scale Color mode Select one of the picture settings Standard, Dynamic or Movie. Select “Personal” to customize your settings. To adjust the contrast. To adjust the brightness. Select one of the options Normal or Centre to obtain the desired picture display. Color temp Choose either Warm (more red), Cold (more blue), S-RGB (for Internet applications) or Normal (balanced colours) according to your preferences. Selecting “Personal” lets you adjust the intensity of red, green and blue individually. Red Set the desired intensity for red. Green Set the desired intensity for green. Blue Set the desired intensity for blue. “Geometry” Menu H offset V offset Clock Phase Auto adjust Auto color This option lets you move the picture position horizontally. This option lets you move the picture position vertically. This option lets you adjust the pixel clock in order to optimise the picture sharpness. This option lets you adjust the phase in order to optimise the picture quality. Automatically adjusts the settings for the horizontal and vertical position, the horizontal size as well as the phase and pixel clock. Adjusts the colour temperature automatically. The “Geometry” menu is available only when you have connected a PC to your LT 2310 and the PC is powered on. 34 Signal Sources HDMI1 / HDMI2 Signal Sources HDMI1 / HDMI2 The setup menu lets you perform specific settings to customise the LT 2310 according to technical and personal requirements. Press the MENU button (53) to open the setup menu. The menu is divided into five items allowing you to adjust or change picture, sound, system, function and picturein-picture settings. The options available under “Picture” are the same as for the signal source “PC”. For a description, please read from page 34. The options available under “Sound” are the same as for the signal source “TV”. Please read the description on page 22. The options available under “Setup” are the same as for the signal source “TV”. Please read the description on page 23. The options available under “Function” are the same as for the signal source “TV”, only the “TTX language” and “9 windows” options are not available here. For a description, please read from page 24. The options available under “Picture-in-Picture” are the same as for the signal source “TV”. For a description, please read from page 28. EN Setup Menu for Signal Sources “HDMI1” or “HDMI2” Signal Source AV Setup Menu for Signal Source “AV” The setup menu lets you perform specific settings to customise the LT 2310 according to technical and personal requirements. Press the MENU button (53) to open the setup menu. The menu is divided into five items allowing you to adjust or change picture, sound, system, function and picturein-picture settings. The options available under “Picture” are the same as for the signal source “TV”. Please read the description on page 21. The options available under “Sound” are the same as for the signal source “TV”. Please read the description on page 22. The options available under “Setup” are the same as for the signal source “TV”. Please read the description on page 23. The options available under “Function” are the same as for the signal source “TV”, only the “9 windows” option is not available here. For a description, please read from page 24. The options available under “Picture-in-Picture” are the same as for the signal source “TV”. For a description, please read from page 28. 35 Signal Source SVideo Signal Source SVideo Setup Menu for Signal Source “SVIDEO” The setup menu lets you perform specific settings to customise the LT 2310 according to technical and personal requirements. Press the MENU button (53) to open the setup menu. The menu is divided into five items allowing you to adjust or change picture, sound, system, function and picturein-picture settings. The options available under “Picture” are the same as for the signal source “TV”. Please read the description on page 21. The options available under “Sound” are the same as for the signal source “TV”. Please read the description on page 22. The options available under “Setup” are the same as for the signal source “TV”. Please read the description on page 23. The options available under “Function” are the same as for the signal source “TV”: only the “9 windows” option is not available here. For a description, please read from page 24. The options available under “Picture-in-Picture” are the same as for the signal source “TV”. For a description, please read from page 28. 36 Remote Control Function Buttons Remote Control Function Buttons Picture and Audio Settings EN The P.MODE button (56) gives you direct access to the picture settings. Press the P.MODE button several times to directly toggle between Standard, Movie, Personal and Dynamic. The option “Personal” can be programmed according to your individual requirements (see also page 21 – “Picture” Menu). The S.MODE button (57) gives you direct access to the sound settings. Press the S.MODE button several times to directly toggle between Standard, News, Music and Personal. The option “Personal” can be programmed according to your individual requirements (see also page 22 – “Sound” Menu). Selecting the Audio Channel Press the AUDIO button (52) to directly switch between the different audio tracks (e.g. original soundtrack and translated version). Sleep Timer The sleep timer is a countdown after which the TV set will automatically power off. For instance, before going to bed you can program the sleep timer so that the device will auto-power off after 30 minutes. Press the SLEEP button (30) to directly select the Sleep timer. Press the SLEEP button multiple times to increase the remaining time. This lets you adjust the value from 15 to 60 minutes. The value Off will disable the sleep timer. Recalling the Last Watched Channel This function is available for the signal source “TV” only. You can press the Recall last tuned channel button (32) to quickly toggle between two channels, even if the two channels are not stored in sequence (e.g. when commercials are being broadcast). Displaying Information about the Current Signal Source You can display information about the currently selected signal source at any time. 1. Press the DISPLAY button (54) to display the information about the currently selected signal source. In the upper right corner of the screen information about the currently selected signal source will be shown. 37 Advanced Functions Advanced Functions Independently of the selected signal source, the device offers additional features that always guarantee fast and trouble-free operation. These allow you to access directly the most common options without having to navigate through different menus. Teletext Press TEXT (49) on the remote control several times to display the Teletext, to display it with a transparent background or to hide it. Via the coloured function buttons (43, 44, 45 and 46) you can control the top text. At the bottom of the Teletext window you’ll see help texts for the coloured buttons and their associated functions. Press a function button to open the suggested page of the top text. Some Teletext pages may consist of multiple subpages that are broadcast and displayed in sequence. These pages can be recognized by indications such as 1/2 (first of two subpages). Press the SUBPAGE button (42) and then the green (46) or red button (45) to navigate through the subpages. The buttons (39) to (50) correspond to the usual control buttons for Teletext. Please also read the short description about the remote control on page 16. Picture Settings Press the P.MODE button (56) multiple times to toggle between the available preset picture modes. Audio Settings Press the S.MODE button (57) multiple times to toggle between the available preset sound modes. Displaying Information Press the DISPLAY button (54) to display the information about the currently selected signal source. 38 Troubleshooting Troubleshooting You can solve the most common problems yourself by using the following table. If the problem persists after checking the suggested solutions, please contact our Service Hotline (see page 44). Do not attempt to repair the product yourself. Unable to power the TV set on. Connect the power cord firmly to the AC input (6) of the TV set and to a properly-functioning power socket. Toggle the main power switch (5) of the TV set to On (position “I”). Replace the batteries of the remote control. The remote control doesn’t work. Are there any obstacles between the remote control and the TV Set? Replace the batteries. Make sure that no direct sunlight reaches the remote control sensor (2). EN General Problems No picture Is the connection cable to the external signal source damaged? Did you firmly and properly connect all required connectors to the external signal source? Did you select the proper signal source on the TV set? TV Reception Problems No picture Is the antenna connected properly? Is the antenna cable damaged? Did you connect the antenna cable plug firmly? Did you select the proper signal source on the TV set? • Have you already executed a channel search at your present location? Bad picture quality Is the antenna connected properly? Re-orientate the antenna. High buildings and geographical obstacles can deteriorate the signal strength or cause ghost pictures. Make sure that the channel is properly tuned. Adjust the picture parameters such as brightness, contrast and sharpness. No sound Is the sound muted? Press the MUTE button (28). Is the volume set to very low? No colour Adjust the colour. Make sure that the current programme is being broadcast in colour. Make sure that the channel is properly tuned. 39 Troubleshooting Problems During Playback from External Devices No sound • Please check if the audio cable is firmly connected. • Check if the audio cable is damaged. • Make sure that you have selected the correct signal source on your TV set. Sound is distorted or humming • Clean the connector plugs. • Replace the connection cable to the external device. 40 Wall-Mounting Wall-Mounting EN You can mount your LT 2310 to the wall by using a VESA wall mount of 100 x 100 mm. The VESA wall-mounting kit is not included in the package. To do this, disassemble the base as follows: 1. Power the device off and unplug all cables and connectors. For the following steps you’ll need a conventional Philips screwdriver. 2. Lie a soft cloth on an empty, level table and carefully place the LT 2310 with its front on it. 3. Loosen the two screws (A) located under the bottom of the base. 4. Release the lock (B) and rotate the bottom of the base approx. 45° clockwise. You can then remove the bottom piece. 5. Under the bottom of the base column there is another screw (C). Loosen it. 6. Loosen the two screws located at the back of the base. Now you can remove the base column from the device housing. 7. Install the VESA wall mount on the back of the monitor. Follow the installation instructions that came with your wall mount kit. Keep the base, the socket and the screws in a safe place in case you need to reassemble the base again. 41 Technical Specifications Technical Specifications Screen Properties Size: Aspect ratio: Resolution: Brightness (cd/m²): Contrast ratio: Response time (ms): Viewing angles (H/V): Colour system: Channel presets ATV/CATV Aspect ratio selectable: Noise reduction: Automatic Sleep Timer: Auto power-off if no input signal is present: Teletext: Parental Control: Antenna: AV input: S-Video input: VGA input: Component In jacks: SCART input: HDMI input: RCA Audio input: PC Audio input: RCA Audio output: Headphones: 59.9 cm (23.6”) 16:9 1920 x 1080 300* 1000:1* 5* 170° H /160° V* PAL/SECAM-Multi 120 Yes Yes Yes Weight kg: 6.0 Yes 1000 pages Yes x1 x1 x1 x1 x1 2x SCART Connectors and 2x HDMI Ports AV/SVx1, Component x1 x1 (3.5 mm) x1 x1, output level 135mV ± 10% x1 (reserved for servicing USB: purposes) Speakers: 2 x 2 W RMS Audio MTS/Nicam Stereo/A2: Yes Power supply: 220-240 VAC, 50/60 Hz Power Supply Power consumption On/Standby: < 60 W / < 1 W Not supplied Wall-mount kit: (VESA 100 x 100 mm) Remote control: Yes (2 x AAA-size batteries, 1.5V) Accessories Power cord User‘s Manual Dimensions with stand 583x230x451 Physical properties: (L x W x H) mm: * typical according to panel specifications 42 Warranty Information Warranty Information EN PRQWKZDUUDQW\ 43 Warranty Information PRQWKZDUUDQW\ 44 Appendix Appendix Pixels are single dots making up the picture that appears on the screen. One pixel always consists of three sub-pixels for displaying the basic colours (red, green and blue). The Pixel Error Classes are rated from Level I (very good) to Level IV (bad quality). Your LT 2310 belongs to Error Class II and therefore offers a high-quality display. Within the Error Classes a limited number of pixel may present errors. There are three types of errors: Type 1: Continuous lighting pixel (a bright, white dot), even when it should not light. Type 2: Non-lighting pixel (a dark or black dot) even when it should light. Type 3: Abnormal or defective sub-pixels of the basic colours (e.g. steady lighting with half intensity, non-lighting of a specific colour, blinking or flickering, but not included in Type 1 or Type 2). Furthermore, a so-called cluster (a matrix of 5x5 pixel) may contain a limited number of erroneous pixel only. For Error Class II, for each 1 million pixel only 2 pixel may contain errors of Type 1, Type 2 and Cluster; it may present up to 5 erroneous pixels of Type 3 (see the following table). Error Class I II III IV Type 1 0 2 5 50 Type 2 0 2 15 150 Type 3 0 5 50 500 EN Pixel Error Classes Cluster 0 2 5 50 Considering the resolution of your LT 2310 (1920 x 1080) it contains 2,073,600 pixel. From this value we can deduce the maximum amount of erroneous pixel (see the following table). Error Class LT 2310 Type 1 4 Type 2 4 Type 3 10 Cluster 4 45 Appendix 46 Appendix We: Targa GmbH Lange Wende 41 59494 Soest, Germany EN EC - Declaration of Conformity declare our responsibility that the product: model: LCD TV SilverCrest LT 2310 is confirmed to comply with the requirements set out in the Council Directive on the Approximation of the Laws of the Member States relating to Electromagnetic Compatibility 2004/108/EC, the Council Directive relating to Low Voltage 2006/95/EC and the Council Directive relating to Ecodesign 2009/125/EC. The measurements were carried out in accredited laboratories. For the evaluation of above mentioned Council Directives the following standards were consulted: EMC: EN 55013: 2001 + A1:2003 + A2:2006 EN 55020: 2007 EN 61000-3-2: 2006 EN 61000-3-3: 1995 + A1:2001 + A2:2005 Safety: EN 60065:2002 + A1:2006 Ecodesign: Executive order 642/2009 Soest, 17th of February 2010 authorised signature ____________________________________ Matthias Klauke, Managing Director 47 hb-cover_lcd-tv_2310_lb6_1002.qxd:Layout 1 23.02.2010 10:12 Uhr Seite 1 HOME TECH LCD TV GB IE service information Mat-No: 1523480 CY User manual and TARGA GmbH Lange Wende 41 D-59494 Soest www.silvercrest.cc 6 LT 2310