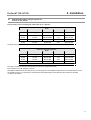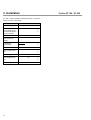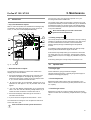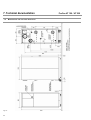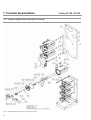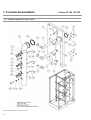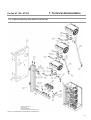
1
1 Table of Contents 1 Installation .............................................................................................................................................................................................5 1.1 1.2 1.3 1.4 ProCon HT 150 / HT 225 scope of delivery.................................................................................................................................5 Description ................................... ....................................................................................................................................... 5 Control and control accessories .................................................................................................................................................... 5 Control function............................................... .......................................................................................................... 6 2 Operation ............................................................................................................................................................................................... 9 2.1 Choosing installation location........................................................................................................................................................9 2.2 ProCon HT terminals...................................................................................................................................................................... 9 2.3 Hydraulic connection ....................................................................................................................................................... ………...10 2.4 Gas connection ............................................................................................................................................................................ 10 2.5 Condensed water outlet ................................................................................................................................................................ 11 2.6 Flue gas outlet/ air supply pipe connection .............................................................................................................................................................................................................. 11 2.6.1 Excerpt from the model building code............................................................................................................................................ 12 2.6.2 Excerpt from the model ordinance on combustion equipment.................................................................................................... ……12 2.6.3 Cleaning and test openings ........................................................................................................................................................ 13 2.6.4 Installation types for gas condensing appliance............................................................................................................................. 13 2.7 Maximum pipe lengths, flue gas systems for ProCon HT 150 / HT 225........................................................................................... 15 2.7.1 Room air independent operation – C33, C 43, C53 , C63 , C83............................................................................................................. 16 2.8 Electrical connection .................................................................................................................................................................... 24 3 Start up ................................................................................................................................................................................................... 27 3.1 3.2 3.3 3.4 3.5 OperationProCon HT 150 / HT 225 .............................................................................................................................................. 27 Setting boiler and room setpointvalue............................................................................................................................................ 27 Setting domestic water temperature ............................................................................................................................................. 27 Programming of ProCon HT 150 / HT 225 .................................................................................................................................... 27 Starting up ProCon HT 150 / HT 225........................................................................................................................ ……………….28 4 Hydraulic schemes ................................................................................................................................................................................ 30 4.1 4.2 4.3 4.4 4.5 4.6 4.7 4.8 Scheme 1: One pump heating circuit and domestic water storage tank with charge pump.................................................................. 30 Scheme 2: Two pump heating circuits and domestic water storage tank with charge pump . ............................................................... 32 Scheme 3: One pump heating circuit, one mixing heating circuit, and domestic water storage tank with charge pump.......................... 34 Scheme 4: Two mixing heating circuits and domestic water storage tank with charge pump .............................................................. 36 Scheme 5: One pump heating circuit, three mixing heating circuits, and a domestic water storage tank with charge .......................... 38 Scheme 6: Two cascades, one pump heating circuit, and domestic water with Charge pump ........................................................... 40 Scheme 7: Two cascades, one pump heating circuit, one mixing heating circuit, and domestic water with charge pump .................... 42 Scheme 8: Two cascades, four mixing heating circuits and domestic water storage tank with charge pump...................................... 44 5 Maintenance.......................................................................................................................................................................................... 47 5.1 5.2 Maintenance............................................................................................................................................................................. 47 Tasks for execution... .................................................................................................................................................................. 47 2 6 Troubleshooting..............................................................................................................................................................................49 6.1 Error messages.................................................................................................................................................................. ..49 6.1.1 Error code............................................................................................................................................................................49 7 Technical documentation ................................................................................................................................................................50 7.1 7.2 7.3 7.4 7.4.1 7.5 7.5.1 7.5.2 7.6 7.7 7.8 7.9 7.10 7.11 7.12 7.13 7.14 7.15 Static delivery head ProCon HT 150 / HT 225 ....................................................................................................................... 50 System resistance curve, flow sensor, domestic water sensor, boiler, and flue gas sensor..........................................................50 System resistance curve, outdoor sensor.............................................................................................................................51 Control panel AGU 2.361...................................................................................................................................................... 52 Display mode and programming of AGU 2.361...................................................................................................................... 54 Display levels ....................................................................................................................................................................... 55 Setting the heating capacity with QAA 73 ............................................................................................................................... 56 Programming of LMU via QAA 73 ......................................................................................................................................... 56 LMU parameters .................................................................................................................................................................... 56 ProCon HT 150 / HT 225 electrical connections................................................................................................................... 60 Technical data RVA 47..................................................................................................................................................... …...61 Measurements and connecting dimensions.............................................................................................................................. 62 ProCon HT 150 / HT 225 technical data.................................................................................................................................. 63 Diagram of replacement part of boiler body, gas/air duct and fan................................................................................................ 64 Diagram of replacement part of frame and panel.......................................................................................................... ………….65 Diagram of replacement part of flue gas collector....................................................................................................................... 66 Diagram of replacement part of water deflector and boiler body .................................................................................................. 67 Legend for exploded diagram ................................................................................................................................................... 68 8 Warranty .............................................................................................................................................................................................72 8.1 Warranty ................................................................................................................................................................................ 72 8.2 Replacement parts..................................................................................................................................................................... 72 Guarantee certificate........................................................................................................................................................................... 72 EC model declaration of conformity ..................................................................................................................................................... 73 3 Important notice This manual is aimed at personnel from companies specialized in heating equipment. It contains the necessary information on installing and setting ProCon HT 150 / HT 225. This symbol is for instructions to follow with respect to your safety and that of others. This symbol is for instructions to follow for proper functioning of the appliance, the compliance with statutory provisions or for facilitating your work. Important safety instructions! Before starting installation, please note the following instructions carefully. They are very important for your safety. Only qualified personnel from companies specializing in heating equipment should install the gas condensing boiler appliance. Electrical specialists should only carry out work on mains voltage-bearing parts. Installation, modifications, or maintenance work on gas appliances in buildings should only be carried out by gas utility companies or by installation agents authorized by the gas utility company. Follow these instructions carefully when carrying out installation. In order to be sure that you are executing all the work properly, you should have this manual on hand during installation. This manual should remain on the gas condensing boiler appliance for future use. MHG shall not be liable for damages because of non-compliance with these instructions. The gas-condensing boiler must be disconnected from the mains before performing any work on it. The gas shut-off valve should be closed and secured against accidental leakages. Please note the scope of application of the DVGW-worksheet G 600 (TRGI), of DIN 4756, DIN 4751 Pt 3, DIN 1988, DIN 50930. Do not make any changes to the components of the gas-condensing boiler. The components should only be replaced with original MHG parts Observe the provisions of code for state buildings with regard to furnaces. According to state law provisions, Prior notification or permission is required for boilers. © 2005 MHG Heiztechnik GmbH The information contained herein applies exclusively to high-capacity boilers in the standard configuration. MHG Heiztechnik will not be liable for any possible damages due to difference in product specifications from the standard configuration. MHG Heiztechnik will not be liable for any damages because of work done by a third party. 4 ProCon HT 150 / HT 225 1 1. Installation Installation • Overview of boiler control system 1.1 Scope of delivery ProCon HT 150 / HT 225 Gas condensing boiler, fully piped and wired, configured for natural gas group E (H) Included in the gas condensing boiler delivery are: ProCon Standard: - An “Installation/operation/maintenance” instruction manual - An outdoor temperature sensor with screws and plugs - Cascade controller RVA 47.320, weather-controlled with weekly time switch program operation - Water deflector (integrated) ProCon Master: - An “Installation/operation/maintenance” instruction manual - An outdoor temperature sensor with screws and plugs - Cascade controller RVA 47.320 weather-controlled with weekly time switch program operation - Cascade flow and return temperature sensor - Without water deflector ProCon Slave: - An “Installation/operation/maintenance“ instruction manual 1.2 Description Text for invitation of tender ProCon HT 150 / HT 225. 1.3 Control and control accessories ProCon HT 150 consists of two 75 kW heat generator modules as well as a cascade and heating circuit controller (RVA 47).Each heat generator module features a module control unit (LMU). The LMU controls and regulates the heat generator module. ProCon HT 225 consists of three 75 kW heat generator modules as well as a cascade and heating circuit controller (RVA 47). Each of the three heat generator modules features a module control unit (LMU). The LMU controls and regulates the heat generator module. By means of the corresponding control panel (AGU), each LMU can be manually switched on or switched to control stop for the purpose of adjustment. Fig. 1: Functional mechanism of boiler control system: RVA 47: Cascade and heating circuit controller LMU: Module control unit 1, 2, 3 OCI: Bus clip-in module AGU: Control panel module 1, 2, 3 • Cascade and heating circuit controller (RVA 47) It is used for the cascade control of two or three heat generator modules or up to six Pro- Con HT 150 or four ProCon HT 225s in the case of multiple devices. Only 1 controller is required in the master device. The other devices communicate with the master device via LPB system bus. The optimized operation of all activated boilers with the lowest possible capacity as well as control of operation sequence combined with the boiler heat-up times ensure constant loading of the boiler. Features - flow temperature control for radiators dependent on outdoor temperatures - 1 Pump heating circuit - Domestic water circuit - Freely selectable timing program - Demand-dependent pump control - Frost protection function - Simple electrical connections - Integrated 2-wire interface for direct connection to LPB system bus 5 1. Installation The radiator flow temperature can be monitored as follows (control types): - Only outdoor temperature controlled - Outdoor temperature and time controlled - Outdoor temperature and time controlled with outdoor temperature effect over room unit QAA 70 - By means of a 0-10 V signal See installation/ operation/maintenance RVA 47 for more information. ProCon HT 150 / HT 225 • Domestic water sensor QAZ 21 94.19314-5002 (4 meters) 94.19314-5003 (6 meters) Storage tank sensor QAZ 21 for recording hot water storage tank temperature for ProCon HT 150 / HT 225 cascade (RVA 47) with connection cable 2 x 0.5 mm², Ni 1000 Ohms at 0°C. 1.4 Control function • Module control unit (LMU) • Boiler circuit temperature control The LMU incorporates all safety and control functions of the heat generator module. The burner starts at the request for heat by the heating circuit. The temperature control integrated in the LMU ensures the attainment and maintaining of the boiler temperature according to the given set point value of the RVA 47 by changing the burner capacity. Features: - Control unit function of automatic burner - Burner capacity regulation with fan speed control - Boiler temperature control - Electronic safety temperature limiter with boiler flow and return sensors for regulation and monitoring - Safety temperature limiter via flue gas temperature sensor - Automatic pump function and anti-block function - Simple electrical connections - Flame control and ignition with a joint electrode • Bus clip-in module (OCI) The OCI is used to communicate via a 2-wire interface and enables the set-up of the system between LMU and RVA 47 with LPB bus. • Demand-dependent boiler circuit control The RVA 47 calculates the outdoor temperature, heating curves and individual timing program to establish the present set point temperature for the boiler circuit. To enable the "outdoor temperature dependent weather control" function, an outdoor sensor is connected to the cascade controller. • Automatic pump function / Pump kick To prevent pump malfunction, the boiler controls executes a pump kick as soon as a pump is not in operation for 24 hours. The duration of the pump kick is adjustable. • Pump overrun • Control panel (AGU) The individual LMU's can be controlled via the AGU, e.g. when adjusting the combustion values during start-up or servicing. The operation statuses and boiler temperature are indicated on the AGU segment display. • Outdoor sensor (QAC 31) Outdoor sensor QAC 31 for wall mounting, protection code IP 21, safety class II safety extra low voltage, NTC, including plugs and fastening screws. • RVA controller, see description of total price list A pump-overrun time can be programmed for the heating circuit pumps. If there is no request for heat for the boiler circuit, the pump will run for the set overrun time. • Hot water regulation The hot water regulation takes place by means of a storage tank sensor with programmable histeresiz. The set point values for the hot water temperature and excess hot water volume can be permanently programmed. Charging of the storage tank can be done prior to or simultaneously with the heating operation. (Factory setting: Prior) Charging of the storage tank starts once the sensor receives a signal for a call for heat. In addition to that, the cascade controller adjusts the boiler temperature to the hot water set point value plus the programmed excess hot water volume in order to enable a burner modulation. 6 1. Installation ProCon HT 150 / HT 225 • Pump overrun for domestic water pump • Safety temperature limiter STL (boiler) In order to use the residual heat of the boiler after it is charged with domestic water, the boiler control carries out a pump overrun. The pump overrun is carried out depending on the boiler temperature until it falls below an adjustable temperature or for up to a maximum of one minute. The boiler control has a corresponding logic that uses the flow and return sensors to prevent overheating of the boiler. If the given temperature gap is exceeded, the capacity of the boiler will reduce. Should the switch off temperature be reached, the burner will switch off and the fan and pump overrun will be initiated. A corresponding error message appears on the display. If the boiler temperature falls below the switch-off temperature, the permanent safety switch-off may be released due to pressure on the unlocking push button. • Demand-dependent hot water regulation In the cascade controller is a timing program for domestic water charging and it can be used to adjust freely the charging times of the storage tank. • Safety temperature monitors STM (boiler) • Weather-dependent control The cascade controller is equipped with a weather-dependent control. In the weather dependent control, the flow temperature is regulated depending on the outdoor temperature and the specific values of the heating system. To increase the comfort in a living room and to save energy, the rapid heat-up,/ rapid cool-off function has been integrated into the cascade controller. This function ensures fast heating up of the room air during switch over from cool—off to day operation. During transition from day to cool-off operation, this function ensures that the system is turned off quickly. • Switching from day to cool-off operation: To calculate the flow temperature, the room temperature is taken into consideration if the room thermostat is on and the cool-off temperature is used if the room thermostat is off. If the programmed switch-off temperature of the STM is exceeded, the fuel supply will be switched off and the fan and pump overrun will be initiated. A corresponding error message appears on the display (see Chap 6.1 titled Error Messages). The system will restart automatically if the temperature reduces below the switch-off point. • Safety temperature limiter STL (Flue gas) If the programmed STL switch-off temperature for the flue gas circuit is exceeded, the boiler capacity will reduce. Should the flue gas temperature not reduce sufficiently afterwards, the fuel supply with be shut off and the fan and pump overrun will be initiated. A corresponding and clear error message will be indicated the display (see Chap 6.1 Error messages). If the STL temperature falls below the switch-off temperature, the permanent safety switch-off may be released due to pressure on the unlocking push button. • Switching from winter to summer operation: RVA 47 has an automatic summer / winter switchover control. The desired temperature can be set or deactivated with parameter 16. If the rated outdoor temperature is more than 1°C above the set switchover temperature, the system will switch to summer operation. • Sensor monitoring The boiler control recognizes and monitors the connected sensors. In the event of a error, a error message will be released • Boiler flow/return sensors If the outdoor temperature reduces by 1°C below the set switchover temperature, the system will go into winter operation. These sensors must always be present. They are being constantly monitored. If there is a sign of irregularity, the burner will switch off and a corresponding error message appears. • Domestic water operation • Outdoor sensor The domestic water operation can be switched on or off irrespective of the operation status of the cascade controller. When switching on the mains voltage, an automatic self-recognition of the outdoor sensors is carried out. The sensor is then monitored for short circuit and interruption. If there is no error when switching on the sensor, then all the functions associated with it stops. A corresponding error message will appear on the display (10). 7 1. Installation • Domestic water sensor If there is no sensor or if a short circuit occurs, an error warning (50) is triggered and all the functions associated with it are automatically deactivated. • Flue gas sensor These sensors must always be present. They are being constantly monitored. If there is a sign of irregularity, the boiler will automatically switch off. • Boiler’s frost protection functions Once the boiler temperature falls below 5°C, the function for the protection of the boiler from frost turns on the boiler. The boiler will then heat up instantly to a temperature of 20°C. • System’s frost protection The system’s frost protection ensures the protection of the system in the case of low outdoor temperatures by activating the pumps. This causes the water in the heating system to circulate. Depending on the current outdoor temperature, the pumps may be activated at intervals or permanently. The frost protection function can be deactivated. (See Parameter 33). • Boiler behaviour in event of malfunction The boiler operation will be shut off in the event of dangerous malfunctions with subsequent fan and pump overruns. Each error has its own error code (See Chap 6.1.1 Error Codes). • Emergency functions If the safety remains intact, the emergency functions will be on; in other words, the functions that are not affected by the errors will remain active. 8 ProCon HT 150 / HT 225 2. Installation ProCon HT 150 / HT 225 2 In b etri e b n ahm e • Mounting the boiler 2.1 Choosing installation location The boiler can be operated dependent or independent of the room air. The construction allows the boiler to be installed on any loadbearing surface. The boiler room must be dry and frost-free. Do not contaminate combustion air through homogenous hydrocarbon (e.g. in solvents, glues, paints [spray cans]), sulphurous compounds (oil chimney) or through excessive dust accumulation as this may cause burner malfunction or corrosion damage. Due to the low surface temperatures, the gas-condensing boiler and air/flue gas piping system do not need to be placed at a distance away from combustible parts. Use the following minimum clearances for connections and necessary setting and maintenance works: A D A Mount the boiler in such a way that a heater specialist can connect the lines at the back of the appliance. The boiler must be mounted securely and in a horizontal position. Check it again with a level. If necessary, adjust boiler using adjustable feet. The boiler has an integrated siphon: If any construction work is taking place during the installation of the condensing boiler that may create heavy formation of dust, the boiler should be protected against dirt with plastic sheet or the like. The dimensions specified refers to the basic dimension and do not include the required minimum clearance of 3% (3cm per meter of horizontal connection line) from the flue gas system to the boiler. 2.2 ProCon HT connections A C Fig. 2: Boiler room Minimum room height: 1800 mm Dimension [Dimension in mm] A 500 B 1000 C 700 D 680 E 1050 Table 1 Mounting dimensions Fig. 3: ProCon HT connections 9 2. Installation 2.3 Hydraulic connection The boiler is factory-equipped with an internal water deflector valve. ProCon HT 150 / HT 225 2.4 Gas connection • Explanations The boiler is a category II2ELL3P gas appliance. • Flushing out the heating system To prevent dirt in the gas-condensing boiler, an existing heating system must be flushed out thoroughly before installing the gascondensing boiler. MHG also recommends installing a dust collector in the return line of the heating system. If the heating system is equipped with an automatic filling system, a Spiro vent air/dirt separators must also be installed. The air separator should be mounted near the filling point. In “open loop” heating systems, the minimum system pressure should be 0.8 bars and a SPIRO VENT air separator must be inserted. We recommend that you install blocking agents in the heating flow and return pipes so that when carrying out any work on the boiler or the heating circuit in the future, water does not have to be drained off the entire system. For heating systems that are not diffusion-tight according to DIN 4726 - DIN 4729, a system separation by means of heat exchanger is necessary. Note that a safety valve must be installed in the flow pipe. • Pressure expansion tank Follow the DIN 4751 Part 2 regulations. The heating system and the boiler require a pressure expansion tank. When installing a pressure expansion tank, MHG recommends mounting a cap valve to facilitate service and maintenance. Do not undersize the pressure expansion tank. Select sufficient inlet pressure. A pressure expansion tank with insufficient inlet pressure will be ineffective. Before installation, check to make sure that the inlet pressure is sufficient. For proper sizing, it is advisable to follow the procedure in accordance with MHG information on “Sizing of pressure expansion tanks.“ Note that there should be no blocking devices in safety lines in the case of an external pressure expansion tank. Therefore, do not mount any ball valve on the corresponding line. 10 The Wobbe index ranges of the gas group are as follows: Group Ws min. Ws max. [MJ/m³] kWh/m³ [MJ/m³] kWh/m³ E LL 40.9 34.4 11.36 9.55 54.7 44.8 15.19 12.4 P 72.9 20.25 87.3 24.25 Table 2: Group E gas includes Group H gases; Group LL gases include Group L gases. When it is delivered, the gas-condensing boiler is set to natural gas E. To operate it with natural gas LL, the compact gas fittings have to be reset. To switch to liquid gas, you must order and install (see "Changing gas nozzle" ) conversion kit for liquid gas (ProCon HT 150: Code No. 96.38200-7033, ProCon HT 225: Code No. 96.38200-7034) • Installation of gas Note the scope of application of DVGW worksheet G 600 (TRGI) or the technical regulations on liquid gas (TRF). Only authorized gas fitters from utility companies should perform work on the gas appliances. Specify the dimensions of the connection lines according to TRGI or TRF. The gas appliances must be equipped with operating pressure (gas) of up to a max. of 70 mbar with unlock able connections. For the connection, use rigid pipes or hose pipes in accordance with DIN 3383 Pt 2. The gas inlet pipe must be equipped with a shut-off valve. We recommend that you install a thermally activated safety valve (TAS) in the gas feed in front of the shut-off valve. It is stipulated in the new model ordinance for combustion equipment. A gas fine filter should be installed in the inlet pipe. Dirt may cause improper functioning of the gas fittings. If you want to operate the gas-condensing boiler with liquid gas below ground level, you must install an additional gas magnetic valve outside the building. 2. Installation ProCon HT 150 / HT 225 • Testing tightness Before start-up, the gas inlet pipe must be checked for tightness. Push the gas inlet pipe only up to the system shut-off valve. Note that the gas fitting cannot withstand the hightest pressure. • Changing the gas nozzle The boiler has been preset for natural gas E (or H). For natural gas LL (or L), the gas quantity must be adjusted via the compact gas fitting. To operate it with liquid gas, liquid gas nozzles (Ø 10 mm) must be screwed into the outlet side of the compact gas fitting. A conversion kit for liquid gas is available under (ProCon HT 150: Code No. 96.38200-7033, ProCon HT 225: Code No. 96.38200-7034). Use nozzles according to the table below: Gas type Natural gas E (H) Natural gas LL (L) Liquid gas propane Ø Nozzle 15 mm 15 mm 10 mm Table 3: Nozzle openings During conversion to liquid gas, attach the sign from the conversion kit onto the appliance. 2.5 Condensed water outlet • Explanations The standards for discharging condensed water from gas condensing boilers into the public sewage system are set by the local sewage disposal regulations. They lean toward the directives of German Wastewater Association (ATV) defined in the ATV worksheets A 115 and A 251. Note the local regulations on discharging of condensed water from gas condensing boilers into the public sewage system. Do not use metal pipes or parts to drain the condensed water. • Do not let water accumulate in the pipe (The outlet pipe must not sag or bend) • Do not connect any additional siphon permanently. • Neutralization When operating the condensing boiler, slightly acidic condensed water (pH value between 4.0 and 5.5) accumulates due to the low flue gas temperatures in the boiler as well as in the flue gas system. The accumulated condensed water is discharged via the integrated neutralization unit into the drainage system. The neutralization unit is filled with neutralization granules. The condensed water uses up the granules during operation of the boiler. The required refills must be determined during the first year because the consumption depends greatly on the operational mode of the boiler. As a reference value we can assume that 1 kg neutralization granules is sufficient for 5000 m³ of natural gas. 2.6 Flue gas outlet / supply air connection • General information The flue gases of the condensing boiler ProCon must be discharged into the open air via an approved pressure-tight and moisture-proof flue gas system. MHG offers appropriate flue gas systems. The fitter should measure or specify the dimensions of the flue gas pipes for heating purposes and install them in accordance with the approval and building supervisory regulations. For the firing measurement, DIN 4705 “Firing calculation of chimney dimensions; Terms, detailed calculation procedure” (Edition: 1993-10) shall apply. Please note the construction supervisory regulations, especially the respective applicable state building code and the state ordinance for combustion equipment. Flue gas systems must have test or clean-out openings for examination and if possible cleaning. We therefore recommend that you include the competent local chimney sweep in the planning stage of the flue gas system. He knows the important construction supervisory regulations. The combustion air can be supplied to the gas-condensing boiler depending on the room air in the boiler room or independent of the room air via combustion air pipes that are concentrically installed around the flue gas pipes. (supply air/flue gas pipe systems). • Mounting condensed water outlet The condensed water outlet pipe is located on the back of the boiler. Use only plastic pipes to drain off the condensed water. Do not use metal pipes. The boiler is equipped with a built-in siphon. 11 2. Installation MHG recommends room air independent operation because this operation mode has major advantages: - Additional energy saving due to preheating of the combustion air - No cooling-off of the building because there are no air inlets - and outlets. Improvement of the condensation ratio of existing systems with high design/flow temperatures (condensed water accumulation is higher because the supply air/ flue gas system functions as an additional heat exchanger), especially when the condensing boiler is in constant operation mode Installation and routing of the flue gas pipes are distinguished as follows: - Routing of the flue gas pipes within ducts. - Routing of the flue gas pipes with no installation in ducts. - Flue gas systems should be installed in ducts as defined by the - State ordinances for combustion equipment, if they bypass floors within a building. Flue gas pipes do not have to be installed in ducts within the installation room of the furnaces if for instance the ceiling of the installation room of the furnace is part of the roof, or even outside buildings. The horizontal part of the gas pipe should be connected to the gas-condensing boiler and must be gas and condensate proof. At the same time, there should be a 3% minimum clearance from the vertical part of the flue gas pipe to the boiler, so that the condensed water that accumulates in the flue gas pipe can be drained off via the condensed water line of the flue gas collection pipe located in the boiler. 2.6.1 Excerpt from the model building code The following excerpt from the model building code is representative of the State building code. Furnaces and flue gas systems such as chimneys, flue gas pipes, and connecting pieces (heating equipment), systems for discharging combustion gases of stationary combustion motors as well as tanks and pipes for combustible gases and liquids must be safe to operate and fireproof and other than that, they should not cause any potential danger or disturbances. The sound conduction in remote rooms must be adequately insulated. ProCon HT 150 / HT 225 Flue gases from closed combustion furnaces that have inflow of combustion air from the outdoors via leak proof pipes (room air independent gas furnaces) , in divergence from the provisions of the above-named clause, may be discharged through the outside wall into the outdoors if it is not possible to discharge the flue gases through a roof or if it is only possible with disproportionately high costs. Flue gases from closed combustion furnaces that have inflow of combustion air from the outdoors via leak proof pipes (room air independent gas furnaces), in divergence from the provisions of the above-named clause, may be discharged through the outside wall into the outdoors if: 1. It is not possible to discharge the flue gases through a roof or only with disproportionately high costs and 2. The rated heating capacity of the furnace, 11 kW for heating and 28 kW hot water heating is not exceeded and dangers or unreasonable disturbances do not occur. 2.6.2 Excerpt from the model ordinance for combustion equipment The following excerpt from the model ordinance for combustion equipment is representative of the State ordinance for combustion equipment. The flue gas systems must be measured according to internal cross section and height, if necessary according to the thermal resistance and inner surface in such a way that in all normal operating conditions, the flue gases can be discharged into the outdoors and will not cause any overpressure to rooms. (As a result, overpressure pipes that bypass floors within buildings must be installed in rear-ventilated ducts.) In buildings, each flue gas pipe that bypasses floors must be placed in individual ducts. This does not only apply to flue gas pipes in installation rooms for furnaces but also to flue gas pipes that are operated under reduced pressure and have fire rating of at least 90 minutes. The placement of several flue gas pipes in a joint duct is allowed if: 1) The flue gas pipes are not made up of non-combustible building materials, Flue gas systems must be easy and safe to clean. 2) The corresponding furnaces are installed on the same floor or The flue gases from the furnaces should be discharged through the roof. 3) Fire transmission between the floors is prevented by automatic shut-off devices. Flue gas systems should be built in such numbers and condition that the furnaces of the building can be connected properly. Exception to Clause 1 may be granted if there are no occurrences of danger or unreasonable disturbances. The ducts must have a fire rating of at least. 90 minutes and at least 30 minutes in low-rise residential buildings. 12 2. Installation ProCon HT 150 / HT 225 Explanation: The term “low-rise building” is explained in building codes of the Bundesländer (states) under the paragraph titled “Terms.” According to the model building code, they are referred to as buildings in which the floor of any story where it is possible to have installation rooms, does not lie more than 7 meters above the ground surface at any point. Flue gas pipes that cannot be cleaned through the mouth must have an additional (upper) cleaning aperture that is - up to 5 meters below the mouth of the flue gas pipe or - up to 15 meters below the mouth of the flue gas pipe if only gas furnaces are installed and the vertical section of the flue gas pipe is not routed (extended) at more than max. one x max. 30° diagonally - For flue gas pipes that are shorter than 5m or 15 meters, the lower cleaning aperture alone is sufficient as long as there is a platform of at least 1 meter x 1 meter. For flue gas pipes that are connected to furnaces, a cleaning aperture is generally sufficient if, - The vertical section of the flue gas pipe is no longer than 15 meters and is routed (extended) at max. one x max. 30° diagonally - The cleaning aperture in the horizontal section is at max. 0.3 meters away from the vertical section - The horizontal section in front of the cleaning aperture is not longer than 1.5 meters and does not contain more than 2 elbows - All deflections (including from the horizontal to the vertical section of the flue gas pipe) are done through elbows with a bend radius that is larger or equivalent to the diameter of the gas pipe - The diameter of the gas pipe is not more than 150 mm. Fig. 4: Duct quality for flue gas pipes 2.6.3 Cleaning und test openings Flue gas systems as defined by the model building code and the state building code must be easy and safe to clean. In addition to that, it must be possible to test their profile and gas tightness. Make sure you can test and clean the cross-section between the flue gas pipe and the duct (rear ventilation) . The cross-section is necessary for reliable operation of the heating system. Cleaning apertures in the ducts must be at least 100 mm wide and 180 mm high. The width can be set at 90 mm if the height is at least 240 mm. 2.6.4 Installation types for the gas-condensing boiler The number, the condition, and the required dimensions should be coordinated with the competent local chimney sweep. These conform to the assessment criteria that are agreed upon with the building supervisory bodies. They include the following excerpts: The lower cleaning aperture of a flue gas pipe should be located - In the vertical part of the flue gas pipe directly above the flue gas deflection or to the side - In the horizontal part of the flue gas pipe at a maximum of 0.3 meters away from the deflection to the vertical part or - In the horizontal part of the flue gas pipe on the front side at a maximum of 1 meter away from the deflection to the vertical part, if there is no deflection in between. Room air independent operation – C33, C43, C63 Use only components approved and provided by MHG to discharge the flue gases and for supplying air. • Installation type C33 C33 =- Gas appliance (Fan in front of the burner) with flue gas system that draws the combustion air from outdoors via a closed system (room air independent gas furnaces). - Gas furnaces with combustion air supply and flue gas outlet vertically above the roof; the mouths are located close together in the same pressure range. 13 2. Installation • Installation type C43 C43 = - Gas appliance (Fan in front of the burner) with flue gas system that draws the combustion air from outdoors via a closed system (room air independent gas furnace). - Gas furnace with combustion air supply and flue gas discharge for connection to an air/flue gas system (across different ducts). • Installation type C63 C63 =- Gas appliance (Fan in front of the burner) with flue gas system that draws the combustion air from open outdoors via a closed system (room air independent gas furnace). - Gas furnace designated for connection to combustion air supply and to the discharge line of the flue gas and that has not been checked with the gas furnace. • Air/flue gas terminal Flue gas pipes have a nominal width of 160 mm and for air inlet pipes it is 125 mm. To put the flue gas pipes together, you can use approved lubricants or water. The seals of the air inlet pipe should be lubricated. • Ducted air/flue gas system The gas-condensing boiler ProCon is connected to an MHG air/flue gas system made of plastic. The building supervisory authority generally approves the methods of ducted installation. Note the approval certificate of flue gas pipe: No.: Z-7.2-3266 (room air independent) and No. Z-7.2-3265 (room air dependent) for configuration and design. • Room air dependent operation - B23 B23 = - Gas appliance (Fan in front of the burner) with flue gas system that draws the combustion air from the installation room (room air dependent gas furnace). - The flue gas discharge takes place under reduced pressure as well as under overpressure. Use only components approved and provided by MHG for drainage and for supplying air 14 ProCon HT 150 / HT 225 2. Installation ProCon HT 150 / HT 225 2.7 Maximum pipe lengths, Flue gas systems for ProCon HT 150 / HT 225 Flue gas outlet in a duct, connecting pipe 2 meters with 2x 87° - deflection Room air dependent operation mode ProCon Connecting pipe Riser max. Length [m] Duct size HT 150 DN 160 DN 125 rigid 26 m 180 x 180 mm HT 150 DN 160 DN 125 flexible 17 m 180 x 180 mm HT 150 DN 160 DN 160 rigid 28 m 220 x 220 mm HT 225 DN 160 DN 160 rigid 40 m 220 x 220 mm Air supply from the boiler room Room air independent operation mode ProCon Connecting pipe Riser max. Length [m] Duct size HT 150 DN 160 DN 125 rigid 27 m 220 x 220 mm HT 150 DN 160 DN 160 rigid 40 m 220 x 220 mm HT 225 DN 160 DN 160 rigid 23 m 220 x 220 mm HT 225 DN 160 DN 160 rigid 40 m 260 x 260 mm Air supply: Air intake can take place via the annular gap of the duct or through the outer wall. Max. resistance of the air inlet pipe is 100 PA. With additional deflections and a more than 2m long connecting pipe, the full installation length reduces. Each additional elbow reduces the installation height by 1m respectively. The specifications are standard values and in borderline cases need to be calculated according to EN 13384-1. 15 2. Installation ProCon HT 150 / HT 225 2.7.1 Room air independent operation – C33, C43, C53, C63, C83 Use only parts provided and approved by MHG to discharge the flue gases. • Installation type C33 Room air independent operation mode; ducted flue gas pipe - Gas appliance (Fan in front of the burner) with flue gas system that draws the combustion air from the outdoors via a closed system (room air independent gas furnace). - Gas furnace with combustion air supply and flue gas outlet vertically above the roof; the mouths are located close together in the same pressure range. Fig. 5. 16 C33 – Room air independent operation; Flue gas pipe in a duct or chimney ProCon HT 150 / HT 225 2. Installation • Installation type C43 Room air independent operation mode; connection to an air/flue gas/duct system (LAS) - Gas appliance (Fan in front of the burner) with flue gas system that draws the combustion air from the outdoors via a closed system - (room air independent gas furnace). Gas furnace with combustion air supply and flue gas outlet for connection to an air/flue gas system (across different ducts). Fig. 6: C43 – Room air independent operation; Connection to an air/flue gas duct system (LAS) 17 2. Installation ProCon HT 150 / HT 225 • Installation type C53 Room air independent operation mode; with separate combustion air supply and flue gas outlet. The mouths are located in different pressure ranges - Gas appliance (Fan in front of the burner) with flue gas system that draws the combustion air from the outdoors via a closed system (room air independent gas furnace). - Gas furnace with separate combustion air supply and flue gas outlet: The mouths are located in different pressure ranges. Fig. 7: 18 C53 – Room air independent operation; with separate combustion air supply and flue gas outlet; The mouths are located in different pressure ranges 2. Installation ProCon HT 150 / HT 225 • Installation type C63 Room air independent operation mode; connection to a combustion air supply and flue gas outlet that has not been checked with the gas furnace. - Gas appliance (Fan in front of the burner) flue gas system that draws the combustion air from the outdoors air via a closed system (room air independent gas furnace). - Gas furnace designated for connection to a combustion air supply and flue gas outlet not checked with the gas furnace. Fig. 8: C63 – Room air independent operation; Connection to a combustion air supply and flue gas outlet not checked with the gas furnace Air supply components Pos. 1 Description Rohr 1.000 mm Size DN 125 Material PPs Code No. 96.00060-1210 Table 4: List of air supply components for installation type C63 19 2. Installation ProCon HT 150 / HT 225 • Installation type C83 Room air independent operation mode; with flue gas connection to a joint flue gas system (reduced pressure operation) and separate combustion air supply from the outdoors - Gas appliance (Fan in front of the burner) flue gas system that draws the combustion air from the outdoors air via a closed system (room - air independent gas furnace). Gas furnace with flue gas connection to a joint flue gas system (under pressure operation) and separate combustion air supply from the outdoors. Fig. 9: 20 C83 – Room air independent operation; with flue gas connection to a joint flue gas system (reduced pressure operation) and separate combustion air supply from the outdoors ProCon HT 150 / HT 225 2. Installation • Installation Type B23 Room air dependent operation; Flue gas pipe ends in moisture-proof chimney - Gas appliance (Fan in front of the burner) with flue gas system that draws the combustion air form the installation room (room air dependent gas furnace). - The flue gas system can operate both under reduced pressure and under overpressure. Fig. 10: B23 – Room air dependent operation; Flue gas pipe ends in moisture-proof chimney 21 2. Installation • Installation Type B23 Room air dependent operation; flue gas pipe in chimney Fig. 11: B23 – Room air dependent operation; Flue gas pipe in chimney 22 ProCon HT 150 / HT 225 2. Installation ProCon HT 150 / HT 225 Use only allowed lubricants to connect flue gas pipes. Make sure horizontal components have a 3% clearance from the boiler (3 cm by 1 meter in length), because condensed water could otherwise accumulate in the flue gas pipe. Condensed water in the flue gas pipe may cause operational malfunction. If the combustion air / flue gas outlet is routed through a ceiling that must have a fire resistance duration, the panel through to the panel roof cladding must correspond to the fire rating of the ceiling. • Legend for the above flue gas examples Pos. 1 2 3 10 11 12 13 14 15 21 22 23 Description Code No. Flue gas pipe with measuring nipple DN 160, PPS PPS pipe DN 160x250 mm PPS pipe DN 160x500 mm PPS pipe DN 160x1000 mm PPS pipe DN 160x2000 mm PPS revised pipe DN 160 Inlet air screen Fixed vent screen, rigid DN 160, Stainless steel Chimney support DN 160, 87°, PPS Spacer DN 160, total 2 m Fixed chimney head cover, rigid, DN 160, Stainless steel Flap valve 96.00060-1785 96.00060-0740 96.00060-1705 96.00060-1710 96.00060-1720 96.00060-1770 PPS pipe DN 125x250 mm PPS pipe DN 125x500 mm PPS pipe DN 125x1000 mm PPS pipe DN 125x2000 mm PPS pipe DN 125x500 mm with measuring nipple PPS revised pipe DN 125 96.00060-0690 96.00060-1205 96.00060-1210 96.00060-1220 96.00060-0691 96.00060-1270 96.00060-1702 96.00060-1796 96.00060-1713 96.00060-1711 Table 5: 23 2. Installation 2.8 ProCon HT 150 / HT 225 Electrical connection Caution 230 V: Make sure all electrical components are disconnected. Follow the applicable VDE regulations. The electrical connection must be checked by an electrical specialist before connecting to the mains. To make electrical connections, there is a terminal block on the back of the boiler. The terminal block is protected with a cover plate against direct contact. Remove the cover plate first. Install the cables on the on the back of the appliance and connect them to the terminal block. After successful connection, replace cover plate. Connect the sensor line, the external heating circuit pump, the domestic water charge pump and where necessary, LPB bus or H1 pin directly to the terminal block on the back of the boiler. Fig 13: Terminal block layout for Legend: RU H1 BW AF BUS BW HK N L Fig 12: Terminal block for electrical connections electrical connections = Room unit = H1 Input (external switch contact) = Domestic water temperature sensor = Outdoor temperature sensor = Local Process Bus (LPB) = Domestic water charge pump = Heating circuit pump = Mains ground connection = Phase mains connection • H1 Input • Domestic water temperature sensor Terminal H1 is an input that has a different function depending on the selected setting. The terminal is open when the input is not in use. The storage tank sensor line is connected with a two-core cable (interchangeable) to the DW terminal. For resistance values, see diagrams in Chap 7.2. There are four functions available: - Operation mode switch by phone e.g. for a vacation home) - Minimum temperature requirement - Generator lock - Heat request The functions of H1 input are described in detail in MBW RVA 47.320 instruction manual included in the scope of delivery. 24 2. Installation ProCon HT 150 / HT 225 • Outdoor temperature sensor • Bus clip-in OCI 420 Connect the outdoor sensor with a two-core cable (interchangeable) to the ATS terminal. See table below for cable profile: The bus module makes it possible for the boiler control system to communicate with RVA series external control devices Length [m] Minimum section [mm²] Up to18 18…35 0.125 0.25 35…50 0.5 Table 6: For resistance values see diagrams in Chap 7.3 • BUS The Local Process Bus (LPB) is used as the communication base for setting up a system with additional MHG heating circuit controllers or external controllers. The terminal is open if the input is not in use. The functions of the LPB are described in detail in the MBW RVA 47.320 instruction manual included in the scope of delivery The maximum wire length of a double wire circuit for the bus is 100m. • DW pump Connects to an external domestic water charge pump. The boiler is equipped with an internal water deflector. • HC Pump Connects to an external heating circuit pump. The boiler is equipped with an internal water deflector. • Mains connection Connection to the mains is carried out on the terminal block with a 3 x 1.5 mm2 cable cross-section. Fig 14: Installationof bus clip-in The Bus clip-in is snapped directly unto the boiler control system and connected to the boiler control with a five-core ribbon cable (Terminal X40). (See pictures below). There is a 2-pin plug available for connecting to the LPB bus Make sure that ground and phase are not mixed up If an under floor heater runs directly with the boiler, then the recommended safety temperature limiter of the under floor heater should be looped into the mains lead of the under floor heating circuit/ circulation pump boiler. 25 2. Installation ProCon HT 150 / HT 225 OCI 420... features an LED for indicating its status. It indicates the status of the LPD and various faults. Status OCI not configured LED Blink code Constantly ON OCI and LMU incompatible (wrong parameter assigned to hydraulic system) 93% ON OFF Frequency: 1 Hz OCI configured LPB short circuit or no supply LPB address impermissible OFF 93% ON OFF Frequency: 1 Hz OCI configured LPB Ok OCI bus supply off 95% OFF Frequency: 1 Hz 70% OCI configured LPB Ok OCI bus supply on Table 7: Bus clip-in signals 26 ON ON OFF Frequency: 1 Hz 3. Start-up ProCon HT 150 / HT 225 3.1 Operating ProCon HT 150 / HT 225 ProCon HT 150 carries two 75 kW heat generator modules as well as a cascade and a heating circuit controller (RVA 47). Each heat generator module has a module control unit (LMU). The LMU controls and regulates the heat generator module. ProCon HT 225 carries three 75 kW heat generator modules as well as a cascade and a heating circuit controller (RVA 47). Each of the three heat generator modules has a module control unit (LMU). The LMU controls and regulates the heat generator module. By means of the corresponding control unit (AGU) each LMU can be manually switched on or switched to control stop for the purpose of adjustment. Con HT 150 / HT 225 control panel houses the cascade control, three AGU's, the main switch, the fuse and a pressure gage. 3.2 Setting boiler and room set point value The boiler and room set point value functions are described in detail in the installation/operation/maintenance RVA 47.320 instruction manual included in the scope of delivery. 3.3 Setting domestic water temperature The domestic water temperature function is described in detail in MBW RVA 47.320 instruction manual included in the scope of delivery. 3.4 Programming ProCon HT 150 / HT 225 All the parameters associated with the heating system should be set in the RVA . The functions of the controller are described in detail in MBW RVA 47.320 instruction manual included in the scope of delivery. The LMU can only be programmed by means of an optional QAA 73 indoor unit. Programming of the LMU is only necessary if you need to replace an original component. Unused heating circuits must be switched off in parameter 17 (Heating characteristics). Otherwise heat will be provided for nonexistent heating circuits. • LPB bus Allocation of device and segment addresses: The LPB bus organizes the connection of several heat generators and heating circuit controllers by allocating distinct addresses to the cascade and heating circuit controller RVA 47, the module control unit LMU as well as the heating circuit controllers. An expert allocates the addresses during start-up. Two parameters (Device address 140 and segment address 141) are available for this purpose. The allocation is carried out according to the following rules: Fig 15: Control panel RVA 47 assumes the cascade function, weather control, the heating program and the domestic water program. The functions of the controller are described in detail in MBW RVA 47.320 instruction manual included in the scope of delivery. 1. The controllers of the heat generator receive segment address 0. The controllers of the heating circuits receive segment address 1. The address format consists of two points for the segment address and two points for the device address separated by a period e.g. RVA 47 with the address 00.01 2. DRVA 47 always receives the Device address 1. RVA 47 can address up to 12 LMU's. The LMU of the heat generator module receives the Device addresses 2 upwards irrespective of whether it is the master or slave cascade boiler. 3. Never allocate an address twice. 27 3. Start-up 3.5 ProCon HT 150 / HT 225 Starting up ProCon HT 150 / HT 225 Before starting up, read the instruction manual carefully and makes sure that: - The gas pipe is adequately vented. If inadequately vented, heavy CO2 fluctuations will occur in the first minutes of operation. . The tank is well vented in the case of liquid gas equipment! The gas pipe is tested for tightness! Fig 16: Release the pump plugs Test the gas inlet pipe under pressure only up to the gate valve. Note that the compact gas fitting cannot withstand the high test pressure. - The heating system and if possible the storage tank are filled - and vented. The electrical connection was properly carried out. The hydraulics of the appliance is properly connected The condensate trap (siphon) is adequately filled. Check once again to make sure all necessary safety devices are properly installed. Then fill the appliance and the heating system. • Switching on and starting - Open all ball valves as well as the gas valve - Turn on device at the I/O switch - Change control with the button from standby continuous operation . • Setting the compact gas fitting • Filling process To determine the correct filling pressure, follow the manufacturer specifications of the pressure expansion tank. We recommend that you proceed according to MHG information on “Sizing of pressure expansion tanks”. A filling pressure of 0.5 to 0.8 bars above the inlet pressure of the pressure expansion tank is sufficient. To vent the boiler, open the hand vent on the heat exchanger and let the air escape into a pail through the enclosed plastic hose. Do not end filling until ProCon and the heating system have been completely vented. Add anticorrosive INIBAL Plus (1-2 kg to 100 l water to the heating circuit water, (see also Certificate of Warranty). • Filling the siphon To fill the siphons, pull out the condensate hose from the heat exchanger and carefully pour water into the siphon (approx. ¾ l) until the water flows out of the condensate outlet. • Inspecting the pumps - Inspect the circulation pumps - After unscrewing the pump plugs, turn the pump shaft (see picture below) - Screw in the pump plug once again - Caution: Collect drips 28 Fig 17: Kromschröder CG 10 compact gas fitting N = Adjusting screw Min. capacity D = Adjusting screw Max. capacity A = Measuring nipple input pressure B = Measuring nipple nozzle pressure Use 2.5 mm hexagon key for all settings– Do not apply force! to 4. Hydraulic schemes 4.1 ProCon HT 150 / HT 225 Scheme 1: A pump heating circuit und domestic water storage tank with charge pump With ProCon HT 150 up to a max. o f 6 boilers can be cascaded. With ProCon HT 225 up to a max. of 4 boilers can be cascaded. Fig 19: A pump heating circuit and a domestic water storage tank with charge pump • Components Typ e Compo nent ProCon HT 225 Single Domestic water sensor 30 Code number 96.30000-7080 QAZ 21 Annotation Included in the scope of delivery: Outdoor sensor QAC 31 94.19314-5002 Length 4 m 94.19314-5003 Length 6 m 4. Hydraulic schemes ProCon HT 150 / HT 225 • Electrical connections Compo nent Outdoor sensor Connection to: OS terminal HC pump 1 Terminal HC pump Domestic water sensor Terminal DW Domestic water charge pump Terminal DW pump Annotation • Programming: The appliance can be operated with the default setting. 31 4. Hydraulic schemes 4.2 ProCon HT 150 / HT 225 Scheme 2: Two pump heating circuits and domestic water storage tank with charge pump With ProCon HT 150 up to a max. of 6 boilers can be cascaded. With ProCon HT 225 up to a max. of 4 boilers can be cascaded. Fig 20: Two pump heating circuits and domestic water storage tank with charge pump • Components Compo nent Typ e ProCon HT 225 Single Control 96.30000-7080 RVA 63.280/380 Wall-mount enclosure for RVA 63 Domestic water sensor QAZ 21 32 Code number Annotation Included in the scope of delivery: Outdoor sensor QAC 31 94.80100-5510 94.85301-5004 94.19314-5002 Length 4 m 94.19314-5003 Length 6 m 4. Hydraulic schemes ProCon HT 150 / HT 225 • Electrical connections Component Connection to: Annotation Outdoor sensor OS terminal Two-wire bus Bus terminal Bus connection between wall-mount enclosure and boiler HC pump 1 RVA 63.280 Q2, N, HC pump 2 RVA 63.280 Q6, N, Domestic water sensor RVA 63.280 B3, M Domestic water charge pump RVA 63.280 Q3, N, • Programming Change default setting according to specification in the table. Contro ller RVA 63.280 Line Set point value Annotation 80 0 67 00.01 No generator 140 1 Device address 1 141 1 Segment address 1 148 1 Unadjusted system time Device address RVA 47 To program the control units RVA 47 and RVA 63, follow the corresponding instruction manuals. 33 4. Hydraulic schemes 4.3 ProCon HT 150 / HT 225 Scheme 3: A pump heating circuit, a mixing heating circuit and domestic water storage tank with charge pump With ProCon HT 150 up to a max. of 6 boilers can be cascaded. With ProCon HT 225 up to a max. of 4 boilers can be cascaded. Fig 21: A pump heating circuit a mixing heating circuit and domestic water storage tank with charge pump • Components Compo nent Typ e ProCon HT 225 Single 96.30000-7080 Domestic water sensor QAZ 21 Control unit RVA 46.531 Wall-mount enclosure for RVA 46.531 Flow sensor QAD 26 34 Code number Annotation Included in the scope of delivery: Outdoor sensor QAC 31 94.19314-5002 Length 4 m 94.19314-5003 Length 6 m 94.80100-5505 94.85301-5003 94.19314-5005 4. Hydraulic schemes ProCon HT 150 / HT 225 • Electrical connections Component Connection to Annotation Outdoor sensor OS terminal HC pump Terminal HC pump Domestic water sensor DW terminal Domestic water charge pump Terminal DW pump Two-wire bus Bus terminal Bus connection between wall-mount enclosure and boiler Flow sensor MK RVA 46.531 B3, M Pump MK RVA 46.531 Q2, N, Mixer motor MK RVA 46.531 Y1, Y2, N, • Programming Change default setting according to specification in the table. Contro ller RVA 46.531 Line Set point value Annotation 80 0 No generator 85 1 Device address 1 86 1 Segment address 1 87 1 Unadjusted system time 95 00.01 Device address RVA 47 To program the control units RVA 47 and RVA 63 please note the corresponding instruction manuals. 35 4. Hydraulic schemes 4.4 ProCon HT 150 / HT 225 Scheme 4: Two mixing heating circuits and domestic water storage tank with charge pump With ProCon HT 150 up to a max. of 6 boilers can be cascaded. With ProCon HT 225 up to a max. of 4 boilers can be cascaded. Fig 22: Two mixing heating circuits and domestic water storage tank with charge pump • Components Compo nent Typ e ProCon HT 225 Single 96.30000-7080 Domestic water sensor QAZ 21 Control unit RVA 63.280/380 Wall-mount enclosure for RVA 63 2 x flow sensors QAD 26 36 Code number Annotation Included in the scope of delivery: Outdoor sensor QAC 31 94.19314-5002 Length 4 m 94.19314-5003 Length 6 m 94.80100-5510 94.85301-5004 94.19314-5005 4. Hydraulic schemes ProCon HT 150 / HT 225 • Electrical connections Component Connection to Annotation Outdoor sensor OS terminal Two-wire BUS BUS terminal BUS connection between wall-mount enclosure and boiler Flow sensor MK 1 RVA 63.280 B1, M Pump MK 1 RVA 63.280 Q2, N, Mixer motor MK 1 RVA 63.280 Y1, Y2, N, Flow sensor MK 2 RVA 63.280 B12, M Pump MK 2 RVA 63.280 Q6, Mixer motor MK 2 RVA 63.280 Y5, Y6, N, Domestic water sensor RVA 63.280 B3, M Domestic water charge pump RVA 63.280 Q3, N, • Programming Change default setting according to specification in the table. Contro ller RVA 63.280 Line Set point value Annotation 80 0 67 00.01 No generator 140 1 Device address 1 141 1 Segment address 1 148 1 Unadjusted system time Device address RVA 47 To program the control units RVA 47 and RVA 63 follow the corresponding instruction manuals. 37 4. Hydraulic schemes ProCon HT 150 / HT 225 4.5 Scheme 5: A pump heating circuit, three mixing heating circuits and domestic water storage tank with charge pump With ProCon HT 150 up to a max. of 6 boilers can be cascaded. With ProCon HT 225 up to a maximum of 4 boilers can be cascaded. Fig 23: A pump heating circuit, three mixing heating circuits and domestic water storage tank with charge pump • Components Typ e Compo nent ProCon HT 225 Single Code number 94.19314-5002 Included in the scope of delivery: Outdoor sensor QAC Length31 4m 94.19314-5003 Length 6 m 96.30000-7080 Domestic water sensor QAZ 21 Control unit RVA 46.531 94.80100-5505 Wall-mount enclosure for RVA 46 Flow sensor MK 1 QAD 26 94.19314-5005 Control unit 94.80100-5510 RVA 63.280/380 Wall-mount enclosure for RVA 63 2 x Flow sensors MK 2 QAD 26 and MK 3 38 Annotation 84.83501-5003 94.85301-5004 94.19314-5005 4. Hydraulic schemes ProCon HT 150 / HT 225 • Electrical connections Component Connection to Annotation Outdoor sensor OS terminal HC pump Terminal HC pump Two-wire bus Bus terminal Bus connection between wall-mount enclosure and boiler Flow sensor MK 1 RVA 46.531 B3, M Pump MK 1 RVA 46.531 Q2, N, Mixer motor MK 1 RVA 46.531 Y1, Y2, N, Flow sensor MK 2 RVA 63.280 B1, M Pump MK 2 RVA 63.280 Q2, N, Mixer motor MK 2 RVA 63.280 Y1, Y2, N, Flow sensor MK 3 RVA 63.280 B12, M Pump MK 3 RVA 63.280 Q6, Mixer motor MK 3 RVA 63.280 Y5, Y6, N, Domestic water sensor RVA 63.280 B3, M Domestic water charge pump RVA 63.280 Q3, N, • Programming Change default setting according to specification in the table. Contro ller RVA 46.531 RVA 63.280 Line Set point value Annotation 80 0 No generator 85 1 Device address 1 86 1 Segment address 1 87 1 Unadjusted system time 95 80 00.01 0 Device address RVA 47 No generator Device address RVA 47 67 00.01 140 2 Device address 1 141 1 Segment address 1 148 1 Unadjusted system time To program the control units RVA 47 and RVA 63 follow the corresponding instruction manuals. 39 4. Hydraulic schemes 4.6 Scheme 6: Two cascades, one pump heating circuit and domestic water with charge pump With ProCon HT 150 up to a maximum of 6 boilers can be cascaded. With ProCon HT 225 up to a maximum of 4 boilers can be cascaded. Fig 24: Two cascades, one pump heating circuit and domestic water with charge pump 40 ProCon HT 150 / HT 225 4. Hydraulic schemes ProCon HT 150 / HT 225 • Components Compo nent Typ e Code number ProCon HT master Cascade 96.30000-7082 ProCon HT slave Cascade 96.30000-7084 Water deflector Domestic water sensor Annotation Included in the scope of delivery: Outdoor sensor QAC 31, Cascade controller, 2 strap-on sensors QAD 26 (s. Total price list) QAZ 21 94.19314-5002 Length 4 m 94.19314-5003 Length 6 m • Electrical connections Compo nent Outdoor sensor Connection to OS terminal HC pump Terminal HC pump Domestic water sensor DW terminal Domestic water charge pump Terminal DW Pump Two-wire bus Bus terminal Annotation Bus connection between boilers master and slave The strap-on sensor included in the scope of delivery must be placed on the structure of the water deflector HC flow sensor Lustre terminal in the appliance Boiler return sensor • Programming: Change default setting according to specification in the table. Contro ller Module control unit 4 Line Set point value Annotation 605 5 Device address Module control unit 5 605 6 Device address Module control unit 6 605 7 Device address To program the control units RVA 47 and RVA 63 follow the corresponding instruction manuals. 41 4. Hydraulic schemes ProCon HT 150 / HT 225 4.7 Scheme 7: Two cascades, one pump heating circuit, one mixing heating circuit and domestic water with charge pump With ProCon HT 150 up to a maximum of 6 boilers can be cascaded. With ProCon HT 225 up to a maximum of 4 boilers can be cascaded. Fig 25: Two cascades, one pump heating circuit, one mixing heating circuit and domestic water with charge pump 42 4. Hydraulic schemes ProCon HT 150 / HT 225 • Components Compo nent Typ e Code number ProCon HT master Cascade 96.30000-7082 ProCon HT slave Cascade 96.30000-7084 Water deflector Control unit Included in the scope of delivery: Outdoor sensor QAC 31, Cascade controller, 2 strap-on sensors QAD 26 (see Total price list) RVA 63.280/380 94.80100-5510 Wall-mount enclosure for RVA 63 Flow sensor for MK QAD 26 Domestic water sensor Annotation 94.85301-5004 94.19314-5005 QAZ 21 94.19314-5002 Length 4 m 94.19314-5003 Length 6 m • Electrical connections Component Connection to Outdoor sensor OS terminal Two-wire bus Bus terminal Annotation Bus connection between boiler master and slave as Well as Wall-mount enclosure Boiler return sensor Lustre terminal in the appliance The strap-on sensors included in the scope of delivery must be placed on the structure of the water deflector. HC pump 1 RVA 63.280 Q2, N, Flow sensor MK 2 RVA 63.280 B12, M Pump MK 2 RVA 63.280 Q6, Mixer motor MK 2 RVA 63.280 Y5, Y6, N, Domestic water sensor RVA 63.280 B3, M Domestic water charge pump RVA 63.280 Q3, N, HC flow sensor • Programming: Change default setting according to specification in the table. RVA 47 Contro ller Line Set point value Annotation 17 --- Heating circuit switched off Module control unit 4 605 5 Device address Module control unit 5 605 6 Device address Module control unit 6 605 7 Device address 80 0 No generator 67 00.01 140 1 Device address 141 1 Segment address 148 1 Unadjusted system time RVA 63 Device address RVA 47 To program the control units RVA 47 and RVA 63 follow the corresponding instruction manuals. 43 4. Hydraulic schemes 4.8 Scheme 8: Two cascades, four mixing heating circuits and domestic water storage tank with charge pump With ProCon HT 150 up to a maximum of 6 boilers can be cascaded. With ProCon HT 225 up to a maximum of 4 boilers can be cascaded. Fig 26: Two cascades, four mixing heating circuits and domestic water storage tank with charge pump 44 ProCon HT 150 / HT 225 4. Hydraulic schemes ProCon HT 150 / HT 225 • Components Compo nent Typ e Code number ProCon HT master Cascade 96.30000-7082 ProCon HT slave Cascade 96.30000-7084 Water deflector 2 Control units Annotation Included in the scope of delivery: Outdoor sensor QAC 31 as well as Cascade controller RVA 47, 2 strap-on sensors QAD 21, bus module OCI 420 (see Total price list) RVA 63.280/380 2 Wall-mount enclosure for RVA 63 3 x Flow sensor QAD 26 Domestic water sensor QAZ 21 94.80100-5510 94.85301-5004 94.19314-5005 94.19314-5002 Length 4 m 94.19314-5003 Length 6 m • Electrical connections Component Connection to Annotation Outdoor sensor OS terminal Two wire bus Bus terminal HC flow sensor Lustre terminal in the appliance Bus connection between the boiler master and slave The strap-on sensors included in the scope of delivery must be place on the structure of the water deflector. HC pump 1 Flow sensor MK 1 RVA 63.280 RVA 63.280 Q2, N, B12, M Pump MK 1 Mixer motor MK 1 Pump MK 2 RVA 63.280 RVA 63.280 RVA 63.280 Q6, Y5, Y6, N, Q2, N, Mixer motor MK 2 RVA 63.280 Y1, Y2, N, Flow sensor MK 3 RVA 63.280 B12, M Pump MK 3 Mixer motor MK 3 RVA 63.280 RVA 63.280 Q6, Y5, Y6, N, Domestic water sensor Domestic water charge pump RVA 63.280 RVA 63.280 B3, M Q3, N, Boiler return sensor 4. Hydraulic schemes ProCon HT 150 / HT 225 • Programming Change factory setting as specified in the table. RVA 47 Contro ller Line Set point value Annotation 17 --- Heating circuit switched off Boiler control 4 605 5 Device address Boiler control 5 605 6 Device address Boiler control 6 605 7 Device address 80 0 67 00.01 140 1 Device address 141 1 Segment address 148 2 Adjustable system time 80 0 67 00.01 140 2 Device address 141 1 Segment address 148 2 Adjustable system time 1. RVA 63 2. RVA 63 Device address RVA 47 Device address RVA 47 To program the control units RVA 47 and RVA 63, follow the corresponding instruction manuals. 46 5. Maintenance ProCon HT 150 / HT 225 5.1 Oil and burner control units should be inspected once a year. According to DIN 4755 and DIN 4756: Maintenance • Display of maintenance request After 12 months of operation, the maintenance message (105) will appear in the multifunction display (12) of the control unit. Code „1“ and „05“ will be displayed alternately. 14 15 16 The operator should make sure the system is checked once a year for operational reliability, functions and efficiency by an authorized manufacturer's agent or by another expert. This includes testing the smooth functioning of the entire system the immediate repair of any errors detected. We recommend that you conclude a maintenance agreement with the manufacturer. 17 7 • Chimney sweep function 13 8 P 9 12 The chimney sweep function enables the boiler to start-up in heating operation by pressing the chimney sweep button (9) on AGU 2.361. It is used for measurements on the boiler; it sets the maximum heating capacity through to addressing the temperature monitor. To enable the highest possible heat intake, the chimney sweep function produces the automatic signal for heat flow. Press the chimney sweep button (9) for more than 3 seconds but not longer than 6 sec. For confirmation, "SF" will appear on display (12) ; In addition to that, the error display (16) will blink once per unit of time. 11 74 94z08 /0 801 Finish off by pressing the chimney sweep for more than 1 sec. 10 Fig. 27: AGU2.361... 5.2 Important tasks • Reset maintenance request • Check gas type The maintenance message in queue in the multifunction display (12) is reset as follows: Check whether the gas type used has changed (Ask gas supplier for gas type). In case the gas type has changed, be reset burner accordingly (see page 29) 1. Press and hold display mode button (8) for more than 3 sec. The letter A will appear on the display. By pressing and holding the button further, it takes you through displays levels A, b, C, d and P. Release the button at level P. 2. By touching button (8) the parameter changes from P0 to parameter P3. After approx. 2 sec, the parameter value P3 will appear. 3. You can use display mode button (8) to increase the value. You can use the chimney sweep button (9) to reduce the value. Parameter P3 must be set to value 2. 4. Press and hold display mode button (8) for more than 3 seconds to store the value. • Check inlet pressure Measure the static pressure at the inlet of the gas fitting. Then switch on the burner and check the gas flow pressure at max. and min. capacity. • Check flue gas values Measure the CO and CO2 content in the flue gas and record the values in the test chart. If necessary, readjust the burner (see page 29). 5. If you do not wish to change the set value, wait for > 12 sec. The maintenance message is now complete and will not be active until after a year. EnEV recommends annual system maintenance. 47 5. Maintenance ProCon HT 150 / HT 225 • Check the hydraulic pressure switch • Clean the combustion chamber / heating surfaces Put the appliance in the heating mode and slowly release the system pressure. Below 0.5 bar the pressure switch should turn off the burner. In the multifunction display of the control unit the error display will be permanently on. The codes „1“ and „19“ will appear on the multifunction display alternately. During system refill (pressure > 0.8 bar) the burner will restart and the error signal will disappear. Check the heating gas end of the heat exchanger for dirt. Where necessary, clean the heat exchanger with a vacuum cleaner or with a nylon brush (does not use PVCs or wire brushes!) • Check expansion tank (MAG) For stubborn dirt, you can simply apply water. You can also use solventfree cleaning agents. You can remove soot deposits with alkaline agents that contain additional surfactants (e.g. Fauch 600). Check the inlet pressure of the pressure expansion tank. For films and yellowish-brown surface discolorations, you can use slightly acidic, chloride-free, phosphorous-based cleaning agents (e.g. Antox 75 E). If the inlet pressure of the pressure expansion tank is lower than the system static pressure, continue to fill in as much nitrogen as possible until the inlet pressure is higher than the system static pressure. Then fill the appliance until the filling pressure is higher than the inlet pressure of the expansion tank (see Check system pressure). Manufacturer of Antox 75 and Fauch 600: Oakite (Europe) GmbH Trakehner Straße 3 60487 Frankfurt • Check system pressure Check the system pressure. In the case of "open loop” heating systems the minimum system pressure should be 0.8 bar and a SPIRO VENT air separator should be inserted. In the case of “closed loop” heating systems with pressure expansion tank, the minimum system pressure should be 1 bar and the maximum system pressure should be 2.5. • Check water connections Check inside and outside the appliance to see whether there are any leakages on the flanges and joints. Even small leakages must be repaired. • Check burner and burner plate The cleaning agents must not contain hydrocarbonbased solvents or potassium. Rinse the surfaces thoroughly with water after cleaning. • Check and clean the condensed water siphon Carry out a visual inspection on the hoses of the inner siphon. • Check neutralization device Check the functioning of the neutralization device as described in the corresponding instruction manual. The pH value of the condensate should be lower than 6.5. • Check CO2 settings Remove the burner plate with fan, suction duct and the burner from the boiler body. After completing all maintenance work and proper assembly of the appliance, check the set CO2 values with closed cap once again and set the operation mode on the control to automatic. Check the seals and insulations of the burner plate for damages; if possible, replace them. Check the wire mesh on the surface of the burner. If the mesh is damaged, replace the burner as well as the burner seals. • Compact gas units Do not clean the burner mechanically. It may damage the surface of the burner. • Check the ignition and ionization electrodes Check the electrodes for dirt and wear. If a white layer has formed on the electrode, remove it with sandpaper. The clearance between the electrode and the burner surface should be approx. 4 mm. If you replace the electrode, you must also change the graphite seal. Use ceramic paste CRC (94.17464-5004) to mount the fastening screws of the ignition electrode. 48 The compact gas units are maintenance-free. Check only the housing for possible damages. 6. Troubleshooting ProCon HT 150 / HT 225 6.1 Error messages In the case of a permanent LMU error status..., the error display (16) will be on permanently. In addition to that, the diagnosis code sent out through flashes on the multifunction display (12). To clear the error status, press the release button (7) (> 2 s). 6.1.1 Error code Error code (Info Possible cause levelne A0) Parameters 1 and 2 must be set (even if they Blink time are correct) 0 No error 10 Error outdoor sensor 20 Error Boiler sensor 1 28 Error Flue gas sensor 40 Error Return sensor 1 50 Error Domestic water sensor 1 52 Error Domestic water sensor 2 61 Indoor unit 1 Error 62 Wrong indoor unit 1 connected or wrong radiocontrolled clock connected 77 Error Air pressure sensor 78 Error Hydraulic pressure sensor 81 Short circuit on the LPB... or no bus feed 82 Address mix-up on the LPB... 91 Data loss in EEPROM 92 Hardware error in the electronic system 100 2 Time masters 105 Maintenance request (see page 47) 110 STB actuated 111 Temperature switch actuated 113 Flue gas monitoring unit actuated 117 Hydraulic pressure too high 118 Hydraulic pressure too low 119 Hydraulic pressure switch actuated 130 Flue gas temperature limit exceeded 132 133 Error code (Info Possible cause level A0) Invalid LPB...Segment number or unit 140 number 148 LPB incompatibility...-Interface / basic unit 151 LMU internal error... 152 Error in the LMU...Programming 153 Appliance was locked manually (Reset button) 154 LMU data record in AGU 160 Fan revolution threshold not reached 161 Maximum fan revolution threshold exceeded 162 Error air pressure monitor (will not close) 164 Error heating circuit- flow switch / pressure monitor 180 Chimney sweep function active 181 Control stop function active 183 Appliance is in programming mode Table 10: Safety shut-off (e.g. by gas pressure switch) No flame formation at the end of safety time 134 Flame cut off during operation 135 Wrong air supply 49 7. Technical documentation 7.1 ProCon HT 150 / HT 225 Static delivery head ProCon HT 150 / HT 225 The boilers are equipped with an internal water deflector. Ignore the hydraulic resistance of the water deflector. 7.2 Resistance curve of flow sensor, domestic water sensor, boiler and flue gas sensor 1.900 1.800 1.700 1.600 1.500 1.400 1.300 1.200 1.100 1.000 900 800 Temperature [°C] 700 -50 -25 0 25 50 75 100 Fig. 28: Resistance curve Ni 1000 Ohm at 0°C Domestic water sensor QAZ 21, Flow sensor QAD 21 50 125 150 175 7. Technical documentation ProCon HT 150 / HT 225 7.3 Outdoor sensor resistance curve 1.900 1.800 1.700 1.600 1.500 1.400 1.300 1.200 1.100 1.000 900 800 Temperature [°C] 700 -50 -25 0 25 50 75 100 125 150 175 Fig. 29: Resistance curve NTC 1000 Ohm at 0°C, Outdoor sensor QAC 31 51 7. Technical documentation 7.4 ProCon HT 150 / HT 225 AGU 2.361 control panel • Control and display elements 14 15 17 16 7 13 8 P 9 12 11 7494z08/0801 10 Control element 52 Function 1 Part for integral timer Timer installation 2 Automatic operation display In automatic operation → LED on (green) 3 Summer- / Winter- / Automatic operation button Switch over 4 Summer- / Winter operation display In winter operation (*) → LED on (green) 5 6 Potentiometer for boiler set point value or room set point value Potentiometer for domestic water set point value 7 Unlock button Unlock LMU... 8 Display mode button Change display 9 Chimney sweep button 10 2-pole mains switch Mains voltage On / Off 11 Infrared interface (query) Communication with e.g. Flue gas analyzer 12 Multifunction display 2 x 7 Segment display (red) 13 Service interface for QAA73... Temporary connection QAA73... for service purposes (Info, query, programming, etc.) 14 Pressure display P 15 Temperature display (green) 16 Error display (red) 17 Flame display (green) Setting Setting 12 Chimney sweep function / Control stop call up (green) 7. Technical documentation ProCon HT 150 / HT 225 • Operation phase display (Display level A4) You can show the operation phases corresponding to the sequence diagram LMU on AGU2.361 via display (12) by pressing the button (8) and At the same time, you are specifying the following coordination between the display code and LMU…phase description: Display Meaning Internal operation phases LMU... 00 01 Standby (no heat request) Anti-start up PH_STANDBY PH_STARTVER 02 Fan run up PH_THL1_1 PH_THL1_2 03 Pre-ventilation PH_TV 04 Standby time PH_TBRE PH_TW1 PH_TW2 05 Pre-ignition time PH_TVZ 06 Constant safety time PH_TSA1_1 PH_TSA2_1 07 Variable safety time PH_TSA1_2 PH_TSA2_2 10 Heating operation PH_TI PH_MODULATION Heating operation 11 Domestic water operation 12 Parallel operation of heating and domestic water 20 Post-ventilation with final operation control PH_THL2_1 PH_TN_1 21 Post-ventilation with pre-air control PH_THL2_2 PH_TN_2 22 Return motion PH_TNB PH_TLO PH_TNN 99 Error status (the current error code will be displayed ) PH_STOER PH_TI PH_MODULATION Domestic water operation PH_TI PH_MODULATION Heating and domestic water operation If the phases are very short or have been skipped, the corresponding display code will not appear. 53 7. Technical documentation ProCon HT 150 / HT 225 Basic processes: 7.4.1 Display mode and programming AGU 2.361 • Arriving at the display mode P To arrive at the display mode press and hold (> 3 sec) the display mode button (8) . (Display (12): A...). Continue to hold down the button to reach the different display levels b, C, d, P as well as A once again. Release the button at the desired display level (A, b, C, d or P). • Selection and display of individual values or parameters By subsequently pressing the display mode button (8) you are alternating between the different values / parameters (0... max. 7) of the different display levels (A, b, C, d and P). The current value will appear approx. 2 sec. after selecting the respective parameter. • Changing parameters (only P0...P6) Follow the procedure below to arrive at the different parameter values: 14 15 16 17 7 13 8 P 9 12 11 74 94z08 /0 801 10 Fig. 30: AGU2.361... 1. Use the display mode button (8) to select display level P (Press and hold display mode button (8)). 2. Use the display mode button (8) to select the desired parameter (Press display mode button (8) briefly). 3. Set value. You can only make changes with the parameters (P0...P6) and in order to do that, you must wait for the value of the parameter to flash on display (12). 54 ← (+) or (Enter) Increase value (+): Reduce value (-): ← (-) Press display mode (8) briefly several times(< 1 sec) Press chimney sweep button (9) briefly several times(< 3 seconds) Store value (Enter): Press and hold display mode button (8) > 3 seconds Ignore value (Esc) Wait(For time see parameter configuration MMI) To confirm, P0...P6 and the newly set value will appear in succession on display (12). The newly set value will not be valid until after it has been stored. 7. Technical documentation ProCon HT 150 / HT 225 7.5 Display levels You can only call up the parameters of Groups A, b, C and d. You can also change Group P. Display level LMU... Variable name Description Display ¹) 15 P 14 General information (End user level) ²) A0 Message code A1 TkIst A2 TbwIst1 A3 Pressure A4 Op. phase Diagnosis code (system) Boiler temperature (flow) Domestic water temperature sensor 1 Water or air pressure Operation phase of the automatic burner control unit Temperatures (Specialist level) b0 Diagnosis code b1 TkRuec b2 TbwIst2 b3 TFlue gas b4 TiAussen b5 TaGem b6 TaGed b7 TvIst LMU... internal DW diagnosis code Boiler return temperature Domestic water temperature sensor 2 Flue gas temperature Outdoor temperature Mixed outdoor temperature Rated outdoor temperature Flow temperature AGU2.500... 3) Process value (Specialist level) C1 Ion. flow C2 Fan rev. C3 Fan PWM_AusAkt C4 RelModLevel C5 Pumpe_PWM C6 ek0 Ionization flow Fan speed Current fan control (PWM) Relative capacity Pump set point value (PWM) Control gap Set point values (Specialist level) d1 Tsoll d2 TkSoll d3 Tsindoor d4 TbwSoll d5 PhzMax Set point value for 2-point or modulation control (PID) Current boiler set point value Set point value for indoor temperature Domestic water set point value Maximum modulation level in heating operation Maximum speed at maximum capacity in heating operation d6 NhzMax Parameter (Specialist level) (Prog mode) [Settings for special functions alone or 4)] Start-up capacity control stop (only for operating mode without corresponding P0 PhzRelMmi set point value potentiometer, otherwise blocked) Indoor / Flow set point value (only for operating mode without corresponding P1 Tr/TvSollMmi set point value potentiometer, otherwise blocked) DW set point value (only for operating mode without corresponding P2 TbwSollMmi set point value potentiometer, otherwise blocked) P3 Reserved Reserved P4 NqmodMin Minimum pump speed P5 Sth1 Slope Hk1 P6 DTR1 Parallel shift Hk1 Table 11: 1) 2) 3) 4) 3) Operation data display Display: = blink, = flash = does not flash You can select Group A parameters by briefly pressing the display mode button The display blinks both ways Setting the heating curve during operation in heating circuit module AGU... After 8 minutes the display automatically switches to boiler temperature A1 55 7. Technical documentation 7.5.1 Setting the heating capacity with QAA 73 You can set the heating capacity alongside the above-named settings on QAA 73. QAA73... Available AGU2.361 Available Boiler set point value TvSollMmi Capacity setting QAA 73...- Indoor set point value knob You can end the control stop function by pressing the chimney sweep button (9) (> 1 sec). Changing the max. heating capacity If you press and hold the chimney sweep button (9) (> 9 seconds) the newly set capacity will count as the maximum heating capacity; the LMU...parameter NHzMax or PHzmax will adjust accordingly depending on whether the speed limit for each parameter specification is active or not. ProCon HT 150 / HT 225 End user level After input in LMU programming levels, you will land directly in the end user level. Specialist level On QAA 73 press « / » buttons simultaneously (approx. > 3 seconds) OEM level On QAA 73 press « / » buttons simultaneously (approx. > 9 seconds) and enter code. Change the parameter To conform with QAA73 system with subsequent line change (In this type of programming, the value will be assumed. After the first parameter change, «183» will appear on the display code (12). Complete the programming Press the information or operation type button. If no change or setting occurs for 8 minutes, the programming will end automatically In the ending of the program described, no parameters changed afterwards will be assumed! 7.5.2 Programming of LMU via QAA 73 Below is the description of the button operation on QAA 73. Entry into LMU input...Programming level On QAA73 press ... «+ » or «+» buttons in the info level simultaneously (approx. > 3 seconds). You are now in the programming levels of the LMU. 7.6 Line After completing the programming display code «183» will disappear from display (12) The programming described here applies only to the values of the LMUs connected on QAA 73... This will not affect QAA 73 parameters. If QAA 73 is used for programming, then connection and disconnection may be carried out only in dead-voltage status. LMU parameters Level 90 Specialist 912) Specialist 93 Specialist 942) Specialist Function Domestic water temperature reduction set point value „TBWSollRed“ Start domestic water charging 0 = BW – Timing program 1 = BW – permanently on Range TBWSmin-TBWSoll Valu e TBWSmin 0 Drinking water operation type switch „EcoHmiEnable“ 0 = without CO 1 = with ECO 0 TRW Circulation pump control 0 = after TRW-Start (depending on par.91) 1 = after TRW-Timing program 0 503 Specialist Minimum boiler set point value-temperature (20°C<=TkSmin<=TkSmax) 20 ... 90°C 20°C 504 Specialist Maximum boiler set point value-temperature (TkSmin<=TkSmax<=90°C) 20 ... 90°C 90°C 505 Specialist Boiler set point value at activated curtain function 20 ... 90°C 85°C 506 Specialist Minimum flow set point value temperature (20°C<=TvSmin<=TvSmax) 20 ... 90°C 25°C 507 Specialist Maximum flow set point value temperature (TvSmin<=TvSmax<=90°C) 20 ... 90°C 90°C 516 Specialist Summer / Winter switch over temperature (30°C: S/W switch over deactivated) 8 ... 30 °C 18 °C 532 Specialist Heating characteristics slope heating circuit 1 1 ... 40 15 533 Specialist Heating characteristics slope heating circuit 2 1 ... 40 15 56 7. Technical documentation ProCon HT 150 / HT 225 Line Level Function 536 Specialist Max. speed at max. capacity in heating operation (upper speed limit) Maximum modulation level in heating operation 541 Specialist (LmodTL <= PhzMax <= LmodVL) 3) 542 Specialist Min. boiler capacity in kW 5433) Specialist Max. boiler capacity in kW Pump - overrun time, max. 210 minutes 544 Specialist (Setting 255: Continuous operation of Q1) 545 Specialist Minimum idle time of boiler (heating demand controlled switch hysteresis) Range 0 ... 9950 rpm Valu e 7000 rpm 0 ... 100 % 100% 0 ... 32766 kW 15 kW 0 ... 32766 kW 75 kW 0 ... 255 min 10 min 0 ... 3600 s 300 s 551 Specialist Constants for rapid reduction without ambient effect 0 ... 20 2 552 Specialist Hydraulic system adjustment 0 ... 255 80 0 ... 255 00101101 Specialist 554 Adjustment flags: Message code Sensor interruption suppressed/not suppressed, 0 = Error message suppressed, 1 = Error message B0 Return sensor 0/1 1 B1 Domestic water sensor 0/1 0 B2 Flue gas sensor 0/1 1 B3 Outdoor sensor 0/1 1 B4 Hydraulic pressure sensor 0/1 0 B5 Flow sensor 0/1 1 B6 Empty --- 0 B7 Empty --- 0 0 ... 255 00010000 Specialist Adjustment flags 555 B0 Empty B1 Domestic water priority, 0 = absolute, 1 = no priority 0 0 0/1 0 B2 B3 Function unused 0 0 Function unused 0 0 B4 System frost protection, 0 = Off, 1 = On B5 Function unused 0/1 1 0 0 B6 B7 Empty --- 0 Empty --- 0 Specialist Adjustment flags 558 0 ... 255 01000001 B0 Must be on 1 0/1 1 B1 Building construction 0 = simple, 1 = complex 0/1 1 B2 Domestic water thermostat 0/1 0 B3 Empty --- 0 B4 Empty b 5...7 3-way valve domestic water 010 = On 596 Specialist Runtime of mixer drive (Time on / Time off) --- 0 XXX 010 30 ... 873 s 150 s 605 Specialist LPB device number of LMU 0 ... 255 2, 3, 4 606 Specialist LPB segment number of LMU 0 ... 14 0 0 ... 255 3 0 ... 255 0 0 ... 255 0 614 Specialist 615 Specialist 618 Specialist Program. input (0: Deerror, 1: Modem funct., 2: Modem funct. neg.logic, 3: Curtain) Programmable output K2 (0: Deerror, 1: Message displayed., 2: Alarm signal 3: Operation message, 4: ext. Transf., 5: Q2Y2, 6: DW circ.., 7: Curtain, 8: Hydr. switch, 9: RegCI, 10: Basic funct.-K2, 11: DW Loading Through (Durchldg), 12: Analogue threshold) Progr. Input on relay clip-in. (0: Deerror, 1: Modem funct., 2: Modem funct. neg. logic, 3: Curtain, 4: Target set point value spec., 5: Target capacity, 6: sensor hydr. switch) 57 7. Technical documentation Line Level 619 Specialist 620 Specialist 621 Specialist 622 Specialist 630 Specialist ProCon HT 150 / HT 225 Function Funct. output1 Relay clip-in. (0: Off, 1: Message display., 2: Alarm signal, 3: Operation message, 4: ext. Transf., 5: Q2Y2, 6: DW Circ.., 7: Curtain, 8: hydr. switch, 9: RegCI, 10: Basic funct. K2, 11: DW- Loading Through (Durchldg), 12: Analogue threshold) Funct. output 2 Relay clip-in. (0: Off, 1: Message display, 2: Alarm signal, 3: Operation message, 4: ext. Transf., 5: Q2Y2, 6: DW Circ.., 7: Curtain, 8: Hydr. switch, 9: RegCI, 10: Basic funct.K2, 11: DW- Loading Through (Durchldg), 12: Analogue threshold) Funct. output 3 Relay clip-in. (0: Off, 1: Message display., 2: Alarm signal., 3: Operation display, 4: ext. Transf., 5: Q2Y2, 6: DW Circ.., 7: Curtain, 8: Hydr. switch, 9: RegCI, 10: Basic funct.K2, 11: DW- Loading Through (Durchldg), 12: Analogue threshold) Heat request-Maximum value at spec. external temperature set point value (5°C<=TReqExtMax<=130°C) Adjustment flags of maintenance messages, (Bit 6 on 1 for exiting, automatically goes to 0 after exiting the parameters.) 636 Specialist Months (interval) since last maintenance Range Valu e 0 ... 255 0 0 ... 255 0 0 ... 255 0 5 ... 130°C 85°C 0 ... 255 00000001 0 ... 255 12 Months Error status memory of the LMU (Parameters 700...717 und 728 ...733) 700 Specialist 1. Past value Error code counter 0 701 Specialist 1. Past value Error phase 0 702 Specialist 1. Past value Diagnosis code 0 703 Specialist 2. Past value Error code counter 0 704 Specialist 2. Past value Error phase 0 705 Specialist 2. Past value Diagnosis code 0 706 Specialist 3. Past value Error code counter 0 707 Specialist 3. Past value Error phase 0 708 Specialist 3. Past value Diagnosis code 0 709 Specialist 4. Past value Error code meter 0 710 Specialist 4. Past value Error phase 0 711 Specialist 4. Past value Diagnosis code 0 712 Specialist 5. Past value Error code meter 0 713 Specialist 5. Past value Error phase 0 714 Specialist 5. Past value Diagnosis code 0 715 Specialist Present value Error code meter 0 716 Specialist Present value Error phase 0 717 Specialist Present value Diagnosis code 0 718 Specialist Operating hours Burner (Total length of time burner is ON) 719 Specialist Operating hours Heating operation 720 Specialist Operating hours Domestic water operation 721 Specialist Operating hours Zone 722 Specialist Start-up Burner 0 ... 131070 Hours 0 ... 131070 Hours 0 ... 131070 Hours 0 ... 131070 Hours 0 ... 327675 727 Display of the diagnosis codes for the present error code; (0 = No error present) 728 Specialist 1. Past value Error code 0 729 Specialist 2. Past value Error code 0 730 Specialist 3. Past value Error code 0 731 Specialist 4. Past value Error code 0 732 Specialist 5. Past value Error code 0 733 Specialist Present value Error code 0 755 Specialist 58 Ionization flow 0 ... 583 In µA 7. Technical documentation ProCon HT 150 / HT 225 • Parameter 536 Setting the maximum heating capacity • Parameter 606 Segment address It specifies the speed for the max. heating capacity of a heat generator module and enables the reduction of the max. module capacity. ProCon HT is a system made up of several control units (LMU, RVA 47). This system is the heat generator segment and can be constructed from a single ProCon HT or several ProCon HTs connected in cascade. The heat generator segment has segment address 0. This means that all control units in the heat generator segment in parameter 606 for LMU and in parameter 141 for RVA 47 have the value 0. • Parameter 541 Setting the max. heating capacity It specifies the PWM signal in percentage for the maximum heating capacity of the heat generator module and enables the reduction of the module capacity. The max. speed attained should be entered into parameter 536. You can read off the speed in the display level of control unit C2 (see Chap 7.5) • Parameter 552 Hydraulic systems It is used for adjusting the module control. This parameter value must be at 80. • Parameter 605 Setting of the device address (Cascade) The device address and the segment address are a type of address in the bus system. Each device must be correctly addressed in order to ensure smooth communication with the connected module controls LMU as well as the cascade and heating circuit control RVA 47. The heating circuit controls (e.g. RVA 63, RVA 46) in complex heating systems constitute a segment made up of heat consumers. You can assign the segment addresses1 to 14 to these segments. It is better to combine several heating circuits of a building into one segment. Different segments are only necessary in the case of several buildings. All controls in a segment must have the same segment address. You can define a maximum of 14 segments (The standard setting is 0). • Parameter 630 Resetting maintenance request with QAA 73 You can rest the maintenance request in queue in the control unit with the QAA 73 by setting the Bit 6 (Parameter 630) b6 from 0 to 1. The maintenance meter restarts afresh and displays the maintenance request anew after one year. (Warning! Do not adjust the bits.) The device address should be assigned continuously with the connected devices. Do not assign an address multiple times in a bus segment because it will cause communication errors. Each segment must have a master device (Address 1). Address 0 1 2...16 Table 12: Effect Example Single operation Not active Cascades and heating circuit control RVA 47 (Master) Module control or heating circuit control (Slave) LMU, RVA 63, RVA 46 59 7. Technical documentation 7.7 Electrical terminals ProCon HT 150 / HT 225 Fig. 31: Electrical connection plan 60 ProCon HT 150 / HT 225 7. Technical documentation ProCon HT 150 / HT 225 7.8 Technical data RVA 47 Voltage supply Rated voltage Rated frequencies Power consumption AC 230 V (±10 %) 50 Hz (±6 %) Max. 7 VA Requirements Protection class (for proper installation) Protection type (for proper installation) Electromagnetic stability Electromagnetic emissions II, according to EN60730 IP 40, according to EN60529 Conforms to EN50082-2 standards Conforms to EN50081-1 standards In operation in accordance with IEC 721-3-3 Temperature In storage in accordance with IEC 721-3-1 Temperature During transportation in accordance with IEC 721-3-2 Temperature Class 3K5 (without condensation) 0...50°C Class 1K3 -25...70°C Class 2K3 -25...70°C Dirt In accordance with EN60730 General Environment Mechan. conditions In operation in accordance with IEC 721-3-3 In storage in accordance with IEC 721-3-1 IEC 721-3-2 Class 3M2 Class 1M2 Class 2M2 Mode of operation In accordance with EN60730 Abs. 11.4 1b Output relay Voltage range Rated flow Switch-on peak Fused connection AC 24...230 V AC 0.02...2 (2) A max. 10 A in the course of max. 1 sec max. 10 A Approved lead length for PPS: (Phone cable φ 0.8mm, 2-wire interchangeable) Max. Lead length Central device/Peripheral device Max. Total lead length (Sum total of all cords) 75 m. 250 m Approved lead length for LPB: (Cu-cable1.5 mm2, 2-wire not interchangeable) With control bus feed (for each controller) With central bus feed (bus feed/controller) 250 m 460 m Bus load factor E=3 Ø 0.6 mm max. 20 m Climatic conditions Bus expansion Approved Sensor lead lengths 2 max. 80 m 1.0 mm 1.5 mm 2 max. 120 m 61 7. Technical documentation 7.9 Fig. 32: 62 Measurements and connection dimensions ProCon HT 150 / HT 225 7. Technical documentation ProCon HT 150 / HT 225 7.10 Technical data ProCon HT 150 / HT 225 Product ID number Category Typ e Volume of hot water in boiler ProCon HT 150 H ProCon HT 225 H CE II2ELL3/P CE II2ELL3/P l 30 35 Boiler weight kg 250 270 Measurements (L x B x H) mm 1650 x 680 x 1030 Hot water connections FlangeDIN 2631 DN 40 / 48.3 PN 6 Gas connection R 1¼ Flue gas connection DN 160 Inlet air connection DB 125 Inlet air/flue gas-connecting pieces DN 160 Condensed water run-up Hose spout D = 20 mm Condensed water drain DN 20, ¾“ AG, flat sealing Rated thermal load kW 15.0 – 149.2 15.0 – 216.0 Rated thermal load 80/60°C kW 14.5 – 143.2 14.5 – 206.0 Rated thermal load 50/30°C kW 16.0 – 155.0 16.0 – 225.0 Degree of efficiency 40/30°C % Gas types Nozzle-∅ CO2 content Flue gas temperature 80/60 Flue gas mass flow rate Manometer pressure on the flue gas connecting pieces Permissible flue gas lead 109.5 Natural gas E / LL 15.0 Liquid gas mm Vol.% 9.0 11.0 10.0 °C Natural gas E /LL 15.0 Liquid gas 9.0 11.0 10.0 74 kg/s 0.0697 0.0643 0.1010 0.0931 Pa 200 200 200 200 B23 , C33, C43, C 53, C63, C 83 4...5.5 pH value of condensed water Gas connection pressure Min. mbar Natural gas E / LL 18.0 Liquid gas Liquid gas 30.0 Natural gas E L 18.0 Max. mbar 30.0 50.0 30.0 50.0 Maximum gas connection pressure, Pimax Electrical connection mbar 70 V/Hz 230 / 50 Max. electr. power consumption W 690 Max. operating pressure bar 3.0 Min. system pressure bar 0.5 Switching on threshold hydraulic pressure switch bar Flow rate at ∆ϑ = 20°C l/h Max. flow temperature °C 30,0 800 0.8 6500 9600 90° 63 7. Technical documentation 7.11 Component diagram of boiler body, Gas/air duct and fan Fig. 33: Exploded diagram of boiler body, Gas-air-channel and fan 64 ProCon HT 150 / HT 225 ProCon HT 150 / HT 225 7.12 7. Technical documentation Component diagram of frame and panel Fig. 34: Exploded diagram of frame and panel 65 7. Technical documentation 7.13 Component diagram of flue gas collector Abb. 35: Exploded diagram of flue gas collector 66 ProCon HT 150 / HT 225 ProCon HT 150 / HT 225 7.14 7. Technical documentation Component diagram of water deflector and boiler body Abb. 36: Exploded diagram of water deflector and boiler body 67 7. Technical documentation ProCon HT 150 / HT 225 7.15 Legend for exploded diagram Pos. 1 2 3 4 5 6 7 8 9 10 11 12 13 14 15 16 17 18 19 20 21 22 23 24 25 26 27 28 29 30 31 32 33 33 34 35 36 37 38 39 40 41 42 43 44 68 Description 1 8 32 32 4 4 1 2 44 46 9 1 25 1 1 1 1 16 1 4 2 4 2 2 2 1 21 1 1 4 8 2 1 --2 1 1 2 1 2 14 12 2 1 1 1 8 32 32 4 4 1 2 44 46 9 1 25 1 1 1 1 16 1 4 2 4 2 2 2 1 21 1 1 4 8 2 1 1 2 1 1 2 1 2 14 12 2 1 1 1 8 32 32 4 4 1 2 44 46 9 1 25 1 1 1 1 16 1 4 2 4 2 2 2 1 21 1 1 4 8 2 1 1 2 1 1 2 1 2 14 12 2 1 1 1 8 32 32 4 4 1 2 45 47 9 1 25 1 1 1 1 19 1 4 3 6 3 3 3 1 21 1 1 4 8 3 1 --2 1 1 2 1 2 14 12 2 1 1 1 8 32 32 4 4 1 2 45 47 9 1 25 1 1 1 1 19 1 4 3 6 3 3 3 1 21 1 1 4 8 3 1 1 2 1 1 2 1 2 14 12 2 1 1 1 8 32 32 4 4 1 2 45 47 9 1 25 1 1 1 1 19 1 4 3 6 3 3 3 1 21 1 1 4 8 3 1 1 2 1 1 2 1 2 14 12 2 1 1 Floor trough Locking nipple enclosure Toothed disk; A 5.3 external; DIN 6797 zp Hexagon nut; M5; DIN 934 A3B Adjustable foot for boiler M12x98 Hexagon nut, M12; DIN 934 A3B Retainer for wheels Fixed roller D= 80 mm, H= 108 mm Disk; 8,4; DIN 125 St A3C B 8,4 Hexagon screw; M8x16; DIN 933, A3C Disk 8,4x24x2; DIN 9021 St verz. Vertical brace, front, left Rectangular nut M8, 30x20x4 Vertical brace, front, right Vertical brace, back, left Vertical brace, back, right Angle plate for frame, left Hexagon nut; M8; DIN 934 A3B Angle plate for frame, right Cross brace Support sheet for boiler body Pop rivet 6.4x12.5 for Cable clamp D=12.7 Socket cap screw; M5x12; DIN 912 8.8 A3C Adjustable foot for boiler M8x116.5 Horizontal brace, right Locating pin D6,5x12; M5x7 Horizontal brace, left Rear panel Strain relief Tapping screw; F2,9x16, zp; DIN 7981/St Retainer for boiler body Water deflector ProCon HT 225 Separator ProCon HT150/225 cascade Immersion sleeve ½" x 80mm Sensor for drinking water temperature Boiler sensor QAZ 21/0720 Air vent 3/8" Pressure retainer, Water, 0.8 bar Sealing ring 11.2x4.1x4, Klinger. Disk; 10.5; DIN 125, St A3C Hexagon screw M10x20; DIN 933, 8.8, zp. Hexagon nut; M10; DIN 934 A3B Retainer for water deflector Flue gas collector DN 160 Code number 96.35460-7020 94.15393-5001 Avail. upon request Avail. upon request 94.17230-7001 Avail. upon request 96.36560-7032 94.17273-7001 Avail. upon request Avail. upon request Avail. upon request 96.35760-7004 95.99196-0022 96.35760-7003 96.35760-7006 96.35760-7005 96.35760-7011 Avail. upon request 96.35760-7012 96.35760-7007 96.36560-7030 Avail. upon request 95.99186-0060 Avail. upon request 94.17230-7002 96.35760-7001 96.36689-7008 96.35760-7002 96.35460-7021 96.39658-7001 Avail. upon request 96.36560-7031 96.36144-7042 96.36144-7046 96.38235-7001 96.00022-0943 94.19314-5001 94.74400-5003 96.32547-7005 95.99187-0036 Avail. upon request Avail. upon request Avail. upon request 96.36560-7033 96.36400-7003 7. Technical documentation ProCon HT 150 / HT 225 Pos. Description o.A. 44.6 44.7 44.13 44.15 44.16 o.A. 45 46 o.A. 47 48 o.A. 48.7 49 50 51 52 53 54 55 56 57 58 59 60 61 63 65 66.1 66.2 66.3 66.4 66.5 66.6 66.7 66.8 66.9 66.10 66.11 66.12 66.13 66.14 66.15 66.16 1 3 1 2 3 2 1 2 2 1 1 1 1 1 2 2 2 2 8 6 1 1 2 1 4 1 1 1 2 2 4 4 4 2 2 2 2 12 2 2 2 8 8 2 1 3 1 2 3 2 1 2 2 1 1 1 1 1 2 2 2 2 8 6 1 1 2 1 4 1 1 1 2 2 4 4 4 2 2 2 2 12 2 2 2 8 8 2 1 3 1 2 3 2 1 2 2 1 1 1 1 1 2 2 2 2 8 6 1 1 2 1 4 1 1 1 2 2 4 4 4 2 2 2 2 12 2 2 2 8 8 2 --3 1 3 4 3 --3 3 --1 1 --1 3 3 3 3 12 8 1 1 2 1 4 1 1 1 2 3 6 6 6 3 3 3 3 18 3 3 3 12 12 3 --3 1 3 4 3 --3 3 --1 1 --1 3 3 3 3 12 8 1 1 2 1 4 1 1 1 2 3 6 6 6 3 3 3 3 18 3 3 3 12 12 3 --3 1 3 4 3 --3 3 --1 1 --1 3 3 3 3 12 8 1 1 2 1 4 1 1 1 2 3 6 6 6 3 3 3 3 18 3 3 3 12 12 3 2 2 2 3 3 3 66.17 66.18 2 6 2 6 2 6 3 9 3 9 3 9 Plugs DN 80 for Flue gas collector Lip-sealed. Plug-in sleeve DN 80 Lip seal DN 160 Siphon pipe for flue gas collector Seal 1" for siphon pipe Cap nut 1" with extension Locking cap 1" Flue gas sensor QAK 36.670/109, M8 Test hose grommet Plugs D18/14 ProCon HT 225gas pipe Inlet air pipe DN 125 Cap DN 60 for inlet air pipe Lip seal DN 125 Retaining plate for boiler control Flat plug 6.3 x 0.8 4pieces Boiler control LMU 64.015C180, Bus module clip-in OCI Socket cap screw; M4x6; DIN 912 8.8 A3C Flat fillister head screw; M5x10; Connection terminal foil , 134 x 44 Terminal block ProCon HA 150/225 Tapping screw; F2.9x9.5, zp; DIN 7981/St E-terminal cover Socket cap screw; M4x8; DIN 912 8.8 A3C Neutralization box Pipe inlet neutralization box Pipe outlet neutralization box Flange nut G 3/4 Boiler body ProCon GWB70/75 Sealing ring 10x16x2,Klingersil Screw-in sensor QAK 36.350 Hand vent, 3/8-inch, for Burner plate Burner plate seal, silicone Burner plate seal, gas/air Insulation for burner plate Mutter (Flange) M6, DIN6923, Ignition/Ionization seal ProCon Ignition and ionization electrode Burner lance (l = 238,5mm) Toothed disk A 6.4 (V2A) Tapping screw, M6x12, 1.4841 Seal (graphite) for burner lance Seal (transparent white) between fan/gas/air duct Gas/air duct Hexagon flange screw M5x10 Code number 96.36400-7006 95.99287-0087 95.99287-0092 96.36444-7001 96.36487-7004 96.36496-7001 96.36496-7003 94.19314-5023 95.95120-0035 95.23188-0052 96.36344-7013 96.36400-7004 96.36400-7007 95.99287-0091 96.35660-7005 95.95112-0019 96.39100-7026 96.39100-7023 Avail. upon request 95.99194-0009 96.38791-7028 96.39216-7005 Avail. upon request 96.35560-7001 Avail. upon request 94.68500-4124 96.36444-7003 96.36444-7005 96.36496-7002 96.31000-7006 95.99187-0029 94.19314-5011 96.00025-0019 96-34600-7006 96.00025-1220 96.00025-1255 96.31587-7002 96.00025-1082 96.34487-7001 96.34236-7001 96.00025-2111 95.99197-0206 95.99194-0046 96.00025-1745 96.00025-2107 96.34784-7007 95.99194-0017 69 7. Technical documentation Pos. 66.19 66.20 66.21 66.22 66.23 66.24 66.25 66.25.3 66.26 66.27 66.28 66.29 66.30 66.31 67 68 o.A. 69 70 71 72 73 74 75 76 o.A. 77 78 79 79 80 81 o.A. 82 83 84 85 86 87 88 89 90 91 o.A. 92 93 94 95 70 2 8 4 2 6 2 2 2 2 2 2 2 6 2 7 2 1 8 2 2 --1 1 8 2 1 2 2 2 2 2 2 1 4 4 2 2 1 2 2 1 1 2 1 1 8 1 4 2 8 4 2 6 2 2 2 2 2 2 2 6 2 7 2 1 8 2 2 --1 1 8 2 1 2 2 2 2 2 2 1 4 4 2 2 1 2 2 1 1 2 1 1 8 1 4 2 8 4 2 6 2 2 2 2 2 2 2 6 2 7 2 1 8 2 2 --1 1 8 2 1 2 2 2 2 2 2 1 4 4 2 2 1 2 2 1 1 2 2 --8 1 4 3 12 6 3 9 3 3 3 3 3 3 3 9 3 9 3 --12 3 3 1 1 1 9 3 --3 3 3 3 3 3 --6 6 3 2 1 2 2 1 1 3 --1 8 1 4 3 12 6 3 9 3 3 3 3 3 3 3 9 3 9 3 --12 3 3 1 1 1 9 3 --2 2 2 2 2 2 1 4 4 2 2 1 2 2 1 1 2 --1 8 1 4 3 12 6 3 9 3 3 3 3 3 3 3 9 3 9 3 --12 3 3 1 1 1 9 3 --2 2 2 2 2 2 1 4 4 2 2 1 2 2 1 1 2 1 --8 1 4 ProCon HT 150 / HT 225 Description Code number Fan mvl RG 148 230V Socket cap screw; M5x12; DIN 912 8.8 A3C Socket cap screw; M4x8; DIN 912 8.8 A3C Shutter for flap valve Screw 3.9x.5 DIN7981F, zp. Seal for flap valve Disk for flap valve Retaining ring DIN 471; 10x 1 Screw for flap valve Pressure ring 0.5x11x74.3x18.5 O-Ring (70x3, NBR 70) between Retainer for gas fitting with inlet opening line Socket cap screw; M6x12 Plugs (AN-28-21-2) for inlet air Klingersil sealing ring 27x38x2 Wilo boiler pump RS 20/7-3 Plugs G1 1/4, galvanized steel; DIN 910 Klingersil sealing ring 17x24x2 Y-branch pipe GWB 70/75 Y-branch pipe HT 225 Return pipe 1 Return pipe 2 Return pipe 3 Klingersil sealing ring 21x30x2 Armoured hose, return flow 370 mm 1-inch cap, self-sealing Combo block without pressure switch Rubber sealing ring 19 x 27 x 3 Gas nozzle, natural gas, Di = 15 mm Gas nozzle, liquid gas, Di = 10 mm O-ring; 21.89x2.62 for flanges Gas corrugated pipe DN 20, with rotary flange, HT 225 1-inch cap, self-sealing Socket cap screw; M4x25; DIN 912 8.8 A3C Socket cap screw; M4x12; DIN 912 8.8 A3C Safety clamp for pipe Retaining clip 2 (w.) for mounting plate Control panel Hinge 1 (m.) for mounting plate Captive disk for M5 2-pole rocker switch A-E 16A(4) Pressure gage with capillaries, 0-4bar Actuator AGU 2.361A109 Blind plate, 96x96mm, grey Cascade controller RVA 47.320/380 Pop rivet AD-510, 4x12.5 Fuse holder for SI 20x5 Enclosure, side frame 96.34000-7006 Avail. upon request Avail. upon request 96.34317-7001 Avail. upon request 96.34387-7001 96.34318-7001 95.99197-0011 96.34394-7001 95.23171-0013 96.00025-0006 96.34784-7008 95.99194-0612 96.00025-1254 95.99187-0004 96.32100-7025 95.23188-7003 95.99187-0017 96.36144-7017 96.36144-7041 96.36144-7043 96.36144-7044 96.36144-7045 95.99187-0006 96.36144-7018 95.99185-0208 96.34500-7007 95.99187-0022 96.34344-7080 96.34344-7081 95.99287-0067 96.36344-7014 95.99185-0208 Avail. upon request Avail. upon request 96.00025-1055 96.00025-8207 96.35760-7008 96.00025-8206 95.99198-0030 96.39444-7002 96.33590-7003 96.39100-7036 94.85560-5020 96.39100-7024 96.39400-7001 96.35160-7002 7. Technical documentation ProCon HT 150 / HT 225 Pos. 96 97 98 99 100 101 102 103 104 105 106 107 108 109 110 111 112 o.A. o.A. o.A. o.A. o.A. o.A. o.A. o.A. o.A. o.A. o.A. o.A. o.A. o.A. o.A. Description 8 2 1 2 2 1 1 1 2 1 1 1 2 2 3 2 5 1 2 2 2 1 1 1 2 2 1 2 --1 X 2 8 2 1 2 2 1 1 1 2 1 1 1 2 2 3 2 5 1 2 2 2 1 1 1 2 2 1 2 --1 X 2 8 2 1 2 2 1 1 1 2 1 1 1 2 2 3 2 5 1 2 2 2 1 1 1 2 2 1 2 --1 X 2 8 2 1 2 2 1 1 1 2 1 1 1 2 3 3 3 6 1 3 3 3 1 1 1 3 3 1 3 1 --X 2 8 2 1 2 2 1 1 1 2 1 1 1 2 3 3 3 6 1 3 3 3 1 1 1 3 3 1 3 1 --X 2 8 2 1 2 2 1 1 1 2 1 1 1 2 3 3 3 6 1 3 3 3 1 1 1 3 3 1 3 1 --X 2 Clip for locking nipple Upper/front lower enclosure Front, upper enclosure Magnetic clamp disk, F=27N Countersunk screw; M4x10; DIN965; Cross slot Protective cap Locking pin with pressure spring Protective cap with handle Disk, 5.3x20x1; polyamide 6 PA Disk; 5.3; DIN 125 St A3C, B 5.3 Hexagon nut; M5; self-locking DIN 985 MHG sign KFE tap, ½-inch, with spout Test hose Di=12x1, L=650 Vario plugs d=12 mm, short Inlet air hose (flexible, d=60mm) Hose clip, 50-65 mm Main cable loop ProCon HT 225 Module cable loop 5-pole connection cable; LMU clip-in AGU/OCI Ignition cable with right angle club Ribbon cable for control elements Ribbon cable for control elements Ribbon cable for control elements Ground cable for ignition 450mm Sensor cable loop Pump cable loop Pump connection cable Set of plain strapping plugs; ProCon HT 225 Set of plain strapping plugs; ProCon HT 150 ProCon HT screw set Neutralization granules; Hydrolyte MG 1.4 kg Code number 94.15371-5001 96.35360-7025 96.35360-7026 96.36689-7009 Avail. upon request 96.35360-7027 96.36689-7007 96.35360-7028 95.99198-0029 Avail. upon request Avail. upon request Avail. upon request 96.00025-0022 95.95213-0025 95.23188-0044 96.00025-8149 96.00025-8160 96.39200-7026 96.39200-7027 96.39200-7015 96.39200-7028 96.39200-7029 96.39200-7030 96.39200-7031 96.39200-7032 96.39200-7034 96.39200-7035 96.39200-7036 96.39200-7042 96.39200-7043 96.36600-7080 94.18564-5006 71 6. Warranty 8.1 Warranty ProCon gas condensing boiler by MHG will function smoothly if you install and start it up properly. ProCon HT 150 / HT 225 8.2 Replacement parts Use only original parts by MHG for replacement. Always provide serial number when ordering parts. The warranty is valid for 2 years from start of operation and at the most 27 months from delivery date. For Spiranox heat exchanger the warranty stretches to 60 months provided that you service the heating system properly every year in compliance with our care and maintenance instructions. All units of measurement are in mm. Technical details and components are subject to change. Please see warranty certificate for further details. Warranty certificate MHG Heiztechnik GmbH grants the company specialized in heating equipment material warranty of 5 years on the cast iron boiler body, storage tank and cast aluminium heat exchanger as well as 2 years on the burner, all electrical parts and other components. Please see our General terms and conditions of sale for detailed explanations about our warranty conditions. This warranty will be null and void upon failure to carry out proper annual maintenance in compliance with our care and maintenance instructions. A copy of proof of maintenance must be presented for warranty service. MHG Heiztechnik GmbH 72 8. Warranty ProCon HT 150 / HT 225 EC Model Declaration of Conformity Hamburg, November 24, 2005 MHG Heiztechnik GmbH certifies herewith that the gas condensing boiler (condensing-circulation boiler) specified below Series ProCon HT 150 / HT 225 Model No. CE approved correspond to the model described in the EC model test certificate. The devices meet the relevant requirements of the Gas Appliance Directive 90/396 EWG (06.1990) and DIN EN 677 (06.1998) and DIN EN 483 (06.2000) test standards. MHG Heiztechnik GmbH Niedermayer i. V. Gieseler (pp) 73 Notes 74 ProCon HT 150 / HT 225 HT 150 / HT 225 GWB 75 Notes 75 76