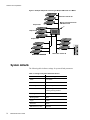
1
EtherXtend User’s Guide
For software version 1.13.2
May 2007
Document Part Number: 830-01613-03
Zhone Technologies
@Zhone Way
7001 Oakport Street
Oakland, CA 94621
USA
510.777.7000
www.zhone.com
[email protected]
COPYRIGHT ©2000-2007 Zhone Technologies, Inc. All rights reserved.
This publication is protected by copyright law. No part of this publication may be copied,
distributed, displayed, modified, transmitted, stored in a retrieval system, or translated without
express written permission from Zhone Technologies, Inc.
Acculink, ADSL/R, Bitstorm, Comsphere, DSL the Easy Way, Etherloop, Ethernet in the First
Mile, EtherXtend, FrameSaver, GigaMux, GranDSLAM, GrandVIEW, Hotwire, the Hotwire
logo, iMarc, JetFusion, Jetstream, JetVision, MALC, NextEDGE, Net to Net Technologies,
Paradyne, the Paradyne logo, Quick Channel, Raptor, ReachDSL, SLMS, StormPort, TruePut,
Z-Edge, Zhone, ZMS, and the Zhone logo are trademarks owned by Zhone Technologies, Inc.,
which may be registered in some jurisdictions.
Zhone Technologies makes no representation or warranties with respect to the contents hereof
and specifically disclaims any implied warranties of merchantability, noninfringement, or
fitness for a particular purpose. Further, Zhone Technologies reserves the right to revise this
publication and to make changes from time to time in the contents hereof without obligation of
Zhone Technologies to notify any person of such revision or changes.
2
EtherXtend User’s Guide
CONTENTS
Document organization.............................................................................................7
Style and notation conventions..............................................................................8
Typographical conventions.......................................................................................8
Acronyms......................................................................................................................9
Related documents ..................................................................................................10
Contacting Global Service and Support.............................................................10
Technical support....................................................................................................11
Service requirements...............................................................................................11
Chapter 3
Safety, Regulations, and Certifications .......................................................13
Grounding and isolation.........................................................................................13
Installation safety precautions .............................................................................13
Important Safety Instructions..................................................................................14
EMI Notices ............................................................................................................16
United States - EMI Notice.....................................................................................16
Canada - EMI Notice ..............................................................................................16
ACTA Customer Information .................................................................................16
Supplier’s Declaration of Conformity ....................................................................18
Notice to Users of the Canadian Telephone Network ............................................19
CE Marking.............................................................................................................19
Contacting Global Service and Support..................................................................19
Technical Support ...................................................................................................19
Service Requirements .............................................................................................20
Chapter 1
Overview ....................................................................................................................21
Product models.........................................................................................................22
Product description .................................................................................................22
Technology description ..........................................................................................23
EFM media ..................................................................................................................24
Review of SHDSL......................................................................................................26
HDSL ......................................................................................................................26
SDSL.......................................................................................................................26
SHDSL....................................................................................................................26
EtherXtend User’s Guide
1
Contents
Ethernet services......................................................................................................27
Chapter 2
Features and capabilities ...................................................................................29
EFM overview ............................................................................................................29
2BASE-TL....................................................................................................................30
Zhone EFM features.................................................................................................30
PME aggregation ....................................................................................................31
Loop bonding ..........................................................................................................31
EtherXtend bonding implementation ..................................................................33
Wire mode ..................................................................................................................33
One Ethernet port mapped to one SHDSL port ................................................34
One Ethernet port mapped to an SHDSL bonded group.........................................34
Multiple Ethernet switch ports mapped to one SHDSL port ..................................35
Multiple Ethernet ports mapped to multiple SHDSL ports ....................................35
Ethernet Ports mapped to different SHDSL bonded groups...................................36
Scenarios ....................................................................................................................36
Endpoint-to-Endpoint .............................................................................................36
Endpoint-to-Multiple DSLAMs..............................................................................37
Multiple Endpoints to Multiple Cards on a Chassis ...............................................37
System defaults ........................................................................................................38
Product specifications ............................................................................................40
Specifications for the ETHX-SHDSL-4 .................................................................40
Specifications for the ETHX-SHDSL-8 .................................................................41
Specifications for the ETHX-SPWE-4-T1/E1/V35 ................................................41
Chapter 3
Preparing for installation ...................................................................................43
General safety precautions....................................................................................43
Tools you need..........................................................................................................43
Selecting the system location...............................................................................44
Environmental specifications ...............................................................................44
Power requirements and specifications.............................................................44
Power specifications ...............................................................................................44
Chapter 4
Installing the EtherXtend....................................................................................47
Unpacking the system.............................................................................................47
Port and LED descriptions.....................................................................................48
Status LED states ....................................................................................................48
LED descriptions..............................................................................................48
Interpreting Status LEDs for the EtherXtend Devices............................................50
Alarm cable and contacts guidelines..................................................................51
2
EtherXtend User’s Guide
Connecting to power ...............................................................................................51
Connecting the WAN SHDSL lines ......................................................................52
Loop bonded connection .......................................................................................53
Connecting the LAN Ethernet line .........................................................................53
Duplex mode ....................................................................................................53
Grounding device....................................................................................................54
Chapter 5
Basic configuration ..............................................................................................55
Logging into the serial (craft) port.......................................................................56
Logging in and out of the system............................................................................56
Configuring a management interface......................................................................57
Ethernet interface .............................................................................................57
Interface types (iftype) ............................................................................................58
Profiles ........................................................................................................................59
Interface indexes ......................................................................................................59
Configuring an Ethernet interface........................................................................60
Configuring a management interface..................................................................62
Managing the EtherXtend with ZMS......................................................................66
System security.................................................................................................67
Configuring RIP on the WAN interface ...............................................................67
Displaying RIP information....................................................................................68
SHDSL..........................................................................................................................69
Configuring SHDSL interfaces...............................................................................69
Automatic baud rate adaption and fixed rate settings ......................................69
Configuration restrictions.................................................................................70
Specifying the type of DSL interface ...............................................................70
Verifying the interface......................................................................................71
Configuring SHDSL interfaces...............................................................................72
Creating a new PME profile.............................................................................72
Viewing pme-profile settings ...........................................................................73
Updating a pme-profile ....................................................................................73
Verifying the interface......................................................................................73
Verifying the type of DSL interface.................................................................74
Verifying port settings......................................................................................74
Configuring static routes.........................................................................................75
Adding a static route.........................................................................................75
Deleting routes ........................................................................................................75
Verifying routes ......................................................................................................75
Displaying the routing table .............................................................................76
traceroute command .........................................................................................76
Chapter 6
Configuring IP .........................................................................................................77
Overview .....................................................................................................................77
EtherXtend User’s Guide
3
Contents
Interfaces that support IP.......................................................................................78
Routing ........................................................................................................................78
Numbered and unnumbered interfaces..............................................................79
DHCP............................................................................................................................80
DNS...............................................................................................................................80
RIP ................................................................................................................................80
Configuring a DHCP server....................................................................................80
Setting global DHCP server options ................................................................81
Creating DHCP server subnet options..............................................................82
Enabling a DHCP server ..................................................................................85
DHCP relay ......................................................................................................86
Chapter 7
Working with an EFM Profile ............................................................................89
Using EFM commands ............................................................................................89
Performing a list command.....................................................................................90
Adding New EFM Profiles .....................................................................................90
Creating a new OAM ..............................................................................................90
Creating a new OAM event ....................................................................................91
Creating a new EFM-Port .......................................................................................91
Creating a new PME-Profile...................................................................................92
Creating a new EFM bond ......................................................................................92
Performing an update..............................................................................................92
Updating the EFM OAM profile ......................................................................93
Updating the EFM-Port profile ........................................................................93
Updating the PME-profile ................................................................................94
Updating the EFM-Bond ..................................................................................94
Displaying Output...................................................................................................94
Displaying EFM-OAM output .........................................................................94
Dispaying EFM-OAM event output.................................................................95
Displaying EFM status............................................................................................96
Displaying OAM statistics......................................................................................97
Displaying the PME status......................................................................................97
Displaying the OAM log.........................................................................................98
Displaying the line card ..........................................................................................98
Displaying the line card status ................................................................................99
Binding the stack.....................................................................................................99
Unbinding the stack ................................................................................................99
Displaying stack output.........................................................................................100
Mapping tables......................................................................................................100
Default settings .......................................................................................................101
Modes....................................................................................................................101
Active mode ..........................................................................................................102
Passive mode.........................................................................................................102
EFM Port default...................................................................................................102
PME defaults.........................................................................................................103
4
EtherXtend User’s Guide
Chapter 8
Defaults ....................................................................................................................105
Modes ........................................................................................................................105
Active Mode..............................................................................................................106
Passive Mode...........................................................................................................106
EFM Port Default.....................................................................................................106
PME Defaults............................................................................................................107
EtherXtend User’s Guide
5
Contents
6
EtherXtend User’s Guide
ABOUT THIS GUIDE
This guide is intended for use by EtherXtend users and administrators.
EtherXtend users should have a fundamental knowledge of DSL protocols,
Ethernet and IP concepts.
Refer to the EtherXtend Quick Start Guide for hardware installation and
connection information.
Document organization
This guide contains the following information:
To Learn About
Read
EtherXtend functionality and features.
Features and capabilities chapter
Obtaining an IP address
Configuring IP chapter
System on the EtherXtend; and configuring a
connection to the ZMS.
Basic configuration chapter
Configuring an Ethernet interface; configuring
static routes; configuring RIP; and configuring
DNS.
Configuring IP chapter
Configuring DHCP server; and creating
DHCP client identifiers.
Configuring IP chapter
CLI diagnostics; SNMP administration; user
accounts; manually binding interfaces; saving
and restoring configurations; and rebooting
the system.
Basic configuration chapter
EtherXtend product specifications.
Features and capabilities Chapter
Basic technology overview
Overview chapter
SHDSL interface configuration
Basic configuration chapter
LED states and descriptions
Installing the EtherXtend chapter
EtherXtend User’s Guide
7
About This Guide
To Learn About
Read
EFM profile information
Working with an EFM profile
chapter
EtherXtend scenarios
Appendix B
Safety issues
Preparing for installation and
Appendix A
Style and notation conventions
The following conventions are used in this document to alert users to
information that is instructional, warns of potential damage to system
equipment or data, and warns of potential injury or death. Carefully read and
follow the instructions included in this document.
Caution: A caution alerts users to conditions or actions that could
damage equipment or data.
Note: A note provides important supplemental or amplified
information.
Tip: A tip provides additional information that enables users to more
readily complete their tasks.
WARNING! A warning alerts users to conditions or actions that
could lead to injury or death.
WARNING! A warning with this icon alerts users to conditions or
actions that could lead to injury caused by a laser.
Typographical conventions
The following typographical styles are used in this guide to represent specific
types of information.
8
EtherXtend User’s Guide
Bold
Used for names of buttons, dialog boxes, icons, menus,
profiles when placed in body text, and property pages (or
sheets). Also used for commands, options, parameters in
body text, and user input in body text.
Fixed
Used in code examples for computer output, file names, path
names, and the contents of online files or directories.
Fixed Bold
Used in code examples for text typed by users.
Acronyms
Fixed Bold
Italic
Used in code examples for variable text typed by users.
Italic
Used for book titles, chapter titles, file path names, notes in
body text requiring special attention, section titles,
emphasized terms, and variables.
PLAIN UPPER
CASE
Used for environment variables.
Command Syntax
Brackets [ ] indicate optional syntax.
Vertical bar | indicates the OR symbol.
Acronyms
The following acronyms are related to the EtherXtend and will appear
throughout this manual:
Acronym
Description
AAL2
ATM Adaption Layer 2
BAN
Zhone Broadband Access Node
CAS
Channel Associated Signaling
CID
AAL2 Channel Identifier
CLI
Command Line Interface
CO
Central Office
CPE
Customer Premises Equipment
dB
Decibel
DHCP
Dynamic Host Configuration Protocol
DSL
Digital Subscriber Line
DSLAM
Digital Subscriber Line Access Multiplexer
DSS1
Digital Subscriber Signaling System number 1
EFM
Ethernet First Mile
ELCP
Emulated Loop Control Protocol
G.SHDSL
Global Symmetrical High-bit-rate Digital Subscriber Line
HDSL2
High-bit-rate Digital Subscriber Line, second generation
IANA
Internet Assigned Numbers Authority
ISDN BRI
Integrated Services Digital Network Basic Rate Interface
Kbps
kilobits per second
EtherXtend User’s Guide
9
About This Guide
Acronym
Description
LAN
Local Area Network
MALC
Zhone Multi-Access Loop Concentrator
MIB
Management Information Base
NAT
Network Address Translation
PMA
PMD
PME
RIP
Routing Information Protocol
SDSL
Symmetric Digital Subscriber Line
SHDSL
Single pair High speed Digital Subscriber Line
SNMP
Simple Network Management Protocol
TDM
Time Division Multiplexing
TFTP
Trivial File Transfer Protocol
VCI
Virtual Channel Identifier
VCL
Virtual Channel Link
VPI
Virtual Path Identifier
WAN
Wide Area Network
Related documents
Refer to the following publications for additional information:
•
EtherXtend Quick Start Guide
•
EtherXtend Release Notes
Contacting Global Service and Support
Contact Global Service and Support (GSS) if you have any questions about
this or other Zhone products. Before contacting GSS, make sure you have the
following information:
10
EtherXtend User’s Guide
•
Zhone product you are using
•
System configuration
•
Software version running on the system
•
Description of the issue
Contacting Global Service and Support
Technical support
If you require assistance with the installation or operation of your product, or
if you want to return a product for repair under warranty, contact GSS. The
contact information is as follows:
E-mail
[email protected]
Telephone (North America)
877-ZHONE20
Telephone (International)
510-777-7133
Internet
www.zhone.com/support
If you purchased the product from an authorized dealer, distributor, Value
Added Reseller (VAR), or third party, contact that supplier for technical
assistance and warranty support.
Service requirements
If the product malfunctions, all repairs must be performed by the
manufacturer or a Zhone-authorized agent. It is the responsibility of users
requiring service to report the need for service to GSS.
EtherXtend User’s Guide
11
About This Guide
12
EtherXtend User’s Guide
SAFETY, REGULATIONS, AND CERTIFICATIONS
This chapter describes how to prepare your site for the installation of the
EtherXtend platform. It includes the following topics:
•
Grounding and isolation, page 13
•
Installation safety precautions on page 13
•
EMI Notices, page 16
•
ACTA Customer Information, page 16
•
Supplier’s Declaration of Conformity, page 18
•
CE Marking, page 19
•
Contacting Global Service and Support, page 19
•
Technical Support, page 19
•
Service Requirements, page 20
Grounding and isolation
The EtherXtend system cards and subassemblies use an integrated frame and
logic ground system as follows:
•
The EtherXtend device and logic ground are bonded.
•
Cable shielding is terminated on the EtherXtend system device ground.
When the AC plug is not grounded, it is recommended to ground the device
using minimum 16-gauge wire to a building or earth ground.
Installation safety precautions
Avoid creating a hazardous condition by maintaining even weight distribution
within the device.
Maximum operating temperature should not exceed 650C (1490F). Observe
the maximum recommended operating temperature as indicated here.
EtherXtend User’s Guide
13
Safety, Regulations, and CertificationsSafety, Regulations, and Certifications
Do not block system air vents; this will deprive the system of the airflow
required for proper cooling. Sufficient clearance must exist on all sides of the
rack to permit equipment access. Connect the system to the power supply
circuit as described in this document. Do not overload the system or power
supply circuit. Ensure that proper system grounding is performed and
maintained.
Important Safety Instructions
Read and follow all warning notices and instructions
marked on the product or included in the manual.
14
EtherXtend User’s Guide
1
Slots and openings in the cabinet are provided for ventilation. To ensure
reliable operation of the product and to protect it from overheating, these
slots and openings must not be blocked or covered.
2
Do not allow anything to rest on the power cord and do not locate the
product where persons will walk on the power cord.
3
Do not attempt to service this product yourself, as opening or removing
covers may expose you to hazardous voltage or to other risks. Refer all
servicing to qualified service personnel.
4
General purpose cables are used with this product for connection to the
network. Special cables, which may be required by the regulatory
inspection authority for the installation site, are the responsibility of the
customer. Use a UL Listed, CSA certified (or a cable that is certified in
the country in which it is being installed), minimum No. 26 AWG
(.163mm2) line cord for connection to the Digital Subscriber Line (DSL)
network.
5
When installed, the product must comply with the applicable Safety
Standards and regulatory requirements of the country in which it is
installed. If necessary, consult with the appropriate regulatory agencies
and inspection authorities to ensure compliance.
6
A rare phenomenon can create a voltage potential between the earth
grounds of two or more buildings. If products installed in separate
buildings are interconnected, the voltage potential may cause a hazardous
condition. Consult a qualified electrical consultant to determine whether
or not this phenomenon exists and, if necessary, implement corrective
action prior to interconnecting the products.
7
When using a certified class II transformer/Input power to this product
must be provided with one of the following: (1) a NRTL certified power
source with a Class 2 output for use in North America, or (2) a certified
power source, with a Safety Extra Low Voltage (SELV) output having a
maximum of 240 VA available, for use in the country of installation.
Installation safety precautions
Figure 1: AC feed power connection
ex
To AC power
06
05
48VDC
Power
Supply
0.5 A
RTN -48
POWER
For DC direct feed operation: Connect the 48 VDC SELV supply source that is electrically
isolated from the AC source. Use Stranded 18 AWG (1.045mm2) gauge wire, type SPT or
HO3 wire. The length may vary up to a maximum of 6 feet. All conductors on both ends of
the wire should be stripped back .25 inches, but not tinned. Use Figure 2 as a guide to
wire the two-wire terminal provided. The 48 VDC source is to be reliably connected to
earth. Ground by attaching an earthing ground wire to the Sem Screw Zhone P/N
150-00071-01 (8-32 x 1/2 split lock steel screw) provided on the rear panel of the chassis
next to the earth ground symbol. The wire should be a minimum of 14 AWG (2.7 mm2)
grounding conductor with insulation colored green with a yellow strip and should connect
to a copper grounding lug Heyco P/N 1851 (Zhone P/N 170-02880-01) or equivalent. The
copper ground lug will connect to grounding screw terminal located on the back of the
EtherXtend chassis next to the earth ground symbol.
Figure 2: DC feed power connection
ex
06
06
48VDC
0.5 A
RTN -48
To DC power
+/-
POWER
1 In addition, since the equipment is to be used with telecommunications circuits, take the
following precautions:
— Never install telephone wiring during a lightning storm.
— Never install telephone jacks in wet locations unless the jack is specifically designed
for wet locations.
EtherXtend User’s Guide
15
Safety, Regulations, and CertificationsSafety, Regulations, and Certifications
—
—
—
—
Never touch uninsulated telephone wires or terminals unless the telephone line has
been disconnected at the network interface.
Use caution when installing or modifying telephone lines.
Avoid using a telephone (other than a cordless type) during an electrical storm. There
may be a remote risk of electric shock from lightning.
Do not use the telephone to report a gas leak in the vicinity of the leak.
EMI Notices
The following are EMI notices.
United States - EMI Notice
This equipment has been tested and found to comply with the limits for a Class A digital
device, pursuant to Part 15 of the FCC rules. These limits are designed to provide reasonable
protection against harmful interference when the equipment is operated in a commercial
environment. This equipment generates, uses, and can radiate radio frequency energy and, if
not installed and used in accordance with the instruction manual, may cause harmful
interference to radio communications. Operation of this equipment in a residential area is likely
to cause harmful interference in which case the user will be required to correct the interference
at his own expense.
The authority to operate this equipment is conditioned by the requirements that no
modifications will be made to the equipment unless the changes or modifications are expressly
approved by Zhone Technologies, Inc.
If the equipment includes a ferrite choke or chokes, they must be installed as described in the
installation instructions.
Canada - EMI Notice
This Class A digital apparatus complies with Canadian ICES-003.
Cet appareil numérique de la classe A est conforme à la norme NMB-003 du Canada.
ACTA Customer Information
This equipment complies with Part 68 of the FCC rules and the requirements adopted by the
ACTA. On the bottom of the network extender is a label that contains, among other
information, a product identifier in the format US:AAAEQ##TXXXX. If requested, this
number must be provided to the telephone company.
A plug and jack used to connect this equipment to the premises wiring and telephone network
must comply with the applicable FCC Part 68 rules and requirements adopted by the ACTA.
See installation instructions for details.
If the network extender causes harm to the telephone network, the telephone company will
notify you in advance that temporary discontinuance of service may be required. But if advance
notice isn't practical, the telephone company will notify the customer as soon as possible. Also,
you will be advised of your right to file a complaint with the FCC if you believe it is necessary.
The telephone company may make changes in its facilities, equipment, operations or
procedures that could affect the operation of the equipment. If this happens the telephone
company will provide advance notice in order for you to make necessary modifications to
maintain uninterrupted service.
16
EtherXtend User’s Guide
Installation safety precautions
If trouble is experienced with this equipment, please contact your local sales representative,
service representative, or distributor directly for any help needed. For additional information
concerning warranty, sales, service, repair, installation, documentation, training, distributor
locations, or Zhone Technologies worldwide office locations, contact Global Service and
Support.
If the equipment is causing harm to the telephone network, the telephone company may request
that you disconnect the equipment until the problem is resolved.
The customer may make no repairs to the equipment.
Connection to party line service is subject to state tariffs. Contact the state public utility
commission, public service commission or corporation commission for information.
EtherXtend User’s Guide
17
Safety, Regulations, and CertificationsSafety, Regulations, and Certifications
Supplier’s Declaration of Conformity
Place of Issue:
Zhone Technologies
8545 126th Avenue North
Largo, FL 33773-1502
USA
Date of Issue:
July 10, 2006
Zhone Technologies, located at the above address, hereby certifies that the
Model ETHX-SHDSL-X (where X = 4 or 8 denoting the total number of
WAN ports) bearing labeling identification number US:6RTDLNANETHX
complies with: the Federal Communications Commission’s (“FCC”) Rules
and Regulations 47 CFR Part 68, and the Administrative Council on Terminal
Attachments (“ACTA”)-adopted technical criteria TIA-968-A,
“Telecommunications - Telephone Terminal Equipment -Technical
Requirements for Connection of Terminal Equipment To the Telephone
Network, October 2002,” as amended by TIA-968-A-1, TIA-968-A-2 and
TIA-968-A-3.
Keith Nauman
Vice President
18
EtherXtend User’s Guide
Installation safety precautions
Notice to Users of the Canadian Telephone Network
NOTICE: This equipment meets the applicable Industry Canada Terminal Equipment Technical
Specifications. This is confirmed by the registration number. The abbreviation IC before the
registration number signifies that registration was performed based on a Declaration of
Conformity indicating that Industry Canada technical specifications were met. It does not
imply that Industry Canada approved the equipment.
NOTICE: The Ringer Equivalence Number (REN) for this terminal equipment is labeled on the
equipment. The REN assigned to each terminal equipment provides an indication of the
maximum number of terminals allowed to be connected to a telephone interface. The
termination on an interface may consist of any combination of devices subject only to the
requirement that the sum of the Ringer Equivalence Numbers of all the devices does not exceed
five.
If your equipment is in need of repair, contact your local sales representative, service
representative, or distributor directly.
CE Marking
When the product is marked with the CE mark on the equipment label, a supporting
Declaration of Conformity may be downloaded from the Zhone World Wide Web site at
www.zhone.com.
Contacting Global Service and Support
Contact Global Service and Support (GSS) if you have any questions about this or other Zhone
products. Before contacting GSS, make sure you have the following information:
•
Software version running on the system
•
System configuration
•
Zhone product you are using
•
Description of the issue
Technical Support
If you require assistance with the installation or operation of your product, or if you want to
return a product for repair under warranty, contact GSS. The contact information is as follows
Table 1:
E-mail
[email protected]
Telephone (North America)
877-ZHONE20
Telephone (International)
510-777-7133
Internet
www.zhone.com/support
EtherXtend User’s Guide
19
Safety, Regulations, and CertificationsSafety, Regulations, and Certifications
If you purchased the product from an authorized dealer, distributor, Value
Added Reseller (VAR), or third party, contact that supplier for technical
assistance and warranty support.
Service Requirements
If the product malfunctions, all repairs must be performed by the manufacturer or a
Zhone-authorized agent. It is the responsibility of users requiring service to report the need for
service to GSS.
20
EtherXtend User’s Guide
OVERVIEW
The Zhone EtherXtend 4-port and 8-port devices are the first products in a
family of next-generation Ethernet-enabled CPE devices. Each of the
products in the family performs the function of a network extender, an
emerging class of products that lengthens the reach of packets passing from
the source or destination to or from a service provider, a distance known as
Ethernet in the First Mile (EFM). These products fall into the EFM
technology category covered by the IEEE standard 802.3ah.
This chapter includes the following topics:
•
Product models on page 22
•
Product description, page 22
•
Technology description, page 23
•
EFM media, page 24
•
Review of SHDSL, page 26
•
Ethernet services, page 27
EtherXtend User’s Guide
21
Overview
Product models
The EtherXtend product family contains the following product models:
Table 2: Product Models
Product Name
Description
ETHX-SHDSL-4-US
A 4-port SHDSL EFM device
running on Alternating Current for
US power requirements.
ETHX-SHDSL-4-UK
A 4-port SHDSL EFM device
running on Alternating Current for
United Kingdom power
requirements.
ETHX-SHDSL-4-EU
A 4-port SHDSL EFM device
running on Alternating Current for
European Union power requirements.
ETHX-SHDSL-4-DC
A 4-port SHDSL EFM device
running on Direct Current power
requirements.
ETHX-SHDSL-8-US
An 8-port SHDSL EFM device
running on Alternating Current
for US power requirements.
ETHX-SHDSL-8-UK
An 8-port SHDSL EFM device
running on Alternating Current
for United Kingdom power
requirements.
ETHX-SHDSL-8-EU
An 8-port SHDSL EFM device
running on Alternating Current
for European power
requirements.
ETHX-SHDSL-8-DC
An 8-port SHDSL EFM device
running on Direct Current power
requirements.
Product description
The 4- and 8-port EttherXtend SHDSL Ethernet Access Devices
(ETHX-SHDSL-4 and ETHX-SHDSL-8) deliver bonded high-speed EFM
services over SHDSL. The ETHX-SHDSL-x device family provides 802.3ah
compliant SHDSL bonding with advanced features, including Zhone’s
Multimedia Traffic Management (MTM). In addition, full compliance to
802.3ah industry standards provide high reliability, low latency, and
integrated Operation, Administration, and Maintenance (OAM) features for
advanced management of Ethernet lines.
22
EtherXtend User’s Guide
Technology description
Figure 3: Rear view of the EtherXtend device
ALARM
SERIAL
WAN
e x0 6 0 3
48VDC
0.5 A
RTN -48
LAN
POWER
N/C
COM
N/O
ZHONE TE
CHNOLO
GIES, INC
MODEL:
ETHERX
TEND
Figure 4: Front view of the LEDs on the EtherXtend Device
Supporting both 802.3ah EFM standards as well as Zhone’s proprietary
lightweight Ethernet bonding technologies, the EtherXtend devices also
provide flexibility. The dual-mode operation allows an EtherXtend device to
aggregate into standards-based products such as the MALC broadband loop
carrier, and other EtherXtend-SHDSL-x units, or they may also connect into
pre-standard Ethernet Loop Bonding products such as Zhone’s 12000E,
SIM2000, SuD2000, SMD20000, and SNE2000 series Ethernet access
products.
Technology description
EFM provides performance for data traveling across a connection between the
customer and the central office (CO) or what has become commonly known
as the head end. This connection has been a stopgap for Internet traffic,
limiting performance to whatever the constraints of this connection are. No
matter how fast data could travel over xDSL links over the network, it would
EtherXtend User’s Guide
23
Overview
still be slowed by having to traverse the link between the head end and the
customer and vice versa.
The EtherXtend devices provide an ideal solution for one of the following
scenarios:
•
a metro LAN extension
•
a cellular site backhaul
•
any point-to-point application requiring Ethernet connectivity over the
WAN
The EtherXtend can be used to create a point-to-point connection over a dry
copper pair. Within a campus environment or multi-tenant unit (for example, a
hospital) where you own the cabling infrastructure, copper pairs are often
available throughout the facility as unused telephone cabling.
Any cell site running EvDO CDMA or 3G provides an Ethernet interface for
the mobile applications such as mini-web browsing. Typically, these Ethernet
ports are connected to a T1 router so they can be carried over long distances to
the CO where they are terminated into Ethernet.
The EtherXtend platforms not only provide a more cost-effective alternative
to deploying dedicated T1 router equipment at each cellular tower, but they
also provide loop bonding capabilities to reach the higher bandwidth demands
of EvDO and 3G.
The Ethernet port of the cell tower simply connects to the appropriate
EtherXtend platform, and the Ethernet frames are transported directly over up
to four SHDSL lines. At the CO, the extended LAN connection presents a
single Ethernet RJ-45 interface for simple connectivity to the data network.
Loop bonding allows multiple physical lines to be grouped together to achieve
higher data rates. For example, four 2.3Mbps SHDSL lines can be combined
to provide up to 9.2Mbps of bandwidth. Loop bonding is an easy way to
increase line speeds where extra copper is available.
Zhone’s EtherXtend technology uses existing copper facilities to deliver high
bandwidth Ethernet services over existing copper loops to business
customers. Products from this technology are both EFM standards compliant
and compatible with existing bonded copper solutions to deliver
point-to-point Ethernet connectivity over the WAN.
EtherXtend transports Ethernet directly over SHDSL, T1, or E1. This makes it
easy to interconnect LANs over virtually any distance. These transparent
LAN services allow businesses with broadly distributed remote offices to
operate as if located on the same local network.
EFM media
EFM is an IEEE standard (802.3ah) that specifies how Ethernet is available
over the access network. The standard encompasses methods for transport
24
EtherXtend User’s Guide
EFM media
over both fiber and copper media. Most of the benefit, though, occurs with the
copper implementation.
Copper wire access lines are the dominant access media today. While optical
fiber facilities appear to be gaining market share, the existing media (copper)
still is more dominant in terms of volume of footage, number of entry points,
and number of regions governed by a technology type.
EFM over copper services offers more than fiber class speed. They support a
wide range of applications and opportunities. EFM technology provides
benefits for installations provisioning high-speed, high-value services and for
users of those services who realize cost and performance improvements
delivered rapidly and flexibly.
EFM over copper applications include:
•
Frame Relay migration to E-LAN services
•
T1/E1 replacement with E-Line services, including internet access,
wireless backhaul, voice access, and wholesale services.
•
Transparent LAN service (TLS)
EFM over copper technology supports a wide range of voice data and video
services and applications. Many applications are extensions of ones now
supported by T1/E1 and Frame Relay services. However, they are more
responsive to new demands by customers by providing much higher data
rates.
EtherXtend User’s Guide
25
Overview
Review of SHDSL
SHDSL stands for Single pair High speed Digital Subscriber Line. It is the
newest in a series of xDSL standards for symmetric links over voice grade
copper wire. In order to appreciate SHDSL, it is helpful to understand HDSL
and SDSL.
HDSL
HDSL emerged in the early 1990s, using the 2B1Q modulation standard, as a
more efficient and cost effective approach to provisioning T1 and E1 services
without repeaters. The technique consisted of splitting the
1,544,000-bit-per-second service onto two pairs (four wires), each running at
784,000 bits per second.
The per-line speed and resulting need for frequency spectrum can be reduced
to allow longer loop reach by splitting the service across two lines and
increasing the bits per baud. This technique was referred to as High-bit-rate
Digital Subscriber Line (HDSL). The result was that an HDSL-based DS1
service could be implemented over a Carrier Serving Area (CSA) specified
loops of up to 12,000 feet assuming 24-gauge wire, or 9,000 feet with 26gauge wire and no repeaters. HDSL is used worldwide today on T1 and E1
lines.
SDSL
SDSL emerged as a technology offering HDSL speeds on a single pair,
allowing transceiver systems to achieve an entire T1 or E1 line speed on a
single loop at distances approaching or exceeding the conventional two-loop
HDSL systems. This single-pair implementation of T1 or E1 HDSL is
referred to as Synchronous Digital Subscriber Line (SDSL). This acronym is
used to refer to symmetric service at a variety of rates over a single loop.
SHDSL
The SHDSL standard is the newest flavor of HDSL. It uses Pulse Amplitude
Modulation (PAM) to transmit data across voice grade copper wires. The first
version of SHDSL used 16-level PAM and was able to operate at a maximum
data rate of 2.3 Mbps across a single pair. The newer enhanced SHDSL uses
32-level PAM and can operate at speeds up to 5.7 Mbps on a single copper
pair.
In SHDSL, a serial bit stream is frame, scrambled, and then sent through a
convolutional encoder. PAM then quantizes the stream out of the
convolutional coder and the resulting symbols are transmitted across the
copper pair. SHDSL performance, like all xDSL modulation standards, is
dependent on the length of the copper pair, the quality of the pair, and the
cross-talk environment.
26
EtherXtend User’s Guide
Ethernet services
Ethernet services
Operating under the pretext of Carrier Ethernet, the Metro Ethernet Forum
(MEF) has a leadership role in defining Ethernet service offerings. An
essential element of this effort is the development of standard definitions for
Ethernet services. The definitions are from the customer’s point of view and
describe the functional characteristics that a customer perceives. The body
established the User Network Interface and Ethernet Virtual Connection for
two principal services: E-Line and E-LAN.
ELine services include point-to-point Ethernet connections using Layer 2
VLAN infrastructure with two types of user network interface (UNI) access:
802.1Q-in-802.1Q(QinQ) and dot1Q encapsulation. These services are also
known as Ethernet Relay Service (ERS) and Ethernet Wire Service (EWS).
ELAN services provide multipoint-to-multipoint services using virtual private
LAN services (VPLS) or simply Layer 2 VLAN core.
Carrier Ethernet has developed a series of extensions to standard Ethernet that
provide improved performance to the Internet experience.
EtherXtend User’s Guide
27
Overview
28
EtherXtend User’s Guide
FEATURES AND CAPABILITIES
Zhone EtherXtend products perform the function of a network extender, an
emerging class of products that lengthens the reach of Ethernet in the first
mile. These products have a series of features associates with them that
provide network extending capability, including bonding, aggregation, and
other performance enhancements.
This chapter includes the following topics:
•
EFM overview, page 29
•
2BASE-TL on page 30
•
Zhone EFM features, page 30
•
EtherXtend bonding implementation, page 33
•
Wire mode, page 33
•
One Ethernet port mapped to one SHDSL port, page 34
•
Scenarios, page 36
•
System defaults, page 38
•
Product specifications, page 40
Note: When operating in Wire Mode, only a limited number of
features are supported. See Wire mode on page 33 for more
information.
EFM overview
As a result of the demand for Ethernet services, vendors and service providers
worldwide created a standard for Ethernet Access technology called IEEE
802.3ah. Also known as Ethernet in the First Mile (EFM), this standard
defines protocols for Ethernet access and management technology across both
the copper and fiber network infrastructure.
Principally, EFM was established to enhance access networks. The
technology provides the following benefits:
•
Ethernet interfaces and transport across a wide variety of media.
EtherXtend User’s Guide
29
Features and capabilities
•
a universal Ethernet service extending the reach of Ethernet to locations
served by both copper and fiber
•
a consistent set of Ethernet services with adjustable bandwidth and rates
from 1 Mbps to 10 Gbps.
2BASE-TL
EFM over Copper (EFMC) is a point-to-point Ethernet over copper standard
targeted at small to medium enterprise sites served by copper. The standard
currently has two versions with different data rates and reaches. EFM has two
protocols associated with it: 2BASE-TL and 10PASS-TS. Zhone currently
supports only 2BASE-TL. The following table provides details about
2BASE-TL.
Table 3: 2BASE-TL Protocol Details
Protocol
Point Method
Standard
Media
Mode
Data Rate
Distance
Bonding
2BASE-TL
Point-to-Point
SHDSL
Copper
Symmetric
1 - 5.7
Mbps
2,700
meters
32 pairs; 8
pairs
(actual)
2BASE-TL is based on the SHDSL standard for symmetric DSL services. The
data rates over a single copper pair range between 1 Mbps and 5.7 Mbps.
2BASE-TL can serve distances up to 2,700 meters. Additionally, up to 32
copper pairs can be bonded together to increase data rates and resiliency. In
practice, no more than 8 pairs are bounded.
The standard closely resembles the SHDSL specification for the PMA and
PMD sublayers. The PMA sublayer consists of a framer/deframer and a
scrambler/descrambler. The PMA sublayer then sends a framed and
scrambled bit stream to the PMD layer for modulation over the single copper
pair.
The PMD sublayer first passes the bit stream through a convolutional
encoder/decoder and then through the PCM modulator/demodulator. The
PMD sublayer then passes electrical signals across a single pair of voice grade
copper lines.
Zhone EFM features
Zhone’s EtherXtend equipment adds enhancements to the EFM standard.
Some of these enhancements are:
30
EtherXtend User’s Guide
•
PME Aggregation
•
EFM Link Bonding
•
Transmission Convergence Sublayer
Zhone EFM features
•
Using T1/E1 at the EFM Physical Layer
•
Multimedia Traffic Management
PME aggregation
PME Aggregation uses frame fragmentation to divide, load balance, and
transmit MAC frames across up to 32 parallel links. Additionally, Zhone
EtherXtend products support bonding across T1 and E1 circuits.
Frame fragmentation is used to so that MAC frames are broken up into
smaller pieces and sent in parallel across multiple links. This increases the
effective throughput while minimizing latency and jitter across the bonded
links.
Fragment sizes must be between 64 and 512 bytes and must be multiples of 64
bytes. All fragments must be at least 64 bytes long. The algorithm for
fragmenting MAC frames is left up to the implementer so there can be
differences in performance between different vendors in transmitting data
across bonded links.
Loop bonding
Ethernet Loop Bonding refers to a technology where multiple physical
SHDSL lines are grouped together to provide greater bandwidth potential
over a single logical connection. The WAN connection terminates into a
single Ethernet connection, providing a single connection to the end user.
However multiple lines aggregate on the WAN to provide higher bandwidth.
This enables carriers to provide greater distances for higher bandwidth
services, for example, IP television, VoIP, and other converged services.
In DSL Loop Bonding, you utilize two or four copper pairs to yield either 2x
or 4x the bandwidth at any given distance. This allows extremely long local
loops to deliver high-speed DSL. For example, while SHDSL only supports
144 Kbps at 25,000 feet, four SHDSL lines together would provide 576 Kbps
or just over .5 Mbps. The Loop Bonding aspect of the connection is invisible
to the consumer who realizes an increase in access speed.
The following table shows the data rates that bonded loops can produce.
Table 4: Selected Data Rates (in Kbps) Realized Through Bonding Loops
Distance
(feet)
CO-to-CPE
(1 Pair)
CO-to-CPE
(2 Pair)
CO-to-CPE
(4 Pair)
CO-to-CPE
(8 Pair)
5,000
5,704
5,704
5,704
5,704
7,000
5,704
5,704
3,984
3,600
9,000
3,856
2,896
2,384
2,320
12,000
2,192
2,192
1,872
1,296
EtherXtend User’s Guide
31
Features and capabilities
Table 4: Selected Data Rates (in Kbps) Realized Through Bonding Loops
Distance
(feet)
CO-to-CPE
(1 Pair)
CO-to-CPE
(2 Pair)
CO-to-CPE
(4 Pair)
CO-to-CPE
(8 Pair)
15,000
1,040
1,040
848
656
18,000
464
464
570
400
While the total achievable distance is not increased through loop bonding, the
maximum bandwidth that can be achieved at any distance is increased,
making even very long DSL deployments capable of high data rates.
32
EtherXtend User’s Guide
EtherXtend bonding implementation
EtherXtend bonding implementation
The following sections detail various implementations of EtherXtend. The
following implementations are provided.
•
One Ethernet port mapped to one SHDSL port
•
One Ethernet port mapped to an SHDSL bonded group
•
Multiple Ethernet switch ports mapped to one SHDSL port
•
Multiple Ethernet switch ports mapped to multiple bonded PCs
•
Ethernet ports mapped to different SHDSL bonded groups
Figure 5:
Unicast traffic destined for remote (SHDSL) ports will not be forwarded to
other local Ethernet ports. However, in wire mode, packets are not processed
by SLMS code within the NPU; they are cut-through to the SHDSL ports
directly.
Wire mode
In Wire Mode, all traffic received on an Ethernet port will be forwarded
according to the rules of 802.1d. That is, a bridge table is created, and local
traffic will be switched to appropriate ports, while traffic destined to the WAN
will be switched to the NPU. Broadcasts will be forwarded to all five Ethernet
ports (the four external ports, and the one internal port that connects to the
NPU).
The NPU will receive all Ethernet packets that are destined for the WAN -tagged and/or untagged -- and push all traffic to a single bonded group, which
may contain one or more physical SHDSL ports, up to the maximum offered
by the device (4 or 8 depending upon the model). Packets destined for other
local devices will be switched to those devices accordingly, and will not
traverse the WAN.
EtherXtend User’s Guide
33
Features and capabilities
The EtherXtend is acting as a simple Ethernet point-to-point wire, hence the
name "Wire Mode". There is no ability to add or control VLAN tags, nor is
there the ability to route traffic at layer 3. SLMS, and the familiar SLMS CLI,
is still present but is not used for forwarding decisions in Wire Mode.
One Ethernet port mapped to one SHDSL port
This configuration is a simple LAN extension application. In this mode, the
device is simply a bridge. Backhaul from a cell tower might use this
configuration. Instead of an Ethernet to T1 conversion, this approach would
allow native Ethernet throughout the network.
One Ethernet port mapped to an SHDSL bonded group
This configuration increases the speed of the WAN link. This configuration
applies to the same scenarios as the instance where one Ethernet port is
mapped to one SHDSL port. However, you use this scenario when there is a
need for greater bandwidth. With two ports bonded together, you can raise
your throughput to 11.4 Mbps. This is appropriate for bursty LAN traffic
because the Ethernet port support throughput at 100 Mbps and the DSL port
supports throughput at 11 Mbps.
34
EtherXtend User’s Guide
One Ethernet port mapped to one SHDSL port
Multiple Ethernet switch ports mapped to one SHDSL port
This configuration allows multiple PCs to be connected to the EAD,
eliminating the need for an additional router or switch for multiple users. This
configuration would be used for small businesses or even in the home. This
configuration is similar to the one served with ADSL routers. For example,
the unit would need to be a DHCP server for the devices on the Ethernet ports.
Multiple Ethernet ports mapped to multiple SHDSL ports
This configuration allows multiple PCs to connect to the EAD eliminating the
need for an additional router or switch for multiple users. In addition, the
WAN link speed is significantly improved. This configuration is similar to the
scenario where multiple Ethernet switch ports map to one SHDSL port.
However, the WAN link speed is much faster. with al eight ports bonded, the
WAN speed can be up to 45 Mbps.
EtherXtend User’s Guide
35
Features and capabilities
Ethernet Ports mapped to different SHDSL bonded groups
In this configuration, two independent Ethernet ports are connected to
different bonded SHDSL groups. This configuration operates as two Ethernet
extenders in the same physical unit. This feature allows for transparent LAN
services. It could be possible for Company A to use Ethernet port 1 and
Company B to use Ethernet port 3. With features such as Plans, the traffic
from each company would be separated. A better solution could be to use just
two units. Then the data is physically as well as logically separated.
Scenarios
This section provides details on possible usage scenarios for the EtherXtend
device:
•
Endpoint-to-Endpoint on page 36
•
Endpoint-to-Multiple DSLAMs on page 37
•
Multiple Endpoints to Multiple Cards on a Chassis on page 37
Endpoint-to-Endpoint
The simplest scenario is a pair of EtherXtend devices acting as endpoints. his
pairing is where an explicit endpoint is directly connected to another explicit
endpoint. This topology is known as back-to-back mode. The following figure
details this.
36
EtherXtend User’s Guide
Scenarios
Figure 6: EtherXtend in Back-to-Back Mode
WAN
EtherXtend Endpoint #1
EtherXtend Endpoint #2
Endpoint-to-Multiple DSLAMs
A second scenario is one EtherXtend device acting as an endpoint that
connects to a number of different Digital Subscriber Line Access Multiplexers
(DSLAMs). This enables you to fan out connections to multiple fanouts that
connect to hundreds of subscribers. This topology is known as multiple
DSLAM mode. The following figure details this:
Figure 7: EtherXtend in Multiple DSLAM Mode
EtherXtend Endpoint
Multiple Endpoints to Multiple Cards on a Chassis
The third scenarios enables the most subscribers. This scenario is multiple
EtherXtend endpoints connecting to multiple SIM-2000 cards in a chassis.
Each card has 24 ports and can connect to multiple endpoints on the
subscriber side. The following figure shows three EtherXtend endpoints
connecting to a MALC containing six SIM-2000 cards. Each of those cards
connects to three subscribers side EtherXtend endpoints, each with four ports.
EtherXtend User’s Guide
37
Features and capabilities
Figure 8: Multiple Endpoints Connecting to Multiple SIM Cards on a MALC
Subscriber Cluster #1
MALC 719 Populated with
SIM-2000 Cards
Endpoint #1
Endpoint #2
Endpoint #3
Subscriber Cluster #3
Subscriber Cluster #2
#1
System defaults
The following table indicates settings for system default parameters.
Table 5: Settings for System Default Parameters
Parameter
Default Setting
Mode
CPE Mode
IP Address
DHCP
SHDSL Speed
5,696 Adaptive
Ethernet Interface
Autosensing Enabled
Autonegotiating Enabled
38
EtherXtend User’s Guide
Bonding
Off
Bonding Mode
N2N
Login
admin
Password
zhone
DHCP Server (LAN)
Enabled
System defaults
Table 5: Settings for System Default Parameters
Parameter
Default Setting
DHCP Client (WAN)
Enabled
The following default configurations are present:
•
Several profiles are automatically configured.
•
The device contains a DHCP client in the ip-interface-record object for
the WAN port of the system
•
The Ethernet LAN interface has 10/100 Mbps throughput and has
autosensing and autonegotiating features built in for handshaking with
interfaces with different throughput and duplex settings.
•
The DSL WAN interface is set to SHDSL, customer premises equipment,
with a line speed of 5,696 Kbps.
EtherXtend User’s Guide
39
Features and capabilities
Product specifications
The following are product specifications for the ETHX-SHDSL-4 and
ETHX-SHDSL-8.
Specifications for the ETHX-SHDSL-4
Table 6: ETHX-SHDSL-4 Specifications
Specification Type
Specification
Dimensions
1.75” (4.45 cm) High x 10” (21.6 cm) Wide x 7.5”
(19.1 cm) Deep
Weight
3.35 lbs (1.52 kg)
Power
-48V DC and Universal AC power options
available.
Interfaces
4 extended-rate SHDSL (2Base-TL) interfaces; 4
10/100 Ethernet interfaces.
Standards Support
ITU G.994.1 G.handshake; IEEE 802.3
Ethernet; IEEE 802.3ah Ethernet in the First
Mile (2Base-TL); IEEE 802.3ah OAM, IEEE
802.1Q/p.
Protocol Support
Host-based routing for per-interface single IP
address assignments; network-based routing for
per-interface IP subnet address assignments; IP host
and gateway support; RIP v1 (RFC 1058), RIP v2
(RFC 2453); RFC 1483/2684 Encapsulation; DHCP
Server (RFC 2131, 2132), DHCP Relay Bridging
802.1D support; VLAN 802.1Q support.
Management
ZMS via SNMPv2c for GUI and CORBA IDL
machine interface; serial terminal and Telnet
for command line interface; inband IP via 10/
100 Ethernet or WAN port.
Bandwidth/Distance
Data rates up to 5.7 Mbps symmetrical;
distances up to 24,000 ft/7,320m; cross-talk
cancellation within bonded groups.
Operating Requirements
Temperature: -400 F to 1490 F (-400 C to 650
C); Non-operating temperature: -400 F to 1580
F (-400 C to 700 C); humidity: 5% to 95%,
non-condensing; altitude: -200 ft to 16,500
ft (-60m to 5,000m).
40
EtherXtend User’s Guide
Product specifications
Specifications for the ETHX-SHDSL-8
Table 7: ETHX-SHDSL-8 Specifications
Specification Type
Specification
Dimensions
1.75” (4.45 cm) High x 10” (21.6 cm) Wide x 7.5”
(19.1 cm) Deep
Weight
3.35 lbs (1.52 kg)
Power
-48V DC and Universal AC power options
available.
Interfaces
8 extended-rate SHDSL (2Base-TL) interfaces; 4
10/100 Ethernet interfaces.
Standards Support
ITU G.994.1 G.handshake; IEEE 802.3
Ethernet; IEEE 802.3ah Ethernet in the First
Mile (2Base-TL); IEEE 802.3ah OAM, IEEE
802.1Q/p.
Protocol Support
Host-based routing for per-interface single IP
address assignments; network-based routing for
per-interface IP subnet address assignments; IP host
and gateway support; RIP v1 (RFC 1058), RIP v2
(RFC 2453); RFC 1483/2684 Encapsulation; DHCP
Server (RFC 2131, 2132), DHCP Relay Bridging
802.1D support; VLAN 802.1Q support.
Management
ZMS via SNMPv2c for GUI and CORBA IDL
machine interface; serial terminal and Telnet
for command line interface; inband IP via 10/
100 Ethernet or WAN port.
Operating Requirements
Temperature: -400 F to 1490 F (-400 C to 650
C); Non-operating temperature: -400 F to 1580
F (-400 C to 700 C); humidity: 5% to 95%,
non-condensing; altitude: -200 ft to 16,500 ft
(-60m to 5,000m).
Specifications for the ETHX-SPWE-4-T1/E1/V35
Table 8: ETHX-SPWE-4-T1/E1/V35 Specifications
Specification Type
Specification
Dimensions
1.75” (4.45 cm) High x 10” (21.6 cm) Wide x 7.5”
(19.1 cm) Deep
Weight
3.35 lbs (1.52 kg)
Power
-48V DC and Universal AC power options
available.
EtherXtend User’s Guide
41
Features and capabilities
Table 8: ETHX-SPWE-4-T1/E1/V35 Specifications
42
EtherXtend User’s Guide
Specification Type
Specification
Interfaces
8 extended-rate SHDSL (2Base-TL) interfaces; 4
10/100 Ethernet interfaces.
Standards Support
ITU G.994.1 G.handshake; IEEE 802.3
Ethernet; IEEE 802.3ah Ethernet in the First
Mile (2Base-TL); IEEE 802.3ah OAM, IEEE
802.1Q/p.
Protocol Support
Host-based routing for per-interface single IP
address assignments; network-based routing for
per-interface IP subnet address assignments; IP host
and gateway support; RIP v1 (RFC 1058), RIP v2
(RFC 2453); RFC 1483/2684 Encapsulation; DHCP
Server (RFC 2131, 2132), DHCP Relay Bridging
802.1D support; VLAN 802.1Q support.
Management
ZMS via SNMPv2c for GUI and CORBA IDL
machine interface; serial terminal and Telnet
for command line interface; inband IP via 10/
100 Ethernet or WAN port.
Operating Requirements
Temperature: -400 F to 1490 F (-400 C to
650C); Non-operating temperature: -400 F to
1580 F (-400 C to 700 C); humidity: 5% to
95%, non-condensing; altitude: -200 ft to
16,500 ft (-60m to 5,000m).
PREPARING FOR INSTALLATION
This chapter describes how to prepare your site for the installation of the
EtherXtend platform. It includes the following topics:
•
General safety precautions, page 43
•
Tools you need, page 43
•
Selecting the system location, page 44
•
Environmental specifications, page 44
•
Power requirements and specifications, page 44
General safety precautions
Tools you need
The required equipment listed in Table 9 should be available before beginning
the installation of the Z-Edge 64 system.
Table 9: Equipment required to install the Z-Edge 64 system
Qty
Equipment
Details
Use
1
VT-100-compatible
terminal or PC used as a
VT-100 terminal emulator
Connected to the Z-Edge 64 through
RJ45 craft port.
Commission and configuration
1
11/32-inch nutdriver
For ground stud hex nuts.
General installation
1
Pliers
1
Cable prep tools
-
Cables
2
#1 and #2 Phillips-head
and 1/8-inch flat-blade
screwdrivers
N/A
Locking and unlocking cards,
front panels and chassis
brackets
2
Antistatic wrist strap
N/A
Static electricity prevention
General installation
Pressfit and crimpers
Cable installation
System connections
EtherXtend User’s Guide
43
Preparing for installation
Selecting the system location
Ensure that the environment is free of dust and excessive moisture, not
exposed to the elements or temperature extremes, and has sufficient
ventilation.
Install the system in reasonable proximity to all equipment with which it will
connect. Ensure that proper cable grades are used for all system and network
connections. For best results, use the cables and connectors recommended in
this document.
Environmental specifications
Table 10 describes the Z-Edge 64 chassis environmental specifications. and
show the Z-Edge 64 dimensions.
Table 10: EtherXtend environmental specifications
Description
Specification
Weight
3.35 lbs. (1.52 kg) fully loaded
Operating temperature
-400C to +700C (-400F to +1580F).
Storage temperature
–400C to +850C (–400F to +1850F)
Operating relative
humidity
5% to 95% noncondensing
Storage relative
humidity
Up to 95% noncondensing
Altitude
Operating altitude: Up to 4,000 m (13,123 ft.)
Airflow
Z-Edge 64 (working at front of unit): Left to right
Power requirements and specifications
–48V DC power sources to be connected to the Z-Edge 64 system. The Return
(+) terminals are common.
Power specifications
Table 11 describes the Z-Edge 64 power specifications.
44
EtherXtend User’s Guide
Power requirements and specifications
Table 11: Z-Edge 64 power supply specifications
Description
Specification
Rated voltage
-41.75V to -60.0V DC
Separate A/B power feeds for –48V DC protection
Rated power
Z-Edge 64: 4-port watts, maximum
Z-Edge 64 8-port watts, maximum
Rated current
Z-Edge 64 4-port: XX maximum
Z-Edge 64 8-port: maximum
DC-input cable
AWG 18 (5.27 mm2) maximum
Listed circuit breaker or
fuse
Z-Edge 64 4-port: XX maximum
Z-Edge 64 8-port: XX maximum
EtherXtend User’s Guide
45
Preparing for installation
46
EtherXtend User’s Guide
INSTALLING THE ETHERXTEND
This chapter explains how to install the EtherXtend hardware. It includes the
following sections:
•
Unpacking the system, page 47
•
Port and LED descriptions, page 48
•
Status LED states, page 48
•
LED descriptions, page 48
•
Interpreting Status LEDs for the EtherXtend Devices, page 50
•
Alarm cable and contacts guidelines, page 51
•
Connecting to power, page 51
•
Connecting the WAN SHDSL lines, page 52
•
Loop bonded connection, page 53
•
Connecting the LAN Ethernet line, page 53
Unpacking the system
Use the following procedure to unpack the EtherXtend system components
from the shipping cartons.
•
On system receipt, check the shipping cartons for physical damage.
•
Unpack the shipping cartons, and check the contents for physical damage.
•
If the equipment appears damaged, immediately contact the shipping
company to file a claim.
The shipping company representative will give instructions on how to submit
a claim, where to send the unit, and any special instructions that may be
required.
If you need to return the equipment, pack the equipment in its original
packing materials and send it by prepaid freight to the address given by the
claims representative. If the original packing materials are unavailable, ship
the equipment in a sturdy carton, wrapping it with shock-absorbing material.
EtherXtend User’s Guide
47
Installing the EtherXtend
Port and LED descriptions
This section provides descriptions of ports on the front panel of the
EtherXtend. Observe the following graphic first to learn of the port
placement.
Figure 9: Ports on the EtherXtend Device
WAN
ALARM
1
SERIAL
5
7
LAN
1
2
3
4
N/C
POWER
COM
2
N/O
Power
Button
3
Alarm
Contact
4
5
WAN (EFM)
Ports
Serial
Port
8
ZHONE TECHNOLOGIES, INC
MODEL: ETHERXTEND
e x0 6 0 2
48VDC
0.5 A
RTN -48
10/100
Ports
Table 12: Descriptions of Ports on Rear Panel
Port
Description
Type
Speed/Protocol
WAN (SHDSL)
Enables a SHDSL connection.
RJ-45
5,696 Kbps
In Net to Net Mode 2,320
Serial
Enables a serial modem
connection for establishing
out-of-band management
sessions from outside of the
network.
RJ-45
9600 Bps/RS-232
10/100
Enables a Fast Ethernet
connection with an aggregate
throughput of 100 Mbps. Four
10/100 ports.
RJ-45
10 Mbps/Ethernet
100 Mbps/Ethernet
Status LED states
This section describes Status LED states on both devices.
LED descriptions
This section provides descriptions of all LEDs on the EtherXtend devices.
Two types of LEDs exist on the devices. They are:
•
Status LEDs. These LEDs reflect certain conditions that exist on the
system at large and are not explicitly referring to a given port.
•
Port LEDs. These LEDs reflect basic conditions (for example, a link
connection status) that exist for a specific port.
The following table details all Link and Rx Tx port LEDs (port status LEDs)
that appear with any ports on the EtherXtend device.
48
EtherXtend User’s Guide
Port and LED descriptions
Figure 10: LEDs on the EtherXtend Device
Table 13: Link and Rx Tx Port LED Descriptions
LED
Description
Power
Indicates when the device is powered on. The LED
connects directly to the device power supply.
Diagnostics
Indicates during the Post state if any alarms are present
in the device.
Operational
Indicates the device is coming up during the
initialization period and that device is completely
operational.
WAN
Indicates the 4/8 SHDSL or T1/E1 ports on a particular
EtherXtend model. Since the EtherXtend devices have
multiple LEDs on the rear panel to indicate the state of
a particular EFM port, the WAN LED on the front
panel will be turned to the On state if any of the EFM
ports are trained and in Data mode. If none of the EFM
ports are in Data mode, then the WAN LED will be in
the Off state.
EtherXtend User’s Guide
49
Installing the EtherXtend
Interpreting Status LEDs for the EtherXtend Devices
The Status LEDs indicate whether the device is operating properly. The
following table describes the status possibilities for each.
Table 14: Status LED States on the EtherXtend Devices
LED
LED
Color
Solid/Blinking
Meaning of the LED
WAN
(SHDSL)
(Left) - Port
State
green
solid
The port link state is up.
off
None of the ports are in DATA
mode.
blinking
The port link state is down.
solid
The unit is booted and running.
off
The port is not physically present,
for example, when port 6 is
referenced on a 4-port model.
solid
The port has activity occurring on
it.
off
The port does not have activity
occurring on it.
solid
Battery voltage is within tolerance.
off
Battery is not operational.
WAN
(SHDSL)
(Right) Port Present
Console
Power
green
green
green
Alarm
Contact
Diagnostics
Operational
WAN
50
EtherXtend User’s Guide
See Alarm section.
amber
green
green
blinking
Occurs during the Post process if
any alarms are present.
solid
A fault has occurred.
blinking
Device is initializing.
solid
Device is operational with no
faults.
solid
Indicates whether any activity
occurs on the EFM ports or in Data
mode. Training has occurred.
Speed negotiation has occurred.
Alarm cable and contacts guidelines
Table 14: Status LED States on the EtherXtend Devices
LED
LED
Color
Solid/Blinking
Meaning of the LED
LAN (10/
100) (left
side)
green
solid
The port links to the network.
off
The port does not link to the
network.
blinking
The port has activity occurring on
it.
off
The port operates in 10BASE-T
mode where it transmits and
receives packets at 10Mbps.
on
The port operates in 100BASE-T
mode where it transmits and
received packets at 100Mbps.
LAN (10/
100) (right
side)
green
Alarm cable and contacts guidelines
The EtherXtend 4-port and EtherXtend 8-port device alarms are located in an
alarm contact LED on the front panel of the device.
The specifications and requirements for the EtherXtend device alarm cable
and alarm relay contacts are as follows:
•
The alarm cable must be rated at VW-1 or higher. To comply with Part 15
of FCC regulations, all cables to DB connectors must be foiled with
braided shielding.
•
One cable is required to interface to the alarms connector. The minimum
gauge for this cable is 20 AWG (24 AWG recommended). To limit alarm
cable signal losses, its length should not exceed 60 feet.
•
Alarm relay contacts are rated at 2A 30V DC.
The following tables describe the EtherXtend alarms.
Connecting to power
Plug the power supply into the power adaptor port on the back of the device
and connect it to your power source. To do this, you need to connect the
power cable to the power terminal strip on the EtherXtend device which
contains two receptacles for the connectors: a plus (+) and a minus (-). The
plus cable then connects to the RTN side of the Power outlet. The minus side
connects to the -48 side of the Power outlet. The same applies for a constant
DC source. Verify that the Power LED on the front of the device illuminates.
EtherXtend User’s Guide
51
Installing the EtherXtend
Upon startup, the Ethernet link will remain disabled until at least one of the
SHDSL connection has been established.
Figure 11: Connecting to AC power
ex
To AC power
06
05
48VDC
Power
Supply
0.5 A
RTN -48
POWER
The following figure shows a DC power connection.
Figure 12: Connecting to DC power
ex
06
06
48VDC
0.5 A
RTN -48
To DC power
+/-
POWER
Connecting the WAN SHDSL lines
The primary feature of the EtherXtend device is loop bonding capability
among all four SHDSL ports. However, both the provider and the subscriber
units can function with a single SHDSL connection.
Link-up time between local and remote SHDSL network extenders can vary
from one to five minutes depending on the quality, gauge and distance of the
copper cables. If cable distance is greater than a particular bandwidth will
support, the units may not link up. If they do achieve a link, traffic quality
may be affected.
52
EtherXtend User’s Guide
Loop bonded connection
Loop bonded connection
Using two, three, or four SHDSL lines for one network connection (loop
bonding) will net two, three or four times the speed and data passing
capability as a single SHDSL connection. Multiple SHDSL lines used for one
connection provide backup for each other should one or more of the lines
become disabled.
Establishing a loop bonded connection
1
Plug your SHDSL cables into the SHDSL RJ-45 ports (any combination
of SHDSL 1, 2, 3, and 4) on the rear of the device. The order of the
connection is not important.
2
Verify all connections. The SHDSL Link LED for each connected port
pulses green to indicate the connection is established and operational.
Single line connection
1
Plug your SHDSL cable into one of the four SHDSL RJ-45 ports on the
back of the device. Any of the four ports may be used.
2
Verify your connection. The SHDSL LED corresponding to the connected
port (SHDSL 1-4) will flash green to indicate the connection is
established and operational.
Connecting the LAN Ethernet line
If an SHDSL connection has not yet been made, the Ethernet link remains
disabled (as indicated by no illumination of the LEDs until at least one of the
four SHDSL links has been established.
Duplex mode
The 10/100 Ethernet port auto-negotiates speed and duplex mode in
accordance with the remote equipment to which it is connected. Ethernet
speed and duplex mode configurations cannot be hard set on the EtherXtend
device.
•
Half Duplex - Receive and transmit functions are mutually exclusive; data
transmission occurs in only one direction at a time. Packet collisions are
unusual.
•
Full Duplex - Receive and transmit functions occur simultaneously,
effectively doubling aggregate bandwidth and preventing packet
collisions.
For the best connection results, the remove device should be set to
autonegotiate speed and duplex mode as well. If the remote device cannot be
configured to autonegotiate, speed may be hard set at either 10 Mbps or 100
Mbps. But duplex mode must be hard set to half duplex. A 10/100 Ethernet
EtherXtend User’s Guide
53
Installing the EtherXtend
connection will not operate properly if the remote device is hard set to full
duplex.
Grounding device
When the AC plug is used, but not grounded it is recommended to ground the
device using mimimum 16-guage wire to a building or earth ground. The
ground screw is located on the far-right on the back of the device.
54
EtherXtend User’s Guide
BASIC CONFIGURATION
This chapter covers basic configuration of the EtherXtend:
•
Logging into the serial (craft) port, page 56
•
Configuring a management interface, page 57
•
Ethernet interface, page 57
•
Interface types (iftype), page 58
•
Profiles, page 59
•
Interface indexes, page 59
•
Configuring an Ethernet interface, page 60
•
Configuring a management interface, page 62
•
Managing the EtherXtend with ZMS, page 66
•
System security, page 67
•
Changing the default user password, page 67
•
Configuring SHDSL interfaces, page 72
•
Creating a new PME profile, page 72
In Wire Mode, all traffic received on an Ethernet port will be forwarded using
the internal Broadcom switch, according to the rules of 802.1d. That is, a
bridge table is created, and local traffic will be switched to appropriate ports,
while traffic destined to the WAN will be switched to the NPU. Broadcasts
will be forwarded to all five Ethernet ports (the four external ports, and the
one internal port that connects to the NPU).
Because the Broadcom switch is VLAN agnostic in its default configuration,
the NPU will receive all Ethernet packets that are destined for the WAN -tagged and/or untagged -- and push all traffic to a single bonded group, which
may contain one or more physical SHDSL ports, up to the maximum offered
by the device (4 or 8 depending upon the model). Packets destined for other
local devices will be switched to those devices accordingly, and will not
traverse the WAN.
The EtherXtend is acting as a simple Ethernet point-to-point wire, hence the
name "Wire Mode". There is no ability to add or control VLAN tags, nor is
there the ability to route traffic at layer 3. SLMS, and the familiar SLMS CLI,
is still present but is not used for forwarding decisions in Wire Mode.
EtherXtend User’s Guide
55
Basic configuration
Logging into the serial (craft) port
The EtherXtend unit provides an out-of-band RS232 D serial (craft) interface
for managing the unit. To access the serial port, configure your terminal
interface software with the following settings:
•
9600bps
•
8 data bits
•
No parity
•
1 stop bit
•
No flow control
Tip: The serial (craft) port settings can be changed by modifying the
RJ-45 profile.
You must perform the initial configuration of the system using the serial
(craft) interface. After you have completed the initial configuration, you can
manage the EtherXtend unit over the network through a telnet session over
the Ethernet interface or over the management PVC.
Note: The EtherXtend supports 10 concurrent management sessions,
9 telnet sessions and a single local session through the serial (craft)
port.
Logging in and out of the system
Log into the system (the default user name is admin, the default password is
zhone):
System login
Follow this example to login to a system.
login:admin
password:
zSH>
To log out of the system, enter the logout command:
zSh> logout
Tip: The system automatically logs you out after a period of
inactivity. The default logout time is 10 minutes, but can be changed
with the timeout command. Refer to the Zhone CLI Reference Guide
for information on the timeout command.
56
EtherXtend User’s Guide
Enabling and disabling logging
Enabling and disabling logging
By default logging is enabled on the serial craft port and disabled over
telnet sessions. To enable or disable logging for the session, using the
following command:
zSh> log session on | off
The log session command only applies to the current session. You can
also enable or disable logging for all serial craft port sessions using the
following command:
zSh> log serial on | off
This command setting persists across system reboots.
Configuring a management interface
This section describes how to configure the following interfaces to remotely
manage the EtherXtend. By default, the 10/100 Ethernet interface (1-1-1-0/
ethernetcsmacd) is assigned the IP address 192.168.10.1.
The following table summarizes the management configuration options.
Task
Command
Configure Ethernet IP interface for
the system.
interface add 1-1-1-0/shdsl 192.168.8.21
255.255.255.0
Created ip-interface-record ethernet1/ip
Ethernet interface
The EtherXtend device has two 100Base-T full duplex Ethernet interfaces
(named ethernet1) designed for management traffic.
Caution: The Ethernet interface must be configured before any other
interfaces on the system, even if you do not intend to manage the unit
over the Ethernet.
Configuring the Ethernet IP interface
The following example configures the IP address for the system:
zSH> interface add 1-1-1-0/shdsl 192.168.8.21 255.255.255.0
Created ip-interface-record ethernet1/ip
EtherXtend User’s Guide
57
Basic configuration
Note: If you have problems with IP interfaces not automatically
binding, refer to the IP Configuration chapter for more information.
By default, the 10/100 Ethernet interface 1-1-1-0/SHDSL has the IP
address 0.0.0.0. This default IP address is reset if a set2default is
performed without the restore option.
Verifying the interface
Use the interface show command to verify that the Ethernet interface was
configured correctly:
zSH> interface show
Interface
Status Rd/Address
Media/Dest Address IfName
--------------------------------------------------------------------------1/1/1/0/ip
UP
1 192.168.8.21/24
00:01:47:65:02:f2 ethernet1
Creating a default route
The following example creates a default route using the gateway
192.168.8.1 with a cost of 1 (one):
route add default 192.168.8.1 1
Verifying the route
Use the route show command to verify that the routes were added:
zSH> route show
Dest
Nexthop
Cost
Owner
-----------------------------------------------------------0.0.0.0/0
192.168.8.1
1
STATICLOW
192.168.8.0/24
1/1/1/0/ip
1
LOCAL
Use the ping command to verify connectivity to the default gateway:
zSH> ping 192.168.8.1
PING 192.168.8.1: 64 data bytes
!!!!!
----192.168.8.1 PING Statistics---5 packets transmitted, 5 packets received
round-trip (ms) min/avg/max = 0/0/0
To stop the ping, press CTRL+C.
Interface types (iftype)
Interfaces on the EtherXtend devices use Internet Assigned Numbers
Authority interface type (IANAifType) definitions to indicate the type of
physical interface which a virtual connection is bound.
The following are some common iftypes you might need to configure your
unit. You can enter either the name or the number of the iftype:
58
EtherXtend User’s Guide
Profiles
•
ethernetcsmacd (6): Ethernet
•
hdsl2 (168): G.SHDSL and SDSL
•
ip (126): Internet Protocol
Profiles
The EtherXtend devices use profiles to store configuration data. Profiles are
similar to templates, in that they have fields for data and once they are saved
they become records. Each profile uses an index, or an address, to identify it.
The valid indexes, or addresses, are listed after the profile name in the output
of the list command.
Note: Refer to the Zhone CLI Reference Guide for more information
about ifindexes, iftypes, profiles, and records.
Interface indexes
Enter a list if-translate command to display the logical addresses and types of
the physical interfaces of the EtherXtend. Then enter an linegroup command
to find the line group identifier (lineGroupId) for each line. The lineGroupId
numbers will be used for configuring applications to a specific line on the
EtherXtend.
Tip: You can also find the lineGroupId for a line with the
showlinestatus command.
The following example is from the EtherXtend:
zSH> list if-translate
if-translate 1-1-1-0/ethernetcsmacd
if-translate 1-1-1-0-ethernetcsmacd/linegroup
if-translate 1-1-1-0/shdsl
if-translate 1-1-2-0/shdsl
if-translate 1-1-3-0/shdsl
if-translate 1-1-4-0/shdsl
if-translate 1-1-5-0/shdsl
if-translate 1-1-6-0/shdsl
if-translate 1-1-6-0/shdsl
if-translate 1-1-7-0/shdsl
if-translate 1-1-8-0/shdsl
if-translate 1-1-2-0-other/n2nlink
if-translate 1-1-3-0-other/n2nlink
if-translate 1-1-4-0-other/n2nlink
if-translate 1-1-5-0-other/n2nlink
if-translate 1-1-6-0-other/n2nlink
if-translate 1-1-7-0-other/n2nlink
if-translate 1-1-8-0-other/n2nlink
if-translate 1-1-1-0-other/n2nlink
EtherXtend User’s Guide
59
Basic configuration
if-translate
if-translate
if-translate
if-translate
if-translate
if-translate
if-translate
if-translate
if-translate
1-1-1-0-ethernetcsmacd/ip
1-1-8-0-shdsl/linegroup
1-1-7-0-shdsl/linegroup
1-1-6-0-shdsl/linegroup
1-1-5-0-shdsl/linegroup
1-1-4-0-shdsl/linegroup
1-1-3-0-shdsl/linegroup
1-1-2-0-shdsl/linegroup
1-1-1-0-shdsl/linegroup
The following example is from the EtherXtend EAD:
zSH> linegroup 1-1-1-0/shdsl
lineGroupId: 40
Configuring an Ethernet interface
Configuring IP interfaces involves creating an ip-interface-record on the
LAN interface. This profile specifies the basic IP parameters of the LAN
interface. These include the IP address and netmask, and the services enabled
on the interface. Each ip-interface-record is associated with a specific
physical interface.
To create an IP interface, you need to know the logical address of the physical
interface over which IP will run: 1/1/1 for WAN, and 1/1/2 for LAN.
Tip: If you use the address format (with slashes instead of dashes)
when creating the IP interface, the system will recognize the physical
address and automatically bind the Ethernet line group to the new IP
interface over the Ethernet port.
Table 15: Interface Parameters
60
EtherXtend User’s Guide
Parameter
Description
addr
The IP address of the EtherXtend device in
dotted-decimal format.
netmask
The subnet mask associated with the IP
interface. The value of the mask is an IP
address with all the network bits set to 1
and all the hosts bits set to 0.
bcastaddr
The IP broadcast address used for sending
datagrams on the (logical) interface
associated with the IP interface. The
broadcast address is determined by the IP
address and the netmask. It should always
be set to an IP address that is the network
address of the interface with all ones in the
host portion of the address.
Configuring an Ethernet interface
Table 15: Interface Parameters
Parameter
Description
mru
The size, in octets, of the largest packet
that can be received on the IP interface.
For interfaces used for network datagrams,
this is the size of the largest network
datagram that can be received on the
interface.
zSH> new ip-interface-record 1/1/2/0/ip
Please provide the following: [q]uit.
vpi: ---------------> {0}:
vci: ---------------> {0}:
rdindex: -----------> {1}:
dhcp: --------------> {none}: ** read-only **
addr: --------------> {0.0.0.0}: 192.168.88.200
netmask: -----------> {0.0.0.0}: 255.255.255.0
bcastaddr: ---------> {0.0.0.0}: 192.168.88.255
destaddr: ----------> {0.0.0.0}:
farendaddr: --------> {0.0.0.0}:
mru: ---------------> {1500}:
reasmmaxsize: ------> {0}:
ingressfiltername: -> {}:
egressfiltername: --> {}:
pointtopoint: ------> {no}:
mcastenabled: ------> {yes}:
ipfwdenabled: ------> {yes}:
mcastfwdenabled: ---> {yes}:
natenabled: --------> {no}:
bcastenabled: ------> {yes}:
ingressfilterid: ---> {0}:
egressfilterid: ----> {0}:
ipaddrdynamic: -----> {static}:
dhcpserverenable: --> {false}:
subnetgroup: -------> {0}
unnumberedindex: ---> {0}
mcastcontrollist: --> {}:
vlanid: ------------> {0}:
maxVideoStreams: ---> {0}:
tosOption: ---------> {disable}:
tosCOS: ------------> {0}:
vlanCOS: -----------> {0}:
s-tagTPID: ---------> {0x8100}:
s-tagId: -----------> {0}:
s-tagIdCOS: --------> {0}:
....................
Save new record? [s]ave, [c]hange or [q]uit: s
This IP Interface has been automatically bound to
1-1-2-0-ethernetcsmacd/other
New record saved.
EtherXtend User’s Guide
61
Basic configuration
Note: If you have problems with IP interfaces not automatically
binding, refer to for more information.
Verify that the Ethernet interface has been set up with the interface show
command:
zSH> interface show
2 interfaces
Interface
Status Rd/Address
Media/Dest Address
IfName
-------------------------------------------------------------------------------1/1/1/0/ip
UP
1 192.5.1.5/24
0/35
1-1-1-0
1/1/2/0/ip
UP
1 192.168.88.200/24
00:01:47:01:af:18
1-1-2-0ethernetcsmacd
--------------------------------------------------------------------------------
Configuring a management interface
You need to configure a management interface to enable ZMS to manage the
device.
Performing initial configuration and creating a management
interface
The following example shows how to create a management interface on the
EtherXtend device.
1
Create an unnumbered IP interface that the EtherXtend will use for its
far-end address:
zSH> new ip-interface-record 192.168.100.1/ip
Please provide the following: [q]uit.
vpi: ---------------> {0}:
vci: ---------------> {0}:
rdindex: -----------> {1}:
dhcp: --------------> {none}: ** read-only **
addr: --------------> {0.0.0.0}: 192.168.100.1
netmask: -----------> {0.0.0.0}: 255.255.255.0
bcastaddr: ---------> {0.0.0.0}: 192.168.100.255
destaddr: ----------> {0.0.0.0}:
farendaddr: --------> {0.0.0.0}:
mru: ---------------> {1500}:
reasmmaxsize: ------> {0}:
ingressfiltername: -> {}:
egressfiltername: --> {}:
pointtopoint: ------> {no}:
mcastenabled: ------> {yes}:
ipfwdenabled: ------> {yes}:
mcastfwdenabled: ---> {yes}:
natenabled: --------> {no}:
bcastenabled: ------> {yes}:
ingressfilterid: ---> {0}:
egressfilterid: ----> {0}:
62
EtherXtend User’s Guide
Configuring a management interface
ipaddrdynamic: -----> {static}:
dhcpserverenable: --> {false}:
subnetgroup: -------> {0}: 1
unnumberedindex: ---> {0}:
mcastcontrollist: --> {}:
vlanid: ------------> {0}:
maxVideoStreams: ---> {0}:
tosOption: ---------> {disable}:
tosCOS: ------------> {0}:
vlanCOS: -----------> {0}:
s-tagTPID: ---------> {0x8100}:
s-tagId: -----------> {0}:
s-tagIdCOS: --------> {0}:
....................
Save new record? [s]ave, [c]hange or [q]uit: s
Could not find an appropropriate interface on which to
bind the IP record.
Could not automatically bind this IP Interface
New record saved.
zSH> new ip-unnumbered-record 1
Please provide the following: [q]uit.
ipUnnumberedInterfaceName: -> { }: 192.168.100.1/ip
....................
Save new record? [s]ave, [c]hange or [q]uit: s
New record saved.
2
Create the DHCP server subnet in the same network as the far-end
address. The EtherXtend device will use this to assign the management IP
address for the configuration VCL. Note that this subnet should be
different than the subnet used for the permanent management channel:
zSH> new dhcp-server-subnet 1
Please provide the following: [q]uit.
network: ---------------> {0.0.0.0}:
netmask: ---------------> {0.0.0.0}:
domain: ----------------> {0}:
range1-start: ----------> {0.0.0.0}:
range1-end: ------------> {0.0.0.0}:
range2-start: ----------> {0.0.0.0}:
range2-end: ------------> {0.0.0.0}:
range3-start: ----------> {0.0.0.0}:
range3-end: ------------> {0.0.0.0}:
range4-start: ----------> {0.0.0.0}:
range4-end: ------------> {0.0.0.0}:
default-lease-time: ----> {-1}: 300
min-lease-time: --------> {-1}:
max-lease-time: --------> {-1}:
boot-server: -----------> {0.0.0.0}:
bootfile: --------------> {}:
default-router: --------> {0.0.0.0}:
primary-name-server: ---> {0.0.0.0}:
secondary-name-server: -> {0.0.0.0}:
domain-name: -----------> {}:
192.168.100.0
255.255.255.0
192.168.100.5
192.168.100.10
EtherXtend User’s Guide
63
Basic configuration
subnetgroup: -----------> {0}: 1
stickyaddr: ------------> {enable}:
external-server: -------> {0.0.0.0}:
....................
Save new record? [s]ave, [c]hange or [q]uit: s
New record saved.
3
Add an interface to the N2N Bond group that points to the EtherXtend.
By performing this task, you add a Class C address to your device that
talks to all other devices at the far end.
zSH> interface add 1-1-201-0/n2nbond 10.10.1.1/24
The system displays the following response
Created ip-interface-record 1-1-201-0-other/ip
4
Verify the command you just issued by issuing the stack show command.
zSH> stack show 1-1-201-0-other/ip
Line Group: 1-1-201-0-other/linegroup
Physical: 1/1/201/0/other
5
List all you parameters by issuing the interface show command.
zSH> interface show
1 interface
Interface Status Rd/Address Media/Dest Address IfName
---------------------------------------------------1/1/1/0 UP 1.10.100.1.91/24 00:01:47:07:c8:39
1-1-1-0-eth ernetcsmacd
6
Verify the connection to the EtherXtend:
Ping the EtherXtend WAN interface:
zSH> ping 192.168.100.5
PING 192.168.100.5: 64 data bytes
!!!!!
----192.168.100.5 PING Statistics---5 packets transmitted, 5 packets received
round-trip (ms) min/avg/max = 30/32/40
7
Telnet to the EtherXtend:
zSH> telnet 192.168.100.5
8
Create the DHCP server subnet the EtherXtend will use for the permanent
management VCL. Note that this subnet should be different than the
subnet used for the configuration management channel (VC 0/32):
zSH> new dhcp-server-subnet 2
Please provide the following: [q]uit.
network: ---------------> {0.0.0.0}: 192.168.50.0
netmask: ---------------> {0.0.0.0}: 255.255.255.0
domain: ----------------> {0}:
range1-start: ----------> {0.0.0.0}: 192.168.50.5
64
EtherXtend User’s Guide
Configuring a management interface
range1-end: ------------> {0.0.0.0}: 192.168.50.10
range2-start: ----------> {0.0.0.0}:
range2-end: ------------> {0.0.0.0}:
range3-start: ----------> {0.0.0.0}:
range3-end: ------------> {0.0.0.0}:
range4-start: ----------> {0.0.0.0}:
range4-end: ------------> {0.0.0.0}:
default-lease-time: ----> {-1}:
min-lease-time: --------> {-1}:
max-lease-time: --------> {-1}:
boot-server: -----------> {0.0.0.0}:
bootfile: --------------> {}:
default-router: --------> {0.0.0.0}: 192.168.50.1
primary-name-server: ---> {0.0.0.0}:
secondary-name-server: -> {0.0.0.0}:
domain-name: -----------> {}:
subnetgroup: -----------> {0}: 2
stickyaddr: ------------> {enable}:
external-server: -------> {0.0.0.0}:
....................
Save new record? [s]ave, [c]hange or [q]uit: s
New record saved.
EtherXtend User’s Guide
65
Basic configuration
Managing the EtherXtend with ZMS
The system profile contains parameters that configure the system contact
information for the EtherXtend and connection information for the ZMS. This
profile does not need to be modified in order to manage the EtherXtend with
ZMS.
Note: For details on using ZMS, refer to the ZMS Administrator's
Guide and the NetHorizhon User's Guide.
CLI provisioning and ZMS
CLI configuration of a device being managed by the ZMS is disabled by
default. Attempting to configure the device results in an error:
zSH> update system 0
Provisioning via CLI is currently not available.
If you need to configure the device from the CLI, use the resetcliprov
command.
If you plan to use a script to provision the device from the CLI while it is
being managed by the ZMS:
1
Update the system profile to disable partial config syncs to ZMS:
zSH> update system 0
Please provide the following: [q]uit.
syscontact: ----------> {Zhone Global Services and Support 7001 Oakport
Road Oakland Ca. (877) Zhone20 (946-6320) Fax (510)777-7113
[email protected]}:
sysname: -------------> {Zhone MALC}:
syslocation: ---------> {Oakland}:
enableauthtraps: -----> {disabled}:
setserialno: ---------> {0}:
zmsexists: -----------> {true}: false
zmsconnectionstatus: -> {inactive}:
zmsipaddress: --------> {192.168.210.28}:
configsyncexists: ----> {false}:
configsyncoverflow: --> {false}:
configsyncpriority: --> {high}:
configsyncaction: ----> {noaction}:
configsyncfilename: --> {192.168.8.21_4_1014067321329}:
configsyncstatus: ----> {synccomplete}:
configsyncuser: ------> {cfgsync}:
configsyncpasswd: ----> {}: ** private **
numshelves: ----------> {1}:
shelvesarray: --------> {}:
numcards: ------------> {3}:
ipaddress: -----------> {192.168.8.21}:
alternateipaddress: --> {0.0.0.0}:
countryregion: -------> {us}:
primaryclocksource: --> {0/0/0/0/0}:
66
EtherXtend User’s Guide
Configuring RIP on the WAN interface
ringsource: ----------> {internalringsourcelabel}:
revertiveclocksource: -> {true}
voicebandwidthcheck: --> {false}
....................
Save changes? [s]ave, [c]hange or [q]uit: s
Record updated.
2
After the provisioning is complete, perform a full config sync from ZMS.
System security
There are several methods to guard against unauthorized access to your
EtherXtend, such as changing the default user password. You can also set up
SNMP access lists to restrict access to your system. See Creating community
access lists on page 86 for more information about setting SNMP access lists.
Changing the default user password
When adding users, the system automatically assigns a temporary password to
each user. Most users will want to change this default password. The
changepass command changes the password for the current logged in user.
The following is an example of changing a password:
jsmith> changepass
Current Password: enter current password
New Password : enter new password
Confirm New Password : confirm new password
User record updated.
Password change successful.
Note: Passwords are case sensitive.
Configuring RIP on the WAN interface
Routing Interface Protocol (RIP) enables dynamic routing, where routes to
specific IP addresses vary according the EtherXtend routing table, which
maintains the best route to a destination based on the number of hops (or
metric) to a destination. Configure RIP on the EtherXtend WAN interface as
shown below.
RIP behavior for the system is configured in the rip-global-config profile.
The Ethernet IP interface is then configured for RIP using the rip command.
The EtherXtend supports RIP v1 and v2. The only routing domain supported
is domain 1.
Configuring RIP global defaults
The following example configures RIP global behavior on the EtherXtend:
EtherXtend User’s Guide
67
Basic configuration
1
Create a rip-global-config profile with a user-defined index number:
zSH> update rip-global-config 1
Please provide the following: [q]uit.
admin-state: -> {disabled}: enabled
update-time: -> {30}:
....................
Save new record? [s]ave, [c]hange or [q]uit: s
New record saved.
2
Enable RIP for the system as a whole:
zSH> rip enable
3
To enable receipt of RIP version 1 or version 2 advertisements on an
interface, use the rip command and specify the interface and the type of
advertisements to receive:
zSH> rip interface 192.168.8.21 listen v1v2
4
To enable transmission of RIP advertisements on an interface:
a
zSH> rip interface 192.168.8.21 talk v2
or
b
zSH> rip interface 192.168.8.21 talk v1compat
Displaying RIP information
Use the rip show command to verify that the route has been established to the
correct IP address:
zSH> rip show
RIP Globals
---------------------------------------------------------Route
Route
Route
Admin
Update
Domain
Changes
Queries
State
Time
---------------------------------------------------------1
0
0
enabled
30
---------------------------------------------------------RIP Interface Statistics
--------------------------------------------------------------Route
IP
Recv Bad
Recv Bad
Updates
Domain
Address
Packets
Routes
Sent To
--------------------------------------------------------------1
198.168.8.21
0
0
0
--------------------------------------------------------------RIP Interface Configuration
---------------------------------------------------------------------------------------------------------------Route
IP
Auth
Auth
DefaultSrc
Domain
Address
Type
Key
Talk
Listen
Metric
Address
Static Poison
--------------------------------------------------------------------------------
68
EtherXtend User’s Guide
SHDSL
--------------------------------1
198.168.8.21 none
(write-only) disabled disabled 0
198.168.8.21
none
enabled
---------------------------------------------------------------------------------------------------------------RIP Peers
-------------------------------------------------------------------------------Route
IP
Last
Recv Bad
Recv Bad
Domain
Address
Update
Version Packets
Routes
------------------------------------------------------------------------------
SHDSL
Configuring SHDSL interfaces
The following table summarizes the commands required to configure SDSL
interfaces on the EtherXtend:
Action
Command
Verify the type of SHDSL interface.
update dsl-config index/shdsl
Where index is of the form shelf-slot-port-subport or a
user-defined string.
Verify the interface is active.
showlinestatus shelf slot port
Note: The SHDSL interfaces for the G.SHDSL-48 card do not
support CPE mode so each port must be configured as unit-mode CO.
Automatic baud rate adaption and fixed rate
settings
When you select the shdsl-2btl line type for an SHDSL interface, the
EtherXtend can perform automatic baud rate adaption. This allows receiving
devices to communicate with transmitting devices operating at different baud
rates without the need to establish data rates in advance. By determining the
baud rate from the transmitting device, the receiving EtherXtend
automatically trains to match the line rate of the incoming data.
The automatic baud rate adaption process may take several minutes. This is
because the CO and CPE device modems use an algorithm to step through a
sequence of baud rates, where the devices establish a connection at each line
rate and then move to the next higher rate until they reach the final rate they
agree upon.
The following table describes how the fixed-bit-rate settings in the
shdsl-config and shdsl-config profiles affect training rates.
EtherXtend User’s Guide
69
Basic configuration
Table 16: Fix-bit-rate settings and modem train rates
CO
CPE
Then
Disabled
Disabled
highest available rate is negotiated.
Disabled
Enabled
Modems train at CPE’s fixed rate.
Enabled
Disabled
Modems train at CO’s fixed rate.
Enabled
Enabled
Modems train at lowest fixed rate.
Configuration restrictions
The same card can support a combination of SHDSL ports with the following
restrictions:
•
Configure the DSL modem in pairs (modems 1 and 2, modems 3 and 4,
and so on).
•
Adjacent modems (ports 1 and 2, 3 and 4, and so on) must have the same
line-type. Each DSL modem supports 2 DSL ports.
•
Adjacent modems must have the same framer-type (if configured for
SDSL).
•
Adjacent modems must have the same unit-mode setting.
•
Adjacent modems must have the same network timing recovery setting.
Other configuration settings, such as line speed, can differ for each line on the
card.
Specifying the type of DSL interface
The dsl-config profile supports the following parameters:
Parameter
Description
line-type
The DSL type supported on this interface.
Values:
shdsl-2btl Supports SHDSL-bonded connections.
Default: shdsl-2btl
70
EtherXtend User’s Guide
SHDSL
Parameter
Description
unit-mode
Specifies whether the unit is configured as a CO or CPE
device.
Values:
co
cpe
Default: co
line-status-trap
-enable
Specifies whether a line status trap should be sent whenever
the DSL line goes up or down. Note that this setting does not
apply to line status traps sent during system bootup. During
bootup, line status traps are not sent.
A DSL link down trap has a moderate severity level and a link
up trap has a low severity.
Default: disabled
To specify the interface as an SDSL line, set the line-type in the dsl-config
profile:
zSH> update dsl-config 1-1-1-0/shdsl
line-type: -> {shdsl-2btl}: shdsl-2btl
unit-mode: -> {coe}:
line-status-trap-enable: -> {enabled}
admin-up-line-alarm: -----> {disabled}:
....................
Save changes? [s]ave, [c]hange or [q]uit: s
Record updated.
Verifying the interface
The showlinestatus command displays the status of the interfaces in the
system. The following example displays the status of the line in shelf, slot 15,
port 1:
zSH> showlinestatus
--------- N2NBOND RP --------.........................
Type ---------------> N2NBOND (22)
Registered lines ---> 0
--------- SHDSL RP --------.........................
Type ---------------> SHDSL (18)
Registered lines ---> 8
.................
Line Type-------> SHDSL (18)
GroupId --------> 40
Status ---------> OOS (3)
Redundancy -----> NONE (0)
TxClk ----------> NONE (1)
RefClkSrc ------> NO
If_index -------> 3
EtherXtend User’s Guide
71
Basic configuration
Shelf ---------->
Slot ----------->
Port ----------->
SubPort -------->
1
1
1
0
Configuring SHDSL interfaces
The EtherXtend supports 2-wire and 4-wire SHDSL cards. These cards
support SHDSL as defined in ITU G.991.2. The cards are configured in the
same way, except that the line rates for the 4-wire card are different. The
SHDSL speed is 5,696 Kbps.
The following sections summarize the commands required to configure
SHDSL interfaces on the EtherXtend:
Creating a new PME profile
First, identify what profiles exist by issuing a list pme-profile command.
Sample output from this command is shown here.
zSH> list pme-profile
pme-profile 1-1-1-0/shdsl
pme-profile 1-1-2-0/shdsl
pme-profile 1-1-3-0/shdsl
pme-profile 1-1-4-0/shdsl
pme-profile 1-1-5-0/shdsl
pme-profile 1-1-6-0/shdsl
pme-profile 1-1-7-0/shdsl
pme-profile 1-1-8-0/shdsl
8 entries found.
To create a new pme-profile, issue the new pme-profile command along with
an available pme-profile and configure parameters that you desire. Also, view
the profile output displayed.
zSH>new pme-profile 1-1-9-0/shdsl
admin subtype: ------------------> {2BaseTL-O}
admin profile: ------------------> {1}
remote discovery code: ----------> {111111}
line attenuation threshold ------> {enabled}
snr threshold: ---------------------> {enabled}
line attenuation enable: --------> {enabled}
snr enable: ---------------------> {enabled}
device fault: -------------------> {enabled}
init failure: -------------------> {enabled}
protocol init failure -----------> {enabled}
profile descriptor --------------> {name}
region: -------------------------> {1}
data rate: ----------------------> {2856}
power: --------------------------> {10}
constellation: ------------------> {adaptive}
72
EtherXtend User’s Guide
SHDSL
Viewing pme-profile settings
To view pme-profile settings, issue the get pme-profile command.
zSH>get pme-profile 1-1-9-0/shdsl
profileVersion: ----------------->
efmCuPmeAdminSubType: ----------->
efmCuPmeAdminProfile: ----------->
efmCuPAFRemoteDiscoveryCode: ---->
efmCuPmeThreshLineAtn: ---------->
efmCuPmeThreshSnrMgn: ----------->
efmCuPmeLineAtnCrossingEnable: -->
efmCuPmeSnrMgnCrossingEnable: --->
efmCuPmeDeviceFaultEnable: ------>
efmCuPmeConfigInitFailEnable: --->
efmCuPmeProtocolInitFailEnable: ->
efmCuPme2BProfileDescr: --------->
efmCuPme2BRegion: --------------->
efmCuPme2BDataRate: ------------->
efmCuPme2BPower: ---------------->
efmCuPme2BConstellation: -------->
efmCuPme2BProfileRowStatus: ----->
{1.0}
{ieee2basetlr}
{0}
{}
{0}
{0}
{false}
{false}
{false}
{false}
{false}
{}
{region1}
{5696}
{0}
{adaptive}
{active}
Updating a pme-profile
To update the profile, issue the update pme-profile command.
zSH> update pme-profile 1-1-9-0/shdsl
Please provide the following: [q]uit.
profileVersion: -----------------> {1.0}:** read-only **
efmCuPmeAdminSubType: -----------> {ieee2basetlr}:
efmCuPmeAdminProfile: -----------> {0}:
efmCuPAFRemoteDiscoveryCode: ----> {}:
efmCuPmeThreshLineAtn: ----------> {0}:
efmCuPmeThreshSnrMgn: -----------> {0}:
efmCuPmeLineAtnCrossingEnable: --> {false}:
efmCuPmeSnrMgnCrossingEnable: ---> {false}:
efmCuPmeDeviceFaultEnable: ------> {false}:
efmCuPmeConfigInitFailEnable: ---> {false}:
efmCuPmeProtocolInitFailEnable: -> {false}:
efmCuPme2BProfileDescr: ---------> {}:
efmCuPme2BRegion: ---------------> {region1}:
efmCuPme2BDataRate: -------------> {5696}:
efmCuPme2BPower: ----------------> {0}:
efmCuPme2BConstellation: --------> {adaptive}:
efmCuPme2BProfileRowStatus: -----> {active}:
....................
Save changes? [s]ave, [c]hange or [q]uit:
Verifying the interface
Use the dslstat command to displays the status of the interface:
EtherXtend User’s Guide
73
Basic configuration
zSH> dlstat 1-1-9-0/shdsl
General Stats:
------------AdminStatus..................................UP
DslUpLineRate (bitsPerSec)...................2320
DslDownLineRate (bitsPerSec).................2320
DslMaxAttainableUpLineRate (bitsPerSec)......2320
DslMaxAttainableDownLineRate (bitsPerSec)....2320
Out Octets...................................1921747131
Out Discards.................................0
Out Errors...................................0
In Octets....................................1921797746
In Discards..................................0
In Errors....................................0
ATM LCD Count................................1
DSL Physical Stats:
-----------------DslLineSnrMgn (tenths dB)....................384
DslLineAtn (tenths dB).......................246
DslCurrOutputPwr (tenths dB).................75
LOFS.........................................1
LOLS.........................................1
LOSS.........................................1
ESS..........................................9
CRC Errors...................................0
Inits........................................1
Verifying the type of DSL interface
The system creates dsl-config profiles for SHDSL cards with the appropriate
settings. To view these, issue the get dsl-config command.
zSH> get dsl-config 1-1-9-0/shdsl
line-type: -> {shdsl-2btl}:
unit-mode: -> {co}:
line-status-trap-enable: -> {enabled}
Verifying port settings
To verify port settings, issue the get efm-port command.
zSH> get efm-port 1-1-1-0/shdsl
profileVersion: ----------> {1.0}
efmCuPAFAdminState: ------> {enabled}
efmCuPAFDiscoveryCode: ---> {}
efmCuAdminProfile: -------> {0x01}
efmCuTargetDataRate: -----> {50000}
efmCuTargetSnrMgn: -------> {6}
efmCuThreshLowBandwidth: -> {0}
efmCuLowBandwidthEnable: -> {false}
74
EtherXtend User’s Guide
SHDSL
Configuring static routes
Static routes are manually configured and define paths to destinations in terms
of an interface identifier or the IP address of a next-hop router or gateway.
Adding a static route
The following section details how to add a static route.
After creating the IP interface, you can create a default route to the remote
device’s LAN interface using the route add command. The command uses
the following syntax:
route add destination mask next-hop cost
Note: The word default can be substituted for a 0.0.0.0 destination.
The following example adds a route to the 192.168.8.0 network using
192.168.1.2 as the gateway.
route add 192.168.8.0 255.255.255.0 192.168.1.2 1
The following example creates a default route using the gateway 192.168.1.2:
zSH> route add default 198.168.1.2 1
Deleting routes
To delete static routes, use the route delete command. The command uses the
following syntax:
route delete destination mask next-hop
The following example deletes the network route to 192.168.88.201 using the
gateway 192.168.1.2:
route delete 192.168.88.0 255.255.255.0 192.168.1.2
Verifying routes
To verify the connection to a remote device:
•
Ping the WAN interface:
zSH> ping 192.168.1.1
PING 192.168.1.1: 64 data bytes
!!!!!
----192.168.1.1 PING Statistics---5 packets transmitted, 5 packets received
round-trip (ms) min/avg/max = 0/3/16
•
Ping the LAN interface:
EtherXtend User’s Guide
75
Basic configuration
zSH> ping 192.168.88.200
PING 192.168.88.200: 64 data bytes
!!!!!
----192.168.88.200 PING Statistics---5 packets transmitted, 5 packets received
round-trip (ms) min/avg/max = 0/0/0
•
Ping the far end device:
zSH> ping 192.168.1.2
PING 192.168.1.2: 64 data bytes
!!!!!
----192.168.1.2 PING Statistics---5 packets transmitted, 5 packets received
round-trip (ms) min/avg/max = 0/0/0
Displaying the routing table
Use the route show command to verify that the routes were added:
zSH> route show
Dest
Nexthop
Cost
Owner
-----------------------------------------------------------0.0.0.0/0
198.168.88.201
1 STATICLOW
198.168.88.200/24
1/1/2/0/ip
1 LOCAL
traceroute command
The traceroute command allows the user to see the route that IP datagram
follows from one host to another. The traceroute command is another method
of verifying routes.
76
EtherXtend User’s Guide
CONFIGURING IP
This chapter covers basic configuration of the EtherXtend:
•
Overview, page 77
•
Interfaces that support IP, page 78
•
Routing, page 78
•
Numbered and unnumbered interfaces, page 79
•
DHCP, page 80
•
DNS, page 80
•
RIP, page 80
The EtherXtend uses the shelf-slot-port-subport/type syntax to identify
system interfaces. The EtherXtend is always 1 for the shelf and slot values and
0 for the subport value. The type is based on the Internet Assigned Numbers
Authority interface type (IANAiftype) definitions.
Note: When configuring the EtherXtend using the command line
interface (CLI), enter all text strings in lower case. The CLI is case
sensitive.
Overview
The Internet protocol (IP) allows devices to communicate over interconnected
networks. IP is a layer 3 protocol in the seven-layer Open Systems
Interconnection (OSI) model. Layer 3, or network layer, handles the delivery
of data packets from source to destination. A device connected to a network is
considered a host or a node on that network.
Zhone devices with IP capability can act as routers to accept network traffic
and forward it on to host destinations based on IP addressing. To get from
source to destination, the IP packet passes through many nodes, or hops, along
the way. All routers maintain routing tables of the sequence of hops taken
from source to destination. The routing table is used by the router to direct
datagrams most efficiently. The routing table information is also shared with
other routers on the same network.
The EtherXtend provides the following IP services:
EtherXtend User’s Guide
77
Configuring IP
•
IP forwarding and routing—incoming packets from an interface are
forwarded to the appropriate output interface using the routing table rules.
•
Numbered or unnumbered interfaces
•
Dynamic Host Control Protocol (DHCP) servers to simplify user IP
address configuration.
•
Telnet client
Interfaces that support IP
The following EtherXtend interfaces support IP traffic:
One Ethernet interface primarily for management traffic.
Routing
Routing is the process of selecting a next hop for forwarding data traffic. The
routing information base (RIB) contains all the information about the routes
in the system, including the preference values and interface states. The
forwarding information base (FIB) is derived from the RIB and only contains
the best route to a given destination.
IP routing through the system makes use of the following types of routes:
•
Interface routes—These routes are defined by the addresses and netmasks
that are provisioned on the IP interfaces.
•
Static routes—These routes are manually configured and define paths to
destinations in terms of an interface identifier or the IP address of a
next-hop router on a directly attached network. There are two kinds of
static routes:
•
78
EtherXtend User’s Guide
–
Low preference—These routes are only used to define default routes
(that is, routes of last resort) and are less preferable to most other
routes.
–
Normal preference—All other static routes are considered more
preferable than other types of routes (with the exception of interface
routes).
Dynamic routes—These routes are learned by running routing protocols,
such as RIP, and have varying preferences, depending on how they were
learned.
Numbered and unnumbered interfaces
The following table describes the default routing preferences on the device.
These preferences cannot be overridden. Higher numbers indicate more
preferred route types:
Type of route
Default preference
Local
10
Static
9
RIP
4
Static low
4
(used for default routes)
Numbered and unnumbered interfaces
The EtherXtend supports both numbered and unnumbered interfaces.
Host-based routing uses a unnumbered interface and adds a single IP address
to the routing table for each route. This type of routing allows a granular
allocation of addresses based on the host floating (unnumbered) IP address
and the available subnetwork addresses. Routes are configured individually
using the host add command. For each configured route, an IP address is
added to the routing table. For example, an unnumbered host address of
10.10.10.1/24, adds one entry in the routing table for the address 10.10.10.1
and makes available a subnet of 254 addresses for individual route
configuration. When each host route is added, a new routing table entry is
created.
Network-based (subnet) routing uses a numbered interface and adds IP
network addresses with variable length subnet masks to the routing table. This
type of routing allows a single routing table entry to represent many
numbered host addresses. However, it does not allow for granular IP address
allocation. For example, an interface configured with 10.10.10.1/24 adds just
one entry to the routing table for 10.10.10.1/24. All 254 addresses in this
subnet are assigned to this interface, regardless of how many addresses in this
subnet are actually used.
The command used to create the IP interface depends on the application, IP
assignment, type of address allocation and interface type.
In a numbered interface, both the EtherXtend and subscriber interfaces are
assigned IP addresses on the same subnet. This type of connection consumes
more IP addresses because each subscriber connection requires a separate
subnet.
In an unnumbered IP interfaces, each subscriber has an IP address. A single,
virtual (or floating) IP address on the EtherXtend, not associated with a
particular interface, is used as the subscribers’ far end address. This type of
connection preserves IP addresses because many different subscribers can be
on the same subnet.
EtherXtend User’s Guide
79
Configuring IP
DHCP
The EtherXtend can act as a DHCP server to provide TCP/IP hosts certain
configuration parameters (such as the clients IP address, its default router and
DNS server, subnet mask, gateway address, and lease time).
The EtherXtend can assign temporary (leased) IP addresses to client PCs.
Each DHCP client PC sends a request to the EtherXtend for an IP address
lease. The EtherXtend then assigns an IP address and lease time to the client
PC. The EtherXtend keeps track of a range of assignable IP addresses from a
subnetwork.
The EtherXtend can also provide the same IP address to a client every time
their DHCP lease renews. This is known as sticky IP addresses. By default,
the EtherXtend attempts to assign the same IP address to the same client on
DHCP lease renewal.
With shared DHCP pools (or subnet groups), DHCP servers are not linked to
physical interfaces. The EtherXtend supports an arbitrary number of DHCP
pools. Zhone devices can assign blocks of IP addresses specifically for certain
customers.
DNS
Domain Name System (DNS) maps domain names to IP addresses, enabling
the system to reach destinations when it knows only the domain name of the
destination.
RIP
Routing Information Protocol (RIP), an interior gateway protocol (IGP), is
widely used for routing traffic on the Internet. RIP performs routing within a
single autonomous system. It is based on distance-vector algorithms that
measure the shortest path between two points on a network. The shortest path
is determined by the number of hops between those points. RIP routers
maintain only the best route (the route with the lowest metric value) to a
destination. After updating its routing table, the router immediately begins
transmitting routing updates to inform other network routers of the shortest
route.
Routing Information Protocol version 2 (RIPv2) allows more information to
be included in RIP packets and provides an authentication mechanism.
Configuring a DHCP server
The EtherXtend DHCP supports the following types of DHCP configurations:
80
EtherXtend User’s Guide
RIP
•
Dynamic address allocation, where the server chooses and allocates an IP
address with a finite lease. By default, the EtherXtend will attempt to
assign the same address (if available) to a device on lease renewal. This
default can be changed to force a new address to be assigned.
•
Static address allocation, where the server allocates the same IP address
every time a device connects to the network.
•
External DHCP server
Setting global DHCP server options
At startup, the EtherXtend creates a default dhcp-server-options record. This
profile defines global options for the EtherXtend DHCP server.
The following example shows the dhcp-server-options profile with its
default values:
zSH> get dhcp-server-options 0
Please provide the following: [q]uit.
lease-time: -----> {43200}:
min-lease-time: -> {0}:
max-lease-time: -> {86400}:
reserve-start: --> {5}:
reserve-end: ----> {5}:
restart: --------> {no}:
....................
The dhcp-server-options profile supports the following parameters (all
others should be left at their default values):
Parameter
Description
lease-time
The global default time in seconds that
will be assigned to a DHCP lease if the
client requesting the lease does not
request a specific expiration time.
min-lease-time
The minimum expiration time in
seconds that will be assigned to a
DHCP lease by the server, regardless
of the value specified by a client.
Values:
-1 to 2147483647
-1 indicates the parameter should be
ignored.
Default: 0
EtherXtend User’s Guide
81
Configuring IP
Parameter
Description
max-lease-time
The maximum time in seconds that
will be assigned to a lease regardless
of the value specified by a client.
Values:
-1 to 2147483647.
-1 indicates the parameter should be
ignored.
Default: 86400
reserve-start
The default number of IP addresses, at
the beginning of the EtherXtend
subnet IP address space, that are
reserved by the DHCP server. To
override this default, create a specific
subnet rule for each subnet that needs
to be handled differently.
reserve-end
The default number of IP addresses at
the end of the EtherXtend ‘s subnet IP
address space that are reserved by the
DHCP server. To override this default,
create a specific subnet rule for each
subnet that needs to be handled
differently.
The following example changes the dhcp-server-options record to specify
that each DHCP server reserve the first 10 addresses and the last 10 addresses
in a network and does not include them in the DHCP server address pool.
zSH> update dhcp-server-options 0
Please provide the following: [q]uit.
lease-time: -----> {43200}:
min-lease-time: -> {0}:
max-lease-time: -> {86400}:
reserve-start: --> {5}: 10
reserve-end: ----> {5}: 10
restart: --------> {no}:
....................
Save changes? [s]ave, [c]hange or [q]uit: s
Record updated.
In this example, if a DHCP server on the 192.168.9.0 network reserved the
first 10 addresses and last 10 addresses, it would assign addresses from
192.168.9.11 to 192.168.9.244.
Creating DHCP server subnet options
The dhcp-server-subnet profile allows you to define options for a specific
network that is being managed by the DHCP server. All subnets within a
82
EtherXtend User’s Guide
RIP
routing domain must be unique, so a given subnet object will provide options
for exactly one connected network.
The dhcp-server-subnet profile supports the following parameters (all others
should be left at their default values):
Parameter
Description
network
The IP network address of this subnet.
netmask
The subnet mask associated with the IP interface.
The value of the mask is an IP address with all the
network bits set to 1 and all the hosts bits set to 0.
domain
The routing domain to which this subnet, group, or
host parameter applies.
range1-start,
range2-start,
range3-start,
range4-start
The starting IP address of an address pool in this
subnet. If either the start or end range has a value of
0 then the entire address pool is ignored.
range1-end, range2-end,
range3-end, range4-end
The ending IP address of an address pool in this
subnet. If either the start or end range has a value of
0, then the entire address pool is ignored.
default-lease-time
The default time, in seconds assigned to a lease if
the client requesting the lease does not request a
specific expiration time.
min-lease-time
See description in dhcp-server-options profile.
max-lease-time
See description in dhcp-server-options profile.
boot-server
The IP address of the server from which the initial
boot file (specified in the bootfile parameter) is to
be loaded.
bootfile
The name of the initial boot file loaded by the
client. The filename should be recognizable to the
file transfer protocol that the client will be using to
load the file.
default-router
The IP address of the client default gateway.
primary-name-server
The IP address of the primary domain name server
that the client should use for DNS resolution.
secondary-name-server
The IP address of the secondary domain name
server that the client should use for DNS resolution.
domain-name
The name of the DNS domain.
subnetgroup
A number which indicates which DHCP subnet
group this pool is a member of. A value of 0
(default) indicates that the subnet is not a member
of any group.
EtherXtend User’s Guide
83
Configuring IP
Parameter
Description
stickyaddr
The DHCP server attempts to assign the same IP
address to the same host, if possible, based on
hardware address.
Values:
disable
enable
Default: enable
external-server
The IP address of the external DHCP server used
for DHCP services.
The following example defines a DHCP server subnet profile that is set up as
follows:
•
Defines a single DHCP address pool with 11 addresses.
•
Defines a default router.
•
Defines a boot server and a boot filename.
•
Defines a domain name.
•
Defines two DNS servers.
•
Uses the minimum, maximum, and default lease time (by accepting the
default settings for the default-lease-time, min-lease-time, and
max-lease-time).
zSH> new dhcp-server-subnet 12
Please provide the following: [q]uit.
network: ---------------> {0.0.0.0}: 192.168.1.0
netmask: ---------------> {0.0.0.0}: 255.255.255.0
domain: ----------------> {0}:
range1-start: ----------> {0.0.0.0}: 192.168.1.10
range1-end: ------------> {0.0.0.0}: 192.168.1.20
range2-start: ----------> {0.0.0.0}:
range2-end: ------------> {0.0.0.0}:
range3-start: ----------> {0.0.0.0}:
range3-end: ------------> {0.0.0.0}:
range4-start: ----------> {0.0.0.0}:
range4-end: ------------> {0.0.0.0}:
default-lease-time: ----> {-1}:
min-lease-time: --------> {-1}:
max-lease-time: --------> {-1}:
boot-server: -----------> {0.0.0.0}: 192.168.1.55
bootfile: --------------> {}: filename.bin
default-router: --------> {0.0.0.0}: 192.168.1.1
primary-name-server: ---> {0.0.0.0}: 192.168.8.21
secondary-name-server: -> {0.0.0.0}: 201.23.20.2
domain-name: -----------> {}: zhone.com
subnetgroup: -----------> {0}: 12‘
stickyaddr: ------------> {enable}:
external-server: -------> {0.0.0.0}:
84
EtherXtend User’s Guide
RIP
....................
Save new record? [s]ave, [c]hange or [q]uit: s
New record saved.
Enabling a DHCP server
Modify the following parameters in the ip-interface-record to enable DHCP
server (all others should be left at their default values):
Parameter
Description
dhcp
Indicates whether this interface is a DHCP client, a
DHCP server, both, or neither.
Values:
none
client
server
both
Default: none
address
The IP address of LAN port.
The following example enables the DHCP server on an IP-enabled interface
in EtherXtend shelf 1, slot 1, port 2, and subport 0.
zSH> update ip-interface-record 1/1/2/0/ip
Please provide the following: [q]uit.
vpi: ---------------> {0}:
vci: ---------------> {0}:
rdindex: -----------> {1}:
dhcp: --------------> {none}: ** read-only **
addr: --------------> {172.24.200.162}:
netmask: -----------> {255.255.255.0}:
bcastaddr: ---------> {172.24.200.255}:
destaddr: ----------> {0.0.0.0}:
farendaddr: --------> {0.0.0.0}:
mru: ---------------> {1500}:
reasmmaxsize: ------> {0}:
ingressfiltername: -> {}:
egressfiltername: --> {}:
pointtopoint: ------> {no}:
mcastenabled: ------> {yes}:
ipfwdenabled: ------> {yes}:
mcastfwdenabled: ---> {yes}:
natenabled: --------> {no}:
bcastenabled: ------> {yes}:
ingressfilterid: ---> {0}:
egressfilterid: ----> {0}:
ipaddrdynamic: -----> {static}:
dhcpserverenable: --> {false}: true
subnetgroup: -------> {0}:
EtherXtend User’s Guide
85
Configuring IP
unnumberedindex: ---> {0}:
mcastcontrollist:---> {264}
vlanid:-------------> {95}
maxVideoStreams:----> {210}
tosOption:--------->
disable originate all
tosCOS:------------>
{0 - 7
vlanCOS:----------->
{0 - 7}
....................
Save changes? [s]ave, [c]hange or [q]uit: s
Record updated.
DHCP relay
The EtherXtend supports DHCP relay. DHCP broadcast messages do not, by
default, cross the router interfaces. To solve the problem of DHCP broadcast
messages on multiple-subnet, the EtherXtend can be configured as a DHCP
relay agent that communicates with a DHCP server and acts as a proxy for
DHCP broadcast messages that need to be routed to remote segments.
In DHCP relay scenarios, the EtherXtend serves as a DHCP relay agent that
forwards broadcast DHCP discover and DHCP request packets to an external
DHCP server. It then forwards the unicast DHCP offer and DHCP ack/nak
replies to the requesting DHCP host.
Note the following requirements for DHCP relay:
•
The external DHCP server must be configured to assign addresses on the
same subnet as the floating IP address used by the remote device.
•
The external DHCP server must be configured with a static route for the
remote device’s subnet back to the EtherXtend on which the relay agent is
running. (The DHCP server will send DHCP unicast packets to the relay
agent’s address, which is the first one in the subnet.)
•
A separate DHCP server can be specified per subnet.
Specifying an external DHCP server
Configure DHCP relay in the dhcp-server-subnet. The following parameter
has been added to this profile:
Parameter
Description
external-server
Enable an external subnet server in order to
support DHCP relay agent.
Default: 0.0.0.0
To specify an external DHCP server:
Create a dhcp-server-subnet profile and specify the IP address of the
external server:
zSH> new dhcp-server-subnet 1
Please provide the following: [q]uit.
86
EtherXtend User’s Guide
RIP
network: ---------------> {172.24.41.0}:
netmask: ---------------> {255.255.255.0}:
domain: ----------------> {1}:
range1-start: ----------> {172.24.41.11}:
range1-end: ------------> {172.24.41.100}:
range2-start: ----------> {0.0.0.0}:
range2-end: ------------> {0.0.0.0}:
range3-start: ----------> {0.0.0.0}:
range3-end: ------------> {0.0.0.0}:
range4-start: ----------> {0.0.0.0}:
range4-end: ------------> {0.0.0.0}:
default-lease-time: ----> {-1}:
min-lease-time: --------> {-1}:
max-lease-time: --------> {-1}:
boot-server: -----------> {172.24.38.102}:
bootfile: --------------> {i3micro/
etherboot-I3M-i.img}:
default-router: --------> {172.24.41.254}:
primary-name-server: ---> {172.24.38.102}:
secondary-name-server: -> {0.0.0.0}:
domain-name: -----------> {nat.myrio.net}:
subnetgroup: -----------> {1}:
stickyaddr: ------------> {enable}:
external-server: -------> {0.0.0.0}: 172.16.88.71
....................
Save changes? [s]ave, [c]hange or [q]uit: s
Record updated.
EtherXtend User’s Guide
87
Configuring IP
88
EtherXtend User’s Guide
WORKING WITH AN EFM PROFILE
This chapter covers basic configuration of the EtherXtend
•
Using EFM commands, page 89
•
Creating a new OAM, page 90
•
Adding New EFM Profiles, page 90
•
Creating a new EFM-Port, page 91
•
Creating a new PME-Profile, page 92
•
Creating a new EFM bond, page 92
•
Displaying Output, page 94
•
Displaying OAM statistics, page 97
•
Displaying the PME status, page 97
•
Displaying the line card, page 98
Using EFM commands
The following table provides a list of EFM commands related to the
EtherXtend platform.
Table 17: EFM Commands
Command
Description
showefmstat
Displays EFM statistics.
showoamstat
Displays OAM statistics.
showpmestat
Displays PME statistics.
showoamlog
Displays the OAM log.
showline
Displays information of the
line type.
showlinestatus
Displays the status of a line.
EtherXtend User’s Guide
89
Working with an EFM Profile
Table 17: EFM Commands
Command
Description
stack bind
Binds a lower stack to a
higher stack. This command
is used to add a port to a
bonding group.
stack unbind
Unbinds a lower stack to a
higher stack.
stack show
Displays stack information.
stack rename
Renames a stack.
Performing a list command
Before beginning to work with specific EFM profile information, perform a
list command to view what EFM profiles are available. The following
example shows a list of EFM specific EFM profiles that are available to you.
zSH>list
efm-bond: ifIndex
efm-loopback: ifIndex
efm-oam: ifIndex
efm-oam-entry: ifIndex/logIndex
efm-oam-event: ifIndex
efm-port: ifIndex
efm-stats: ifIndex
ether: ifIndex
Adding New EFM Profiles
To add a new profile, you issue the new command, using the following
syntax:
new profile-type profile-storage-key
To add new EFM profiles, issue the appropriate one of the following new
command statements (1-1-1-1 is used as an example storage key).
new
new
new
new
new
efm-oam 1-1-1-1
efm-oam-event 1-1-1-1
efm-port 1-1-1-1
pme-profile 1-1-1-1
efm-bond 1-1-1-1
Creating a new OAM
To create a new OAM, issue the new efm-oam command and view the profile
output displayed.
90
EtherXtend User’s Guide
Creating a new EFM-Port
Please provide the following: [q]uit.
profileVersion: ---->
{1.0}:
** read-only **
dot3OamAdminState: ->
dot3OamMode: ------->
{NONE(0)}:
{NONE(0)}:
Creating a new OAM event
To create a new OAM event, issue the new efm-oam-event command and
view the profile output displayed.
zSH>new efm-oam-event 1-1-1-1
Please provide the following: [q]uit.
profileVersion: ---------------------->
read-only **
dot3OamErrSymPeriodWindowHi: --------->
dot3OamErrSymPeriodWindowLo: --------->
dot3OamErrSymPeriodThresholdHi: ------>
dot3OamErrSymPeriodThresholdLo: ------>
dot3OamErrSymPeriodEvNotifEnable: ---->
dot3OamErrFramePeriodWindow: --------->
dot3OamErrFramePeriodThreshold: ------>
dot3OamErrFramePeriodEvNotifEnable: -->
dot3OamErrFrameWindow: --------------->
dot3OamErrFrameThreshold: ------------>
dot3OamErrFrameEvNotifEnable: -------->
dot3OamErrFrameSecsSummaryWindow: ---->
{1.0}:
**
{0}:
{0}:
{0}:
{0}:
{NONE(0)}:
{0}:
{0}:
{NONE(0)}:
{0}:
{0}:
{NONE(0)}:
{0}:
Creating a new EFM-Port
To create a new EFM-Port, issue the new efm-port command and view the
profile output displayed.
zSH>new efm-port 1-1-1-1
profileVersion: ---------->
efmCuPAFAdminState: ------>
efmCuPAFDiscoveryCode: --->
efmCuAdminProfile: ------->
efmCuTargetDataRate: ----->
efmCuTargetSnrMgn: ------->
efmCuThreshLowBandwidth: ->
efmCuLowBandwidthEnable: ->
{1.0}: ** read-only **
{enabled}:
{}:
{0x01}:
{50000}:
{6}:
{0}:
{false}:
EtherXtend User’s Guide
91
Working with an EFM Profile
Creating a new PME-Profile
To create a new pme-profile, issue the new pme-profile command and view
the profile output displayed.
zSH>new pme-profile 1-1-1-0/shdsl
Please provide the following: [q]uit.
profileVersion: -----------------> {1.0}:** read-only **
efmCuPmeAdminSubType: -----------> {ieee2basetlr}:
efmCuPmeAdminProfile: -----------> {0}:
efmCuPAFRemoteDiscoveryCode: ----> {}:
efmCuPmeThreshLineAtn: ----------> {0}:
efmCuPmeThreshSnrMgn: -----------> {0}:
efmCuPmeLineAtnCrossingEnable: --> {false}:
efmCuPmeSnrMgnCrossingEnable: ---> {false}:
efmCuPmeDeviceFaultEnable: ------> {false}:
efmCuPmeConfigInitFailEnable: ---> {false}:
efmCuPmeProtocolInitFailEnable: -> {false}:
efmCuPme2BProfileDescr: ---------> {}:
efmCuPme2BRegion: ---------------> {region1}:
efmCuPme2BDataRate: -------------> {5696}:
efmCuPme2BPower: ----------------> {0}:
efmCuPme2BConstellation: --------> {adaptive}:
efmCuPme2BProfileRowStatus: -----> {active}:
Creating a new EFM bond
To create a new EFM, issue the new efm-bond command view the profile
output displayed.
zSH>new efm-bond 1-1-1-0/shdsl
Please provide the following: [q]uit.
config: -------> {auto}:
dynamic-link: -> {enabled}:dynamic
Performing an update
The update command changes an xisting profile for the unit. In EFM, there
are five new profile types added. They are:
•
efm-oam
•
efm-oam-event
•
efm-port
•
pme-profile
•
efm-bond
Examples of each profile type are shown in the following sections.
92
EtherXtend User’s Guide
Performing an update
Updating the EFM OAM profile
To update the efm-oam profile using 1-1-1-1 as an example, issue the update
efm-oam command.
zSH>update efm-oam-vent 1-1-1-1
symbol error window (High): ---> {10}:
symbol error window (Low): ----> {10}:
symbol threshold (High): ------> {10}:
symbol threshold (Low): -------> {10}:
symbol error notify enable: ---> {enabled}:
frame error period window: ----> {10}:
frame error period threshold: -> {10}:
frame error period notify: ----> {10}:
frame error window ------------> {10}:
frame error threshold ---------> {10}:
frame error period notify: ----> {10}:
frame error window: -----------> {10}:
frame error threshold: --------> {10}:
frame error notify enable: ----> {10}:
frame error seconds: ----------> {10}:
frame error seconds threshold: -> {10}:
frame error seonds notify: ----> {enabled}:
dying gasp: -------------------> {enabled}:
critical event: ---------------> {enabled}:
Updating the EFM-Port profile
To update the EFM port profile using 1-1-1-1 as an example, issue the update
efm-port command.
zSH>update efm-port 1-1-1-1
profileVersion: ---------->
efmCuPAFAdminState: ------>
efmCuPAFDiscoveryCode: --->
efmCuAdminProfile: ------->
efmCuTargetDataRate: ----->
efmCuTargetSnrMgn: ------->
efmCuThreshLowBandwidth: ->
efmCuLowBandwidthEnable: ->
{1.0}: ** read-only **
{enabled}:
{}:
{0x01}:
{50000}:
{6}:
{0}:
{false}:
EtherXtend User’s Guide
93
Working with an EFM Profile
Updating the PME-profile
To update the PME profile using 1 as an example, issue the update
pme-profile command.
zSH>update pme-profile 1-1-1-0/shdsl
Please provide the following: [q]uit.
profileVersion: -----------------> {1.0}:** read-only **
efmCuPmeAdminSubType: -----------> {ieee2basetlr}:
efmCuPmeAdminProfile: -----------> {0}:
efmCuPAFRemoteDiscoveryCode: ----> {}:
efmCuPmeThreshLineAtn: ----------> {0}:
efmCuPmeThreshSnrMgn: -----------> {0}:
efmCuPmeLineAtnCrossingEnable: --> {false}:
efmCuPmeSnrMgnCrossingEnable: ---> {false}:
efmCuPmeDeviceFaultEnable: ------> {false}:
efmCuPmeConfigInitFailEnable: ---> {false}:
efmCuPmeProtocolInitFailEnable: -> {false}:
efmCuPme2BProfileDescr: ---------> {}:
efmCuPme2BRegion: ---------------> {region1}:
efmCuPme2BDataRate: -------------> {5696}:
efmCuPme2BPower: ----------------> {0}:
efmCuPme2BConstellation: --------> {adaptive}:
efmCuPme2BProfileRowStatus: -----> {active}:
Updating the EFM-Bond
To update the EFM-Bond profile using 1 as an example, issue the update
efm-bond command.
zSH>update efm-bond
dynamic link: -----------------> {enabled}
Displaying Output
EFM supports five show commands that display output for valid parameters
affected by EFM. The commands are:
•
show efm-oam
•
show efm-oam-event
•
show efm-port
•
show pme-profile
•
show efm-bond
Displaying EFM-OAM output
To display EFM-OAM ouput, issue the show efm-oam command.
94
EtherXtend User’s Guide
Displaying Output
zSH>show efm-oam
profileVersion:---->
dot3OamAdminState:->
dot3OamMode:------->
{0 - 0}
disabled enabled
active passive
Dispaying EFM-OAM event output
To display EFM-OAM event output, issue the show efm-oam-event
command.
zSH>show efm-oam-event
profileVersion:---------------------->
dot3OamErrSymPeriodWindowHi:--------->
dot3OamErrSymPeriodWindowLo:--------->
dot3OamErrSymPeriodThresholdHi:------>
dot3OamErrSymPeriodThresholdLo:------>
dot3OamErrSymPeriodEvNotifEnable:---->
dot3OamErrFramePeriodWindow:--------->
dot3OamErrFramePeriodThreshold:------>
dot3OamErrFramePeriodEvNotifEnable:-->
dot3OamErrFrameWindow:--------------->
dot3OamErrFrameThreshold:------------>
dot3OamErrFrameEvNotifEnable:-------->
dot3OamErrFrameSecsSummaryWindow:---->
dot3OamErrFrameSecsSummaryThreshold:->
dot3OamErrFrameSecsEvNotifEnable:---->
dot3OamDyingGaspEnable:-------------->
dot3OamCriticalEventEnable:---------->
{0 - 0}
{0 - 0}
{0 - 0}
{0 - 0}
{0 - 0}
enabled disabled
{0 - 0}
{0 - 0}
enabled disabled
{0 - 0}
{0 - 0}
enabled disabled
{100 - 9000}
{1 - 900}
enabled disabled
enabled disabled
enabled disabled
Displaying EFM-Port output
To display EFM-Port output, issue the show efm-port command.
zSH>show efm-port
profileVersion:---------->
efmCuPAFAdminState:------>
efmCuPAFDiscoveryCode:--->
efmCuAdminProfile:------->
efmCuTargetDataRate:----->
efmCuTargetSnrMgn:------->
efmCuThreshLowBandwidth:->
efmCuLowBandwidthEnable:->
{0 - 0}
enabled disabled
{260}
{8}
{1 - 999999}
{0 - 21}
{0 - 100000}
true false
Displaying PME-Profile output
To display PME-Profile output, issue the show pme-profile command.
zSH>show pme-profile
EtherXtend User’s Guide
95
Working with an EFM Profile
efmCuPmeAdminSubType:----------->
ieee2basetlo ieee2basetlr ieee10passtso
ieee10passtsr ieee2basetlor10passtsr ieee2basetlor10passtso
ieee10passtsor2bas
etlo
efmCuPmeAdminProfile:----------->
{0 - 255}
efmCuPAFRemoteDiscoveryCode:---->
{260}
efmCuPmeThreshLineAtn:---------->
{-127 - 128}
efmCuPmeThreshSnrMgn:----------->
{-127 - 128}
efmCuPmeLineAtnCrossingEnable:-->
true false
efmCuPmeSnrMgnCrossingEnable:--->
true false
efmCuPmeDeviceFaultEnable:------>
true false
efmCuPmeConfigInitFailEnable:--->
true false
efmCuPmeProtocolInitFailEnable:->
true false
efmCuPme2BProfileDescr:--------->
{260}
efmCuPme2BRegion:--------------->
region1 region2
efmCuPme2BDataRate:------------->
{0 - 5696}
efmCuPme2BPower:---------------->
{0 - 42}
efmCuPme2BConstellation:-------->
adaptive tcpam16 tcpam32
efmCuPme2BProfileRowStatus:----->
active notinservice notready
createandgo
createandwait destroy
Displaying EFM status
The showefmstat command displays the statistics for the EFM PAF. This
command supports one profile type: efm-port. The format of the command is:
showefmstat profile-type profile-storage-key
An example of the command is shown here.
zSH>showefmstat efm-port
PAF supported
peer PAF supported
PAF capacity
Peer PAF capacity
fault status
port side
number of PMEs
PAF in errors
PAF in small fragments
PAF in large fragments
PAF in bad fragments
PAF in lost fragments
PAF in lost starts
PAF in lost ends
PAF in overflows
96
EtherXtend User’s Guide
1-1-1-1
true
true
3
3
none
Office
2
1
3
3
3
3
3
3
3
Displaying OAM statistics
Displaying OAM statistics
The showoamstat command displays the statistics for the EFM OAM. This
command supports one profile type: oam-stats. The format of the command
is:
showoamstat profile-type profile-storage-key
An example of the command is shown here.
zSH>showoamstat oam-stats 1-1-1-1
oper status
Active
config revision
1.1.1
functions supported
Loopback
peer status
active
peer vendor oui
10.1.7.3
peer vendor info
234
peer mode
Active
peer max oam pdu size
10
peer config revision
1.1.1.1
peer functions supported
Loopback
information tx
100
information rx
50
unique event notify tx
0
unique event notify rx
0
dup event notify tx
2
dup event notify rx
1
loopback control tx
1
loopback control rx
1
variable request tx
1
variable request rx
1
variable response tx
1
variable response rx
1
org specific tx
1
org specific rx
1
unsupported codes tx
1
unsupported codes rx
1
frames lost due to oam
1
loopback status
no loopback
Displaying the PME status
The showpmestat command displays the status for the EFM PME. This
comman supports one profile type: pme-stats. The format of the command is:
showpmestat profile-type profile-storage-key
An example of the command is shown here.
zSH>showpmestat pme-stats 1-1-1-1
sub-type
2BaseTL-O
Oper status
up
Fault status
None
EtherXtend User’s Guide
97
Working with an EFM Profile
Profile index
Snr
Peer snr
Line attn
Peer line attn
Tcc code error
1
10
10
10
10
10
Displaying the OAM log
The showoamlog command displays the OAM event log. The command
supports one profile type: efm-oam-entry. The format of the command is:
showoamlog profile-type profile-storage-key
An example of the command is shown here.
zSH> showoamlog profile-type profile-storage-key
Oui
1
Type
Symbol
Location
Local
Window
20
Threshold
10
Value
10
Running total
10
Event total
10
Displaying the line card
The showline command displays the line card type. The format of the
command is:
showline shelf slot -c number_of_columns
An example of the command is
zSH>showline 1-1
Search in progress .........
-----------------------------------------------------------------------shelf = 1, slot = 1, line type = SHDSL
line
1-12
OOS OOS OOS OOS OOS OOS OOS OOS
-----------------------------------------------------------------------shelf = 1, slot = 1, line type = ETHERNET
line
1-12
ACT
zSH> showline 1-1
Search in progress .........
98
EtherXtend User’s Guide
Displaying the line card
-----------------------------------------------------------------------shelf = 1, slot = 1, line type = SHDSL
line
1-12
OOS OOS OOS OOS OOS OOS OOS OOS
-----------------------------------------------------------------------shelf = 1, slot = 1, line type = ETHERNET
line
1-12
ACT
Displaying the line card status
The showlinestatus command enables you to display the status of a specified
line card. The format of the command is:
showlinestatus
An example of he command is shown here.
zSH>showlinestatus
Search in progress................
Line Type --------->FAST(13)
GroupId ----------->17
Status ------------>OOS(3)
Redundancy -------->ACTIVE(3)
TxClk ------------->NTR_DISABLE(7)
RefClkSrc --------->NO
If_index ---------->15
Shelf ------------->1
Slot -------------->1
Port -------------->1
SubPort ----------->0
.........
Binding the stack
The stack bind command enables you to bind the stack. The format for the
command is:
stack bind upper_layer lower_layer
An example of the command is shown here.
zSH>stack bind
Enter the upper layer: efm-bond 1
Enter he lower layer: efm-port 1-1-1-1
Unbinding the stack
The stack unbind command enables you to unbind the stack. The format for
the command is:
EtherXtend User’s Guide
99
Working with an EFM Profile
stack unbind upper_layer lower_layer
An example of the command is shown here.
zSH>stack unbind
Enter the upper layer: efm-bond 1
Enter the lower layer: efm-port 1-1-1-1
Displaying stack output
The stack show command enables you to display output related to the current
stack.
Mapping tables
The tables provided contain a mapping of CLI commands tothe database
profile and MIBs. These tables reflect data in the new EFM MIBs:
efmCommon.mib and efmCu.mib.
Table 1 provides MIB detail for the CLI commands: new, upate, and show.
The profile type is efm-oam.
Table 18:
CLI Element
Profile
MIB
MIB Table
MIB Element
Mode
EfmProfile
Efm Common
dot3OamTable
dot3OamMode
Admin-State
EfmProfile
Efm Common
dot3OamTable
dot3OamAdminState
Table 19:
100
CLI Element
Profile
MIB
MIB Table
MIB Element
symbol error
window (High)
EfmOamEvent
Efm Common
dot3OamEventCon
figTable
dot3OamErSymPer
iodWindowHi
symbol error
window (Low)
EfmOamEvent
Efm Common
dot3OamEventCon
figTable
dot3OamErrSymPe
riodWindowLo
symbol threshold
(high)
EfmOamEvent
EfmCommon
dot3OamEventCon
figTable
dot3OamErrSymPe
roidThresholdHi
symbol threshold
(low)
EfmOamEvent
Efm Common
dot3OamEventCon
fig Table
dot3OamErrSymPe
riodThresholdLo
symbol error
notify enable
EfmOamEvent
Efm Common
dot3OamEventCon
figTable
dot3OamErrSymPe
riodEvNotifEnable
frame error period
window
EfmOamEvent
Efm Common
dot3OamEventCon
figTable
dot3OamErrFrame
PeriodWindow
EtherXtend User’s Guide
Default settings
Table 19:
CLI Element
Profile
MIB
frame error period
threshold
EfmOamEvent
frame error period
notify
EfmOamEvent
Efm Common
MIB Table
MIB Element
dot3OamEventCon
fig Table
dot3OamErrFrame
PeriodThreshold
dot3OamEventCon
figTable
dot3OamErrFrame
PeriodEvNotifEnab
le
Default settings
This chapter provides descriptions of defaults. basic configuration of the
EtherXtend:
The defaults fall into several categories:
•
Modes. Indicates whether the device is in an active or passive way of
operating.
•
Port
•
PME Profile
•
EFM-OAM
•
EFM-OAM-Event
•
EFM-OAM-Entry
•
EFM Loopback
Modes
DTEs incorporating the OAM sublayer support Active and/or Passive mode.
When OAM is enabled, a DTE capable of both Active and Passive modes
shall select either Active or Passive. The following table indicates the
behavior of Active and Passive mode DTEs.
Table 20: Active and Passive Mode
Capability
Active DTE
Passive DTE
Initiates OAM Discovery process.
Yes
No
Reacts to OAM Discovery process
initiation.
Yes
Yes
Required to send Information
OAMPDUs
Yes
Yes
Permitted to send Event Notificaiton
OAMPDUs
Yes
Yes
EtherXtend User’s Guide
101
Working with an EFM Profile
Table 20: Active and Passive Mode
Capability
Active DTE
Passive DTE
Permitted to send Variable Request
OAMPDUs
Yes
No
Permitted to send Variable Response
OAMPDUs
Yes
Yes
Permitted to send Loopback Control
OAMPDUs
Yes
No
Reacts to Loopback Control
OAMPDUs
Yes
Permitted to send Organization
Specific OAMPDUs
Yes
Yes
Requires the pper DTE to be in
Active mode
Yes
Yes
Active mode
DTEs configured in Active mode initiate the exchange of Informaiton
OAMPDUs as defined by the Discovery state. Once the Discovery process
completes, active DTEs are permitted to send any OAMPDU while connected
to a remote OAM peer entity in Active mode.
Active DTEs operate in a limited respect if the remote OAM entity is
operating in Passive mode. Active devices should not respond to OAM
remote loopback commands and variable requests from a Passive peer.
Passive mode
DTEs configured in Passive mode do not initiate the Discovery process.
Passive DTEs react to the initiation of the Discovery process by the remote
DTE. This eliminates the possibility of passive to passive links.
EFM Port default
The following output displays the EFM Port parameters in their default state.
zSH>show efm-port
profileVersion:-------------> {0 - 0}
efmCuPAFAdminState:---------> enabled disabled enabled
efmCuPAFDiscoveryCode:------> {260} unit’s serial number
efmCuAdminProfile:----------> {8}
efmCuTargetDataRate:------> {1 - 999999} 50000
efmCuTargetSnrMgn:--------> {0 - 21} 6
efmCuThreshLowBandwidth:--> {0 - 100000} 0
efmCuLowBandwidthEnable:--> true false false
102
EtherXtend User’s Guide
Default settings
PME defaults
The following output displays the PME parameters in their default state.
zSH> show pme-profile
profileVersion:------------> {0 - 0}
efmCuPmeAdminSubType:------> ieee2basetlo ieee2basetlr
ieee10passtso ieee10passtsr ieee2basetlor10passtsr
ieee2basetlor10passtso iee10passtsor2basetlo ieee2basetlr
efmCuPmeAdminProfile:------> {0 - 255}
efmCuPAFRemoteDiscoveryCode:-> {260} unit’s serial number
efmCuPmeThreshLineAtn:------> {-127 - 128} 0
efmCuPmeThreshSnrMgn:-------> {-127 - 128} 0
efmCuPmeLineAtnCrossingEnable:--> true false false
efmCuPmeSnrMgnCrossingEnable:---> true false false
emCuPmeDeviceFaultEnable: -----> true false false
emCuPmeConfigInitFailEnable:---> true false false
efmCuPmeProtocolInitFailEnable:--> true false false
efmCuPme2BProfileDescr:-----> {260}
efmCuPme2BRegion: ------> region1 regoin2
efmCuPme2BDataRate: ------> {0 - 5696} 5696
efmCuPme2BPower:-----> {0 - 42}
efmCuPme2BConstellation -----> adaptive tcpam16 tcpam32 adaptive
efmCuPme2BProfileRowStatus: ----> active notinservice notready createandgo
createandwait destroy active
EtherXtend User’s Guide
103
Working with an EFM Profile
104
EtherXtend User’s Guide
DEFAULTS
This chapter provides descriptions of defaults. basic configuration of the
EtherXtend:
•
Modes on page 105
•
EFM Port Default, page 106
•
PME Defaults, page 107
The defaults fall into several categories:
•
Modes. Indicates whether the device is in an active or passive way of
operating.
•
Port
•
PME Profile
•
EFM-OAM
•
EFM-OAM-Event
•
EFM-OAM-Entry
•
EFM Loopback
Modes
DTEs incorporating the OAM sublayer support Active and/or Passive mode.
When OAM is enabled, a DTE capable of both Active and Passive modes
shall select either Active or Passive. The following table indicates the
behavior of Active and Passive mode DTEs.
Table 21: Active and Passive Mode
Capability
Active DTE
Passive DTE
Initiates OAM Discovery process.
Yes
No
Reacts to OAM Discovery process
initiation.
Yes
Yes
Required to send Information
OAMPDUs
Yes
Yes
EtherXtend User’s Guide
105
Defaults
Table 21: Active and Passive Mode
Capability
Active DTE
Passive DTE
Permitted to send Event Notification
OAMPDUs
Yes
Yes
Permitted to send Variable Request
OAMPDUs
Yes
No
Permitted to send Variable Response
OAMPDUs
Yes
Yes
Permitted to send Loopback Control
OAMPDUs
Yes
No
Reacts to Loopback Control
OAMPDUs
Yes
Permitted to send Organization
Specific OAMPDUs
Yes
Yes
Requires the upper DTE to be in
Active mode
Yes
Yes
Active Mode
DTEs configured in Active mode initiate the exchange of Information
OAMPDUs as defined by the Discovery state. Once the Discovery process
completes, active DTEs are permitted to send any OAMPDU while connected
to a remote OAM peer entity in Active mode.
Active DTEs operate in a limited respect if the remote OAM entity is
operating in Passive mode. Active devices should not respond to OAM
remote loopback commands and variable requests from a Passive peer.
Passive Mode
DTEs configured in Passive mode do not initiate the Discovery process.
Passive DTEs react to the initiation of the Discovery process by the remote
DTE. This eliminates the possibility of passive to passive links.
EFM Port Default
The following output displays the EFM Port parameters in their default state.
zSH>show efm-port
profileVersion:-------------> {0 - 0}
efmCuPAFAdminState:---------> enabled disabled enabled
efmCuPAFDiscoveryCode:------> {260} unit’s serial number
efmCuAdminProfile:----------> {8}
efmCuTargetDataRate:------> {1 - 999999} 50000
106
EtherXtend User’s Guide
PME Defaults
efmCuTargetSnrMgn:--------> {0 - 21} 6
efmCuThreshLowBandwidth:--> {0 - 100000} 0
efmCuLowBandwidthEnable:--> true false false
PME Defaults
The following output displays the PME parameters in their default state.
zSH> show pme-profile
profileVersion:------------> {0 - 0}
efmCuPmeAdminSubType:------> ieee2basetlo ieee2basetlr
ieee10passtso ieee10passtsr ieee2basetlor10passtsr
ieee2basetlor10passtso iee10passtsor2basetlo ieee2basetlr
efmCuPmeAdminProfile:------> {0 - 255}
efmCuPAFRemoteDiscoveryCode:-> {260} unit’s serial number
efmCuPmeThreshLineAtn:------> {-127 - 128} 0
efmCuPmeThreshSnrMgn:-------> {-127 - 128} 0
efmCuPmeLineAtnCrossingEnable:--> true false false
efmCuPmeSnrMgnCrossingEnable:---> true false false
emCuPmeDeviceFaultEnable: -----> true false false
emCuPmeConfigInitFailEnable:---> true false false
efmCuPmeProtocolInitFailEnable:--> true false false
efmCuPme2BProfileDescr:-----> {260}
efmCuPme2BRegion: ------> region1 regoin2
efmCuPme2BDataRate: ------> {0 - 5696} 5696
efmCuPme2BPower:-----> {0 - 42}
efmCuPme2BConstellation -----> adaptive tcpam16 tcpam32
adaptive
efmCuPme2BProfileRowStatus: ----> active notinservice
notready createandgo createandwait destroy active
EtherXtend User’s Guide
107
Defaults
108
EtherXtend User’s Guide
INDEX
Numerics
4-port EtherXtend 22
4-port EtherXtend SHDSL 22
802.3ah 23
EFM Media 24
8-port EtherXtend 22
A
addresses
assigned via DHCP 81
alarm cables and contacts
guidelines 51
specifications 51
automatic baud rate detection
SDSL 69
B
bootfile parameter 84
boot-server parameter 84
C
cables and connectors
alarm cables and contacts 51
changepass command 67
chassis
environmental specifications 44
fans 44
grounding and isolation 13
operating altitude 44
operating humidity 44
operating temperature 44
storage altitude 44
storage humidity 44
storage temperature 44
unpacking 47
chassis dimensions 44
circuit breaker, specifications 45
commands
changepass 67
dslstat 73
rip 67, 68
rip show 68
route add 75
route delete 75
route show 76
showlinestatus 71
traceroute 76
configuration
basic 55, 77, 89, 101, 105
CLI disabled 66
creating DHCP server subnet options 82
displaying RIP information 68
Ethernet
interface 60
management channel 60
fundamentals 55, 77, 89, 101, 105
description 55, 77, 89, 101, 105
interface types 55, 77, 89, 101, 105
profiles 59
interface indexes 59
local management channel 56
logging in 56
logging out 56
profiles 59
RIP 67
global defaults 67
SDSL/SHDSL interface 69, 72
SHDSL interface 72
specifying DSL interface 70
system security 67
verifying interfaces 71, 73
WAN interface 67
configuring management interface
accessing the serial port 56
local management channel 56
logging in and out 56
configuring physical interfaces
SDSL/SHDSL interfaces 69, 72
SHDSL interfaces 72
specifying DSL interface 70
verifying interfaces 71, 73
craft interface 56
EtherXtend User’s Guide
109
Index
D
default-lease-time parameter 84
default-router parameter 84
devices
4-port EtherXtend SHDSL 22
8-port EtherXtend SHDSL 22
DHCP
address assignment 81
creating subnet options 82
description of 80
enabling a DHCP server 85
relay 86
setting server options 81
DHCP server, enabling 85
dhcp-server-subnet profile 83
displaying RIP information 68
DNS, description of 80
documents related to this guide 10
Domain Name System, see DNS
domain parameter 84
domain-name parameter 84
DSL
fixed bit rate settings and training rates 70
DSL interfaces
specifying interface type 70
verifying the interface 71
E
EFM
media 24
supported applications 25
technology description 23
EFM media
copper services 25
environmental requirements
precautions 44
specifications 44
Ethernet
configuring for full duplex 57
interface
configuration 60
management channel 60
Ethernet interface
configuration 57
creating a default route 58
IP interface 57
route show command 58
110
EtherXtend User’s Guide
verifying 58
verifying the route 58
EtherXtend device
4-port SHDSL 22
EtherXtend product family 22
I
installation
unpacking the system 47
installation precautions
environmental requirements 44
interface indexes, configuration of 59
interface types, configuration of 55, 77, 89, 101,
105
interfaces
line speeds for DSL interfaces with fixed bit
rates 70
IP
DHCP relay 86
overview 77
routing 78
IP address
assigning to Ethernet 57
L
LAN
interface
pinging 75
lease-time parameter 81
local management channel 56
logging
enabling/disabling for session 57
enabling/disabling over the serial craft port 57
logging in and out
description 56
logout command 56
timeout command 56
loop bonding 24
M
max-lease-time parameter 81, 84
min-lease-time parameter 81, 84
modems
DSL training rates 70
N
netmask parameter 84
network parameter 84
O
tools you need 43
primary-name-server parameter 84
profiles
configuration 59
rip-global-config 67
R
overview 21, 23
P
parameters
bootfile 83
boot-server 83
default-lease-time 83
default-router 83
domain 83
domain-name 83
lease-time 81
max-lease-time 81, 83
min-lease-time 81, 83
netmask 83
network 83
primary-name-server 83
range1-end 83
range1-start 83
range2-end 83
range2-start 83
range3-end 83
range3-start 83
range4-end 83
range4-start 83
reserve-end 82
reserve-start 82
secondary-name-server 83
password
changing default user password 67
power
circuit breaker 45
power feeds 45
power specifications
DC power 45
description 44
power feeds 45
rated current 45
rated power 45
preparing for installation
grounding and isolation 13
selecting the system location 44
range1-end parameter 84
range1-start parameter 84
range2-end parameter 84
range2-start parameter 84
range3-end parameter 84
range3-start parameter 84
range4-end parameter 84
range4-start parameter 84
rated current 45
rated power 45
reserve-end parameter 82
reserve-start parameter 82
RIP
configuration
description 67
displaying RIP information 68
description 80
global defaults
configuration 67
rip command 67, 68
rip show command 68
rip-global-config profile 67
route add command 75
route delete command 75
route show command 76
routing
description 78
routing information base 78
routing in Zhone systems
route types 78
routing information base, description of 78
Routing Information Protocol, see RIP
S
SDSL/SHDSL interfaces
configuration 69, 72
secondary-name-server parameter 84
security
changing default user password 67
selecting the system location 44
EtherXtend User’s Guide
111
Index
SHDSL interfaces
configuration 72
verifying the interface 73
specifications
chassis dimensions 44
environmental 44
static routes
deleting routes 75
verifying routes 75
system
configuring management interface 56
Ethernet interface 57
profile
updating 66
system profile 66
unpacking 47
Uplink cards 57
system environmental dimensions
fans 44
operating altitude 44
operating humidity 44
operating temperature 44
storage altitude 44
storage humidity 44
storage temperature 44
T
terminal interface, settings for 56
tools for installation 43
traceroute command 76
U
Uplinkcards
configuration 57
V
verifying routes
displaying routing tables when 76
traceroute command 76
W
WAN
interface
pinging 64, 75
RIP configuration 67
112
EtherXtend User’s Guide
Z
ZMS
CLI configuration disabled 66