1
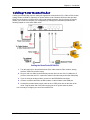
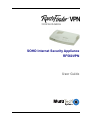
Chapter 2 – Installation
Cabling Your RouteFinder
Cabling your RouteFinder requires making the appropriate connections to PCs, Cable or DSL modem,
analog modem or ISDN TA (optional), AC power and the router. Because this device also provides
DHCP server functions, remote access, routing and firewall protection, after your device is properly
cabled, you will need to complete your configuration by following the instructions provided in the
following chapter or in the Quick Start Guide.
Cabling the RouteFinder RF560VPN
1. Turn the power off on all network devices (PCs, cable modems, DSL modems, analog
modems, ISDN TAs, and the router).
2. Plug one end of a cable into the Ethernet port and other into one of the 4 LAN ports. (If
you have more than one PC, connect the others in the same way to the other LAN ports).
3. If you are using an analog modem, connect it to the RF560VPN’s serial port.
4. Connect a network cable from the DSL modem or cable modem to the WAN port.
5. Connect the provided power supply cable to the 12 VDC power port on the back of the
router. Plug the other end of the power supply into an AC power outlet as shown.
You are ready to configure your router and network PCs.
Multi-Tech Systems, Inc. RF560VPN User Guide
11