1
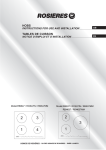
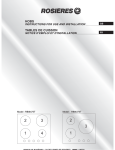
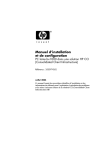
HOBS
GB
INSTRUCTIONS FOR USE AND INSTALLATION
TABLES DE CUISSON
FR
NOTICE D’EMPLOI ET D’INSTALLATION
Model:RBI647 / RCI647IN / RBI647MM
Model:RBI637 / RCI637IN / RBI637MM
GENERAL WARNINGS
READ THE INSTRUCTIONS BOOKLET CAREFULLY TO MAKE THE MOST OF YOUR HOB.
We recommend you keep the instructions for installation and use for later reference, and before installing the hob, note its serial number
below in case you need to get help from the after sales service.
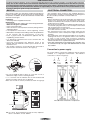
Identification plate
(located under the hob's bottom casing)
• It is strongly recommended to keep children away from the cooking zones while they are in operation or when they are switched off,
so long as the residual heat indicator is on, in order to prevent the risks of serious burns.
• When cooking with fats or oils, take care always to watch the cooking process as heated fats and oils can catch fire rapidly.
• The hob’s control area is sensitive, do not place hot containers on it.
• Aluminium foil and plastic pans must not be placed on heating zones.
• After every use, some cleaning of the hob is necessary to prevent the build up of dirt and grease. If left, this is recooked when the
hob is used and burns giving off smoke and unpleasant smells, not to mention the risks of fire propagation.
• Do not left metallic objects such as knives, forks, spoons or lids on the induction zone,because if they are too large or too heavy, they
could become hot.
• Never cook food directly on the glass ceramic hob. Always use the appropriate cookware.
• Always place the pan in the centre of the unit that you are cooking on.
• Do not use the surface as a cutting board.
• Do not slide cookware across the hob.
• Do not store heavy items above the hob. If they drop onto the hob, they may cause damage.
• Do not use the hob as a working surface.
• Do not use the hob for storage of any items.
• In the unlikely event of a surface crack appearing, do not use the hob. Immediately disconnect the hob from the electrical power supply
and call the After Sales Service.
Warning: this appliance complies with current safety regulations and electromagnetic compatibility regulations. Nevertheless,
people with a pacemaker should not use this appliance. It is impossible to guarantee that all such devices found on the market
comply with current safety regulations and electromagnetic compatibility regulations, and that dangerous interference will not
occur. It is also possible that people with other types of device, such as a hearing aid, could experience some discomfort.
RBI647/RCI647IN/RBI647MM
RBI637/RCI637IN/RBI637MM
3 INDUCTION
4 INDUCTION
220-240 V 50/60 Hz
400 V 50/60 Hz
7200
dXwXh
7000
590 X 520 X 55
560 X 490
We are constantly striving to improve product quality and as such may modify appliances to incorporate the latest technical improvements.
Induction hobs conform to European Directives 73/23/CEE and 89/336/CEE, replaced by 2006/95/EC and 2004/108/EC,
and subsequent amendments.
INSTALLATION
Installing a domestic appliance can be a complicated operation which if not carried out correctly, can seriously affect consumer
safety. It is for this reason that the task should be undertaken by a professionally qualified person who will carry it out in
accordance with the technical regulations in force. In the event that this advice is ignored and the installation is carried out
by an unqualified person, the manufacturer declines all responsibility for any technical failure of the product whether or not
it results in damage to goods or injury to individuals.
BUILT-IN
ELECTRICAL CONNECTION
The furniture in which your hob will be installed and all adjacent
furniture, should be made from materials that can withstand high
temperatures. In addition, all decorative laminates should be fixed
with heat-resistant glue.
Installation:
• A watertight seal is supplied with the hob.
Before fitting:
- turn the hob upside down, with the glass surface facing downwards.
Make sure the glass is protected.
- fit the seal round the hob.
- make sure that it is correctly fitted to avoid any leakage into the
supporting cabinet.
• It it important to fit the hob on a level supporting surface.
• Deformations caused by incorrect fitting can alter the specifications
of the worktop and the performance of the hob.
• Leave a gap of at least 5 cm between the appliance and any
neighbouring vertical surfaces.
• It is absolutely essential that the recess conforms with the
dimensions indicated.
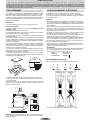
• Cut a hole in the worktop of the dimension shown in the
diagram below.A minimum of 50 mm space should be left
around the hole.
• The worktop should be at least 30 mm thick and made of
heat-resistant material.As shown in the Figure(1)
"The installation must conform to the standard directives."
The manufacturer declines all responsibility for any damage that
may be caused by unsuitable or unreasonable use.
Warning :
• Always check before any electrical operation, the supply tension
shown on the electricity meter, the adjustment of the circuitbreaker, the continuity of the connection to earth to the installation
and that the fuse is suitable.
• The electrical connection to the installation should be made via
a socket with a plug with earth, or via an omnipole cut-out switch
with an opening gap of at least 3 mm.
If the appliance has a socket outlet, it must be installed so that
the socket outlet is accessible.
• The yellow/green wire of the power supply cable must be
connected to the earth of both power supply and appliance
terminals.
• The manufacturer cannot be held responsible for any accidents
resulting from the use of an appliance which is not connected
to earth, or with a faulty earth connection continuity.
• Any queries regarding the power supply cord should be referred
to After Sales Service or a qualified technician.
• If the cable is damaged or to be replaced, the operation must
be carried out the by sale agent with dedicated tools to avoid
any accident.
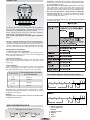
Connection to power supply
The socket shall be connected in compliance with the relevant
standard, to a single-pole circuit breaker. The method of
connection is shown in Figure(3):
Seal
L1
L2
N1
N2
Grey
•You can not build the hob in above an oven with no fan, a
dishwasher, fridge, freezer or washing machine.
• It is essential that the induction hob is well ventilated and
that the air intake and exit are not blocked.
Make sure the hob is correctly installed as shown in Figure(2)
JIKI D HJ
A`i \o`k
JIKI D JJ
JIKI B HJ
The cable must not be bent or compressed.
A`i `ekXb\
NB: For safety, the gap between the hob and any cupboard
above it should be at least 760mm.
• Always use good quality cookware with perfectly flat and
thick bases : using this type of cookware will prevent hot spots
that cause food to stick. Thick metal pots and pans will provide
an even distribution of heat.
• Ensure that the base of the pot or pan is dry : when filling
pans with liquid or using one that has been stored in the
refrigerator, ensure that the base of the pan is completely dry
before placing it on the hob. This will help to avoid staining the hob.
• Use pans whose diameter is wide enough to completely
cover the surface unit : the size of the pan should be no smaller
than the heating area. If it is slightly wider the energy will be
used at its maximum efficiency.
INDUCTION
The following information will help you select the pans best adapted
to obtain good results.
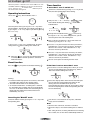
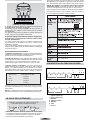
Control unit
USE PROCEDURE
An electronic generator powers a coil located inside the appliance.
This coil creates a magnetic field, so that when the pan is placed
on the hob, it is permeated by the induction currents.
These currents make the pan into a real heat transmitter,
while the glass ceramic hob remains cold.
This system is designed for use with magnetic-bottomed
pans.
Put simply, induction technology has two main advantages :
- as heat is emitted only by the pan, heat is maintained at its
maximum level and cooking takes place without any heat loss.
- There is no thermal inertia, as cooking automatically starts when
the pan is placed on the hob and stops when it is removed.
A HIGH SAFETY APPLIANCE
• Protection from over-Temperature
A sensor monitors the temperature in the cooking zones.
When the temperature exceeds a safe level.the cooking zone
is automatically switched off.
• Residual heat warning
When the hob has been operating for some time,there will be
some residual heat.The letter"H"appears to warn you to keep
away from it.
• Auto shutdown
Another safety feature of the induction hob is auto shutdown.
This occurs whenever you forget to switch off a cooking zone.
The default shutdown times are shown in the table below.
Oem[h b[l[b
R^[ ^[Wj_d] ped[ i ^k j Zemd
Wk jecWj_YWbbo W\j[h
6q:
= ^ek hi
;q65
9 ^ek hi
66q69
7 ^ek hi
6:
6^ek hi
When the pan is removed from the cooking zone, it stops
heating immediately and switches itself off after the buzzer
sounded for one minute.
REMIND:
The patient with a heart pacemaker shall use this product under
the guidance of the doctor.
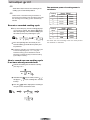
LTYV^ReZT UZRXcR^ `W eYV T`_ec`] aR_V]
RBI647
1
Using good quality cookware is critical for setting the best
performance from your hob.
4
2
RBI637
5 6 7
3
1
HOB COOKWARE ADVICE
5 6 7
3
1. Power regular key
2. Timer regular key
3. Booster
4. Special function
5. Memory
6. Lock
7. On/Off
2
4
E`e fdgUf[a`e Xad Ne W
U^[d j^[ fem[h _i i m_jY^[Z ed1 j^[ Xk pp[h m_bb i ek dZ edY[
WdZ Wbbj^[ _dZ_YWjehi m_bbYec[ ed \eh ed[ i [YedZ WdZ j^[d
]e ek j3 R^[ ^eX _i dem _d i jWdZXo ceZ[3 ObWY[ j^[ fWd _d
j^[ Y[djh[ e\j^[ Yeea_d] ped[3
Operating instructions
1.Press the "
Timer function
If more than 1 zone is switch on :
activate the selected zone by pushing "+" or "-" key of that
zone,the corresponding digits will be flashing.
" key, all the indicators show "--".
--
then press the " + " or " - " timer key
level indicator flashing and showing "
indicator flashes
power
" and the timer
Select the power level by pressing the "+" or "-" key for the
relevant hotplate. To begin with the indicator shows" "or " "
by pressing the "+" or "-" key. Adjust up or down by pressing
the "+" or "-" key.
To begin with the indicator shows" :
",set the time by
pressing the "+" or "-" key. After setting the time, you can
select the power level of the cooking zone.
Then set the time for between 1 minute and 9 hours 59
minutes by pressing the "+" or "-" key.
If you press the "+" and "-" keys simultaneously, the power
setting returns to" "and the cooking zone switches off.
Press the "+" key once increases the time by one minute ;
hold down the "+" key increases the time by 10 minutes ;
When the time exceeds 1 hour, hold down the "+" key
increases the time by 30 minutes .
NB : When the " " key is pressed, the induction hob returns
to standby mode if no other operation is carried out
within two minutes.
Press the "-" key once decreases the time by one minute ;
hold down the "-" key decreases the time by 10 minutes ;
When the time exceeds 2 hours, hold down the "-" key
decreases the time by 30 minutes .
You can set the power level during the timer mode.
Boost function
Press the“
" key, the power level indicator showing "
"
If the timer is set on more than 1 zone:
Timer can be set on all 4 cooking zones. When you set the
time for several cooking zones simultaneously, decimal
dots of the relevant cooking zones are on.
Warning:
1. The boost function only operates for 5 minutes, after which
the cooking zone will revert to its original setting.
2. The boost function works on the all cooking zone.
3. As the boost function of the 1st cooking zone is activated,
the 2nd cooking zone is limited under level 2 automatically,
vice versa. As the boost function of the 3rd cooking zone is
activated,the 4th cooking zone is limited under level 2
automatically, vice versa.
on the timer display will be shown the timer than will expire
first. The dot of the corresponding zone will be on but
flashing.Once the countdown timer expires the
corresponding zone will be switch off. Then it will be shown
the new first expiring timer and the corresponding zone will
have the dot flashing.
Cancelling the "BOOST" mode
Cancel the "Boost" mode by pressing the "+" or "-" key of the
corresponding zone.
If the timer is set but not active on any zone, it will work
simply as timer countdown.
Note:
1. When the timer is 0 minute, the timer is cancelled.
2. When time elapses, the relevant cooking zone is switched
off.
3. After setting the timer, the timing indicator has been flashing
for 5 seconds, the set time will be automatically confirmed.
E`e fdgUf[a`e Xad Ne W
4. In timer mode, pressing the "+" or "-" key of the timer
simultaneously, timer setting returns to"0", time is cancelled.
Memory function
You can use the memory function to store the power level
settings and duration for one zone.
Safety mode
To ensure the safety of children, the induction hob is fitted with
an interlock device.
Lock:
In working mode, press the "
" key, the hob then goes
into the lock mode, timer will display "
rest of the keys are disabled except the "
key, "
Select the desired cooking zone by pressing the "+" or "-"
key, with the power level indicator of that zone flashing,
" and the
" key.
In standby mode, press the "lock" key, the hob then goes
into the lock mode, the timer shows"
" and the rest
of the keys are disabled.The timer shows"
" for a
while and then goes out.
If you press the
while.
Recording
press the" " key, with the timer indictor showing "
",
"
"means "no cooking cycle in memory". hold down the
memory key for 3 seconds, with the timer indicator show
"
", recording is started.
" will be displayed for a
the power level indicator showing "
Unlock:
" and power level
alternately.
Hold down the"Lock" key for 3 second, and the lock
function will be deactivate.
The maximum number of operations is 10 power level
variations in 8 hours. Any power level variation lasting less
than 15 seconds will not be recorded.
Special function
Stop recording
Press again the memory key, "
" will be no more
display on the timer display and the cooking cycle will be
stored
SIMMERING key
MEDIUM key
HIGH key
(level 1)
(level 8)
(level 15)
OR
Ativate the selected zone by pushing "+" or "-".
Switch off the corresponding cooking zone by pressing
"+" and "-" simultaneously or by setting the power level
to , "
" will be no more display on the timer
display and the cooking cycle will be stored.
SUHVVWKH6,00(5,1*NH\WKHLQGLFDWRUZLOOEHVKRZ³´
SUHVVWKH0(',80NH\WKHLQGLFDWRUZLOOEHVKRZ³´
OR
Remove the pan from the corresponding cooking zone.
When the zone detects missing pan,then "
" will
be no more display on the timer display and the cooking
cycle will be stored
SUHVVWKH+,*+NH\WKHLQGLFDWRUZLOOEHVKRZ³´
OR
Do more than 10 power level setting variations, "
will be no more display on
"
E`e fdgUf[a`e Xad Ne W
OR
The maximum power of cooking zones is
as follows:
switch off the hob,in that case the recording of the
cooking cycle is automatically aborted.
OR
VZLWFKRIIWKHDUHFRUGHGFRRNLQJ]RQHEHIRUH
VHFRQGVLQFHWKHVWDUWLQJRIWKHUHFRUGLQJLQWKDWFDVH
WKHUHFRUGLQJRIWKHFRRNLQJF\FOHLVDXWRPDWLFDOO\
DERUWHG
Execute a recorded cooking cycle
Press the memory key, the timer indicator displays
"
",key for 5 seconds, then displays"
". The
zone corresponding at the recorded cooking cycle
will switch on and starts performing the cycle.
,IGXULQJWKHH[HFXWLRQRIDUHFRUGHGFRRNLQJF\FOH
RQWKHFRUUHVSRQGLQJ]RQH³´RU³´NH\WKH
UHFRUGHGFRRNLQJF\FOHLVDERUWHGDQGQRUPDO
PDQDJLQJLVUHVWRUHGDQ\ZD\WKHVWRUHGFRRNLQJ
F\FOHLVNHSWLQPHPRU\
How to record one new cooking cycle
if we have already recorded one:
Activate the cooking zone we want to record by
pressing"+" or "-"
will appear. "
memory".
" key for a while,and the "
Model : RBI647
MehcWb
Beei j
6
2100
3000
7
1500
2000
8
2100
9
1500
3000
2000
Model : RBI637
Heating
zone
MehcWb
6
2200
3000
7
1500
8
2200
2000
3300
Beei j
R^[ WXel[ cWo lWho WYYehZ_d] j e j^[ i _p[ e\ j^[ fWd WdZ
j^[ cWj[h_Wb _j _i cWZ[ \hec
If the corresponding zone was already on, the
recorded cooking cycle will take the priority and
be performed.
Hold down the"
Heating
zone
"
" means "cooking zone stored in
Then the"
" will be displayed,the recording of
the cycle on the selected zone starts.
CLEANING AND MAINTENANCE
• Before carrying out any maintenance work on the hob, allow it
to cool down.
• Only products, (creams and scrapers) specifically designed for
glass ceramic surfaces should be used. They are obtainable
from hardware stores.
• Avoid spillages, as anything which falls on to the hob surface
will quickly burn and will make cleaning more difficult.
• It is advisable to keep away from the hob all substances which
are liable to melt, such as plastic items, sugar, or sugar-based
products.
MAINTENANCE:
- Place a few drops of the specialised cleaning product on the
hob surface.
- Rub any stubborn stains with a soft cloth or with slightly damp
kitchen paper.
- Wipe with a soft cloth or dry kitchen paper until the surface is
clean.
If there are still some stubborn stains:
- Place a few more drops of specialised cleaning fluid on the
surface.
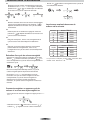
- Scrape with a scraper, holding it at an angle of 30° to the hob,
until the stains disappear.
- Wipe with a soft cloth or dry kitchen paper until the surface is
clean.
- Repeat the operation if necessary.
A FEW HINTS:
Frequent cleaning leaves a protective layer which is essential to
prevent scratches and wear. Make sure that the surface is clean
before using the hob again. To remove marks left by water, use
a few drops of white vinegar or lemon juice. Then wipe with
absorbent paper and a few drops of specialised cleaning fluid.
The glass ceramic surface will withstand scraping from flatbottomed cooking vessels, however, it is always better to lift them
when moving them from one zone to another.
NB:
30° Maxi
Foods cook slowly.
• Improper cookware being used. Pan bases should be flat, fairly
heavy-weight and the same diameter as the heat zone selected.
Tiny scratches (may appear as cracks or abrasions) on the
glass surface of the hob.
• Incorrect cleaning methods, cookware with rough bases, or
coarse particles (salt or sand) trapped between the cookware
and the surface of the hob.
Use recommended cleaning procedures, be sure cookware
bases are clean before use and use cookware with smooth
bases.
Metal markings (may appear as scratches).
• Do not slide aluminium cookware across the surface.
Use recommended cleaning procedure to remove marks.
• Incorrect cleaning materials have been used, spillage or grease
stains remain on the surface, use a razor scraper and
recommended cleaning product.
Dark streaks or specks.
• Use a razor scraper and recommended cleaning product.
Areas of discoloration on cooktop.
• Marks from aluminium and copper pans as well as mineral
deposits from water or food can be removed with the cleaning
cream.
Hot sugar mixtures / plastic melted to the surface.
• See the Glass Hob Cleaning section.
The hob is out of order, or some heat zones do not work.
• The shunt bars are not properly fitted on the terminal block.
Check the connection is made in conformity with the instructions
page 2.
The hob does not operate.
• The control panel is locked. Press the “Locking” button to release.
The hob does not cut off
• The control panel is locked. Press the “Locking” button to release.
Refer to the section, page 5.
The hob stops automatically
• The cooking zones stop automatically if they are left on for too
long. Refer to the section, page 3.
Frequency of on/off operations for cooking zones
• The on-off cycles vary according to the required heat level:
- low level: short operating time,
- high level: long operating time.
Do not use a sponge which is too wet.
Never use a knife or a screwdriver.
A scraper with a razor blade will not damage the surface, as
long as it is kept at an angle of 30°.
Never leave a scraper with a razor blade within the reach of
children.
Never use abrasive products or scouring powders.
AFTERCARE
Before calling out a Service Engineer please check the
following:
— that the plug is correctly inserted and fused;
If the fault cannot be identified:
switch off the appliance — do not tamper with it — call the Aftercare
Service Centre. The appliance is supplied with a guarantee
certificate that ensures that it will be repaired free of charge at the
Service Centre.
PROBLEM SOLVING
The induction hob gives shorings out.
• Normal. The cooking fan of the electronic components is on.
The induction hob gives a light whistling out.
• Normal. According to the working frequency of the inductors, a
light whistling can occur when using several cooking zones on
maximum power.
Cooking zones that do not maintain a rolling boil or a fast
enough frying rate.
• You must use pans which are absolutely flat.
• Pan bottoms should closely match the diameter of the heat zone
selected.
7 GB
This appliance is marked according to the
European directive 2002/96/EC on Waste
Electrical and Electronic Equipment (WEEE).
By ensuring this product is disposed of correctly,
you will help prevent potential negative
consequences for the environment and human
health, which could otherwise be caused by
inappropriate waste handling of this product.
The symbol on the product indicates that this
product may not be treated as household waste.
Instead it shall be handed over to the applicable collection point
for the recycling of electrical and electronic equipment
Disposal must be carried out in accordance with local
environmental regulations for waste disposal.
For more detailed information about treatment, recovery and
recycling of this product, please contact your local city office,
your household waste disposal service or the shop where you
purchased the product.
INSTRUCTIONS GENERALES
LIRE ATTENTIVEMENT LA NOTICE POUR VOUS PERMETTRE DE TIRER LE MEILLEUR PARTI DE VOTRE APPAREIL.
Nous vous conseillons de conserver la notice d'installation et d'utilisation pour toute consultation ultérieure, et de noter ci-dessous, avant
installation de la table, le numéro de série de l'appareil en cas d'éventuelle demande d'intervention du service après-vente.
Plaque signalétique
(située sous le caisson inférieur de la table)
• Pendant son fonctionnement ou dans le cas de l'extinction d'un foyer, tant que l'indicateur de chaleur résiduelle est allumé, il est
vivement conseillé de tenir les enfants à l'écart de la plaque afin d'éviter les risques de brûlure grave.
• Lorsque vous cuisinez avec des graisses ou de l'huile, prenez garde de toujours surveiller le déroulement de la cuisson car les graisses
ou l'huile surchauffées peuvent s'enflammer rapidement.
• La plage de commande de la table est sensible, ne pas placer dessus des récipients chauds.
• Les feuilles d'aluminium et les récipients en matière plastique ne doivent pas être placés sur les surfaces chaudes.
• Après chaque utilisation, un petit nettoyage de la table est nécessaire, pour éviter l'accumulation des salissures et des graisses. Cellesci recuiraient à chaque nouvel usage et se carboniseraient en dégageant une fumée et des odeurs désagréables, sans compter les
risques de propagation d'incendie.
• Ne pas déposer d’objets métalliques tels que couteaux, fourchettes, cuillères ou couvercle sur la table car si leur dimension ou leur
masse métallique est suffisamment importante, ils peuvent s’échauffer et endommager la table.
• Ne jamais cuisiner directement sur la table, employer des récipients.
• Placer toujours la casserole bien centrée sur le foyer utilisé.
• Ne pas utiliser la surface de la table comme planche à découper, ou plan de travail.
• Ne pas faire glisser les casseroles sur la table : risque de rayures.
• Ne pas stocker d'objets lourds au dessus de la table, ils pourraient tomber et endommager la table.
• Ne pas entreposer sur la table des objets quels qu'ils soient.
• Dans le cas improbable où une fêlure apparaîtrait sur le verre, déconnecter immédiatement l'appareil de l'alimentation et adressezvous directement au Service après-vente.
• Cet appareil n’est pas destiné à être utilisé par des personnes (notamment les enfants) incapables, irresponsables ou sans connaissance
sur l’utilisation du produit, à moins qu’elles ne soient surveillées, ou instruites sur l’utilisation de l’appareil, par une personne responsable
de leur sécurité.
• Surveillez les enfants pour être sûr qu’ils ne jouent pas avec l’appareil.
Attention: cet appareil répond à la directive en matière de sécurité et de compatibilité électromagnétique. Toutefois,
il est recommandé que les personnes ayant un stimulateur cardiaque ne s'approchent pas de l'appareil. Il est impossible
de garantir que chaque stimulateur cardiaque sur le marché répond à la directive applicable en matière de sécurité
et de compatibilité électromagnétique et qu'il n'y aura pas d'interférences qui compromettent le fonctionnement correct
de l'appareil. Eventuellement, des dérangements peuvent aussi survenir sur d'autres appareils, tels que des appareils
auditifs.
MODELE
Foyers de cuisson
Alimentation électrique
Puissance totale
électrique (W)
Dimensions de l’appareil
(l x p x h) mm
Dimensions
d’encastrement
(A x B)
RBI647/RCI647IN/RBI647MM
RBI637/RCI637IN/RBI637MM
4 INDUCTIONS (4 Boosters)
3 INDUCTIONS (3 Boosters)
220/240 V - 50/60 Hz
400 V - 50/60 Hz
220/240 V - 50/60 Hz
400 V - 50/60 Hz
7200 W
7000 W
590 X 520 X 55
590 X 520 X 55
560 x 490
560 x 490
Toutes ces caractéristiques sont données à titre indicatif. Soucieux de toujours améliorer la qualité de sa production, le constructeur
pourra apporter à ses appareils des modifications liées à l'évolution technique en respectant les conditions fixées à l'article R 132-2
du Code de la Consommation.
Produit compatible avec les Directives Européennes 73/23/EEC et 89/336/EEC, remplacées par 2006/95/EC et 2004/108/EC,
et les modifications successives.
INSTALLATION
La mise en place fonctionnelle des appareils ménagers dans leur environnement est une opération délicate qui, si elle n'est pas correctement
effectuée, peut avoir de graves conséquences sur la sécurité des consommateurs. Dans ces conditions, il est impératif de confier cette tâche
à un professionnel qui la réalisera conformément aux normes techniques en vigueur. Si malgré cette recommandation, le consommateur
réalisait lui-même l'installation, le constructeur déclinerait toute responsabilité en cas de défaillance technique du produit entraînant ou non
des dommages aux biens et/ou aux personnes.
ENCASTREMENT
LE RACCORDEMENT ELECTRIQUE
Le meuble ou le support dans lequel doit être encastrée la table,
ainsi que les parois du meuble qui pourraient juxtaposer celui-ci,
doivent être d'une matière résistant à une température élevée.
De plus, il est nécessaire que le revêtement qui recouvre le meuble
ou le support soit fixé par une colle résistant à la chaleur afin
d'éviter le décollement.
Installation:
• Un joint d'étanchéité est livré avec la table de cuisson.
Avant encastrement:
• retourner la table face verre vers le bas, en prenant soin de
protéger le verre.
• Placer le joint tout autour de la table.
• Veiller particulièrement à le placer correctement afin d’éviter
toute infiltration dans le meuble support.
• S’assurer que la surface sur laquelle va reposer la table soit
parfaitement plane.
• Les déformations éventuelles provoquées par une mauvaise
pose de la table risquent d’entraver les performances de l’appareil.
• Prévoir un espace de 5 cm minimum entre l’appareil et les parois
verticales avoisinantes.
• La découpe du meuble pour encastrer la table à induction doit
impérativement être conforme aux cotes indiquées sur le dessin.
• Découper une ouverture sur le plan de travail, aux dimensions
spécifiées sur le schéma ci-dessous.
• Pour pourvoir installer correctement la table à induction, vous
devez disposer d’un espace d’au moins 50 mm entre le bord de
la découpe et le mur et/ou les meubles.
• S’assurer que l’épaisseur du plan de travail soit d’au moins
30 mm et que le matériau dont il est fait soit résistant aux hautes
températures. Voir dessin (Fig. 1).
Joint
"L’installation recevant l’appareil cité en référence doit être
conforme à la norme en vigueur dans le pays d’installation.”
Le constructeur décline toute responsabilité en cas de non respect
de cette disposition.
Attention :
• Avant de procéder au raccordement, le technicien doit vérifier
la tension d'alimentation indiquée au compteur, le réglage du
disjoncteur, le calibre du fusible (25 A) et la continuité de la terre
de l'installation.
• Le raccordement électrique au réseau doit être effectué par une
prise de courant avec prise de terre, ou par l'intermédiaire d'un
dispositif à coupure omnipolaire ayant une distance d'ouverture
des contacts d'au moins 3 mm.
Si l'appareil comporte une prise de courant, il doit être installé
de telle façon que la prise de courant soit accessible.
• Le fil de protection vert/jaune doit être relié aux bornes de terre,
de l’appareil d’une part, et de l’installation d’autre part.
• Notre responsabilité ne saurait être engagée pour tout incident
ou ses conséquences éventuelles qui pourraient survenir lors
de l’usage d’un appareil non relié à la terre, ou relié à une terre
dont la continuité serait défectueuse.
• Toute intervention se rapportant au câble d’alimentation doit
impérativement être réalisée par le Service après-vente ou une
personne de qualification similaire.
ATTENTION:
Au cas où il serait nécessaire de remplacer le cable d’alimentation,
les codes couleurs dans le branchement de chacun des fils
doivent être respectées comme ci-dessous :
BLEU
- NEUTRE (N)
MARRON
- PHASE (L)
JAUNE-VERT
- TERRE (
)
RACCORDEMENT ELECTRIQUE
Suivre la procédure comme indiqué ci-dessous (Fig. 3) :
L1
L2
N1
N2
Grey
• L’encastrement de la table de cuisson au dessus d’un four non
ventilé, lave-vaisselle, réfrigérateur, congélateur ou lave-linge
n’est pas possible.
• Toujours s’assurer que la table à induction est bien encastrée
dans le plan de travail et qu’elle est bien ventilée par de l’air
entrant et sortant (Fig. 2).
mini 760 mm
mini 5 cm
SORTIE D’AIR
mini 5 cm
mini 2 cm
PRISE D’AIR
Attention: pour des raisons de sécurité, prévoir un espace d’au
moins 760 mm entre la table de cuisson et le bas des meubles
situés au-dessus.
• Le cordon d’alimentation ne doit être ni plié ni écrasé.
INDUCTION
Récipient
qui transforme
le flux d’induction
en chaleur
Veiller à ce que le fond des récipients soit sec: lors du rem
plissage du récipient ou lorsqu’on utilise une casserole sortant
du réfrigérateur, par exemple, s’assurer que l’ustensile est bien
sec, cette précaution évitera toute salissure sur le plan de cuisson.
• Utiliser des récipients d’un diamètre suffisant pour recouvrir
entièrement le foyer : il convient de veiller à ce que le fond soit
au moins aussi grand que la zone de cuisson. Si le fond est
légèrement plus grand, l’énergie est utilisée de manière optimale.
Les informations suivantes vous aideront à choisir les récipients
les mieux adaptés pour obtenir de bons résultats.
Flux d’induction
Dessus vitrocéramique
Bobine
Module commande/contrôle
PRINCIPE DE FONCTIONNEMENT
Un module électronique alimente et commande électriquement
une bobine située à l’intérieur de l’appareil.
Cette bobine créé un champ magnétique de telle sorte que le
récipient posé sur le support se trouve traversé par des courants
dits “d’induction”.
Ces derniers transforment le récipient en véritable émetteur de
chaleur, le dessus vitrocéramique restant froid.
Ce procédé implique l’utilisation de récipients magnétiques.
Concrètement, la technologie de l’induction conduit à deux
résultats fondamentaux :
- la chaleur n’étant émise que par le récipient, la puissance de
chauffe restituée est maximale et la cuisson s’effectue sans
déperdition calorifique.
- il n’y a pas d’inertie thermique puisque la pose ou le retrait du
récipient sur le support déclenche instantanément le démarrage
ou l’arrêt de cuisson.
UN APPAREIL DE HAUTE SECURITE ....
• Protection anti-surchauffe : un capteur contrôle la température
à l’intérieur de la table de cuisson. S’il relève une chaleur excessive,
la table de cuisson s’éteindra automatiquement.
• Indication de chaleur : lorsque l’utilisation de la table de cuisson
se prolonge dans le temps, la température de la zone de cuisson
s’élève. Dans ce cas, le témoin lumineux “H” s’allume, vous
avertissant ainsi que la surface du foyer est encore chaude.
• Sécurité coupure automatique : une autre sécurité de la
plaque induction est la coupure automatique. Elle fonctionne
lorsque vous oubliez d’éteindre un foyer de cuisson. La coupure
automatique dépend du niveau de puissance et du temps de
fonctionnement, comme indiqué dans le tableau ci-dessous.
Niveau
de puissance
1-5
6-10
11-14
15
La zone de cuisson s’éteint
automatiquement après
8 heures
4 heures
2 heures
1 heures
Lorsqu’une casserole est retirée du foyer de cuisson, il s’arrête
de chauffer immédiatement et s’éteint après un signal sonore
d’une minute.
Rappel : le patient porteur d’un pacemaker peut utiliser la table
de cuisson seulement sous les recommandations du médecin.
LE CHOIX DES USTENSILES
L’utilisation de récipients de qualité est nécessaire
pour obtenir de bons résultats de cuisson.
• Utiliser des récipients de bonne qualité à fond plat et épais:
le fond rigoureusement plat supprimera les points de surchauffe
sur lesquels les aliments attachent, et l’épaisseur du métal
permettra une parfaite répartition de la chaleur.
PRESENTATION DU TABLEAU DE BORD
RBI647
5 6 7
3
1
4
2
RBI637
5 6 7
3
1
1. Power regular key
2. Timer regular key
3. Booster
4. Special function
5. Memory
6. Lock
7. On/Off
2
4
,QVWUXFWLRQVG·XWLOLVDWLRQ
¬ODPLVHVRXVWHQVLRQGHODSODTXHGHFXLVVRQO¶DYHUWLVVHXU
pPHWXQHVRQQHULHHWWRXVOHVYR\DQWVV
DOOXPHQWSHQGDQW
XQHVHFRQGHDYDQWGHV
pWHLQGUH/DSODTXHHVWjSUpVHQWHQ
PRGHGHYHLOOH
3ODFH]ODFDVVHUROHDXFHQWUHGHOD]RQHGHFXLVVRQ
$QQXODWLRQGXPRGH©%2267ª
$QQXOH]OHPRGHERRVWHQDSSX\DQWVXUODWRXFKH©ªRX©ª
GHOD]RQHFRUUHVSRQGDQWH
&RQVLJQHVG
XWLOLVDWLRQ
$SSX\H]VXUODWRXFKH©ªWRXVOHVLQGLFDWHXUVDIILFKHQW
©ª
6pOHFWLRQQH]OHQLYHDXGHSXLVVDQFHHQDSSX\DQWVXUOD
WRXFKH©ªRX©ªSRXUODSODTXHFKDXIIDQWHFRQFHUQpH
/¶LQGLFDWHXUDIILFKHWRXWG
DERUG©ªRX©ªORUVTXHYRXV
DSSX\H]VXUODWRXFKH©ªRX©ª)DLWHVXQUpJODJH
YHUVOHKDXWRXYHUVOHEDVHQDSSX\DQWVXUODWRXFKH©ª
RX©ª
6LYRXVDSSX\H]VLPXOWDQpPHQWVXUOHVWRXFKHV©ªHW
©ªOHQLYHDXGHSXLVVDQFHUHYLHQWj©ªHWOD]RQHGH
FXLVVRQV
pWHLQW
5HPDUTXH6LYRXVDSSX\H]VXUODWRXFKH©ªODSODTXH
jLQGXFWLRQVHUHPHWHQPRGHGHYHLOOHVLDXFXQHRSpUDWLRQ
Q¶HVWHIIHFWXpHGDQVOHVGHX[PLQXWHV
)RQFWLRQERRVW
$SSX\H]VXUODWRXFKH©ªO¶LQGLFDWHXUGHQLYHDXGH
SXLVVDQFHDIILFKH©ª
)RQFWLRQPLQXWHXU
6LSOXVLHXUV]RQHVVRQWDFWLYpHV
DFWLYH]OD]RQHVpOHFWLRQQpHHQDSSX\DQWVXUODWRXFKH©ª
RX©ªGHFHWWH]RQHOHVFKLIIUHVFRUUHVSRQGDQWVFOLJQRWHQW
DSSX\H]DORUVVXUODWRXFKHGHPLQXWHXU©ªRX©ª
O
LQGLFDWHXUGHQLYHDXGHSXLVVDQFHFOLJQRWHHWDIILFKH©ª
HWO¶LQGLFDWHXUGXPLQXWHXUFOLJQRWH
/¶LQGLFDWHXUDIILFKHWRXWG
DERUG©ªDSSX\H]VXUODWRXFKH
©ªRX©ªSRXUUpJOHUOHWHPSV
8QHIRLVOHWHPSVUpJOpVpOHFWLRQQH]OHQLYHDXGHSXLVVDQFH
GHOD]RQHGHFXLVVRQ
5pJOH]DORUVOHWHPSVHQWUHPLQXWHHWKHXUHVPLQXWHV
HQDSSX\DQWVXUODWRXFKH©ªRX©ª
6LYRXVDSSX\H]XQHIRLVVXUODWRXFKH©ªOHWHPSV
DXJPHQWHG¶XQHPLQXWH
6LYRXVPDLQWHQH]ODWRXFKH©ªHQIRQFpHOHWHPSV
DXJPHQWHSDULQWHUYDOOHVGHPLQXWHV
ORUVTXHOHWHPSVGpSDVVHKHXUHVLYRXVPDLQWHQH]OD
WRXFKH©ªHQIRQFpHOHWHPSVDXJPHQWHSDULQWHUYDOOHVGH
PLQXWHV
6LYRXVDSSX\H]XQHIRLVVXUODWRXFKH©ªOHWHPSVGLPLQXH
G¶XQHPLQXWH
VLYRXVPDLQWHQH]ODWRXFKH©ªHQIRQFpHOHWHPSVGLPLQXH
SDULQWHUYDOOHVGHPLQXWHV
/RUVTXHOHWHPSVGpSDVVHKHXUHVVLYRXVPDLQWHQH]OD
WRXFKH©ªHQIRQFpHOHWHPSVGLPLQXHSDULQWHUYDOOHVGH
PLQXWHV
9RXVSRXYH]UpJOHUOHQLYHDXGHSXLVVDQFHHQPRGHPLQXWHXU
$YHUWLVVHPHQW
/DIRQFWLRQERRVWQHIRQFWLRQQHTXHSHQGDQWPLQXWHV
DSUqVTXRLOD]RQHGHFXLVVRQUHYLHQWjVRQUpJODJH
G¶RULJLQH
/DIRQFWLRQERRVWIRQFWLRQQHVXUWRXWHVOHV]RQHVGH
FXLVVRQ
/RUVTXHODIRQFWLRQERRVWGHODqUH]RQHGHFXLVVRQ
HVWDFWLYpHODqPH]RQHGHFXLVVRQVHOLPLWH
DXWRPDWLTXHPHQWVRXVOHQLYHDXHWLQYHUVHPHQW
/RUVTXHODIRQFWLRQERRVWGHODqPH]RQHGHFXLVVRQ
HVWDFWLYpHODqPH]RQHGHFXLVVRQVHOLPLWH
DXWRPDWLTXHPHQWVRXVOHQLYHDXHWLQYHUVHPHQW
6LOHPLQXWHXUHVWDFWLYpVXUSOXVLHXUV]RQHV
/HPLQXWHXUSHXWrWUHUpJOpSRXUOHV]RQHVGHFXLVVRQ
/RUVTXHYRXVUpJOH]OHVWHPSVGHSOXVLHXUV]RQHVGHFXLVVRQ
VLPXOWDQpPHQWOHVSRLQWVGpFLPDX[GHV]RQHVGHFXLVVRQ
FRQFHUQpHVV¶DIILFKHQW
,QVWUXFWLRQVG·XWLOLVDWLRQ
OHWHPSVTXLDSSDUDvWVXUO¶DIILFKHXUHVWFHOXLTXLH[SLUHUD
HQSUHPLHU/HSRLQWGHOD]RQHFRUUHVSRQGDQWHHVWpFODLUp
PDLVFOLJQRWH8QHIRLVTXHOHFRPSWHjUHERXUVGXSUHPLHU
PLQXWHXUHVWWHUPLQpOD]RQHFRUUHVSRQGDQWHV
pWHLQW/H
WHPSVTXLDSSDUDvWVXUO
DIILFKHXUFRUUHVSRQGDORUVDX
SURFKDLQPLQXWHXUjH[SLUHUHWOHSRLQWGHOD]RQH
FRUUHVSRQGDQWHFOLJQRWH
$FWLYH]OD]RQHVpOHFWLRQQpHHQDSSX\DQWVXU©ªRX©ª
$SSX\H]VXUODWRXFKH6,00(5,1*O¶LQGLFDWHXUDIILFKH©ª
$SSX\H]VXUODWRXFKH0(',80O¶LQGLFDWHXUDIILFKH©ª
6LOHPLQXWHXUHVWUpJOpPDLVQ
HVWDFWLIVXUDXFXQH]RQH
LOQHVHUYLUDTXHGHPLQXWHXU
5HPDUTXH
/RUVTXHOHPLQXWHXUHVWVXUPLQXWHLOHVWDQQXOp
8QHIRLVOHWHPSVpFRXOpOD]RQHGHFXLVVRQFRQFHUQpH
V
pWHLQW
8QHIRLVOHUpJODJHGXPLQXWHXUWHUPLQpO¶LQGLFDWHXUGX
PLQXWHXUFOLJQRWHSHQGDQWVHFRQGHVHWOHWHPSVUpJOp
HVWDXWRPDWLTXHPHQWFRQILUPp
(QPRGHPLQXWHXUVLYRXVDSSX\H]VLPXOWDQpPHQWVXU
OHVWRXFKHV©ªHW©ªOHUpJODJHGHODSXLVVDQFH
UHYLHQWj©ªHWOHWHPSVHVWDQQXOp
$SSX\H]VXUODWRXFKH+,*+O¶LQGLFDWHXUDIILFKH©ª
)RQFWLRQPpPRLUH
9RXVSRXYH]XWLOLVHUODIRQFWLRQGHPpPRLUHSRXUVWRFNHUOHV
UpJODJHVGHVQLYHDX[GHSXLVVDQFHHWOHVGXUpHVSRXUXQH]RQH
0RGHGHVpFXULWp
3RXUJDUDQWLUODVpFXULWpGHVHQIDQWVODSODTXHjLQGXFWLRQ
HVWpTXLSpHG¶XQGLVSRVLWLIGHYHUURXLOODJH
9HUURXLOODJH
(QPRGHGHIRQFWLRQQHPHQWDSSX\H]VXUODWRXFKH©ª
ODSODTXHHQWUHDORUVHQPRGHGHYHUURXLOODJHOHPLQXWHXU
DIILFKH©ªHWOHVDXWUHVWRXFKHVVRQWGpVDFWLYpHVj
O¶H[FHSWLRQGHODWRXFKH©ª
(QPRGHGHYHLOOHDSSX\H]VXUODWRXFKH©ORFNªOD
SODTXHHQWUHDORUVHQPRGHGHYHUURXLOODJHOHPLQXWHXU
DIILFKH©ªHWOHVDXWUHVWRXFKHVVRQWGpVDFWLYpHV/H
PLQXWHXUDIILFKH©ªSHQGDQWXQPRPHQWSXLVV¶pWHLQW
6LYRXVDSSX\H]VXUODWRXFKH©ªV¶DIILFKH
SHQGDQWXQPRPHQW
(QUHJLVWUHPHQW
6pOHFWLRQQH]OD]RQHGHFXLVVRQHQDSSX\DQWVXUODWRXFKH
©ªRX©ªO
LQGLFDWHXUGXQLYHDXGHSXLVVDQFHGHFHWWH
]RQHFOLJQRWH
$SSX\H]VXUODWRXFKH©ªO
LQGLFDWHXUGXPLQXWHXUDIILFKH
©ª©ªVLJQLILH©DXFXQF\FOHHQPpPRLUHª0DLQWHQH]
ODWRXFKHGHPpPRLUHHQIRQFpHSHQGDQWVHFRQGHV
O
LQGLFDWHXUGXPLQXWHXUDIILFKH©ªHWO
HQUHJLVWUHPHQW
FRPPHQFH
/¶LQGLFDWHXUGXQLYHDXGHSXLVVDQFHDIILFKHDOWHUQDWLYHPHQW
©ªHWOHQLYHDXGHSXLVVDQFH
'pYHUURXLOODJH
0DLQWHQH]ODWRXFKH©/RFNªHQIRQFpHSHQGDQW
VHFRQGHVSRXUGpVDFWLYHUODIRQFWLRQGHYHUURXLOODJH
)RQFWLRQVSpFLDOH
/HQRPEUHPD[LPDOG¶RSpUDWLRQVHVWGHYDULDWLRQVGH
QLYHDX[GHSXLVVDQFHHQKHXUHV$XFXQHYDULDWLRQGX
QLYHDXGHSXLVVDQFHG¶XQHGXUpHGHPRLQVGHVHFRQGHV
QHVHUDHQUHJLVWUpH
$UUrWGHO¶HQUHJLVWUHPHQW
7RXFKH6,00(5,1*
PLMRWDJHQLYHDX
7RXFKH0(',80
PR\HQQLYHDX
7RXFKH+,*+
pOHYpQLYHDX
$SSX\H]jQRXYHDXVXUODWRXFKHPpPRLUH©ªGLVSDUDvW
GHO
DIILFKHXUGXPLQXWHXUHWOHF\FOHGHFXLVVRQHVWPpPRULVp
,QVWUXFWLRQVG·XWLOLVDWLRQ
28
eWHLJQH]OD]RQHGHFXLVVRQFRUUHVSRQGDQWHHQDSSX\DQW
VLPXOWDQpPHQWVXU©ªHW©ªRXHQUpJODQWOHQLYHDXGH
SXLVVDQFHVXU©ª©ªQHV
DIILFKHSOXVVXUO¶DIILFKHXU
GXPLQXWHXUHWOHF\FOHGHFXLVVRQHVWPpPRULVp
28
5HWLUH]ODFDVVHUROHGHOD]RQHGHFXLVVRQFRUUHVSRQGDQWH
/RUVTXHOD]RQHGpWHFWHO¶DEVHQFHGHFDVVHUROH©ª
GLVSDUDvWGHO
DIILFKHXUGXPLQXWHXUHWOHF\FOHGHFXLVVRQ
HVWPpPRULVp
28
(IIHFWXH]SOXVGHYDULDWLRQVGHUpJODJHGXQLYHDXGH
SXLVVDQFH©ªGLVSDUDvWGHO
DIILFKHXUGXPLQXWHXUHWOH
F\FOHGHFXLVVRQHVWPpPRULVp
(QVXLWHOH©ªV¶DIILFKHHWO
HQUHJLVWUHPHQWGXF\FOHGHOD
]RQHVpOHFWLRQQpHGpPDUUH
/DSXLVVDQFHPD[LPDOHGHV]RQHVGH
FXLVVRQHVWODVXLYDQWH
=RQHGH
FKDXIIH
28
eWHLJQH]O¶LQWHUUXSWHXUGDQVFHFDVO
HQUHJLVWUHPHQWGX
F\FOHGHFXLVVRQVHUDDXWRPDWLTXHPHQWDEDQGRQQp
28
eWHLJQH]XQH]RQHGHFDLVVRQGDQVOHVVHFRQGHVj
SDUWLUGXGpEXWGHO¶HQUHJLVWUHPHQWGDQVFHFDV
O¶HQUHJLVWUHPHQWGXF\FOHGHFXLVVRQHVWDXWRPDWLTXHPHQW
DEDQGRQQp
([pFXWLRQG
XQF\FOHGHFXLVVRQHQUHJLVWUp
$SSX\H]VXUODWRXFKHGHPpPRLUHO¶LQGLFDWHXUGXPLQXWHXU
DIILFKH©ªSHQGDQWVHFRQGHVSXLVDIILFKH©ª/D
]RQHFRUUHVSRQGDQWDXF\FOHGHFXLVVRQHQUHJLVWUpV¶DOOXPH
HWGpPDUUHOHF\FOH
6LOD]RQHFRUUHVSRQGDQWpWDLWGpMjDFWLYpHOHF\FOHGH
FXLVVRQHQUHJLVWUpSUHQGUDODSULRULWpHWVHUDH[pFXWp
6LODWRXFKH©ªRX©ªHVWPDQLSXOpHDXFRXUVGH
O¶H[pFXWLRQG¶XQF\FOHGHFXLVVRQHQUHJLVWUpVXUOD]RQH
FRUUHVSRQGDQWHOHF\FOHGHFXLVVRQHQUHJLVWUpHVW
DEDQGRQQpHWXQHJHVWLRQQRUPDOHHVWUHVWDXUpH
QpDQPRLQVOHF\FOHGHFXLVVRQHQUHJLVWUpHVWFRQVHUYpHQ
PpPRLUH
&RPPHQWHQUHJLVWUHUXQQRXYHDXF\FOHGH
FXLVVRQVLYRXVHQDYH]GpMjHQUHJLVWUpXQ
$FWLYH]OD]RQHGHFXLVVRQjHQUHJLVWUHUHQDSSX\DQWVXU©ª
RX©ª
0DLQWHQH]ODWRXFKH©ªHQIRQFpHXQPRPHQW©ª
V¶DIILFKH©ªVLJQLILH©]RQHGHFXLVVRQPpPRULVpHª
=RQHGH
FKDXIIH
0RGqOHO5%,
1RUPDO
%RRVW
0RGqOHO5%,
1RUPDO
%RRVW
K[i fk _i i WdY[i _dZ_gk w[i f[k l[dj lWh_[h [d \edYj_ed Z[ bW
cWj_vh[ [j Z[i Z_c[di _edi Z[i YWi i [heb[i 3
ENTRETIEN DE LA SURFACE
• Il est important lors du nettoyage de la surface vitrocéramique
de la table, d’attendre le refroidissement complet de cette dernière.
• Seuls les produits spécifiques, pour le nettoyage de la surface
vitrocéramique, crème et grattoir, doivent être utilisés. Vous les
trouverez facilement dans le commerce.
• Eviter les débordements, les salissures qui tombent sur le plan
de cuisson se carbonisent rapidement et sont donc plus difficiles
à nettoyer.
• Il est recommandé de tenir à l’écart du plan de cuisson tout ce
qui susceptible de fondre tels que les objets en matière plastique,
sucre ou produits à forte teneur en sucre.
ENTRETIEN:
- Disposer quelques gouttes d’un produit nettoyant spécifique
pour la surface vitrocéramique.
- Frotter en insistant sur les parties tachées s’il en existe, à l’aide
d’un chiffon doux ou un papier légèrement humide.
- Essuyer avec un chiffon doux ou papier essuie-tout sec jusqu’à
ce que la surface soit nette.
Si après cet entretien courant des taches persistent :
- Disposer à nouveau quelques gouttes d’un produit spécifique.
- Gratter à l’aide d’un grattoir en respectant un angle de 30° par
rapport à la table jusqu’à disparition des taches récalcitrantes.
- Essuyer avec un chiffon doux ou papier essuie-tout sec jusqu’à
ce que la surface soit nette.
- Répéter l’opération si nécessaire.
CONSEILS:
Un nettoyage fréquent laisse une couche protectrice essentielle
pour la prévention des rayures et de l’usure.
S’assurer que la surface soit propre avant de réutiliser la table.
Pour enlever les traces d’eau et de calcaire, utiliser quelques
gouttes de vinaigre blanc, ou jus de citron. Rincer et essuyer à
l’aide d’un papier absorbant puis appliquer quelques gouttes de
produit spécifique et essuyer.
Le verre vitrocéramique supporte le frottement des ustensiles de
cuisson à fond plat, mais il est quand même conseillé de les
soulever pour les déplacer.
NB:
30° Maxi
Eviter d’employer une éponge trop humide.
Ne jamais utiliser un outil en acier tel que couteau ou tournevis.
L’utilisation du grattoir avec lame de rasoir ne peut
endommager la surface si un angle de 30° est respecté.
Ne pas laisser le racloir avec lame de rasoir à la portée des
enfants.
Ne pas utiliser de produits abrasifs ou de poudres récurantes.
Cuissons trop lentes.
• Utilisation de récipients non adaptés. N’utiliser que des ustensiles
avec fond plat et d’un diamètre au moins égal au foyer.
Petites rayures ou éraflures sur la surface vitrée de la table.
• Une mauvaise méthode de nettoyage, ou des récipients avec
fond rugueux sont utilisés, des particules tels que grains de sable,
ou sel se trouvent entre la table et le fond du récipient. Se reporter
au chapitre “Entretien”, s’assurer que les fonds des récipients
sont propres avant utilisation et n’utiliser que des récipients avec
fond lisse. Les rayures peuvent être atténuées seulement si un
bon nettoyage est réalisé.
Marques de métal.
• Ne pas faire glisser des récipients en aluminium sur la table. Se
reporter aux recommandations d’entretien.
• Vous n’utilisez pas les bons matériaux, les taches quelles qu’elles
soient persistent. Aidez-vous d’une lame de rasoir et suivre le
chapitre “Entretien”.
Taches sombres.
• Utiliser une lame de rasoir et suivre le chapitre “Entretien”.
Surfaces claires sur la table.
• Marques provenant de récipient en aluminium ou cuivre, mais
aussi de dépôts de minéraux, de l’eau ou des aliments ; ils peuvent
être enlevés avec de la crème nettoyante.
Caramélisation ou plastique fondu sur la table.
• Se reporter au chapitre “Entretien”.
La table ne fonctionne pas ou certains foyers sont sans
fonction.
• Les barrettes shunts ne sont pas positionnées correctement sur
la plaque à bornes. Faire vérifier que le raccordement est effectué
conformément aux recommandations.
La table ne fonctionne pas.
• Le tableau de bord est verrouillé. Appuyer sur la touche
“Verrouillage”.
La table ne se coupe pas
• Le tableau de bord est verrouillé. Appuyer sur la touche
“Verrouillage”.
La table s’arrête automatiquement
• Les foyers s’arrêtent automatiquement si on les laisse fonctionner pendant une période assez longue. Se reporter au
chapitre “Durée de fonctionnement”.
Fréquence de fonctionnement arrêt/marche sur foyers.
• Les cycles coupure-fonctionnement varient en fonction du niveau
de puissance demandé :
- niveau faible : temps de fonctionnement court,
- niveau élevé : temps de fonctionnement long.
ASSISTANCE TECHNIQUE
Avant d’appeler le Service d’Assistance Technique:
Si la table de cuisson ne fonctionne pas, nous vous conseillons
de :
- vérifier que la fiche soit bien introduite dans la prise de courant;
Si la cause du dysfonctionnement n’est pas trouvée,
- éteindre l’appareil, ne pas y toucher et appeler le Service
d’Assistance Technique.
Veiller à ce que le coupon de garantie fourni avec le produit soit
correctement rempli, avec la date d’achat de la table de cuisson.
PROBLEMES ET SOLUTIONS
La table à induction émet un ronflement.
• Normal. La turbine de refroidissement des composants
électroniques est en fonctionnement.
La table à induction émet un léger sifflement.
• Normal. Etant donné la fréquence de fonctionnement des
inducteurs, un léger sifflement peut se produire lors de l’utilisation
de plusieurs foyers à puissance maximale.
Les foyers ne maintiennent pas les petits bouillons ou friture
peu vive.
• N’utiliser que des récipients à fond plat.
• Le fond du récipient doit recouvrir entièrement le diamètre du
foyer choisi.
Cet appareil est commercialisé en accord avec
la directive européenne 2002/96/CE sur les
déchets des équipements électriques et électroniques (DEEE). En vous assurant que ce produit
est correctement recyclé, vous participez à la
prévention des conséquences négatives sur
l’environnement et la santé publique qui pourrait
être causé par une mise au rebut inappropriée
de ce produit. Le symbole sur ce produit indique
qu’il ne doit pas être traité comme un déchet ménager. Il doit
être rapporté jusqu’à un point de recyclage des déchets électriques
et électroniques. La collecte de ce produit doit se faire en accord
avec les règlementations environnementales concernant la mise
au rebut de ce type de déchets.
Pour plus d’information au sujet du traitement, de la collecte et
du recyclage de ce produit, merci de contacter votre mairie, votre
centre de traitement des déchets ou le magasin où vous avez
acheté ce produit.