1
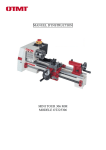
4" MCB100A Metal
Cutting Bandsaw
700247
User Manual
W
Axminster Reference No:MCB100A
w w w. a x m i n s t e r. c o . u k
AXMINSTER
W H I T E
Table of Contents
1 General Safety Rules……………………………………………………………1
Electrical Schematic………………………………………………………………2
2 The Quick Vise and Work Set Up……………………………………………...3
3 Special Safety Rules for Metal Saw…………………………………………...4
Before Using the Saw……………………………………………………………..4
Before Each Use…………………………………………………………………..4
Whenever Saw is Running……………………………………………………….5
4 Power Supply……………………………………………………………………..6
Motor Specifications………………………………………………………………6
Earth………………………………………………………………………………...6
Motor Safety Protection…………………………………………………………...6
Wire Sizes………………………………………………………………………….7
5 Unpacking and Checking Contents……………………………………………7
Tools Needed for Assembly……………………………………………………….7
6 Description and Characteristics………………………………………………8
7 Operating…………………………………………………………………………..9
Rate of Feed ………………………………………………………………………9
Angle Cutting………………………………………………………………………9
Blade Direction of Travel………………………………………………………….9
Changing Blade …………………………………………………………………..10
Vertical Cutting…………………………………………………………………….11
Magnetic Switch…………………………………………………………………..11
8 Adjustment……………………………………………………………………….12
Adjusting Blade Guide……………………………………………………………12
Adjusting Poor Cutting……………………………………………………………12
Maintain Gear Transmission…………………………………………………….13
Blade Tension Adjustment……………………………………………………….13
9 Part List ………………………………………………………………………..14~17
1. General Safety Rules
WARNING
1. Read and understand instructions of this
manual entirely before operating the
machine.
2. Always wear approved safety glasses
/face shields when using the machine.
3. Make certain the machine is properly
grounded.
4. Before machine in operation, remove ties,
rings, watches, other jewelry, and roll
your sleeves up to above elbows.
Remove loose clothing and confine long
hair.
5. Keep the floor around this machine clean
and free of scrap material, oil and grease.
6. Keep machine guards in place at all
times when the machine is in use. If it
removed for maintenance purpose, pay
extra attention and replace these guards
at once.
7. Do not over reach. Keep a balanced
stance all the time so that your don’t fall
lean against blade or some other moving
parts.
8. Whenever make any adjustments or
maintenance with the machine must
unplugged the power source
9. Use the right tool. Don’t force a tool or
attachment to do a job that it was not
designed for.
10. Replace warning labels if they have
become obscured or removed.
11. Make certain the motor switch is in “off”
position while connecting the machine
into the power supply.
12. Pay your work undivided attention.
Looking around, and carrying on a
conversation, or “ horse-play ” are
careless acts which might result in
serious injury.
13. Keep visitors a safe distance from the
work area.
14. Use recommended accessories, and
parts. Improved accessories may be
hazardous.
15. Form the good habit of checking to see
keys and wrenches are removed before
turning on this machine,
16. Always keep hands & fingers away from
the black when this machine is running.
17. Never hold a material with this saw in the
horizontal position. Please be sure
always use the vise to clamp it securely.
18. Read and understand warnings that
posted on the machine.
19. Always provide necessary support for
long and heavy material
20. Use a sharp blade and always keep
machine clean for a best and safest
performance.
21. Failure to comply with any of these
warnings may cause serious injury.
BEFORE CUTTING
Loosen the lock plate (A) in Fig 1 to
release this saw. After service, must
replace the lock plate, and fasten it
properly for your safety and carry.
Failure to comply with the warning
could result in personal injury and
machine damage.
2.The Quick Vise And Work
Set Up
Fig. 1
USAGE OF THE QUICK VISE
Novel and improved “quick action” vise has
been mounted on the machine. Three pieces
of devices & one handle simply solve all the
troubles you have met in the past. Follow the
easy steps as below. You’ll thank for the
design we made for your convenience.
1. Lift up the handle (A) in Fig. 2 then you
can move the vise forward and backward
with ease by holding the wheel (B) at the
left end of base.
2. Push the vise jaw (C) toward the work,
make it as close as possible against the
other vise jaw which is fixed.
CAUTION !
NEVER OPERATE SAW
BLADE GUARDS IN PLACE
WITHOUT
WORK SET UP
1. Raise saw head to vertical position.
2. Open vise to accept the piece to be cut
by pulling the wheel at the end of the
base.
3. Place work piece on saw bed if the piece
is long, support the end.
3. Replace handle by pressing it down.
4. Turn the wheel (B) clock-wise to make
sure the work is well located. During
operation, you shall find it more
convenient & more powerful to fulfill the
clamp job than any of traditional ones
could offer.
Fig. 2
3.Special Safety Rules For
Metal Saw
WARNING: For your own safety, do
not operate your metal saw until it is
completely assembled and installed
according to the instructions…and until
you have read and understood the
following.
Before using the saw:
1. Assembly and alignment.
2. Learn the function and proper use of:
A. The on-off switch.
B. The upper and lower blade guards.
C. The arbors lock and handle latch.
D. The bevel clamp, fence clamps, and
metal lock handle.
3. Read and understand all safety
instructions and operating procedures
throughout the manual.
4. Read the warning label on the metal saw.
Before each use:
1. Inspect your saw. If any part of this metal
saw is missing, or bent, or has failed in
any way, or any electrical parts do not
work properly, turn the saw off and
unplug the saw. Replace damaged,
missing, or failed parts before using the
saw again.
2. Plan your work to protect your eyes,
hands, face and ears.
A. Wear safety goggles (not glasses)
that comply with DIN58214 (show on
package). Using any power tool can
result in permanent eye damage.
Goggles are available at stores. Use
of glasses or use of goggles not in
compliance with DIN58214 could
result in severe injury form breakage
of the eye protection.
B. For dusty operations, wear a face
shield along with safety goggles.
C. To avoid injury from jams, slips or
thrown piece:
It is important to choose the right
blade for the material and the type
of cutting you plan to do. This saw
is equipped with a bi-metallic blade
which can be used to cut stainless
steel, steel, iron, brass, aluminum,
wood, plastic and so on.
• Make sure the direction of rotation
arrow on the blade matches the
direction arrow on the saw. The
blade teeth should always point
downward at the front of the saw.
• Make sure the blade is sharp,
undamaged and property aligned,
with the saw unplugged, push the
power-head all the way down.
Head spin the blade and check for
clearance. Tilt the power-head to
45 degree level and repeat the
check. If the blade hits anything,
make the adjustments shown in the
Maintaining
Maximum
Cutting
Capacity section.
• Make sure the blade and arbor
collars are clean.
• Make sure all clamps and locks are
tight and there is no excessive play
in any parts.
• Never cut EREEHAND:
a. Brace your workpiece solidly
against the fence and table top so it
will not rock or twist during the cut.
Make sure no debris is caught
beneath the workpiece.
b. Make sure no gaps between the
workpiece , fence and table will let the
workpiece shift after it is cut in two.
c. Use jigs, fixture or a different tool for
unstable workpieces.
• Never cut more than one workpiece at a
time.
• Make sure the cut-off piece can move
sideways after it is cut off. Otherwise, it
could get wedged against the blade and
thrown violently.
• Make sure bystanders are clear of the
tool and workpiece. Keep them clear of
the area behind the saw where debris will
be thrown.
• Never turn your metal saw “ON” before
clearing everything except the workpiece
and related support devices off the able.
D. To avoid risk of hearing damage, war ear
plugs or muffs during extended period of
operation.
E. To avoid being suddenly pulled into the
blade.
1. Do not wear gloved.
2. Remove all jewelry and loose clothing.
3. Tie back long hair.
4. Roll long sleeves above the elbow.
F. To avoid injury from accidental starting,
always unplug saw before disconnecting
the guard, installing or removing any
blade, accessory or attachment, or
making any adjustment.
G. To avoid an electrical shock, make sure
your fingers do not touch the metal
prongs on the plug when inserting or
removing the plug to or from a live outlet.
H. Never put lubricants on the blade while it
is spinning.
I. To avoid burns or other fire damage,
never use the saw near flammable liquids,
vapors or gases.
J. To avoid injury from unsafe accessories
use only accessories shown on the
recommended accessories list in this
manual.
Whenever saw is running
WARNING: Do not allow familiarity
(gained from frequent use of your
metal saw) to cause a careless
mistake. Always remember that a
careless fraction of a second is
enough to cause a severe injury.
1. Before actually cutting with the saw, let it
run for a while. If your saw makes an
unfamiliar noise or if it vibrates
excessively, stop immediately. Turn the
saw off. Unplug the saw. Do not restart
until finding and correcting the problem.
2. Never confine the piece being cut out.
Never hold it, clamp it, touch it, or use
length stops against it. It must be free to
move sideways. If confined, it could get
wedged against the blade and thrown
violently.
3. Avoid awkward hand positions where a
sudden slip could cause a hand to move
into the blade.
4. Let the blade reach full speed before
cutting.
5. Feed the saw into the workpiece only fast
enough to let the blade cut without
bogging down or binding.
6. Before freeing jammed material, release
switch and unplug the saw. Wait for all
moving parts to stop.
7. After finishing a cut, keep holding the
power head down, release the switch,
and wait for all moving parts to stop
before moving your hands.
WARNING: Read the following warning
labels found on the front of the saw.
DANGER
•
•
•
•
Keep hands out of sawblade path.
Never cut anything freehand.
Never reach behind or beneath blade.
To avoid electric shock, do not expose to
rain.
• Tighten arbor screw and all clamps before
turning power on.
4.Power Supply
Motor specifications
The AC motor used in this saw is a
conduction, nonreversible type having the
following specifications:
Maximum capacity (KW)
0.375
Voltage (V)
230
Amperes (A)
2.23
Frequency (Hz)
50
Motor speed (RPM)
1430
Earth
This metal saw is single insulated tool, so the
earth system is provided to protect you from
being shocked. The appropriate earthing
system is set up as soon as this machine is
plugged into the proper power supply system.
Therefore, the standard power supply system,
shall be provided for this machine in order to
protect you from the risk of shock.
DANGERA: To avoid electric shock
1. Do not change the power cord and
plug into another specification
provided by the manufacturer.
2. Do not use in rain or where floor is
wet. This tool is intended for indoor
residential use only.
Motor safety protection
CAUTION: To avoid motor damage,
this motor should be blown out or vacuumed
frequently to keep sawdust from interfering
with normal motor ventilation.
1. If the motor does not start, release the
trigger switch immediately. UNPLUG
THE TOOL. Check the saw blade to
make sure it turns freely. If the blade is
free, try to start the motor again, if the
motor still does not start, refer to the
“Motor Trouble Shooting Chart”.
2. If the motor suddenly stalls while cutting
wood, release the trigger switch, unplug
the tool, and free the blade from the wood.
Then you may restart the motor and
finish the cut.
3. Fuses may “blow” or circuit breakers may
trip frequently if:
a. Motor is overloaded-overloading can
occur if you feed too rapidly or made
too many start/stops in a short time.
b. Voltage not more than 10% above or
below the nameplate voltage can
handle normal loads, for heavy loads,
however, the voltage (caused by a
small size wire in the supply circuit or
an overly long supply circuit wire)may
drop too low for the motor to operate.
Always check the connections, the load
and the supply circuit whenever motor
does not work well. Check wire sizes
and length with the Wire Size Chart
below.
4. Most motor troubles may be trace to
loose or incorrect connections, overload,
low voltage (such as small size wire in
the supply circuit) or to overly long supply
circuit
wire.
Always
check
the
connections, the load and the supply
circuit whenever motor doesn’t work well.
Check wire sizes and length with the
Wire Size Chart below
Wire sizes
The use of any extension cable will cause
some loss of power. To keep this to a
minimum and to prevent overheating and
motor burn-out, use the table below to
determine the minimum wire size (lead
cross-section) of an extension cable. For
circuits that are more than 40m away from
the electrical service box, the wire size must
be increased proportionately in order to
deliver ample voltage to the saw motor.
Length
of
the
conductor
Up to 15m
15-40m
Wire
Sizes
Required For 230V
1.5mm2
2.5mm2
ITEM
Contents
the Metal Saw is shipped complete in one
carton. Separate all parts from packing.
Material and check each item with illustration
and “Table of Loose Part”. Make certain all
items are accounted for, before discarding
any packing material.
WARNINGA: If any parts are
Q’TY
A
Basic Saw Assembly
1
B
Stop Rod Assembly
1
C
Saw Head Knob
1
D
5.Unpacking And Checking
TABLE OF LOOSE PARTS
E
90º Support Bar Assembly
Instruction Manual
1
1
Tool needed for assembly
Note: The shown tools are not standard
deliver with this saw.
Medium Screwdriver
Adjustable Wrench
missing, do not try to assembly the
metal saw, plug in the power cable
or turn the switch on until the
missing parts are obtained and
installed correctly.
Combination Square
13mm Hex. Soc. ”L” Wrench
6.
Description
And
Characteristics
unusual happens on your gear
transmission system, do not try to fix or
restore it personally. Send it back to your
dealer for check-up or repairmen. Failure
to comply can result in machine damage.
1. This 4” portable band saw is made as
light as 31kgs by weight & equipped with
an easy carrying handle for your fitness
to transport to any worksites.
6. The machine combines miter, vertical
and horizontal cutting and is designed for
full efficiency & operator convenience in
each position.
2. The body of this machine is formed with
Aluminum Die Casting (Alum Casting is
optional) such that body construction of it
becomes sturdier and appearance
smoother and more acceptable.
7. An auto shutoff assures the complete cut
work,
thus
permitting
unattended
operation.
3. During operation, the noise level of this
machine is about 80 dB which is mush
less than any of the other band saws, and
of course, it can present a comfortable
working environment.
4. This machine is made ready for the blade
tension adjustment by holding the handle
to give a little turn for the tension
increasing, or decreasing as you wish
during the period of blade replacement or
machine in operation. Also attached with
the handle, there are a couple of
compression springs set up for reducing
vibration that is from a defective
workpiece popping while machine is
running. It permits the blade to be used
much longer.
5. The drive of this machine is through gear
transmission that gives steadier, stronger,
and smoother cuts superior to any of
pulley drive band saws, and make less
trouble after service. Note: if anything
WARNING
SHUT OFF THE POWER SOURCE
AT ALL THE TIME, BEFORE THE
MACHINE IS IN MAINTENANCE,
OPERATION, ADJUSTMENT, OR
REPAIRMENT.
WARNING
Disconnect machine from the power
source!
No matter when, where, or how. Pay
extra attention to the saw during it in
transportation,
operation,
maintenance, or adjustment.
Failure to comply may cause serious
injury!
7.Operating
INFORMATION BEFORE OPERAION
3. If the pointer is matched by the right
degree on the scale. Tighten the bolt, and
a perfect angle cut will be given.
Be sure the table isn’t in contact with the
work when the motor is started.
Run the motor, allow the saw to come to full
speed. Begin the cut by letting the head
down slowly onto the work.
DO NOT DROP OR FORCE. Let the weight
of the saw provide the cutting force. The saw
shuts off at the end of the cut automatically.
RATE OF FEED
The rate of feed is preset (On Mark H) at the
factory for solid metal material cutting.
Fig. 3
To decrease feed, proceed as follows:
1. Release the lock-pin by pulling up the
Knob (A) in Fig. 3 a little bit.
2. Turn the wheel (B) toward the Knob and
stop on the Mark M, let the lock pin slide
in the slot. The rate of feed is for thick
metal pipes cutting.
3. Turn the wheel and stop on the Mark L
and lock it on the position, the rate of
feed is for thin metal pipes cutting.
ANGLE CUTTING
The machine uses a swivel miter base for
angle cutting from 0~45 degree. On the
swing arm, there is a pointer (A) in Fig. 4
attached. This machine is preset zero degree
before leaving the factory. Angle cutting is
adjusted as follows.
1. Loosen bolt (B) to release the arm.
2. Move this swivel arm forward along the
scale that is for searching a right angle
for the work to be cut.
Fig. 4
B L A D E D I R E C T I O N O F T R AV E L
Be sure this blade is assembled to the
wheels such that the vertical edge can
engage the work piece first.
!
WARNING
Disconnect machine from the power
source!
guide bearings. Make sure the teeth of
blade face down toward the bed
No mater when, where, or how. Pay
extra attention to the saw during it in
transportation, operation, maintenance,
or adjustment.
6. Fasten the tension handle clockwise
move the blade by pulling it down with
one hand and it will be tracked onto
wheels properly.
7. Replace blade cover (G) and guards. And
start the machine to see that the blade
runs properly.
Failure to comply may cause serious
injury!
CHANGING BLADE
1. Raise this saw head up-to 90 degree by
lifting up knob (A) in Fig. 5 a little bit to
release the lock-pin, and slide it into the
slot that is made for setting the saw arm
in vertical position.
2. Remove this blade guards (B), and blade
cover by loosening two bolts (C) on the
saw frame.
3. Push tension handle (D). Counter wise to
let the blade slip off.
4. Remove blade from both wheels (E), and
blade guide bearing (F).
5. Place a new blade on the flanges of
wheels but not too tight, twist blade
slightly and let it slip into between each of
Fig. 5
VERTICAL CUTTING
1. Fasten the supporting bar (A) in Fig. 6
into the slot at the saw head.
2. Raise saw head to vertical position by
lifting up the knob (B) a little to release
the lock-pin and slide it into the slot which
is set for 90 degree.
3. Remove the small plate (C).
4. Before cutting a bigger work, take away
the carrying handle (E). After service,
replace the handle.
Fig. 6
Caution: Be sure that the machine is
disconnected from the power source
before attempting to service or take
any component away!
MAGNETIC SWITCH
The band saw is equipped with TRIPUS
magnetic switch which is designed for
operating safety. After power failure, the
machine has to be restarted by opening the
cover and pushing the inner “ ON “ button.
There is a red button attached on the switch
cover, depress it to stop all machine functions
if emergency. This magnetic switch also
connects with the limit switch at the back of
bed, when the work piece is completely cut,
both switches will shut off automatically.
MAGETIC SWITCH
8.Adjustment
ADJUSTING BLADE GUIDE
An unbounded handle is mounted on the unit
for freely changing direction by lifting it up
and turning a little bit. It’s designed for your
convenience to adjust blade guide easily and
quickly at any time, and under any situation.
Adjustment of this blade guide is in
accordance with the sizes of work pieces.
The only one located at the left of the saw
head can be adjusted and the other is fixed.
Fig.7
1. If the work is big, loosen the handle (A) in
Fig.7. move the guide toward the work
about one inch then tighten the handle.
1. Bad cuts due to blade worn, replace a
new blade.
2. When cutting a small work, move the
guide toward the work as close as it can
be. Both cuttings will present you
satisfactory jobs.
2. The saw uses fixed ball bearings. For
keeping proper cutting, the best way is to
replace them every three or six months
depending on the frequency of service.
WARNING
Do not make any adjustments, or load,
unload work from vise when machine is
running!
3. Poor cuts can be made because the fixed
nut (A) is getting loose. Then tighten it
properly.
ADJUSTING POOR CUTTING
The machine has been adjusted and
power-tested with several test cuts before
leaving the factory to insure proper cutting. If
there is any poor cuts occurred, correct it as
follows.
MAINTAIN GEAR TRANSMISSION
The gears of the transmission system
equipped with this machine are made of a
special kind of steel.
WARNING
SHUT OFF THE POWER SOURCE
BEFORE MACHINE IS RUNNING
ADJUSTMENT, MAINTENANCE, OR
REPAIRMENT.
The quality insures that the gears will be
more sturdy and durable. In order to keep the
performance as perfect as they are designed
for. We suggest that a lubricant shall be
required for them every three months. To
fulfill the job follow the steps as below.
1. Loosen the screw (A) in Fig. 8 with a
8mm Hex. wrench.
2. Remove the wheel (B), then lubricate the
gears with Anti-high heat grease.
3. Replace this wheel with care, then tighten
the screw (A) properly.
Fig.8
BLADE TENSION ADJUSTMENT
The tension device of this machine is
designed for the ready service basis. All you
have to do is hold the handle (B) in Fig. 6 to
control blade tension by giving turn to
increase or decrease tension as you wish
during machine in operation. The major
function of it is to present a perfect cut,
because it can make the blade work on
constant tension. Furthermore, attached with
the tension system, there are a couple of
compression springs which are made for
decreasing the blade backlash. Consequently,
it is for sure to extend life of the blade.
BEFORE STARTING
MAKE SURE LOOSEN THE LOCK
PLATE BETWEEN THE SAW ARM AND
BED TO RELEASE THE SAW. AFTER
SERVICE, REMEMBER IT MUST BE
REPLACED BACK FOR SAFETY AND
EASY CARRYING.
Part
PART
NO.
1
2
3
4
5
6
7
8
9
10
11
12
13
14
15
16
17
18
19
20
21
22
23
24
25
26
27
28
29
30
31
32
33
34
35
36
37
38
39
40
41
42
43
44
45
46
47
DESCRIPTION
Base
Transport Lock
Thick Washer (large) 6mm
Hex. Bolt M6x25
Set Cap Nut
Hex. Bolt M6x12
0º~45º Lock Washer
Stop Rod
Stop Block
Thumb Screw
Hex. Soc. Screw M6x12
Spring
Nut
Wheel Handle
Hand Wheel
Hex. Soc. Screw M6x6
Hex. Bolt M8x16
Washer 8mm
Nut Seat
Hex. Soc. Screw M5x12
Nut M5
Eccentric Shaft
Eccentric Handle
Key 5x5x15
Lead Screw
Vise Jaw (Left)
Hex. Soc. Screw M5x16
Nut M5
Hex. Bolt M6x12
Washer 6mm
Set Plate
Square Guard Tube
Screw M6x30
Vise Jaw (Right)
Washer 10mm
Hex. Bolt M10x20
Set Cover
Bushing
Spring
Pin
Hex. Bolt M6x12
Washer (large) 6mm
Nut M8
Spring Adjusting Plate
Hex. Soc. Screw M8x30
Spring Set Seat
Spring
Q’TY
1
1
1
1
1
2
1
1
1
1
1
1
1
1
1
1
2
2
1
1
1
1
1
1
1
1
1
1
2
2
1
2
2
1
2
2
1
1
1
1
1
1
1
1
1
1
1
List
PART
NO.
48
48-1
49
50
51
52
53
54
55
56
57
58
59
60
60-1
60-2
61
62
63
64
65
66
67
67-1
68
69
70
71
73
74
74-1
75
76
77
78
79
80
81
82
83
84
84-1
85
86
87
88
89
DESCRIPTION
Q’TY
Cut Off Power Cam
Screw M8x10
Key 4x4x20
Joint Shaft
Key 4x4x12
Screw M6x10
Support Plate
Swivel Support Elbow
Hex. Soc. Screw M8x20
Spring Washer 8mm
Hex. Soc. Screw M8x40
Flat Washer
Nut 8mm
Hex. Bolt M8x45
Hex. Bolt M8x35
Nut 8mm
Flat Washer
Swivel Miter Base
Hex. Bolt
Cross Screw M5x16
Limit Seat
Bushing
Washer δ1.5
Flat Washer δ3
Hex. Soc. Screw M8x20
Spring Pin 3x20
Set Pin
Spring
Set Knob
Cross Screw M5x10
Washer 5mm
Pointer
Plate
Cross Screw M4x10
Cross Screw M5x30
Limits Switch
Switch Plate
Cross Screw M5x10
Hex. Soc. Screw M5x25
Ball Bearing 625z
Spring Washer 5mm
Washer 5mm
Cross Screw M4x6
Blade Guard (Left)
Adjustable Bracket (Left)
Saw Head Knob
Nut M8
1
1
1
1
1
2
1
1
1
1
1
1
1
1
1
1
1
1
1
4
1
2
1
1
1
1
1
1
1
1
1
1
1
4
2
1
1
2
2
4
2
2
2
1
1
1
1
Part
PART
NO.
90
91
92
93
94
95
96
97
98
99
100
100-1
101
102
103
104
105
106
107
108
112
113
114
115
116
117
118
119
120
121
122
123
124
125
125-1
125-2
125-3
126
126-1
126-2
126-3
127
128
129
130
131
131-1
DESCRIPTION
Blade Tension Handle Shaft
Blade Wheel Seat Tooth
Blade Wheel Swat
Nut M6
Blade Tension Block
Compression Spring Lock Bolt
U-Shape Plate
Compression Spring
Hex. Bolt M6x10
Guide Plate
Blade wheel Shaft (Left)
Screw M6x12
Blade wheel (Left)
Ball Bearing 6003z
C-Ring 35
Washer (Large) 8mm
Spring Washer 8mm
Hex. Bolt M8x45
Cross Screw M5x10
Blade Cover
Hex. Bolt M8x50
Spring Washer 8mm
Washer (Large) 8mm
Blade
C-Ring 35
Ball Bearing 6003z
Rubbing Ring
Blade Wheel (Right)
Felt Pad
Down Speed Cog
Hex. Soc. Screw M6x12
Blade Wheel Shaft (Right)
Saw Arm
Motor Shaft
Washer
Centrifugal Switch
Cross Screw M4x6
Motor Case
Motor Shell
Washer 6mm
Cross Screw M6x6
90º Support Bar
Nut M10
Hex. Soc. Screw M5x16
Spring Washer 5mm
Magnetic Switch
Capacitor
Q’TY
1
1
1
2
1
2
1
2
4
2
1
2
1
2
1
1
1
1
2
1
1
1
1
1
1
2
1
1
1
1
3
1
1
1
1
1
2
1
1
1
1
1
1
4
4
1
1
List
PART
NO.
132
132-1
133
134
135
136
136-1
137
142
143
144
145
146
147
148
149
150
150-1
151
152
153
154
155
156
157
158
158-1
159
160
161
162
162-1
163
165
166
167
168
169
DESCRIPTION
Switch Case
Cross Screw ST 4x10
Cross Screw M5x10
Nut M12
Washer (Large) 12mm
Ball Bearing 625z
Round Key
Carry Handle
Cross Screw M4x10
Blade Cover (Right)
Hex. Bolt M8x20
Spring Washer 8mm
Ball Bearing Seat
Ball Bearing 625z
Round Key
Hex. Bolt M6x25
Spring Washer 5mm
Flat Washer 5mm
Ball Bearing 625z
Hex. Soc. Screw M5x25
Ball Bearing Protecting Plate
Screw M6x10
Hex. Soc. Screw M5x12
Blade Tension Adjustable Handle
Bushing
Hook
Washer 8mm
Hex. Bolt M8x12
Knob M8x25
Washer 8mm
Power Cord
Wire
Scale
Nut M10
Hex. Bolt M10x30
Iron Box
Screw M5x10
Plate
Q’TY
1
2
4
1
1
1
1
1
2
1
2
2
1
2
2
2
2
2
4
2
1
2
1
1
1
1
1
1
1
1
1
1
1
1
1
1
2
1
MCB100A Metal Cutting Bandsaw
700247
Axminster Reference No:MCB100A
W
Axminster Devon EX13 5PH UK
AXMINSTER
W H I T E
FREEPHONE 0800 371822
www.axminster.co.uk