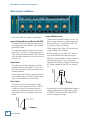
1
USER’S GUIDE
DSR-1 De-Esser
plug-in
For Tracktion 2
DSR-1 De-Esser plug-in for Tracktion
Mackie Software License
Please read this license carefully before using the
accompanying Software. By downloading and using the Software, you are agreeing to be bound
by the terms of this license. Software as used
herein means all computer code (both source and
object) including, but not limited to, all interfaces,
navigational devices, search engines, databases,
menus, menu structures or arrangements, drivers,
development tools, icons, operational instructions,
scripts, commands, and syntax, whether created,
or licensed from third parties by LOUD Technologies Inc., including all associated documentation.
1. Software License. Any Software whether on
disk, in read-only memory, or on any other media,
and related documents are licensed to you by
LOUD Technologies Inc. You own the disk(s) on
which the Software is recorded but LOUD Technologies and/or LOUD Technologies’ Licensor(s)
retain all rights, title, and interest to the Software
and related documentation. This License allows
you to use the Software on a single computer and
make one copy of the Software in machine-readable form for backup purposes only. You must
reproduce on such copy LOUD Technologies’ copyright notice and any other proprietary legend on
the original copy of the Software.
2. Restrictions on Software Use. The Software
contains copyrighted material, trade secrets and
other proprietary material and in order to protect
them you may not decompile, reverse engineer,
disassemble or otherwise reduce the Software to
human-perceivable form, or in any way analyze or
utilize in a manner inconsistent with this license,
or allow a third party to do so. You may not modify,
network, rent, lease, loan, distribute, create derivative works, or use the Software to create a
compilation based upon the Software in whole or
in part. You may not electronically transmit the
Software from one computer to another over a network or other means of transmission.
3. Support. You acknowledge and agree that LOUD
Technologies may not offer any technical support
in the use of the Software.
4. Termination. This License is effective until terminated. You may terminate this License at any
time by destroying the Software and related documentation and all copies thereof. This License will
terminate immediately without notice from LOUD
Technologies if you fail to comply with any provi-
2
User’s Guide
sions of this License. Upon termination you must
destroy the Software and related documentation
and all copies thereof.
5. Export Law Assurances. You agree and certify
that neither the Software nor any other technical
data received from LOUD Technologies, nor the
direct product thereof, will be exported outside
the United States except as authorized and as permitted by the laws and regulations of the United
States and with LOUD Technologies’ express permission.
6. Government End Users. If you are acquiring
the Software on behalf of any unit or agency of the
United States Government, the following provisions apply. The Government agrees:
(i) if the Software is supplied to the Department of
Defense (DOD), the Software is classified as “Commercial Computer Software” and the Government
is acquiring only “restricted rights” in the Software and its documentation as that term is defined
in Clause 252.227-701(c)(1) of the DFARS; and
(ii) if the Software is supplied to any unit or
agency of the United States Government other
than DOD, the Government’s rights in the Software and its documentation will be defined in
Clause 52.227-19(c)(2) of the FAR or, in the case
of NASA, in clause 18-52.227-86(d) of the NASA
supplement to the FAR.
7. Limited Warranty on Software Media (if
provided on disks). LOUD Technologies Inc.
warrants the disks on which the Software is recorded to be free from defects in materials and
workmanship under normal use for a period of
ninety (90) days from the date of purchase as evidenced by a copy of the purchase receipt. LOUD
Technologies’ entire liability and your exclusive
remedy will be the replacement of the defective
disk when it is returned postage prepaid to LOUD
Technologies at the address below or a Mackie
authorized representative with a copy of the
purchase receipt. LOUD Technologies will have
no responsibility to replace a disk damaged by
accident, abuse or misapplication. THIS WARRANTY SPECIFICALLY EXCLUDES ANY OTHER
WARRANTY RELATED TO SOFTWARE MEDIA,
INCLUDING, BUT NOT LIMITED TO, ANY IMPLIED WARRANTIES ON THE DISKS, SUCH AS
THE IMPLIED WARRANTIES OF MERCHANTABILITY OR FITNESS FOR A PARTICULAR
PURPOSE OR USE. THIS WARRANTY GIVES
DSR-1 De-Esser plug-in for Tracktion
YOU SPECIFIC LEGAL RIGHTS, AND YOU MAY
ALSO HAVE OTHER RIGHTS, WHICH VARY
FROM STATE TO STATE AND FROM COUNTRY
TO COUNTRY.
8. Disclaimer of Warranty on Software. You
expressly acknowledge and agree that use of
the Software is at your sole risk. The Software
and related documentation are provided “AS
IS” and without warranty of any kind. LOUD
TECHNOLOGIES EXPRESSLY DISCLAIMS ALL
WARRANTIES, EXPRESS OR IMPLIED, INCLUDING, BUT NOT LIMITED TO, THE IMPLIED
WARRANTIES OF MERCHANTABILITY AND
FITNESS FOR A PARTICULAR PURPOSE OR
USE. LOUD TECHNOLOGIES DOES NOT WARRANT THAT THE FUNCTIONS CONTAINED IN
THE SOFTWARE WILL MEET YOUR REQUIREMENTS, OR THAT THE OPERATION OF THE
SOFTWARE WILL BE UNINTERRUPTED OR
ERROR-FREE, OR THAT DEFECTS IN THE
SOFTWARE WILL BE CORRECTED. FURTHERMORE, LOUD TECHNOLOGIES DOES NOT
WARRANT OR MAKE ANY REPRESENTATIONS
REGARDING THE USE OR THE RESULTS OF
THE USE OF THE SOFTWARE OR RELATED
DOCUMENTATION IN TERMS OF THEIR CORRECTNESS, ACCURACY, RELIABILITY, OR
OTHERWISE. NO ORAL OR WRITTEN INFORMATION OR ADVICE GIVEN BY LOUD
TECHNOLOGIES OR A MACKIE AUTHORIZED
REPRESENTATIVE SHALL CREATE A WARRANTY OR IN ANY WAY INCREASE THE SCOPE
OF THIS WARRANTY. SHOULD THE SOFTWARE
PROVE DEFECTIVE, YOU (AND NOT LOUD
TECHNOLOGIES OR ANY MACKIE AUTHORIZED
REPRESENTATIVE) ASSUME THE ENTIRE
COST OF ALL NECESSARY SERVICING, REPAIR OR CORRECTION. SOME STATES DO NOT
ALLOW THE EXCLUSION OF IMPLIED WARRANTIES, SO THE ABOVE EXCLUSION MAY
NOT APPLY TO YOU.
9. Limitation of Liability. UNDER NO CIRCUMSTANCES INCLUDING NEGLIGENCE, SHALL
LOUD TECHNOLOGIES BE LIABLE FOR ANY
INCIDENTAL, SPECIAL OR CONSEQUENTIAL
DAMAGES INCLUDING, BUT NOT LIMITED TO,
LOST PROFITS OR EARNINGS, DAMAGE TO
PROPERTY OR PERSON, OR ATTORNEYS’ FEES
THAT RESULT FROM THE USE OR INABILITY
TO USE THE SOFTWARE OR RELATED DOCUMENTATION, EVEN IF LOUD TECHNOLOGIES
OR A MACKIE AUTHORIZED REPRESENTATIVE
HAS BEEN ADVISED OF THE POSSIBILITY
OF SUCH DAMAGES. SOME STATES DO NOT
ALLOW THE LIMITATION OR EXCLUSION OF
LIABILITY FOR INCIDENTAL OR CONSEQUENTIAL DAMAGES SO THE ABOVE LIMITATION
OR EXCLUSION MAY NOT APPLY TO YOU. IN
NO EVENT SHALL LOUD TECHNOLOGIES’ TOTAL LIABILITY TO YOU FOR ALL DAMAGES,
LOSSES, AND CAUSES OF ACTION (WHETHER
IN CONTACT, TORT (INCLUDING NEGLIGENCE)
OR OTHERWISE) EXCEED THE AMOUNT PAID
BY YOU FOR THE SOFTWARE.
10. Controlling Law and Severability. This
License shall be governed by and construed in accordance with the laws of the United States and
the State of Washington, as applied to agreements
entered into and to be performed entirely within
Washington between Washington residents. If for
any reason a court of competent jurisdiction finds
any provision of this License, or portion thereof,
to be unenforceable, that provision of the License
shall be enforced to the maximum extent permissible so as to effect the intent of the parties, and
the remainder of the License shall continue in full
force and effect.
11. Complete Agreement. This License constitutes
the entire agreement between the parties with
respect to the use of the Software and related
documentation, and supersedes all prior or contemporaneous understandings or agreements,
written or oral, regarding such subject matter. No
amendment to or modification of this License will
be binding unless in writing and signed by a duly
authorized representative of LOUD Technologies
Inc.
LOUD Technologies Inc. • 16220 Wood-Red Road NE • Woodinville, WA 98072 • USA
©2005 LOUD Technologies Inc.
User’s Guide
3
DSR-1 De-Esser plug-in for Tracktion
Iconography
This icon will lead you to some further explanations of features and practical tips.
This icon marks information that is very important, so please make sure you have a
read.
This icon does not appear in this guide. Well, except here, of course.
Note: Visit our website at www.mackie.com to obtain the latest manuals and downloads
for all your Mackie products.
“Mackie” and the “Running Man” figure are trademarks or registered trademarks of LOUD Technologies Inc. VST is a trademark of Steinberg Media Technologies GmbH. All other brand names
mentioned are trademarks or registered trademarks of their respective holders, and are hereby acknowledged.
Part No. SW0216 Rev. A 7/05
© 2005 LOUD Technologies Inc. All Rights Reserved.
4
User’s Guide
DSR-1 De-Esser plug-in for Tracktion
Contents
Mackie Software License-------------------------2
Introduction ----------------------------------------6
Main Features -------------------------------------- 6
A brief word about De-Essers ------------------- 7
Adding the DSR-1 in Tracktion ------------------8
DSR-1 Features-------------------------------------- 9
Global Controls------------------------------------- 9
Main Controls and Meters ----------------------- 9
Global Controls ----------------------------------- 10
Lock and Hide-------------------------------------- 10
Preset Toggle Buttons---------------------------- 10
Preset Title Window ----------------------------- 10
DS Band Listen------------------------------------- 10
Memory A/Memory B ---------------------------- 11
Active------------------------------------------------- 11
Help (?)----------------------------------------------- 11
Block diagram -------------------------------------- 11
Main Controls and Meters ---------------------- 12
Input and Output Meters and OL LEDS -------12
Input Control ---------------------------------------12
Filter Control ---------------------------------------12
Freq and Width Controls -------------------------12
Threshold Control ---------------------------------13
Ratio Control ---------------------------------------13
S-Band Meter ---------------------------------------13
Reduction Meter -----------------------------------13
Using the DSR-1------------------------------------14
Specifications--------------------------------------15
Need Help?-----------------------------------------15
User’s Guide
5
DSR-1 De-Esser plug-in for Tracktion
Introduction
Thank you for choosing Mackie software products for your computer-based audio recording
system.
The DSR-1 plug-in is a highly accurate, frequency controlled, dynamics processor. It enables
you to quickly isolate and correct unwanted
sibilance in vocal recordings of singers and
speakers.
The DSR-1 reduces annoying sibilant and popping sounds that are often found in recordings,
without losing the crisp top-end clarity. Don’t
let the simple chicken-head controls and the
funky retro-look fool you. The DSR-1 is a highly
professional and invaluable tool that is ideal
for editing vocals, instrumentals, and other
sources.
The DSR-1 plug-in comes with Tracktion, our
easy-to-use music production software application. When you install Tracktion, the plug-in is
automatically installed in Tracktion's plug-ins
folder.
Note: This plug-in only works with Tracktion,
and will not work with any other VST host applications you may have on your computer.
6
User’s Guide
Main Features
•
•
•
•
•
•
•
•
•
•
•
•
•
•
•
•
•
•
•
•
Mono De-Esser plug-in for Tracktion
Input Meter
Input Overload indicator
Output meter
Output Overload indicator
Global enable button
User presets
Memories A and B for quick comparisons
S-Band Listen (solo)
Input level control
High-pass filter control
S-band center frequency control
S-band beamwidth control
Threshold control
Compression Ratio control
S-band level meter
Gain reduction meter
Basic on-screen help
Fizzy sherbet drinks maker
Time portal into the Andromeda Galaxy
DSR-1 De-Esser plug-in for Tracktion
A brief word about De-Essers
A De-Esser is a useful audio tool used for removing Sss sounds, or sibilance, from vocal
tracks.
The problem Sssss sounds exist in a frequency
band (the S-Band), which we can narrow-in on
with the DSR-1's Freq and Width controls.
The DSR-1's compressor works just on the
S-Band. It allows us to compress the level of
the higher peaks, once they get louder than a
threshold level. The Ratio control sets the action of the compressor, once the signals cross
the threshold.
Passing your lovely tracks through the DSR-1
can be a good thing, resulting in vocals which
are much improved, and much better than a
poke in the eye with a blunt stick. Have a go,
and have fun. It can improve even a great recording.
User’s Guide
7
DSR-1 De-Esser plug-in for Tracktion
Adding the DSR-1 in Tracktion
The first thing to do is to open up Tracktion and
open your project. Well, turn your computer on
first; er... you do have a computer don't you?
Tracktion uses the term “filter” to refer to a
plug-in, be it native to Tracktion, or a 3rd party
plug-in such as a VST plug-in.
To add the plug-in to your tracks, simply drag
the icon labelled “new filter...” located just
above the filter section, and drop it where you
want the new filter to be placed. The figure below shows a filter being added to track one.
Top Right of Tracktion Screen
Notice that the area in front of the volume/pan
filter is glowing red; this is how you can tell
where the filter will be placed. If there is no illumination, then you are not currently over a valid
target area.
Once the “new
filter” icon has
been dropped,
a list of available filters will
appear, as if by
magic. Choose
the filter you
wish to add to the track from this list. The DSR
and other plug-ins are available in the "Mackie
Plugins" folder of this drop down menu.
8
User’s Guide
DSR-1 De-Esser plug-in for Tracktion
DSR-1 Features
Global Controls
Main Controls and Meters
The Main Screen is made up of two sections:
•
•
Global Controls
Main Controls and Meters
Global Controls
The Global Controls section includes the Lock
and Hide buttons, Preset up/down buttons, Preset title window, the Active, Menu, and Mem
A/B buttons, and the S-Band Listen button.
Main Controls
The Main Controls section includes most of the
controls, meters and readouts. You can change
the controls using your mouse to move the
knobs or the readouts.
These sections are described in more detail as
we gently ramble-on over the following pages.
User’s Guide
9
DSR-1 De-Esser plug-in for Tracktion
Global Controls
Lock
If this is pressed, the DSR-1 interface will not
disappear when you select other items or areas
in Tracktion.
Hide
This hides the DSR-1 interface from view, and is
useful if you have previously selected "Lock."
Preset Toggle Buttons
You can save your own favorite settings as presets for later recall.
The preset up/down arrow buttons, on the left
side of the Preset window, enable you to scroll
up or down through the user presets.
In most vocal recordings, there are usually a
number of areas that could be improved with
the DSR-1. However, there is not necessarily one overall optimum setting that will work
throughout the track. Building user presets is
a good way to have multiple De-Esser settings
that can be quickly accessed. You can then apply these settings to various regions of your
track. There is no delay time in loading presets.
You might try building performances by stacking user presets and toggling between them
using the up/down arrows. For example, you
can quickly switch from a Verse Ess to Chorus
Ess preset and back. This would eliminate problematic spots in your recording.
Preset Title Window
This window displays the currently selected
preset. Click on it to access the pull-down menu
where you can choose your previously-saved
user presets. You can save your presets in any
folder location you specify. The default is the
last folder you've saved or recalled presets
from.
Note: if you load a preset, and then adjust any
10
User’s Guide
controls, an asterisk will appear next to the preset name. This is a reminder that things have
changed from the original preset.
DS Band Listen
Press this to audition (solo) the band of the
"Ssss" frequencies you are trying to eliminate.
This band's center frequency is set by the Freq
control and the bandwidth is set by the Width
control.
While listening to your track, adjust the controls until you can hear the "Ssss" (or other
bothersome sounds) quite distinctly.
The button will flash on and off in a mesmerising manner when engaged. (While under its
influence, please cut my lawn every Thursday,
and you will then forget everything.)
Menu
Pressing the MENU button opens a pull-down
menu that performs some familiar functions:
About DSR: Opens a window that shows the
version number and copyright information.
Undo: Undo the previous action.
Redo: Redo the previous undo.
Load DSR: Loads a previously saved preset file.
Save User Preset As...: Saves a Preset to the
hard drive with a new file name. (for example,
use this after making slight changes to a preset,
and saving it as a variation)
Save User Preset: Saves changes to the current
preset to the hard drive.
Reset DSR: Resets all the settings to the current preset values.
Cut DSR: Copies all the settings to the clipboard
and resets them to their default values.
Copy: Copies all the settings to the clipboard,
leaving the settings as they are.
DSR-1 De-Esser plug-in for Tracktion
Paste DSR: Copies the settings from the clipboard to the current window.
Note: Cut/Copy/Paste are useful for changing
MEM A and B to identical settings.
Memory A/Memory B
The Mem A and Mem B buttons temporarily
store all the current settings of the DSR-1 to allow comparative referencing. You can also copy
and paste settings from one memory location to
another using commands found on the menu.
Active
Use this to engage or disengage the DSR-1
from the signal path. If the red LED is on, the
DSR is active, and any audio passing through
is affected by its settings. If the red light is out,
then the DSR-1 is bypassed, and it has no effect
on the audio.
Help (?)
Pressing the question mark button will bring up
a second screen showing a block diagram of the
DSR, and some helpful text. The question mark
becomes an X; click on it to remove the help
screen and return to the controls screen.
Block diagram
This shows the signal path through the DSR-1.
What happens is basically this:
The signals enter the input level adjustment,
and into a high-pass filter (which reduces the
level of the low-frequency range if required).
The signals are then split into three bands by
the crossover:
•
•
The S-Band containing your problem ess
sounds. (The frequency and width are set by
the Freq and Width controls.)
Frequencies lower than the S-Band.
•
Frequencies higher than the S-Band.
The compressor only acts on the S-Band. The
compression action is set by the Threshold and
Ratio controls to reduce the ess sounds. The
Listen button lets you audition the S-Band before compression occurs.
The high, de-Essed S-Band, and low bands are
then re-combined, and pass on their way to the
output.
User’s Guide
11
DSR-1 De-Esser plug-in for Tracktion
Main Controls and Meters
Input and Output Meters and Overload OL LEDS
The meters on the left show the input levels of
the signals going into the DSR-1 and the output
(post-effect) levels.
The small boxes above the meters are the overload LEDs. They light if the signal goes above
0 dB, and this should be avoided. Most little red
lights should be avoided, like that one in the car
that says "Oil."
Input Control
This allows you to adjust the gain or attenuation applied to the input signal. If this is set to
0 dB, the input signal initially has no gain or attenuation applied.
Freq and Width Controls
These controls are used to select the "ess" frequency range, where your problem frequencies
exist to taunt you. (From now on, we will call
this naughty range, the S-Band.)
FREQ, ranging from 1 kHz to 20 kHz, sets the
center frequency of the S-Band.
WIDTH ranges from 1 to 100, with 1 being a
very narrow band and 100 being very wide.
Setting the Freq and Width controls is a bit like
setting a peaking EQ, only you are trying to
highlight and isolate the problem S-Band, which
will then be reduced by the DSR-1's compressor.
Level
From left to right, the details are as follows:
Width
You can adjust the control by grabbing the knob
or the readout below it. (Move the mouse left or
right, or up and down but not circularly.)
Filter Control
Level
This controls the cut-off frequency of a highpass filter, and it ranges from 20 Hz to 200 Hz.
It offers you a quick and convenient way to
reduce any low-frequency noise in your vocal
input signals, such as microphone pops for example.
Filter
12
User’s Guide
Frequency
Freq
Frequency
Use your ears to locate a troublesome frequency
range by pressing the LISTEN button to hear
the S-Band. Then use the FREQ and WIDTH
controls to adjust the range.
DSR-1 De-Esser plug-in for Tracktion
Threshold Control
At the heart of the DSR-1 is a compressor,
which operates on the S-Band set by the Freq
and Width controls. Any peaks in the S-Band,
louder than the threshold will be compressed.
Input signals below the threshold, will not be
affected.
In this example, the Threshold (T) is set to
–30 dB, and the ratio (the slope of the graph) is
2.5:1, after the threshold.
S-Band Meter
This meter represents the
dB level of the S-Band.
Level
The small arrow on the
right edge of the meter
shows the threshold level
set by the threshold control. You can move this
arrow with the mouse
to adjust it below your
S-band peaks. (The threshold control will move as
you move the arrow.)
Threshold
Frequency
Ratio Control
The compression ratio shows us how much
compression is being applied, once (S-Band) signals have crossed the threshold level.
For example, if the ratio is 2.5:1, then for signals above the threshold, a 2.5 dB increase in
input level will yield only a 1 dB increase in the
output level. So, with this control, we can reduce the level of those peaks that have wronged
us.
If the ratio is 1:1, there is no compression; any
increase in input level yeilds the same increase
in output level.
Reduction Meter
The gain-reduction meter shows the overall
reduction in output level due to the compressor
operation. It is a downward-moving meter, so
it is not something you see every day. It gives
you some idea of how much you might need to
adjust the Input level to make up for the gain
reduction.
The meter reads 0 dB whenever the input is
below threshold, and moves down as the input
level goes above threshold and gain reduction
starts.
If the ratio is 20:1, then an increase in input
level of 20 dB, will yeild an increase in output
level of 1 dB. This is heavier compression.
The Compressor action is often shown as a
graph of output level vs. input level, like this:
0
-6
OUTPUT LEVEL dB
-12
-18
-24
-30
-36
-42
-48
-48 -42 -36 -30 -24 -18 -12
INPUT LEVEL dB
-6
0
User’s Guide
13
DSR-1 De-Esser plug-in for Tracktion
Using the DSR-1
1.
2.
3.
4.
5.
6.
7.
14
Start by adding the DSR-1 to a vocal track.
Set the DSR-1’s Input control to an acceptable level. Start with 0 dB, and adjust it
later if needed, to make up for the reduction
in gain caused by the action of the DSR-1.
Press the Listen button to isolate the
S-Band.
Set the Ratio to 1:1 so that no compression
is applied to the S-Band just yet.
Adjust the Freq and Width controls so you
hear as much of the problematic sibilance
as possible. At the same time, keep the
width narrow enough so you do not hear too
much of the good signals you would like to
leave unaffected.
Typically, you will find a center frequency
in the range of 3 kHz to 6 kHz, with a width
ranging from 20 to 40 is useful. Watch the
S-Band meter change as you adjust the frequency and width of the S-Band.
Adjust the Threshold level so it
is just below the peak levels of
the S-Band meter.
Watching the threshold arrow
is a good way to see where your
threshold level should be after
you have dialed in an S-Band frequency and width.
The DSR-1 compressor only
affects signals that are above the
threshold.
Now you’ve got a good starting point. Take
it out of Listen mode. (In Listen mode, you
are hearing the S-Band uncompressed, and
not affected by the Threshold or Ratio controls.)
User’s Guide
8.
Adjust the Ratio control to apply a desired
amount of compression to your specified
S-Band. Start with mild compression ratios
and work gently, with just enough to reduce
the peaks of the bad effects.
9. Continue to tweak the ratio and threshold
parameters until you’ve got the sound you
want. You may need to change threshold
level to compensate for adjustments made
with the Freq and Width controls.
10. When you are happy, save your settings as a
preset. If there are other frequencies in the
same track that need work, you can repeat
this procedure and save it as another preset
for quick recall.
DSR-1 De-Esser plug-in for Tracktion
Specifications
Input/ Output Meters
-40 to 0 dB
Input Control
Off to +12.0 dB
High-Pass Filter
20 Hz-200 Hz (4th Order), and off
Frequency
1 kHz to 20 kHz (the frequency of the S-Band)
Width
Narrow to Wide (the width of the S-Band)
Compression Threshold
–40 dB to 0 dB (applied to the S-Band)
Compression Ratio
1:1 to 100:1 (applied to the S-Band)
S-band (Key) Meter
–40 dB to 0 dB
Gain Reduction Meter
–40 dB to 0 dB
Weight
Well it all depends on what you mean by weight
Dimensions
1.5 car parking spaces
Directions
Gindle the two left spansoes, and elevate the throndle's cotter
pin longitudinally thence-ways.
Need Help?
Contact our Technical Support staff at 1-800-898-3211, Monday to Friday,
from 7 am to 5 pm PST. After hours, please visit www.mackie.com and look
under Support, or email us at [email protected].
User’s Guide
15
16220 Wood-Red Road NE • Woodinville, WA 98072 • USA
United States and Canada: 800.898.3211
Europe, Asia, Central and South America: 425.487.4333
Middle East and Africa: 31.20.654.4000
Fax: 425.487.4337 • www.mackie.com
E-mail: [email protected]