1
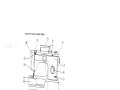
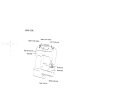
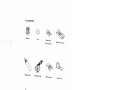
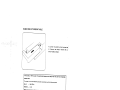
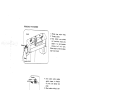
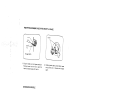
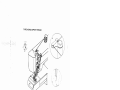
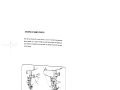
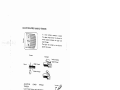
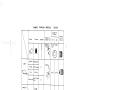
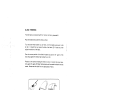
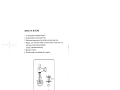
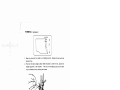
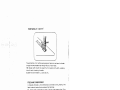
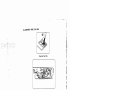
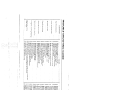
INSTRUCTION MANUAL
FOR
SEWING MACHINE
WHITE
__
____
____
__
__
__
__
__
__
____
__
____
___
POLARIZED PLUG
S CAUTION
This product is equipped
with a polarized altern
ating
current line plug (a plug
having one blade wid
er than
the other). This plug will
fit into the power outle
t only
one way. This is a safe
ty feature. If you are
unable to
insert the plug fully into
the outlet, try reversing
the plug.
If the plug should still
fail to fit, contact an
electrician
to replace the obsolete
outlet. Do not defeat
the safety
purpose of the polariz
ed plug.
WHITE SEWIN
G MACHINE CO
MPANY
Record in space provided
below the Serial No. and
Model No. of this appliance
.
The Serial No. is located on
Bed Plate.
The Model No. is located
on Rating Plate.
Serial No.
Model No.
Retain these numbers
for future referenc
e.
IMPORTANT SAFETY INSTRUCTIONS
When using an electrical appliance, basic safet
y precautions should always be
folowed, including the following:
Read all instructions before using
(this sewing machine)
DANGER
To reduce the risk of electric shock:
An appliance should never be left unattend
ed when plugged in. Always unplug this
appliance from the electric outlet immediat
ely after using and before cleaning.
Always unplug before relamping, Replace
bulb with same type rated 15 watts.
WARNING
To reduce the risk of burns, fire,
electric shock, or injury to persons:
1. Do not allow to be used as a toy. Clos
e attention is necessary when this appl
iance
is used by or near children.
2. Use this appliance only for its intended
use as described in this manual. Use
only
attachments recommended by the man
ufacturer as contained in this man
ual.
3. Never operate this appliance if it has
a damaged cord or plug, if it is not work
ing
properly, if it has been dropped or
damaged, or dropped into water, Retu
rn the
appliance to the nearest authorized deale
r or service center for examination, repa
ir,
electrical or mechanical adjustment.
4. Never operate the appliance with any air
openings blocked, Keep ventilation ope
n
ings of the sewing machine and foot
controller free from the accumulation
of lint,
dust, and loose cloth.
5. Never drop or insert any object into
any opening.
6. Do not use outdoors.
7. Do not operate where aerosol (spra
y) products are being used or where
oxygen is
being administered.
8. To disconnect, turn all controls
to the off (‘O”) position, then remove
plug from
outlet.
9. Do not unplug by pulling on cord
. To unplug, grasp the plug, not the
cord.
10. Keep fingers away from all
moving parts. Special care is required
around the sewing
machine needle.
ii. Always use the proper need
le plate. The wrong plate can caus
e the needle to break.
12. Do not use bent needles.
13. Do not pull or push fabric
while stitching. It may deflect the
needle causing it to
break.
14. Unplug the sewing mach
ine when making any adjustments
in the needle area,
such as threading needle, chan
ging needle, threading bobbin,
or changing
presser foot, etc.
15. Always unplug sewing
machine from the electrical outlet
when removing covers,
lubricating, or when making any
other user servicing adjustments
mentioned in the
instruction manual.
SAVE THESE INSTRUCTIONS
CONTENTS
Name of Parts
Accessories
1
2
Removing the extension table
Before swing (Power supply and Sewing lamp)
Fitting shank and quilting seam guid
e. Fitting of presser feet
Winding the bobbin
Removing bobbin case and bobbin
Inserting bobbin into bobbin case
3
4
5
6
7
7
Inserting bobbin case into shuttle race
Changing needle
Threading upper thread & Twin needle threa
ding
Drawing up bobbin thread
Changing sewing directions
Adjusting.thread tensions
Regulating the presser foot pressure
Darning plate
Fabric. Thread, Needle guide
Sewing (pattern selector) and operation table
To start sewing to finish a seam
Straight stitch zig zag stitch
Blind hemming
Three step zig-zag
Overcasting edges-binding
Straight stretch stitch
Sewin’ on buttons
Sewing in zips
Button hole sewing
Hemming
Twin needle-freehand embroidery
Cleaning of race.and shuttle hook
Cleaning and oiling
Trouble shooting guide
8
8
9
10
10
11
12
12
13
14
15
16
17
18
19
20
21
22
23
24
25
26
27
28
NAME OF PARTS (FRONT SIDE
)
1
Pattern selector dial
2 Take up lever
3 Tread tension dial
4 Tread guide for upp
er
threading
5 Presser foot
6 Shuttle cover
7
Zigzag Width Dial
8 Spoolpiri
9 Top cover
10 Stitch length dial
1 1 Reverse button
12 Face cover
13
Handle
—1—
(REAR VIEW)
Bobbin winder stopper
Bobbin winder spindle
Upper thread guide
Stop Motion knob
Hand wheel
Thumb screw
Needle plate
Needle clamp screw
Presser foot lever
Extension table
Accessories Box
1A—
ACCESSOR I ES
0
Bobbin
Machine Oil
Button hole cutter
Felt
Zigzag foot
(On machine)
Blind hem foot
Button hole f
01
Buttor foot
Zipper foot
Screw driver
Needle
#11
—2—
#14
REMOVING EXTENSION TABLE
:s:stt::
THIS IS ONLY APPLICABLE TO MACHINES MANU
FACTURED FOR THE UNITED KINGDOM
IMPORTANT
The
wires
in this mains lead ar, coloured in accordance with
the following code:
NEUTRAL
BLUE
—
BROWN
—
LIVE
NOTE. As the colours of the mains lead of this applian
ce may not correspond with the coloured
markings identifying the terminals in your plug,
proceeo as follows:
Connect BROWN wire to terminal marked L or colour
ed RED.
Connect BLUE wire so terminal marked N or
coloured BLACK.
FIT CORRECT PLUG TO POWER CORD
-
WHEN USING A BS. 1363 FUSED PLUG. A AMP.
3
FUSE MUST BE FITTED.
If the terminals of the plug are unmarked consul
t a qualified electrician before use.
Vikien leaving the sewing machine unattended,
the plug must be removed from the socket
outlet
M’sen servicing the sewing machine, or when
removing covers or changing amps, the
machine or
the electrical set must be disconnected from
the supply by removing the plug from
the socket
outlet
THE MAXIMUM INPUT OF LAMP: 240 V 15 W.
THIS APPLIANCE CONFORMS TO THE
STATUTORY RADIO INTERFERENCE
SUPPRESSION REGULATIONS.
—3--.
:
BEFORE SEWING
1. Fit
the machine plug int
o
the machine.
2. Plug the machine to
the
power supply.
3. Sewing speed can be
varied
by the speed controller.
(BE
SURE
TO
FIT A
CORRECT PLUG TO SU
PPLY
CORD)
1. Remove or install
lamp from
/
Important:
inside of face cover.
2. Open face cover in dir
ection
of arrow.
3. Remove lamp by unscre
wing
it counter clockwise.
4. Install a new bulb
by screw
ing it in clockwise.
5. Use only a
120V,
15W
(Max) “Hi-Light” brand re
placement sewing machine
lamp. Available from your
Riccar stockist.
When leaving the machi
ne unattended, servic
ing, changing lamps
or removing covers,
disconnect from the
sup
ply by removing
plug from the
socket outlet.
—4—
FITTING SHANK
AND
QUILTING SEAM GUIDE
FITTING OF PRESSER FEET
Raise the presser bar and
fit shank as
shown. (1) Insert qui
ltinglseam guide
carefully so as not to dam
age the holding
spring. (2>
Raise the presser foot. Pull
the one-touch
lever towards you and the
foot will be
released. Centre new foot
under shank.
Lower shank until gro
ove is directly
above and touching the
pin. Pull onetouch lever towards you
and the foot will
become engaged. (3, 4)
Pr.,i.r r
Tlght.n
L0OMfl
Sh.nk
One
4
-/
—5—
WINDING THE BOBBIN
1. Release stop motion knob.
2. Thread as shown.
3. Place bobbin onto spindle
and hand-wind thread onto
bobbin in an anti-clockwise
direction for 5 or 6 turns.
(When bobbin is filled re-tighten
stop motion knob)
48obbin
winder
spindle,
4. Push bobbin winder spindle
against stopper, in direction
of arrow, and depress foot
pedal.
5. When bobbin winding is com
pleted return spindle to its
original position.
-
bz
Note:
If the bobbin winding should be
uneven (it is factory set) the
thread guide can be raised or
lowered to achieve the correct
winding.
Remove the top cover and adjust
with a suitable tool.
—6-—
REMOVING BOBBIN CASE AND BOB
BIN
Hinged latch
1. Raise needle to its high
est
position and open the
shuttle race Cover,
2. Open hinged latch of
bobbin case and pull bobbin case out of machine.
3. Release the latch and
bob
bin will fall out easily.
INSERTING BOBBIN
INTO BOBBIN CAS
E
H
c
5
m
1. Pull off 5cm of
thread
from bobbin and inser
t it
into bobbin case as show
n.
2. Guide the end of thread
into slot.
TenionsPrin
iocm
Pull into slot and
under
tension Spring and
draw
out about
10 cm of
thread,
—7-—
INSERTING BOBBIN CASE INT
O SHUTTLE RACE
Th
Insert
Hinged latch
1. Ensure needle is at its hig
hest position.
Pulling thread to the front,
open the
latch of bobbin case and hold
it.
2. Holding latch open, plac
e bobbin case
onto centre pin in shuttle
and release
latch.
CHANGING NEEDLE
I-
Needle clamp 1
screw
1. Raise needle to its
highest position.
2. Loosen needle clamp
screw and re
Tighten
move old needle.
3. With the flat side of the
needle facing
away from you, insert nee
dle as far up
as it will go.
4. Tighten the needle
clamp screw
securely.
Note:
At the first sLgn
of any stitching
irregularity always cha
nge the needle for
a new good quality
one.
—P8—-
THREADING UPPER THREAD
Thread the machrne from A to G as illustrated.
A. Through the thread guide.
B. Between the tension discs.
C. Up and into the tension spring.
D. Into the thread take-up lever from right to left.
E. Down behind the thread guide.
F. Behind the needle clamp thread guide.
G. Through the needle from front to backFig. 1 &
2
also illustrates threading for twin needle sewing
(see page 25)
—9—
DRAWING UP BOBBIN THREAD
Hold the top thread with a slight tension in
your left hand and rotate the han
d
wheel towards you so that the needle goes dow
n and up agarn, then gently pull
your thread out towards the rear and under you
r sewing toot and you are read
y
to start sewing.
CHANGING SEWING DIRECTIONS
1. Lower needle down into fabric and
raise presser foot, pivot the fabric
around the needle to change dire
ction
as desired.
—10—
2. Put down presser foot and
start to sew.
ADJUSTING UPPER THREAD TENSIO
N
It is only normally nece
ssary to adjusi
the upper thread tension
to achieve the
correct balance between
the upper and
lower threads.
The higher the number
on the dial the
greater the tension.
S
Correct
Incorrect
Inside of fabric
Upper thre
ad
Fabric
Upper thread
Bobbin thread
ADJUSTING
LOWER
THREAD
TENSION
Lower thread tension can be adju
sted by
turning the screw on the bobbin
case
slightly to the right (clock-wi
se) to
increase tension, (Anti-clockwise)
to the
left to decrease tension.
As a general guide only, the user
can achieve the correct
tension for normal sewing,
by carefully suspending the
wound bobbin in its case
by the thread. It the bobbin
and case immediately fall to the
ground, the tension is too
loose and should be increased
. The correct tension is
obtained when a slight jerk of the
thread causes the bobbin
to drop a short distance only. If
this action does not move
the bobbin the tension is too
tight and should be loosened
until the desired effect is achieved.
—
Ti
—
Increase
Decrease
REGULATING THE PRESSE
R FOOT PRESSURE
1. Adjust lever to desire
d pressure. For light
fabrics use 3, for
use 1-2, for heavy fabric
medium fabrics
s use 1.
2. Insufficient pressure
may cause poor fee
ding, skipped stitche
in guiding the fabric.
s, or difficulty
3. No. pressure adjus
tment is required wh
en darning or sew
embroidery
ing freehand
-
DROP FEED
I
Lower feed dog
by pushing lever,
down in direction
fNo feeding of fabric
of arrow.
)
Uwd when tewing
on buttons, free
hand embroidery,
etc.
For general sew
ing, raise height
of feed dog by
direction of arrow
lifting lever ri
—12—
___________
_____
FABRIC
THREAD
NEEDLE
GUIDE
Length of
stitches
Fabric
Thread
Needle
Pressure ci
presser foot
Pressure
regulation
Nylon
80 Cotton
Tricot
60S. Fibe
Silk
50 silk
ST.
I
ZZ.
I
Indica
ton of
tension
Stitch length
dial
Light
SOS. Fibe
Wool silk Silk
Medium
Gingham
\4
11
05-3
0.5-3
0.5-4
0.5—4
1—4
0.5—4
11
60-80
Cotton
or
hin Jerse 60 S.
14
Gabardine 50 Silk
Heavy
¶E”\
Denim
50 CottOn
14
Jersey
50 S. Fiber
14
:-
-‘
Tweed
50 Silk
14
As a general rule use shorter stitch lengths on finer
fabrics and longer stitch lengths
with heavier fabrics, finer thread and needles with finer fabrics
and heavier thread and
needles with heavier fabrics. Use special ‘ball point’ or
‘stretch’ needles on difficult
stretchy fabrics.
—13
—
‘Li
-J
I.
2
0
I
Ui
a.
0
0
2
0
I—
0
Ui
-J
Ui
U)
2
Ui
I
0
0
2
Ui
C,)
—14-—
TO START SEWING
Important Hints.
1. Raise the take-up lever to its highest position when starting and.stopping
sewing.
2. Hold both threads about 10 cms to th rear of machine for the first two or
three stitches.
3. Sufficient fabric should be placed under needle before lowering presser foot.
4. Depress toot/Speed Control and start to sew.
5. Test the machine stitches on a scrap of fabric you plan to use, adjusting the
machine for the length of stitch and tension suitable to your fabric.
Attention.
1.
2.
3.
When turning the hand wheel manually, always turn it toward you.
Guide the cloth gently with your hand.
To prevent breaking needle always stop with the needle out of the fabric.
TO FINISH SEAM
1. Sew to the edge of seam.
2. Push the reverse button and sew in reverse for
about 2—3 cms.
3. Raise needle to its highest position.
4. Lift presser foot and pull out the fabric to rear
of machine.
5. Cut threads, as shown, on the thread cutter.
—15—
STRAIGHT STITCH
While “2” or “3” on the dial gives a suitable stitch length for ordinary purposes.
the stitch length varies with the weight of fabric, thickness of thread and pur
poses, the stitch length varies with the weight of fabric, thickness of thread and
purpose of sewing. Generally speaking, the finer the fabric, the finer fhe thread
and shorter the stitch length; the heavier the fabric, the thicker the thread and
longer the stitch length.
I
I
I
I
I
$
3
2
0.5
0
At “0” the fabric will not move ahead, and the needle will keep pIercing the
same point.
ZIG-ZAG STITCH
The zig-zag stitch can be set at various stitch
widths and lengths according to the
application required. Set the pattern selector as
desired.
Satin
HIlt
stitching is a “closed up”, very short
stitch length, stitch and can be used
for sewing initials, patterns
applique, etc.
—
16—
BLIND HEMMING
Fold the fabric as illustrated with the “wrong” side facing upwards.(l)
Place the folded fabric under the foot as shown.
Turn the hand wheel towards you by hand, until the needle swings over to the
far left. It should then just pierce the fold of the fabric. (2) If it does not, then
adjust the position of the fabric.
Once the correct position of the fabric has been set, position the “guide” of the
foot (3) up against the fold (2) by turning the nut (4).
Proceed to sew carefully feeding the fabric to ensure it retains the correct posi
tion against the guide. (3) Note: Some practice will be needed to obtain the best
results. Always test the stitch first on a spare piece of fabric.
(
I
L
—
17
—
THREE STEP ZIGZAG
The three step zig-zag stitch has a wide range of sewing applications, such as
patching, darning, repairing tears, mending, sewing on elastic and lace, oversew
ing edges etc. on a wide range of fabrics.
The illustration shows patching, where the stitches are to the edge of the patch
and a tear, where the stitches go firstly over the centre of the tear and then to
either side but overlapping slighly on the first row.
The stitch length can be reduced until the stitches are very close together. This
will give a stronger finish for most repairing operations.
(
•
C.
>
._*
<
-
.
)
S
>
c
h
.
(
I
)
S
-
—18—
OVERCASTING EDGES
For thicker fabrics
Both these stitches are designed to overlock the edge of a fabic.
When the needle is at Its extreme right position, allow it to just pass over or just
pierce the edge of the fabric according to the effect you require.
Using the overcasting foot will prevent puckering of thin fabrics.
BINDING
To sew fabrics edge to edge select
the multi zigzag stitch
—19—
STRAIGHT STRETCH STITCH
The straight stretch sews two stitc
hes forward and one stitch backwards,
thereby
giving “triple” strength. Use it for stre
tch fabrics and for areas of “str
ess” where
a strong stitch is required. (2A
)
TRIPLE ZIG-ZAG (RIC-R
AC) STITCH
The triple zig-zag stitch is
a very strong zig-zag stitch
used for seaming heavy
fabrics such as canvas etc.
It can be used to oversew
edges where the seam has
already been sewn by
straight stitch, or as an attracti
a
ve decorative stitch. (28
)
Ill
Ill
III
Ill
II
Ill
III
2
A
B
—20—
SEWING ON BUTTONS
Fit darning plate as described on page 12.
Use button presser foot and attach firmly.
Place button between presser foot and fabric and lower presser foot.
Manuaily turn hand wheel towards you ensuring that the needle enters into
both holes of button without obstruction.
(Increase or decrease width setting).
5. Sew about 7 stitches.
6. Pull both threads to the underside and tie together.
1.
2.
3.
4.
Te
—21
—
SEWING IN ZIPS
Fit the Zipper foot. The Zipper foot can be moved to the left or right. (2) To
move foot over to the right as
illustrated and reverse the procedure to sew the left hand side of the zipper. (3)
sew on the right hand side of the zipper,
To move the ‘zip slider” out of the way, leave needle in the fabric, raise foot
and slide it behind the foot. Lower the foot and continue.
—22—
BUTTON HOLE SEWING
Fit the button hole foot.
to achieve the Correct density
within the green marki4g
Set the stitch length dial
strated (1) selecting
Sew in the sequence illu
(1)
h.
stitc
n
sati
of
(closeness)
again.
patterns 18, 19, 20 and 19
USER TIPS
nge
fabric as settings will cha
tonhole on some spare
,
rics
fab
t
Always sew a sample but
icul
diff
er
tchy or oth
used. For very thin, stre
aid
to
ric
according to the fabric
fab
the
er underneath
ene) or tissue or other pap
try using interfacing (vil
machine feeding.
markings to measure the
e foot using its calibrated
Always use the Buttonhol
hole can be sewn taking
able fabric, a corded button
buttonhole length. On suit
the cord. (2)
of the buttonhole oversew
care that the zig-zag stitches
e with the seam ripper
hol
ton
but
the
sides (beads) of
Carefully cut between the
seam ripper going too far.
bar tack (2) to prevent the
using a pin through the end
king buttonhole.
uced to achieve a better loo
The top tension may be red
—23—
HEMMING (option&)
4
—i
3
—
I’
I
1. Raise the toot arid the needle to its highest position. Replace the foot with the
hemmer toot.
2. Fold over the fabric edge by about 3mm and place it under the foot. Secure the
Take out the workpiece and draw the hem
folded edge with a few stitches.
into the hemmer foot by pulling the threads.
3. Lower the foot and sew the hem.
4. During
sewing, fold the fabric to the left a little and allow it to run into the
hemmer foot.
5. Make sure that the fabric does not move under the right half of the foot. The
fabric must be fed into the scroll of the hemmer sufficiently so that the work
piece edge runs freely through the groove under the foot.
Only suitable materials can be used and some practice may be necessary to acheive
best results.
24
TWIN NEEDLE (optional)
I
Thread machine as for normal sewing using both spooi pins and pass the threads
through the same procedure but through the eye of each needle.
NB. Sewing width should not exceed the third widest stitch width, exceeding
this will result in breaking of needles.
Suitable for stitch numbers 1, 2, 3 and 13 only.
FREEHAND EMBROIDERY
In freehand embroidery, unlike mechanically controlled stitching, feeding of the
fabric is done by hand without assistance from teed dogs.
Fit darning plate as described on page 12 and set stitch patterns from 1S as
desired.
A round embroidery hoop is generally used. Use wooden or plastic hoops with
an adjusting screw.
Stretch the fabric tight accross
the hoop and sew whilst moving
the hoop to create the desired
effect.
L
—25
—
CLEANING OF RACE AND SHUTTLE HOOK
Raise the needle bar to its highest point by turning the hand wheel toward you.
Open shuttle cover.
1)
2)
3)
4)
Take out the bobbin case.
Unlock the shuttle race holder.
Release the shuttle race cover.
Take out the shuttle hook
Clean dust and gummed oil off each part with an oiled cloth. When finished
cleaning, reassemble reversing the above procedure.
Shuttle race
cover
Bobbin case
Shuttle race
Shuttle hook
holder
Shuttle race cover
Shuttle hook
—
26
—
:
,
.--
-
--
—.
CD
(ft
0)
C-
a.
CD
-4
0
aCD
.
a
CD
CD
UI
0
CD
z
CD
CD
0)
C)
0
C
0
a.
.4
CD
‘a
‘4
0
C
-
-—— —---
C)
z
0
z
>
C)
z
z
r
rn
C,
I.
2
3
4
I
2
3.
2
3
I
2
3
4
5
1
2
3
4
5
1
2
3
4
I
2
3
4
I
2
3
4
5
6
-
Bobbin rose is improperly threaded
Bobbin tension is too tight
Needle is not inserted correctly
Needle is damaged
Wrong type of needle is used
Wionglootisused
Foot pressure is wrong
Needle is damaged
Needle is not inserted correctly
Fabric too Freovy/wrong needle size.
Fabric is being polled by operator.
Wrong sewing loot is used
Needle is nat threaded correctly
Bobbin is not threaded correctly
Needle/lobrrc/Ihieod ratio is incorrect
Incorrect tensions.
Foot pressure is too heavy
Needlers too large for fabric
Wrong stitch length is used
Tension is too heavy
Thread is of poor quality.
Foot pressure is too light
Bobbin is threaded ‘ncarrectly
Material is being pulled by opeiator
Machine needs oil
Lint and oil residue hove coltected in hook or on needle bar
Inferior oil has been used and gums.up machine.
CAUSE
Mochine is threaded incorrectly
Tension is too light
Thread is too heovy for needle size.
Needle is inserted incorrectly
Thread may he cougfst on reel holder
Needle is damaged
Bobbin cose is not inserted correctly
TROUBLE-SHOOTING GUIDE
C0NDIrION
lop thread breok
Lower thread breaks
Skipped stitches
Needle breakage
Striching forms loops
Seams shrink or pucker
Irregular stitching/feeding
Machine is noisy
ond rough
4. Needle is dorioged
5. Machine requires servicing
I
2.
3
4
5.
6
I
2
3
I
2
3
4
5
I
2
3
4
5.
I
2
3
4
-•.1.)-- ray.
___________
___________
__________
_______
__
REMEDY
Rethreod machine and needle
Reduce tension on top (smaller numbers)
Use larger needle
Reinsert needle (flat side toward bock)
Remove spool, rewind excess thread.
Insert new needle.
Repostron bobbin Check by pulling thread If it pul Is
smoothly Its correct
Check for correct threirdirrg
Clronge bobbin tension according to instructions
Reinsert needle (flat side toward bock).
fnsert new needle
Match needle size to fabric and thread weight
Check to see ii proper sewiiig foot used
Check foot pressure regulation for proper setting
Inserl new needle
Reinsert needle correctly (flat side toward bock)
Match needle size to thread & fabric weight
Do riot pull on cloth. Check for proper foot pressure
Use correct loot
Thread needle front to bock
Thread bobbin according to chart
Match needle size to thread & fabric weight.
Set correct tensions.
.-r
I Reduce foot pressure )srrroller numbers)
2. Use smaller needle
3 Adjust length for proper stitches
4 Check tensions
I Use quolity thread!
2 Increase foot pressure (larger numbers)
3 Tfrreod bobbin ogorr and check for proper insertion.
4 Do not pull on fabric leI it feed automatically
I Oil according to instructions
9 Clean race and hook accardin to instructions
3. Clean and oil again only with fine sewing machine oil
(not 3-in-I oil)
4 Replace needle.
5. Consult your specialist dealer.
-
C’
:
5,\i