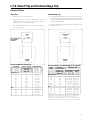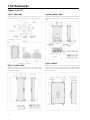
1
®
I-T-E Molded Case
Circuit Breakers
Bulletin SIB 2.7-7A
Sensitrip®
JD & LD-Frame
Information and
Instruction Guide
I-T-E® JD & LD-Frame Circuit Breakers
3-Pole, 200-600 Amperes
Types SJD6, SHJD6, SLD6, SHLD6, SCJD6, SCLD6
Digital Solid State Circuit Breakers
Table of Contents
Important Notices
2
Accessories (Cont’d):
General Information
3
Side Handle Operator
Dimensional Reference Drawings
Installation Instructions
4,5
6
Operational Characteristics:
29
Rotary Handle (D11CJU2)
30,31
Rotary Handle (RHOJSD, RHOJVD)
32,33
Max-FlexTM Flange-Mount Handle Operator
34-37
TELEMAND® Electric Motor Operator
38-40
Trip Unit Adjustments
7-11
Time Current Curves
12-15
Connecting Straps
41
Let-Thru Curves
16,17
Enclosures
42
Connecting Studs
18,19
Door Latch Mechanism
43,44
Plug-In Adapters
20,21
Neutral Sensing Transformer
45,46
47,48
Pressure Wire Connectors
22
TS-31 Test Kit
Compression Connectors
23
Ordering Information:
Handle Locking Devices
24
Circuit Breaker Catalog Numbers
49,50
Accessories:
Internal Accessory Catalog Numbers
51
Shunt Trip, Undervoltage Trip,
Auxiliary Switch and Bell Alarm
Switch Installation
Additional Accessory Catalog Numbers
52
Shunt Trip and Undervoltage Trip
Mechanical and Electrical Check
Auxiliary Switch and Bell Alarm
Switch Mechanical and
Electrical Check
25,26
Miscellaneous:
UL Listings and File Numbers
53
Industry Specifications
53
27
28
IMPORTANT
The information contained herein is general in nature and is not intended for
specific application purposes nor is it intended as a training manual for
unqualified personnel. Refer to Note for definition of a qualified person.*
It does not relieve the user of responsibility to use sound practices in
application, installation, operation and maintenance of the equipment
purchased or in personnel safety precautions. Should a conflict arise
between the general information contained in this publication and the
contents of drawings or supplementary material or both, the latter shall take
precedence. Siemens Energy & Automation, Inc. reserves the right to make
changes in specifications shown herein or add improvements at any time
without notice or obligation.
NOTE
*Authorized and qualified personnel—
For the purpose of this manual a qualified person is one who is familiar with
the installation, construction or operation of the equipment and the hazards
involved. In addition, he has the following qualifications:
(a) is trained and authorized to de-energize, clear, ground, and tag
circuits and equipment in accordance with established safety practices.
(b) is trained in the proper care and use of protective equipment such as
rubber gloves, hard hat, safety glasses or face shields, flash clothing,
etc., in accordance with established safety practices.
(c) is trained in rendering first aid.
SUMMARY
These instructions do not purport to cover all details or variations in
equipment, nor to provide for every possible contingency to be met in
connection with installation, operation, or maintenance. Should further
information be desired or should particular problems arise which are not
covered sufficiently for the purchaser’s purposes, the matter should be
referred to the local sales office listed on back cover of this instruction guide.
The contents of this instruction manual shall not become part of or modify
any prior or existing agreement, commitment or relationship. The sales
contract contains the entire obligation of Siemens Energy & Automation,
Inc. The warranty contained in the contract between the parties is the sole
warranty of Siemens Energy & Automation, Inc. Any statements contained
herein do not create new warranties or modify the existing warranty.
2
Information and Instructions
General Information
General
JD and LD-Frame Solid State Sensitrip style breakers of the
Sentron family are for use in individual enclosures, switchboards, and power distribution panel boards. They are
available both as 80% and 100% rated devices and in three
interruption ranges as shown in the table below.
AAAA
AAAA
AAAA
AAAA
AAAA
AAAA
AAAA
AA
AAAA
AAAA
AAAA
AAAA
AAAA
AAAA
AAAA
AAAA
AAAA
AAA
AAAA
AAAA
AAAA
AAAA
AAA
AAAA
AAAAA
AAAA
AAAAA
AAAA
AA
AAAA
AAA
AAAA
AAAA
AAA
AAAA
A
A
AAAAAAAAAAAAAAAAAAAAAAAAAA
A
A
AAAA
A
Symetrical RMS Amperes UL Interruption Ratings
Interruption
Rating
Type
240V AC
480V AC
600V AC
Standard
SJD6-SLD6
65kA
35kA
25kA
High Rating
SHJD6-SHLD6
100kA
65kA
35kA
Current Limiting
SCJD6-SCLD6
200kA
150kA
100kA
SCJD6 and SCLD6 type circuit breakers are designed to
meet the requirement of current limiting as outlined in the
National Electric Code, article 240-11 and UL 489 standards.
SCJD6 and SCLD6 type circuit breakers are fuseless and
therefore eliminate the requirement of locating and replacing
blown fuses should a high current fault occur. The common
trip feature of the circuit breaker is completely retained so that
all poles of the circuit breaker open when caused to trip due
to an overcurrent condition.
Pressure wire connectors, suitable for use with aluminum or
copper wire are available for all JD and LD-Frame circuit
breakers. Rear connection studs or plug-in connector assemblies are also available. The latter mounting arrangement
permits the removal of the circuit breaker from its leads
without physically coming in contact with either line or load
terminals. UL listed special features such as a shunt trip,
auxiliary and alarm switches and undervoltage trip devices
are available for internal mounting. The installation and/or
removal of these devices is to be accomplished by qualified
personnel only.
The chart below illustrates the functions available in all
Sentron Solid State Sensitrip circuit breakers.
Breaker
Suffix
Letters
AAAA
AAAA
AAAA
AA
AAAA
AAAA
AAAA
AAAA
AAAA
AAAA
AAAA
AA
AAAA
A
AAAA
AAAA
A
A
AAAA
AAAA
A
Adjustments
No AAAA
G AAAA
NT AAAA
NGT A
AAAA
AAAA
AAAA
AA
AAAA
A
AAAA
A
A
Suffix
AAAALong
AAAA
AAAAAAAAAAAAAA
A AAAA
A AAAA
A
A
Time Adj.
Current Setting
Adj.
Long Time Delay
Adj.
Instantaneous
Setting
Adj.
Short Time Pick Up
Adj.
Short Time Delay
Adj.
Short Time I²t
Pick Up
Adj.
Ground Fault
Pick Up
Adj.
Ground Fault Delay
✓
✓
✓
✓
✓
✓
✓
✓
✓
✓
✓
✓
✓
✓
✓
✓
✓
✓
✓
✓
✓
✓
NOTES: “G” suffix in catalog number denotes circuit breaker for 3 phase, 3 wire circuits. For
3 phase, 4 wire, order correct 4th wire (neutral) transformer as separate and additional item.
For 100% rated breakers, an “H” is added at the end of the normal catalog number
Circuit Breaker Operation
With the mechanism latched and the contacts open, the
operating handle will be in the OFF position. Moving the
handle to the ON position closes the contacts and establishes
a circuit through the circuit breaker. Under overload or short
circuit conditions sufficient to trip or open the breaker automatically, the operating handle moves to a position between
ON and OFF. To relatch the circuit breaker after automatic
operation, move the operating handle to the extreme OFF
position. The circuit breaker is now ready for reclosing.
The overcenter toggle mechanism is trip free of the operating
handle. The circuit breaker, therefore, cannot be held closed
by means of the handle should a tripping condition exist. After
automatic operation, the handle will assume an intermediate
position between ON and OFF, thus displaying a clear
indication of tripping.
NOTE: The lockable cover shield prevents unauthorized
access to trip unit. See photo on page 53.
Manual Operation
Manual operation of the circuit breaker is controlled by the
circuit breaker handle and the PUSH-TO-TRIP button. The
circuit breaker handle has three indicating positions, two of
which are molded into the handle to indicate ON and OFF.
The third position indicates a TRIP position and is between
the ON and OFF positions.
A.
Circuit Breaker Reset After tripping, the circuit breaker
is reset by moving the circuit breaker handle to the reset
position and then moving the handle to the ON position.
B.
The PUSH-TO-TRIP Button PUSH-TO-TRIP button
checks the tripping function and is used to manually
exercise the operating mechanism.
3
I-T-E JD and LD-Frame Outline Drawings(1) — 3-Pole
Types SJD6, SHJD6, SLD6. SHLD6
4
I-T-E JD and LD-Frame Outline Drawings(1) — 3-Pole
Types SCJD6, SCLD6
5
I-T-E JD and LD-Frame Installation Instructions
General
NOTE: This instruction page outlines the recommended
installation procedure.
The JD and LD-Frame circuit breaker line includes types
SJD6, SHJD6, SCJD6, SLD6, SHLD6 and SCLD6 circuit
breaker types. These devices are rated for operating voltages up to 600VAC, 50/60 Hz.
Installation of Breaker
JD and LD circuit breaker devices are for use in individual
enclosure, panelboards, switchboards or other approved
equipment.
The installation procedure consists of inspecting, attaching
required accessories, mounting the device and connecting
and torquing the line and load wire connectors.
Mounting hardware and unmounted wire connectors (where
required) are available as separate catalog items.
A. Turn off and lock out all power before installing or
servicing.
B. Make sure that the device is suitable for the installation
by comparing nameplate ratings with system requirements. Inspect the device for completeness and check
for any damage before mounting.
C. Device must be in TRIPPED or OFF position prior to
mounting.
D. To mount the device perform the following steps:
1. For individual enclosures, panelboards and switchboards manufactured by Siemens Energy & Automation, Inc., follow the instructions provided with
this equipment.
2. For those applications where mounting is on a flat
surface of the customers equipment, drill and tap
mounting bolt holes according to the drilling plan in
Figure 1. For handle escutcheon cut out plans refer
to Figure 2.
3. If device contains internal accessories, make sure
terminals can be connected when the circuit breaker
is mounted.
4. Position device on mounting surface.
5. Install mounting screws and washers. Tighten hardware securely.
6. After mounting the device, line and load terminals
and accessory terminals should be connected.
7. After the device is installed, check all mounting
hardware for secureness. Check wire connectors
for correct torque requirements. Torque values for
line and load connectors are Provided on the device
nameplate.
6
Figure 1
Figure 2
JD and LD-Frame Trip Adjustments
7
JD and LD-Frame Trip Adjustments
Figure 1
Breaker Functions
In=Nominal Rating of Circuit Breaker
AAAA
AAAA
AAAA
AA
AAAA
AAAA
AAAA
AAAA
AAAA
AAAA
AAAA
AAAA
AAAA
AAAA
AAAA
AAAA
Function
Performance
AAAA
AAAA
AAAA
AA
AAAA
AAAA
AAAA
AAAA
AAAA
AAAA
AAAA
AAAA
AAAA
AAAA
AAAA
AAAA
AAAAAAAAAAAAAAAAAAAAAAAAAAAAAAAAAAAAAAAAAAAAAAAAAAAAAAAAAA
AAAA
Continuous Ampere (Ir) Varies the level of current the circuit breaker will carry without tripping. Completely adjustable
from 20 to 100% of breaker's continuous ampere rating. (I, = % of In)
8
Long-Time Delay
Referred to as the overload" position, this function controls the breaker's "pause-in-tripping"
time to allow low level, temporary inrush currents such as those encountered when starting a
motor to pass without tripping. Adjustable settings from 3 or 25 seconds at 6 x Ir are possible.
Short-Time Pickup
Controls the amount of high current the breaker will remain closed against for short periods of
time, allowing better coordination. Adjustable between 1.5 to 10 times the continuous ampere
setting of the circuit breaker (i.e., adjustable from 1.5 to 10 times 1r).
Short-Time Delay
Controls the amount of time (from .05 to .2 seconds in fixed time, or .2 seconds at 6 x Ir in the
12t ramp mode) a breaker will remain closed against high fault current. This function is used in
concert with the Short-Time Pickup function to achieve selectivity and coordination. (A
pre-determined override automatically preempts the setting at 10.5 times the maximum
continuous ampere setting In.)
Instantaneous Pickup
Determines the level at which the circuit breaker trips without an intentional time delay The
instantaneous pickup function is adjustable from 2 to 40 times the continuous ampere setting
(Ir) of the breaker (Anytime an overlap exists between the instantaneous and short-time pickup
settings the instantaneous automatically takes precedence.)
Ground Fault Pickup
Controls level of ground fault current which will cause circuit interruption to occur. Complies
with National Electrical Code, Article 230, Section 95(a) for maximum trip point settings.
Adjustable from 20 to 70 percent of the breaker's maximum continuous ampere setting (In)
Ground Fault Delay
Adds a predetermined time delay to the trip point once ground fault pickup level is reached.
Inverse 12t ramp is standard which provides better tripping selectivity between the main and
feeder or other downstream breakers.
JD and LD-Frame Trip Adjustments
Continuous Current (I,) and Long Time Delay
Instantaneous Pickup
All models have a Continuous Current and Long Time Delay
adjustment. This single knob adjusts the Continuous Current
setting of the circuit breaker and sets the Long Time Delay.
This setting (I,) is a percentage of the Maximum Continuous
Current rating (In) Two long time delay bands are available.
These are delay times of 3 seconds or 25 seconds at 6 times
the Continuous Current Setting (Ir) These are selected by
using the appropriate area of the setting.
All models have an instantaneous Pickup adjustment. This
adjustment sets the instantaneous Pickup of the circuit
breaker. The settings are multiples of the Continuous Current
Setting (I,).
These devices have a fixed instantaneous override of approximately 10.5 times the Maximum Continuous Current
rating (In) of the circuit breaker. When set to “MAX” the
Instantaneous Pickup defaults to the instantaneous override
value.
9
JD and LD-Frame Trip Adjustments
Short Time Pickup/Short Time Delay (Optional)
Ground Fault Pickup (Ig) (Optional)
Circuit breakers with the letters “NT” in the catalog number
have an adjustment to set both the Short Time Pickup and the
Short Time Delay. This single knob sets both pickup and
delay at the same time.
Circuit breakers with the letter “G” included in the catalog
number have integral equipment ground fault protection.
These circuit breakers have an adjustment to set the Ground
Fault Pickup current (Ig) as a percentage of the Maximum
Continuous Current rating (In) The pickup has a built in time
delay. Three time delays are available of 0.1, 0.2, or 0.4
seconds. These are selected by using the appropriate area
of the setting. Below 50% Maximum Continuous Current
rating (In) the pickup delay has an 12t slope.
Four delays are available. These are fixed delays of 0.05, 0.1,
or 0.2 seconds or an 12t delay slope at 0.2 seconds at 6 times
the Continuous Current Setting (Ir ) The delay is selected by
using the appropriate area of the setting knob. The pickup
settings are multiples of the Continuous Current Setting (Ir ) of
the circuit breaker.
10
JD and LD-Frame Trip Adjustments
The ground fault option has two modes of operation. The
modes are set by a switch on the side of the trip unit with the
settings identified as GROUND RETURN and RESIDUAL.
See Figure 1 for switch location.
Residual Setting (Outgoing Circuit Method)
This is the standard position to which the breaker is set when
shipped from the factory. With the switch in this position the
circuit breaker may be used on 3 phase 3 wire or, with the
addition of an external neutral sensing transformer, on 3
phase 4 wire systems. See Neutral Sensing Transformer
section pages 45 and 46 for more information.
Ground Return Setting (Ground Return Method)
This setting may only be used for service disconnects or
separately derived systems. With the switch in this position
the circuit breaker may be used on 3 phase 3 wire and 3
phase 4 wire systems. An external sensing transformer which
is installed on the main bonding jumper is required for this
method. See Neutral Sensing Transformer section pages 45
and 46 for more information.
Electronic Testing
Sensitrip III solid state molded case circuit breakers may be
tested for electronic functionality by the use of TS-31 test set.
Neutral Sensing Transformer
An external transformer is required for circuit breakers
equipped with ground fault protection when operating in the
RESIDUAL mode on 3 phase 4 wire systems and when
operating in the GROUND RETURN mode on any system.
The sensors listed below must be used for these applications.
The sensor catalog number must be matched to the circuit
breaker Maximum Continuous Current rating (In) as shown in
Table 1. Please note that sensors used with other breaker
types cannot be used with the SJD/SLD circuit breakers.
Installation instructions are included with the sensors.
Table 1
AAAA
AAAA
AA
AAAA
AAAA
AAA
AAAA
AAAA
AA
Transformer
Circuit
Breaker
Transformer
AAAA
AAAA
AA
AAAA
AAAA
AAA
AAAA
AAAA
AA
Catalog
No.
Rating
Color
AAAA
AAAA
AA
AAAA
AAAA
AAA
AAAA
AAAA
AAAA
AAAAAAAAAAAAAA
AAAAAAAGREEN
AAAAAA
AA
NO2SJD200
Amps
NO3SJD300
NO4SJD400
NO5SLD500
NO6SLD600
Amps
Amps
Amps
Amps
Maintenance
JD and LD frame circuit breakers are designed to provide
years of maintenance free service. Experience has shown
that properly applied molded case circuit breakers normally
do not require maintenance. However, some industrial users
may choose to establish an inspection and maintenance
procedure to be carried out on a regular basis. For detailed
information, consult applicable NEMA publication or your
local Siemens sales office.
NOTE: Do not spray or allow any petroleum based chemicals, solvents or paints to contact the molded parts or
nameplates.
GREEN
GREEN
GREEN
GREEN
11
JD and LD-Frame Time Current Curves
12
JD and LD-Frame Time Current Curves
13
JD and LD-Frame Time Current Curves
14
JD and LD-Frame Time Current Curves
15
JD and LD-Frame Let-Trhu I2t Curve
Types SCJD6, SCLD6
16
JD and LD-Frame Let-Trhu Current (Ip) Curve
Types SCJD6, SCLD6
17
I-T-E Rear Connecting Studs
Breaker Preparation (Figure 2)
A. Remove wire connectors from breaker if present.
B. Attach long and short studs (1), (2) to circuit breaker for
three pole devices, short studs (1) only for two pole
devices. Attach with the 5/,6-18 X 1 in. hex head bolt and
the 5/16 in. serrated cone lockwasher (4). Tighten finger
tight only.
C. Slide one stand-off insulator (5) onto each stud until the
stand-off insulator fully covers the square end of the
studs. Tighten hex head bolt (3) to 132 in. Ib. and install
insulator (10) over studs only if using a metallic mounting
panel.
General Description
One complete rear stud assembly requires the following:
1
1
1
1
1-12 threaded stud
Molded stand-off insulator
Insulator bushing
Insulator (req’d for metallic
mtg. panels only
1 “T” connector
2 Brass locknuts
1 5/16-18 X 1 in. mtg. bolt
1 5/16 in. Belleville washer
Application Information
AAAA
AAA
AAAA
AAA
AAAA
AAAA
AAAA
AAAA
AA
Ampere
Poles
Quantity
per Breaker
AAAA
AAA
AAAA
AAA
AAAA
AAAA
AAAA
AAAA
AA
Rating
(In)
AAAA
AAA
AAAA
AAA
AAAA
AAAA
AAAA
AAAA
AA
AAAA
AAA
AAAA
AAA
AAAA
AAAA
AAAA
AAAA
AA
200, 300
2
4 of RS-5774
400
500, 600
3
4 of RS-5774 plus 2 of RS-5773
2
4 of RS-5784
3
4 of RS-5784 plus 2 RS-5783
Mounting Preparation (Figure 1)
Final Assembly (Figure 3)
A. Install circuit breaker so that all studs extend through
mounting panel and the stand-off insulators (5) are
seated against the mounting panel.
B. Install insulator bushings (6 and 7) over studs where
required and tighten them securely in place against the
mounting panel with the locknut (8).
C. Thread the second locknut (8) and the “T” connector (9)
over the studs as far as possible where required. Position “T”
connector as desired by loosening (one full turn max.) and
lock in place with the second locknut at 132 in. Ib.
Important User Note
Assemblies are designed with adequate 600 volt electrical
clearance between components. User installation must maintain these clearances through spacing or proper insulation.
A.
Insert the upper end shields (11) into the slots provided
at the line and load ends of the breaker (Figure 2), one
for each stud position.
B.
Affix the label Pc. No. 60229 to breaker cover (Figure 2).
C.
Make desired bus bar connections with 5/16 in. bolts
and washers to “T” connectors. (See Figure 3 for hole
pattern of “T” connector).
A. Drilling locations are shown in Figure 1. The 5/6 in. wide
cutout between holes is required when mounting the
breaker with stud assemblies to a metallic panel.
18
Installation, Diagrams
19
I-T-E Plug-In Adapters
General
Mounting Block (Figure 3)
A complete plug-in installation requires one line end adapter
assembly (consisting of a mounting block, tulip connectors
and associated hardware), one load end adapter assembly
and one switchboard mounting plate. The switchboard
mounting plate is optional and can be replaced by other
mounting means to suit customer’s requirements.
A.
Breaker Preparation (Figure 4)
Application Information
AAAA
AAAA
AAAA
AALine EndAAAA
AA Load End
AA
AAAA
AAA
Breaker
Type AA
No. Of AAAA
Switchboard
AAAA
AAAA
AA
AAAA
AA
AAAA
AAA
Poles AAAA
Adapter AAAA
Adapter
Mtg Plate
AAAA
AAAA
AA
AAAA
A
AAAA
A
AA
AAAA
Cat No. AAAA
Cat No.
Cat. No.
AAAAAAAAAAAAAAAAAA
A
A
AAAA
AAAAAAAAA
AAA
SJD6,SHJD6
SLD6,SHLD6
SCJD6
Align mounting block (2) with cutouts in switchboard
mounting plate (or customer’s mounting means as
previously prepared in Step B above) and secure in
place with 5/16 in. lockwashers (3) and 5/16 in. bolts (4)
furnished .
2
PC5777
PC5777
PL5796
3
PC5778
PC5778
PL5796
2
PC5660
PC5660
PL5796
3
PC5661
PC5661
PL5796
2
PC5660
PC5660
PL5797
3
PC5661
PC5661
PL5797
2
PC5660
PC5660
PL5797
3
PC5661
PC5661
PL5797
A . Remove pressure wire connectors from breaker if present.
Place tulip clip assembly (5) on back of breaker in recess
provided in base molding. Secure in place with 1/4 in.
Belleville washers (6) and 1/4 in.-20 x 1 hex head bolts
(7) furnished. Recommended tightening torque for these
bolts is 5-6 ft. Ib. to assure a good electrical connection.
Repeat this procedure for the remaining tulip clip assemblies.
B.
Insert line end shields (8) into slots provided at line and
load end of breaker No lower end shields are required.
C.
Affix accessory warning labels (9) to top of breaker as
indicated in Figure 5.
Final Assembly (Figure 6)
SCLD6
Mounting Preparation (Figures 1 and 2)
A.
If the switchboard mounting plate (PL5796, PL5297) (1)
is to be used, provide drilling as shown in Figure 1.
B.
If other mounting means are to be used, provide the
cutouts and drilling required to mount the adapter blocks
as shown in Figure 2.
Switchboard Mounting Plate, if used (Figure 3)
A.
20
Place switchboard mounting plate (1) in position at
location previously prepared in Step A above. Secure in
place with 5/16 in Lockwashers (3) and 5/16 in. bolts (4)
furnished.
A.
Make bus connections to flat bar connectors at rear of
mounting blocks with customer supplied 5/16 in. hardware (see Figure 6 for hole pattern).
Caution: Make certain that breaker operating handle is in the
OFF position before proceeding with the next step.
B.
Align breaker with mounting blocks and force female
tulip clips over male studs in mounting blocks until
breaker base bottoms against mounting block. Secure
breaker in place with ‘/4-20 x 3 in. mounting screws (10),
lockwashers (11) and flatwashers (12) furnished.
C.
If installation requires use of front panel trim, provide
cutout for breaker escutcheon (Figure 7).
Installation Diagrams
21
I-T-E Pressure Wire Connectors
General
Each connector kit contains a solderless connector and
associated hardware for making one line or load connection.
Installation
NOTE: Trip unit must be installed in circuit breaker prior to
mounting load end connector.
A.
Tighten mounting screws (1) to securely attach connector. See table for torque values.
B.
Tighten set screws (2) securely to prevent overheating of
conductor and connector. See table for torque values.
Figure 1
AAAA
AAAA
AAA
AAAA
AAAA
AA
AAAA
AAAA
AAAA
AAAA
AA
AAAA
AAAA
AAAAAAA
AAAA
AAAAA
AAAA
AAAA
AAAA
Mounting
AAAA
Connector(2)
AAAA
AAA
AAAA
CircuitAAAA
BreakerAAAA
AA
AAAA
AAAA
AAAA
AA
AAAA
Set
AAAA
ScrewAAA
AAAA
AAAA
A
ForAAAA
Use With
AAAA
Connector
Wire
Range
Screw
Torque
AAAA
AAAA
AAA
AAAA
AAAA
AA
AAAA
AAAA
AAAA
AA
AAAA
AAAA
AAA
AAAA
AAAA
A
AAAA
AAAA
Catalog
Numbers
Ampere
RatingAAAA
Torque
(in. Ib.)
Type(s) AAAA
(in.
Ib.)
AAAA
AA
AA
AAAAA
AAAA
AAAAAAAA
AAAAAAA
AAAAAAA
AAAAAAAA
AAAAAAAA
AA AAAA
AAAA
AAAAAAAA
AAAAAAAA
AAAAAAAA
AA AAAA
AAAA
AAAAAAA
AAAAAAA
AAAAAAAA
AAAAAAAA
A
AAAAAAAA
AAAA
200-600
(1-2)#3/0-500 MCM(Cu)
(1-2)#4/0-500 MCM (Al)
300
132
200-600
(1)#500-750 MCM (Al)
200-600(1)#500-600 MCM(Cu)
or
2Pcs.of250 MCM (Al)
500
228
TA2J6500
SJD6,SLD6,
SHJD6,SHLD6,
SCJD6,SCLD6
TA1L6750
200-600
(1)#3/0-600 MCM(Cu)
500
228
200-600
(1-2)#3/0-500 MCM(Cu)
300
132
TC1J6600
TC2J6500
22
I-T-E Compression Connectors (CCL600)
H.
Select an appropriate tool and die combination from
Table 1 and make the required number of crimps within
the boundaries stamped on the connector barrel. Refer
to Figure 2 for sequence of multiple crimps.
Table 1—Compression Tool and Die Chart For
Copper and Aluminum Conductors
AAAA
AAAA
AAA
AAAA
AAA
AAAA
AA
Wire AAAA
Size AAAA
ToolAA
Tool No.
Die No.
No. of
AAAA
AAAA
AAAA
AA
AAAA
AAA
AAAA
AAA
AAAA
AA
Mfgr.
Crimps
AAAA
AAAA
AAAA
AA
AAAA
AAA
AAAA
AAA
AAAA
AAAA
AAAAAAAA
AAAAAA
AAAAAAA
AAA
AAAA2 AA
AA
500 MCM
Homac
UT-15
94, 96
500 MCM
Burndy
Y 35
655, 321,
316
3
500 MCM
Kearney
WH-2
1-1/8-2
2
1/0-500 MCM
Square D
VC-6
-
2
General
NOTE: This instruction sheet outlines the recommended
installation procedure. Use of these lugs in some installations may result in less wire bending space than is
specified in the National Electric Code.
Installation of Compression Connector
A.
Turn off power supplying device before installation compression lugs.
B.
Remove any existing wire connectors from circuit breaker.
C.
Install circuit breaker.
D.
Preform cables to final configuration and strip insulation
back 11/,6 in. on each conductor. Use an appropriate
insulation stripping tool to avoid damaging the conductor. (See Figure 1.)
Figure 2
I.
Remove any inhibitor compound expelled during the
crimping operation from the connector body and the
cable insulation .
J.
Slip insulating cover over connector tang and then over
connector barrel so that only the connector tang is
exposed (Figure 3).
Warning: Short spacings will result if Step J is not followed.
Figure 1
E.
Clean aluminum conductor surfaces thoroughly with a
wire brush or other suitable means, to remove oxides
and other contaminants from the conductor.
NOTE: Copper wires and the compression connector should
not be cleaned abrasively.
F.
Remove cap from compression connector and insert
cable fully into barrel (1) (Figure 1) of connector
G. Insure that connector tang(s) (2) (Figure 1) are in their
proper orientation prior to crimping. This helps avoid
twisting of cables during installation.
Figure 3
K.
Position connector tang on top of the circuit breaker
terminal pad and secure with 3/8-16 x 1 1/2 in. socket
head cap screw and conical spring washer. Conical
spring washer is to be installed with convex side of
washer toward underside of screw head (Figure 3).
Torque screw to 228 in-lb.
NOTE: If only using one lug for proper ampacity, insert spacer
supplied with kit between spring washer and compression lug.
23
I-T-E Handle Locking Devices
ATTACHING I-T-E HANDLE BLOCKING DEVICE
(J6HBL)
To Block Handle ON
Turn Breaker ON. Assemble blocking device to breaker by
positioning over handle as shown, with handle opening of
blocking device toward the line end. Insert tab A into slot A1.
Push toward handle and downward in area shown (Figure 1)
until tab B drops into slot B1 (Figure 2).
To Block Handle OFF
Turn Breaker OFF. Reverse handle blocking device so that
handle opening of blocking device is toward the load end.
Insert tab A into slot B1. Push toward handle and downward
in area shown until tab B seats in slot A1 (Figure 3).
ATTACHING I-T-E PADLOCKING DEVICE (J6HPL)
With breaker in TRIPPED position, assemble padlocking
device to breaker by positioning over handle as shown. Insert
tab A into slot A1. Pivot tab B into slot B1 until surface D is
resting on surface C (Figure 4). Install #6-32 x .188 nonremovable screws (2 places).
To Lock Handle OFF
To padlock handle in OFF position, move breaker handle to
OFF and move slider to the right until .375 in. dia. holes line
up, allowing padlock to be installed (Figure 5).
To Lock Handle ON
To padlock circuit breaker in ON position, enlarge 12 in. dia.
hole of slider to .375 in. dia. before assembly to breaker. File
away burrs after drilling. Assemble padlocking device to
breaker as explained above, then turn breaker ON and install
padlock.
Figure 1
Figure 4
Figure 2
Figure 5
Figure 3
24
I-T-E Internal Accessories
Circuit Breaker Preparation
A.
Depress trip button (Figure 1 ) to trip circuit breaker prior
to removing cover. Before attaching accessory unit,
circuit breaker must be in tripped position.
B.
Remove two terminal shield screws on load end cover
(1), load end cover screws (5 or 9) (2) and, if breaker is
mounted, also remove mounting screws (not shown).
Remove load end cover only (3). Accessory units can be
mounted in right pole only of the circuit breaker.
Figure 1
Accessory Mounting Instructions
A.
Feed accessory leads down and through 5/16 X 1/2 in.
elongated opening (4) to bring leads out of bottom of
circuit breaker (Figure 3). NOTE: Leads must be brought
out in the same order as they exit wire retainer of
accessory case.
B.
Accessory is located in circuit breaker by groove (5),
bottom side of accessory. Remove protective label from
top of trip unit and guide actuator (9) into opening (10).
NOTE: On shunt trip, undervoltage trip and auxiliary switch
accessories, transfer link is in top opening and transfer
link slides into top opening of trip unit. Transfer link is in
bottom opening of Bell Alarm switch and slides into
bottom opening of the trip unit.
Figure 2
Figure 3
25
I-T-E Internal Accessories
Recommended Combinations
C.
D.
Slide accessory down to rest on pad (6) trip unit. When
accessory is installed correctly, front of accessory (7) will
rest on pad (8) of line cover. Pull gently and evenly on
accessory wire leads (2 to 6 wires) while lowering
accessory into base. Make sure all the slack is removed
from leads inside breaker.
Replace load end cover (3), cover screws (2) and four
mounting screws if mounted. Replace terminal shield
with screws (1).
E.
Add two labels to circuit breaker. Attach identification
label (11) to appropriate space in label on top of circuit
breaker on right hand side. Attach accessory information label (12) on side of circuit breaker base (Figure 5).
F.
Refer to Electrical Check, pages 27 and 28.
Figure 4
Figure 5
26
Maximum Installable Accessory Combinations
Shunt
Undervoltag
Auxiliary
Bell Alarm
AAAA
AAA
AAAA
AAAA
AAAA
AAAA
AAAA
AAAA
AAAA
AAA
AAAA
AAAA
AAAA
AAAA
AAAA
Trip(1)
Trip
Switch
Switch
AAAA1 AAAAAAA0AAAAAAAA1AAAAAAAA0 AAAA
AAAA
0
0
0
1
0
0
(1) Shunt trip units include a coil clearing switch.
NOTE: See page 51 for catalog combinations.
2
2
2
0
0
1
I-T-E Shunt Trip and Undervoltage Trip
Electrical Check
Shunt Trip
Undervoltage Trip
A.
Reset and turn circuit breaker ON.
A.
B.
Attach test circuit to accessory leads. When the test
voltage reaches 55 percent or more of the rated coil
voltage, the circuit breaker should trip.
With breaker in TRIPPED position, connect test circuit to
accessory leads. Energize undervoltage trip device at 85
percent of the marked rated voltage of the coil. Reset and
turn breaker handle ON.
B.
C.
With breaker TRIPPED or OFF, check to make sure coil
circuit has opened.
Reduce voltage to 35 percent of rated coil voltage. Circuit
breaker must trip.
Electrical Data For Shunt Trip
Coil Voltage
InrushAAAA
CurrentAA
CatalogAAAA
Number
AAAA
AAAA
AA
AAAA
AAAA
AA
AAAA
AAAA
AA
AAAA
AAAA
AAAA
AAAA
AA
Coil At
Rated AA
AAAA
AAAA
AA
AAAA
AAAA
AA
AAAA
AAAA
AA
Voltage
AAAA
AAAA
AA
AAAA
AAAA
AA
AAAA
AAAA
(Amperes)
AAAAAAAAAAAAAAAAAAAAAAAAAAAAAA
AA
60 Cycles AC
24
48
120
208
240
277
480
600
1.2
0.8
0.395
0.265
0.165
0.190
0.145
0.080
S17JLD6
S18JLD6
S01JLD6
S02JLD6
S03JLD6
S15JLD6
S04JLD6
S06JLD6
24
48
125
250
2.2
1.2
0.5
0.35
S07JLD6
S09JLD6
S11JLD6
S13JLD6
DC
Electrical Data For Undervoltage (UV) Trip(1)(2)
Coil AA
Sealed-In
Catalog
Number
AAAA
AAAA
AAAA
AA
AAAA
AAAA
AAAA
AA
AAAA
AAAA
AAAA
AA
AAAA
AAAA
AAAA
AA
VoltageAA
Current
Catalog
AAAA
AA
AAAA
AAAA
AAAA
AAA
AA
1 UV AAAA
Trip AAAA
1AAAA
UV Trip
Number
At AA
AAAA
AA
AAAA
AAAA
Plus 1AAAA
Aux. AAAA
OnlyAAA
RatedAAAA
VoltageAA
AAAA
AA
AAAA
AAAA
AA
AAAA
AAAA
AAAA
AAA
Sw.
(Amperes)
AAAA
AA
AAAA
AAAA
AA
AAAA
AAAA
AAAA
60 Cycles
AC
AAAA
AAAAAA
AAAAAAAAAAAAAAAAAAAAA
AAA
120
208
240
277
480
600(3)
DC
.03
.018
.016
.013
.008
.008
U01JLD62A
U02JLD62A
U03JLD62A
U16JLD64A
U06JLD64A
N/A
U01JLD6
U02JLD6
U03JLD6
U16JLD6
U06JLD6
U08JLD6
24
48
125
250(4)
.11
.06
.027
.02
U13JLD62A
U14JLD62A
U10JLD62A
U12JLD62A
U13JLD6
U14JLD6
U10JLD6
U12JLD6
(1)Resistor to be mounted externally of circuit breaker and connected by installer.
(2)All auxiliary switch ratings are the same as auxiliary switch kit A01FD64.
(3)Kit includes a 30k ohm, 25 watt resistor (Clarostat Cat. No. VP-25-K or equivalent).
(4)Kit includes a 2.5k ohm, 25 watt resistor (Clarostat Cat No VP-25-K or equivalent).
27
I-T-E Auxiliary Switch and Bell Alarm Switch
Electrical Check
Auxiliary Switch Kits
AAAA
AAA
AAAA
AA
AAAA
AAAA
AAAA
AAAA
AA
Catalog
Number
Ampere
Rating
of Switch
AAAA
AAA
AAAA
AA
AAAA
AAAA
AAAA
AAAA
Number
of
AAAA
AAA
AAAA
AA
AAAA
AAAA
AAAAA
AAAA
Volts
AC AAAA
Volts
DC A
Switches
AAAA
AAA
AAAA
AA
AAAA
AAAA
A
AAAA
AA
AAAA
AAA
AAAA
AA
AAAA
AAAA
AAAA
AAA
A
AAAA
A
AAAA
120
240
480
125
250
AAAA
AAA
AAAA
AA
AAAA
AAAA
AAA
AAAA
AAAAA
AAAA
AA
AAAA
AAA
AAAA
AA
AAAA
AAAA
AAA
AAAA
A
A01JLD64
1
10
10
10
0.5
0.25
A02JLD64
2
10
10
10
0.5
0.25
Bell Alarm Switch Kits
AAAA
AAAA
AAAA
AAA
AAAA
AAAA
AAAA
AAAA
Catalog
Number
Ampere
Rating
of Switch
AAAA
AAAA
AAAA
AAA
AAAA
AAAA
AAAA
AAAA
Number
Of
AAAA
AAAA
AAAA
AAA
AAAA
AAAA
AAA
AAAA
AAAA
AAAA
AAAA
AA
Volts
AC
Volts
DC
Auxiliary
AAAA
AAAA
AAAA
AAA
AAAA
AAA
AAAA
AAAA
AA
Switches
AAAA
AAAA
AAAA
AAA
AAAA
AAAA
AAA
AAAA
AAAA
AAAA
AAAA
AA
125
250
480
125
25
AAAA
AAAA
AAAA
AAA
AAAA
AAAA
AAAA
AAAA
AAAA
AAAA
AAAA
AAAA0AAAAAAA
AAAA
AAAA
AAAA
AAAA
B01JLD64
10
10
10
0.5 .25
A01JLD64B
A02JLD64B
1
2
10
10
10
10
10
10
0.5
0.5
.25
.25
Switch Identification (All With Three Leads)
AAAA
AAAA
AAA
AAAA
AAAA
AAAA
AA
WireAA
Wire
SwitchAAAA
Terminals
or Contacts
AAAA
AA
AAAA
AAA
AAAA
AAAA
AAAA
AAAA
Markings
Color
AAAA
AA
AAAA
AAA
AAAA
AAAA
AAAA
AAAA
AA
AAAA
AA
AAAA
AAA
AAAA
AAAA
AAAA
AAAA
C or C1
White
C - Common terminal
A or A1
B or B1
Black
Red
N.O. - Contact open when
breaker is open, closed when
breaker is closed.
Bell Alarm Identification (All With Three Leads)
AAAA
AAAA
AAAA
AAAA
AAAA
AA
WireAAA
Wire AA
SwitchAAAA
Terminals
or Contacts
AAAA
AAA
AAAA
AA
AAAA
AAAA
AAAA
AAAA
Markings
Color
AAAA
AAA
AAAA
AA
AAAA
AAAA
AAAA
AAAA
AA
AAAA
AAA
AAAA
AA
AAAA
AAAA
AAAA
AAAA
C
White
C - Common terminal
N.C. - Contact closed when
breaker is open, open when
breaker is closed.
Accessory units that employ a combination will have the same wiring colors or identifiers. A
double auxiliary switch combination will use wiring markings A-A1, B-B1 and C-C1.
Use a buzzer or light indicator attached to switch leads A
and C. With breaker in ON position, a light or buzzing
noise should be observed.
B.
Move handle to OFF position. Indicator light or buzzer
should turn off.
C.
Attach test to leads B and C. Light or buzzer should turn
on.
D.
Repeat Steps A through C using leads A1, B1 and C1
E.
Move handle to ON position. Indicator light or buzzer
should turn off.
(1) Should the indicator not function properly during “check”
procedure, check for incorrect installation or wiring.
28
Yellow
N.C. - Normally closed contact
(Closed when circuit breaker is
tripped.)
B
Brown
N.O. - Normally Open contact
(Open when circuit breaker is
tripped.)
A.
Use a buzzer or light indicator attached to switch leads A
and C. With breaker in ON position, trip breaker by
depressing red trip button. Indicator light or buzzer
should operate.
B.
Reset breaker to OFF Indicator light or buzzer should turn
off.
C.
Move breaker handle to ON. Indicator light or buzzer
should remain off.
Auxiliary Switch(1)
A.
A
I-T-E Slide Handle Operator
(D11JLU, D11JL4U, D11JRU, D11JR4U)(1)
Types 1, 4, 12
A.
Cut slot and holes in enclosure flange for operating
handle (1), provide mounting holes for circuit breaker (2)
and support member (3) as shown.
B. Weld interlock latch (4) to inside of cover. Additional cover
securing means also required.
C. Loosen four cover screws (5) and remove terminal shields
(14). Insert four 1/4-20 x 23/4 in. screws (6) with lockwasher
(7) and flatwasher (8) through mounting holes of circuit
breaker (2) and tighten securely to mounting surface.
Make terminal connections and reassemble the circuit
breaker terminal shields.
D. Mount support member (3) by means of four 1/4-20 in.
slotted pan head screws (9).
E. The operating handle (1) and interlock assembly (10) are
supplied preassembled. Before disassembling note the
position of the levers on the interlock assembly with
respect to the operator. Care must be taken to insure this
relationship is maintained when the device is reassembled.
F. Assemble operating handle (1) with gasket (11) from
outside of the enclosure and interlock assembly (10) from
inside of the enclosure by means of two 3/8-16 in. hex
nuts (12). When correctly assembled the operating handle
cannot be moved from the OFF position to the ON
position while the cover is open.
G. Pick up actuating member assembly (13) at hex head
screw and assemble to support member (3). NOTE: Be
sure the nylon rollers engage circuit breaker handle, Uslot engages operator and actuating member engages
slot in support member. Tighten hex head screw securely.
Figure 2
Operation
The handle cannot be operated from the OFF position to the
ON position with cover open unless the interlock mechanism
is deliberately voided. This involves turning the screw in the
handle housing counterclockwise before moving the handle.
For inspection with power on, rotate same screw clockwise to
open the cover.
(1)D11JLU, D11JL4U designate left-side handle operators; D11JRU, D11JR4U designate
right-side handle operators; D11JL4U, D11JRU are for use with 4-4x applications.
Figure 3
Figure 1
Figure 4
29
I-T-E Rotary Handle
Enclosure Mechanism
Types 1, 12
Variable Depth (D11CJU2)
General
Handle with permit locking the disconnect device in the OFF
position using up to three locks having shackles up to 3/8 in.
in dia. Provision for locking in ON position is provided/ but the
handle plate must have the material covering the locking
notch removed. This can be done with a hacksaw or file. The
handle has a voidable interlock. Voiding the interlock requires
inserting a small screwdriver into the rectangular opening in
the handle plate, which will release the handle.
A.
Measure distance F from breaker mounting surface to
top surface of cover. If distance F is less than 8 in. then
remove shaft guide bracket.
B.
Find length G by subtracting 5.50 in. from F dimension.
Mark length G from underside of operating plate on shaft
and cut shaft squarely at mark.
NOTE: Breaker must be “tripped” during installation. Push red
button marked PUSH TO TRIP (1).
C.
30
Loosen the two 8-32 screws (2) that secure both terminal
shields to the breaker, remove the two .28 in. dia.
knockouts (3) and fasten circuit breaker with four 3.56
total length fastening members (4). Wire circuit breaker
and replace terminal shields. Using 1/4-20 x 11/2 in. R.H.
screws together with lockwasher and washer supplied
with kit, attach mechanism plate assembly on breaker as
shown.
D.
Insert end of operating shaft into square socket in cast
operating arm so that top of shaft has proper relationship
to handle as illustrated in photograph on front of instruction sheet. (Breaker or handle may be rotated in 90
increments so long as relationship of handle and top of
operating shaft is held.) Tighten set screw in side of cast
operating arm (recommended torque—75 in. Ib.).
Handle Mounting
Holes in cover to be as shown in Figure 2. Mount handle with
cork gasket on cover and handle mounting plate on inside of
cover. Fasten together loosely through cover with the two
short screws provided. The two .31 in. dia. mounting holes
must be rotated in the same 90ø increments to maintain the
handle and operating shaft relationship. Close cover, adjust
handle with actuator to be free of binding. Tighten handle
mounting screws and operate handle ON and OFF to see that
circuit breaker operates satisfactorily.
Installation Diagrams
31
I-T-E Rotary Handle
Enclosure Mechanism
Types 1, 3, 3R, 4, 4x, 12
Standard Depth (RHOJSD)
Variable Depth (RHOJVD)
General Information
When properly installed, the rotary handle operator provides
single point latching of the enclosure door For maximum
protection against unauthorized entry into the enclosure,
additional latching means should be provided. The handle can
be padlocked in the OFF position with up to three 5/16 in.
padlocks. The breaker operator can also be padlocked in the
OFF position.
Drilling of Enclosure
A.
B.
Catalog number RHOSSD standard depth shafts are
used for minimum depth enclosures. Refer to minimum
dimension K in Figure 2. Catalog Number RHOSVD
variable depth shafts are used for all other enclosure
depths. Shafts are cut to length L as shown in Figure 4.
Drill and tap circuit breaker mounting holes in breaker
mounting surface (1) and handle mounting holes in enclosure door (2) as shown in Figure 1.
Installation of Shaft (RHOSSD, RHOSVD)
A.
NOTE: The proper orientation of the “wings” (11) (shown in off
position) at the end of the shaft when the breaker is in the
OFF position (Figure 4).
NOTE: It is recommended that the shaft support bracket (12)
be installed if the enclosure depth exceeds 10 in. Attach
as shown in Figure 3. Tighten to 45 in. Ib.
Installation of Handle (RHOH, RHOH4)
A.
Attach the handle (13) and gasket (14) to the enclosure
door (2) and secure with the four bolts, lockwashers and
nuts supplied (15). Tighten to 75 in. Ib. (Figure 5).
B.
Make sure that when the enclosure door is closed, the
handle interlocks with the shaft in all handle positions
except RESET/OPEN. To open the enclosure door when
the breaker is in the ON position, rotate the screw slot on
the handle plate counterclockwise. This procedure will
defeat the interlock.
C.
To lock the handle in the OFF position, pull the lock plate
(16) from the handle into the grooves on the handle plate
(17) located at the interlock defeater screw and insert the
padlocks.
D.
The unit can be modified to lock in the ON position by
cutting slots in the boss located beneath the letters ON.
Installation of Breaker and Breaker Operator
(RHOJBO)
A.
Remove the two terminal shields (3) from the circuit
breaker and punch or drill out the two .53 in. dia.
knockouts.
NOTE: Cut slots in terminal shields as shown to allow access
to terminal lugs after installation of breaker operator
without prior removal of mechanism.
Caution: Replace the terminal shields.
B.
Mount circuit breaker to enclosure panel using the four
breaker mounting screws (4) as shown. Tighten to 75 in.
lb.
C. Insert spacers (5) into the four circuit breaker mounting
holes and attach the breaker operator (6) using the four
1/4-20 X 1-3/4 in. mounting screws (7) and 1/4 in.
lockwashers (8) as shown. Tighten to 75 in. lb.
32
Shaft length for Variable Depth Operators L = K - 3.61 in.
Attach the shaft (9) to the operating arm (10) of the
breaker operator and tighten the set screw to 70 in. lb.
min.
NOTE: The score lines on the inside diameter below the letters
ON indicate the slot locations.
Installation Diagrams
33
I-T-E Max-FlexTM Flange-Mount Handle Operator
Types 1, 3, 3R, 4, 4x, 12
Application
The Max-Flex Operator is designed to work with I-T-E circuit
breakers having current ratings through 600A. The Max-Flex
unit meets all the industrial criteria such as UL and Automotive
Industry Standards.
Design
GENERAL INFORMATION
The new Max-Flex Handle Operator provides maximum flexibility in design and assembly of electrical equipment. Since
there are no linkages to assemble, the Max-Flex system can
save time during installation.
Description
The I-T-E Max-FlexTM Flange-Mount Handle Operator is a
flexible cable control device used for the remote switching of
a circuit breaker within an enclosure. The flexible cable is
connected directly to the breaker switch handle at one end
and a factory installed switch handle operator at the other end.
The remote operator handle, located on the enclosure flange,
is used to perform mechanical open/close switching operations. This is accomplished through the cable’s sliding center
race enclosed within the cable.
Function
The advanced design concept of the Max-Flex Handle Operator provides for greater flexibility when locating a circuit
breaker within an enclosure. The circuit breaker can be
mounted almost anywhere, at any angle and on almost any
convenient surface. The same flexibility applies when locating
the switch handle operator on the flange section of the
enclosure.
The cable design is flexible and rugged. It is similar to those
cables used in aircraft control systems. The flexible cable
comes in standard 3 or 4 ft. lengths. However, specific lengths
can be special ordered up to 20 ft.
Operation
When properly installed, the Max-Flex Handle Operator is
used to perform remote switching operations from outside of
the enclosure. Switching is accomplished by pushing the
Max-Flex Handle Operator up for ON and down for OFF. The
mechanical advantage gained with this device simplifies switching operations when compared with local switching at the
breaker.
This unique design offers breaker trip indication as a standard
feature. Interlocking provisions are included and described
below. All switching functions are standard to accepted
practices.
Unassembled Max-FlexTM Flange-Mount Handle Operator
34
I-T-E Max-FlexTM Flange-Mount Handle Operator
Types 1, 3, 3R, 4, 4x, 12
INSTALLATION
INSTALLATION DIAGRAMS
Mounting Max-FlexTM Handle Operator
to Enclosure Frame Assembly
A.
B.
C.
Drill the mounting holes in the enclosure flange and file all
burrs (Figures 1 and 2). Note the maximum and minimum
drill hole distances in Figure 2.
Push the rubber gasket (1) down in the groove of the
handle assembly (2) (Figure 3).
The handle and the interlock mechanism are supplied
preassembled from the factory. NOTE: For ease of
assembly, move the operating handle to the ON position.
(up toward the top of the enclosure). Mount the frame (4)
and handle assembly (2) to the enclosure flange (5) with
two #1/4-20 x 3/4 in. socket head cap screws and
lockwashers. Tighten cap screws from within the enclosure (Figure 3).
Secure E-Ring Connection
A.
B.
Rotate the bellcrank (6) clockwise to engage the return
spring (7). Hold the bellcrank in position and place the
plastic washer (8) and connecting link (9) onto the bellcrank
pin (10). Using pliers, secure the connection with an Ering (11) (Figure 3).
Mount the interlock lever extension (12) to the interlock
lever (3) using #8-32 x 3/8 in. machine screw and
lockwasher. Screw mounts through the threaded lever
extension into the lever (Figure 3).
Operating Note: With the enclosure door open/ the operating handle cannot be moved from the OFF to ON position
without deliberately defeating the interlock mechanism. In the
OFF position, the interlock can be defeated by pushing the
interlock lever extension (12) downward while moving the
handle to the ON position (Figure 2). With the enclosure door
closed and the handle in the ON position, the interlock can be
defeated by turning the defeater screw (13) on the operating
handle counter-clockwise on left-hand side and clockwise on
right-hand side. When the enclosure door is closed, the door
latch mechanism now automatically defeats the interlock.
C. Weld the door catch bracket (14) to the enclosure door.
(Figures 2 and 4).
NOTE: Holes may be drilled in the door catch bracket using
the projections as centers. User must provide the mounting hardware.
D. Fasten the door catch (15) to the door catch bracket with
two #8-32 x 5/16 in. pan head screws and external tooth
lockwashers (Figure 2).
35
I-T-E Max-FlexTM Flange-Mount Handle Operator
Types 1, 3, 3R, 4, 4x, 12
Adjusting Door Catch Mechanism
A.
Close the enclosure door and move the handle into the
ON position. Adjust the door catch downward if the
handle cannot be moved from the ON position.
With the handle in the ON position, try to open the
enclosure door without turning the defeater screw in the
handle. If the door opens, readjust the door catch and
repeat Steps A and B.
B.
Mounting Breaker Operator
The circuit breaker can be mounted remotely from the handle
within a range that is limited by the length of the operating
cable (16) (Figure 7) and the depth of the enclosure. Table 2
and Figure 5 show the horizontal range E of the circuit breaker
in 8 to 30 in. enclosures.
Table 1—Circuit Breaker Mounting Dimensions
AAAA
AAAA
AAAA
AAAAAAA
AAAAAA
AAAAAA
AAAAAAA
AAAA
AAAAAAA
A AAAA
AAAA
Breaker Type
A
B
C
D
G
Tap Size
SCJD6, SCLD6
2.5
9.75
.625
17.23
6.86
1/4-20
All Other Types
2.5
9.75
0.62
10.625
-
1/4-20
Table 2—Maximum E Dimensions
AAAA
AA
AAAA
AAAA
AAAA
AAAA
AA
AAAA
AAA
AA
AAAA
AAAA
AAAAAAA
AAAA
AAAA
AA
AAAA
AAA
AA
AAAA
AAA
A
AAA
AA
AAAA
AA
AAAA
AA
AAAA
AAA
AA
AAA
AA
AAAA
AAA
AA
AAA
AA
AA
AAAA
AAAA
AA
AAA
A
A
AA
AAA
AA
AAAA
AA
AAAA
AA
AAA
AA
AAA
AA
AAA
AA
A
AAA
AA
AA
AAAA
A
AA
AA
AA
AA
AA
AA
A
AAAAAAAAAAAAAAAAAAAAA
(1)
(1)Maximum E dimension only if F=4.6.
Table 3—F Dimensions
AAAA
AAAAA
AAAA
AAAA
AAAA
AAAA
AAA
AAAA
A
AAAA
AAAA
AAAA
AAAA
AA
AAAA
AAA
AA
AAAA
A
AAAA
AAAA
AAAA
AA
AAAA
AAAAAAAA
A AAAAAAAAAAAAAAAA
AA
Enclosure
Depth
8
10
12
16
18
20
24
30
36" Cable
48" Cable
Min.
Max.
Min.
Max.
-4.2
-5
-6.0
-4.5
-3.4
0.6
-
15.5
15.0
14.7
14.2
12.8
10.0
-
-16.0
-16.5
-17.0
-16.5
-16.0
-15.5
-14.0
-8.7
27.0
27.0
26.8
26.5
25.5
24.5
22.5
17.4
NOTE: When installed, the cable bend radius should not be
less than 3 in. This minimum wire bending requirement
must be met to insure operating safety. The mounting
procedure is as follows:
A. Determine the desired circuit breaker mounting location
using Tables 1, 2 and Figure 5.
B. Drill and tap four mounting holes (17) in the enclosure
back panel using dimensions A and B from Table 1.
C. Remove the four terminal shield screws (18) and two
terminal shields (19).
D. Punch or drill out the two .531 in. dia. knockouts in the
terminal shields. REPLACE THE SHIELDS.
E. Fasten circuit breaker to prepared mounting surface
using four breaker mounting screws (20).
F. Place the four spacers (21) into the breaker mounting
holes.
G. Fasten circuit breaker operating mechanism (22) onto
circuit breaker with four lockwashers (23) and four 1/4-20
X 13/4 in. screws (24).
Securing Operating Cable to Frame Assembly
A.
36
To attach the operating cable (16) to the frame assembly
(4), move the operating handle (2) to the ON position and
attach the cable swivel (25) to the outer hole of the
bellcrank (6). Secure the connection with an E Ring
(Figure 7).
INSTALLATION DIAGRAMS
I-T-E Max-FlexTM Flange-Mount Handle Operator
Types 1, 3, 3R, 4, 4x, 12
Tighten Detent Screws
B.
Secure the cable (16) to the frame assembly (4) by placing
it between the cable retainer clip (26) and the shim (27),
secure with two #10-32 x 3/8 in. screws and lockwashers.
NOTE: Detent (28) in cable retainer must align with the
groove (29) in the cable’s metal fitting (Figure 7).
Securing Operating Cable to Circuit Breaker
NOTE: Before attaching the cable to the circuit breaker,
installers must confirm that the power from the supply
source has been de-energized.
A. Move the circuit breaker handle to the ON position
B. Remove the soft plastic cap from the end of the threaded
cable rod (30) and slide the rod through the hole in the
sliding plate tab (31) of the circuit breaker operating
mechanism (22) (Figure 8).
C. Move the flange mount operating handle (2) to its maximum ON position and hold it in place.
D. Place the cable mounting threads (30) into the slot on the
fixed plate tab (32) so that the two mounting nuts (33) are
on both sides of the tab. Adjust the two mounting nuts so
that the #10-32 nut on the cable rod just touches the
sliding plate tab (31). Tighten the mounting nuts (33) to
secure the cable (Figure 8).
E.
fIGURE 8
Continue holding the operating handle in the ON position
and place the spring (34) over the end of the rod. Screw
on the spring adjuster (35) and tighten until it begins to
compress the spring. Do not overtighten.
Making Cable Adjustments
A.
B.
C.
D.
Check that circuit breaker turns OFF and ON by moving
the operating handle (2) up for ON and down for OFF If the
breaker does not switch ON, loosen the cable mounting
nuts (29) at the fixed plate tab (28), hold the operating
handle in the maximum ON position, and move the cable
(16) toward the top of the breaker. Retighten the mounting nuts (29) to secure.
Side View of Max-Flex Handle Operator
Trip the circuit breaker by pressing the PUSH TO TRIP
button on the front of the circuit breaker.
Check that circuit breaker resets by moving the operating
handle (2) from ON to OFF and back to ON. If the breaker
resets, tighten the spring adjuster (31) one additional
turn. Attach the lockwasher and #10-32 locknut (32) to
the end of the cable rod, and tighten the locknut.
If the circuit breaker does not reset after Step B, tighten
the spring adjuster (35) one turn and repeat Step B.
Continue this procedure until the breaker does reset,
then tighten the adjuster spring one additional turn.
Secure with the lockwasher and locknut (36).
Fixed Plate Adjustment
Spring Adjustment
37
I-T-E TELEMAND(R) Electric Motor Operator
General
The motor operated mechanism is designed to open, close
and reset a circuit breaker or switch by remote control. The
customer must supply the circuit breaker or switch, normally
ON and OFF momentary type push-buttons, external wiring,
a control power source, and all control logic. Consult the
wiring diagram (Figure 3, page 40) for a typical control
connection.
The motor operator is hinged for opening to the left or right
dependent on catalog number designation. The “L” suffix
means the motor operator is hinged to the left. A motor
operator hinged to the right uses no suffix.
Figure 2
NOTE: For automatic reset operation a separate auxiliary
contact must be provided by the customer See page 40
for more details.
Operator Selection
AAAA
AAAA
AA
AAAA
AAAA
AAAAA
AAAA
AAAA
Motor
Frame
For Use
With AAAA
I-T-E
AAAA
AAAA
AA
AAAA
AAAA
A
AAAA
AAAA
Operator
Circuit
Breakers
AAAA
AAAA
AA
AAAA
AAAA
A
AAAA
AAAA
AAAA
AAAA
AAAAAAAAAAAAAAAAAA
A
AAAAAAAA
MOJ6120
MOJ6120L
MOJ6240
MOJ6240L
JD,LD
SJD6, SLD6,
SHJD6, SHLD6,
SCJD6, SCLD6
Installation
A.
Turn off and lock out all power supplying circuit breaker
and motor operator before installing or servicing.
B.
Attach the circuit breaker to its mounting surface using
the mounting hardware (1) supplied with the motor
operator (Figure 2).
C.
Remove the four shield screws (2) and two lug shields (3)
(Figure 1).
D.
Replace the shields with those provided with the motor
operator and discard the shields which were removed.
E.
38
Open the motor operator cover and attach the motor
operator to the circuit breaker using the spacers (4) and
screws (5) provided (Figure 2).
Figure 2
I-T-E TELEMAND(R) Electric Motor Operator
F.
With the circuit breaker handle in the OFF position, align
the motor operator mechanism rollers (indicator to be in
OFF position) and the circuit breaker handle by rotating
the lead screw (6) with a screwdriver The lead screw
access hole is at the bottom of the motor operator (Figure
2).
G. Close and latch the mechanism cover
H. Complete the desired control connections and electrically test the motor operator system before reenergizing
the breaker power terminals in accordance with the
electrical operation .
Electrical Characteristics
AAAA
AA
AAAA
AAAA
AA
CatalogAAAA
Numbers
VoltsAAAA
AC AAAAAAAA
Amperes
AAAA
AAAA
AA
AAAA
AAAA
AAAA
AAAA
AAAA
AAAA
AAAAAAAAAA120AAAAAAAA
AAAAAAAAA
MOJ6120
10.0 Amperes Inrush
MOJ6120L
MOJ6240
MOJ6240L
6.0 Amperes Running
240
5.8 Amperes Inrush
2.8 Amperes Running
Electrical Operation
With the breaker and the operating mechanism in the OFF
position, press the ON button to energize the motor. The
action will close the breaker When the breaker handle reaches
the ON position, the motor circuit is disconnected by an
internal limit switch.
With the breaker and the operating mechanism in the ON
position, press the OFF button to energize the motor The
action will open the breaker When the breaker handle reaches
the OFF position, the motor circuit is disconnected by an
internal limit switch.
When the circuit breaker trips automatically, there is no
external indication that the breaker has tripped unless a
separate Bell Alarm accessory (contact Siemens for appropriate catalog number) is provided to energize a customer
furnished warning device. After the circuit breaker trips automatically, it is necessary to press the OFF button to move the
breaker handle to the reset position.
Automatic Reset
For automatic reset, an auxiliary switch (contact Siemens for
appropriate catalog number) is used to return the breaker to
the OFF/RESET position after it has been tripped. This auxiliary switch is mounted inside the breaker and wired in parallel
with the OFF button. When the breaker trips, the auxiliary
switch closes, energizing the motor circuit which moves the
breaker to the OFF/RESET position.
After the motor operated mechanism has reset the breaker,
the motor operator internal limit switch opens the circuit. To
provide automatic reset, the ON push button must be a single
pole, double throw device and it must be wired per Figure 3.
Manual Operation
Operate the two cover latches and swing the hinged motor
operator cover away from the breaker to expose the breaker
handle. To return to electrical operation, follow the installation
instructions on page 27 deleting Steps B through E. After
operation checks are complete, restore to normal operation.
Align Rollers and Handle
39
Installation Diagrams
40
I-T-E Panelboard Connector Straps(1)
41
I-T-E Enclosures
Types 1, 3, 4x, 12
Type 1—J6N1, L6N1
Type 3R—J6N3R, L6N3R
General purpose indoor, sheet-steel enclosure for use in
normal atmosphere, listed as service-entrance equipment.
An outdoor, sheet-steel enclosure providing protection against
driving rain, sleet or snow. Listed as service-entrance equipment.
Type 4—LD6SS4
Type 12—J6N12, L6N12
A special-industry, sheet-steel enclosure for indoor use in
atmosphere containing particles of lint, dirt, sawdust and
other foreign matter.
42
Stainless steel indoor or outdoor enclosure designed for use
in areas where serious corrosion problems exist. Meets NEMA
Type 3, 4, 4X, 12 and 13 requirements and UL 508 Type 4 and
4X requirements.
I-T-E Door Latch Mechanism (DKR2, DKR3, DKL2, DKL3)(1)
H.
Turn the handle 1/4 turn clockwise (looking from inside
the enclosure door) and attach the latch plate roller to the
handle shaft, while inserting the bent leg of the spring into
the hole in the latch plate. Fasten with a locking-type
flange nut. Tighten the nut, then loosen 1/8 turn to allow
movement of the roller assemblies (Figure 1).
NOTE: Straight leg of spring must rest against pin (12) on
handle plate. See inset on Figure 1.
I.
General Information
These door latch mechanisms are for use in standard or
custom built enclosures. The door latch post assemblies and
the door catch are supplied with the kits. Users must supply
their own 7/4 in. x 1/2 in. steel latch bar Enclosures with an
overall height less than 40 in. require the two-point door latch
mechanism. When the overall height is greater than 40 in., the
three-point latch mechanism is used.
The door latch mechanism can be used with or without the
type FHOH Flange Mount Handle Operator. These instructions apply when the door latch mechanism is mounted
adjacent to and interlocks with the FHOH Handle Operator.
The door handle can be padlocked to prevent unauthorized
entry into the enclosure. Drawings in these installation instructions are oriented for right-hand flange installation. Left-hand
flange installation drawings are mirror images of the righthand versions. For left-hand flange installation, substitute
“clockwise” for “counterclockwise” and vice versa, whenever
those words appear.
Installation of the Door Latch Mechanism
A.
Drill mounting holes in the enclosure door observing the
minimum dimensions shown in Figure 2. See FHOH
Handle Operator instructions for flange drilling pattern.
NOTE: D and E dimensions are determined by the height of the
enclosure.
Refer to Figure 1 for the following steps:
B. Place gasket (1) on handle plate (2) and attach handle
plate to enclosure door with two thin wall hex nuts (3).
Tighten the nuts to 100 in. Ib.
C. Insert lockout screw (4) and handle (5) through holes in
the handle plate.
D. Install latch bar post assembly (6) (screw, sealing washer,
flat washer, and special hex nut (7), if used.)
E.
Attach top (8), bottom (9) and latch plate rollers (10) to
latch bar with retaining pins and E-rings.
NOTE: Two-point latch does not have bottom roller
F. Fasten the top and bottom rollers to the enclosure door
with locking type flange nuts. Tighten the nuts, then
loosen them 1/8 turn to allow movement of the roller
assemblies.
G. Place bottom spring (11) over the bottom thin wall hex nut
inside the enclosure door
Place top spring (13) over top thin wall hex nut. Attach
lockout plate (14) to lockout screw using locking type
flange nut. Tighten flange nut. Insert bent leg of spring into
hole in lockout plate as shown in Figure 1 detail.
J . Attach the interlock defeater lever (15) to the latch bar (16)
with two #10 lockwashers and #10-24 screws.
NOTE: The position of lever depends on enclosure depth
(Figure 3)
K. Weld or rivet the door catch (17) to the enclosure door
User must supply the mounting hardware.
L. Attach the door latch label to the door handle on the
enclosure door.
Adjusting the Mechanism
If using in conjunction with the FHOH or FHOH4 Handle
Operator, perform the following steps:
A.
With the door in the-open (unlatched) position, close the
door, but do not turn the door handle. The lockout plate
should latch the door partially closed.
B.
Turn the handle clockwise to stop. This will engage the
rollers against the enclosure flange, securing the door
fully closed .
C. Check that the circuit breaker can be turned ON. If the
breaker will not turn ON, adjust the interlock defeater
lever downward to engage the lever on the handle
operator.
D. To open the door, insert a screwdriver into the handle
screw and turn the screw and handle counterclockwise.
The door will only open partially if the operating handle is
in the ON position. If the door fully opens with the handle
in the ON position, adjust the interlock defeater lever
upward and repeat Steps C and D.
NOTE: To open the door when the handle is in the ON position,
turn the latch defeater screw located on the side of the
operating handle.
Minimum Dimensions (In Inches)
C
1.922
Q
2.594
H
9.375
R
1.875
I
.50
S
1.625
J
2.688
T
250
K
1.859
U
.688
L
1.797
V
.281 Dia.
M
.391 Dia.
W
.703 Dia.
N
2.297
X
2.484
P
.719
Y
.219 Dia.
43
(1)The last letter and number designate right- or left-hand, 2 or 3 point latches.
Installation Diagrams
44
I-T-E JD and LD-Frame
Neutral Sensing Transformer
General
A. Turn off power feeding this device before starting the
installation.
B. Also turn off any line power within the immediate vicinity to
prevent the incidental or accidental contact of tools by
the installer.
NOTE: This instruction sheet outlines the recommended
installation procedure for the following Neutral Sensing
Transformers:
AAAA
AAAA
AA
AAAA
AAAA
AAA
AAAA
AAAA
AA
Transformer
Ampere
Rating
Color
AAAA
AAAA
AA
AAAA
AAAA
AAA
AAAA
AAAA
AA
Cat.
No. AA
AAAA
AAAA
AAAA
AAAA
AAA
AAAA
AAAA
AA
AAAA
AAAA
AA
AAAA
AAAA
AAA
AAAA
AAAA
AA
NO2SJD
200 Amps
Green
NO3SJD
NO4SJD
NO5SLD
NO6SLD
300
400
500
600
Amps
Amps
Amps
Amps
Green
Green
Green
Green
Caution: Incorrect usage of the neutral sensor transformer
could cause nuisance tripping or improper operation of the
ground fault function. Use only the above series of neutral
sensors.
Introduction
This neutral sensing transformer is designed to be mounted
on one 3.00" x .50" bus bar or, two 500 MCM cables,
maximum.
Mounting Procedure
A.
Position the neutral sensor within easy wiring range of the
associated circuit breaker and fabricate two .312 diameter holes 2.25 inches apart in bus or panel, as shown in
Figure 1. Orient L-Mounting brackets as necessary for
the mounting configuration being used and secure to the
neutral sensor with the hardware provided.
B. Mount the neutral sensor to bus or panel with 1/4-20
hardware (not provided).
NOTE: The SJD and SLD series of electronic trip circuit
breakers equipped with ground fault protection may be
used in the residual or ground return modes. When used
in the residual mode the orientation of the neutral sensing
transformer is important for proper operation. See Figures 2 and 3 for proper orientation of the neutral sensor
for residual mode ground fault. Orientation of the neutral
sensor is not required when used in the ground return
mode of ground fault. See Figure 4 for installation of
neutral sensor.
Figure 1
45
I-T-E JD and LD-Frame Neutral Sensing Transformer
Terminal Connections
A.
After properly orienting and mounting the neutral sensing
transformer, maintain the correct polarity by attaching
the white lead from the circuit breaker to terminal x 1 of
the neutral sensor, and the black lead to terminal x 2.
AAAA
AAAA
AAAA
AAAA
AAAA
Hardware
ListAAAAAA
QuantityAAAA
AAAA
AAAA
AAAA
AAAA
AA
AAAA
AAAA
AAAA
AAAA
AAAAAAAAAAAAAAAAAAAAAA
AAAA
10-32 Terminal Screw
2
Cupped Washer
L Mounting Bracket
1/4-20 x 5/8" machine screw
1/4" lockwasher
Breaker Label
2
2
2
2
1
Breaker Label (Figure 5)
A.
This label is to be attached to the associated circuit
breaker at installation.
Figure 3
Figure 4
Figure 2
Figure 5
46
I-T-E Universal Test Kit (TS-31)
Catalog Number xxxxxx Not Found.
Press Enter to Continue
and you will be asked to enter another catalog number.
E. If valid catalog number has been entered, the TS-31
will prompt for the Breaker switch settings. The TS-31 will
respond with:
Enter continuous current setting in %
Enter instantaneous pickup setting.
Enter long time delay in seconds.
For breakers with short time functions you may be asked
one of the following:
Enter short time pickup.
Select Short Time Delay: 1 -Fixed 2-12t
Enter short time delay in seconds.
Enter I2t delay in seconds.
For breakers with ground fault you will be asked:
Enter ground fault pickup setting in %
Enter ground fault delay in seconds
In each case, enter your breaker’s switch settings. For
example if your breaker is set for a continuous current of
70%, type 70 and then press enter. Entry of erroneous
data in the above steps will result in false tests and results.
F.
After entering the breaker switch setting you must select
the test you wish to perform. The TS-31 will request:
Enter test to perform; see instructions.
Universal Test Kit
Type in one of the following letters depending upon the
test you wish to perform:
Caution: Remove electrical loads from the circuit breaker to
be tested prior to performing tests. Failure to do so can
produce erroneous results and possible electrical systems
malfunction.
“L” - Long time or overload test,
"S" - Short time test,
Operating Instructions
“I” - Instantaneous test,
A.
Remove electrical loads from circuit breaker.
“G” - Ground fault test,
B.
Plug the TS-31 test set into a grounded 120 VAC
receptacle and turn it on. You will be greeted by the
identifying turn-on message:
"C” - Current transformer continuity test,
Siemens Energy & Automation, Inc.
TS-31 Test Set. Press ENTER to continue
C.
Select the appropriate ribbon cable assembly and connect it between the TS-31 and the circuit breaker, making
sure of alignment and polarity. After pressing ENTER, the
TS-31 will prompt:
G.
The TS-31 will report the type of test you selected and
give you a chance to abort the test. For example, if “I” was
pressed above. The TS-31 will display:
Instantaneous Test
Press ENTER to continue or A to abort
If you pressed the letter “A” to abort, you will be asked to
again:
Enter Catalog Number
D.
Type in the catalog number and then press the ENTER
key. The catalog number can be found on the nameplate
of the circuit breaker. The TS-31 will respond with:
Searching Catalog . . .
Searching Family/Series . . .
If an invalid catalog number has been entered, the TS-31
will respond with:
47
I-T-E Universal Test Kit (TS-31)
Enter Test to perform
H.
If you press ENTER, you will be prompted for the phase
to test: The TS-31 will display:
Enter phase to test.
Enter one of the following letters:
“A” - Phase A or left pole.
“B” - Phase B or center pole.
“C” - Phase C or right pole.
I.
Press Enter again to start the test. Press any other key to
STOP the test. Once a test has been started, the TS-31
will respond with:
Testing . . .
Be careful at this time. Any key press will abort the test.
Caution: Handling of the test cable, the breaker, or the trip unit
at this time can cause electric shock which may result in
injury and/or death.
J.
K.
The test may take anywhere from a fraction of a second
to minutes to complete, depending on which procedure
was run. If the test passes, the display will show the
following, depending on whether the breaker tripped or
not.
CT Resistance Test. Phase X Short
Press ENTER to exit test and continue
The “Phase X Failed” message indicates that the CT
resistance is neither open nor shorted. but is not within
design tolerance .
M. There are additional ERROR messages which may appear on the display during this operation which were not
covered previously:
Test Not Running! Check test cable connection.
Press ENTER to continue.
The test set has sensed that current is not flowing
properly in the breaker under test and that there is either
an open or short circuit between the TS-31 and the
breaker trip unit.
Function Not Available
Press ENTER to continue.
Passed Test xxx.xx seconds
Press ENTER to continue,
If the circuit breaker tripped during the test, RESET the
circuit breaker before continuing.
Inconclusive Test, check settings
Press ENTER to continue or A to abort
The TS-31 will prompt for the next instructions. The
display will show:
Enter one of the following numbers:
“1” - Select a new test
“2” - Enter a new catalog number
“3” - Enter new switch settings
If you enter “1” you will be sent to step F Choosing a “2”
will send the program back to step C and entering a “3”
will route program control back to step E. Entering “3”
which sends you back to step E, will be slightly different
the second time through. On the second line after the
prompt for the setting, a number or text in angle brackets
will appear This will indicate the last setting you entered.
If you DON’T wish to change a setting, just press ENTER.
If you DO wish to change a setting, type in the new setting
and press ENTER.
If you pressed “C” when asked,
Enter test to perform; see instructions,
you will first be prompted by,
Current Transformer Test Press
ENTER to continue or A to abort,
and then by the phase to test. One of the following
messages will then appear depending on the test results:
CT Resistance Test. Phase X Passed
Press ENTER to exit test and continue
48
CT Resistance Test. Phase X Open
Press ENTER to exit test and continue
You will get this error message if you enter a choice that
is not available, such as entering “G” in step F for ground
fault test on a catalog number that does not have ground
fault.
Change: 1 - Test 2 - Catalog 3 - Settings
L.
CT Resistance Test. Phase X Failed
Press ENTER to exit test and continue
NOTE: This warning will appear if you attempt to run a short
time test with the instantaneous pickup set equal to or
below the short time pickup. It would also appear if you
tried to run a long time test with short time pickup set to
2. This is only a warning; the test can still be run. However,
passing or failing the test may not be conclusive .
Invalid Input
Press Enter to continue
NOTE: This message will appear if you enter a setting value
that does not exist. For example, a SMD69700NGT has
continuous current settings of 20, 30, 35, 40, 50, 65, 70,
80, 90, and 100 percent. If you were to enter any other
value that those listed, the above message would appear.
Test exceeds capability of TS-31
Press ENTER to continue
NOTE: This message is not likely to occur. If it does, it means
that a test requires more current to run than the TS-31
can produce.
Unit too hot, please wait
NOTE: Running many successive high-current long time tests
may over-heat the test set. It will protect itself from
damage by preventing further tests until it has had a
chance to cool down. The display will indicate when
testing can resume.
Ordering Information
Circuit Breaker Catalog Numbers
SJD6
3-Pole, 600V AC
AAAA
AAA
AAAA
AAAAA
AAAA
AAAAA
AAAA
AAAA
AAA
AAAA
AAAAA
AAAA
AAAAA
AAAA
AAAAA
AAAA
AAAAA
AAAA
AAAAA
AAAA
AAAA
AAAA
AAAA
AA
AAAA
AAA
AAAA
A
A
AAAA
AAA
AAAA
A
A
A
A
A
AAAA
AAAA
AAAA
AA
AAAA
AAA
AAAA
A
AAAA
A
AAAA
AAAA
AAA
AAAA
A
AAAA
A
AAAA
A
AAAA
A
AAAA
A
AAAA
AAAA
AAAA
AAAA
AA
AAAA
AAA
AAAA
A
AAAA
A
AAAA
AAAA
AAA
AAAA
A
AAAA
A
AAAA
A
AAAA
A
AAAA
A
AAAA
AAAA
AAAA
AAAA
AA
AAAA
AAA
AAAA
A
AAAA
A
AAAA
AAAA
AAA
AAAA
A
AAAA
A
AAAA
A
AAAA
A
AAAA
A
AAAA
AAAA
AAAA
A
AAAA
AAAA
AAAA
AAAA
AAAA
A
AAA
AA
AAAA
AAA
AAAA
A
AAAA
A
AAAA
AAAA
AAA
AAAA
A
AAAA
A
AAAA
A
AAAA
A
AAAA
A
AAAA
AAAA
AAAA
A
AAAA
AAAA
AAAA
AAAA
AAAA
A
AAA
AAAAAAAAAAAAAAA
A
A AAAAAAAAAAAAAAA
AAAA
A
A
AAAA
A
AAAA
A
AAAA
A AAAAAAAA
AAAA
A AAAA
AAAAAAA
AAA
UL Interrupting Ratings (kA) RMS
Symmetrical Amperes)
Catalog
Number
Max.
Cont.
Current
Rating
Cont.
Current
Setting
Long
Time
Delay
Instantaneous
Setting
Short
Time
Pick Up
Short
Time
Delay
Short
Time I²t
Pick Up
SJD69200
SJD69300
SJD69400
200
300
400
✓
✓
✓
✓
✓
✓
✓
✓
✓
SJD69200G
SJD69300G
SJD69400G
200
300
400
✓
✓
✓
✓
✓
✓
✓
✓
✓
SJD69200NT
SJD69300NT
SJD69400NT
200
300
400
✓
✓
✓
✓
✓
✓
✓
✓
✓
✓
✓
✓
✓
✓
✓
✓
✓
✓
SJD69200NGT
SJD69300NGT
SJD69400NGT
200
300
400
✓
✓
✓
✓
✓
✓
✓
✓
✓
✓
✓
✓
✓
✓
✓
✓
✓
✓
Ground
Fault
Pick Up
✓
✓
✓
✓
✓
✓
Ground
Fault
Delay
✓
✓
✓
✓
✓
✓
Volts AC
120
120/24
240
277
480
600
65
65
65
35
35
35
25
25
25
65
65
65
35
35
35
25
25
25
65
65
65
35
35
35
25
25
25
65
65
65
35
35
35
25
25
25
100
100
100
65
65
65
35
35
35
100
100
100
65
65
65
35
35
35
100
100
100
65
65
65
35
35
35
100
100
100
65
65
65
35
35
35
200
200
200
150
150
150
100
100
100
200
200
200
150
150
150
100
100
100
200
200
200
150
150
150
100
100
100
200
200
200
150
150
150
100
100
100
SHJD6
3-Pole, 600V AC
SHJD69200
SHJD69300
SHJD69400
200
300
400
✓
✓
✓
✓
✓
✓
✓
✓
✓
SHJD69200G
SHJD69300G
SHJD69400G
200
300
400
✓
✓
✓
✓
✓
✓
✓
✓
✓
SHJD69200NT
SHJD69300NT
SHJD69400NT
200
300
400
✓
✓
✓
✓
✓
✓
✓
✓
✓
✓
✓
✓
✓
✓
✓
✓
✓
✓
SHJD69200NGT
SHJD69300NGT
SHJD69400NGT
200
300
400
✓
✓
✓
✓
✓
✓
✓
✓
✓
✓
✓
✓
✓
✓
✓
✓
✓
✓
✓
✓
✓
✓
✓
✓
✓
✓
✓
✓
✓
✓
SCJD6
3-Pole, 600V AC
SCJD69200
SCJD69300
SCJD69400
200
300
400
✓
✓
✓
✓
✓
✓
✓
✓
✓
SCJD69200G
SCJD69300G
SCJD69400G
200
300
400
✓
✓
✓
✓
✓
✓
✓
✓
✓
SCJD69200NT
SCJD69300NT
SCJD69400NT
200
300
400
✓
✓
✓
✓
✓
✓
✓
✓
✓
✓
✓
✓
✓
✓
✓
✓
✓
✓
SCJD69200NGT
SCJD69300NGT
SCJD69400NGT
200
300
400
✓
✓
✓
✓
✓
✓
✓
✓
✓
✓
✓
✓
✓
✓
✓
✓
✓
✓
✓
✓
✓
✓
✓
✓
✓
✓
✓
✓
✓
✓
Note: “G” suffix in catalog number denotes circuit breaker for 3 phase, 3 wire circuits. For
3 phase, 4 wire, order correct 4th wire (neutral) transformer as separate and additional
item. For 100% rated breakers, an “H” is added at the end of the normal catalog
number, i.e. SHJD69400NGTH.
Neutral Transformers
AAAA
AAAA
AAAA
AAA
AAAA
AAAA
AAAA
AAA
Ampere
Rating
Catalog
Number
AAAA
AAAA
AAAA
AAA
AAAA
AAAA
AAAA
AAAAAAAA
AAAAAAAAAAAAAAA
AAAAAAA
AAA
200
NO2SJD
300
NO3SJD
400
NO4SJD
49
Ordering Information
Circuit Breaker Catalog Numbers
SLD6
3-Pole, 600V AC
AAAA
AAA
AAAA
AAAAA
AAAA
AAAAA
AAAA
AAAA
AAA
AAAA
AAAAA
AAAA
AAAAA
AAAA
AAAAA
AAAA
AAAAA
AAAA
AAAAA
AAAA
AAAA
AAAA
AAAA
AA
AAAA
AAA
AAAA
A
A
AAAA
AAA
AAAA
A
A
A
A
A
AAAA
AAAA
AAAA
AA
AAAA
AAA
AAAA
A
AAAA
A
AAAA
AAAA
AAA
AAAA
A
AAAA
A
AAAA
A
AAAA
A
AAAA
A
AAAA
AAAA
AAAA
AAAA
AA
AAAA
AAA
AAAA
A
AAAA
A
AAAA
AAAA
AAA
AAAA
A
AAAA
A
AAAA
A
AAAA
A
AAAA
A
AAAA
AAAA
AAAA
AAAA
AA
AAAA
AAA
AAAA
A
AAAA
A
AAAA
AAAA
AAA
AAAA
A
AAAA
A
AAAA
A
AAAA
A
AAAA
A
AAAA
AAAA
AAAA
A
AAAA
AAAA
AAAA
AAAA
AAAA
A
AAA
AA
AAAA
AAA
AAAA
A
AAAA
A
AAAA
AAAA
AAA
AAAA
A
AAAA
A
AAAA
A
AAAA
A
AAAA
A
AAAA
AAAA
AAAA
A
AAAA
AAAA
AAAA
AAAA
AAAA
A
AAA
AAAAAAAAAAAAAAA
A
A AAAAAAAAAAAAAAA
AAAA
A
A
AAAA
A
AAAA
A
AAAA
A AAAAAAAA
AAAA
A AAAA
AAAAAAA
AAA
UL Interrupting Ratings (kA) RMS
Symmetrical Amperes)
Max.
Cont.
Current
Rating
Catalog
Number
Cont.
Current
Setting
Long
Time
Delay
Instantaneous
Setting
Short
Time
Pick Up
Short
Time
Delay
Short
Time I²t
Pick Up
SLD69300
SLD69400
SLD69500
SLD69600
300
400
500
600
✓
✓
✓
✓
✓
✓
✓
✓
✓
✓
✓
✓
SLD69300G
SLD69400G
SLD69500G
SLD69600G
300
400
500
600
✓
✓
✓
✓
✓
✓
✓
✓
✓
✓
✓
✓
SLD69300NT
SLD69400NT
SLD69500NT
SLD69600NT
300
400
500
600
✓
✓
✓
✓
✓
✓
✓
✓
✓
✓
✓
✓
✓
✓
✓
✓
✓
✓
✓
✓
✓
✓
✓
✓
SLD69300NGT
SLD69400NGT
SLD69500NGT
SLD69600NGT
300
400
500
600
✓
✓
✓
✓
✓
✓
✓
✓
✓
✓
✓
✓
✓
✓
✓
✓
✓
✓
✓
✓
✓
✓
✓
✓
Ground
Fault
Pick Up
✓
✓
✓
✓
✓
✓
✓
✓
Ground
Fault
Delay
✓
✓
✓
✓
✓
✓
✓
✓
Volts AC
120
120/24
240
277
480
600
65
65
65
65
35
35
35
35
25
25
25
25
65
65
65
65
35
35
35
35
25
25
25
25
65
65
65
65
35
35
35
35
25
25
25
25
65
65
65
65
35
35
35
35
25
25
25
25
100
100
100
100
65
65
65
65
35
35
35
35
100
100
100
100
65
65
65
65
35
35
35
35
100
100
100
100
65
65
65
65
35
35
35
35
100
100
100
100
65
65
65
65
35
35
35
35
200
200
200
200
150
150
150
150
100
100
100
100
200
200
200
200
150
150
150
150
100
100
100
100
200
200
200
200
150
150
150
150
100
100
100
100
200
200
200
200
150
150
150
150
100
100
100
100
SHLD6
3-Pole, 600V AC
SHLD69300
SHLD69400
SHLD69500
SHLD69600
300
400
500
600
✓
✓
✓
✓
✓
✓
✓
✓
✓
✓
✓
✓
SHLD69300G
SHLD69400G
SHLD69500G
SHLD69600G
300
400
500
600
✓
✓
✓
✓
✓
✓
✓
✓
✓
✓
✓
✓
SHLD69300NT
SHLD69400NT
SHLD69500NT
SHLD69600NT
300
400
500
600
✓
✓
✓
✓
✓
✓
✓
✓
✓
✓
✓
✓
✓
✓
✓
✓
✓
✓
✓
✓
✓
✓
✓
✓
SLD69300NGT
SLD69400NGT
SLD69500NGT
SLD69600NGT
300
400
500
600
✓
✓
✓
✓
✓
✓
✓
✓
✓
✓
✓
✓
✓
✓
✓
✓
✓
✓
✓
✓
✓
✓
✓
✓
✓
✓
✓
✓
✓
✓
✓
✓
✓
✓
✓
✓
✓
✓
✓
✓
SCLD6
3-Pole, 600V AC
SCLD69300
SCLD69400
SCLD69500
SCLD69600
300
400
500
600
✓
✓
✓
✓
✓
✓
✓
✓
✓
✓
✓
✓
SCLD69300G
SCLD69400G
SCLD69500G
SCLD69600G
300
400
500
600
✓
✓
✓
✓
✓
✓
✓
✓
✓
✓
✓
✓
SCLD69300NT
SCLD69400NT
SCLD69500NT
SCLD69600NT
300
400
500
600
✓
✓
✓
✓
✓
✓
✓
✓
✓
✓
✓
✓
✓
✓
✓
✓
✓
✓
✓
✓
✓
✓
✓
✓
SCLD69300NGT
SCLD69400NGT
SCLD69500NGT
SCLD69600NGT
300
400
500
600
✓
✓
✓
✓
✓
✓
✓
✓
✓
✓
✓
✓
✓
✓
✓
✓
✓
✓
✓
✓
✓
✓
✓
✓
✓
✓
✓
✓
Neutral Transformers (Not to be used on Sensitrip II)
AAAA
AAAA
AAAA
AAAA
AAAA
Ampere
Rating
Number
AAAA
AAAA
AAAAAAAA
AAAACatalog
AAAA
AAAA
300
NO3SJD
50
400
NO4SJD
500
NO5SLD
600
NO6SLD
✓
✓
✓
✓
✓
✓
✓
✓
✓
✓
✓
✓
Note: “G” suffix in catalog number denotes circuit breaker for 3 phase, 3 wire circuits.
For 3 phase, 4 wire, order correct 4th wire (neutral) transformer as separate and
additional item.
For 100% rated breakers, an “H” is added at the end of the normal catalog
number, i.e. SHLD69600NGTH.
Use copper only terminal connectors for LD frame solid state 100% rated circuit
breakers .
Ordering Information
Internal Accessory Combination
Shunt Trip
AAAA
AAAA
AAAAA
AAAA
AAAA
AAAA
AAAA
AA
AAAA
AAAA
AAAA
AAAA
AAAA
AA
ControlAAAA
VoltageAAAAAAAA
1 Shunt Trip
1Shunt
Trip
and
AAAA
AAAA
AAAA
AAAA
A
AAAA
AAAA
AAAA
AAAA
AA
AAAA
AAAA
AAAA
AAAA
AAAA
AA
1 Auxiliary
Switch
AAAA
AAAA
AAAA
AAAA
A
AAAA
AAAA
AAAA
AAAA
AAAA
AA
AAAA
AAAA
AAAA
AAAA
AAAA
AA
AAAA
AAAA
A
AAAA
AAAA
A
AAAA
AAAA
AAAA
AAAA
AAAA
AA
AAAA
AAAA
AAAA
AAAA
AAAA
AA
AC
DC
Catalog
Number
Catalog
Number
AAAA
AAAA
A
AAAA
AAAA
A
AAAA
AAAA
AAAA
AAAA
AAAA
AA
AAAA
AAAA
AAAA
AAAA
AAAA
AAAA24AAAAAAAA
A
AAAAAAAA
A
AAAAAAAA
AAAAAAAAAAAA
AA AAAAAAAA
AAAAAAAAAA
AA
S17JLD6
S17JLD62A
48
120
208
240
277
480
600
24
48
125
250
S18JLD6
S01JLD6
S02JLD6
S03JLD6
S15JLD6
S04JLD6
S06JLD6
S18JLD62A
S01JLD62A
S02JLD62A
S03JLD62A
S15JLD64A
S04JLD64A
N/A
S07JLD6
S09JLD6
S11JLD6
S13JLD6
S07JLD62A
S09JLD62A
S11JLD62A
S13JLD62A
Undervoltage Trip
AAAA
AAAA
AAAAA
AAAA
AAAA
AAAA
AA
AAAA
AAAA
AAAA
ControlAAAA
VoltageAAAAAAAA
1 Undervoltage
Trip AAAAAAAA
1 Undervoltage
Trip andAAAAAA
AAAA
AAAA
AAAA
AAAA
A
AAAA
AAAA
AAAA
AAAA
AA
AAAA
AAAA
AAAA
AAAA
AAAA
AA
1 Auxiliary
Switch
AAAA
AAAA
AAAA
AAAA
A
AAAA
AAAA
AAAA
AAAA
AAAA
AA
AAAA
AAAA
AAAA
AAAA
AAAA
AA
AAAA
AAAA
A
AAAA
AAAA
A
AAAA
AAAA
AAAA
AAAA
AAAA
AA
AAAA
AAAA
AAAA
AAAA
AAAA
AA
AC
DC
Catalog
Number
Catalog
Number
AAAA
AAAA
A
AAAA
AAAA
A
AAAA
AAAA
AAAA
AAAA
AAAA
AA
AAAA
AAAA
AAAA
AAAA
AAAA
AAAA120
AAAAAAAA
A
AAAAAAAA
A
AAAAAAAA
AAAAAAAAAAAA
AA AAAAAAAA
AAAAAAAAAA
AA
U01JLD6
U01JLD62A
208
240
277
480
600
24
48
125
250
U02JLD6
U03JLD6
U16JLD6
U06JLD6
U08JLD6
U02JLD62A
U03JLD62A
U16JLD64A
U06JLD64A
N/A
U13JLD6
U14JLD6
U10JLD6
U12JLD6
U13JLD62A
U14JLD62A
U10JLD62A
U12JLD62A
Auxiliary Switch
AAAA
AAAA
AAAAA
AAAA
AAAA
AAAA
AAAA
AA
AAAA
AAAA
AAAA
AAAA
AAAA
AA
ControlAAAA
VoltageAAAAAAAA
1 Auxiliary
Switch
2 Auxiliary
Switches
AAAA
AAAA
AAAA
AAAA
A
AAAA
AAAA
AAAA
AAAA
AA
AAAA
AAAA
AAAA
AAAA
AAAA
AA
AAAA
AAAA
A
AAAA
AAAA
A
AAAA
AAAA
AAAA
AAAA
AAAA
AA
AAAA
AAAA
AAAA
AAAA
AAAA
AA
AC
DC
Catalog
Number
Catalog
Number
AAAA
AAAA
A
AAAA
AAAA
A
AAAA
AAAA
AAAA
AAAA
AAAA
AA
AAAA
AAAA
AAAA
AAAA
AAAA
AAAAAAAAAAAA
A
AAAAAAAA
A
AAAAAAAAAAAAAAAAAAAA
AA AAAAAAAAAAAAAAAAAA
AA
120
208
240
277
480
24
48
125
250
A01JLD64
A01JLD64
A01JLD64
A01JLD64
A01JLD64
A02JLD64
A02JLD64
A02JLD64
A02JLD64
A02JLD64
A01JLD64
A01JLD64
A01JLD64
A01JLD64
A02JLD64
A02JLD64
A02JLD64
A02JLD64
Bell Alarm Switch
AAAA
AAAA
AAAAA
AAAA
AAAA
AAA
AAAA
AAAA
AAAA
AA
AAAA
ControlAAAA
VoltageAAAAAAAA
1 Alarm Switch
1 Alarm
Switch
and AAAA
1AAAA
Alarm Switch
andAAAA
AAAA
AAAA
AAAA
AAAA
A
AAAA
AAAA
AAA
AAAA
AAAA
AAAA
AA
AAAA
AAAA
1 Auxiliary
Switch
2AAAA
AuxiliaryAAAA
Switches
AAAA
AAAA
AAAA
AAAA
A
AAAA
AAAA
AAAA
AAA
AAAA
AAAA
AAAA
AA
AAAA
AAAA
AAAA
AAAA
AAAA
AAAA
A
AAAA
AAAA
A
AAAA
AAAA
AAAA
AAA
AAAA
AAAA
AAAA
AA
AAAA
AAAA
AC
DC
Catalog
Number
Catalog
Number
Catalog AAAA
Number AAAA
AAAA
AAAA
AAAAA
AAAA
AAAAA
AAAA
AAAA
AAAA
AA
AAAA
AAAA120
AAAAAAAA
A
AAAAAAAA
A
AAAA
AAAAAAA
AAAAAAA
AAAAAAAA
AAAA
AAAAAAAA
AA AAAA
AAAA
AAAA
AAAAAAAA
AAAA
B01JLD64
A01JLD64B
A02JLD64B
208
240
277
480
24
48
125
250
B01JLD64
B01JLD64
B01JLD64
B01JLD64
A01JLD64B
A01JLD64B
A01JLD64B
A01JLD64B
A02JLD64B
A02JLD64B
A02JLD64B
A02JLD64B
B01JLD64
B01JLD64
B01JLD64
B01JLD64
A01JLD64B
A01JLD64B
A01JLD64B
A01JLD64B
A02JLD64B
A02JLD64B
A02JLD64B
A02JLD64B
51
Ordering Information
Additional Accessories
Item
PressureWire Connectors
(1-2) #3/0-500 MCM (Cu)
(1 -2) #4/0-500 MCM (Al)
Catalog No.
TA2J6500
Item
Side Handle Operators
Left Side
Right Side
(1) 500-750 MCM (Al)
(1) 500-600 MCM (Cu)
(2) 250 MCM (Al)
TA1 L6750
(1) #3/0-600 MCM (Cu)
TC1J6600
(1-2) #3/0-500 MCM (Cu)
Catalog No.
D11JLU,
D11JL4U
D11JRU,
D11JR4U
TC2J6500
Motor Operators
120VAC (Hinged to the right)
120VAC (Hinged to the left)
240VAC (Hinged to the right)
240VAC (Hinged to the left)
MOJ6120
MOJ6120L
MOJ6240
MOJ6240L
Compression Connector
CCL600
Linear Drive Operator
OHJS1
Handle Blocking Device
J6HBL
Connector Straps Outside Strap
JD-Frame
Padlocking Device
J6HPL
LD-Frame
Rear Connecting Studs
JD-Frame Long—11 13/64 Length
Short_5 27/32 Length
LD-Frame Long—11 13/64 Length
Short—5 27/32 Length
RS5773
RS5774
RS5783
RS5784
Center Strap
JD-Frame
LD-Frame
Plug-ln Adaptors
JD-Frame
(2-Pole)
(3-Pole)
LD-Frame
(2-Pole)
(3-Pole)
PC5777
PC5778
PC5660
PC5661
Switchboard Mounting Plates
SCJD6/SCLD6 BreakerTypes
All OtherTypes
PL5297
PL5796
Rotary Handle Operator
Variable Depth
D11CJU2
Rotary Handle Operators
Complete Mechanism Standard Depth
Variable Depth
Handle
Breaker Operator
Shaft Standard Depth
Variable Depth
RHOJSD
RHOJVD
RHOH(1)
RHOJBO
RHOSSD
RHOSVD
Flange Mount Handle Operator
Complete Mechanism
Handle Breaker Operator
Standard Cable (36 in.)
Optional Cable (48 in.)
FHOJ036
FHOH(1)
FHOJBO
FHOJC036
FHOJC048
Door Latch Mechanisms
Left Side
Right Side
DKL2,DKL3
DKR2, DKR3
(1) For 4-4x application, order RHOH4 instead of RHOH.
(2) For 4-4x application, order FHOH4 instead ot FHOH.
Mounting Screw Kits
Enclosures
JD-Frame
Type 1
Type 3R
Type 4
Type 12
Neutral
LD-Frame
Type 1
Type 3R
Type 4
Type 12
Neutral
CS3621R
CS3623R
CS3625R
CS3627R
MSJ6(2)
J6N1
J6N3R
LD6SS4
J6N12
W60992
L6N1
L6N3R
LD6SS4
L6N12
W60993
NOTE: Except for LD6 Enclosures, LD6SS4 Enclosure
Neutral is N600
Time Current Curves
JD-Frame Types JXD2, JXD6, JD6, HJD6
Type CJD6
LD-Frame
Types LXD6, LD6, HLD6
Type LCD6
Let-Thru Curves
JD-Frame
Peak Current (Ip)
I2 t
LD-Frame
Peak Current (Ip)
I2 t
(4) Consists of 4 screws and assorted washers and/or nuts.
52
CS3620R
CS3622R
CS3624R
CS3626R
TD-7104
TD-7105
TD-7106
TD-7107
TD-7105-A
TD-7105-B
TD-7107-A
TD-7107-B
UL Listings and File Numbers
Industry Specifications
AAAA
AAAA
AAA
AAAA
AAAA
AAAA
I-T-E
UL-489
File AA
CSAAAAA
Report AA
AAAA
AAAA
AAA
AAAA
AAAA
AA
AAAA
AAAA
AA
Number
Number
AAAA
AAAA
AAA
AAAA
AAAA
AA
AAAA
AAAA
AA
AAAA
AAAA
AAA
AAAA
AAAA
AA
AAAA
AAAA
AA
Breakers
E10848
LR13077
Terminal Connectors
Plug-ln Connectors
Rear Studs
Handle Operators
Motor Operators
Internal Accessories
Shunt Trip
Undervoltage Trip
Aux. Switch
Bell Alarm Switch
Enclosures
E23615 (SP)(1)
E23615
E23615
E57501
E57501
E69455
LKR13077
E10848
(1) For CSA application use TC2J6500 or TC1 J6600 connectors.
National Fire Protection Assoc. (National Electrical Code4).
Federal Specification W-C-375B/GEN.
Underwriters Laboratories, Inc. (UL 489).
Canadian Standards Association (C22.2 No. 5).
Blue Label
Red Label
Lockable Cover Shield
(Customer Supplied Locking Device)
53
Siemens Energy
& Automation, Inc.
3333 State Bridge Rd.
Alpharetta, GA 30202
Bulletin SIB2.7-7 A (New) 1190
©1990 Siemens Energy & Automation
Siemens is a registered trademark of Siemens AG