1
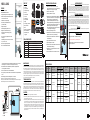
WARNINGS AND SAFEGUARDS
WARNING! Buyer/user assumes all responsibility
for safety and proper use not in accordance with
the directions and safety labels.
Before installation of the Polario™, read and follow these important Warnings and Safeguards.
This product may contain chemicals known to the state of California to cause
cancer and or birth defects or other reproductive harm. Wash your hand after
handling this product.
• The use of a computer grade surge suppressor is strongly recommended.
• Always use the large strainers to prevent small fish, anemones, and/or small invertebrates from
entering the pump.
GFCI
ONLY
• If the controller or transformer comes in contact with water or moisture, the warranty is void!
It is your sole responsibilities to verify that the plug and the receptacle are
clean and free of moisture and salt build up at all times. The receptacle
must be free of water, salt, calcium, magnesium and dust. Failure to do so
can cause fire, damage to property, permanent damage to the product and
personal injury not limited to loss of life.
• If the Polario™ is used with any other power supply, the warranty is void!
Drip Loop
Do not plug into extension cord/power strip.
4ML, 7ML & 10ML
must disconnect all electrical aquarium devices.
• Routine maintenance is required to ensure the maximum performance and the longevity of the
Polario™ water pump. See maintenance guidelines.
A drip loop must be used when plugging all electrical aquarium devices. A drip
loop is that part of the cord hanging below the receptacle.
MAGNET MOUNT ! DANGER !
• Bi-directional outputs to simulate natural wave and
currents of the ocean
• Very strong magnet! Not a toy! Keep out of reach of children! Failure to do so will cause serious
injury and/or permanent damage to your aquarium.
• Pre-set random flow and alternating outputs
• Due to the strength of the magnets, they will attract other metals or magnets with force. When
installing or handling magnets, there must not be any other magnets or metals in close proximity to
the magnet holders. Failure to do so can cause serious injury.
• Keep away from devices sensitive to magnetic fields, such as pacemakers, data carriers, credit
cards, electronic equipment and medical devices. Failure to do so may result in permanent
damage to such devices.
POLARIO
• Do not mount controller or transformer where it will come in contact with moisture or water.
• Hold magnets only by the sides. Never get your fingers or hands between the contact surfaces.
• Do not operate the pump out of water.
• When using as an algae cleaner, keep the algae pad free of any abrasive materials to avoid any
damage to the aquarium.
• Do not put your hands or fingers in the propeller well.
• Intended for indoor use only.
• Mount the controller above the aquarium.
• If the controller or transformer comes in contact with water, do not reach for it. Disconnect power
first, then retrieve.
Note: magnets are very strong and will attract other metals and magnets that will embed themselves
in the algae pad, thus damaging the aquarium.
TECHNICAL SERVICE DEPARTMENT
Monday to Friday 9 am - 5 pm PST
(805) 383-3566 ext. 102, e-mail: [email protected]
• Prior to maintenance on any electrical aquarium appliance or maintenance to the aquarium, you
1
1
2
3
DIRECTIONS FOR INSTALLING
4
Read and follow all warning and safeguards!
5
6
7
3. Mount and secure the controller in an area that is dry,
will stay dry and away from the aquarium.
8
9
Controller
GFCI
ONLY
4ML
10-11
3
1a. Back Plate
SOLUTION:
1. Turn off the unit and unplug the transformer
5 ft.
2. Remove the back plate of the controller (1a).
3. Locate fuse and with a flat head screwdriver remove the blown fuse
4. Replace 1.6 amp fast blow fuse for 4ML and 2.5 amp fast blow fuse for
7ML and 10ML.
GFCI
ONLY
3 ft.
5
FUSE
5. Install back plate of the unit.
6 ft.
4
PolarioTM 7ML-10ML Propeller
Controller will not power up and/or pump will not turn on: It is imperative to
keep the pump clean and well maintained to ensure the pump is in good
working order and the propeller and strainer clean at all times, failure to do so
will cause the 4 ML, 7 ML and 10 ML controller to shut down. At that time the
fuse will have to be replaced.
Controller
8. Turn unit ON.
7-10ML
3-4
Verify the intake strainers are free and clean of all debris at all times
Drip Loop
10
4ML
PolarioTM 4ML Propeller
TROUBLE SHOOTING
YES
7. While the unit is in the off position plug in transformer
directly to a GFCI outlet
11
6 ft.
UL Listed
Transformer
6. Connect the transformer to the controller
GFCI
ONLY
Description
3-4
It is the utmost importance to clean and maintain the pump monthly. Remove
the strainers to access the propeller. Remove the propeller which should slide
off the motor easily. Now reinstall and verify that the propeller rotates easily
around the motor. If the propeller binds or there is too much drag created: the
motor, propeller and ceramic shaft need to be cleaned well. These high speed
motors attract calcium build up, let the pump soak in a water/vinegar solution
for a minimum of 1 hour. (3 parts water to 1 part vinegar) Then clean well with
a small brush. If the pump has not been maintained on a regular basis or if
high amount of calcium is added this process may be needed to be repeated.
If there is any noticeable damage to the propeller replace immediately.
5 ft.
5. Plug pump into the transformer
GFCI
ONLY
Part Number
MAINTENANCE:
NO
4. Mount and secure the transformer in an area that is dry,
will stay dry and away from the aquarium.
9
REPLACEMENT PARTS
2
1. Choose a location for the pump
2. Install magnet mount
a.Read all warnings! Handle this product with care,
failure to do so will cause injury, damage to the
aquarium and or livestock.
b.Choose desired position of magnetic holder
c.Separate the magnet holders by twisting units apart
d.Place the magnet in the desired position in the
aquarium, verify that the magnet is flat on the glass
e.Place the pump and magnet flat on the inside glass
and slide the inner magnet until they engage.
• 360° degree directional pump mounting bracket with
magnet mount
• Always handle magnets one at a time. Once separated keep a minimum of 12in (30cm) apart.
• Do not mount the controller or transformer inside the stand.
1. Strainers
2. Main Pump Housing
3. Ceramic Shaft
4. Propeller
5. 4x rubber tension bands
6. 360° degree mounting bracket
7. Magnet mount
8. Fuse
9. Controller
10.Transformer
11. Receptable plug
• Random flow rates from approximately 600 GPH to
2600 GPH (2,300LPH to 10,000LPH) depending on
the model
• Never allow magnets to snap together.
• Never plug Polario™ into any other power supply.
PART LIST
TURBINE DUAL ACTION
RANDOM FLOW WATER
PATENT PENDING
• Energy efficient, high flow low voltage water pump
• Keep out of reach of children.
The national code requires that a GFCI (Ground fault circuit interrupter) be
used in the branch circuit supplying all power to water pumps and electrical
aquarium equipment. If you do not have a GFCI, have an electrician install
one prior to operating any aquarium component.
FEATURE
6. Verify that the impeller is clean and free of all debris, the pump is placed
back into the aquarium and that the strainers are free of all debris.
7ML & 10ML
7. Restart the unit.
UL Listed
Transformer
Drip Loop
6
7
15ML & 22ML
PART LIST
DIRECTIONS FOR INSTALLING
1. Couplers
2. Propeller
3. Large strainers
4. Main pump housing
5. Endcaps
6. Water diverters
7. Controller
8. Magnet Mount
9. Pump extension
10.O-Ring
11. Power supply connection
12.Pump connection
13.Fuse
14.Mini sun moon light adapter
15.UL listed transformer
7
16.Transformer power
supply cord
FEATURE
TURBINE DUAL ACTION
PROGRAMMABLE AQUA PUMP
• Energy efficient, high flow low voltage water pump
• Bi-directional outputs to simulate natural wave and
current actions of the ocean
• Variable time and output settings
• Flow rates up to 5,500GPH/22,000LPH
(on selected models)
• Single or dual outputs
• Preset feeding settings at 8 and 16 min.
• Magnet mount Included to secure pump
• Pre-programmed in all settings to gradually
Increase flow
• In “Auto” mode, pump initially alternates 15 sec.,
left and right
1
1
3
4
operate. There are three options: (a) “Auto” or alternating
discharge from left to right. (b) Left. (c) Right.
6
5
10
8
11
12 13 14
9
15
16
every 15 sec. to 30 min.
• Mini sun moon light adapter included
• 16 volt UL listed transformer included
8
the screen will now read 15 and the blue/second LED will be lit. If set on the LEFT or
RIGHT setting, the screen, will not be lit and pump will run continually.
13.Press the SET button until the desired time parameter is set. (a) Blue LED is
seconds. (b) Yellow LED is minutes
14.Once the desired time is set. Press the ENTER button.
15.To change time, press the SET button to desired set time and then press the ENTER
button.
16.When feeding, press the desired feeding time 8 or 16 minutes.
product with care, failure to do so will cause injury and/or
damage to your aquarium. (b) Remove from box.
(c) Choose the desired placement for the magnetic
holder. (d) Separate the magnet holders by twisting units
apart. (e) Place the magnet in the desired location in the
aquarium.The magnet must be flat on the glass.
f. Place the outer magnet flat on the glass and slide it to
the inner magnet until they engage.
If the pump is on and is removed from water, it will automatically shut off. To reset, secure the pump
back on the magnet mount, then turn controller OFF then ON to reset.
Mini Sun Moon Light
(Optional part)
Description
2
PolarioTM 15ML Propeller
2
PolarioTM 22ML Propeller
PolarioTM 15ML MM300 Magnet Mount
8
PolarioTM 22ML MM500 Magnet Mount
11. While the unit is OFF, plug the transformer into a GFCI
electrical receptacle.
10
PolarioTM O-Ring
12.Turn the controller ON. If the controller is set on AUTO
15
PolarioTM 15ML UL Listed Transformer
15
PolarioTM 22ML UL Listed Transformer
MAINTENANCE:
It is the utmost importance to clean and maintain the pump monthly. Remove the Large intake strainers
and the endcaps to access the propeller. Remove the propeller which should slide off the motor easily.
Now reinstall and verify that the propeller rotates easily around the motor. If the propeller binds or there
is too much drag created: the motor, propeller and ceramic shaft need to be cleaned well. These high
speed motors attract calcium build up, let the pump soak in a water/vinegar solution for a minimum of
1 hour. (3 parts water to 1 part vinegar) Then clean well with a small brush. If the pump has not been
maintained on a regular basis or if high amount of calcium is added this process may be needed to be
repeated. If there is any noticeable damage to the propeller replace immediately.
TROUBLE SHOOTING
Controller will not power up and/or pump will not turn on: It is imperative to keep the pump clean and well
maintained to ensure the pump is in good working order and the impeller and strainer clean at all times,
failure to do so will cause the 15 ML & 22 ML controller to shut down until the problem or problems are
rectified. At that time the unit may just go to default setting where as the controller is plugged in and the
green transformer light will be on however the controller will not power up or may power up for just a
few seconds then shut down. In some instances the controller’s fuse has blown in addition to going to
default setting. Replace fuse with a 22ML 3.5a/250v and 15ML 3.5a/250v slow blow fuse.
Please go to our website, to download Warranty Card.
http://www.riopump.net/Resources_folder/Warranty.html
Fill out this warranty card and mail it with PROOF OF PURCHASE
within 15 days of purchase
10
SPECIFICATIONS
Item #
Watt
4ML
7w
7ML
23w
Pump Size
L x Dia. (Approx.)
1.9 x 2 in
(4.8 x 5 cm)
Flow Rate (Approx.)
LPH
GPH
2300-4000
600-1000
5000-7000
1300-1800
2.1 x 2.4 in
10ML
25w
6000-10000
1500-2600
15ML
30w
12000-15000
3000-3500
12
50w
(Approx.)
10-20 Gal.
(35-80 Ltr.)
Output O.D.
Transformer
2 in (50 mm)
30-50 Gal.
18000-22000
4500-5500
Fuse
Glass Thickness
1.6 amp
0.27 in
fast blow fuse
(7 mm)
2.5 amp
0.7 in
fast blow fuse
(18 mm)
9v
(115-190 Ltr.)
40-100 Gal.
UPC #
0006760
1024 2
1025 9
1026 6
(150-380 Ltr.)
50-150 Gal.
3.5 amp
0.5 in
(190-570 Ltr.)
slow blow fuse
(12 mm)
2.55 in (65 mm)
(24 x 7.7 cm)
22ML
Aquarium Size
2.4 in (60 mm)
(5.4 x 6 cm)
9.5 x 3in
3. Remove the Large intake strainers and the endcaps to access the propeller. Remove the propeller
it should slide off the motor easily. Now reinstall and verify that the propeller rotates easily around
the motor. If the propeller binds or there is too much drag created: the motor, propeller and ceramic
shaft need to be cleaned well. These high speed motors attract calcium build up, let the pump soak
in a water/vinegar solution for a minimum of 1 hour. (3 parts water to 1 part vinegar) Then clean
well with a small brush. If the pump has not been maintained on a regular basis or if high amount of
calcium is added this process may be needed to be repeated. If there is any noticeable damage to
the propeller replace.
11
WARRANTY CARD
9
2. Remove the Large intake strainers and the endcaps to access the propeller. Verify that there is not
anything blocking the propellers rotation.
UL Listed
Transformer
Please contact our service center at (805) 383-3566 ext. 102 or fax (805) 383-3565 to arrange repair and/
or replacement. Please allow 4-6 weeks for all returns.
10.Set the flow rate. It is recommended to set the flow at low
flow rate then adjust accordingly.
8
RETURNS
9. Plug the pump into the controller.
1. Check all intake strainers verifying that they are free of all debris.
GFCI
ONLY
YES
8. Plug the transformer into the controller.
SOLUTION:
Controller
NO
T.A.A.M. Inc.®’s entire liability and your sole and exclusive remedy shall be either repair or replacement
of the Polario™ only if you return the defective unit directly to T.A.A.M. Inc.® with the original receipt in its original box
along with twenty dollars ($20.00) for shipping and handling. Do not send Polario™ by insured mail. You may send
your returns or replacements by UPS if requiring a signature upon arrival. Any replaced unit will be warranted for the
remaining time of the original warranty period. In no event shall any shipping charges be reimbursed. In no event will
T.A.A.M. Inc.® be liable for any consequential or incidental damages, including but not limited to, lost sea life, personal
injury, property damage, equipment damage, lost profits, lost wages, lost savings, lost income, etc., arising out of the
use of the Polario™. Some states do not allow for the limitation or exclusion of liability for incidental or consequential
damages, so the above exclusion may not apply to you.
7. Mount and secure the transformer in an area that is dry
and that will stay dry.
Part Number
CONSUMER REMEDIES
5. Attach the pump to the magnet mount.
Verify the intake strainers are free and clean of all debris
Note: Polario™ pumps are equipped with an automatic safety SHUT-OFF.
Drip Loop
2. Choose a location for the pump.
3. Attach pump extension to the pump.
4. Install magnet mount: (a) Read all warnings! Handle this
6. Mount and secure the controller above and away from the
aquarium in an area that is dry and will stay dry.
REPLACEMENT PARTS
• The alternating water currents can be set to switch
T.A.A.M. Inc.® warrants that the Polario™ is free from defects for a period of six months from the initial date
of purchase shown on the original cash register receipt. T.A.A.M. Inc.® disclaims all other warranties of merchantability
and/or fitness for a particular purpose. Although this limited warranty may give you specific rights, you may have other
rights that may vary from state to state. This warranty is void if the failure of the controller or any part, sealant or
component there of is due to (i) misuse, (ii) tampering, (iii) negligence, (iv) misapplication, (v) abuse, (vi) accident and/
or (vii) failure to properly (a) maintain, (b) clean, (c) keep free from water and moisture and/or use the controller with a
Ground Fault Circuit Interrupter (GFCI).
1. Select the mode on the controller in which the pump will
2
LIMITED WARRANTY
1015 0
16v
90-250 Gal.
3.5 amp
0.75 in
(340-950 Ltr.)
slow blow fuse
(20 mm)
1016 7
13