1
EMS180RV
GB
FR
DE
ES
IT
NL
PT
DK
SE
FI
NO
RU
PL
CZ
HU
RO
LV
LT
EE
HR
SI
SK
GR
TR
GB
180W MULTI SANDER
PONCEUSE MULTIFONCTIONS 180W
180W MULTI-SCHLEIFER
MULTI LIJADORA 180W
LEVIGATRICE MULTIFUNZIONE DA 180W
180W MULTI-SCHUURMACHINE
LIXADORA MULTI DE 180W
180W MULTISLIBER
MULTISLIP 180 W
180 W MONITOIMIHIOMAKONE
180 W MULTISLIPER
!"# $%&"# , 180 SZLIFIERKA UNIWERSALNA 180 W
180 W VÍCEÚELOVÁ BRUSKA
180 W-OS MULTIFUNKCIÓS CSISZOLÓ
MA'IN( DE 'LEFUIT MULTIFUNC)IONAL( 180 W
180 W DAUDZFUNKCIONL SL*PMAŠ*NA
180 W DAUGIAFUNKCINIS ŠLIFUOTUVAS
UNIVERSAALNE LIHVMASIN 180 W
MULTI BRUSILICA 180 W
180 W VENAMENSKI BRUSILNIK
180W UNIVERZÁLNA BRÚSKA
180W +../+. :;
180W ÇOK AMAÇLI ZIMPARA MAKINESI
USER’S MANUAL
MANUEL D’UTILISATION
BEDIENUNGSANLEITUNG
MANUAL DE UTILIZACIÓN
MANUALE D’USO
GEBRUIKSHANDLEIDING
MANUAL DE UTILIZAÇÃO
BRUGERVEJLEDNING
INSTRUKTIONSBOK
KÄYTTÄJÄN KÄSIKIRJA
BRUKSANVISNING
INSTRUKCJA OBSUGI
NÁVOD K OBSLUZE
HASZNÁLATI ÚTMUTATÓ
MANUAL DE UTILIZARE
LIETOTJA ROKASGRMATA
NAUDOJIMO VADOVAS
KASUTAJAJUHEND
KORISNIKI PRIRUNIK
UPORABNIŠKI PRIRONIK
NÁVOD NA POUŽITIE
KULLANiM KILAVUZU
1
6
12
18
24
30
36
42
47
52
57
62
68
74
79
84
89
94
99
104
109
114
119
125
| FR TRADUCTION DES INSTRUCTIONS ORIGINALES | DE ÜBERSETZUNG DER ORIGINALANLEITUNG | ES TRADUCCIÓN DE LAS
| IT TRADUZIONE DELLE ISTRUZIONI ORIGINALI | NL VERTALING VAN DE ORIGINELE INSTRUCTIES | PT TRADUÇÃO DAS INSTRUÇÕES
| SE ÖVERSÄTTNING AV DE URSPRUNGLIGA INSTRUKTIONERNA | FI ALKUPERÄISTEN
OHJEIDEN SUOMENNOS | NO OVERSETTELSE AV DE ORIGINALE INSTRUKSJONENE | RU | PL TUMACZENIE INSTRUKCJI
ORYGINALNEJ | CZ PEKLAD ORIGINÁLNÍCH POKYN | HU AZ EREDETI ÚTMUTATÓ FORDÍTÁSA | RO TRADUCEREA INSTRUCIUNILOR ORIGINALE | LV TULKOTS
NO ORIINLS INSTRUKCIJAS | LT ORIGINALI INSTRUKCIJ VERTIMAS | EE ORIGINAALJUHENDI TÕLGE | HR PRIJEVOD ORIGINALNIH UPUTA | SI PREVOD
ORIGINALNIH NAVODIL | SK PREKLAD POKYNOV V ORIGINÁLI | GR !"#!$% &' (#&)*(&' )+%,-&' | TR ORIJINAL TALIMATLARIN TERCÜMESI
ORIGINAL INSTRUCTIONS
INSTRUCCIONES ORIGINALES
ORIGINAIS
| DK
OVERSÆTTELSE AF DE ORIGINALE INSTRUKTIONER
4
3
1
10
2
11
14
6
5
Fig. 1
5
9
2
7
Fig. 2
Fig. 3
3
1
Fig. 4
Fig. 5
10
2
12
11
Fig. 6
Fig. 7
6
13
5
Fig. 8
7
5
6
Fig. 9
Fig. 10
14
6
8
10
Fig. 11
10
11
12
Fig. 12
Important!
It is essential that you read the instructions in this manual before operating this machine.
Attention!
Il est indispensable que vous lisiez les instructions contenues dans ce manuel avant la mise en service
de l’appareil.
Achtung!
Bitte lesen Sie unbedingt vor Inbetriebnahme die Hinweise dieser Bedienungsanleitung.
¡Atención!
Es imprescindible que lea las instrucciones de este manual antes de la puesta en servicio.
Attenzione!
Prima di procedere alla messa in funzione, è indispensabile leggere attentamente le istruzioni contenute
nel manuale.
Let op!
Het is van essentieel belang dat u de instructies in deze gebruiksaanwijzing leest vooraleer u dit toestel
in gebruik neemt.
Atenção!
É indispensável que leia as instruções deste manual antes de utilizar a máquina.
OBS!
Denne brugervejledning skal gennemlæses inden maskinen tage i brug.
Observera!
Det är nödvändigt att läsa instruktionerna i denna bruksanvisning innan användning.
Huomio!
On ehdottoman välttämätöntä lukea tässä käyttöohjeessa annetut ohjeet ennen käyttöönottoa.
Advarsel!
Det er meget viktig at du leser denne brukerveiledningen før du tar maskinen i bruk.
=>?@=>Q!
:;:< =>?;@?Q W X[\]=@?^ W_=`;]^:_`[ _:?>x?<W^? ?X_[@?^W`{=} = W_=`;]@~W:Q \? @=\][`[~WW.
Uwaga!
Przed przystpieniem do uytkowania tego urzdzenia, naley koniecznie zapozna si z zaleceniami
zawartymi w niniejszym podrczniku.
D[ležité upozorn\ní!
Nepoužívejte tento p
ístroj d
íve, než si p
etete pokyny uvedené v tomto návodu.
Figyelem!
Feltétlenül fontos, hogy a jelen használati útmutatóban foglalt elírásokat az üzembe helyezés eltt
elolvassa!
Aten]ie!
Este esenial s citii instruciunile din acest manual înainte de operarea acestui aparat.
Uzmanbu!
Svargi, lai js pirms mašnas darbinšanas izlastu instrukcijas šaj rokasgrmat.
Dmesio!
Prieš praddami eksploatuoti š prietais, svarbu, kad perskaitytumte šiose instrukcijose pateiktus
nurodymus.
Tähtis!
Enne trelli kasutama hakkamist tuleb käesolevas juhendis esitatud juhised kindlasti läbi lugeda.
Upozorenje!
Neophodno je da proitate ove upute prije uporabe ovog ureaja.
Pomembno!
Pred uporabo tega stroja, obvezno preberite navodila iz tega prironika.
Dôležité!
Pre prácou s týmto zariadením je dôležité, by ste si preítali pokyny v tomto návode.
+^_`_fj!
¡¡ ¢ £ ¡¢ ¤ ¥¦ £¦ § ¨© ¡ ª¡£¥.
Dikkat!
Cihaz«n çal«¬t«r«lmas«ndan önce bu k«lavuzda bulunan talimatlar« okuman«z zorunludur.
Subject to technical modifications / Sous réserve de modifications techniques /Technische Änderungen vorbehalten /
Sujeto a modificaciones técnicas / Con riserva di eventuali modifiche tecniche /Technische wijzigingen voorbehouden /
Com reserva de modificações técnicas / Med forbehold for tekniske ændringer / Med förbehåll för tekniska ändringar /
Tekniset muutokset varataan / Med forbehold om tekniske endringer / ®?¯]` >°`{ ±_:=:_° `:x_W²:=@W: WX^:_:_W} /
Z zastrzeeniem modyfikacji technicznych / Zm³ny technických údaj´ vyhrazeny / A mµszaki módosítás jogát fenntartjuk /
Sub rezerva modificaiilor tehnice / Paturam tiesbas maint tehniskos raksturlielumus / Pasiliekant teis daryti techninius pakeitimus /
Tehnilised muudatused võimalikud /Podložno tehnikim promjenama /Tehnine spremembe dopušene/
Technické zmeny vyhradené / *¶ ¡·¸ª¹ ¡º§¦ » ¡¤ / Teknik de¼i¬iklik hakk« sakl«d«r
GB
FR
DE
ES
IT
NL
PT
DK
SE
FI
NO
RU
PL
CZ
HU
RO
LV
LT
EE
HR
SI
SK
GR
TR
English
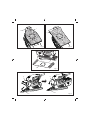
DESCRIPTION
1. On/off switch
2. Dust collection box
3. Variable speed control selector
4. Live tool indicator
5. Triangular detail pad
6. Sheet pad
7. Triangular detail sanding sheet
8. Non-adhesive sandpaper
9. Quick change hook and loop pad
10. Cover
11. Finger pad
12. Lock
13. Hex key
14. Paper clamp
185 x 92 mm
Weight
1.4 kg
FEATURES
KNOW YOUR POWER TOOL
See Figure 1.
Your sander is suitable for sanding with coarse, medium
and Âne grit sandpaper. It will produce a Âne, scratch free
Ânish when used to sand with the grain on wood surfaces.
It has been designed so that Èush corner sanding on three
sides of the sander is possible.
Your sander has a comfortable palm grip handle that
provides maximum one-hand comfort and reduces
operator fatigue during continuous sanding operations.
Before using this product, familiarize yourself with all
operating features and safety requirements. However, do
not let familiarity with the tool make you careless.
SPECIFIC SAFETY INSTRUCTIONS FOR
SANDERS
À
Always wear safety goggles and a dust mask when
sanding, especially sanding over-head.
À
The machine is not suitable for wet sanding.
À
Do not use sanding paper larger than needed.
Extra paper extending beyond the sanding pad can
also cause serious lacerations.
À
The dust collection box shall be equipped with the
tool. It should be emptied frequently. To connect
dust collection box, insert the adapter of dust box to
the dust-collection opening on the rear end of the
sander.
SWITCH
This tool is equipped with a simple switch control located
near the front of the motor housing.
EXCHANGEABLE HOOK AND LOOP BASE PADS
This sander includes 2 base pads which are
interchangeable for different applications.
Ê triangular detail pad for detail sanding
Ê 1/3 sheet pad for sanding large areas
The hook and loop design allows for quick change of
sanding sheets and different pads. It also enables you to
easily clean and reuse them.
WARNING
Do not throw sanding dust on an open Âre because
materials in Âne particle form may be explosive.
CIRCULAR SANDING ACTION
The oscillating action of your sander produces very quick,
small circular motion of the sanding pad. The motion is
ideal for producing a Âne Ânished grain.
WARNING
A suitable breathing respirator must be worn while
sanding lead paint, some woods and metal to avoid
breathing the harmful/toxic dust or air.
DUST COLLECTION BOX
The dust collection box attaches to the sander and keeps
dust to a minimum.
VARIABLE SPEED
SPECIFICATIONS
Voltage
230 V - 240 V
Power
180 W
Orbital minute
6000-12000 min-1
See Figure 4.
Your sander has advanced electronic features, designed
to assist you in getting the maximum use from your
sander. By making proper speed selections, your tool can
be adjusted to speciÂc sanding needs.
The electronic feature of your tool introduces the Èexibility
of adjusting the motor speed to required job conditions. An
electronic speed control module senses the load applied
to the motor and increases or decreases motor voltage to
50 Hz
Pad size
Triangular pad
1/3 Sheet pad
168 x 100 mm
1
GB
FR
DE
ES
IT
NL
PT
DK
SE
FI
NO
RU
PL
CZ
HU
RO
LV
LT
EE
HR
SI
SK
GR
TR
English
compensate for and maintain desired RPM. Speed can be
set according to the sanding purpose or the surface of the
workpiece you will be using. Select clockwise to increase
speed for rough surfaces or for quick removal of stock and
anti-clockwise to decrease speed for the smaller, delicate
sanding applications.
backing pad clean to provide for best adhesion. Clean
occasionally by brushing lightly with a small brush.
ATTACHING THE DUST COLLECTION BOX
See Figure 3.
The dust collection box provides a dust collection system
for the sander. Sanding dust is drawn up through the holes
of the sanding disc and collected in the dust collection box
during sanding.
1. Unplug the sander.
2. Using a slight twisting motion, Ârmly slide the dust
collection box assembly in the blower exhaust on the
sander.
ASSEMBLY
WARNING
The tool should never be connected to a power supply
when you are assembling parts, making adjustments,
cleaning, performing maintenance, or when the tool is
not in use. Disconnecting the tool will prevent accidental
starting that could cause serious injury.
WARNING
Exercise caution when using this tool. Careless actions,
for even a fraction of a second, can result in serious
personal injury.
SANDPAPER SELECTION
Selecting the correct size, grit and type of sand paper is
an extremely important step in achieving a high quality
sanded Ânish. Aluminum oxide, silicon carbide, and
other synthetic abrasives are best for power sanding.
Natural abrasives, such as Èint and garnet are too soft for
economical use in power sanding.
In general, coarse grit will remove the most material
and Âner grit will produce the best Ânish in all sanding
operations. The condition of the surface to be sanded
will determine which grit will do the job. If the surface is
rough, start with a coarse grit and sand until the surface
is uniform. Medium grit may then be used to remove
scratches left by the coarser grit and Âner grit used for
Ânishing of the surface. Always continue sanding with
each grit until surface is uniform.
APPLICATIONS
You may use the sander for the purposes listed below:
Ê sanding on wood surfaces
Ê removing rust from and sanding steel surfaces
Ê polishing and scrubbing porcelain and metal
CAUTION
Keep the cord away from the sanding pad and position
the cord so that it will not be caught on lumber, tools, or
other objects during sanding.
WARNING
WARNING
Always wear safety goggles or safety glasses with side
shields when operating this tool. Failure to do so could
result in dust, shavings, or loose particles being thrown
into your eyes, resulting in possible serious injury.
Do not use sander without sandpaper, doing so will
damage the cushion.
Sheet/pad recommended use
80-grit sanding sheet
Coarse sanding
120-grit sanding sheet
Light sanding
150-grit sanding sheet
Light sanding
OPERATION
TURNING THE SANDER ON/OFF
See Figure 4.
ATTACHING HOOK AND LOOP SANDING DISCS
À
Turn on the sander: Push the on/off switch to the left.
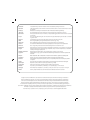
See Figure 2.
1. Unplug the sander.
2. Align holes in hook and loop type sanding disc with
holes in pad, then carefully press fuzzy side of sanding
disc against pad as tightly as possible.
NOTE: It is recommended that you keep the sanding disc
À
Turn off the sander: Push the on/off switch to the right.
OPERATING THE SANDER
See Figure 5.
1. Secure the workpiece to prevent it from moving under
the sander.
2
GB
FR
DE
ES
IT
NL
PT
DK
SE
FI
NO
RU
PL
CZ
HU
RO
LV
LT
EE
HR
SI
SK
GR
TR
English
For more efÂcient operation, empty the dust collection
box when it is no more than half full. Always empty and
clean the dust collection box thoroughly upon completion
of a sanding operation and before placing the sander in
storage.
WARNING
Unsecured workpieces could be thrown towards the
operator, causing injury.
WARNING
WARNING
Keep your head away from the sander and the sanding
area. Your hair could be drawn into the sander causing
serious injury.
Collected sanding dust from sanding surface coatings
such as polyurethanes, linseed oil, etc., can self-ignite
in your sander dust collection box or elsewhere and
cause Âre. To reduce the risk of Âre always empty your
dust collection box frequently (10-15 minutes) while
sanding and never store or leave a sander without
totally emptying its dust collection box. Also follow the
recommendations of the coatings manufacturers.
2. Place the sander on the workpiece so that all of the
sanding disc surface is in contact with the workpiece.
CAUTION
Avoid damaging the motor from overheating; be careful
not to let your hand cover the air vents.
1. Unplug the sander.
WARNING
3. Turn on the sander and move it slowly over the
workpiece.
NOTE: Hold the sander in front and away from you,
keeping it clear of the workpiece. Start sander and let the
motor build to its maximum speed, then gradually lower
the sander onto the workpiece. Move the sander slowly
across the workpiece using small circular motions.
Failure to unplug the tool could result in accidental
starting causing possible serious injury.
2. Remove the dust collection box from the sander.
3. Shake out the dust.
4. Reattach the dust collection box to the sander.
NOTE: For a more thorough cleaning of the dust collection
box, remove dust collection box from frame and shake out
dust. Replace dust collection box over frame then install
dust collection box assembly on sander.
Do not force. The weight of the unit supplies adequate
pressure, so let the sanding disc and sander do the work.
Applying additional pressure only slows the motor, rapidly
wears sanding disc and greatly reduces sander speed.
Excessive pressure will overload the motor causing
possible damage from motor overheating and can result in
inferior work. Any Ânish or resin on wood may soften from
the frictional heat.
CHANGING THE BASE PADS
Sheet and triangular pad
Do not allow sanding on one spot too long as the sander’s
rapid action may remove too much material, making the
surface uneven.
See Figure 8.
1. For safety reasons, ensure your tool is unplugged.
2. Remove the sanding sheet from the base. Undo the
allen screws on the base, using the hex key provided.
3. Once all 3 screws have been removed, remove the
base.
4. When Âtting the new base, place the base up to the
sander and insert the Ârst screw (do not tighten).
5. Insert the remaining 2 screws, then tighten all 3
screws. Tighten up the allen screws opposite to each
other.
Place the desired sanding paper on to the base and
continue to work.
Extended periods of sanding may tend to overheat the
motor. If this occurs, turn sander off and wait until sanding
disc comes to a complete stop, then remove it from
workpiece. Remove your hand from vent area, remove
sanding disc, then with your hand removed from vent
area, turn sander on and run it free without a load to cool
motor.
CORNERS AND CREVICES
See Figure 6.
À
For detail sanding such as corners and crevices, use
the tip of the sanding pad with small back and forth
motions.
CAUTION
Remove the sanding sheet when not in use to prevent
warping.
EMPTYING THE DUST COLLECTION BOX
See Figure 7.
3
GB
FR
DE
ES
IT
NL
PT
DK
SE
FI
NO
RU
PL
CZ
HU
RO
LV
LT
EE
HR
SI
SK
GR
TR
English
INSTALLING SANDPAPER
Inspect sandpaper before installing. Do not use if broken
or defective.
MAINTENANCE
Hook and loop sandpaper
The tool should never be connected to a power supply
when you are assembling parts, making adjustments,
cleaning, performing maintenance, or when the tool is
not in use. Disconnecting the tool will prevent accidental
starting that could cause serious injury.
WARNING
See Figure 9 - 10.
1. Unplug the sander.
2. Align holes in hook and loop type sanding disc with
holes in pad, then carefully press fuzzy side of sanding
disc against pad as tightly as possible.
NOTE: It is recommended that you keep the sanding disc
backing pad clean to provide for best adhesion. Clean
occasionally by brushing lightly with a small brush.
WARNING
When servicing, use only identical replacement parts.
Use of any other parts may create a hazard or cause
product damage.
WARNING
Failure to unplug the tool could result in accidental
starting causing possible serious injury.
GENERAL
Avoid using solvents when cleaning plastic parts.
Most plastics are susceptible to various types of
commercial solvents and may be damaged by their use.
Use clean cloths to remove dirt, carbon dust, etc.
Non-adhesive sandpaper
See Figure 11.
1. Unplug the sander.
2. Release the paper clamp. Remove used sandpaper,
if any.
3. Insert the new sandpaper under the paper clamp.
4. Clamp the sandpaper in place.
WARNING
Do not at any time let brake Èuids, gasoline, petroleumbased products, penetrating oils, etc., come in contact
with plastic parts. They contain chemicals that can
damage, weaken or destroy plastic.
ORBITAL MOTION
Orbital motion is ideal for fast cutting action when removing
old Ânishes, smoothing rough wood, cutting stock down to
required dimensions or for Ânishing surfaces to be painted.
The sandpaper moves in tiny circles at a very high speed,
allowing the sander to move easily.
Electric tools used on Âberglass material, wallboard,
spackling compounds, or plaster are subject to
accelerated wear and possible premature failure because
the Âberglass chips and grindings are highly abrasive to
bearings, brushes, commutators, etc.. Consequently, we
do not recommended that this tool be used for extended
work on these types of materials. However, if you do work
with any of these materials, it is extremely important to
clean the tool using compressed air.
USING THE FINGER PAD
See Figure 11.
1. Open the Ânger pad cover.
2. Lower the Ânger pad and lock it in place.
3. Close the Ânger pad cover.
WARNING
LIVE TOOL INDICATOR
Always wear safety goggles or safety glasses with side
shields during power tool operation or when blowing
dust. If operation is dusty, also wear a dust mask.
This tool features a live tool indicator which illuminates as
soon as the tool is connected to the supply. This warns the
user that the tool is connected and will operate when the
switch is pressed.
LUBRICATION
All of the bearings in this tool are lubricated with a
sufÂcient amount of high grade lubricant for the life of
the unit under normal operating conditions. Therefore, no
further lubrication is required.
4
GB
FR
DE
ES
IT
NL
PT
DK
SE
FI
NO
RU
PL
CZ
HU
RO
LV
LT
EE
HR
SI
SK
GR
TR
English
CLEANING THE SCRUBBING PADS
To ensure longer life and optimum performance,
periodically clean all sanding residue and foreign
materials from the scrubbing pads. This can be done
simply by rinsing the pad with warm water until all foreign
material has been washed away. After cleaning, gently
squeeze the pad to remove excess water and allow pad
to dry. Always store pads and sanding sheets Èat in a cool
dry location.
Wear ear protection
Wear eye protection
Please read the instructions carefully before
starting the machine.
Waste electrical products should not be
disposed of with household waste. Please
recycle where facilities exist. Check with your
Local Authority or retailer for recycling advice.
CLEANING THE SANDING SHEETS
The sanding sheets that came with your sander are
made to be re-used. Therefore, it is important that they
be cleaned periodically to remove sanding residue and
foreign material that can accumulate over time.
To clean sanding sheets, rub the sheets with a hard rubber
block. You can also use the clean rubber sole of a shoe.
WARNING
Always remove scrubbing or sanding pad from sander
before cleaning. Failure to do so could cause serious
personal injury.
ENVIRONMENTAL PROTECTION
Recycle raw materials instead of disposing
of as waste. The machine, accessories
and packaging should be sorted for
environmental-friendly recycling.
SYMBOL
Safety Alert
V
Hz
W
no
min-1
Volts
Hertz
Alternating Current
Watts
No-load speed
Revolutions or reciprocations per minute
Orbital diameter
CE Conformity
Double insulation
5