1
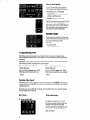
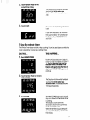
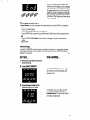
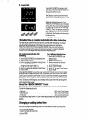
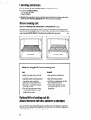
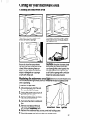
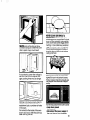
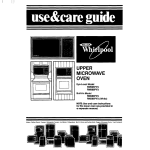
UPPER
MICROWAVE
OVEN
Eye-Level Models
RM988PXP
RM978BXP
RM973BXP
SM988PEP
SM958PEP
Built-h
wave
Ovens
Trash Compactors.
Room Air Condllmners
Oehumldlflers
Automallc
Washers
Models
RM288PXP
RM278BXP
Clothes
Oryers
freezers.
Relrlgeralor-freeze
Contents
Parts and Features.
Before You Use Your
Microwave
Oven.
Important
Safety Instructions.
Precautions
to Avoid
Possible Exposure to
Excessive Microwave
Energy.
Using Your Microwave
Oven.
Microwave
Oven Controls
Programming
Tone
Setting the Clock
Using the Minute Timer,
Cooking in One Cycle.
High Cook Power.
Lower Cook Powers.
Defrosting.
Cooking in Two Cycles
Cooking with the
Temperature Probe
Page
-3
4
5
5
7
7
8
8
9
10
10
11
13
15
Using PAUSE
Using KEEP WARM.
Using AUTO START
Cancelling
Instructions
Bi-Level Cooking Rack.,
Caring for Your Microwave
Oven........................
Cleaning
the Microwave
Oven
Replacing
the Light Bulb.
Microwave
Oven Operating
Safety Precautions
If You Need Service or
Assistance.
1. Before Calling for
Assistance..
2. If You Need Assistance
3. If You Need Service.
4. If You Have a Problem
18
c 1984 Whirlpool
Corporation
Page
21
22
23
26
26
27
27
27
28
30
30
31
31
31
Parts and features
UPPER MICROWAVE OVEN
DEFROST GUIDE
(Not Shown]
DOOR LATCH
MODEL AND SERIAL
NUMBER PLATE
I
CONTROL
PANEL
\
TEMPERATURE
PROBE SOCKET
2-POSITION
BI-LEVEL \
COOKING RACK
Copy your Model and Serial Numbers here...
If you need service, or call with a
question,
have this information
ready:
1. Complete
Model and Serial Numbers (from the plate located behind
the microwave
oven door).
2. Purchase date from sales slip.
Copy this information
in these
spaces. Keep this book, other oven
literature, your warranty
and sales
slip together in a handy place.
There is no warranty registration to
return. Proof-of-purchase
is all that is
required for in-warranty
service.
Model
Number
Serfal Number
Purchase
Service
Date
Company/Phone
Number
Fill out and return the “Microwave
Registration
Card” attached
to the
Microwave
Oven Door. If the card is missing, please send the model and serial
number of your Microwave
Range, with your name and address to...
Whirlpool Corporation
Microwave
Registration Department
Administrative
Center
2000 U.S. 33 North
Benton Harbor, Michigan
49022
This information will help us reach you if there is ever a need to pass along
information about your microwave
range.
Remove
the Consumer
Buy Guide
label
before
using your microwave
range.
Before you use your microwave oven
Read and carefully follow the 6~INSTALLATIONINSTRUCTIONS”
packed wifh your microwave oven.
Read this “Use & Care Guide” and your “Cooking Guide” carefully for important
use and safety information, Store these with Range or Lower Oven literature for
future use.
It is your personal
responsibility
and obligation
to be
sure your microwave
oven:
l Has been
installed where it is protected
from the
elements.
The microwave
oven should be at a temperature
above
50°F (10°C) for proper operation
l Has been
installed and levelled on a floor strong enough
to support its weight. [Eye-level models only]
l Has been
properly connected
to electrical
supply and
grounded.
(See “Installation
Instructions:‘)
l Is not used by anyone
unable to operate it properly.
l Is properly
maintained.
l Is used only for jobs expected
of a microwave
oven.
See your Range or lower Oven “Use & Care Guide” for
additional
safety and operating
instructions.
4
IMPORTANT
SAFETY INSTRUCTIONS
For Use of Microwave
Upper Oven
Microwave ovens have been used successfully in homes for a
number of years. They are thoroughly tested for safe and efficient
operation. However, as with any appliance, there are special installation and safety precautions which must be followed to ensure
safe and satisfactory operation and prevent damage to the unit.
PRECAUTIONS TO AVOID POSSIBLE
EXPOSURE TO EXCESSIVE
MICROWAW ENERGY...
DO NOT attempt to operate this
oven with the door open since
open-door
operation
can result
in harmful exposure to microwave energy. It is important not
to defeat or tamper with the
safety interlocks.
DO NOT place any object between the oven front surface and
the door or allow soil or cleaner
residue to accumulate
on sealing surfaces.
DO NOT operate the microwave
oven if the door glass is broken
The microwave
oven should be
checked for microwave
leakage
by qualified service personnel
after a repair is made.
The oven door should not be
adjusted or repaired by anyone
except properly qualified
service personnel.
DO NOT operate the oven if it is
damaged.
It is particularly
important that the oven door
close properly and that there
is no damage
to the
(I] Door (bent],
(2) Hinges and latches (broken
or loosened),
(3) Door seals and sealing
surfaces.
continued
on next page
WARNING
shock,
-To reduce
fire, injury to persons
microwave
energy:
1. Read all instructions before
using appliance.
2. Read and follow the specific
“PRECAUTIONS TO AVOID POSSIBLE EXPOSURETO EXCESSIVE
MICROWAVE ENERGY” found on
page 5.
3. This appliance must be installed and properly grounded in
accordance with the separately
provided “Installation
Instructions!’
4. Some products such as whole
eggs and sealed containers - for
example, closed glass jars - may
explode and should not be
heated in this oven.
5. Use this appliance only for its
intended use as described in this
manual.
6. As with any appliance, close
supervision is necessary when
used by children.
7. Do not operate this appliance
if it has a damaged cord or plug,
if it is not working properly, or if it
has been damaged or dropped.
Electric shock, fire or other hazards may result.
8. This appliance should be serviced only by qualified service
personnel. Call a Whirlpool authorized TECH-CARE” Service
Company for examination, repair
or adjustment
9. Do not cover or block any
opening on the appliance, because fire may result.
6
the risk of burns, electric
or exposure to excessive
10. Do not use outdoors because
damage to the oven or electric
shock may result.
11. See door surface cleaning instructions on page 27.
12. To reduce the risk of fire in the
oven cavity:
a. Do not overcook food. Carefully
watch appliance if paper, plastic,
or other combustible materials are
placed inside the oven to facilitate
cooking. Paper can char or burn,
and some plastics can melt if used
when heating foods.
b. Remove wire twist-ties from paper or plastic bags before placing bag in oven. Cooking in metal
containers can damage the
oven. So can containers with
hidden metal (twist-ties, foil lining,
staples, metallic glaze or trim].
Testdinnerware or cookware.
before using. See page 28.
c. If materials inside the oven
should ignite, keep oven door
closed, turn oven off, and disconnect the power cord, or shut off
power at the fuse or circuit
breaker panel.
13. Read and follow “OPERATING SAFETYPRECAUTIONS”
starting on page 28.
SAVE THESE INSTRUCTIONS
Using your microwave oven
Microwave oven controls
There are three parts to the microwave
oven control section :
-The Digital Display/Clock
and Indicator Lights
-Command
Pads
- Number Pads
Instructions for each are covered on the following pages. Read them carefully.
When you first connect power to the oven, the Display will show 88:88. If after you
set the Clock (page 81, the Display again shows all 8’s, it means your electricity
was off for a while. Reset the Clock.
Digital display/clock
and indicator
lights
When you are not using the microwave oven, this is an accurate digital
clock.
When you are using the microwave
oven, it displays Time, Temperature,
Cook Power, Indicator Lights and
shows what Number Pads you
touched.
While the oven is running, an Indicator Light (or lights) will be on to show
what the oven is doing.
7
Command
pads
Touch Command
Pads to tell the
microwave
oven what to do and in
what order to do it. Examples:
- CLOCK SET tells the oven you are
going to set the clock.
- START tells the oven to start.
Each Command
Pad (except CLOCK
SET,START and CANCEL] lights an
Indicator Light on the digital display.
The Indicator Light comes on when
you touch the Command
Pad.
Number pads
Once you’ve touched a Command
pad to tell the oven what to do, you’ll
touch Number Pads to tell it...
- a time,
- a Cook Power,
-a food temperature.
Programming
tone
Each time you touch a pad you will hear a tone. If you do not hear a tone,
it is because the instruction is not correct, or it is because the tones have been
removed,
EXAMPLE: If you touch a Number Pad before you touch a Command
Pad, you
will not hear a tone. The instruction is not correct.
If you want to remove the tone:
If you want to replace the tone:
l Open
the door.
l Open
the door.
l Touch CANCEL twice,
then START.
l Touch CANCEL twice,
then START.
l The tone will not sound
for any
l The tone will sound
for any correct
touch.
touch.
Setting the clock
When the oven is first plugged
in, the Clock,Display
shows 88:88. If the electric
power ever goes off, the ClockDisplay
will again show all 8’s when the power
comes back on.
You can cook or use the Minute Timer without setting the clock, but the display
will be blank after cooking
DO THIS...
1. Touch CLOCK
THIS HAPPENS...
SET.
The Display will show a “0” and
the colon will start to flash. [The first
Number Pad must be touched
within 5 seconds or the display will
go blank. Touch CLOCK SET again
and continue.)
8
2. Touch Number Pads for the
correct time of day.
The Display will show what numbers
you touched in the order you
touched them. This example
shows
3:25.
3.
Touch START.
The colon will stop flashing. The Clock
is set.
If you have touched in an incorrect
time, such as12:65, “Err” will show on
the Display. Touch CLOCK SET and
start over.
Using the minute timer
The Minute Timer does not start or stop cooking.
oven is operating.
It works like a kitchen timer.
It can be used alone or while the
THIS HAPPENS...
DO THIS...
1. Touch MINUTE TIMER.
The Minute Timer Indicator Light will
come on and the Display will show a
“0:’ The first Number Pad must be
touched within 5 seconds or the
Display will again show the time of
day. Touch MINUTE TIMER again and
continue.
Touch Number
and seconds.
Pads for minutes
The Display will show what numbers
you touched in the order you
touched them. This example
shows
1 minute, 45 seconds.
Touch START.
The MINUTE TIMER Indicator Light will
stay on to show that the Minute Timer
is running.
The Display counts down the
seconds to show how much time is
left on the Minute Timer.
When the set time is up, a beep will
sound and the Display will show the
time of day.
9
Changing the minute timer
Cancelling
the minute timer
-Touch MINUTE TIMER.
-Touch numbers to set new time.
- Touch START.
New Instructions
cancel the old
ones.
-Touch MINUTE TIMER.
-Touch CANCEL. Note: Touch MINUTE
TIMER before touching CANCEL to
cancel just the Minute Timer. If
CANCEL Is touched
first, all cookIng Instructlons
will be cancelled
and the Minute Tlmer will continue
to operate.
Opening the oven door does not stop the Minute Timer countdown;
however, it
does stop any cooking or defrosting. Close the door and touch STARTto continue
cooking or defrosting.
Cooking in one cycle
-Follow these steps to cook at high power.
DO THIS...
1. Put food in the
THIS HAPPENS...
oven and close
the door.
2.
Touch COOK CYCLE 1.
The COOK CYCLE 1 Indicator Light will
come on and the Display will show
four 0’s.
3. Touch Number Pads for the
cooklng time you want.
The Display will show the numbers
you touched In the order you
touched them. The example
shows
1 minute, 30 seconds.
4.
Touch START.
The oven will automatically
cook
at hlgh Cook Power.
The COOK CYCLE 1 Indicator Light will
stay on to show that the oven is cooking in the first cycle.
10
I
I Ii
The Display counts down the time
to show how much time is left in the
first cycle.
dOWll
When the cooking time ends, “End”
will show on the Display and 4 beeps
will sound. (You can stop the beeping
by opening the door or by touching
CANCEL.) “End” will remain on the Display until door is opened or CANCEL
is touched. The Display will then show
the time of day.
Changing the cooking time.
Cooking time can be changed
any time before touching
cycle:
I, Touch COOK CYCLE 1
2. Touch numbers for new time.
3. Touch START.
Cook Cycle 1 will continue cooking for the new time.
START or during
the
lower cook powers
For best results, some recipes call for lower Cook Powers. The lower the Cook
Power, the slower the cooking. Each Number Pad also stands for a different
percentage
of Cook Power. Many recipes in your MICRO MENUS* Cookbook
tell
you, by number, which Cook Power to use. Recipes in other books and,magazines may tell you by name (HI, MED, LO, etc.] or percentage
(lo%, 50%, 80%, etc.).
The following chart gives the percentage
stands for, and Cook Power name usually
automatic
100% of full power HIGH
9 = 90% of full power
8 = 80% of full power
7 = 70% of full power MED-HIGH
6 = 60% of full power
5 = 50% of full power MED
of Cook Power each
used.
4
3
2
1
0
=
=
=
=
=
Number
Pad
‘lmk.
40% of full power
30% of full power MED-LOW
20% of full power
10% of full power LOW
no power (fan and light
will be off)
DO THIS... .-,I&-lI~Yj _-w.z-a~1 THIS
./“_ -? HAPPENS...
I .Y.rf I.
1. Put food in the oven and close
the door.
--c__o~s~.l,~-~““s~~
2.
,m,l.p.,.l“: _--._
Touch COOK CYCLE 4.
The COOK CYCLE 1 Indicator Light will
come on and the Display will show
four O’s
3. Touch Number Pads for the
cooking time you want.
The Display will show the numbers
you touched in the order you
touched them. This example
shows
7 minutes, 30 seconds.
4.
Touch COOK POWER.
The COOK POWER Indicator Light will
come on and the Display will show
“P-HI”. This shows the oven is preprogrammed
to cook at full (HIGH]
power.
5. Touch a Number Pad for the
Cook Power you want.
The Display will show what you
touched. This example
shows you
touched Number Pad 5 for 50% of
full power.
6. Touch START.
COUd
0Wl-l
d
The COOK CYCLE 1 and COOK POWER
Indicator Lights will stay on to show
that the oven is cooking in the first
cycle at a Cook Power other than
high.
The Display counts down the time to
show how much cooking time is left
in the first cycle.
For 2 of every 10 seconds, the Display
will show the Cook Power you
selected.
12
When the cooking time ends, “End”
will show on the Display and 4 beeps
will sound. (You can stop the beeping
by opening the door or by touching
CANCEL.) “End” will remain on the Display until door is opened or CANCEL
is touched. The Display will then show
the time of day.
Changing cook power
l
Cook Power can be changed
any time before touching STARTor during the
cycle.
-Touch COOK POWER.
- Touch a number for the new Cook Power.
-Touch START.The cycle will cook at the new Cook Power for the original time
OR...
-Touch COOK POWER twice if you want to change a lower Cook Power to
HIGH.
Touch START.
Defrosting
Use QUICK DEFROST to thaw frozen food before cooking. For suggested defrost
times, see the guide on the inside of the oven door or the chart in your MICRO
‘Tmk.
MENUS* Cookbook.
DO THIS...
1. Put frozen food
close
2.
THIS HAPPENS...
in the oven and
the door.
Touch QUICK DEFROST.
The QUICK DEFROST Indicator
will come on and the Display
show four 0’s.
Light
will
3. Touch Number Pads for the
defrosting
time you want.
The Display will show the number
you touched in the order you
touched them. This example
shows
2 minutes, 30 seconds.
13
4.
Touch START.
The QUICK DEFROST Indicator Light
will stay on to show that the oven is in
the Quick Defrost Cycle.
The Display counts down the time to
show how much defrosting time is left
When the defrost time ends, “End”
will show on the Display and 4 beeps
will sound. (You can stop the beeping
by opening the door or by touching
CANCEL.] “End” will remain on the Display until door is opened or CANCEL
is touched. The Display will then show
the time of day.
-I
_,=,,._
__.._- _jh”l*..,“jA.,..l, a*.~.#-8
Standing time or cooking automatically
after defrosting
For best results, allow the food to stand for a while after defrosting, This helps
equalize the temperature
of the food to provide more even defrosting.
When the COOK CYCLE 1 follows QUICK DEFROST,the oven automatically
provides a standing time equal to the time touched in for QUICK DEFROST.
COOK CYCLE 1 will begin after the automatic
standing time.
For cooking automatically
after
For a differentstanding
time:
defrosting:
1. Touch QUICK DEFROST and
1. Touch QUICK DEFROST and desired time.
desired time.
2. Touch COCK CYCLE 1.
2. Touch COOK CYCLE 2.
3. Touch numbers for desired cooking time.
3. Touch numbers for desired
4. Touch COOK POWER. (If you want to cook
standing time.
at high power, skip to step 6.)
4. Touch COOK POWER.
5. Touch a number for desired Cook Power.
5. Touch “0” for zero Cook Power.
6. Touch START.
6. Touch START.
When QUICK DEFROST is over, the oven will shut off. If Cook Cycle1 has not been
programmed,
3 beeps will sound and the Display will count down the time for
Cook Cycle 2 at zero Cook Power. If Cook Cycle1 has not been programmed,
the Display will count down and sound 2 beeps before Cook Cycle1 will start.
“End” will show on the Display and 4 beeps will sound when the standing time
and cooking time is over.
About the “QUICK DEFROST” Cycle
The microwave
oven automatically
divides the time set for the QUICK DEFROST
Cycle into three equal parts:
-First part
80% of full Cook Power;
-Second
part
50% of full Cook Power;
-Third part
20% of full Cook Power.
This automatic
step-down
in Cook Power helps defrost food quickly and completely
Changing or adding defrost time
You can change
the defrosting
-Touch QUICK DEFROST.
-Touch numbers for new time.
- Touch START.
14
time any time before or after touching
START
Any new time seftfng made while QUICK DEFROST Is operating
will continue
the defrosting
at only 20% of full power.
The best time to change the setting is near the end of the QUICK DEFROST Cycle.
- Open the door.
- Check the food with long-tined fork; if center area is hard frozen, set additional
time. Remember
that standing time is necessary
to complete
the
defrosting.
- Close the door and touch STARTto continue the cycle if no additional
time is
needed.
OR...
-Touch in new instructions for additional
defrosting time.
Cooking in two cycles
For best results, some recipes call for one Cook Power for a certain length of
time, and another Cook Power for another length of time. Your oven can be set
to change from one to another automatically.
DO THIS...
1. Put food in
THIS HAPPENS...
the oven and close
the door.
2.
Touch COOK CYCLE 1.
The COOK CYCLE 1 Indicator Light
will come on and the Display will
show four 0’s.
I
3.
Touch Number Pads for the
cooking time you want in the
first cycle.
., ..,
4.
The Display will show the numbers
you touched in the order you
touched
them. This example
shows
3 minutes, 25 seconds.
Touch COOK POWER. (if you
want the high Cook Power, skip
to step 6.)
The COOK POWER Indicator Light will
come on and the Display will show
“P-HI”. This shows the oven is preprogrammed
to cook at full (HIGH]
power.
15
5. Touch a Number Pad for the
Cook Power you want in the first
cycle.
The Display will show what you
touched. This example
shows you
touched Number Pad 6 for 60%
of full power.
6.
Touch COOK CYCLE 2.
The COOK CYCLE 2 Indicator Light
will come,on and the Display will
show four O’s
7. Touch Number Pads for the
cooking time you want in the
second cycle.
The Display will show the numbers
you touched in the order you
touched
them. This example
shows
4 minutes, 30 seconds.
8.
Touch COOK POWER. (if you
want the high Cook Power, skip
to step 10.).
The COOK POWER Indicator Light will
come on and the Display will show
“P-HI”. This shows the oven is preprogrammed
to cook at full [HIGH]
power.
9. Touch a Number Pad for the
Cook Power you want in the
second cycle.
The Display will show what you
touched. This example
shows you
touched Number Pad 4 for 40%
of full power.
16
When you touch START,the COOK
CYCLE 1 Indicator Light will stay on
while the oven is cooking in the first
cycle. The COOK POWER Indicator
Light will be on if you are using
a Cook Power other than high. All
other Indicator Lights will go off.
The Display counts down the cooking time to show how much time is
left in the first cycle.
BEEPBEE~
For 2 of every 10 seconds, the
Display will show the Cook Power
you selected, if you are using a
Cook Power other than high.
You will hear 2 beeps at the end of
Cook Cycle 1.You can either open
the door to check, stir or turn the food,
etc., or you can let the oven start the
next cycle. If you do open the door,
touch START after closing the door to
resta ri the oven.
The COOK CYCLE 2 Indicator Light will
be on during the second cycle. The
COOK POWER Indicator Light will also
be on if you are using a Cook Power
other than high.
The Display counts down the time
to show how much time is left in the
second cycle.
For 2 of every 10 seconds, the Display will show the Cook Power you
selected, if you are using a Cook
Power other than high.
When Cook Cycle 2 ends, “End” will
show on the Display and 4 beeps will
sound. [You can stop the beeping
by
opening the door or by touching
CANCEL.) “End” will remain on the Display until door is opened or CANCEL
is touched. The Display will then show
the time of day.
Changing or adding instructions
You can change times, Cook Powers, or add cycles any time before touching
START or during oven operation.
-Touch the COOK CYCLE you wish to change or add (COOK CYCLE 1 or 2).
-Touch numbers for new time, if desired.
-Touch COOK POWER, if change is desired.
-Touch number for new Cook Power, or touch COOK POWER again if high is
desired.
-Touch in new cycle and time, if desired.
-Touch START.
17
Cooking with the TEMPERATURE
PROBE
The Temperature
Probe helps take guesswork out of cooking roasts and larger
casseroles. The probe is designed to turn off the oven when it senses the temperature you chose. See your MICRO MENUS* Cookbook
for helpful information
‘Tmk.
in cooking different types food.
DO THIS...
1.
Insert at least %
of the temperature
probe into the
food.
DO THIS...
4. Touch PROBE
2. Place food in the
oven and plug the
probe into the
socket on the oven
wall.
3. Make sure the
probe does not
touch any part of
the oven interior.
Close the door.
THIS HAPPENS...
TEMP.
The PROBE TEMP Indicator Light
will come on and the Display will
show “F.”
5. Touch Number Pads for the
desired final temperature.
The Display will show the numbers
you touched in the order you
touched them. This example
shows
a final cooked temperature
of
aboutl40”F
6.
18
Touch COOK POWER (Option:
Touch START if you want to use
high power.)
..
... 2:.
I.
The COOK POWER Indicator Light will
come on and the Display will show
“P-HI”. This shows the oven is preprogrammed
to cook at full (HIGH]
power.
I
I Ii
7. Touch the Number Pad for the
Cook Power you want.
8.
The Display
touched.
will show what you
Touch START.
The PROBE TEMP and COOK POWER
Indicator Lights will stay on.
The Display will show ” ~ 9OF” to show
the food is less than 90°F As the food
cooks the Display will show the internal temperature
of the food for every
5-F increase.
For 2 of every 10 seconds, the Display will show the Cook Power you
selected, if you are using a Cook
Power other than high.
When the probe senses the temperature you selected, the oven shuts
off, “End” will show on the Display and
4 beeps will sound. (You can stop the
beeping
by opening the door or by
touching CANCEL.) “End” will remain
on the Display until door is opened or
CANCEL is touched. The Display will
then show the time of day,
Hints for using the tempemture
probe
The recommended temperature settings in your MICRO MENUS* Cookbook
may list COOK TEMPfollowed by a number (l-9). Use the following chart to
convert these numbers to tempemtures which can be directly
‘Tmk.
programmed into the control.
COOK TEMP
COOK TEMP
COOK TEMP
1 = 90°F
4 = 130°F
7 = 160°F
5 = 145°F
2 = 110°F
8 = 165°F
6 = 150°F
9 = 185°F
3 = 1209
NOTE: Any tempemture
setting
between
DO...
l
l
l
l
l
use hot pads when removing
probe from food or from oven.
stir foods during cooking when
recommended.
stir soups, casseroles and drinks
before serving.
cover roasts with foil and let
stand a few minutes after cooking.
Remove foil if you decide to
cook longer.
remove the probe from the oven
when not cooking by
temperature.
90°F and 200°F can be entered.
DONT...
let probe or probe cable touch
any part of the oven interior.
l let probe touch foil (If used for
shielding). Foil can be kept away
from probe with wooden toothpicks. Remove foil if arcing occurs.
l use paper, plastic wmp or plastic
containers.
l use probe in regular oven.
. force probe into frozen food.
l use probe for foods that need to
simmer.
l
I
I I’
Changing the temperature
setting
When using the Temperature
Probe, PROBE TEMP setting can be changed
any
time before touching START or during oven operation.
-Touch PROBE TEMP
-Touch Number Pads for new temperature.
-Touch START.The oven will continue cooking to the new temperature.
If the
new temperature
is lower than the temperature
of the food, the oven will
shut off.
Tempemture
probe cooking tips
For casseroles, the tip
of the probe should be
in the center of the
food. Stir foods when
recommended.
Replace the probe.
l
l
l
l
For liquids, balance
the
probe on a wooden
spoon or spatula so the
tip of the probe is in
the center of the liquid.
Casseroles cooked using the
Temperature
Probe should be
made from precooked
foods. Do
not use raw meats, raw vegetables and cream sauces in
casseroles.
Dry casseroles do not work well.
Thaw frozen casseroles and
meats in the microwave
oven
before inserting the probe.
If you are cooking individual
servings such as mugs of soup,
l
l
For roasts, the tip of the
probe should be in the
center of the largest
muscle, but not touching fat or bone.
check the probe setting in several of the items - all the mugs
may not heat at the same rate.
Dry meat loaf mixtures don’t work
well.
Remember that roasts may vary
in size, shape and composition.
Use the timings for minutes per
pound as a guide as well as the
Temperature
Probe.
Cleaning the probe
1. Remove probe from microwave
oven using hot pads.
2. Wipe probe with a hot sudsy cloth. Use plastic scouring pad to remove
stubborn foods.
3. Probe may be placed in the silverware basket of the dishwasher.
20
Using PAUSE
For best results, some recipes call for stirring, turning, or adding ingredients during cooking. Your microwave
oven can be set to pause between COOK CYCLE1
and 2, or between either cycle and PROBE TEMP to give you time to stir or turn the
food, or to add ingredients, PAUSE cannot be added after QUICK DEFROST.
DO THIS...
THIS HAPPENS...
1. Put
food in the oven and close
the door.
2. Touch in desired cooking
instructions
for COOK
CYCLE 1, (page 15).
The PAUSE Indicator Light will come
on and the Display will show the time
you selected for Cook Cycle 1.
4. Touch in desired cooking
instructions
for COOK
CYCLE 2, (page 16).
5. Touch START.
BEEP BEEP
When COOK CYCLE 1 is over, 2 beeps
will sound and the oven will shut off.
The PAUSE and COOK CYCLE 2 Indicator Lights will come on. The Display
will show the time set for COOK
CYCLE 2.
Open the door. Stir, turn or add ingredients. Close the door.
Touch START to continue with COOK
CYCLE 2. The oven will remain off
until you touch START.
Adding “PAUSE”
PAUSE can be added to the cycle in operation, if there is to be another cycle,
-Touch PAUSE.
- Touch START.
The microwave
oven will stop automatically
after the cycle in operation. You
will hear 2 beeps. START must be touched to begin the next cycle after PAUSE.
If the final cycle has already started, PAUSE cannot be added. Open the oven
door to stop cooking; stir or turn food; close the door and touch START.
Using “KEEP WARM”
Hot, cooked foods can be safely kept warm in your microwave
oven for up
to 99 minutes, 99 seconds (about1 hour, 40 minutes). KEEP WARM can be used by
itself, or it can automatically
follow a cooking cycle, or PROBE TEMP cycle.
DO THIS...
THIS HAPPENS...
1. Put
cooked, hot food in oven
and close door.
2.
Touch KEEP WARM.
The KEEP WARM Indicator Light will
come on. The Display will show the
time of day.
3.
Touch START.
The KEEP WARM Indicator Light
will stay on. The oven light and the
fan will come on. The Display will
continue to show the time of day.
-KEEP WARM operates for up to 99 minutes, 99 seconds.
-Opening
the oven door cancels KEEP WARM. Close the door and touch KEEP
WARM, then START if additional
KEEP WARM time is desired.
-Foods cooked covered should be covered during KEEP WARM.
-Pastry items [pies, turnovers, etc.) should be uncovered
during KEEP WARM.
-Complete
meals kept warm on a dinner plate should be covered during
KEEP WARM.
-The use of more than one complete
KEEP WARM (about 1 hour, 40 minutes] is
not recommended.
The quality of some foods will suffer with extended time.
To automatically
follow another cycle
While you are touching in cooking instructions,
touch KEEP WARM before
touching start.
l After
the oven starts operating,
touch KEEP WARM and then START.
l When the last cooking
cycle is over you will hear 4 beeps. The KEEP WARM
Indicator Light will come on and the time of day will be displayed
while the
oven continues to run.
. KEEP WARM will follow QUICK DEFROST,COOK CYCLE 1,COOK CYCLE 2 or PROBE
TEMP
l
22
II
I I’
Using AUTO START
The microwave
START to delay
oven can be set to start automatically
at a later time. Use AUTO
the start of cooking for up to 11 hours, 59 minutes.
THIS HAPPENS...
,...
DO THIS...
1. Make sure
the Clock is set to
correct tlme of day. See page
If any change is needed.
8
2. Put food in oven and close the
door. (See CAUTION on page 25.)
3.
Touch AUTO START.
The AUTO START Indicator Light will
come on and the Display will show
a “0:’
4. Touch Number Pads for the tlme
of day you want cooklng to start.
The Display will show the numbers
you touched in the order you
touched them. This example
shows 5
o’clock.
5.
Touch COOK CYCLE 1.
The COOK CYCLE 1 Indicator Light will
come on and the Display will show
four 0’s.
.*~
6.
,.I
.uIr
_<
Touch Number Pads for the
cooklng time you want.
The Display will show the numbers
you touched,‘ln the order you
touched them. This example
shows
8 minutes, 30 seconds.
23
8.
Touch a Number Pad for
the Cook Power you want.
The Display will show what you
touched. This example
shows you
touched Number Pad 7 for 70%
of full power.
9.
Touch START.
The AUTO START Indicator Light will
stay on. All other Indicator Lights will
go off. The Display will go back to
showing the time of day.
When the time of day reaches the
time you have set in AUTO START,the
AUTO START Indicator Light will go off,
the COOK CYCLE 1 Indicator Light will
come on, the cooking time will show
on the Display, and the oven will start
cooking.
COdI
0Wl-l
d
The Display counts down the time
to show how much time is left in
COOK CYCLE 1.
For 2 of every 10 seconds the Display
will show the Cook Power you
selected, if you are using a Cook
Power other than high.
24
When the cooking time ends, “End”
will show on the Display and 4 beeps
will sound. (You can stop the beeping
by opening the door or by touching
CANCEL.) “End” will remain on the Display until door is opened or CANCEL
is touched. The Display will then show
the time of day.
NOTE: If the oven light and fan come
on when you touch START, the Start
Time has not been set correctly.
Open and close door, reprogram
AUTO START time, then touch START.
Additional
l
l
l
information
Additional
cycles can be set when using AUTO START.Follow instructions
under the proper heading [Defrosting, Cooking in Two Cycles, Cooking with
the Temperature
Probe, Using PAUSE, Using KEEP WARM] either before or after
you touch START.
You can change times, or add cycles at anytime during the AUTO START cycle,
1. Touch the Cook Cycle you wish to change or add.
2. Touch numbers for new time.
3. Touch COOK POWER, if desired.
4. Touch number for new Cook Power, or touch COOK POWER again if high is
desired.
5. Touch START.
Opening the door does not stop Auto Sian operation.
CAUTION:
l
l
l
l
Use foods that will not go bad or spoil while waiting for cooking to start.
Avoid using dishes with milk or eggs, cream soups, cooked meats, poultry
or fish, or any item with baking powder or yeast.
Smoked or frozen meats may be used; so can vegetables, fruits and
casserole type foods.
Any food that has to wait for cooking to start should be very cold or frozen
before it is put in the oven. MOST UNFROZENFOODS SHOULD NEVERSTAND
MORE THAN TWO HOURSBEFORECOOKING STARTS.
Other operating
1.
hints
To double check settings while the oven is running, touch the Command
Pad
for the setting you want to check. The instruction programmed
for that pad will
show on the Display for 5 seconds. Then the Display returns to showing what
the oven is doing.
2. To stop the oven while it is running:
l Open
the door. The oven will stop. Restart the oven by closing the door and
touching START.
l Touch CANCEL. All instructions
will be erased. You must touch in new
instructions.
25
Cancelling instructions
Touch CANCEL to erase all instructions
except Minute Timer,
To cancel the Minute Timer:
-Touch MINUTE TIMER.
-Touch CANCEL.
Opening the oven door during cooking does not cancel cooking
However, KEEP WARM is cancelled
when the oven door is opened.
l
l
l
instructions.
Bi-level cooking rack
(Models RM988PXP, SM988PEP & RM288PXP only)
Use the Bi-Level Cooking Rack when cooking in more than one container. The
rack can be turned upside-down
to help fit taller containers on the bottom of the
oven. See the MICRO MENUS’ Cookbook
provided with your oven.
‘Tmk.
First Position
I
Second
Hints for using the Bi-level cooking
l
l
l
l
Wash by hand with a mild de
tergent or in your dishwasher.
Use only when cooking foods in
more than one container.
Use only in microwave
oven.
Put food in containers, before
placing on rack.
Turn rack upside-down
when
using taller containers on the
bottom of the oven.
Optional
rack
DON’T...
DO...
l
Position
l
l
l
l
Use abrasive scrubbers or
cleansers.
Use with browning dish.
Let food or container touch the
top or side of the oven.
Cook foods directly on rack
without putting them in containers first.
bi-level cooking rack kit
(Models RM978BXP, RM973BXP, SM958PEP & RM278BXP)
A removable
Bi-level Cooking Rack is available
as an accessory
lets you cook or reheat foods together as a meal. Ask your dealer
l RCKBOO (832848)
- Bi-Level Cooking Rack Kit
26
kit. This rack
for details on...
Caring for your microwave oven
Cleaning the microwave oven
Wipe often with warm sudsy water
and a soft cloth or sponge.
For stubborn soil, boil a cup of water
in the oven for 2 or 3 minutes. Steam
will soften the soil.
Be sure to clean the areas where
the door and oven frame touch when
closed. When cleaning
these surfaces, use only mild, non-abrasive
soaps or detergents on a sponge
or soft cloth. Rinse well.
CAUTION:
Abrasive cleansers, steel
wool pads, gritty wash cloths, etc.,
can damage
the control panel, interior and exterior oven surfaces. Use
a soft cloth or sponge with a mild detergent or spray glass cleaner.
Replacing the microwave oven light
The microwave
oven light should come
oven is operating.
To replace the light bulb:
1. Move range away from the wall.
Be very caretul. It Is heavy.
2. Unplug the power cord, or turn off
the main power supply.
3. Remove holding screw on microwave oven access panel.
4. ;Vs; aside the interior cardboard
on whenever
(Electric Eye-Level Models only]
the door is opened or the
5. Remove and replace the bulb
Screw
Access Panel
with a 40-watt appliance
bulb.
6. Replace the cardboard flap, access panel and holding screw
7. Plug in the power cord, or turn on the main power supply.
light Bulb
I
27
I
II
Microwave oven operating safety precautions
DO NOT use the oven until vou have read and understand
on safe use.
USE HOT PADS. Microwave energy
does not heat containers, but the hot
food does.
ALL the information
To test a dish for safe use, put it into
the oven with a cup of water beside
it. Cook on high Cook Power for one
minute. If the dish gets hot and the
water stays cool, do not use..
DO NOT heat or store flammable
or inflammable
materials in or near
the oven. Fire may result.
DO NOT OVERCOOK
POTATOES.
Fire could result. At the end of the
recommended
cooking time they
should be slightly firm. Wrap in foil
and set aside for 5 minutes. They will
finish cooking while standing.
WARNING - Use care when heating
liquids or adding ingredients to
heated liquids. Liquids heated in certain shaped containers may become overheated.
The liquid may
splash out with a loud noise during or
after heating, or when adding ingredients (instant coffee, etc.). This can
harm the oven and the hot liquid
could burn you. Do not use such containers to heat liquids again.
28
DO NOT use the oven for storage. Do
not leave paper products, books or
cooking utensils in the oven when not
in use. Fire may result if someone accidentally
starts the oven.
Don’t let anything
oven.
touch the top of the
NEVER COOK OR REHEAT A
WHOLE EGG. Steam build-up in
whole eggs may cause them to burst,
burn you and possibly damage
the
oven. Slice hard boiled eggs before
heating. In rare instances, poached
eggs have been known to explode.
Cover poached
eggs and allow a
standing time of one minute before
cutting into them.
NEVER lean on the door or allow
a child to swing on it when the oven
door is open. Injury could result.
,
FUSE
~ BOX
i
i
If your electric power line voltage is
less than the normal required voltage, cooking times may be longer.
Starting a microwave
oven when its
empty is not recommended.
If you
experiment,
put a container of water
in the oven.
It is normal for the inside of the oven
door to look wavy alter the oven has
been running a while.
Make popcorn only in poppers designed for use in microwave
ovens.
Follow popper directions. Results are
the popper manufacturer’s
responsibility
If a fire should start in the oven cavity:
keep door closed
l turn oven
off
l disconnect
the power supply at
the cord, fuse or circuit breaker.
l
29
I
I Ii
If you need service or assistance,
we suggest you follow these four steps:
1. Before calling for assistance...
Performance
problems
often result
from little things you can fix yourself
without tools of any kind.
If nothing operates:
l Is the power
supply cord plugged
into a live circuit with the proper voltage? (See “Installation
Instructions:‘)
l Have
you checked
the main fuse or
circuit breaker box?
If the microwave
oven will not run:
l Is the Timer set?
l If the
Temperature
Probe is being
used, is it plugged
tightly into its
sot ket?
l Is the
door firmly
closed
and
latched?
l Did you touch
START?
l Did
you follow
the directions
exactly?
If microwave
cooking
times seem
too long:
l Is the electric
supply to your home
low or lower than normal? Yourelectric company
can tell you if the line
voltage is too low.
l Is the Cook
Power set correctly?
l Are
you allowing
for more time
when cooking
more food at one
time?
30
If the display shows a time counting
down, but the oven is not cooking:
l Is the Minute
Timer in use?
l Is the
oven door closed
completely?
l Is the oven in standing
time between
QUICK DEFROST AND COOK CYCLE I?
[See page 14.)
If you do not hear a programming
tone (Page 6):
l Is the command
correct?
l Has the tone
been cancelled?
If the microwave
oven turns off too
soon or not soon enough when using
the probe:
l Is at least ‘/3 of the probe
in the food?
l Is the probe
tip in the center of the
food?
l Is the probe
touching bone or fat?
l Have you allowed
roasts to stand for
a few minutes after cooking
to
equalize temperatures?
l Is the probe
plugged
tightly into its
socket?
l Is the Cook
Power set correctly?
l Is
the Probe
Temperature
set
correctly?
2. If you need assistance?..
Call Whirlpool
COOL-LINE”
service
assistance
telephone
number. Dial
free from:
Continental
U.S. . . (800) 253-1301
Michigan
. . . . . . . . (800) 632-2243
Alaska 81 Hawaii
. (800) 253-1121
and talk with one of our trained Consultants. The Consultants
can instruct
you in how to obtain satisfactory operation from your appliance
or, if service is necessary,
recommend
a
qualified
service company
in your
area.
3.
If you need service?..
Whirlpool
has
a nationwide
network of franTKi+l
01 1 chised TECHCARE” Service
rG2
TFc#cARE
1 Companies.
SERVICE
A TECH-CARE sewI FRANCHISED
ice technicians
are trained to fulfill the product warranty and provide
after-warranty
service,anywhere
in the United States.
To locate TECH-CARE service in your
area, call our COOL-LINE service assistance telephone
number [see Step
2) or look in your telephone
directory
Yellow Pages under:
4.
If you have a
problem?..
Call our COOL-LINE service assistance
telephone
number (see Step 2) and
talk with one of our Consultants, or if
you prefer, write to:
Mr. Stephen E. Upton, Sr. Vice President
Whirlpool Corporation
Administrative
Center
2000 US-33 North
Benton Harbor, Ml 49022
‘If you must call or write, please provide: model number, serial number,
date of purchase, and a complete
description
of the problem. This information is needed
in order to better
respond
to your
request
for
assistance.
FSP is a registered
trademark
ot Whirlpool
Corporation
for
quality parts. took for this
FSP
symbol of quality whenever
you need CI replacement
part
V”
for your Whirlpool
appliance
FSP replacement
parts
wrll tit right and work right, because
they are
made to the some exacting
specitications
used to build every new Whirlpool
appliance
Q
31
~irlpool
Home
A Appliances
Making your world a llttle easier
Part No. 36-062024-03-01/312880
01985 Whirlpool Corporation
allc
Washers,
Clothes
Dryers.
Freezers.
Refrlgeralor-Freezers
Rev. A
Ice Makers.
Printed in U.S.A.
DIshwashers.
Bull:ln
Ovens
and Surface
Units.
Ranges.
Mlcrr