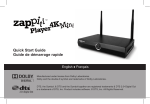
1
Operating Manual
OPERATING MANUAL v2.8.5.0
Introduction
Zappiti Media Center is a Windows based software developed by Group Archisoft to create movie
and TV show cover arts. Zappiti™ is PCHC-friendly (PC Home Cinema) and allows uploading of cover
arts browsing system on media players such as Zappiti player or Dune HD media player.
Operating principle is as follows: download Zappiti™ software on PC computer (or Mac with Windows
based virtual machine) then point out your Movies, TV shows and Music files. Zappiti™ software will
scan your files and download cover arts and many other data through internet database. Zappiti™
can also sort out movies and create folders to store your files. On PC can also be played multimedia
files on a « MPC Home Cinema » player through Zappiti™.
On Zappiti Player or Dune HD Media Player, Zappiti™ will upload data to create on hard drive a local
GUI that will then be used on player (or on a NAS server)
NOTE: either Dune HD player or your home cinema computer can be controlled through an optional
software designed for pads or smart phones. As for questions about how to use Zappiti on iPhone,
process must be checked from dedicated file on official zappiti.com website. Zappiti players are
delivered with a full Zappiti Media Center license (from any retailer) allowing you to listen to music
on Zappiti. As for logging process on Zappiti™, please refer to” Upload” section or “Help” button on
zappiti.com website. The Android version is able to use “Zapitti cloud” app to synchronize cover
arts on air. For more info about Zappiti Media Control for Android, please visit the official Zappiti
Forum : http://www.zappitiforum.com.
Before starting to use Zappiti app, we do advise you to carefully read this operating manual.
*Zappiti music is only available to PCHC and Zappiti player users.
How to operate Zappiti with a PC Home Cinema (PCHC), main principles:
1. Arrange and rename files then store them in two distinct categories: movies and TV shows.
2. Install and startup Zappiti™ app on your PC.
3. Set your media folder location through Zappiti Media Center using wizard assistant.
4. Click on “Scan” (list of movies will be displayed).
5. Click on “Scrap all” (cover arts will be downloaded).
6. Zappiti Media Center is now ready. To start playing a movie, just click on its data sheet. Zappiti™
will play your file through MPC HC player.
Note: for enhanced use through iPhone /iPad App, please follow the procedure available on official
website (“iPhone” tab). You can directly control this way your media files playback through
Zappiti™ App for iPhone/iPad.
How to operate Zappiti with a Dune HD media player or Zappiti player, main principles:
1. Arrange and rename files then store them in two separate folders: movies and TV shows.
2. Connect media player (or NAS) hard drive to your computer.
3. Install and startup Zappiti™ on your PC.
4. Install Zappiti™ with help of wizard assistant.
5. Click on “Scan” (list of movies will be displayed).
6. Click on “Scrap all” (cover arts will be downloaded).
7. Click on “Dune Upload” (Zappiti uploading interface).
8. Unplug hard drive then connect it to your media player.
9. On Dune HD or Zappiti Player, click on hard drive icon, then on “Zappiti” file. Zappiti™ cover arts
browsing system is now available! No internet connection is needed on your media player to perform
covert arts browsing, as Zappiti™ can be used off-line.
Note: for enhanced use through iPhone /iPad App, please refer to way to proceed on official
website www.zappiti.com (“ iPhone” tab)
Main features:
- Files AutoScan
- AutoDownload of cover arts and Movie / TV Shows / Music* data
- Cover Art / Media Info editing
- Use of multiple HDD / NAS
- Multi-language display available
- Either alphabetical or category sort out
- Movie groups
- User friendly
- Optional iPhone/iPad App (admission fee App) through search engine and virtual RC
*Zapitti Music is only available to PCHC and Zapitti Player users.
SUPPORT
Despite our efforts to publish tutorial (e.g. on forums), operating manuals and videos (see “Help” tab
on zappiti.com), users may have some problems to properly achieve Zappiti™ setup with specific
settings. If you do, please notice paying help (hotline) is available by HD LAND. Please contact us for
details at +33 144 692 900 or refer to following informative service file:
http://www.hdland.fr/lecteurs-multimedias/1681-forfait-formation-zappiti.html
Prerequisite
Before starting Zappiti™ on a Dune HD player, you first have to purchase Dune firmware update,
version 100413_1555 or later. Latest firmware can be found on: http://dune-hd.com/firmware. If
you own a Zappiti player, you can use Zappiti™ whatever firmware version you own, while we deeply
invite you to setup latest version. If you own no media player, you can use Zappiti™ on your Home
cinema computer too (Windows only) without any fee (except for optional plug-ins). Anyway, you
have to use either a Windows or MAC computer fitted with a virtual machine such as Parallels
Desktop or Bootcamp. An Internet connection on your computer is required too. Warning! To be
noticed that Zappiti™uses a lot of Internet connexion; hence, to properly perform Zappiti™, you first
have to quit any other internet applications, particularly P2P applications or other downloading files
services such as BitTorrent or Newsgroup which require too much bandwidth. If computer does not
comply with these conditions, deep slowdowns might occur during e.g. simultaneous scanning
process on lots of files.
Finally, the User folder and all of the sub-folders must be configured with « Read /Write » in
Windows .To make sure, click right on the User folder and select “Properties” option. In the
« General » thumbnail, the « Readonly » case must be unmarked. If not, unmark it and click
“apply”.Please wait until it ‘s done and click »OK » to shut the window.
Note to Dune HD /Zappiti Player users.
BEWARE! Zappiti™ will not be able to find access paths (means it will be unable to playback files) if
displaying of hidden files has been authorized on DuneHD or Zappiti player. You must deny access to
hidden files in either Dune HD or Zappiti player settings.
IMPORTANT! Files organization
Movies, TV shows and music files must be stored in three separate folders. Movies must be stored in
a “Movie” folder, TV shows in a “TV shows” folder and Music files in a “Music” folder. To help
settings process, we also highly recommend using only one “Movies” folder, whereas more than one
might be used. If either one or several “Movie” folder is used, while all files can be stored altogether,
you can also use sub-folders to separate them. Anyway, the use of sub-folders is not recommended.
Moreover, avoid naming your folders “_Movies”, “_TV shows” or “_Music”, because this _ character
is used in Zappiti access folder. Zappiti access folder uses this _ specific character so as to be
displayed in head of files list. This allows avoiding browsing lots of pages when hard drive is fully
loaded on root level with files or folders.
Files names
Movies: Ideally, files must be properly named, using only movie titles (either in French or in English).
Title words (if more than one) must be properly separated. Blank and Caps can be used, but other
special characters cannot. Characters such as point, hyphen, apostrophe or underscore can be used.
Movie date of release can be entered too and added at the end of name so as to enhance search. E.g.
“The.Green.Horse.1978.mkv” or: “The Green Horse 1978.mkv”. If a given movie cannot be found,
please report to “Unknown movie” section further below in this manual.
Beware! For Blu-ray stored in a folder structure, the full structure must have been previously
created to ensure normal operation. Your main folder must be named after the movie title. This
folder must include BDMV and CERTIFICATE folder. For DVD stored in a folder structure, the full
structure must have been previously created to ensure normal operation. Your main folder must be
named using and in accordance with movie title. This folder must include a VIDEO_TS folder.
Beware! The number of character in the path being limited, it is recommended to limit the number
of sub-folders. Ideally, all movies would have to be stored in one single folder. Otherwise, playback
problems might occur (only applicable to Dune HD or Zappiti player users) .This applies also to TV
shows or Music (as it frequently occurs that long names are used in these fields).
TV SHOWS: for TV shows, files must be stored in a folder and named after title of the TV show. It is
highly important to use TV show original title from the US version (this only applies to TV shows). For
instance, TV show “24” has to be named “24”, instead of the more commonly used title “Twenty four
hour”. E.g. “House” TV show has to be named “House” instead of “Doctor House”. If a TV show can’t
be found, please report to paragraph “TV show unknown” further below in this manual.
Files where episodes are stored must be named as follows: “name of TV show s01e01”, with “s” for
“season” and “e” for “episode”. For episode ranks 1 to 9, we recommend to add number “0” prior to
rank order. This is not required for episodes above 10. Apart from the most efficient way to proceed
explained here above, you can use following categories too: s1e2, s01e02, 2x01, 01x03, s01.e03.
MUSIC: while no special categories are to be used for Music files, it is recommended to only use Title
of song, then Name of album or name of artist. Names connected with music file technical data must
be avoided (such as broadband or sample rate). Folder structure might include use of sub-folders,
but following structure is recommended:
ALBUM FOLDER
L ---Music folder track n° 1
L --- Files « icon.jpg » (either album cover art or album title)
L --- Audio files “title.flac”
Whenever one picture at least ("icon.jpg", "folder.jpg", "folder.png", "poster.jpg", "icon.png",
"poster.png", "front.jpg", "front.png") has been stored in audio tracks folders, it will be used as the
picture dedicated to music file and release cover art. If more than one picture is stored with audio
tracks sub-folders, the first one than can be found will be used as music file cover art for this release.
It is not required to create a dedicated sub-folder for each track, except if you intend to use
customized picture files. If either no picture is available or no dedicated sub-folder available for each
track, a picture will be downloaded from LAST FM audio database. Categories are based from audio
files tags data. Playlists cannot yet be managed by Zappiti™. For now, music related options are still
limited but will soon be updated and enhanced so as to be more user-friendly.
SETTINGS
The software is delivered for free, so you can download freeware on official Zappiti™ website:
http://www.zappiti.com/FR/download.html
Download latest software version on top of homepage.
Once file is downloaded, double-click on “Zappiti.exe” file then follow instruction on screen and wait
until download is completed. Zappiti™software automatically starts as soon as settings process is
achieved. Warning, Zappiti media center window may be hidden under a window from another app,
moreover, computer Firewall may stop software setting. If this occurs, modify Firewall or anti-virus
software settings so as to be able to restart setting.
By default, Zappiti Media Center has to be setup in following file:
« C:\Program Files (x86)\HDLand\Zappiti ».
Settings process
When starting for the first time Zappiti Media Center, “Setup wizard” startups automatically.
If it does, please go direct to Step 3. If not, follow instructions on Step 1.
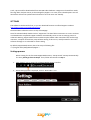
1. Click “SETUP” icon on upper left of Zappiti Media Center interface.
2. When Settings panel is displayed, click on “New folder” icon.
3. Setup Wizard
When setup wizard process is started, two options might be selected: either “close” wizard
assistant or ”Where your multimedia files are stored”. Click on ”Where your multimedia files
are stored” button.
4. Where your files are stored?
Select on this screen one of the options (two available) to locate your multimedia files.
Options are the following: either “Add a local folder” or “Add a shared network folder”.
Select one of these options, depending on your computer settings. To help you, Zappiti has
identified and listed most of available settings. This setup screen allows Zappiti Media Center
to locate movies so as to allow downloading of both movies data and movie cover arts.
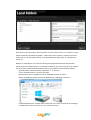
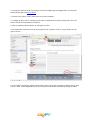
5. Local folders, USB interfaces
If first option “Add a local folder” is selected, screen will then display the following:
With the help of files browser, browse folders to locate either movies, or TV shows or music
folders selected to be added to Zappiti™. These files can be located on computer (internal
hard drive), on an external hard drive, on multimedia player hard drive, on network drive,
and so on.
Beware! If media player icon cannot be displayed in Zappiti Media Center files browser
(while Dune HD or Zappiti Player is connected to network), the reason may be your network
drive has been created without Windows letters. This problem can be solved as follows:
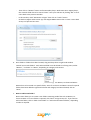
- Open Windows network browser (“Windows” + “E” button).
- Locate “Network Places” icon then click right
- When Pop-up menu is displayed, click on “Map Network Drive” option.
NOTE: on Window 8, select the item as showed on the following screenshot:
-
A “Map Network Drive” window will be displayed. Then select a character by clicking on
scrolling menu next to word “Drive” (any character can fit)
-
-
Then click on “Browse” button and locate media player. With Dune HD or Zappiti player,
this network folder has to be named “Dune”. Save your selection by clicking “OK” so as to
come back to the previous window.
In this window, mark “Reconnect at logon” then click on ”Finish” button.
Go back to Zappiti media center app. Exit Zappiti Media Center then re-start it. Start back
at Step 1 of process here over.
6. Once folder or folders have been located, drag and drop them to right hand window
named “Your media folders”. Each selected folder must be linked to its fitting name, either
“Movies”, “TV shows” or “Music”, depending on category and content.
To be reminded media files have to be split into 3 categories: Movies, TV shows and Music.
Movies have to be stored in a specific folder, same for TV shows and Music. Once all required
folders have been added in right hand column and category has been selected, click on
“Next”.
7. Want to add a new folder?
Next screen allows you to create a new folder containing media files such as Movies, TV
shows or Music. If no new folder is required, click “Next” and go to Step “8”. If you need to
add a new folder, click on “Add a local folder” or “Add a shared network folder”, depending
on what is required.
The same process can be used more than once for as many folders as you need to add. Once
all required folder(s) have been added, click on “Next” button.
8. Categories of movies
If you missed to mention into Zappiti which media category is stored in a given folder, Zappiti
is fitted with an extra Step to fill missing data. So, click on the fitting button so as to describe
category content, such as “Movies content”, “TV shows content” or “Music content”.
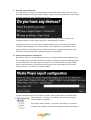
9. Have any other peripherals?
This step allows to mention into Zappiti Media Center which kind of player you own, either
Dune HD or Zappiti media player and/or Zappiti™ App for smart phone/iOS tab (to be noticed
an Android version is under development by now).
If you have none (no PCHC), mark no selection then just click on “Next”. Setup is now
completed. Click on “Close” button then go to “Scrapping data” chapter.
If you did not mark ”I use a Dune HD or a Zappiti media player”, click “Next” then click on
“Forward” then step forward to “iTunes setting”. On the opposite, if you marked “I use an
iPhone / iPad / iPod” but did not mark “I have a Dune HD or a Zappiti media player”, then
click “Next” and step forward to “Upload settings to a media player”.
10. Settings for upload to a media player.
Next screen allows you to setup location of cover arts upload. All data used to display cover
arts on media player will then be stored at this place. We highly recommend uploading cover
arts and media files in the same place. For instance, if movies have been stored on media
player internal hard drive, upload has to be operated on the same folder level as already
existing “Movies”, “TV shows” and “Music” folders.
To select upload location, click on “Browse” folder. Then browse folders and locate folder
where “Movies”, “TV shows” and “Music” are stored, then click on
selected folder to highlight it.
If hard drive where “Movies”, “TV shows” and “Music” are stored is
located in your network connected media player while media player is
connected to network, you can access to hard drive by clicking on “My Network Places” on
your browser. Network folder should be displayed as “Dune”, whereas it is a Dune HD or a
Zappiti player. Click on “Dune” network folder to highlight it.
Finally, apply this selection by clicking “OK”; the window will be closed.
Back to screen “Uploading settings to a media player”, path should now be displayed left
hand of “Browse” button.
Make sure path is the fitting path then click on “Next” button to step forward.
11. Creating access path
Cette étape vous peThis step allows Zappiti Media Center to manage how Dune HD or Zappiti
media player will access to your folder. Click on the selection you need. Two to four buttons
may be displayed on screen, this depending on your previous selection.
Note: Zappiti Player is identified by Zappiti Media Center as a Dune HD player.
Depending on your selection, an extra setup screen might be displayed. In this case, follow
instructions displayed on screen. If you have any problem, you can refer to video tutorials
available in “Help” section, on official Zapata.com website.
If you did not mark “I have an iPhone / iPad /iPod” at step “Do you have peripherals?”, setup
is now completed, then go to “SCAN” chapter. Otherwise, follow “iTunes setting” process.
12. iTunes settings (for iPhone / iPad)
This step allows to setup upload parameters for iOS devices. Begin by clicking on “Browse”
button then select location where Zappiti will generate iOS data files, e.g. desktop (data files
will then be synchronized with iPhone / iPad via iTunes). This location has to be remembered
and saved as it will be required later to perform synchronizing process (as explained further
below in this manual).
Apply selection by clicking on “OK”.
Select encoding parameters. These parameters will be required to upload either movies or
TV shows, for local playback on your iPhone or iPad. Once these parameters have been filled,
click on “Next”.
Congratulations! Settings are now completed. Click “OK” and go to “Scan” step.
Note: settings can be modified at will through” Setting” button symbolized with by a cogwheel icon
on upper left of Zappiti Media Center interface.
BEWARE! “Others”, “Scrap” and “Upload” folders on Settings panel are advanced settings for advanced users
only. We highly recommend avoiding using these in a first time, as beginners.
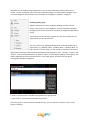
Data scan
Click on “Scan” button symbolized by a target icon on upper left of GUI (Graphical User Interface).
Zappiti will check the amount of files to be checked and display the value (amount) of files
that have to be scanned. Then click on “… to be scrapped” (which means “to be saved”) and
insert in this sequence the number of files that have been found here over.
A window will pop-up and display the list of files that have been found. Below this window, click on
”Scrap All” button.
Please wait until data scraping process is completed. Beneath each media file will be displayed a
synthetic feedback of data scraping status as follows: [Identification], [Scraping], then
[Scraped].When all files have been scraped, the window will disappear and an indicator box on top of
screen will display downloading data status.
Tip: if data uploading process is too long, please restart your computer (don’t startup any software
but Zapitti only). This process requires most of available RAM (depending on number of files to be
scrapped) and an old computer may be out of memory or its CPU limit can be reached during this
process.
While it is still possible to browse Zapitti even during data uploading process, we recommend you to
avoid clicking on buttons in Zapitti’s top toolbar.
Tip: To display task progress status, please click on moving (turning) cogwheel icon as it is
displayed besides data downloading status indicator. Then all tasks will be displayed in a
synthetic table with an uploading status indicator dedicated to each task.
Once all tasks have been completed (status progress completed displayed by removal of task status
indicator in Zappiti upper bar) then data and Movies, TV shows and Music cover arts can be edited. If
any of the media doesn’t match to selection, it can be matched by the user.
Scan of movies/TV shows/music by the user
If your files names are fitting, Zappiti will generally automatically track any fitting data. It can occur
Zappiti fails to perform this process, due to “remakes” (several movie versions released at different
time), then the software will pop-up a window for the user to select himself the fitting version. Just
click on convenient movie, TV shows or Music version (a release date information would be helpful
for this) to be sure it matches. In order to improve automatic indexation process, you can add release
date or music title to movie or to TV shows episode, either typed at the end of file name or between
brackets. E.g. “Name of movie (1988)”.
If file name does not match any file stored in Zappiti database, you can edit name (i.e. a sequence of
words) to be searched with no change to file name necessary on Windows. To do so, select unknown
file from the list and change it inside field below window for any Movies, TV shows or Music files you
are tracking. For Instance, if data fitting to a file named “My movie 2.mkv” cannot be found, this
means Zappiti cannot read the identifying data because there are errors in movie name typing. At
this step, write down a keyword in research field then click “Scrap”; Zappiti will download the fitting
movie. If movie still doesn’t match to requirements, another way to proceed is explained further in
this operating manual, named “Scraping data” (process only available for movies for now).
At the top of the interface is displayed the amount of completed tasks
along with the total number of tasks to be processed.
Movie not found
Check the spell of movie name, and its convenience. To be checked too if spaces or hyphens are
fitting or missing.
If the process still cannot match and the required movie cannot be found, there is still an issue left.
Check on TMDb website: (http://www.themoviedb.org/). Write down fitting movie name on website
search engine then click on matching movie. Copy from movie datasheet the movie title and drop it
in Zappiti scraping window.
Whenever a movie still cannot be found even through TMDB website, maybe movie (or title) is only
available in English or is no more available. When movie datasheet is only available in English, you
might fill out movie datasheet in French language. This can be achieved through logging on TMDB
website. You can either modify existing datasheets or translate them into French or create them
from scratch, if no data are available in any language. You can add missing data such as release
date or cover arts or “Fan arts”. We strongly recommend you to proceed this way, which may be
helpful for other members of Zappiti community. Please note that editing a new file may require 24
hours to be made available through Zappiti Media Center.
Duplicates
If some cover arts appear in duplicates, this may be due to duplicates in movie titles, most of all in
case of sequels. For instance, “Kill bull 4” will be read and processed as “Kill bull 1”, because
original movie title isn’t the right one. If you type convenient title “Kill bull: Vol.IV” then the right
movie will be displayed and mismatch avoided with a movie issued from “Kill bull” famous saga.
Software like DropBox Pro might create virtual double files (masked files) identified by identical
original title with extra _ character typed in front of file name. Hence Zappiti will be deceived and
consider this file is a media file and so, it will create cover arts duplicates. Whenever this occurs,
modify Windows settings to unmask “masked files”; then locate and delete these files. Warning;
during the double files deleting, problems process may occur on the software used to create these
files. Please carefully read operating manual of software before deleting double files.
TV Show not found
Check the spell of TV Show name, and its convenience; to be checked too if spaces or hyphens are
fitting or missing. If release date is entered, it has to be entered between brackets.
If the process still cannot match and one given TV show cannot be found, there is another issue.
Check on TMDb website: (http://thetvdb.com ). Type fitting TV show name on TMDb search engine
then click on matching movie. On TMDb movie datasheet, copy movie title and drop it in Zappiti
scraping window.
Whenever a TV show still cannot be found even through TMDB website, maybe TV show is no more
available. If there is no existing movie datasheet, you might fill out a new datasheet in French
language. This can be achieved through logging on TMDB website. You can either modify this way
available datasheets or translate them into French or even create them from scratch, when no data
are available in any language. You can also add missing data such as release date, cover arts or “Fan
arts”.
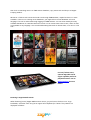
For iPad / iPhone users,
optional App adds search
engine capability and local
playback function. See on
Official website for more
details.
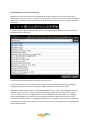
Browsing in Zappiti Media Center
When browsing (on PC) Zappiti Media Center menus, you just have to click on icons. To go
backwards, use either "ESC" key (see on upper left of keyboard) or “Return” key. Menus are
displayed as follows:
Browsing chart of Zappiti Media Center
VIDEOS
L--- All files
L--- All
L--- A, B, C (in alphabetical order)
L--- Cover arts
L--- Page Synopsis (data)
L---MOVIES
L--- Cover arts
L--- Synopsis page (data)
L--- TV SHOWS
L--- TV shows cover arts
L--- Seasons cover arts
L---episodes thumbnail
L--- Synopsis page (data)
L--- MOST RECENTLY STORED FILES
L--- COVER ARTS
L--- Synopsis page (infos)
L--- GENRES
L--- War, Science Fiction, Thriller, ... ( Genres list)
L--- Cover arts
L--- Page Synopsis (data)
MUSIC
L--- TITLES
L--- Synopsis page(data)
L--- ALBUMS
L--- Cover arts
L--- Titles
L--- Synopsis page (data)
L--- ARTISTS
L--- Cover arts with picture of the artist
L--- Titles
L--- Synopsis page (data)
L--- MOST RECENTLY STORED FILES
L--- COVER ARTS
L--- Titles
L--- Synopsis page (data)
L--- GENRES
L--- COVER ARTS
L--- Titles
L--- Synopsis page (data)
L--- PLAYLISTS
L--- Synopsis page (data)
Cover Art / Movie Cover Editing
To modify a movie or TV show cover art straight from a list, just point the required cover art and click
right on mouse to display Pop-up menu. Then click on “Modify” button and a pop-up window will be
displayed. After a short while, movie cover arts will be displayed on screen. To match a cover art, just
select it by clicking then click on “Select” button below the window.
To browse pictures when lots of them are displayed, just use scrolling bar below pictures list. If no
picture is displayed in a delay of around 20 seconds, this means Zappiti couldn’t find any picture
related to the required file, so you may match any of the pictures stored on your hard disk. To match
a personal/custom picture, just click on “Select from disk” button below the window. A new “Open”
pop-up window will be displayed. Locate required picture on your hard drive (or on any external or
network storage), click to select it then click on “Open” button.
Cover arts can also be edited via “Synopsis” page (See browsing chart). Click on the selected movie
cover art then click on “Scraping pictures” on “Synopsis” screen. A pop-up window will be displayed.
After a short while, movie pictures and screen art will be displayed into two separate tabs. To match
movie and picture, click on a cover art then click on “Select” button below the window. To modify
synopsis page wallpaper, click on dedicated folder right hand and proceed as described before: select
a picture, click left on this picture then click on “Select” button below the window. Once this is done,
click on “Close” button.
Screen arts of TV shows are fully customizable too.
For Music files, cover arts can’t be modified direct from Zappiti for now. This will be soon upgraded in
Zappiti Media Center.
Data editing
Zappiti displays in Synopsis screen page data related with movies (or TV shows) or with file. Can be
found e.g. movie title, synopsis, TMBd mark, movie duration, date of release, name of film-maker(s)
and main actors, aspect ratio, file picture frequency, resolution, audio codec (issued from first audio
track by default), number of channels, format (can display a DVD or a Blu-ray logo), video codec,
available languages, subtitles and categories (genre). Below can be found a link to video file, and this
file can be edited by the user (as an advanced user function).
Any data can be updated by the user. This can be achieved on Synopsis screen page by clicking on
“Edit” button in upper Zappiti toolbar, so that a window is displayed allowing free data editing. Some
fields include scrolling lists to facilitate data typing. Typing many soundtracks or subtitles requires the
use of a separating comma. Selecting Blu-ray or DVD in “Extension” field displays a corresponding
icon on Synopsis page. Modifying movie mark can be achieved by clicking on Star icons. Linking one
or more categories (genres) to a movie can be achieved by clicking on icon close to “Category” name.
The link between one or more categories (genres) can then be activated or deactivated at will just by
clicking on the icon of linked category. Creating a custom category can be achieved too; just refer for
this to corresponding chapter. Once modifications have been edited, click on “Validate” button to
apply modifications. In case of mistake, just click on “Cancel” button.
Scrap data (movie or TV show not fitting)
Whenever it occurs a media file has not been linked to the fitting movie, the scan (scrap) can be
operated once more by the user. To perform this, just click on covert art of a movie stored on Zappiti
Media Center interface. Movie data (synopsis) will be displayed; then click on “Scrap data” button in
the toolbar.
A window will then display original movie name in the text field along with a list of movies that will
be displayed below file name.
Then you just have to select the convenient movie in this list.
If the required movie is none of those listed, search process can be enhanced through modifying
/enlarging (size of) text field then clicking on “TMBD” button at the border of this field.
While this method can be useful for example described here over, as the name “Bodyguard” can be
related to lots of movies, we deeply recommend modifying a given file name before starting first
scan. E.g. when file name is “bodyguard.mkv » and corresponds to the year 1948 w/ no copyright
movie, 2011 Bodyguard is more likely to be selected by default through automatic scrap. So we
recommend renaming movie e.g. “bodyguard (1948).mkv” or else before scan process is performed.
This method also allows easier research of movies in the event of a hard drive crash or Zappiti Media
Center database crash.
Customizing of categories (genres).
Files can be sorted out by genre in Zappiti. To have an access to genres, click on “Category” button on
Zappiti main page. By default, Zappiti uses 18 separate genres categories, but others can be added as
you will then linked to freely selected key words.
To add a new category, click on “New category” button on top of Zappiti interface.
A table will then display many settings options:
1. Enter here the required category; e.g. “Theater”.
2. Then enter a list of key words allowing movies to be linked to the selected category; e.g.
“Theatre; Theater, Opera…” Hyphens and capitals are not taken into account in this process.
E.g. “Science fiction” will refer to “Science Fiction” and to “science fiction” too.
3. Then link an icon to the new category. This can be done by clicking on link “Browse” under
the button.
4. Category button can be customized the same way...
5. ...same with the button active status.
6. Once category has been customized this way, click on “Validate” button to validate the new
category creation process. The new one will be displayed below category list file.
Order of categories can be modified, organized or sorted out in a very simple way. Click left on
required icon then, without releasing left button on mouse, slide mouse arrow to the fitting area.
Then release left button to set the new category on the fitting place.
Once categories have been created this way, they still can be either cancelled or edited. This can be
performed by moving mouse arrow above a given category then clicking on mouse right hand button.
A menu will be displayed with the following options: “Edit”, “Cancel”, “Reinitialize categories”. “Edit”
link allows you to modify category parameters such as name, linked key words, linked icons or
button. “Cancel” link allows you to cancel any selected category. And “Reinitialize categories” will
cancel all categories customizations and come back to the Zappiti “by default” categories.
Creating movie groups
Zappiti is fitted with an extra capability allowing creation of movie
groups. This function is not available for TV show episodes (managed
through seasons items) and neither for Music (managed through albums
items).
This function can also be used to gather two extracts issued from one
single movie cut into two split files.
This way can be easily gathered the whole lot of movies issued from a
single show, e.g. “Holidays 2010”, “Holidays 2011”, “Holidays 2012”. To
link a movie to a movie group, set the mouse on a movie art then press
right button on mouse. A Pop-up menu will display following options: Edit”, “Change”, “Gather” and
“Cancel”. Click on mouse left button on “Gather” option; a sub-window including a “New group” link
will be displayed. Click on mouse left button on this “New group” link then wait until group
management window is displayed.
1. Enter in “Group name” text field the required movie group name.
2. Then click on “Save” button with left mouse button.
Once one group or more have been created this way, you can link other movies to one or many
groups as follows:
1. Slide mouse arrow over the cover art of a movie you want to link to a group then press right
button on mouse.
2. When Pop-up menu is displayed, click with mouse left button and mark the checkbox located
in front of the required movie groups.
To modify location of cover arts inside a given group, slide mouse on the required group cover art
then click on “Edit” button in Pop-up menu. The group management window will be displayed.
1. The area titled “Group members” displays the list of movies linked to the group.
2. The “Sort by date” button allows you to sort out movie cover arts by date of release inside a
given group.
3. “Set towards top” and “Set towards bottom” buttons allow selection by the user inside a
given group of movie cover art display order.
4. “Remove” button allow to cancel a movie selected inside a given group.
Note: movie selection is performed by clicking on movie title. Once selected, movie is then displayed
in highlighted blue to display marking.
To cancel a movie group, slide mouse arrow on required movie cover art then click on “Cancel”
button in Pop-up menu. A warning message will propose to either validate or cancel this step.
Warning! “Group” function has not been designed for other uses than those described here over.
Otherwise, deep slowdowns may occur, along with extremely long uploading delays and an
oversized Zappiti upload resources file.
Multi hard disk / multi NAS / Multi network disk (advanced function)
Zappiti is fitted with a useful capability allowing browsing a whole collection of movies and TV shows
through one single interface. So, on Dune player, you just have to click on Zappiti folder located on
one of hard disks (either USB or network connected) to have whole access to your files (short cut).
In order to be able to use this function through NAS or network connected computers while selecting
movie or TV shows folders, all hardware have to be setup in fixed IP. As for the right way to achieve
IP settings for NAS, refer to your hardware operating manuals.
Hard disk not found (advanced function)
To use either external or internal hard disks on Zappiti, they must have been given a linked volume
letter, e.g. “E” or “F”. When formatting a hard disk in NTFS direct on Dune player, you have to check
whether a letter has been linked to this hard disk into Windows, when this disk will be connected to
a computer.
To link a letter to a hard disk, a partitioned disk or a volume, proceed as follows:
1. Open an Administrator or Member of administrator group session
2. Click on Startup on Settings panel, then Performance, then Support.
Note: if neither Performance nor Support is displayed, go to step 3. Performance and Support can be
displayed only if categories display has been selected. This option will not be displayed in
standard/by default screen display mode.
3. Click on Administrator tools, double-click on Computer management then click in left
window on Disks management.
4. Click with right hand button on disk, partitioned disk, logical disk or volume to which you
wish to link a letter then click on Modify disk letter and access paths.
5. Click on Add.
6. Click on Attribute following disk letter (only if this option has not been selected yet) validate
letter by default or click on letter you wish to select for this use.
7.
Click on OK.
This letter is linked to the disk or partitioned disk or volume you have specified, and it is
displayed in convenient disk, partitioned disk or volume in Disk management tool.
Warning! Zappiti changes hard disk name so as to be able to find it easily even if the linked letter
has been modified by Windows (this occurs frequently). So you must avoid changing this name,
otherwise you will have to perform once more the whole linking process on your hard disk.
Multiple database(beta function)
When many databases are used in order to e.g. make one database available per hard disk, you have
to proceed as follows:
1.
2.
3.
4.
Click on “Setting” button located above Zappiti interface.
Click on “Browse” button in displayed window.
Select file in which database will have to be saved.
Click on OK to validate.
Warning: your database files should be created on main hard disk (C://), but not in AppData file.
Note: this function is still in beta version. So we highly recommend you to avoid using it for now.
Once many databases have been created, you just have to select them by clicking on the small arrow
located at the left of "Browse” button, in order to browse databases.
Upload
You are invited to browse all menus available to check if all your movies, TV shows cover arts and
data are OK, and you can edit and modify them at will. Then uploading process can be started.
How to export to a Zappiti Player
Along with your Zappiti Player, you are delivered a license giving access to upload Zappiti Music for
your multimedia Zappiti Player and for any other Dune HD players. To proceed to upload, click on
“Zappiti Player upload”.
Saving process
if you are not yet logged, you will be invited to mention whether you own a Zappiti Player. If you do,
click on “I have a Zappiti Player” button then you will be invited to create an account on Zappiti
Market. Fill the fields and type your user name and password.
We advise you either to create easy to remember user name and password or to save them apart.
These data will be required later for further access to Zappiti Market
.
Once you are logged to Zappiti Market, select an upload module for Zappiti Player. Warning! Dune
upload module cannot be selected for this purpose, even if you own a Dune HD player along with
your Zappiti Player. The reason for this is that Dune upload module is made for users having no
Zappiti Player. Upload module for Zappiti Player displays a “Z” letter and is fitted with a button
“Activate with code”. Click on this button and type your “Token” code. This code should be typed on
Zappiti Player packaging and on bill form. If it does not, please contact your retailer. If you have
bought your Zappiti Player abroad (outside France), this code still can be created through a specific
process available on distributor’s website. For more details, refer to your local retailer.
NOTE: you can have access to a sign in of Zappiti Player Upload module via Zappiti Market. To
have access to Zappiti Market, click on dedicated button displaying a basket located above left
on your interface.
NOTE: upload license for Zappiti Player is limited to use on one single computer. If a new computer is
used, you must deactivate this option then make a request for the new computer, once Zappiti Media
Center has been installed on this new computer.
How to export to a Dune HD player
If you own a Dune HD, you don’t need any more to be logged (as it was on previous version).
How to upload data on a multimedia player
Once you are logged, on the first time you click on “Upload”
button, Zappiti will ask you to upload in “Full” mode. Next time you
use the player then, an “Incremental” upload will be proposed.
If you wish to upload music, mark the dedicated checkbox.
Upload will start as you click on this button. First upload process
generally takes a long time because Zappiti has to upload the whole
amount of cover arts along with the GUI (Graphical User Interface).
Then, further upload operations will last a few seconds only.
WARNING! Never stop your computer during upload process. If you use a laptop, check mains cable
to laptop has been properly connected. An upload window will be displayed through clicking on
UPLOAD button. This function allows the interface to be prepared to be uploaded to Media Player.
The files created through this process will be stored in a dedicated folder located on the root of
hard disk, and processing times will be optimized this way. Hence, on the first time upload is
operated, uploading process takes a long time (around 2 to 4 seconds par movie). Then on the
opposite, as further movies or TV shows will be added, only modifications and added data will be
uploaded; thus, uploading process will perform faster than it did on first time.
How to upload iTunes (App iPhone / iPad)
Zappiti is fitted with a very useful capability allowing control of cover arts process, starting either
local or remote play of media and of one (or more) multimedia player/s (Dune HD or Zappiti Player)
To be able to use this capability of remote play function on your computer (PCHC) from iPhone/iPad
app, minimal PC RAM is 2 GB or more. To be able to play correctly ISO Blu-ray, computer must have a
high level clock frequency, otherwise play process will be interrupted.
If you wish to control a Dune HD player, your computer has to fit setup with chip issued at least
from series SMP8640 (SMP8642/43), SMP8650 (SMP8653) or later. All players sold on the market
are compatible (SMP8671, SMP8672…). Players fitted with older chips such as series SMP8620
(SMP8620L) and SMP8630 (SMP8634) cannot be used (Dune HD Center, Dune BD Prime, Dune HD
Ultra). Then minimal firmware required is 110127_2105_beta version or later. Zappiti Players are
compatible by default.
When iTunes settings folder has been adequately setup through initial Zappiti setting, proceed as
follows:
1. Startup your iPhone / iPad / iPod Touch. Purchase a Zappiti app from Apple Store. You may also
download this app from iTunes Store.
2. Connect your iPhone / iPad / iPod Touch to your PC computer.
3. In Zappiti PC app, click on “Setting” button then on Upload tab and setup access path. This area
will be used then to upload data for iPhone.
4. Click on Upload to iPhone button on top right of screen.
5. Once upload is processed, startup iTunes app on your computer. Click on “Apps” button on top
right of screen.
6. Use scrollbar to go down, display “Shared files” section then click on Zappiti (in Apps section). Then
click on “Add”. Locate Zappitidata.dt on your computer and validate selection by clicking on OPEN.
7. Startup Zappiti app on your iPhone / iPad: a warning window will display on the screen. Validate by
clicking on "YES" option.
8. Wait till synchronization is totally performed.
9. Disconnect your iPhone. When a multimedia player has been used, startup your multimedia Dune
HD or Zappiti Player.
10. Startup Zappiti app on iPhone. If an error warning is displayed, then quit app and restart. On app
main page, click on « Settings » button located top right then enter your multimedia player or PC
(PCHC) IP address.
To have access to your multimedia player IP address, press SETUP button on remote then click on “I”
button.
Once all required data have been entered on dedicated fields, click on “Zappiti” button to come back
to main menu.
Congratulations! Setup is now over.
To start play mode on a video file, open “Details” (Synopsis) screen page then click on play button
located on top right of screen. During Play mode, Dune can be controlled by virtual remote that is
displayed on iPhone screen.
Video tutorial for video files compression and local playback on your iPhone/iPad :
http://youtu.be/GlJl-v9OLuc
Note: during Play mode, buttons 1 to 9 allow access to corresponding percentage of the movie (e.g.:
“5” corresponds to 50% of movie length). Press “0” button to rewind and come back to the movie
starting point.
Note 2: during Dune HD player or Zappiti Player Sleep mode, when Play mode has been started via
Zappiti app on iPhone or iPad, multimedia player is automatically set to On then to Play mode.
Note 3: Play mode on BD ISO files is performed in “Full” mode (with original menus) on Dune HD
Smart, HD Max, HD Duo, BD Prime 3 and HD Base players. Play mode is performed in “BD Lite” mode
on Dune HD Lite, Dune HD TV 303D, Dune HD Base 3D and Zappiti Player (and on some other players).
Note 4: when used on PC (PCHC), Zappiti Media Center plays multimedia files through MPC Home
Cinema software. Virtual remote function has been setup to control the Play mode with MPC Home
Cinema
For more details about iTunes upload settings mode, please refer to detailed instructions in “iPhone”
tab to be found on official Zappiti website: http://www.zappiti.com.
You can also view video tutorial on YouTube at the following address:
http://youtu.be/a7vjpWLqs18
Zappiti on Dune HD Media Player or Zappiti Player
Once data upload has been performed, connect hard drive including your files to multimedia player
(least it is either already connected or your multimedia files have been stored in a network folder).
If your multimedia files have been stored on a peripheral network, we highly recommend you to
create a network short cut. This can be done as follows:
Network SMB / NFS short cuts on Zappiti Player
Prerequisite: Your computer (connected to network or NAS server computer) must have been setup
in SMB or NFS mode (means: services and files share activated)
1. On Zappiti Player homepage (Sources tab), set mouse arrow on one of the highlighted icons
displayed then press “Pop-up menu” on remote controller.
2. Once Pop-up menu is displayed, select “New network file”.
3. Name short cut (this name will then be displayed to identify this short cut). Any name can be
selected at will.
4. Select either SMB or NFS (these are two network standards).
5. Enter NAS server IP address (or computer IP address) where files are stored.
Note: a NAS server is a box set containing network connected hard disks.
6. Enter name of shared file (taking care of Capitals if some are typed). File name can vary, depending
on type of NAS. For QNAP servers; this name may be QMultimedia but depending on user, the folder
where files have been stored can be different. WARNING: depending on NAS type, access path can
include "/" or "\". For more details about fitting nomenclature to be used, please refer to your NAS
user’s manual.
7. With a SMB setup network, type “User name” and “Password” in dedicated field. If NFS network is
used, neither “User name” nor “Password” is necessary.
8. Validate then check process.
Note 1: network shortcuts are stored in internal HDD of the Media Player (not in System Storage
memory). They will then be automatically displayed when disk is re-started, so that they have not to
be setup each time computer is started.
Note 2: if “favorites” linked to a network folder are created, it may be necessary to access at least
once to distant network through the network short cut, for the network to work correctly. So,
creating a “favorite” path can be useful to generate e.g. direct access link to a Zappiti category. E.g.:
“Cartoons”.
Note 3: Warning! User names including special characters may be rejected. In order to avoid any
problem, please only use users name without blank or accent.
How to use Zappiti on Media Player
On Dune HD Media Player or on Zappiti Player, click on hard drive icon (which can be local, external
or network, depending on your previous selection in Wizard panel) or on the network file where
multimedia files have been stored. Then click on file named Zappiti (previously created by upload
process). Zappiti interface is displayed and you can now browse in cover arts list (see chart).
To step up one level, use BACK key on remote controller. When you are on a Synopsis page, you just
have to click on “OK” button on remote controller to start playing a video file.
Playing music on PC computer
Click right on either title or album and select “Play” option in Pop-up menu.
Playing music on Dune HD media player or Zappiti player.
In Zappiti Music, click on “TITLES” button then press “PLAY” button in Pop-up menu.
A random access playing mode is available for albums and for the whole music database stored. To
use this, press “Pop-up menu” button during play mode then select “Playing list”. As this Playing list
is displayed, press button “8” on your remote controller to select random Play mode. Press button
“7” for a looped Play mode. Press again “Pop-up menu” on your remote controller to cancel this
menu. This function can also be used for titles of a given album or for songs of a given artist.
Note: When browsing in movie cover arts, groups are symbolized par a « G » icon. Movies marked
five stars (or 10/10 mark with “Silver” theme) are symbolized by a Star icon (means favorite movie)
on cover arts.
Optional functions
Viewed / Not viewed (for movies)
An experimental function named "Viewed/Not viewed” allows tagging movie cover arts so as to be
able to identify movies which have been viewed. To activate this function, mark dedicated checkbox
in file “Others” of Settings panel. A status can be linked to a given movie by right clicking mouse
button on a movie cover art and marking your selected option.
Top covers for Blu-ray / DVD / MKV movies
A “Blu-ray”, DVD” or “MKV” top cover can be displayed on cover arts so as to identify easily media
categories in a movies cover arts list. Another option allows activation/deactivation of “reflecting”
special effect on cover arts. To activate/deactivate one of these functions, mark dedicated checkbox
in folder “Others” on Settings panel.
Interface customization
Extra graphic themes are available to modify Zappiti interface graphical appearance. These themes
can be released from Zappiti Market. To access to Zappiti Market, click on the basket shaped icon
located top left of Zappiti Media Center interface (on PC). E.g.: a graphical theme displaying
cover arts on either 2 or 3 lines can be downloaded.
GUI (graphical interface) can also be modified by the user. To customize “Fan art” wallpaper (set by
default to red curtain appearance), click on folder “Others” in Settings panel. Then click on “Browse”
just beneath “Fan art”; any cover art can then be selected at will. Buttons on homepage can also be
customized with a right click on one of the buttons then a left click on “Edit” option. You can
customize this way the button background, his rollover status along with button icon.
More details about this function along with examples of buttons and Fan art customizations
performed by other users can be found and downloaded on Zappiti orum and at the following
address:
http://www.zappitiforum.com
Zappiti “skins” are available too to customize Dune HD player or Zappiti Player interface with Zappiti
brand or logo. A selection of “skins” can be downloaded at the following address:
http://www.zappiti.com/zappiti-skin.html.
Both “Classic” and “Silver” Zappiti “skins” are already pre-installed and available in Zappiti Player, so
it is not necessary to download these “skins”.
Note: interface customization on older models of Dune HD players requires the old System Storage
option to be available on an old player. If you did not purchase this option along with your previous
old player, it can still be ordered from HD LAND.
On the opposite, new models of Dune HD multimedia players and Zappiti Player might not require this
System Storage.
Zappiti short cuts (made for users of multimedia players)
A Zappiti short cut can be generated in Dune HD multimedia player or Zappiti Player’s “Favorite”
folder. This can be achieved as follows:
1. Startup your multimedia player.
2. With help of your multimedia player’s remote controller, find out Zappiti file that has been created
through “Upload” function on Zappiti Media Center. Then press “Pop-up Menu” button on remote
controller and select « Add to favorite” option.
Tip: along with a direct access to Zappiti overview screen, favorites can also be created and linked to
any Zappiti category such as RECENT, TV SHOWS or any other category. For example, a short cut to
THRILLER category can be created as follows: startup Zappiti on Dune player then browse to find and
select THRILLER category. Then use “Pop-up Menu” on remote controller to select “Add to favorites”
option. If this option does not work, maybe the reason is System Storage had not been installed, so
refer to previous tips above.
Zappiti On Startup
If you lucky guy own a Zappiti Player or Dune player fitted with chip series SMP8642 or later, you can
use “Zappiti on startup” function allowing automatic startup of cover arts browsing system as
multimedia player is started. This can be achieved as follows:
1.
Startup your Zappiti Player. For details about how to operate this, please follow chapter
about quick startup process available in owner’s manual delivered with the player.
2.
Find the Zappiti file created through "Upload Zappiti Player" function. This file is generally
stored on the disk where movies have been stored.
3. Once file is found, highlight it then press Pop-up Menu key on Zappiti Player remote
controller and select option “Add to favorites”.
4. With Zappiti Player remote controller, set arrow on “Favorite” tab. The previously created
“Zappiti” favorite should now be displayed.
5. Highlight this favorite then press again Pop-up Menu key on Zappiti Player remote controller.
Now, select “Zappiti on Startup” option.
Congratulations! Zappiti Player is now setup so that Zappiti cover arts browsing system starts
as soon as player is started!
Slowdowns (only on multimedia players)
If slowdowns occur on multimedia player via Zappiti during Play mode on movie file, while playing
mode works on your multimedia box, the most probable reason is that access path has not been
adequately set, so that it uses network server function on Dune player, instead of playing files in local
mode. So solve this problem, modify upload path through Settings panel. This can be achieved as
follows: click on “Modify” button located right hand of movies/TV shows files in Settings panel. Then,
as window “Access path creation” is displayed on screen, click on one of the first buttons being
displayed, depending on where your video files are stored.
Zappiti On Startup option.
Zappiti On Startup is not Zappiti by default starting mode (while it was on former Zappiti versions). To
force automatic scan process on Zappiti startup, mark the dedicated option located in “Scrap” folder
of Settings panel (Settings button).
Saving of database
Database files are stored by default in following file:
« C:/Utilisateurs/Votre_nom_d’utilisateur/AppData/Local/Zappiti »
To be noticed “AppData” is a hidden file. We highly recommend to regularly process database save
on either USB stick or external hard disk or CD-ROM, as a safety measure. Doing this allows saving
your cover arts in case of a crash disk or need to reinstall your operation system.
Total deinstalling of Zappiti app
Database will not be modified and is saved through Zappiti deinstalling process. Anyway, if you need
to definitely cancel database too, you just have to suppress following file:
« C:/Utilisateurs/Votre_nom_d’utilisateur/AppData/Local/Zappiti ». Warning; to be noticed that
deinstalling process is permanent, so it cannot be reversed. So before starting this process, we highly
recommend to save your Zappiti database.
WARNING! Take great care to avoid suppressing either Local or AppData file. This may alter your
operating system stability and your computer may be damaged too.
Users’ forum
If you have any problem to use Zappiti, please refer to users’ forum available at following address:
http://www.zappitiforum.com
You will find at this address lots of tutorial files and technical tips.
Project management and technical support
To report any problem that may occur during use of software, or to suggest improvements, please
connect to our support platform at following address: https://zappiti.uservoice.com
To be able to mention anomalies or defects, you have first to be logged. Logging process is as follows:
click on link dedicated to this process, displayed at top right of Internet website.
You can also find through this support platform data about software improvements and update along
with a schedule of updates and functions implementations.
Zappiti Media Center™ is a free software offered and developed by Groupe Archisoft.
CREDITS
Project manager: Jacques Bensahkoun / Christophe Cherel (HD LAND)
Graphics / Ergonomics / Project management: Christophe Cherel (HD LAND)
Responsible for Development: Damien Hoffschir (HD LAND)
iPhone / iPad Development: Gregory Mac-Connell
Android Development: Francesco Bevillacqua (HD LAND)
Zappiti™ All rights reserved – 2010-2013. Developed by HD LAND.
Zappiti™ is a registered trade mark. Any use of picture or Zappiti logo for commercial use may be prosecuted.