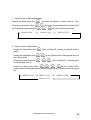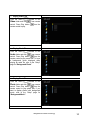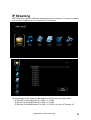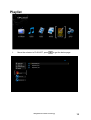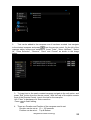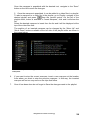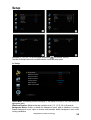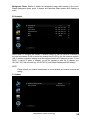
1
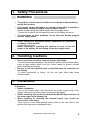
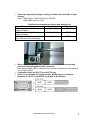
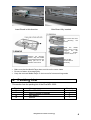
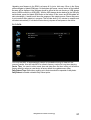
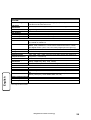
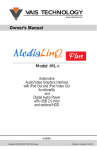
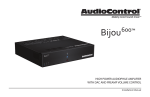
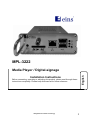
MPL-3222
English
Media Player / Digital-signage
Installation Instructions
Before connecting, operating or adjusting this product, please read through these
instructions completely. Please keep this manual for future reference.
All Rights Reserved Eins Technology
1
1. Safety Precautions
WARNING
•
•
•
•
To avoid fire, electric shock or failure never attempt to disassemble or
modify this product.
If you sense smoke, odd odors, or unusual noises while in operation,
immediately unplug the display from the power source.
Switch off and unplug the plasma display from the supply outlet.
To avoid fire or shock, do not leave the power of the display turned on.
To avoid shock or other problems, do not leave the display plugged
into the supply outlet.
Please contact our designated service department for installation
or change of this product.
To Service personnel:
Before removing or installing this product, be sure to turn the
power of the display off and unplug it from the supply outlet.
2. Handling Cautions
•
•
Do not touch the connector contacts directly with hands.
To avoid electrostatic damage to internal parts, before handling this product,
touch a large metallic object such as a steel cabinet to ground yourself
before handling this product.
Be sure to use the supplied cable or specified parts for connection to
the display.
To avoid malfunction or failure, do not use parts other than those
recommended.
3. Installation
Precautions
• Before installation
Turn off the power switch and disconnect the power supply plug of the
display. Disconnect all other plugs connected to the display.
• Before removing this product, shutdown the Media Player and turn off
the main power of the display first.
• When installing or removing the terminal board, care should be
exercised to avoid injury.
There may be some sharp-pointed solder joints on the rear side of this
product that may cause unexpected injury.
All Rights Reserved Eins Technology
2
•
Select the appropriate jumper setting to match the resolution of your
display.
Note: 1024x768 or 1366x768 is set on SD/HD;
1920x1080 is set on FHD.
Relationship between resolution and display unit
Plasma display unit
Resolution
Remarks
42” Widescreen High Definition
1024×768 (XGA)
SD/HD
Plasma Display
50” Widescreen High Definition
1366×768 (WXGA)
SD/HD
Plasma Display
50”, 65” or 103” Widescreen Full 1920x1080
FHD
High Definition Plasma Display
•
When installing this product, insert it fully into the slot horizontally
until it is firmly plugged into the connector.
Note that damage may be caused to the internal components if this product
is not fully inserted.
Compatible slots are SLOT1 and SLOT2 only.
Slot-3 is not allowed for digital module, Media player can only be
installed on SLOT1 and SLOT2 by default of the display.
All Rights Reserved Eins Technology
3
Insert Board in this direction
After Board fully inserted
Remove the slot cover
by
removing
the
screws
Insert
the
Media
Player until it is firmly
plugged
into
the
connector.
Tighten
screws in order 1 - 4
Remove the securing
screws. Grip the handle
of the terminal board; and
slowly pull out in the
direction of the arrow
•
•
•
Affix the Slot
function label if
necessary
Make sure that the Media Player does not ride on the tower claws.
Be sure to fasten all screws tightly.
Keep the removed Media Player or slot covers for future servicing needs.
4. Packing List
This section lists the packing list of the Eins MPL-3222:
Check
Name
Eins MPL-3222
RM212 Remote Controller
AAA battery
Manual
All Rights Reserved Eins Technology
Quantity
1
1
2
1
4
5. Operation Guide
Overview
Full HD Digital Media Player plug-in board provides playback for a wide range of SD & HD video up
to 1080p, audio and high-resolution image media types onto the professional displays with native
FHD resolution and astounding video quality. Premium contents that comes with raw digital audio
surround sound can utilize the coaxial digital audio output to deliver true 5.1 or multi-channel
surround sound profile to an external AV receiver. Video is rendered by a purpose designed 12-bit
video processor giving rich contrast and brilliant color rendering to complement the high quality
display manufactured by Panasonic. It is well suited as a standalone or a LAN connected display of
high resolution images and industrial video contents up to 1080p resolution. It converts the full range
of Panasonic Professional displays from small to large sizes to deliver applications in Digital
Signage, Corporate Conference Room Presentation, Educational institution, Cinema Lobby Trailer
Signage, Retail Front product info content access and more.
It is designed for quick set-up and ease of use via the simple remote control.
Video content with formats ranging from MPEG-1, MPEG-2(PS & TS) MPEG4.2, MPEG-4.10,
WMV9, WMVHD to AVCHD can be played back in native 1080p resolution. Lower resolution
content will be up-scaled to 1080p through the in-built scalar. Image files can support resolutions of
up to 2048 x 1532. Audio content supports .wav and mp3 formats.
Media content can be played back from SD/SDHC cards, USB multi-readers, USB storage devices
as well as from Samba, NFS NAS or PC connected over the LAN. With a LAN connection, the
MPL3222 will play back media content directly from a connected PC from its shared folder. The
Media player will also auto detect media devices attached to it. Future functional upgrade can easily
be carried out via the USB port through an external USB storage device.
This document provides an overview and the general description on the setup, features, applications
and operations of the Full HD Digital Media Player Plug-in Board.
Key Features
MPL3222 plays back high definition video (up to 1920x1080P 50/60 Hz) and still
images up to 5 times the picture resolution of SD player. Recorded HDTV
programs from a digital TV set-top box, personal digital video or by a HDV™
camcorder can be played back with the MPL3222 HD via the direct LVDS
interface to the display panel.
All Rights Reserved Eins Technology
5
English
Using the advanced EM8653 Video Processor, MPL3222 HD supports the latest
media formats in H.264, WMV9 & WMV HD as well as MPEG-1 /2 /4.2. H.264 is
the new industry endorsed superb compression technology that promise to deliver
the same video quality at half the bit rate required for conventional video.
LVDS provides the uncompressed video signal directly to the video panel driver
with unparalleled qualities to digital video.
MPL3222 HD can be networked with a PC using its built-in LAN port. You are able
to stream files from a PC and play the file on the display.
With two USB host ports, you can now attach additional external USB Thumb
drive, USB Multi-Reader, powered USB hard drives. You can also playback files
from the USB connection of a digital camera, PDA, Hand Phone or MP3 player.
All Rights Reserved Eins Technology
6
Remote Control Tour
A.
POWER (Standby)
Power on/off the device
B.
ALPHA NUMERIC INPUT
Enter numbers for Setup
options
C.
CLEAR
Delete the characters
immediately before the cursor
D.
E.
MUTE ON/ OFF
Mute volume of device on/
off
REPEAT
Enable Repeat Function Loop:
Repeat Off, Repeat One, and
Repeat ALL (Repeat STBY
when Playlist Mode)
F.
RETURN
G.
VOLUME (+,-)
Return to last step
Increase/ Decrease the
volume
H.
OK
Activate selected items
I.
DIRECTIONAL KEYS
J.
REVERSE
K.
STOP
Horizontal directional keys
Fast Reverse playback of file
Stop a clip or playback
L.
PLAY
M.
PAUSE
Resume playback from pause
Toggle between pause & play
N.
SLOW FORWARD
O.
FAST FORWARD
P.
DIRECTIONAL KEY
Slow Forward playback of file
Fast Forward playback of file
Vertical directional keys
Q.
MENU
R.
SKIP PREVIOUS/NEXT
Jump to MENU page
Jump to previous/next media
file in playlist
S.
SETUP
Jump to SETUP page
T.
EDIT
U.
SELECT
Start to edit text
Select content from the list
Note:
F1, F2
Do not have any function
All Rights Reserved Eins Technology
7
Playing Video, Music & Photo
After turning on the power to the display, a home page will appear with the following
options: IP STREAMING, AUDIO, VIDEO, PHOTE, PLAYLIST and SETUP.
‘VIDEO’ is automatically selected as the default.
Playing Media Files
1. Use the directional buttons
to move selector to “Media Type” button on
screen and press
from the remote control. The below page will be
displayed on the screen, Sources are: USB-1 disk, USB-2 disk or SD card.
All Rights Reserved Eins Technology
8
2. Use
to select the source/file, press
as shown in below image:
to enter “SD Card”, “USB 1” and so on listed
3. The file names of the media will be displayed on the screen, if the file type matches the type
indicated on the left side.
Note: When navigated from video, only the video files can be seen. If navigated
from other file types (for example, audio or photo), only the matched file type will
appear.
4. To play: Move the selector to the file, Press
.
All Rights Reserved Eins Technology
9
5. Repeat function in Playing Media Mode:
Pressing the repeat button once
Pressing the repeat button twice
list. Pressing the repeat button third
REPEAT ONE
will repeat the playback of current video file once.
will result in repeated playback of all videos in the
→
→
→
will result to cancel repeat status.
REPEAT ALL
REPEAT OFF
6. Repeat function in Playlist Mode:
will be in Repeat Off, meaning no repetition video in
Pressing the repeat button once
playlist
Pressing the repeat button twice
time video in playlist.
Pressing the repeat button third
the entire playlist video list.
→
→
will be in Repeat Once, meaning repeat only one
→
will be in Repeat ALL, meaning repeat
Pressing the repeat button fourth
→
→
→
will be in Repeat STBY,
meaning repeat selected playlist and the Plasma Display will be in standby mode once playlist
end.
REPEAT ONE
REPEAT ALL
REPEAT STBY
REPEAT OFF
All Rights Reserved Eins Technology
10
Playing Video Files
From the menu,
browse to the
Video folder and click
from remote
control. Press Play button
from the
remote control to play.
Playing Music Files
English
From the menu,
browse to the
Audio folder and click
from remote
from the
control. Press Play button
remote control to play music files. To have
a background photo displayed while
playing an audio file, refer to the “Setup”
page for “Background Photo”
Playing Photo Files
From the menu,
browse to the
Photo folder and click
from remote
control. Press Play button
from the
remote control to play photo files. If you
want to display photos with background
music, refer to the “Setup” page for
“Background Music”.
All Rights Reserved Eins Technology
11
IP Streaming
MPL3222 also supports multicast streaming over the network. It acts as a receiver
and currently supports up to a maximum of 10 streams:
All the settings for the streams that appear on the screen are hard coded.
IP Stream 01 fixed Multicast IP is 224.1.1.1:1234
IP Stream 02 fixed Multicast IP is 224.1.1.2:1234
IP Stream 03 fixed Multicast IP is 224.1.1.3:1234, etc. up to IP Stream 10
All Rights Reserved Eins Technology
12
Playlist
1.
Move the selector to PLAYLIST, press
to get the below page:
All Rights Reserved Eins Technology
13
1.
To create a new playlist, move the selector to “CREATE NEW” and press
. New playlist created will be called “PlaylistX.pst”, repeat to create more
Playlists.
2. To delete an existing playlist, select the playlists by pressing
. Once
selected, a
will be marked beside the selected playlist. You can select multiple
playlists. Move the selector to “DELETE”, press
to delete all selected playlists.
Once the delete option is selected, the files will be permanently deleted.
√
√
All Rights Reserved Eins Technology
14
3. To Edit playlists, move the cursor by right navigation key
Icon to one of the PLAYLIST file name with .plst extension.
4. To insert media to the newly created Playlist, navigate
Media’ button and press
from the remote control.
All Rights Reserved Eins Technology
from PLAYLIST
to the ‘Insert
15
5. On the next screen, select the source from where the media is located. The
below image shows the attached USB disk. Navigate
to the video files that
have to be added and press the select button
from the remote control, a
will be displayed next to the video file. Once the selection of video files is complete,
navigate the cursor by
to the OK button on the screen and press
from
the remote control to confirm the operation, or to cancel button on screen to
discard the operation.
6. If OK button is selected, the files will be added to the current playlist as shown
in the below image:
All Rights Reserved Eins Technology
16
7. To add more media to existing (or any other) playlist, repeat the above steps.
Note: Only video files can be added to a playlist.
8. Once it has been done, move to “save” button then Press
changes made to the playlist.
All Rights Reserved Eins Technology
to save the
17
Popup
Popup is a list which allows you to popup other narrow banners on screen to
overlap the video on screen from top / bottom or left / right side. Described below
are the instructions on how to create/delete and edit a popup.
1.
Go to Playlist from the home page, move to the Popup List button and
press
2.
There is no popup list available and you will have to create new popup list .
Navigate to the “Create New” button and press
from the remote control. It will
create a popup with the default pattern as Popup0.pop. You can create as many
popup lists as shown in the below image:
All Rights Reserved Eins Technology
18
3.
Contents can be added to the popup once it has been created. Navigate the
selector to the desired popup and press
from the remote control.
On the left of the popup editor, available buttons are:
“Insert Banner”, “Move Up/Down”, “ Select All”, “Clear Selection”, “Remove” ,
“Save” and “Cancel” shown in the below image:
4. To insert banner files to the newly created Popup, navigate to the Insert Banner
button and press
from the remote control. On the next screen select the
banner file source as shown in the following image:
All Rights Reserved Eins Technology
19
5.
Navigate to the banner files to be added and press Select button
from
will be marked next to the banner file. Once the selection
the remote control, a
of banner files are completed then with the help of the navigation keys navigate to
the OK button on screen and press
from the remote control to confirm the
operation.
6.
To cancel, press the cancel button to discontinue operation. If OK button is
selected then the file will be added to the current popup as shown in the image
below:
All Rights Reserved Eins Technology
20
7. In the Popup browser there are Duration and Position need to be set:
Duration available range: 10 ~ 120 seconds;
Position available range: Top & Bottom (for vertical images) or
Left or Right (for a horizontal image);
Once the popup is populated with the desired banners, navigate to the Save button
follow by
to save the changes as shown in the image below:
Note: Banners can only be set in Vertical (Left or Right) position or in
Horizontal (Top or Bottom) position. The popup feature has been designed in
such a way that it automatically detects the banner configuration and
displays the exact position options i.e. Top & Bottom for a horizontal image,
Left & Right for a vertical image.
8.
Once the popup listing is completed, it can be added to video files in a
playlist. To add a popup to a video file in the playlist, go to playlist, navigate to the
desired playlist and press
from the remote control.
9. On the left of the playlist editor, clicking on the “Insert Popup” button will show
the list of available pop ups. Select the desired popup to insert it and it will be
displayed at the top of the list of video files.
10. Position of an inserted popup could be changed by the “Move Up” and “Move
Down” buttons available at the left side of the playlist editor as shown in the
below image:
All Rights Reserved Eins Technology
21
11.
An inserted popup will appear in all the video files that are scheduled to
play after the inserted popup.
12.
If you want to stop a popup from appearing on a video, insert a new popup
at the location where you want the popup to stop. In this way the inserted popup
will not run any more on the clips that follow.
13.
Once it has been done, do not forget to save the changes made to the
playlist.
Marquee
Marquee is an editable text banner displayed on top or bottom of the screen. This
is specially integrated for marketing purposes.
1.
Go to Playlist from the home page; click the “Marquee List” button from the
left side of the options to get into the marquee list browser. At the start there will be
no marquee list available and one would have to be created. Navigate to the
“Create New” button available at the left of the popup list browser and press
from the remote control. It will create a marquee with the default pattern as
Marquee0.mrq. One can create as many as marquee lists as desired or required
as shown in the image below:
All Rights Reserved Eins Technology
22
3. To insert text to the newly created marquee navigate to the edit option and
press “Edit” button from the remote control. With the help of the alpha numeric
keys of the Remote Control, type in the text for the marquee.
Use “Clear” to backspace for texts correction.
Press
to finish editing.
4. There are Duration and Position of the marquee need to set:
Duration can be set at: 10 ~ 120 seconds
Position can be set at: Top & Bottom.
All Rights Reserved Eins Technology
23
English
2.
Text can be added to the marquee once it has been created. Just navigate
to the desired marquee and press
from the remote control. On the left of the
marquee editor, buttons are available to “Insert Ticker”, “Move Up/Down”, “Select
All”, “Clear Selection”, “Remove”, “Save” and “Cancel” as shown in the image
below:
Once the marquee is populated with the desired text, navigate to the “Save”
button on the left to save the changes.
5. Once the marquee is populated, it can be added to a video files in a playlist.
To add a marquee to a video file in the playlist, go to Playlist, navigate to the
desired playlist and press
from the remote control. On the left of the
playlist editor, button is available to “Insert Marquee”, click and it will show the
list.
Select the desired marquee to insert from the list and it will be displayed at the
top of the video files lists.
The position of an inserted marquee can be changed by the “Move Up” and
“Move Down” buttons available at the left side of the playlist editor as shown in
the image below:
Inserted Marquee will appear in all the video clips that follow the inserted
marquees.
6.
If you want to stop the current marquee, insert a new marquee at the location
from where you want to stop the previous marquee. In this way, the inserted
marquee will not run any more on the clips that follow.
7.
Once it has been done do not forget to Save the changes made to the playlist.
All Rights Reserved Eins Technology
24
Setup
Navigate to “SETUP” on home page and press
on remote control.
Or press the Setup button on the remote control to invoke the setup option
A: Setup:
Output Mode: Automatically detects the display i.e. the display is SD/HD or FHD, and selects the
appropriate option
Slideshow Duration: Slideshow duration could be set to 5, 10, 15, 20, 30, or 60 seconds.
Background Music: Enable or disable the background music while a slideshow is running.
Expand background music option to browse and associate default background music while
running a slideshow.
All Rights Reserved Eins Technology
25
Background Photo: Enable or disable the background image while listening to the music.
Expand background photo option to browse and associate default photos while listening to
music.
B: Network:
Second step is to configure the network IP address settings so that you could be connected to
the local area network (LAN) to access the contents from the PC(s) over the local area network.
LAN IP address connection settings could be configured with fixed IP Manually or Auto IP from
DHCP. If manual IP option is selected, you will be required to enter the IP address (e.g.
192.168.1.150), Sub-net mask (e.g. 255.255.255.0), and Default Gateway and DNS settings.
NOTE:
Please consult your network administrator for more detailed your network environment
setting.
C: Update
All Rights Reserved Eins Technology
26
Upgrading new firmware to the ROM is a breeze & it’s just a click away. When in the Setup
screen navigate to Update ROM page. On the bottom right corner, current version of the installed
firmware will be displayed. New firmware should be stored at the root directory a USB storage
device (USB thumb drive or USB HDD). With the USB storage device attached to the USB port
and browsed, press the Update ROM button at the bottom of the screen and ROM update will
start automatically. A status bar will show the progress of the update process. Ensure that power
is not turned off while update is in progress. This will take about 2 to 3 minutes to complete and
will reboot automatically. If unit does not auto reboot, just power off and power on the device.
D: CLOCK:
You may set MPL to automatically reboot on predefine timing to clear off the
memory cache, this will help MPL to refresh memory cache for long time playing.
Device Time: You need to enter current time and date when first time turning on the device
(factory default) or when you reset device to factory default from updates menu option.
Daily Reboot Time: Reboot time could be set to a minute and will be repeated on daily basis.
Daily Reboot: to Enable or disable Daily Reboot option.
All Rights Reserved Eins Technology
27
Specifications
SYSTEM
HD Video Playback
HD Video
Resolution
Media Processor
CPU / System Board
AV OUTPUT
Video output
Audio output
MEDIA FORMAT
Video Format
Audio format
Image Format
TV System
RESOLUTION
Multiple Digital
Output Resolution
Video Resolution
Multiple Component
Resolution
Picture Resolution
CONNECTIVITY
Network
USB Interface
USB Classification
English
USB device
VC-1(WMV9 MP@HL), MPEG-2 MP@HL(720p/1080i), DivX HD, MPEG4 H.264 Full HD write before VCI
Up to 720p/1080i/1080p (True High-Definition Decoding)
Sigma Designs SMP8653
500MHz RSIC Processor
Internal connection with PDP (LVDS)
Internal connection with PDP and Digital bit Stream to SPDIF Coaxial
MPEG-4.10(H.264), MPEG-4.2, MPEG-2, MPEG-1, VC-1, WMV9, AVS,
DV, RMVB v9, RMVB v10
MPEG-1 Layer1/2/3(MP3), MPEG-4 AAC (Low Complexity, 5.1 Channel),
WMA9, PCM, WMA9 Pro, Linear PCM at 16/20/24 bit with 44.1/48/96
KHz Digital Stream. (AC3, THX, DTS, Dolby Digital pass through only)
JPG, PNG, BMP
NTSC/PAL Compatible
576p, 480p, 720p, 1080p, Selective PDP Native Panel Size Settings (pprogressive, i-interleaved)
Up to 1920 x 1080 [1080i / 1080p]
[50Hz]: 576i[PAL], 576p, 720p, 1080i/p
[60Hz]: 480i[NTSC], 480p, 720p, 1080i/p
Up to 1920*1024 (4096*4096 without background music)
10/100 Base-T LAN
Type-A Connector, USB1.1[12Mbps], USB2.0[480Mbps]
Mass Storage Classification – Fat16, Fat32, SCSI transparent command
set HDD, Thumb Drive, MP3 Player, Media Reader (CF, Micro Drive,
USB
Memory Stick (Pro), Smart Media, MMC, SD, xD)
BASIC SPECIFICATION
Power Requirement
AC 100-240V 50/60 Hz, 13W
*1
PDP Requirement
Panasonic PDP 10 series above with 1-slot available
*1 Note: Support FHD and HD series.
All Rights Reserved Eins Technology
28