1
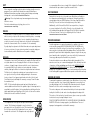
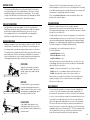
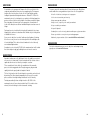
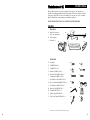
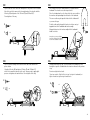
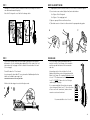
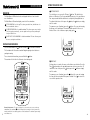
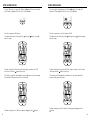
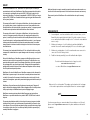
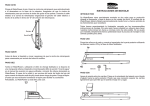
Owner’s Manual
assembly INSTRUCTIONS
monitor instructions
warranty & contact info
OWNER’S MANUAL
TABLE OF CONTENTS
INTRODUCTION
Owner’s Manual02 – 08
Assembly Instructions10 – 16
Monitor Instructions17 – 20
Warranty Information / Troubleshooting
21 – 22
Congratulations on becoming a WaterRower owner.
Rowing is universally recognized as the perfect aerobic exercise − smooth,
low impact, rhythmic and whole-body − unrivalled for its physiological
benefits and aesthetic pleasures.
“Rowing, indoors or outdoors, at any exercise level of intensity,
requires a greater exercise expenditure than any other aerobic
activity. Calories are burned in relation to the number of muscles
used and the intensity and duration of the exercise. Rowing with a
sliding seat uses a very large muscle mass since the upper, lower
and trunk muscles are used vigorously.”
-Dr. C Everett Koop- Former US Surgeon General
While most rowing machines imitate the action of rowing, they do so
mechanically, and therefore lack the natural dynamics experienced when a
boat and crew glide down a river.
At WaterRower, we have focused on replicating the physical dynamics of
rowing, with the knowledge that this will achieve all of its physiological
benefits, as well as much of the aesthetic pleasure.
To maximize the enjoyment from using your WaterRower we recommend
that you follow our suggestions on rowing technique and training
programs. We hope that some of the discussion points in this manual will
improve your knowledge about exercise in general, so that you are better
able to fulfill your specific exercise objectives.
Your WaterRower has been carefully hand-crafted to give you years of
trouble-free use. You will notice that each WaterRower is unique due to
the variance in color and grain that occurs naturally in genuine hardwood.
We recommend that you closely follow the assembly details provided,
particularly by assembling the machine in the correct sequence, and
adhering to the suggested maintenance schedule.
We hope you enjoy using your WaterRower for many years to come.
01
02
Safety
We recommend consulting a physician before starting out with an exercise
program. Please read all instructions before using the WaterRower.
Additional information on getting started, rowing technique and rowing
training advice can be found at www.HowToRow.com.
! Warning: Please keep hands away from moving parts when rowing
machine is in use.
For further information on safety tips, please refer to
www.waterrower.com/safety.
Operation
The WaterRower is unique in using the effect of drag to provide an exercise
which is entirely self paced. Because drag is linked to speed, a crew rowing
down a river chooses its intensity of exercise simply by altering the pace
at which they row: the faster the boat travels the greater the drag and the
harder the crew must work. There is a similar effect in swimming.
By replicating these dynamics the WaterRower does not require adjustment
to increase resistance: if a more intensive workout is required, simply row
faster and harder, and the WaterRower will respond accordingly.
Water Level
The amount of water in the Tank simulates the weight of the Boat and Crew
as it glides down the river. Changing the Water Level does not change the
resistance, it simply changes the mass which the user is trying to move.
Increasing the Water Level simulates a heavier boat and crew mass,
similarly reducing the Water Level simulates a lighter boat and crew mass.
The Water Level is adjusted according to one’s personal preference or
user type; the intensity is altered simply by moving the chosen mass
faster or slower. A level gauge is positioned on the side of the the tank.
Overfilling the tank could impact the warranty coverage. Do not fill above
the maximum level.
NOTE - Fill the tank with ordinary municipal water. Municipal water
contains additives which will deter the growth of algae. If municipal water is
unavailable, use distilled water. Unless using blue dye, add the purification
tablet supplied with your WaterRower. (Refer to the section on Preventative
Maintenance for advice on Water Treatment).
Footpad Position
The Footpad has been designed to be adjusted for maximum
comfort. The Footstrap is designed to cross the foot at the
pivot point of the toes (the ball of the foot). This should enable
the heel to be raised off the Footboard as the user comes
forward with each stroke. The Footpad can be easily adjusted
03
to accommodate different users, simply lift the top lip of the Footpad to
unhook and slide up or down to reposition on another hole.
Start up Maintenance
During the first weeks of use, the wood in your WaterRower will adjust to
the temperature and humidity of the environment. During this period it is
strongly advised that you GENTLY tighten all the Connecting Bolts with the
Allen Key. Please be careful not to overtighten any of these bolts.
Additionally, as the Drive and Recoil Belts loosen up with use, it may be
necessary to tighten the Recoil Belt. To do this, leave the Handle in the
full forward position and adjust the Bungee/Recoil Belt Buckle to provide
a little more tension. Please refer to ‘Adjusting the Recoil’ video at:
www.waterrowerservice.com/videos.
Preventative Maintenance
Periodic maintenance is required to maintain the condition of the water
in the tank. We strongly advise using Municipal Tap Water which
contains other Chemicals to keep it free from Bacteria and Algae, etc. The
water must be refreshed periodically by adding a Water Purification Tablet
provided. The purification tablet degrades by exposure to light: this may vary
from 6 months in direct sunlight to 2 years in an artificially lit environment.
On average, add one purification tablet every 6 months.
If water discoloration occurs add a purification tablet immediately. If the
water does not clear, we recommend emptying the Tank, flushing it out with
clean water, refilling, and adding a purification tablet. Never use Pool
Chlorine or Chlorine Bleach in the Tank as this will irreparably
damage the Polycarbonate Tank. The use of an alternative purification option
in the tank beyond the approved WaterRower product could void the warranty.
Maintaining and Cleaning
To maintain the appearance and integrity of your WaterRower it is necessary
to keep the machine clean. It is particularly important to ensure that there
is no dust build up in the Clutch and Belt Mechanism between the Top and
Bottom Decks. Dust can be removed by using a vacuum cleaner.
The surface and groove in the monorail must be kept clean to prevent dust
fouling the Seat Wheels, and can be cleaned by wiping with a damp cloth.
The surface of the tank can be cleaned, however, please ensure you read the
instructions for any cleaning fluids prior to use.
do not use methylated spirits, chlorates, bleach or ammonia
based fluids when cleaning any part of your WaterRower. The use of
improper cleaning products could void the warranty.
04
Maintaining the Wood
The natural wood WaterRowers are finished with Danish Oil which gives
a deep penetrating finish to the Hardwood Frame. Other than occasional
dusting or polishing, the wood requires no maintenance. The use and/or
storage of the WaterRower in inclement weather, including but not limited,
to extreme temperatures and moisture could void the warranty.
Please visit www.HowToRow.com to learn more about the phases and
positions of the rowing technique.
Your Exercise Program
Storage of Your WaterRower
Your WaterRower can be stored upright. Lift the Rear Leg end, pull the
WaterRower towards you and use the momentum to stand it in an upright
position. When storing the WaterRower, please ensure the seat is in
the forward position (close to the footboard). When stored upright the
WaterRower is stable and it only takes the space of a chair.
Starting Out With Rowing
Rowing is an endurance sport which requires a high level of skill. This skill
is based on the co-ordination of the legs (which create the driving force of
the rowing action), torso and arms in propelling the boat across the water.
The rowing action is comprised of both fast (drive phase) and slow (recovery
phase) movements. Skill is also required in combining these movements
into a rhythm in order to create a smooth, flowing, unhurried rowing action.
The diagrams below show 3 basic movements of the rowing action.
CATCH POSITION
Sitting tall, arms straight reaching forward, shoulders relaxed, head up, eyes
looking forward, legs compressed and
shins vertical.
DRIVE PHASE
Drive back with the legs, arms hang off
the handle and only begin to bend once
handle is above the knees, torso is strong
with good posture and body angle opens
up slowly as you drive the legs.
RELEASE POSITION
Legs straight, handle drawn to chest,
sitting back just past the vertical, torso
firm, shoulders relaxed, head up and eyes
looking forward.
05
Allow yourself the first few rowing sessions to practice the correct
positions and phases as well as the correct ratio and rhythm of the rowing
action. With regular rowing, the technique will become easier and you will
soon experience the physiological benefits of rowing.
Most of us recognize the benefit of exercise and the potential
improvements to our general health and well being. However few of us
fully understand the physiology of exercise and the best means of achieving
our specific exercise objectives.
In order to get the most out of any exercise program, it is essential to have
an understanding of what your exercise objectives are. These may include
reducing or maintaining weight, improving general strength, developing
bulging muscles, improving sporting competitiveness or simply avoiding
the health consequences of a modern sedentary lifestyle.
It is important to set a few different types of objectives.
These are divided into:
▪▪Immediate Objectives - weekly
▪▪Short Term Objectives - monthly
▪▪Long Term Objectives - yearly
Your long term objectives are your final objectives, to achieve these, you
need stepping stones which are the short term objectives and immediate
objectives. Objectives need to be:
▪▪Specific - set goals that you would like to achieve by certain dates
▪▪Realistic - do not set a standard too high or motivation will be lost
▪▪Flexible - be prepared for set backs such as injuries and illness
Your personal exercise objectives will influence the intensity, duration,
frequency and type of exercise you do. Below are a few examples of
different exercise objectives:
Weight Maintenance
At lower intensities our body uses a mixture of fat and carbohydrate as
its source of fuel. As the maximum aerobic output is approached, the
percentage of fat consumed as fuel reduces to zero. Also, as the duration
of exercise is increased the percentage of fat consumed tends to increase.
If your objective is weight maintenance, then it is necessary to burn as
much fat (as opposed to carbohydrate) as the source of fuel as possible.
This is best achieved at lower intensities and over longer durations. As
soon as the intensity is increased the aerobic process starts to burn more
carbohydrate and less fat. A low intensity (60 - 70% of the maximum heart
rate) is typically that at which you can hold a conversation: it is by no
means strenuous and is about that achieved by a brisk walk.
06
Aerobic Training
A sustained exercise program will improve the efficiency with which the
respiratory and cardiovascular system can supply oxygen. This improves
lung function, heart function, vascular efficiency and capillary growth,
leading to improved well being and endurance. At about 70 - 80% of the
maximum heart rate, lactate begins to accumulate in the blood supply at a
greater rate than it can be extracted by the liver, kidneys and other organs.
Exercising above this intensity will cause progressive accumulation of
lactate in the blood, increased heart and breathing rates and cause muscle
fatigue.
Prolonged exercise at or below this intensity will maintain lactate at nonfatiguing levels and exercise duration will be limited solely to the depletion
of available fuel stores.
If your exercise objective is aerobic (cardio-vascular/endurance) training
then it is necessary to exercise at an intensity which will avoid fatigue due
to lactate build up. This is best achieved at moderate levels of intensity
over medium/long durations.
A moderate exercise intensity (70-80% of the maximum heart rate) is about
that achieved by a steady jog, avoiding the onset of muscle soreness.
Training Guidelines
To ensure you get the maximum benefit from training on your WaterRower
and to avoid unnecessary problems or injuries here are a few guidelines:
▪▪A health check before starting an exercise program.
▪▪Use heart rate to monitor your intensity.
▪▪Always warm up and cool down.
▪▪Always stretch, especially at the end of your workout.
▪▪Keep a record of your workouts.
▪▪Keep well hydrated.
▪▪Gradually increase the intensity, duration and frequency of your workouts.
▪▪Ensure you include recovery time in your training program.
▪▪Add variety to your workouts (refer to www.HowToRow.com/workouts).
Training Resources
For further information on your exercise objectives and rowing training
types please visit www.HowToRow.com.
Anaerobic Training
Anaerobic training causes the build-up of lactate (as rapidly as one minute
after exercise is commenced). Lactate saturation will necessitate either a
rapid reduction in exercise intensity or complete cessation.
The accumulation of lactate limits the contribution of the anaerobic
process to total energy production. Though energy may be generated
rapidly, total work capacity and total output is limited.
The level of intensity at which lactate begins to accumulate can be altered
by training. This is best done by improving the efficiency of the aerobic
process and is achieved by training at moderate levels of intensity.
Training anaerobically is done at high intensities (80-100% of the
maximum heart rate) over a short period of time (10 seconds to a few
minutes). Interval training is a form of anaerobic training.
07
08
ASSEmBLY MANUAL
We have done our best to keep the assembly instructions as clear and concise as
possible. Assembling your WaterRower takes about 30-45 minutes and the only tool
you need is a 5mm Allen Key that is included on the rear spacer or in the assembly
bag. The WaterRower comes partially assembled in two boxes.
Please Read Instructions Fully Before Starting Assembly
Components
Main Parts
A
Mono Rail Assembly
(with seat and bungee)
A
B Tank Assembly
C
Sub Rails × 2
B
C
D
Other Parts
D Footboard
E
JCB (WRB-B700) × 8
F
JCN (WRP-B711) × 8
G
Handle Rest (WRP-P430) × 2
H Handle Rest Bolt (WRP-P455) × 2
I
Clamp Bar Bolt (WRP-P1140) × 1
J
Rail Sub Bracket Bolt (WRP-S201) × 1
K* Back of Footboard Bolt (WRP-B720) × 4
L
E
F
G
H
I
J
K
L
M
N
O
P
Rail Sub Bracket (WRP-R1500) × 1
M 5mm Allen Key (WRP-B740) × 1
N Footpads (WRP-P1700) × 2
O
Syphon Pump (WRP-B405) × 1
P
Purification Tablets (WRP-B960) × 3
*K Bolts are located on the back of footboard [see step 3]
09
10
Step 1
Lay the sub rails on the floor with ends parallel. Dolly wheels on the outside.
Attach the end of the mono rail to the angled ends of the sub rails with the
Allen key (M) and 4 pairs of the JCN nuts (F) and JCB bolts (E) .
Do not tighten all the way.
E
F
×4
×4
Step 3
First remove the Back of Footboard Bolts (K) from behind the
footboard. These bolts are used in steps 6 and 8.
Place the footboard on the rails, then attach the sensor cable to
the monitor cable protruding from the back of the footboard.
The sensor cable may be taped to the back of the footboard. If
so, remove the tape.
Feed the cable gently through the brackets so it does not get
trapped between the footboard and tank assembly.
Align gold rivnuts on the tank assembly with the footboard’s
handle rest holes.
K
It may be necessary to slightly
loosen the 2 bolts on the top deck
to allow the footboard clearance.
Step 2
Place the tank assembly on the sub rails in the direction shown in the
picture below.
Using the Allen key (M) and 4 pairs JCN nuts (F) and JCB bolts (E),
attach the forward riser bracket to the rails. You may need to apply slight
pressure to align bracket and rail holes. Do not tighten all the way.
E
F
11
×4
Step 4
Using the 5mm Allen key (M), screw the handle rests and bolts (G & H)
through the top of the footboard into the rivnuts mentioned in the previous
step.
Do not over tighten these bolts.
*If you loosened the Top Deck Bolts in step 3 to align the footboard, first
tighten them before tightening the handle bolts.
G
×2
H
×2
×4
12
Step 5
Tighten the footboard to the mono rail by screwing in the clamp bar bolt (I).
Do not tighten all the way.
I
×1
Step 8
Screw in the rail sub bracket (L) underneath the footboard using the two
remaining back of footboard bolts (K). Tighten all the way.
J
K
×1
×2
Step 6
Stand the machine up. Insert 2 of the Back of Footboard Bolts (which were
removed in step 3) into the footboard bracket and tighten.
Having kept all the bolts loose will allow easier alignment of the bolts and
rivnut holes in the footboard.
Do not tighten all the way.
K
×2
Step 9
Go back and tighten all the bolts in steps 1, 2, 5, and 6. Also tighten the
4 bolts on the front of the rower (below forward riser bumpers, see tag).
Leave the bolts in step 4 and 7 alone. Should you experience any problem
with aligning the components, loosen all bolts, align and retighten.
Step 10
Tighten the rail sub bracket bolt (J) (Step 7) firmly in place.
Step 7
Insert the sub bracket bolt (J) through the “U” in the rail sub bracket (L)
into the rail, to hold the bracket in place for step 8.
13
14
Step 11
Unwrap the recoil belt from the forward riser bracket, making sure the belt
runs below and around the pulley.
Attach the D ring on the recoil belt to the bungee hook.
How to Fill and Empty the Tank
1) To pump water, turn the knob clockwise to close valve as shown in figure A
2) Locate water source above (higher than) water destination:
▪▪See Figure B for filling tank
▪▪See Figure C for emptying tank
3) Squeeze pump 4-5 times until water flows
4) Turn knob counter-clockwise to allow air into the pump and end syphon.
A
Step 12
B
The Level Gauge
Lay the unit flat and remove the tank stopper from between the top and
bottom deck. Use the included syphon pump (O) to fill the tank to the level
indicated on the level gauge sticker located on the underside of the tank.
(See next page.)
The Level Gauge is positioned underneath the
tank; to locate the Level Gauge sticker stand the
machine up and look between the two wooden
sub rails.
Do not fill above the 19 level mark.
Information on the sticker includes the Serial
Number, WaterRower contact information and the
Water Level Gauge. The standard Calibration Level
is Level 17. The maximum level to fill the tank is
Level 19 - DO NOT fill above this level. Doing so
could void your warranty.
Insert one purification tablet (P) every six months. Additional purification
tablets are available upon request at:
www.waterrowerservice.com/puritabs
Moisten the tank stopper to assist with replacement.
O
C
P
It is recommended that all machines in a group
class setting are filled to Level 17, this is to ensure
all users are in the ‘same boat’, and race times
remain accurate and consistent.
WaterRower
560 Metacom Avenue
Warren, RI 02885
1-800-582-2210
www.waterrower.com
LEVEL GAUGE
19
MA XIMUM LEVEL
18
C A L IB R AT I O N
17
LEVEL
16
Recommended Water Level is Level 17
15
15
14
16
Monitor manual
SETTING UP THE RACE PACE COACH
DISTANCE RACE
Introduction
The WaterRower GX Monitor has been designed to balance function with
user friendliness.
The WaterRower GX monitor display consists of three windows.
A
Total Window is at the top. This shows your total time, total distance in
meters and total calories.
B
Current Window is the middle window. This shows your current stroke
rate (in strokes per minute), current speed in miles per hour, and in split
time per 500 meters.
C
Race Pace Coach Window is the bottom window. This one allows you to
do a race using time or distance.
To set a distance race, press the Distance ( ) button. This defaults to a
distance of 50 meters. Use the up and down arrows to select your distance.
You can press and hold these buttons to scroll quickly through distances.
To confirm the distance either press the button, the button, or simply
wait 5 seconds.
To commence a race/workout, press the button. Once you start rowing,
the distance will count down. The monitor will beep when it the race is
finished. To race the set distance again, simply press .
r
Starting Out/Basic Information
time
Press the WaterRower GX ( ) button (located at
D
meters
) to turn on the monitor.
The 3 windows will all read zero and will begin keeping track of data once
you begin rowing.
To reset monitor information, press and hold the
button.
The monitor will shut off after 5 minutes of not being used.
E
total meters
A
total
calories
total
time
TIME RACE
Setting a time race works the same as the distance race button. Press the
Time ( ) button and use the up and down arrows to choose your time. To
confirm the time either press the button, press the button or simply
wait 5 seconds.
total meters
miles
per
hour
time
per
500m
B
total
total
es
Once you start rowing
To commence a race/workout, press
the button.
the time will decrease and will beep once finished. Press to restart the
race with the previous time.
les
r
r
r
strokes per minute
C
time
meters
time
meters
D
E
17
Battery Replacement - To replace the batteries, unscrew the two screws on the top
and bottom of the monitor ( E ) with a Phillips head screwdriver. Carefully remove the
monitor and lift the inset battery pack out of the foot board. The monitor is powered by
two AA batteries.
18
SETTING 100 METER RELAY RACE
SETTING 2 MINUTE CHALLENGE
To set a 100 meter race, press the Distance ( ) button, 50 meters will show
in the Distance display of the Race Pace Coach Window.
time
To set a 2 minute challenge press the Time ( ) button, 30 seconds will
show in the Time display of the Race Pace Coach Window.
meters
time
Press the up arrow to 100 meters.
meters
Press the up arrow to scroll to 2 minutes (2:00)
button, the
To confirm the distance either press the
wait 5 seconds.
button, or simply
total meters
total
calories
total
time
miles
per
hour
time
per
500m
miles
per
hour
time
per
500m
strokes per minute
time
button or simply
total meters
total
calories
total
time
button, press the
To confirm the time either press the
wait 5 seconds.
strokes per minute
meters
time
meters
Continue rowing, the 100 meters will flash ready to commence the 100
meters race when the button is pressed.
Continue rowing, the 2 minutes will flash ready to commence the 2 minute
challenge when the button is pressed
The 100 meter distance will immediately count down once you start rowing.
The monitor will beep when it the race is finished.
The 2 minutes will immediately count down once you start rowing. The
monitor will beep once finished.
total meters
total meters
total
calories
total
time
total
calories
total
time
miles
per
hour
time
per
500m
miles
per
hour
time
per
500m
strokes per minute
strokes per minute
time
time
Continue rowing, to race 100 meters again, simply press the
19
meters
meters
button.
Continue rowing, to row the 2 minute challenge again simply press the
button.
20
WARRANTY
Private and Commercial Use - WaterRower will replace or repair at its factory or
nominated service facility any WaterRower or WaterRower component found to be defective in material or workmanship for a period of ONE (1) YEAR from the date of initial
shipment by WaterRower. The warranty is upgradeable to THREE (3) YEARS on all components and FIVE (5) YEARS on all wooden elements by registering your WaterRower within
the first year of purchase.
This warranty will be invalid if, in the opinion of WaterRower, the claim has been caused
by: (a) accident, abuse, misuse, misapplication or as a result of any modification other
than by WaterRower, (b) deterioration due to normal wear and tear, (c) improper preventative maintenance steps as described in the WaterRower Owner’s Manual.
The warranty will be voided if, in the opinion of WaterRower, the claim is found to be
a result of: (a) improper assembly of the product, (b) usage beyond the design of the
product, (c) overfilling of the tank as advised in the Assembly Manuals, (d) use of alternative purification option in tank beyond approved WaterRower product, (e) use of improper
cleaning materials as described in the preventative maintenance steps, (f) use and/or
storage of product in inclement weather, including but not limited, to extreme temperatures and moisture.
This warranty is not transferable. WaterRower (US) Inc. shall not be liable for any direct,
consequential, incidental indirect or special damages under this warranty, or any implied
warranty.
Return of the WaterRower or WaterRower component to WaterRower’s factory or nominated service centre will be the responsibility of the claimant. The WaterRower or component should be packed to protect it from damage; WaterRower will not be responsible
for any damage which may occur during shipment. Postage should be prepaid and the
package should contain the claimant’s name, address and telephone number, a description of the problem and proof of purchase.
Additional information on parts, assembly, preventative maintenance and manuals, as referred to within this warranty document, can be found at www.waterrower.com/warranty.
Please consult your local WaterRower office or local distributor for specific warranty
details.
Troubleshooting Tips
1. Loosening bolts - over time and with use bolts can come loose, use the
5mm Allen key to gently tighten the bolts. If the bolts continue to loosen
use a small amount medium strength Loctite® to fasten the nuts and bolts
more securely.
2. Monitor not turning on - check the batteries positioned behind the
monitor. Unscrew the monitor and gently lift to access the battery pack.
3. Monitor not counting down - check the monitor and sensor connector is
connected. Check all wiring is intact.
4. Paddle not turning smoothly, loosen all tank bolts and retighten.
For other troubleshooting and service tips, please visit:
www.waterrowerservice.com
or contact WaterRower at [email protected]
WaterRower will return the WaterRower or WaterRower component to the claimant at its
(WaterRower’s) expense except in the case where the warranty has been deemed void
or invalid. In the event that the warranty is found to have been void or invalid, then the
costs of such investigation, repair and any associated shipping costs shall be borne by the
claimant.
WaterRower will ground/economy ship all replacement warranty parts. Charges will
apply for all alternative shipping methods. Product shipped outside of its initial purchase
country may be subject to additional warranty cost and shipping charges.
WaterRower warrants against any defective WaterRower spare part received from
WaterRower or any authorized dealer for a period of NINETY (90) DAYS after the date of
shipment.
The warranty described above shall be in lieu of any other warranty, express or implied,
including but not limited to, any implied warranty of merchantability or fitness for a particular purpose. The term of this warranty does not affect or prejudice the statutory rights
of a consumer, neither does it limit or exclude any liability for death or personal injury
caused by WaterRower’s negligence.
21
Make note of the serial number. This number can be found on the level gauge
sticker and is required when contacting WaterRower for customer support.
S/No:
If you have any questions or comments about the assembly or use of this unit,
please contact [email protected] or the phone numbers on the back of
this booklet.
22
United States | www.waterrower.com
560 Metacom Avenue | Warren, RI 02885
Tel: +1 (401) 247 7742 | [email protected]
United Kingdom | www.waterrower.co.uk
19 Acton Park Estate | The Vale, London W3 7QE
Tel: +44 (0)20 8749 9090 | [email protected]
Australia | www.waterrower.com.au
Unit 8/46-50 Wellington Rd. | South Granville, NSW 2142
Tel: +61 (0) 2 9681 4221 | [email protected]
WRM7210 RevB