1
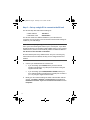
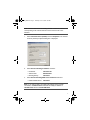
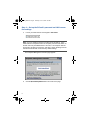
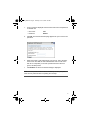
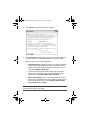
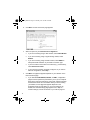
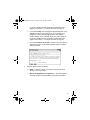
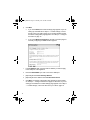
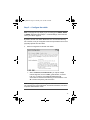
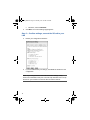
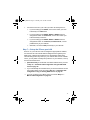
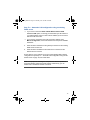
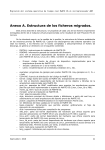
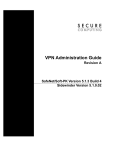
QUICK INSTALLATION GUIDE SnapGear Network Gateway Security SG300 SG560 SG565 SG580 Desktop Appliance www.securecomputing.com DESK_BODY.fm Page 2 Thursday, June 14, 2007 8:29 AM Copyright ©2007 Secure Computing Corporation. All rights reserved. No part of this publication may be reproduced, transmitted, transcribed, stored in a retrieval system, or translated into any language in any form or by any means without the written permission of Secure Computing Corporation. Secure Computing, SecureSupport, SnapGear, and Webwasher are trademarks of Secure Computing Corporation, registered in the U.S. Patent and Trademark Office and in other countries. TrustedSource is a trademark of Secure Computing Corporation. Publishing history 2 Date Part number Models June 2007 520074-07 Desktop Appliance SG300, SG560, SG565, SG580 DESK_BODY.fm Page 3 Thursday, June 14, 2007 8:29 AM Document conventions Bullet points shown below indicate you must choose only one of the options: Option 1 Option 2 Italics indicate a file or directory (/docs); placeholder text, and also refer to other publications, such as the SnapGear Administration Guide. Note: IP addresses and screen captures within this document are intended as examples, and do not necessarily represent a proper or complete configuration or the configuration that is appropriate to your needs. System requirements The quick setup assumes you have a PC running Microsoft Windows (2000 or later) with an Ethernet network interface card installed. You may need to be logged in with administrator privileges. 3 DESK_BODY.fm Page 4 Thursday, June 14, 2007 8:29 AM Quick setup This guide walks you through the installation of your SG unit. Installing the SG unit into a well-planned network is quick and easy; however, network planning is outside the scope of this guide. Take some time to plan your network prior to installing your SG unit. To add your SG unit to your LAN (Local Area Network), follow these steps: Step 1 — Unpack the SG unit on page 5 Step 2 — Power on the SG unit on page 5 Step 3 — Set up a single PC to connect to the SG unit on page 6 Step 4 — Set up the SG unit's password and LAN connection settings on page 8 Step 5 — Configure the switch on page 15 Step 6 — Confirm settings; connect the SG unit to your LAN on page 16 Step 7 — Set up the PCs on your LAN on page 17 Step 8 — Register your SG unit on page 21 4 DESK_BODY.fm Page 5 Thursday, June 14, 2007 8:29 AM Step 1 — Unpack the SG unit In addition to this document, check that you have the following items included with your SG unit: Power cable Power adaptor SG CD Network cable Take a few minutes to get familiar with the SG unit. On the rear panel of the SG unit, there are network, serial, and possibly USB ports, an erase button, and a power inlet. The front panel of the SG unit contains activity LEDs (lights) that vary slightly between models.The status LEDs provide information on the operating status of the SG unit. Step 2 — Power on the SG unit Connect the power adapter to the SG unit and apply power. Use only the power adapter packaged with the unit. Check the front panel lights: • System/Heart Beat (H/B) /TST flashes when the SG unit is running. • Initially, all appliance models except for the SG300 also have all other front panel LEDs flashing. Note: If these LEDs do not behave in the above manner before your SG unit is attached to the network, perform a factory reset. Press the erase button on rear panel twice within three seconds, 1 second apart to restore factory default settings. If the LEDs are still not flashing after 30 seconds, you may need to contact customer support. 5 DESK_BODY.fm Page 6 Thursday, June 14, 2007 8:29 AM Step 3 — Set up a single PC to connect to the SG unit The SG unit ships with initial network settings of: • LAN IP address: • LAN subnet mask: 192.168.0.1 255.255.255.0 The SG unit needs an IP address suitable for your LAN before it is connected. You can choose to use the SG unit's initial network settings as a basis for your LAN settings. Note: Secure Computing strongly recommends you do not connect the SG unit to your LAN until this guide instructs you to. At this point, if you attach the SG unit directly to a LAN with an existing DHCP server, or a PC running a DHCP service, the SG unit automatically obtains an additional address. The SG unit is still reachable at 192.168.0.1. All other network ports are by default inactive. They are not running any network services such as DHCP, and they are not configured with an IP address. a. b. 6 Connect your administrative PC to the SG unit: If you are setting up the SG300, attach your PC's network interface card directly to any LAN port on the SG unit using the supplied network cable. If you are setting up the SG560, SG565 or SG580, attach your PC's network interface card directly any network port on switch A (A1 - A4) using the supplied network cable. Modify your PC's network settings to enable communication with the SG unit. Click Start > (Settings >) Control Panel and double-click Network Connections. Right-click Local Area Connection and click Properties. DESK_BODY.fm Page 7 Thursday, June 14, 2007 8:29 AM Note: If there is more than one existing network connection, select the one corresponding to the network interface card to which the SG unit is attached. c. Select Internet Protocol (TCP/IP) and click Properties. The Internet Protocol (TCP/IP) Properties dialog box is displayed. d. Select Use the following IP address and enter: • IP address: • Subnet mask: • Default gateway: e. 192.168.0.100 255.255.255.0 192.168.0.1 Select Use the following DNS server addresses and enter: • Preferred DNS server: 192.168.0.1 Note: If you want to retain your existing IP settings for this network connection, click Advanced and add the secondary IP address of 192.168.0.100, subnet mask 255.255.255.0. 7 DESK_BODY.fm Page 8 Thursday, June 14, 2007 8:29 AM Step 4 — Set up the SG unit's password and LAN connection settings a. Launch your Web browser and navigate to 192.168.0.1. Note: If you are unable to browse to the SG unit at 192.168.0.1, or the initial username and password are not accepted, press the erase button on the SG unit's rear panel twice within 3 seconds, 1 second apart. Wait 20 30 seconds, and then try browsing to 192.168.0.1 again. Pressing erase as instructed resets the SG unit to its factory default settings. The SnapGear Management Console page appears: . b. 8 Click the Quick Setup Wizard link in the center of the page. DESK_BODY.fm Page 9 Thursday, June 14, 2007 8:29 AM c. A log in prompt is displayed. Enter the initial user name and password for the SG unit: • User name: • Password: d. root default Click OK. The SG Unit Password page appears for you to enter a new password. . e. Enter and confirm a new password for your SG unit. This is the password for the user root, the main administrative user account on the SG unit. It is important you choose a password hard for others to guess, and keep it safe. f. Click Submit. An action successful message is displayed. Note: The new password takes effect immediately. You are prompted to enter the new password when completing the next step. 9 DESK_BODY.fm Page 10 Thursday, June 14, 2007 8:29 AM g . The LAN page of the quick setup wizard appears. . h. Enter a Hostname to identify the SG unit. The name must begin with an alpha character. The hostname defaults to the model number. i. Select an option for your LAN configuration: [Recommended] To manually configure your LAN and optionally enable the SG unit's built-in DHCP server, which automatically configures the network settings of PCs and other hosts on your LAN, select Manual configuration. To use the SG unit's initial network settings (see page 6) as a basis for your LAN settings, and not use the SG unit's built-in DHCP server, select Skip: LAN already configured. [Not recommended] If you have an existing DHCP server, and want to rely on the DHCP server to automatically configure the SG unit's LAN connection setting, choose Obtain LAN IP address from a DHCP server on LAN. Note: Changes to the SG unit's LAN configuration do not take effect until you complete the quick setup wizard. 10 DESK_BODY.fm Page 11 Thursday, June 14, 2007 8:29 AM j. Click Next. If you did not select Manual configuration, skip to step m on page 12. If you selected Manual configuration, the Manual LAN Configuration page appears. . k. Enter an IP address and Subnet Mask for the SG unit's LAN connection. Take note of the IP address and subnet mask; you will need them later on. l. To enable the SG unit's built-in DHCP server, enter a range of addresses in DHCP Server Address Range. PCs and other hosts on your LAN set to automatically obtain network settings are assigned an address from this range, and use the SG unit as their gateway to the Internet, and as their DNS server for Internet domain name resolution. Or, if you plan to use a DHCP server already on your LAN, leave the field blank to leave the SG unit’s DHCP server disabled. 11 DESK_BODY.fm Page 12 Thursday, June 14, 2007 8:29 AM m. Click Next. The ISP Connection page appears. . n. o. Select an option for your Internet Port Configuration: If you are connecting using a cable modem, select Cable Modem. If you are connecting using a regular analog modem, select Modem. If you are connecting using an ADSL modem, select ADSL to attempt automatic detection of your ADSL connection type. If you have a direct connection to the Internet (e.g., a leased line), select Direct Connection. If your Internet connection is already configured, or you want to defer its configuration, select Skip. Click Next. The page that appears depends on your selection in the ISP Connection page: 12 If you selected Cable Modem, Modem, or ADSL, configuration pages for those options are presented to you for you to complete. Refer to the onscreen instructions, online help, and the SnapGear Administration Guide for more details. When you finish entering your details, the next page that appears depends on the SnapGear model you are setting up. If you are setting up an SG300, the Confirm Settings page appears. Go to Step 6 — Confirm settings; connect the SG unit to your LAN on page 16. DESK_BODY.fm Page 13 Thursday, June 14, 2007 8:29 AM For all other desktop models, the Switch Configuration page appears. Go to Step 5 — Configure the switch on page 15. If you selected Skip, the next page that appears depends on the SnapGear model you are setting up. If you are setting up an SG300, the Confirm Settings page appears. Go to Step 6 — Confirm settings; connect the SG unit to your LAN on page 16. For all other desktop models, the Switch Configuration page appears. Go to Step 5 — Configure the switch on page 15. If you selected Direct Connection, the ISP Connection page for choosing a dynamic or static WAN interface appears. Continue with the next step. . p. Select an option for ISP connection. DHCP — Select this option if you plan to use a DHCP server already in use on your LAN. [Recommended] Manual configuration — Select this option to manually configure the WAN address using static parameters. 13 DESK_BODY.fm Page 14 Thursday, June 14, 2007 8:29 AM q. Click Next. If you chose DHCP, the Confirm Settings page appears if you are setting up an SG300. Go to Step 6 — Confirm settings; connect the SG unit to your LAN on page 16. For all other desktop models, the Switch Configuration page appears. Go to Step 5 — Configure the switch on page 15. If you chose Manual Configuration, the ISP Connection page for manually configuring the WAN interface appears. . 14 r. In the IP Address field, enter the static IP address you want to apply to the WAN port of the appliance. s. Enter the Subnet Mask you want to use for the WAN port. t. [Optional] Set the default Gateway Address. u. [Optional] Set the IP address of the Domain Name Server. v. Click Next. The Switch Configuration page appears for most models. Go to Step 5 — Configure the switch on page 15. Otherwise, if you are setting up an SG300, the Confirm Settings page appears. Go to Step 6 — Confirm settings; connect the SG unit to your LAN on page 16. DESK_BODY.fm Page 15 Thursday, June 14, 2007 8:29 AM Step 5 — Configure the switch Note: This page will only display if you are setting up the SG560, SG565 or SG580. Otherwise, skip to Step 6 — Confirm settings; connect the SG unit to your LAN on page 16. By default, the SG unit's switch A behaves as a conventional switching hub. However, it may be configured so that each port behaves as if it were physically separate from the others. a. Select a configuration for the SG unit's switch: . Select 1 LAN Port, 3 Isolated Ports if you require multiple network segments, such as a DMZ, guest network, or second LAN, or if you want to use multiple broadband Internet connections for Internet load balancing or Internet failover. Port A1 is used as the primary LAN connection. Note: Setting up multiple network segments and Internet connections is not covered by this quick install guide. For further instructions, refer to the SnapGear Administration Guide. 15 DESK_BODY.fm Page 16 Thursday, June 14, 2007 8:29 AM b. Otherwise, select 4 LAN Ports. Click Next. The confirm Settings page appears. Step 6 — Confirm settings; connect the SG unit to your LAN a. Review your configuration selections. . b. If you are satisfied with your settings, click Finish to activate the new configuration. Note: If you changed the SG unit's LAN connection settings, it may become uncontactable at this point. The next step describes how to set up the PCs on your network to access the SG unit and the Internet. 16 DESK_BODY.fm Page 17 Thursday, June 14, 2007 8:29 AM c. Connect the SG unit to your LAN if you have not already done so: If you are setting up the SG300, connect PCs and/or your LAN hub directly to its LAN switch. If you are setting up the SG560, SG565 or SG580 and have configured its switch as 4 LAN Ports, connect PCs and/or your LAN hub directly to switch A. If you are setting up the SG560, SG565 or SG580 and have configured its switch as 1 LAN Port, 3 Isolated Ports, connect port A1 directly to your LAN hub. Otherwise, connect the LAN port directly to your LAN hub. Step 7 — Set up the PCs on your LAN Each PC on your LAN must now be assigned an appropriate IP address, and have the SG unit's LAN IP address designated as its gateway and DNS server. A DHCP server allows PCs to automatically obtain these network settings when they start up. If your network does not have a DHCP server, you may either manually set up each PC on your network, or set up the SG unit's DHCP server. [Recommended] To use the SG unit's built-in DHCP server, proceed to Step 7a — Automatic LAN configuration using the SG DHCP server on page 18. If your LAN already has a DHCP server you will use instead of the SG unit's built-in DHCP server, proceed to Step 7b — Automatic LAN configuration using an existing DHCP server on page 19. If you do not want to use a DHCP server, proceed to Step 7c — Manual LAN configuration on page 20. 17 DESK_BODY.fm Page 18 Thursday, June 14, 2007 8:29 AM Step 7a — Automatic LAN configuration using the SG DHCP server By selecting Manual Configuration for the SG unit's LAN connection, and supplying the DHCP Server Address Range, the SG unit's DHCP server is already set up and running. Each PC on your LAN must now be set up to automatically obtain network settings. 18 a. Click Start > (Settings >) Control Panel and double-click Network Connections. If presented with multiple connections, right-click Local Area Connection (or appropriate network connection) and click Properties. b. Select Internet Protocol (TCP/IP) and click Properties. c. Click Obtain an IP address automatically, click Obtain DNS server address automatically and click OK. DESK_BODY.fm Page 19 Thursday, June 14, 2007 8:29 AM Step 7b — Automatic LAN configuration using an existing DHCP server If you chose to have the Obtain LAN IP address from a DHCP server on LAN option, it is strongly recommended you add a lease to your existing DHCP server to reserve the IP address you chose for the SG unit's LAN connection. If you chose to set the SG unit's LAN connection settings using Manual configuration, remove this address from the pool of available addresses. a. Enter this same IP address as the gateway IP address for the existing DHCP server to hand out. b. Enter this same IP address as the DNS server IP address for the DHCP server to hand out. Ensure all PCs on the network are set up to automatically obtain network configuration as per Step 7a — Automatic LAN configuration using the SG DHCP server on page 18, then restart them. Note: The purpose of restarting the computers is to force an update of their automatically configured network settings. Alternatively, you can disable and re-enable the network connection. 19 DESK_BODY.fm Page 20 Thursday, June 14, 2007 8:29 AM Step 7c — Manual LAN configuration a. Click Start> (Settings >) Control Panel and double-click Network Connections. If presented with multiple connections, right-click on Local Area Connection (or appropriate network connection) and select Properties. b. Select Internet Protocol (TCP/IP) and click Properties. Enter the following details: • IP address — An IP address that is part of the same subnet range as the SG unit's LAN connection (for example, if using the default settings, 192.168.0.2 - 192.168.0.254). • Subnet mask — Subnet mask of the SG unit's LAN connection (if using the default settings, 255.255.255.0). • Default gateway — IP address of the SG unit's LAN connection (if using the default settings, 192.168.0.1). • Preferred DNS server — IP address of the SG unit's LAN connection (if using the default settings, 192.168.0.1). c. 20 Click OK. Perform this step for each PC on your network. DESK_BODY.fm Page 21 Thursday, June 14, 2007 8:29 AM Step 8 — Register your SG unit Quick setup is now complete. Quick setup is all you need to do to get basic network connectivity to the Internet. Network devices on the LAN should now be able to access the Internet in accordance with the settings you have configured and provided all physical network connections are in place. You must register your SG unit in order to receive technical support. A current e-mail address is required to register your product. For prompt product registration, go to the following Web site: http://my.securecomputing.com Step-by-step procedures for registering your device and activating add-on features are provided in the Introductory chapter of the SnapGear Administration Guide. Further reading For detailed configuration information, refer to the SnapGear Administration Guide, which is available on the SG CD in the /docs directory, and from the Product Manuals link in the SnapGear knowledgebase: http://sgkb.securecomputing.com You can also access the product manuals from the Resource Center > Product Manuals location on the Securing Computing Web site; located at: http://www.securecomputing.com/techpubsRC.cfm Select SnapGear from the Product list and click Go. Advanced configuration Use the menu in the SnapGear Web Management Console to configure more sophisticated security settings and networking features such as VPN. Refer to the SnapGear Administration Guide, the online help, and the SnapGear KB for further configuration information. 21 DESK_BODY.fm Page 22 Thursday, June 14, 2007 8:29 AM Product compliance For product compliance information, refer to Compliance.pdf on the SG CD in the /docs directory. Product specifications • • • • • • • Power (SG300): Power (SG560): Power (SG565): Power (SG580): Operating temperature: Storage temperature: Humidity: 12 VDC, 0.5 A 5 VDC, 1.2 A 5 VDC, 2 A 5 VDC, 1.3 A 0º C to 40º C -20º C to 70º C 0 to 95%, non-condensing Firmware support Your SG unit has been preprogrammed with firmware current at the time of manufacture. However, should you want to upgrade the firmware, you can obtain the latest firmware for your device from the SnapGear portal: http://www.securecomputing.com/index.cfm?skey=1597 Before downloading firmware, be sure to read article #2725 in the SnapGear Knowledgebase first. 22 DESK_BODY.fm Page 23 Thursday, June 14, 2007 8:29 AM Technical support Secure Computing works closely with our reseller partners to offer the best worldwide Technical Support services. Your Secure Computing reseller is the first line of support when you have questions about our products and services; however, if you require additional assistance, contact us directly. • U.S. toll-free 1.800.700.8328 • International +1.651.628.1500 Contact technical support by e-mail at: [email protected]. SnapGear knowledgebase If you prefer, visit the SnapGear Knowledgebase at: http://sgkb.securecomputing.com Click Create a Support Ticket to file a help ticket online. Support contract To inquire about obtaining a support contract, refer to our Product Support Web page for the latest information at www.securecomputing.com. Follow the Company > Contact Us links for the latest contact information. If you prefer, send an e-mail to: [email protected]. 23 DESK_BODY.fm Page 24 Thursday, June 14, 2007 8:29 AM SnapGear Limited Hardware Warranty Secure Computing Corporation, on behalf of itself and its subsidiaries, (hereinafter "Secure Computing") warrants that its SnapGear hardware products will be free from defects in material and workmanship under normal use for a period of one (1) year from the date of purchase from Secure Computing or an authorized Secure Computing reseller. If Secure Computing receives notice of such defects during the warranty period, Secure Computing's entire liability and your sole remedy shall be either the repair or replacement of the SnapGear hardware which proves to be defective. Repair parts and replacement products will be provided on an exchange basis and will be either new or reconditioned. Secure Computing will retain, as its property, all replaced parts and products. Notwithstanding the foregoing, this hardware warranty does not include service to replace or repair damage to the SnapGear hardware resulting from accident, disaster, abuse, misuse, electrical stress, negligence, use of materials not supplied by Secure Computing, any modification of the SnapGear product not authorized by Secure Computing, or other cause not arising out of defects in material or workmanship. This hardware warranty also does not include service to replace or repair damage to the product if the serial number or seal or any part thereof has been altered, defaced or removed. If Secure Computing does not find the SnapGear product to be defective, the Purchaser will be invoiced for said inspection and testing at Secure Computing's then current rates, regardless of whether the product is under warranty. THIS WARRANTY GIVES YOU SPECIFIC LEGAL RIGHTS, AND YOU MAY ALSO HAVE RIGHTS WHICH VARY FROM STATE TO STATE (OR COUNTRY TO COUNTRY). SECURE COMPUTING'S RESPONSIBILITY FOR MALFUNCTIONS AND DEFECTS IN HARDWARE IS LIMITED TO REPAIR OR REPLACEMENT AS SET FORTH IN THIS WARRANTY STATEMENT. ALL EXPRESS AND IMPLIED WARRANTIES FOR THE PRODUCT, INCLUDING, BUT NOT LIMITED TO, ANY IMPLIED WARRANTIES AND CONDITIONS FOR MERCHANTABILITY AND FITNESS FOR A PARTICULAR PURPOSE, ARE LIMITED IN TIME TO THE TERM OF THE LIMITED WARRANTY PERIOD. NO WARRANTIES, WHETHER EXPRESS OR IMPLIED, WILL APPLY AFTER THE LIMITED WARRANTY PERIOD HAS EXPIRED. SOME STATES OR COUNTRIES DO NOT ALLOW LIMITATIONS ON HOW LONG AN IMPLIED WARRANTY LASTS, SO THIS LIMITATION MAY NOT APPLY TO YOU. SECURE COMPUTING DOES NOT ACCEPT LIABILITY BEYOND THE REMEDIES PROVIDED FOR IN THIS LIMITED WARRANTY OR FOR CONSEQUENTIAL, INCIDENTAL, OR INDIRECT DAMAGES, INCLUDING, WITHOUT LIMITATION, ANY LIABILITY FOR THIRD PARTY CLAIMS AGAINST YOU FOR DAMAGES, FOR PRODUCTS NOT BEING AVAILABLE FOR USE, OR FOR LOST DATA OR LOST SOFTWARE. SECURE COMPUTING'S LIABILITY WILL BE NO MORE THAN THE AMOUNT YOU PAID FOR THE PRODUCT THAT IS THE SUBJECT OF THE CLAIM. THIS IS THE MAXIMUM AMOUNT FOR WHICH SECURE COMPUTING IS RESPONSIBLE. SOME STATES OR COUNTRIES DO NOT ALLOW THE EXCLUSION OR LIMITATION OF INCIDENTAL OR CONSEQUENTIAL DAMAGES, SO THE ABOVE LIMITATION OR EXCLUSION MAY NOT APPLY TO YOU. 24 DESK_BODY.fm Page 25 Thursday, June 14, 2007 8:29 AM SG Software License Agreement CAREFULLY READ THE FOLLOWING TERMS AND CONDITIONS BEFORE LOADING THE SOFTWARE. BY CLICKING "I ACCEPT" BELOW, OR BY INSTALLING, COPYING, OR OTHERWISE USING THE SOFTWARE, YOU ARE SIGNING THIS AGREEMENT, THEREBY BECOMING BOUND BY ITS TERMS. IF YOU DO NOT AGREE WITH THIS AGREEMENT, THEN CLICK "I DO NOT ACCEPT" BELOW OR DO NOT USE THE SOFTWARE AND RETURN ALL COPIES OF THE SOFTWARE AND DOCUMENTATION TO SECURE COMPUTING CORPORATION ("SECURE COMPUTING") OR THE RESELLER FROM WHOM YOU OBTAINED THE SOFTWARE. 1. SOFTWARE PRODUCTS DEFINITION. "Software Product(s)" means (i) the machine-readable object-code versions of the SG software contained in the media (the "Software"), (ii) the published user manuals and documentation that are made available for the Software (the "Documentation"), and (iii) any updates or revisions of the Software or Documentation that you may receive (the "Update"). Under no circumstances will you receive any proprietary source code of the Software. 2. GRANT OF LICENSE. Secure Computing grants to you, and you accept, a nonexclusive, and non-transferable license (without right to sub-license) to use the Software Products as defined herein on a single machine. 3. LIMITATION OF USE. You may not: 1) copy, except to make one copy of the Software solely for back-up or archival purposes; 2) transfer, distribute, rent, lease or sublicense all or any portion of the Software Product to any third party; 3) translate, modify, adapt, decompile, disassemble, or reverse engineer any Software Product in whole or in part; or 4) modify or prepare derivative works of the Software Products. You agree to keep confidential and use your best efforts to prevent and protect the contents of the Software Product from unauthorized disclosure or use. Secure Computing reserves all rights that are not expressly granted to you. 4. LIMITED SOFTWARE PRODUCT WARRANTY. Secure Computing warrants that the medium/media on which its Software is recorded is/are free from defects in material and workmanship under normal use and service for a period of ninety (90) days from the date of shipment to you. Secure Computing does not warrant that the functions contained in the Software will meet your requirements or that operation of the program will be uninterrupted or error-free. The Software is furnished "AS IS" and without warranty as to the performance or results you may obtain by using the Software. The entire risk as to the results and performance of the Software is assumed by you. If you do not receive media which is free from defects in materials and workmanship during the 90-day warranty period, you will receive a refund for the amount paid for the Software Product returned. 25 DESK_BODY.fm Page 26 Thursday, June 14, 2007 8:29 AM 5. DISCLAIMER OF WARRANTY AND LIMITATION OF REMEDIES. THE WARRANTIES STATED HEREIN ARE IN LIEU OF ALL OTHER WARRANTIES, EXPRESS OR IMPLIED, INCLUDING ANY WARRANTIES OF MERCHANTABILITY OR FITNESS FOR A PARTICULAR PURPOSE. SOME STATES AND COUNTRIES DO NOT ALLOW THE EXCLUSION OF IMPLIED WARRANTIES, SO THE ABOVE EXCLUSION MAY NOT APPLY TO YOU. THIS WARRANTY GIVES YOU SPECIFIC LEGAL RIGHTS. YOU MAY HAVE OTHER RIGHTS WHICH VARY BY STATE OR COUNTRY. SECURE COMPUTING'S AND ITS LICENSORS ENTIRE LIABILITY UNDER, FOR BREACH OF, OR ARISING OUT OF THIS AGREEMENT, IS LIMITED TO A REFUND OF THE PURCHASE PRICE OF THE PRODUCT OR SERVICE THAT GAVE RISE TO THE CLAIM. IN NO EVENT SHALL SECURE COMPUTING OR ITS LICENSORS BE LIABLE FOR YOUR COST OF PROCURING SUBSTITUTE GOODS. IN NO EVENT WILL SECURE COMPUTING OR ITS LICENSORS BE LIABLE FOR ANY INDIRECT, SPECIAL, CONSEQUENTIAL, INCIDENTAL, EXEMPLARY, OR OTHER DAMAGES WHETHER OR NOT SECURE COMPUTING HAS BEEN ADVISED OF THE POSSIBILITY OF SUCH LOSS OR DAMAGE. 6. TERM AND TERMINATION. This license is effective until terminated. You may terminate it at any time by destroying the Software Product, including all computer programs and documentation, and erasing any copies residing on computer equipment. This Agreement also will automatically terminate if you do not comply with any terms or conditions of this Agreement. Upon such termination you agree to destroy the Software Product and erase all copies residing on computer equipment. 7. PROTECTION OF CONFIDENTIAL INFORMATION. The Software Product is delivered to you on a confidential basis and you are responsible for employing reasonable measures to prevent the unauthorized disclosure or use thereof, which measures shall not be less than those measures employed by you in protecting its own proprietary information. You may disclose the Software Product to your employees as necessary for the use permitted under this Agreement. You shall not remove any trademark, trade name, copyright notice or other proprietary notice from the Software Product. 8. OWNERSHIP. This Software is licensed (not sold) to you. All intellectual property rights including trademarks, service marks, patents, copyrights, trade secrets, and other proprietary rights in or related to the Software Products are and will remain the property of Secure Computing or its licensors, whether or not specifically recognized or protected under local law, provided however that certain components of the Software are components licensed under the GNU General Public License (version 2), which Secure Computing supports. You may obtain a copy of the GNU General Public License at http:/www.fsf.org/copyleft/gpl.html. Secure Computing will provide source code for any of the components of the Software licensed under the GNU General Public License upon request. You will not remove any product identification, copyright notices, or other legends set forth on the Software Product. 26 DESK_BODY.fm Page 27 Thursday, June 14, 2007 8:29 AM 9. EXPORT RESTRICTIONS. You agree to comply with all applicable United States export control laws, and regulations, as from time to time amended, including without limitation, the laws and regulations administered by the United States Department of Commerce and the United States Department of State. You have been advised that Software Products are subject to the U.S. Export Administration Regulations. You shall not export, import or transfer Software Products contrary to U.S. or other applicable laws, whether directly or indirectly, and will not cause, approve or otherwise facilitate others such as agents or any third parties in doing so. You represent and agree that neither the United States Bureau of Export Administration nor any other federal agency has suspended, revoked or denied your export privileges. You agree not to use or transfer the Products for end use relating to any nuclear, chemical or biological weapons, or missile technology unless authorized by the U.S. Government by regulation or specific license. 10. U.S. GOVERNMENT RIGHTS. Software Products furnished to the U.S. Government are provided on these commercial terms and conditions as set forth in DFARS 227.7202-1(a). 11. ENTIRE AGREEMENT. This Agreement is our offer to license the Software Product to you exclusively on the terms set forth in this Agreement, and is subject to the condition that you accept these terms in their entirety. If you have submitted (or hereafter submit) different, additional, or other alternative terms to Secure Computing or any reseller or authorized dealer, whether through a purchase order or otherwise, we object to and reject those terms. Without limiting the generality of the foregoing, to the extent that you have submitted a purchase order for the Software Product, any shipment to you of the Software Product is not an acceptance of your purchase order, but rather is a counteroffer subject to your acceptance of this Agreement without any objections or modifications by you. To the extent that we are deemed to have formed a contract with you related to the Software Product prior to your acceptance of this Agreement, this Agreement shall govern and shall be deemed to be a modification of any prior terms in their entirety. 12. GENERAL. Any waiver of or modification to the terms of this Agreement will not be effective unless executed in writing and signed by Secure Computing. If any provision of this Agreement is held to be unenforceable, in whole or in part, such holding shall not affect the validity of the other provisions of this Agreement. You may not assign this License or any associated transactions without the written consent of Secure Computing. This License shall be governed by and construed in accordance with the laws of California, without regard to its conflicts of laws provisions. 27 your trusted source for enterprise security TM Web Gateway – Comprehensive protection against malware, viruses, data leakage and Internet misuse, while ensuring policy enforcement, regulatory compliance, and a productive application environment. Messaging Gateway – Inbound defense against spam, viruses, denial-of-service and intrusions; outbound protection against data leaks and policy violations. Network Gateway – World’s strongest firewall appliance contains the most comprehensive set of security solutions consolidated in one appliance and automatically discards huge volumes of unwanted traffic from known “bad” entities. Identity & Access Management – Providing safe access to applications, data, and resources through policy-driven security and strong authentication. Secure Computing Corporation www.securecomputing.com Corporate Headquarters 4810 Harwood Road San Jose, Ca 95124 USA Tel +1.800.379.4944 Tel +1.408.979.6100 Fax +1.408.979.6501 European Headquarters 1, The Arena Downshire Way Bracknell Berkshire, RG12 1PU UK Tel +44.0.870.460.4766 Fax +44.0.870.460.4767 Asia/Pac Headquarters 1604-5 MLC Tower 248 Queen’s Road East Wan Chai, Hong Kong Tel +852.2520.2422 Fax +852.2587.1333 Japan Headquarters Level 15 JT Bldg. 2-2-1 Toranomen Minato-Ku Tokyo 105-0001 Japan Tel +81.3.5114.8224 Fax +81.3.5114.8226 For more information, visit us at: www.securecomputing.com Trademarks 520074-07 © 2007 Secure Computing Corporation. All Rights Reserved. Secure Computing, SafeWord, Sidewinder, Sidewinder G2, Sidewinder G2 Firewall, SmartFilter, Type Enforcement, CipherTrust, IronMail, IronIM, SofToken, Enterprise Strong, Mobile Pass, G2 Firewall, PremierAccess, SecureSupport, SecureOS, Bess, Cyberguard, SnapGear, Total Stream Protection, Webwasher, Strikeback and Web Inspector are trademarks of Secure Computing Corporation, registered in the U.S. Patent and Trademark Office and in other countries. G2 Enterprise Manager, SmartReporter, SecurityReporter, Application Defenses, Central Management Control, RemoteAccess, SecureWire, TrustedSource, On-Box, Securing connections between people, applications and networks and Access Begins with Identity are trademarks of Secure Computing Corporation. © 2007 Secure Computing Corporation. All rights reserved. No part of this publication may be reproduced, transmitted, transcribed, stored in a retrieval system, or translated into any language in any form or by any means without the written permission of Secure Computing Corporation.