1
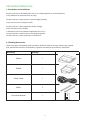
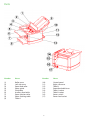
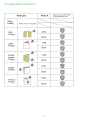
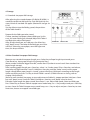
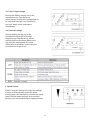
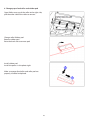
Product instruction manual
Magnum® MFM-PS Folding System
Magnum Folders have been designed to be user friendly,
however we strongly recommend you take a few minutes
to read through this manual to ensure correct operation.
Keep this manual safe for future reference.
Contents
Page 2 - Specifications
Page 3 - Introduction
Page 4 - Safety Instructions and environmental requirements
Page 5 - Information before use
Page 6 - Parts
Page 8 - How to use
Pages 16 & 17 - Fine Adjustments
Page 22 - Warranty and incorrect use
Specifications
Paper Size
Paper Weight
A3
Up to 220gsm single folding, up to 135gsm multiple folding
Paper Quality
Woody paper, high-quality paper, high-quality paper for stencil printing,
medium-quality paper
Single, Double parallel, Letter, Gate, Zig-Zag, Fold-out
Three-roller friction feed system
500 sheets (64m2)
50-200 sheets per minute
Digital key input
610 x 580 x 450mm
33Kg
Fold Type
Paper Feed system
Max. Stacking Capacity
Folding Speed
Operating Method
Dimensions
Gross Weight
2
Introduction
Thank you for purchasing the Magnum MFM-PS Folding System.
This system enables users to achieve greater efficiency in clerical work by releasing
them from paper-folding work that has manually been performed in the past.
Please read these instructions carefully before starting to use the system to ensure you
get the best results and are competent at operation.
Should you experience any problems please contact us your supplier.
3
Safety Instructions
•
•
•
•
•
•
•
•
•
•
•
•
•
•
•
•
•
Make sure that the system is electrically grounded. This prevents an electric shock when there is a leak
of electricity.
Use the system at 110 – 120 VAC, 220 – 240 VAC with a frequency of 50Hz to 60Hz. A fire may start or
the system may break down if a higher or lower voltage is used, or if an electric current with a
frequency that is not within the range of frequency stated above.
Do not place any objects on this system. A fire may start or electricity may leak if water or a foreign
object enters the system.
Handle the power cord with care. A fire may start or an electric shock may be caused if the cord is
damaged, broken, or processed, if a heavy object is placed on the cord, or if the cord is bent forcibly.
Do not pull the power plug out of or put it in the electric outlet using a wet hand.
Otherwise, an electric shock may be caused.
Do not remove the cover of this system. Otherwise, an electric shock or injury may be caused.
Do not remodel this system. Otherwise, a fire may break out or an electric shock may be caused.
If the system is used when it is in an abnormal condition, such as generating heat, emitting smoke,
and giving out a strange smell, a fire may break out or an electric shock may be caused. Turn off the
power switch immediately and then pull the power plug out of the electric outlet. Afterwards, report
the fault to your supplier.
If abnormalities such as the power cord generating heat and giving out a strange smell are found,
turn off the power switch immediately and then pull the power plug out of the electric outlet.
Afterwards, report the fault to your supplier.
If a foreign object enters the system, turn off the power switch first and then pull the power plug out
of the electric outlet. Afterwards, report the fault to your supplier.
If thunder approaches, pull the power cord out of the electric outlet to prevent a fire or breakdown
caused by the falling of a thunderbolt.
Do not let hairs, a necktie or necklace hang above the drive of the system.
Doing so may cause an injury.
Do not put the system on an unstable place such as a shaky stand or a slanted floor. Doing so may
cause the system to drop or fall down, causing an injury.
Do not put the system in a moist or dusty place. Doing so may start a fire or cause an electric shock.
Be sure to pull out the power cord while holding the plug. If the power plug is pulled out while
holding the cord, a fire may break out or an electric shock may be caused.
Be sure to pull the power plug out of the electric outlet first when moving this system.
Otherwise, the cord may be damaged, causing a fire or an electric shock.
Be sure to pull the power plug out of the electric outlet for safety purposes when this system is not
used for consecutive holidays or for other reasons.
4
Information Before Use
1. Precautions on Installation
Do not install it in an unstable place such as on a faltering bench or an inclined place.
It may fall down or drop and cause an injury.
Do not install it in a dusty place or a place of high humidity.
It may cause a fire, or an electric shock.
Do not install it in a place exposed to direct sunlight.
Avoid a location near a window.
It should be used at an ambient temperature of 5 to 35°C
Do not install it in a location close to heating equipment.
Do not install it in a place exposed to a direct wind.
2. Checking Accessories
Check accessories immediately after unpacking. Should an item be missing, contact your supplier.
Also, check if the warranty has the dealer’s signature and the date of purchase is mentioned.
Accessory
Quantity
Table A
1
Table B
1
Power Cable
1
Roller
2
Instruction Manual
1
i
5
Parts
Number Name Number Name
(1) (2) (3) (4) (5) (6)
(7) (8) (9) Roller cover Left side cover Paper feed roller Paper guide Feed table Auxiliary feed table
Paper ejection roller Paper stacking table Table A (10) (11) (12) (13) (14) (15) (16) (17)
6
Control panel
Right side cover
Table B
Paper feed table lever
Table A socket
Table B socket
Power switch
Power lead socket
Operation Panel and Functions
No. Designation/Indication Function
(1)
Speed adjustment key
Used for adjusting the speed.
(2)
Store key
Select memory 1/2 stored folding position and the folding
position after adjustment is stored.
(3)
Memory 1/2 lamp
Two special folding types are stored.
(4)
Select key
Used for selecting paper length, the feed position of table A and B, indicating of the counter when lights are off.
(5)
Paper length input mode lamp It is on when paper length is input, if non-standard size paper, press CLEAR/RESET, input correct paper length.
(6)
Table A stopper lamp
Lights when the position of stopper of table A can be adjusted.
(7)
Table B stopper lamp
Lights when the position of stopper of table B can be adjusted.
(8)
+/- key
Used for adjusting the position of the stopper of table A and B.
(9)
Fold type key
Six folding types & six types of paper can be selected and stored.
(10) Numerical key 1
Used for inputting the reduced number for subtraction counting and the length of non-standard size paper.
(11) Counter
Shows the number of sheets, the position of the stopper pin of table A and B, and paper size.
(12) Clear/Reset key
Clears counter indication and resets error. When the paper length lamp is on, press this key, can input non-standard size paper.
(13) Test key
Test fold one sheet (stopper of table A and B move to the position).
(14) Start/Stop key
Starts and stops the system.
(15) Status lamp
Lights when paper stock runs short, or indicates the location when feed trouble occurs.
7
How to Use
1. Preparation
(1) Install the rollers
8
(2) Install table A and B, before starting the system
1. Position of Table A’s notch and
connector.
2. Insert the front notched part of Table A
into the stud (1) of the system and drop
its rear notched part on the stud (2).
Insert the plug into the connector (3).
3. Position of Table B’s notch and
connector.
4. Insert the front notched part of Table
2 into the stud (4) of the system
and drop its rear notched part on the
and drop its rear notched part on the
connector (6).
5. Extend the paper stacking table to
required length.
6. Insert the power cord into the
adapter and set it while lifting the
auxiliary table.
9
2. Indication of the counter
(1) Addition counter
When the three lamps are off, the number
indicates the counter. Press start/stop key
after choosing the fold type, it automatically
counts the folded paper.
Press the Clear/Reset key and reset the
number at zero (0).
(2) Subtraction counter
When the three lamps are off, the number
indicates the counter. Input the desired
number using the Numerical keys.
(40 is input in this case)
Subtraction Mode Lamp will light. Press
start/stop key after choosing the fold type.
The number on the counter decrease by one
each time a sheet of paper is folded. When
the number is finished, the counter will
return to the desired number again.
(3) Input non-standard size paper length
Press the Select key, Paper length input
mode lamp is on, press Clear/Reset key.
Input the paper length using the Numerical
keys (300mm is input in this case, micro
meter can be input after decimal point).
Press store key, and store under 1 or 2
memory indication.
10
3. How to use
(1) Standard folding of standard size paper
Set the standard-size paper. Loosen the paper
guide. Set screw and set the paper guide to fit the
width of the paper.
Stack the paper on the paper feed table with its
printed side facing up (its printed side down in
case of fold-out) after neatly arranging it. Make
the paper guide closely contact the paper, and
tighten the setscrew. Lower the paper feed table
lever to raise the table.
(2) Setting the paper ejection roller
Move the paper ejection roller to the position that
fits the size of paper being used. If the roller
doesn’t run smoothly, change the roller position.
Change the roller position to fit the paper size
11
3. How to use
(3) Selecting the folding type
One of the six folding types (Single, Gate,
Letter, Zigzag, Double, Parallel Fold-out)
can be selected. Press the desired folding
type key.
(4) Before folding, press Test key, Table A/B move
to the position of designated fold type, one sheet
will be folded. Check the paper has been folded
correctly. (In case of correcting slanting folding,
refer to Adjustment on Chapter 9).
(5) Note: If Table A or B has been adjusted, press Test key before continuous folding, or the adjustment
will not be accepted, Table A / B will return to origin before the adjustment. Press the Start/Stop key, the
system will continuously fold the paper, and the counter is in addition counting. When the Start/Stop key
is pressed while the system is in operation, the system will stop the operation. If only required number of
sheets need to be folded, please refer to chapter 6 Subtraction Counter.
3.1 Standard Folding of Non-standard size Paper
(1) Measure the paper length
(2) Input the paper length - Press the select key and
select the paper length input mode. Press clear/reset
key. Input paper length by using numerical key.
Note: Input length number should be bigger than B6,
smaller that A3, otherwise it will not register.
12
(3) After inputting the paper length, press store key,
choose store at 1 or 2. (press store key and
release memory lamp will shift light between 1
and 2; hold pressing store key until “beep”
sound, means paper length stored) When
paper length is stored, system will adjust 6
fold types according to paper length.
Choose one fold type; Press Test key to check
if the fold is correct. (In case of correcting
slanting folding, refer to Adjustment on
page 14).
Note: The position of the table A and table B stopper in relation to the measurement value L.
Example In the case of performing the Double Parallel fold using sheets of paper 300mm in length:
Table A=300 x (1/2)=150 mm
Table B=300 x (1/4)=75 mm
13
3.1 Cross Folding
Cross folding can be used if, for example,
the sheet of A3-size paper folded using the
double parallel folding method is still too
large to be enclosed in envelope.
The maximum weight of paper that can be used for cross
folding is 105g/m2. This requirement, however, varies according
to the following conditions: Paper type; Paper size; Whether
grains run lengthways or sideways; Temperature and
relative humidity; Printing condition. The folding position may
be displaced to a greater extent than when the paper is folded
using a regular fold method, or a corner of the folded paper may
be folded inside as indicated in the figure. These however, do
not mean that the system has broken down.
(1) Adjust the paper feed roller position, so the three rollers feed
paper together.
(2) Press the crease hard using the hand. Do not stack too many
sheets of paper on the paper feed table.
3.2 Slant Adjustment
If the folding position is not square because the edges of the
paper are slanted or for other reasons, it can be adjusted using
the slant adjustment dial.
After testing paper fold, check the folded paper. If the paper as
per the right photo (lower paper is to the right),
adjust the knob clockwise.
14
3.3 Table Stopper Adjustment
After moving the stop by fold guide fine adjustment dial,
make sure to press Test key before the Start/Stop key.
Otherwise, adjustment will not be accepted.
Note: If you press Start/Stop key, after adjusting the fold guide,
the fold guide will return to origin to fold.
When the stopper is moved largely, it will be convenient to use
the +/– key.
(A). Press the Select key and select the Table A Stopper Move
Mode. Press the +/- key and move the stopper to the desired
position.
(B). Press the Select key and select the Table B Stopper Move
Mode. Press the +/- key and move the stopper to the
desired position.
Note: To store the stopper position, after adjusting stopper by
using stopper fine adjustment knob or +/- key, please refer
to chapter 10 Storage.
15
Fine Adjustment for Table A
16
Fine Adjustment for Table B
17
4. Storage
4.1 Standard-size paper fold storage
After adjusting the standard paper (A3,B4,A4,B5,A5,B6), it
would be stored into fold type key. One fold type key can
store 6 kinds of standard-size paper. (Maximum storage: 6 x
6=36)
You are able to store the folding speed, the positions
of the Table A and B.
Prepare for the fold type to be stored:
Choose standard-size paper, choose fold type, (in this
case, A4, Letter folding are selected) Adjust the Table A
and B position, adjust fold speed.
After all adjustment are set, hold press the Select key,
until “beep” sound. The lamp of the fold type you chose
will flash. Select the same paper, same fold type next
time, this lamp will flash.
4.2 Non-Standard size paper fold storage
Measure non-standard size paper length, press Select key to Paper length input mode, press
Clear/Reset key. Input paper length using numerical keys,
(Note: number should be bigger than B6, smaller than A3, otherwise can’t work. Non-standard size
paper length storage)
After inputting paper length, press Store key, select 1 or 2 to be stored. (Press Store key, and release,
store lamp will light between 1 and 2; Hold press Store key until the “beep” sound, means paper
length stored) When paper length is stored, system will adjust 6 fold types according to the length.
Select one fold type, press Test key to check if fold is correct. (If fold incorrect or slating, refer to
chapter 9 Adjustment)
(Note For non-standard size paper, to store adjustment of table A’s stopper position, hold press Store
key until “beep” sound. Same for Table B, hold press Store key until “beep” sound to store).
Example: Paper length has been stored; Store lamp 1 is on; Adjust fold speed; Select one fold type;
Press Select Key to choose Table A stopper move mode lamp, use +/-key to adjust and press Store key
to store. Same for Table B stopper move mode lamp, use +/-key to adjust and press Store key to store.
Next time, choose same paper same fold type.
18
4.3 Cancel single storage
Recover the folding storage set by the
manufacturer by Clear/Reset key.
Select the key in which the storage needs to
be cancelled, keep pressing Clear/Reset
key until “beep” sound, and release
immediately.
4.4 Cancel all storage
Recover folding storage set by the
manufacturer by cancel all storage.
Keep pressing Clear/Reset key, do not
release the key at first beep; Release the
key until the second beep. All stored
information is cancelled, system return to
manufacturer’s original set.
5. Speed Control
If fold is incorrect, change the speed accordingly.
If crease or fold unevenly, lower the speed.
If thick paper is fed improperly, increase the speed.
Note if the fold speed changes at correct fold
position, you may need to adjust stopper position.
19
6. Change paper feed roller and rubber pad
Open Roller cover, push the roller to the right side,
pull the other side of the roller to remove.
Change roller Rubber pad
Remove rubber pad
Raise the back side to remove pad
Install rubber pad
Install the pad as in the photo right
Make sure paper feed roller and roller pad are
properly installed and placed.
20
21
Warranty & Incorrect Use
IMPORTANT INFORMATION
Your Magnum Folding Machine should reach you in perfect condition, however please retain all of the original packaging once
you have unpacked your Folding Machine in case you need to return it for repair. If your machine arrives damaged or faulty in
anyway, this must be reported to your supplier immediately. If the Folding machine is sent back for repair under warranty and
is damaged in transit due to faulty packaging your warranty may be void.
The Folding Machine you have purchased includes a 1 year warranty on defective parts and general wear and tear. It does not
cover any jams or misfeeds caused by operator error and you could be liable for the repair costs (including delivery charges) if
damage is caused by operator error.
E&O.E