Download Zebra QL Plus Series User guide
Transcript
Intro
duc
tion
arte
d
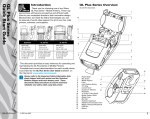
Thank you for choosing one of our Zebra
QL Plus Series™ Mobile Printers. These rug ged printers will become productive and efficient addi tions to your workplace thanks to their innovative design.
Because they are made by Zebra Technologies you can
be assured of world-class support for all of your bar code
printers, software, and supplies.
Gett
ing S
t
QL Plus Series
Quick Start Guide
Introduction
QL 320 Plus
Media width:
.75 in. to 2.12 in.
(16 to 53.8 mm)
Media width:
1.5 in. to 3.1 in.
(38.1 to 78.4 mm
L: 7.52 in. [191.0 mm]*
W: 3.57 in. [90.7 mm]
H: 3.61 in. [91.7 mm]*
*w/ belt clip
L: 8.16 in. [207.4 mm]*
W: 4.67 in.[118.7 mm]
H: 3.9 in [100.2 mm]*
*w/ belt clip
QL 420 Plus
Media width:
2 in. to 4.1 in.
(50.8 to 104.1 mm)
L: 8.20 in. [208 mm]*
W: 6.1 in.[154.9 mm]
H: 3.5 in. [89 mm]*
*w/ belt clip
This document provides an easy reference for operating and
maintaining the QL Plus Series of Mobile Printers.
Complete and current documentation for each model printer
is provided by the QL Plus Series User Guide available on
the Internet at: www.zebra.com/manuals .
Always refer to the Important Safety Information data
sheet shipped with each printer and the Technical
Bulletin shipped with each battery pack. These
documents detail procedures to ensure maximum
reliability and safety while using this printer.
Con
tac
t Us
Acce
ssor
ies
Trou
bles
hoo
ting
Usin
g
Prin the
ter
QL220 Plus
PAGE 1 OF 18
π
1-800-295-5510
0813 IH-2551
QL Plus Series Overview
(QL 220 Plus Illustrated)
1
12
2
11
3
10
4
9
5
8
6
7
13
1
2.
3.
4.
5.
6.
7.
8.
9.
10.
11.
12.
13.
14.
15.
16.
17.
18.
Platen Roller
Bar Sensor
6
Media Support
Latch
Latch Release Button
18
“D” Ring
Control Panel
QuickLink™ Module
17
Printhead
“E-Z Peel” Label Peeler
Media Support Disks
Media Cover
Belt Clip
Kickstand (optional)
RS232 Communications Port
Battery Charging Receptacle
USB Port
Battery
14
15
16
π
PAGE 2 OF 18
1-800-295-5510
0813 IH-2551
Charger Jack
Intro
duc
tion
Gett
ing S
t
arte
d
Batteries are shipped uncharged. Remove protective
shrink-wrap and labels from new battery packs and
allow them to charge completely prior to initial use.
Do not charge the battery while using the printer!
Charge the battery pack when removed from the
Printer for best results.
Usin
g
Prin the
ter
QL Plus Series
Quick Start Guide
Charge the Battery
LI72 Single Battery
Charger
Using the LI72 Single Charger
Insert the plug from the charger cable into the battery
pack’s charger jack. Plug the charger into the A.C. outlet.
The light on the front of the charger will indicate the bat tery pack’s charge status.
Consult the QL Plus User’s Guide available at
www.zebra.com/manuals for complete information on us ing the various versions of the Model LI72 Single Charger.
Con
tac
t Us
Acce
ssor
ies
Trou
bles
hoo
ting
Battery
Pack
PAGE 3 OF 18
π
1-800-295-5510
0813 IH-2551
Install the Battery
Rotate the Belt Clip out of
the way of the Battery
QL 420 Battery
Rotate the Belt Clip out of
the way of the Battery
QL 220/ 320 Battery
π
PAGE 4 OF 18
1-800-295-5510
0813 IH-2551
Intro
duc
tion
arte
d
Gett
ing S
t
Trou
bles
hoo
ting
Acce
ssor
ies
t Us
Con
tac
PAGE 5 OF 18
Open the Media Compartment
Latch flips
open
Press Latch Button
Usin
g
Prin the
ter
QL Plus Series
Quick Start Guide
Load the Media
Open the QL 220 & 420
Open the Media Compartment
Latch flips
open
Rotate Latch Levers
(both sides
Open the QL 320
π
1-800-295-5510
0813 IH-2551
Pull Media Sup ports apart where
shown.
Media Roll
Note direction media
pulls off the roll.
Pull Media out of
Printer
Close Media
Cover
Flip Peeler Bar into
position if you will
be peeling labels
as you print.
Load the Media Roll
Close the Cover
(common for all models)
(common for all models)
Close Latch
Assembly
π
PAGE 6 OF 18
1-800-295-5510
0813 IH-2551
Intro
duc
tion
arte
d
Gett
ing S
t
Connect The Printer With a Cable
You can connect your printer to a terminal or a PC us ing either RS232C or USB protocols. Refer to the Label
Vista™ application available on the QL product CD or at
www.zebra.com/software for help on setting up communi cations with your printer.
Terminal
Communications
Port
RS232C or USB
Communications Cable to
Terminal
Refer to Appendix A in the QL Plus
User Guide for part numbers.
Cable Communications with a Terminal.
Con
tac
t Us
Acce
ssor
ies
Trou
bles
hoo
ting
Usin
g
Prin the
ter
QL Plus Series
Quick Start Guide
Connect the Printer
PAGE 7 OF 18
RS-232C or USB Communications
Cable to Computer
Refer to Appendix A in the User Guide
for part numbers.
RS232
Connector
USB
Connector
Cable Communications with a P.C.
If you are using a USB cable to connect to a PC you
may need to install the Zebra Universal Driver available
at: www.zebra.com/drivers.
π
1-800-295-5510
0813 IH-2551
Connect the Printer (Continued)
Connect the Printer by Infrared (IR) or Radio
If your QL Plus printer has the optional IR module, you can make
wireless line-of-sight connections to other IR equipped devices us ing the standard IrDA protocol.
If your QL Plus printer has a radio option, you can connect wire lessly to either a terminal or a wireless network (WLAN.) Refer to
the Mobile Printer Wireless Configuration Guide available on the
product CD or at www.zebra.com/manuals for help on setting up
wireless communications with your printer.
QL Plus printer with
Wireless option
Terminal with wireless
communications ability
π
PAGE 8 OF 18
1-800-295-5510
0813 IH-2551
Printer Controls
Standard Keypad
Refer to the QL Plus User’s Guide for complete information.
Yellow LED
Green LED
Steadily lit indicates printer is
out of media or media cover
not closed.
Fast Blink indicates Radio
activity on printers equipped
with a Radio.
Fast blink with beeper indi cates no application is loaded.
Steady Light indicates power on
and/or established Radio link.
Fast Blink indicates no Radio link
Slow Blink means low battery.
Power Button
Press to turn unit
on. Press again to
turn unit off
Feed Button
Function Button
Press to advance a blank
label or a predetermined
length of journal media.
Used for special functions set
by your printer’s application.
Optional LCD Keypad
Refer to the QL Plus User Guide for complete information.
Printer Status Icons
Refer to the Troubleshooting section for
more information on the status icons.
Scroll Button
Feed Button
Press to scroll through
the menu choices on
the display.
Refer to the QL Plus
User Guide for more
complete information.
Press to advance a blank
label or a predetermined
length of journal media.
Select Button
Power Button
Press to select a menu
choice on the display.
Press to turn unit on. Press
again to turn unit off.
π
PAGE 9 OF 18
1-800-295-5510
0813 IH-2551
Intro
duc
tion
QL220 Plus (shown)
& QL 320 Plus
Label Presence Sensor
Tear Bar
Printhead
Elements
arte
d
Gap Sensor
Gett
ing S
t
QL Plus Series
Quick Start Guide
Cleaning the Printers
Media Rollers (QL 420 Plus only)
Avoid using alcohol on linerless
media roller surfaces
Bar Sensor
Platen Surface
Avoid using alcohol on
linerless platen surface
Peeler Bar
Linerless units only
Caution • To avoid possible
personal injury or damage to the
printer never insert sharp or pointed
objects into the printer mechanism.
Area
Cleaning Method
Printhead
Use the supplied cleaning pen to clean the print
elements from end to end (the print elements
are located in the thin gray line on the printhead).
Platen Surface
Rotate the platen roller and clean it thoroughly
with the cleaning pen.
Linerless Platen Units with linerless platens: Rotate platen &
Surface
clean bearing points only. Avoid use of alcohol
on the surface of linerless platens!
Peel bar
Clean thoroughly with the cleaning pen.
Scraper (Linerless Clean thoroughly with the cleaning pen.
units only)
Bearing Points
Linerless Platens only
Scraper
Linerless units only
Interval
After every five rolls of media (or more
often, if needed) Linerless media requires
more frequent cleaning
As needed
After every five rolls of media (or more
often, if needed)
Tear bar
Exterior
Interior
Clean thoroughly with the cleaning pen.
Wipe with water-dampened cloth
As needed
Brush/air blow. Ensure the Bar Sensor, Gap Sensor
and Label Present Sensor windows are free of dust.
Interior of units
with Linerless
Platens
Clean inside surfaces of Media Supports & Media After every five rolls of media (or more
often, if needed)
Support Disks with the supplied cleaning pen
or 70% isopropyl alcohol on a cotton swab.
Con
tac
t Us
Acce
ssor
ies
Trou
bles
hoo
ting
Usin
g
Prin the
ter
Support Disks, Inner
surfaces on both sides.
PAGE 10 OF 18
π
1-800-295-5510
0813 IH-2551
Cleaning the Printers
QL420 Plus
Peeler Rollers
Label Presence Sensor
Gap Sensor
Media Rollers (QL 420 Plus only)
Avoid using alcohol on linerless
media roller surfaces
Support Disks, Inner
surfaces on both sides.
Linerless units only.
Bar Sensor
Platen Surface
Avoid using alcohol on
linerless platen surface
Peeler Bar or Scraper
Linerless units
Caution • To avoid possible
personal injury or damage to the
printer never insert sharp or pointed
objects into the printer mechanism.
Area
Cleaning Method
Printhead
Use the supplied cleaning pen to clean the print
elements from end to end (the print elements
are located in the thin gray line on the printhead).
Interval
Platen Surface
Rotate the platen roller and clean it thoroughly
with the cleaning pen.
Linerless Platen Units with linerless platens: Rotate platen &
Surface
clean bearing points only. Avoid use of alcohol
on the surface of linerless platens!
Peel bar
Clean thoroughly with the cleaning pen.
Scraper (Linerless Clean thoroughly with the cleaning pen.
units only)
After every five rolls of media (or more
often, if needed) Linerless media requires
more frequent cleaning
As needed
After every five rolls of media (or more
often, if needed)
Tear bar
Exterior
Interior
Clean thoroughly with the cleaning pen.
Wipe with water-dampened cloth
As needed
Brush/air blow. Ensure the Bar Sensor, Gap Sensor
and Label Present Sensor windows are free of dust.
Interior of units
with Linerless
Platens
Clean inside surfaces of Media Supports & Media After every five rolls of media (or more
often, if needed)
Support Disks with the supplied cleaning pen
or 70% isopropyl alcohol on a cotton swab.
π
PAGE 11 OF 18
1-800-295-5510
0813 IH-2551
The top of the display shows icons indicating various printer functions. Check the icon’s status
and refer to the referenced Troubleshoot ing topic on the following pages.
Icon
Status
Gett
ing S
t
arte
d
Intro
duc
tion
LCD Control Panel
Trou
bles
hoo
ting
Usin
g
Prin the
ter
QL Plus Series
Quick Start Guide
Troubleshooting
Indication
On
Bluetooth Link established
Ref. to Topic #
on next page
n/a
Off
No Bluetooth Link
5
On
Bluetooth link established
n/a
Off
No Bluetooth link
5
Flashing
Transmitting/Receiving data
n/a
On
802.11x RF Link established
n/a
Off
No 802.11x RF Link
5
Flashing
Low Battery
3, 5, 6,
Flashing
Head latch not closed
9, 11
Flashing
Indicates Printing activity
n/a
Steady
Data processing in process
7
Flashing
Out of Media
9,11
Blank Screen
n/a
No application
QL series printers may be built with one of two LCD types. LCDs using the Bluetooth icon
(highlighted by a gray background in the table above) will gradually replace LCDs with the
“light bulb” icon indicating Bluetooth activity. Printers with either type of display will function
identically.
Standard Control Panel
Green LED Status
Steady
Off
Fast Blink
Slow Blink
Steady
Steady
Steady
Yellow LED Status
Off
Off
Off
Off
Steady
Fast Blink
Fast Blink, Beeper
Indication
Normal Operation and/or RF Link established
Power Off
No RF Link
Low Battery
Out of media, or Media Cover not closed
Normal RF activity
No application
Ref. to Topic #
n/a
1
5, 10
3, 5, 6
8, 10
7
7
Con
tac
t Us
Acce
ssor
ies
Refer below to find the state of the two LEDs on the Control Panel. Then refer to the
referenced Troubleshooting topic on the following pages.
PAGE 12 OF 18
π
1-800-295-5510
0813 IH-2551
arte
d
Intro
duc
tion
1. No power:
Gett
ing S
t
QL Plus Series
Quick Start Guide
Troubleshooting Topics
2. Media does not feed:
3. Poor or faded print or
icon flashing:
Always dispose of batteries properly. Refer to Appendix E of the QL Plus User Guide
for more information.
Usin
g
Prin the
ter
4. Partial/missing print:
5. No print:
Trou
bles
hoo
ting
6. Reduced battery life:
7. Yellow error light or
icon flashing:
8. Yellow error light always on,
or
flashing:
10. Communication Error:
Con
tac
t Us
Acce
ssor
ies
9. Skips labels:
PAGE 13 OF 18
π
1-800-295-5510
0813 IH-2551
Intro
duc
tion
• Open head release latch and media cover.
• Generously apply alcohol using either the cleaning pen supplied
with the printer or an alcohol-saturated cotton swab to the area
of jammed label.
Gett
ing S
t
arte
d
Caution – Never use sharp or pointed object when attempting
to remove a label jam.
12. Blank LCD Screen:
• No application loaded or application corrupted:
program must be reloaded.
Con
tac
t Us
Acce
ssor
ies
Trou
bles
hoo
ting
Usin
g
Prin the
ter
QL Plus Series
Quick Start Guide
11. Label Jam:
PAGE 14 OF 18
π
1-800-295-5510
0813 IH-2551
Intro
duc
tion
LI72-4 Quad Charger
1. Slide Battery Pack
into a Charger bay
arte
d
Power Supply
Gett
ing S
t
QL Plus Series
Quick Start Guide
Accessories
2. Rock Battery
Pack into place
Fast
Faul
Char
t
ge
Full
Char
ge
Read
y
Fast
Faul
t
Char
ge
Full
Char
ge
Read
y
Fast
Trou
bles
hoo
ting
Usin
g
Prin the
ter
Amber
Indicator
Faul
Char
ge
t
Acce
ssor
ies
t Us
Con
tac
Char
ge
Read
y
Fast
Faul
Green
Indicator
Char
ge
t
Full
Char
ge
Read
Charger Bay
Powe
r
y
Power Indicator
The UCLI72-4 Quad Charger is designed to charge up to four QL
series battery packs simultaneously.
Plug a battery pack into any one of the four charging bays as
shown opposite, noting the orientation of the battery pack. Slide
the battery pack into the charging bay until it stops. Then rock the
battery pack back until it snaps into place. The amber indicator di rectly under the battery being charged will turn on if the battery is
properly inserted.
The indicators under the battery will allow you to monitor the
charging process per the table below:
Amber
On
PAGE 15 OF 18
Full
Green
Off
Battery Status
Charging
80% charged
On
Flashing
(O.K. to use)
Completely
Off
On
Charged
Flashing Off
Fault
Notes: For more information refer to the instructions included
with the LI72-4 Quad Charger, or to the more detailed discussion
of the quad charger in the QL Plus User Guide.
The UCLI72-4 Quad Charger has a safety feature which stops
charging a battery after six hours regardless of its charge state.
π
1-800-295-5510
0813 IH-2551
Intro
duc
tion
arte
d
Belt Clip (standard on all printers)
Gett
ing S
t
QL Plus Series
Quick Start Guide
Accessories Continued
Printer can pivot
freely
To use: hook the clip over your belt,
and ensure that the clip is securely
attached to the belt. The belt clip
will pivot in all directions to allow
you to move freely while wearing the
printer.
Con
tac
t Us
Acce
ssor
ies
Trou
bles
hoo
ting
Usin
g
Prin the
ter
Clip printer to
belt
PAGE 16 OF 18
π
1-800-295-5510
0813 IH-2551
Intro
duc
tion
Hold Buckle
Pull Strap here to
lengthen
Gett
ing S
t
arte
d
Pull Strap here
to shorten
Usin
g
Prin the
ter
QL Plus Series
Quick Start Guide
Adjustable Shoulder Strap
Refer to figure above. Snap each end of the shoulder strap
into the “D” rings in the top of the printer. Hold the buckle
and adjust the strap as shown until you achieve the desired
length.
Con
tac
t Us
Acce
ssor
ies
Trou
bles
hoo
ting
Snap in to “D”
rings on printer
PAGE 17 OF 18
π
1-800-295-5510
0813 IH-2551
Intro
duc
tion
arte
d
Refer to the figure below. The Kickstand option allows users to use the
printer on a desktop. To use the optional Kickstand: Flip the Kickstand on
the back of the printer open until it locks in place. The printer will now sit at
an angle on a desktop.
Gett
ing S
t
Trou
bles
hoo
ting
Usin
g
Prin the
ter
QL Plus Series
Quick Start Guide
Kick Stand
Rotate Kickstand until it locks
into position
Deck Stand
Refer to the figure opposite. To use the Desk
Stand: Slide the printer onto the Desk Stand as
shown. The printer’s belt clip will hook onto the
Desk Stand and retain it in place. Ensure that
the clip is securely attached to the Stand and
the media compartment of the printer is seat
ed securely in the stand.
Holes are provided to secure the Desk
Stand to the work surface. The charger
Hook Belt Clip
over the Stand
Do not charge the battery while
printing.
Printer’s Media
Compartment sits in cutout
Con
tac
t Us
Acce
ssor
ies
the printer in the usual manner.
π
PAGE 18 OF 18
CHICAGO • ATLANTA • DALLAS • LOS ANGELES • MINNEAPOLIS • NYC/PHILA • SEATTLE • MEXICO • CANADA
1-800-295-5510
uline.com
0813 IH-2551


