1
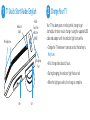
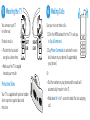
T1 QUICK START GUIDE 1 T1 Quick Start Guide: English MultiFunction Button (MFB) Indicator Light Microphones Charging Port 2 Charge Your T1 Your T1 has been given an initial partial charge to get started, but for best results charge it using the supplied USB cable and adaptor until the indicator light turns white. > Charge the T1 whenever it announces that the battery is Very Low. > A full charge takes about 3 hours. > During charging, the indicator light flashes red. > When the light goes white, the charge is complete. Vol + Vol - 3 Pair Your T1 1. Turn the T1 on by sliding the power switch on the back to the green on position. 4 Transfer Your Phonebook Power switch (on) 2. Put the T1 in your ear. 3. The first time you use the T1 it will go straight to pair mode and talk you through the pairing process. For subsequent pairings, make sure the T1 is not connected to any phones, then hold down the MFB. The T1 will announce that it is going into pairing mode. Tip: The pairing code is 0000 (four zeros). Once the pairing is complete, your T1 will attempt to transfer your phonebook contacts so that it can announce the names of incoming callers. Please accept any connection requests from the T1 and wait for the transfer to finish. Some phones do not support automatic phonebook transfers. If the T1 announces that this is the case, you need to go to your phone’s address book and send contacts via Bluetooth to the T1. See www.blueantwireless.com for help. Note: Whenever you add contacts to your phone in future you must update your phonebook on the T1: with the T1 connected to your phone but not on a call, hold down the MFB for 3 seconds to initiate a phonebook update. 5 Wearing the T1 6 Making Calls You can wear your T1 on either ear. For best results: > Position the hook and ear gel as shown here. Use your voice to make calls: LEFT EAR > Make sure the T1 is angled towards your mouth. Protective Skins Your T1 is supplied with optional rubber skins to protect against dust and moisture. RIGHT EAR 1. Click the MFB and wait for the T1 to ask you to Say A Command. 2. Say Phone Commands to activate the voice dial feature on your phone (if supported by your phone). Or: > Dial the number on your phone and the audio will automatically transfer to the T1. > Hold down Vol + for 1 second to redial the last outgoing call. 7 Taking Calls When the phone rings, you can answer the call with your voice: wait for the prompt to ask you if you want to take the call, and then say Answer or Ignore. If you don’t want to wait for the prompt, or you are in a noisy place: > Click the MFB once to accept the call. > Double click the MFB to reject the call. During a call, click the MFB to end the call. 8 Voice Commands To use any of the voice commands, click the MFB, wait for the T1 to ask you to Say A Command, then say the command: > Check Battery — Tells you the battery level on the T1. > Call Information — Calls an information service number stored in your headset. Call charges may apply. > Phone Commands — Activates your phone’s voice dialing feature (if available on your phone). Depending on your phone model, you may need to record voice tags on the phone to use this feature. Voice recognition will cancel automatically after a short period of time if you do not say a command. You can also cancel voice recognition by clicking the MFB. 9 Listening to Audio The T1 supports A2DP audio streaming: if your phone or Bluetooth device supports the A2DP profile then you can simply start playing music or any other audio (including directions from a GPS application on the phone) and it will automatically transfer to the T1. The audio will mute automatically if you make or receive a phone call, and resume when the call ends. 10 Multipoint Up to 2 phones can connect to the T1 at the same time. To pair a second phone: 1. Use your phone’s Bluetooth menu to disconnect the existing paired phone from the T1. 2. With the T1 switched on, hold down the MFB until the T1 starts to talk you through the pairing process. 3. When the pairing is complete, use the Bluetooth menu on each phone to reconnect them to the T1. When you have 2 phones connected, you can always answer a call on either phone. If you initiate a call through the T1 it will happen on the “primary phone”: the one that connected to the T1 first. 11 Advanced Button Functions 12 Advanced Button Functions > To hold an active call and switch to an incoming or held call, press Vol + for about 1 second. > During a call you can mute and unmute the T1 microphone by holding Vol + and Vol - together until the T1 beeps twice (about 1 second). > To end an active call and answer a new incoming call, press Vol - for about 1 second. > You can conference two active calls together by holding the MFB for 3 seconds (if your phone and network support this). > To transfer audio to the phone, click Vol + and Vol together during a call. > To disconnect your phone from the T1, click Vol + and Vol together when you are not on a call. Hold down Vol + for about 1 second to reconnect. > Whenever you add contacts to your phone you must also update your phonebook on the T1: with the T1 connected to your phone but not on a call, hold down the MFB for 3 seconds to initiate a phonebook update. > To turn the flashing indicator light on or off, disconnect the T1 from your phone and hold down Vol + and Vol - for 1 second. > Click the MFB to: end a call, cancel pair mode, cancel voice recognition, or cancel a phonebook transfer/update. 13 Reset your T1 14 Troubleshooting Tips If you are having problems with the T1, you can reset the T1 and your phone and start again: The following are some troubleshooting tips for using the T1 with specific phone models. 1. Disconnect the T1 from your phone by deleting the pairing from your phone’s Bluetooth menu. Phonebook Transfers 2. Turn your phone off and back on again to clear its memory. 3. With the T1 switched on, but not connected to any phones, click all three buttons (Vol +, Vol -, and the MFB) together. Note that you must quickly press and release all three buttons at the same time (do not hold down the buttons). The T1 will reset and go straight to pairing mode. You will now need to pair your phone with the T1 again. When you pair your phone the T1 will attempt to transfer the contacts from your phonebook so that it can announce the names of incoming callers. Note: If your phone prompts you to allow a connection to the T1, you must select “YES” or “OK”. 15 BlackBerry® 16 Android™ If you are using a BlackBerry smartphone you may see a message like this one during the phonebook transfer. On Android devices a message about the phonebook transfer may appear in the notifications area at the top of the screen. Accept connection request from BlueAnt T1? YES NO Don’t ask this again Select “Don’t ask this again” so that a tick appears in the box, and then choose “YES”. In order to transfer your contacts you must swipe your finger over this message and accept the phonebook transfer request from the T1. Phonebook Access Request Notification shown on Android devices 17 Automatic Transfer Not Supported 18 Phonebook Transfer Not Supported Some phones do not support automatic phonebook transfers. If this is the case on your phone the T1 will announce that it cannot transfer the contacts automatically: Some phones do not support phonebook transfers at all. 1. Go to your phonebook and select the contacts you want to send to the T1. Choose the option to “Mark All” or “Select All” if this is available on your phone (if this is not available, you will need to transfer each contact individually). 2. Select the option on your phone to “send” or “beam” contacts, business cards, or v-cards via Bluetooth, and select the T1 from the list of Bluetooth devices. See your phone’s manual for help with this step. In order to transfer your phonebook to the T1, your phone must support either the Phonebook Access Profile (PBAP), AT commands, or the Object Push Profile (OPP). If your phone does not support any of these Bluetooth profiles, then you will not be able to copy your contacts to the T1. When you receive a call, the T1 will read out the caller’s number instead. 19 Voice Dialing 20 Help and Support Use the command Phone Commands to activate your phone’s voice dial feature. Your phone must support “voice dialing over Bluetooth”. This guide is just to get you started with the T1. If you are having trouble getting the T1 to work, please visit www.blueantwireless.com for online help, support, and troubleshooting tips. This feature is supported by the iPhone 3GS (iOS 3.1+) and iPhone 4, most BlackBerry smartphones, and most Android devices running Android 2.2 and above. Please contact us before returning the T1 to a store and we will help you through any difficulty you may have. Once you have activated the voice dial feature, you are using your phone’s voice recognition software. Please check your phone manual for help on getting the most out of this feature and to find out what commands your phone supports, as well as any limitations of your phone’s voice recognition software. Version: T1-QSG-EN-2.0 NEED MORE HELP? “HOW-TO VIDEOS FOR YOUR BLUEANT DEVICE” www.blueantwireless.com/geekspeak