1
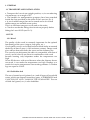
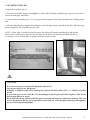
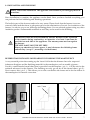
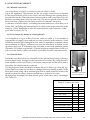
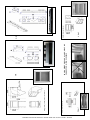
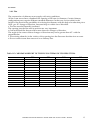
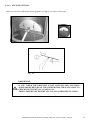
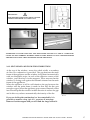
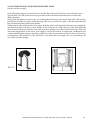
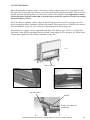
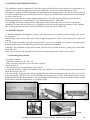
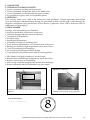
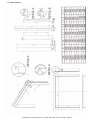
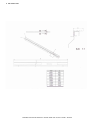
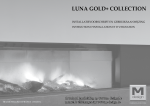
LUNA GOLD+ COLLECTION
INSTRUCTION FOR INSTALLATION AND USE
Passion for fire
English - 08/2011
INSTRUCTION FOR INSTALLATION AND USE LUNA GOLD+ WOOD
V E RY I M P O R TA N T
I N S T A L L A T I O N
INSTRUCTIONS FOR THE M - D E S I G N GAS FIREPLACES
T H E S U P P L I E R TA K E S N O
RESPONSBILITY FOR ANY
POSSIBLE DAMAGE, POOR WORKING
APPLIANCES AND ACCIDENT AS A
R E S U LT O F I N C O R R E C T I N S TA L L AT I O N
INSTRUCTION FOR INSTALLATION AND USE LUNA GOLD+ WOOD
SUMMARY
1. GENERAL..................................................................................... 4
1.1 TRANSPORT AND INSTALLATION................................ 4
1.2 TYPES OF FUEL...................................................................... 1.2.1 Wood
1.2.2 Forbidden fuel
4
1.3 STARTING THE FIRE........................................................... 5
2. INSTALLATION......................................................................... 6
2.1 ACTIONS UPON INSTALLATION.................................... 6
2.2 POSITIONING THE FIREPLACE....................................... 6
2.3 INSULATION AND FNISHING......................................... 7
2.4 MOUNTING A 3-SIDED FRAME....................................... 8
2.5 AIR SUPPLY FOR COMBUSTION..................................... 9
2.6 CONVECTION CURRENT.................................................. 2.6.1 Natural convection.............................................................
2.6.2 Convection generated by a fan (optional)......................
2.6.3 Hot air ducts.......................................................................
10
2.7 FAN............................................................................................ 2.7.1 Installation...........................................................................
2.7.2 Fan dimmer.........................................................................
12
2.8 FLUE.......................................................................................... 2.8.1 Flue.......................................................................................
13
2.9 HOW TO REGULATE FIREPLACE IN SENSE OF DROUGHT
2.9.1 Baffle plate
2.9.1.1 First settng..................................................................... 2.9.1.2 Second setting............................................................... 2.9.2 System with three deflectors............................................. 2.9.3 Secondary air flow for combustion.................................. 14
2.10 BAFFLE PLATE LUNA GOLD SEE-TROUGH............... 18
3. FUNCTIONNING...................................................................... 19
4 GENERAL RECOMMENDATIONS........................................ 20
4.1 MAINTENANCE..................................................................... 4.1.1 Cleaning the window........................................................ 20
20
5. GUARANTEE.............................................................................. 5.1 TERMS AND ITEMS COVERED........................................ 5.2 PROVISO................................................................................. 5.3 DISCLAIMER.......................................................................... 6. SPARE PARTS............................................................................. 7-8. 3 SIDED AND 4th FRAME.................................................... 21
21
21
21
22
23-24
14
15
16
17
INSTRUCTION FOR INSTALLATION AND USE LUNA GOLD+ WOOD
3
1. GENERAL
1.1 TRANSPORT AND INSTALLATION
• Transport the Luna in an upright position, or, in encumbering
circumstances, at an angle of 45°.
• The handles for transportation purposes have been attached
inside the slots provided on the sides of the Luna (see Pic.1)
• A set of rubber straps that can be turned and a set of fixed
rubber straps are available as an option.
This is to facilitate transport on-site and on the stairs.
• Check to see that the lifting door functions properly before
fitting the Luna GOLD (see Pic.2).
Pic. 1
1.2 FUEL
1.2.1 Wood
The quality of the wood is extremely important for the optimal
functioning of the stove (output, clear glass, etc.).
Good quality wood is wood that has been dried under an aerated
shelter for at least 2 years (+ 18% moisture content). Damp wood
gives off less heat and dirties the stove and the chimney less.
You can also use briquettes (the effect is comparable with that of
wood), and it is best to use them in combination with wood
because burning only briquettes makes the temperature too
high.
Never fill the stove with wood because when the chimney draws
too much, it can make the temperature too high. Damage as a
result of excessive temperature is not under guarantee. 3 wooden
logs are equal to 12 kW.
1.2.2 Forbidden fuel
The use of treated wood (painted, etc.) and all types of household
waste, which can disperse hazardous gases, is FORBIDDEN and
CANCELS OUT ANY CLAIM ON THE GUARANTEE. The use
of fluid fuel (petrol, etc.) is also forbidden.
INSTRUCTION FOR INSTALLATION AND USE LUNA GOLD+ WOOD
Pic. 2
4
1.3 STARTING THE FIRE
• Open the window (pic.3).
• Put a bed of tinder (paper or firelighters) with a little kindling (small twigs or pieces of wood) in
the stove and light the tinder.
• Leave the door slightly ajar (+ 3 cm) to get a turbo stream of air that will make the kindling catch
fire.
•After the kindling has caught fire and burns well, the logs may be placed on the fire. After the logs
have caught fire, the window may be shut.
NOTE: When a fire is made for the first time, the paint will harden and that give off smoke
and a smell, which starts after the fire has burned for about 10 minutes and lasts for about
15 minutes. See to it that there is ample ventilation in the room.
pic. 3
CAUTION :
It is not necessary to overload the fireplace with wood.
1 kg dry wood gives a 4 kW power.
Example : a fireplace with a 78% return gives a power for about 4kw x 78% = +/- 3 kW for 1 kg dry
wood.
If you want a power of +/-12 kW , it is just enough to put 4 kg wood in the fireplace. This is like
two normal pieces of wood.
Be carefull not to use palletwood (this gives an enormous heat) for continuous heating. This can
lead to fire hazard. We are not responsible for the bad use of the fireplaces and any consequence
for not following this guideline.
INSTRUCTION FOR INSTALLATION AND USE LUNA GOLD+ WOOD
5
2. INSTALLATION
2.1 ACTIONS TO BE TAKEN UPON INSTALLATION
Your supplier is the specialist who chose to represent M-design in your area. For your own safety
and satisfaction, we advise you to entrust him with the installation. The appliance has to be
installed according to certain prescribed rules and local regulations.
In the absence of the correct regulations in Belgium, the French regulations in respect of
installation will be (D.T.U. 24.2.2) applicable.
However, if you decide to carry out the work on your own, we advise you to do the following:
• Refer to the terms and conditions of our contract of guarantee.
• Ask your supplier for advice.
2.2 POSITIONING THE FIREPLACE
Place the fireplace on a stable surface using the adjustable feet. Adjust the height of the fireplace
by turning the bolt ( pic 1 )
The stove may not be placed direct ont the floor to allow natural convection.
The appertures for the air supply ( IN ) is situated underneath the appliances.
Regulating the height of the appliance :
This can be made in two ways.
A regulation by 8 times 5 cm ( pic. 1 ) and a fine regulation by screw ( pic.2 ).
The minimal height as from ground to the 4th side frame is 3,5 cm ( A min ).
The minimal height “C min” will be 18 cm, measured as from the ground to 4th side frame ( pic.3 ).
The maximal height as from the ground to the 4th side frame is 45 cm.
pic. 1
pic. 2
A min = 3,5 cm
B = 14,5 cm
C min = 18 cm
INSTRUCTION FOR INSTALLATION AND USE LUNA GOLD+ WOOD
pic. 3
6
2.3 INSULATION AND FINISHING
Please , follow this instruction. The appliance can overheat if you not apply those instructions.
Once installation is complete, the appliance can be fitted. Once you have checked everything, you
can perform the final insulating and finishing operations.
The built-in part of the furnace tends to be very warm. Please check that the furnace is not too
narrowly fitted and that there is adequate space for the elimination of hot air. For insulation of the
furnace, we advise you to use M Design insulating plates. You are advised against using any other
insulation product. Inflammable materials as well may not be used for the finishing.
The masonry must be raised around the furnace. Because of the expansion
of the furnace during combustion, an interstice of at least 5 mm must be
provided on each side of the appliance. The masonry must not lean against
the furnace.
THE APPLIANCE MUST BE SET FREE .
Please pay attention to leave approx. 2 mm inbetween the finishing frame
and maconry ( see p.17 , mounting a 3-sided frame )
REFERENTIAL DISTANCES IN REGARDS TO FINISHING THE MANTLEPIECE
A very essential point when setting up the Luna Gold is that the distance has to be respected
inbetween fireplace and the finishing material for the mantlepiece such as marble, gipsum,...
For this, a small bended metal sheet that is provided ont the fireplace ( pic.1 ) , is to be used as the
minimal reference for the distance. The finishing can only ga oas far as this meteal sheet ( pic.2 ).
Don’t remove this ( pic.3 ) ! This allows you to take out the 4th side frame and to let the airflow in
the mantlepiece for natural convection.
min. 5 mm
Pic. 1
Pic. 2
Pic. 3
INSTRUCTION FOR INSTALLATION AND USE LUNA GOLD+ WOOD
7
2.4 MOUNTING A 3-SIDED FRAME ( see page 23 and 24 drawings 3-sided frame and 4th side )
First remove the profile that is delivered with the fireplace ( pic. 1 )
The 3 sided frame consist of 3 parts and are assembled to the Luna ( pic. 2 )
Fixing to frame with the included screws ( pic.3 )
the 3 sides frame and his 3 parts
pic.2
pic.1
pic.3
PLEASE PAY ATTENTION TO LEAVE APPROX 2 MM INBETWEEN THE FRAME
AND THE FINISHING MATERIAL ( HEAT = EXPANSION)
Example :
Finished size of the Luna 1150H+ Gold is 450 x 1080 mm
Thickness 3-sided frame : 3mm
Calculate as follow : 1080mm + 2x3mm ( 3-sided frame ) + 2x2mm ( expansion ) = 1090 mm.
This is now the measurement you need to have when using a 3-sided frame in combination with
marble, gyproc, or othet materials.
For the height you start calculate from just underneath the 4-sided frame to the top of the
3-sided frame : this is 450mm. For the finishing measurement calculate 450mm + 2mm.
INSTRUCTION FOR INSTALLATION AND USE LUNA GOLD+ WOOD
8
2.5 AIR SUPPLY FOR COMBUSTION
Every form of combustion uses air. In the case of a thermally sealed room supplementary air supply
is essential. One must at all times avoid creating under-pressure in the room. If a cooking hood appears to be absolutely essential in the adjoining room, sufficient
air supply will have to be provided to avoid every form of under-pressure.
You need an airlet with dia. 150mm coming from outisde, or a ventilated shelter. This airinlet you
have to connect to the Luna.
For a double sided LUNA and the LUNA 1000V+ and 1150V+ ,
you need two air inlets dia. 150mm.
With the Luna Gold+, the fresh air for combustion is supplied directly from outside through a
flexible ( dia. 150mm ) that is connected to one of the 4 entrances that are provided on the left,
right or lower side of the fireplace ( pic. 4 & 5 ) . Use for this purpose one of five connection
pieces ( pic. 6 & 7 )
Thanks to this new system, the air that is required for combustion is completely separated from
the convection air stream in the room ( see further at point 2.3. Convection current ).
The appliance is always delivered with an open air inleet at the left side. If you want to change,
you can remove the plate on the side you wish to connect en replace the plate on the side that was
open before.
FRESH AIR INLETS FROM OUTSIDE
NEEDED FOR COMBUSTION
ø150
pic. 5
pic. 4
Luna Gold 700 H+
1 x ø150
Luna Gold 850 H+
1 x ø150
Luna Gold 1000 H+
Luna Gold 1150 H+
1 x ø150
1 x ø150
Luna Gold 1300 H+
1 x ø150
Luna Gold 550 V+
Luna Gold 850 V+
1 x ø150
1 x ø150
Luna Gold 1000 V+
2 x ø150
Luna Gold 1150 V+
2 x ø150
2 x ø150
2 x ø150
2 x ø150
2 x ø150
Luna Gold 1150 DH+
Luna Gold 1000 DV+
Luna Gold 850 DH+
Luna Gold 850 DV+
pic. 6
pic. 7
INSTRUCTION FOR INSTALLATION AND USE LUNA GOLD+ WOOD
2.6 CONVECTION CURRENT
2.6.1 Natural convection
It is compulsory to open 2 or 4 hot air vents (see table 1) at the
top of the appliance. The entrance for the air supply convection are situated
at the lower backside of the Luna Gold+ and also through the opening that is
provided for the fan. These have been constructed in such a way that no air can
be blown out along here, not even with a fan. The stove is placed at least 20 mm
above the floor (if placed on the floor) to allow for natural convection.
A clearance of at least 4 dm3 , excluding the measurements of a dust filter, or at
least 6 dm3 , including the measurements of a filter, must be provided for in the
masonry. (Note: Remember to take the measurements of the clearance of the
grids into account.) (Pic.7a)
2.6.2 Convection by means of a fan (optional)
It is compulsory to open at least 2 hot air vents (see table 1). It is essential to
separate the air supply ducts and the air vents correctly in the masonry. Some
insulation material gets damaged in time, and it is essential to separate it from
the ventilation air supply, otherwise one runs the risk that it is sucked in and
spread in the house. It is therefore also advisable to use fixed insulation plates
(Promatec, HT-platen or promatec). The fan may be mounted either on the outside or on the inside, which even makes it possible to install a fan afterwards.
Pic. 7a
2.6.3 Hot air ducts
Thermally insulated ducts are essential for the optimal functioning of the appliance (these cause ‘draught’ in the convection air current). By using the maximum number of ducts (at least 2), the output is improved and the noise (that is
caused by the displacement) is reduced.
For the purposes of the installation of these ducts it is best to go vertically upwards first for at least 1m and then to change direction, making a rather wide
bend and avoid using a flue terminal grid with a small clearance because the
speed loss that this causes reduces the efficiency of the hot air vents.
M-design has developed its ideal hot air grids which have many advantages
(Pic 7b and 7c)
Entrance convection
air ( at backside )
Pic. 7b
Tabel N°1. Warm air outlet
with fan
without fan
Luna Gold 700 H
2
2
Luna Gold 850 H
2
2
Luna Gold 1000H
2
4
Luna Gold 1150 H
2
4
Luna Gold 1300 H
2
4
Luna Gold 550 V
2
2
Luna Gold 850 V
2
4
Luna Gold 1000V / 1150V
2
4
Luna Gold 850 DV / DH
2
Luna Gold 1150 DH
2
Luna Gold 1000DV
2
INSTRUCTION FOR INSTALLATION AND USE LUNA GOLD+ WOOD
10
INSTRUCTION FOR INSTALLATION AND USE LUNA GOLD+ WOOD
2 dm²
Inlet Grid convection air
Design Grid ( outlet ) with 2 connections
EACH APPERTURE YOU MAKE, MUST BE
CONNECTED WITH FLEXIBLE
OR
Design Grid ( outlet ) with 2 connections
4 dm²
Inlet Grid convection air
OR
Design Grid ( outlet ) with 4 connections
The grids are provided with two connections. 2 flexibles for one grid !
Two holes between the two connection provides ventillation in the
maconry.
To simplify the mounting of the grids you can use the corner profile wich
is furnished with the grid. This profile is can be mounted on the side of
the grid (two little wholes en screws are provided).
corner
profile
Note: a circulation of hot air requires that no under-pressure be created
in the room. A grid that is near the floor (pic 7d) sees to it that cold air
can be drawn in. Don’t connect those with a flexible. Air will find the
way to get at the right place. Place all the fittings that you use at the
same lengths and angles if possible, otherwise it is possible that some
grids give off more heat than others and, seeing that a hot air pipe functions in a manner similar to a chimney, the one that is hot first has the
most draught and therefore becomes hot even more quickly.
Pic. 7c
F
2.7 FAN
2.7.1 Installation
Pic. 7d
• Remove the Chamotflex plates, the bottom plates and the opening to
the fan. See pic.8.
• Now slide the fan downwards to just under the stove.
• Make the necessary electrical connections.
2.7.2 Fan dimmer
•Leave the adjustment of the fan speed closed.
• Fuse 1.5A (Take the knob off, unscrew the little plate, take it
out if it is to be replaced.)
• The adjustment screw for the minimum speed is under the knob.
(M-design has developed a new induction dimmer which lets the fan run
noiselessly and which may be bought as an option.)
• The fan (optional) may be started after the fire has burned for 15 minutes.
• Let the fan turn at the maximum speed for 12 hours the first time to let
it run in.
Pic. 8
INSTRUCTION FOR INSTALLATION AND USE LUNA GOLD+ WOOD
12
2.8 FLUE
2.8.1 Flue
The construction of chimney must comply with strict conditions:
All the Luna stoves have a standard flue opening of 250 mm. in diameter. Certain chimney
configurations may require different standard diameters. In that case, look at table for the
height of the flue and the possibility of reducing the diameter with the help of a reduction piece.
Note : per 45° change of direction, one must keep to within 1m of this table.
• The flue must be thermally insulated.
The opening into the flue and its position are very important.
• One individual flue does not have more than two changes of direction.
The angle of the corner of these changes of direction may not be greater than 45 ° with the
perpendicular.
• The existing obstacles in the vicinity of the opening into the flue must be taken into account.
• Do not connect more than one stove to a chimney flue.
Table N°2 / MINIMUM HEIGHT OF THE FLUE IN TERMS OF ITS REDUCTION.
ø 300
ø 250
ø 200
ø 180
Luna Gold 700 H+
-----
> 4m
> 7m
Luna Gold 850 H+
-----
≥ 4m
> 4m
> 7m
Luna Gold 1000 H+
-----
≥ 4m
> 5m
-----
Luna Gold 1150 H+
-----
≥ 4m
> 6m
-----
Luna Gold 1300 H+
-----
≥ 5m
> 8m
-----
Luna Gold 550 V+
-----
≥ 4m
> 4m
> 7m
Luna Gold 850 V+
-----
≥ 4m
> 7m
-----
Luna Gold 1000 V+
-----
≥ 4m
> 8m
-----
Luna Gold 1150 V+
-----
> 5m
Luna Gold 1150 DH+
≥5m
> 7m
Luna Gold 1000 DV+
≥5m
Luna Gold 850 DH+
-----
Luna Gold 850 DV+
-----
---------
-----
> 8m
-----
-----
≥ 5m
> 7m
-----
≥ 5m
> 8m
-----
INSTRUCTION FOR INSTALLATION AND USE LUNA GOLD+ WOOD
13
2.9. HOW TO REGULATE FIREPLACE IN SENSE OF DROUGHT
2.9.1 Baffle plate
The stoves have all been provided with an automatically adjustable baffle plate. This can be
adjusted according to the chimney draught. In this way, all stoves are suited to every chimney and
draught. The baffle plate is automatically opened when the window is slid open, so that no smoke
escapes into the living room. The plate may be adjusted in 2 ways.
2.9.1.1 FIRST SETTING: ANGLE BAFFLE PLATE WITH CLOSED DOOR
FIG. 9a door open
FIG. 9b door closed
FIG. 9c
FIG. 9d
Setting the inclination (a) of the trottle when the door is closed (fig. 9a). Screw in or screw out the
screw spindle nr.2 ( When necessary : completely remove the nut nr.3 and don’t forget to put back
afterwards)
When the door is closed, the trottle will be completely horizontally when you’re screwing out the
screw spindle to the highest position (fig 9b).
INSTRUCTION FOR INSTALLATION AND USE LUNA GOLD+ WOOD
14
2.9.1.2
SECOND SETTING :
Remove screws to adjust the moving plate nr 1 (fig 9e ) in sence of drough
FIG. 9e
IMPORTANT :
IF YOU THINK THE DROUGHT IS NOT ENOUGH AND YOU HAVE
SOME SMOKE RETURN IN THE LIVINGROOM, THEN YOU HAVE TO
CHECK FIRST POINTS 2.9.1.1 AND 2.9.1.2.
THIS IS IMPORTANT BEFORE YOU DO ANY OTHER REGULATION.
INSTRUCTION FOR INSTALLATION AND USE LUNA GOLD+ WOOD
15
2.9.2 SYSTEM WITH THREE DEFLECTORS AND TWO AUTOMATIC VALVES
With a closed door (fig 10) , we have a minimal evacuation for the combustion gaz.
The main valve is closed (fig.10)
The second deflector has a valve too (fig.11).
When opening the liftdoor, the main valve and the second valve in the second deflector
are opening simultaniously (fig.11). The combustion gaz is going out quickly when the
window is open and is not going into the livingroom.
Fig.10 : door closed
main valve
valve on second deflector
Fig.11 : door open
2cm
Installing the deflectors :
The first deflector (1) exists of two parts. A movable part (1a) and a fix part (1b).
Plate (1a) leans on plate (1b).
Plate (1b) has some trenches (see picture 13 and 14 ).
The minimal opening to remove the gaz is about 2cm along the width of the first deflector (fig.11).
When there is to less draught, you can make this gap bigger by lifting up plate nr. 1a. Put this plate
more to the backside in the trenches of plate (1b).
You can move plate (2a) in the same way as plate (1a).
In some exceptional situation , when the draught is very poorly, you can remove the plate nr 1a.
INSTRUCTION FOR INSTALLATION AND USE LUNA GOLD+ WOOD
16
IMPORTANT :
THIS MUST BE DONE IF YOU DIDN’T FOUND
SATISFACTION WITH 2.9.1.1 AND 2.9.1.2
Fig.12
Pic..13
ATTENTION : FOT THE LUNA 550V YOU DON’T FIND A PLATE nr 1a AND nr 3. THIS IS BECAUSE OF THE NARROW ARCHITECTURE OF THIS MODEL. IN ANY CIRCUMSTANCES
THIS WILL NOT GIVE A BAD FUCNTION OF THE APPLIANCE.
2.9.3. SECUNDARY AIR FLOW FOR COMBUSTION
At the top of the window, across the whole witdh, a secondary
air flow for combustion is provided. The gap between the main
frame of the appliance and the window is regulated automatically
with two bimetallic strips. At each of the superior corners of the
window, you’ll find two circular magnets. Those ensures that the
window is closing well against the bimetals situated on the main
frame of the applliance.
When the aplliance is still in cold situation, the gap between the
window and the main frame is made in that way the fire gets
enough oxygen. When the appliance gets warmer, bimetals comes
in action and pulls the window in their direction to reduce the gap
and in this way reduces automatically the intesity of the fire.
If you are feeling the combustion is a less controlable, it is
possible to remove a ring (pic.15 ) , even two if necessary.
Remove first the magnet and you will find the rings behind it.
Pic.15
INSTRUCTION FOR INSTALLATION AND USE LUNA GOLD+ WOOD
17
2.10 AUTOMATICALLY ADJUSTABLE DOUBLE PLATE
(Luna Gold see-trough )
In the illustrated figure, the first lift door and the first plate will drive the second lift door and
second plate. The lift doors have been provided with a mechanical transmission to drive the
different plates.
Seeing that the plates are driven by two independent lift doors, the smoke flue tube will only be
partly closed off by one plate when burning with only one lift door open, with the result that the
fire will keep burning much more mildly.
When there is a fire with two lift doors open, both the plates will automatically open up completely
and therefore there will be no more smoke in the living room. When there is a fire with both lift
door closed, both plates will also close and, therefore, partly close off the smoke flue tube. This will
cause the temperature in the stove to be higher, wich will result in an improved combustion and
a substantially higher output, much less pollution of the environment and much less wood or fuel
consumption. The windows of the lift doors, wich make the see-trough stove so interesting will
stay clear for much longer.
FIG. 15
INSTRUCTION FOR INSTALLATION AND USE LUNA GOLD+ WOOD
18
3. FUNCTIONNING
When burning this fireplace with a closed door, the air clapet with seal is closed and so the
fire takes the air through the channel connected with the flexibel from outside. The air is then
spread underneath the spoiler over the entire width of the fireplace. It is important to clean
out the fireplace from the ashes and to free the space under the spoiler to let the air coming
into the fireplace ( Pic.9 ).
When the door is opened , the air clapet is also being opened. Extra air is going in the fireplace trough apertures situated in the 4th side frame direct from the air channels (see arrows
into the fireplace on pic. 8) . Of course air is also taken from the livingroom.
The primary air supply can be regulated manually. Use the key ( pic. 10 & 11 ) to slide the
regulator to the left for opening primary air and on the right to close primary air. When door
is open this regulation will not have an effect on the fire.
Pic 8
valve with seal
Pic. 10
Pic. 11
4th side frame /
Spolier
Primary air supply for
combustion
Pic. 9
INSTRUCTION FOR INSTALLATION AND USE LUNA GOLD+ WOOD
19
4. GENERAL RECOMMENDATIONS
The appliance must be connected to the flue pipe and tested before the material is cemented in. In
order to ensure that the appliance functions optimally, one must insulate the hot air ducts
completely, comply with the minimum of the diameter measurements for the hot air ducts and hot
air vents and the chimney must be adjusted. Do not put any inflammable materials in the immediate
vicinity of the stove.
Note: If you leave the door open, little burning pieces of wood may be projected onto the floor.
Insulating materials: it is preferable to use “high temperature” materials.
It is strongly advisable to position the chimney and to connect the stove in such a way that no
humidity or water can enter the stove. Humidity and water are the greatest enemies of the Chamotflex in the appliance because it can swell and burst after the fire has been lit.
4.1 MAINTENANCE
• Besides regularly cleaning the window, you must have your chimney swept at least once a year
for optimal
functioning of the Luna. (Not only is this a legal requirement, but it is also meant for your own
safety.)
• A fire brick (Chamotte) can still work perfectly, even if it is cracked, but if pieces are missing the
brick must be replaced to effectively protect the combustion chamber.
• Remove the remainder of the ash in time, take the ash pan and remove a great part of the ashes
from the Luna.
Note: Never remove all the ashes because a fire always burns better with its own ashes.
4.1.1Cleaning the window:
- Close the window
- Open the window to 45°. (Pic. 16)
- Once you have done this, you can slide it up and
down to clean it.
• We advise you to use M-design’s “Bio-Clean”
to clean the window, which is available from your supplier. It is one of the few products that do not
harm the lacquer (Pic.17).
• It is necessary to grease the convection mechanism with heat-resistant silicone oil if you use the
stove frequently. DO NOT USE ANY OTHER type of grease or oil. This Teflon-based grease is also
available from the M-design dealers. The mechanism could otherwise dry out and the window could
be blocked when the temperature is constantly high.
Pic. 16
Pic. 17
INSTRUCTION FOR INSTALLATION AND USE LUNA GOLD+ WOOD
Ash pan
20
5. GUARANTEE
5.1 TERMS AND ITEMS COVERED
• 8 years’ guarantee on the general structure.
• 2 years’ guarantee on the parts and on the baffle plate
• 1 year’s guarantee on the fans and the speed variator.
• No guarantee on glass, seals or Chamotflex plates
5.2 PROVISO
This contract ceases to be valid if the instructions and guidelines of these operating instructions
were not followed. Indemnification during the guarantee period will take place only through the
supplier’s mediation upon presentation of the invoice of purchase. Parts will be delivered only in
replacement of defect parts.
5.3 DISCLAIMER
Damage, loss and malfunctions linked to:
• Incorrect installation of incorrect connection.
• Chimney draught that has not been adjusted.
• Transport and installation.
• Incorrect usage.
• Insufficient maintenance.
• Unsuitable, hazardous and damp fuel.
• Every internal adjustment to or reconstruction of the stove.
• Burning at extremely high temperature, more than 12 kw.
• Costs for packaging and transport.
• All costs not pre-arranged with M-design.
• Costs linked to the misuse and/or abuse of the appliance.
• Elke interne wijziging of ombouw van de haard.
• Branden met extreem hoge temperatuur, meer dan 12 kw.
• Kosten voor vervoer en verpakking.
• Alle niet op voorhand aangenomen kosten door M-design.
• Kosten verbonden aan het misbruiken van het toestel.
SERIAL NUMBER
PRODUCT SHIELD
open door, serial number left corner above on main frame
appliance
Your Serial number
...............................................
situated at the backside of the appliance
8
INSTRUCTION FOR INSTALLATION AND USE LUNA GOLD+ WOOD
21
6. SPARE PARTS
INSTRUCTION FOR INSTALLATION AND USE LUNA GOLD+ WOOD
7. 3 SIDED FRAME
INSTRUCTION FOR INSTALLATION AND USE LUNA GOLD+ WOOD
8. 4th sided Frame
INSTRUCTION FOR INSTALLATION AND USE LUNA GOLD+ WOOD