1
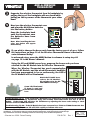
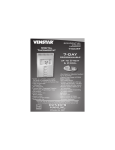
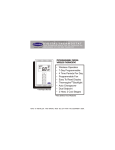
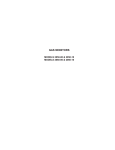
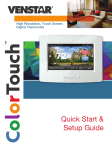
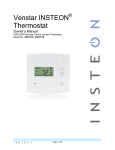
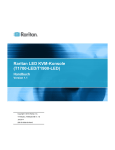
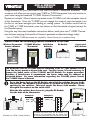
MODEL
ADD-A-WIRELESS
T1119RF
THERMOSTAT
Congratulations on your purchase of the Add-A-Wireless Thermostat accessory. This
accessory will allow you to control your T1800 or T1900 thermostat from any location in
your home using the handheld T1100RF Wireless Thermostat.*
Operation is simple! When a button is pressed on the T1100RF it will take complete control
of the thermostat. From the T1100RF you can change the mode of your thermostat, turn
the fan on, and even energize your heating or cooling system. To transfer control back to
the T1800 or T1900 thermostat, press any button on that thermostat’s keypad (except for
the Outside button).
Using the easy four-step installation instructions below, install your new T1100RF Thermostat and start enjoying the benefits of Venstar’s patented wireless technology today!
*Not all T1800 & T1900 thermostats are compatible. Consult Venstar for a complete listing.
Please locate the following products contained in this box:
Wireless Thermostat
Owner’s Manual
T1100RF Wireless
Thermostat
AA Lithium
Batteries
Screws and
Wall Anchors
RF Module
residential
WIRELESS
THERMOSTAT
Digital
Thermostat
HEAT
COOL
o
8:21 Am
up to 2-heat
& 2-cool
72
C
Su
AUTO
HEAT
PUMP
FanOn
Dual Setpoint w/ Adjustable Deadband
‘O’ or ‘B’ Terminal
Optional Power Supply (ACC0800)
Control up to 2 Heat & 2 Cool Stages
Unique Features
Full Range of Compatibility for Use on
Non-Volatile Memory
Gas/Electric, HP, Electri and Hydronic Heat Wireless: Transmits up to 500 feet,
7-Day Programmable
through walls and floors - 418 MHZ
4 Settings/Day
will not interfere with other systems
Auto Changeover
Receiver capable of listening to up
5 minute Built-In Compressor Protection
to 4 thermostats
Self-Prompting Programming w/ Copy
Thermostat capable of transmitting
Full Electronic
to multiple receivers
Applications
Display Either F or C
Back-Lit Display
No wires to run
Keypad Lockout
Ideal for century old homes
Large Easy-to-Read Display
Ideal for keeping the baby’s room
Programmable Fan
the perfect temperature
Use with most Air Conditioning & Heating Systems including: 1 or 2 Stage
Electric Cooling & 2 Stage Gas Heating, Heat Pump, Electric or Hydronic Heat.
AA Lithium
Battery
7-DAY
PROGRAMMABLE
OOL
72
HEAT o
70
AA Lithium
Battery
T1100RF
MODE
OWNER’S
MANUAL
FAN
Venstar Inc. 08/07
The RF Module and the T1100RF that are contained in the T1119RF package arrive
from the factory preset to House Code zero. For this reason, it is not necessary to
change the house codes of the T1100RF and RF Module for proper operation.
However, if interference is encountered, the house codes may be changed as
instructed below. For more information regarding the T1100RF, please consult
the T1100RF Owner’s Manual.
To set the House Code on the RF Module, add all of the switches that are in the
ON position. The numbers of each switch are printed on the plastic next to the
opening for the switches. This total equals the House Code number. Please
disregard the numbers on the switch itself.
After the dip switches have been set, plug the RF Module
into the base of the thermostat.
I2:00
Su
Pm
74
COOL
AUTO
Example A
ON
House
Code = 4
3
4
5
5
3
4
6
6
5
6
1
2
4
8
16
32
2
4
2
1
2
4
8
16
32
7
©Venstar Inc. 06/08 - Patent Pending
8
RF Receiver
ACC0437
7
C
8
8
OFF
7
HOUSE CODE
HEAT
1
3
1
ON
1
2
4
8
16
32
ON
2
ON
1
House
Code = 9
(1+8 = 9)
72
Example B
Note: The degree icon of the T1800 or T1900
thermostat will blink when the RF Module is in
control of the thermostat and has heard from
the wireless thermostat within the last ten minutes.
P/N 88-791
Rev. 1
MODEL
T1119RF
ADD-A-WIRELESS
THERMOSTAT
Separate the wireless thermostat from its backplate by
pulling the top of the backplate with one hand while
pulling on the top corner of the thermostat your other
hand.
Now turn the wireless thermostat over
and place the AA Lithium batteries
into the battery holder.
Q4
T1
2.01
Snap the backplate back
onto the thermostat once
the batteries have been
installed.
Y2
AA Lithium
Battery
Note: After installing the batteries, two dashes will appear
momentarily.
AA Lithium
Battery
MODEL: T1100RF
T070500138
If you wish to change the house code from the factory preset of zero, follow
the instructions on page 12 of the Wireless Thermostat Owner’s Manual to
enter Advanced Setup.
In advanced setup, press the MODE button to advance to setup step #4
on page 13 in the Owner’s Manual.
Using the UP and DOWN arrow keys, program the house code you have
selected for the RF Module into the Wireless Thermostat.
When the Wireless Thermostat has good communication
with the RF Module, and the wired thermostat’s backlight
has been programmed to be on continuously, the LED of
the RF Module will be illuminated.
Setup
HC
4
0
Match the T1100RF house
code to the RF Module’s
dip switches using the UP
and DOWN arrow keys.
Comm LED illuminated
if Comm is good and
thermostat’s backlight
is on.
MODE
FAN
Troubleshooting Tip #1: If the thermostat’s backlight is on continuously, but the Comm LED on the RF
Module is not continuously illuminated, bring the T1100RF Thermostat within five feet of the RF
Module. If the Comm LED still does not illuminate try adjusting the house code setting or check
batteries of the T1100RF thermostat.
Troubleshooting Tip #2: If the RF Module has been connected to a T1800 or T1900 thermostat that
is not compatible, the Comm LED will blink rapidly to indicate this error.
This device complies with Part 15 of the FCC Rules. Operation is subject to the following two
conditions: (1) this device may not cause harmful interference, and (2) this device must accept
any interference received, including interference that may cause undesired operation.
©Venstar Inc. 06/08 - Patent Pending
P/N 88-791
Rev. 1
c
FC
Add-A-Wireless
Thermostat
T1119RF
FCC ID MUH-T10013