1
outlet.
2
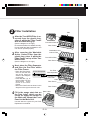
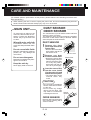
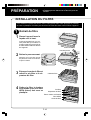
Filter Installation
Tabs
the True HEPA Filter is re1 After
moved from the plastic bag,
place it within the Filter Frame
with the tabs facing up.
Filter Frame
Ensure that the filter is installed correctly.
Do not install the filter backwards or the
unit will not operate properly.
2
Washable Active
Carbon Filter
After removing the Washable
Active Carbon Filter from the
plastic bag, place it within the
Filter Frame on top of the True
HEPA Filter.
True HEPA Filter
Filter Frame
(See the diagram to the right.)
place the Filter Separator
3 Next,
and then the Pre-Filter within
Tabs (4 places)
the Filter Frame.
Pre-Filter
• Place the Filter SepaRib of the Filter Separator
rator so that the ribs
are facing down as
shown in the diagram
on the right.
• Insert the tabs, (4), of
the Pre-Filter into the
associated
holes
found on the Filter
Frame.
• Mount the Filter Frame as shown in the
diagram to the right to the main unit.
4
Fill in the usage start date on
the Date Label, which can be
found on upper left corner of
the Main unit. Mount the Front
Panel to the Main Unit.
ENGLISH
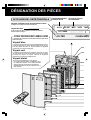
True HEPA Filter
(See the diagram to the right.)
Filter Separator
Washable Active
Carbon Filter
Holes
Filter Frame
Filter Frame
Date Label
Use the date as a guide for your Filter
Replacement schedule.
E-13