1
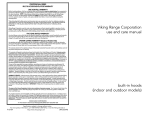
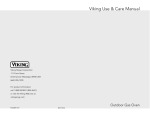
VEWD PROFESSIONAL SERIES
BUILT-IN ELECTRIC WARMING DRAWER WARRANTY
ONE YEAR FULL WARRANTY
Built-in electric warming drawers and all of their component parts, except as detailed below*, are warranted to be free from
defective materials or workmanship in normal household use for a period of twelve (12) months from the date of original retail
purchase. Viking Range Corporation, warrantor, agrees to repair or replace, at its option, any part which fails or is found to be
defective during the warranty period.
*Painted and decorative items are warranted to be free from defective materials or workmanship for a period of ninety (90)
days from the date of original retail purchase. ANY DEFECTS MUST BE REPORTED TO THE SELLING DEALER WITHIN
NINETY (90) DAYS FROM DATE OF ORIGINAL RETAIL PURCHASE.
FIVE YEAR LIMITED WARRANTY
Any heating element which fails due to defective materials or workmanship in normal household use during the second
through fifth year from the date of original retail purchase will be repaired or replaced, free of charge for the part itself, with
the owner paying all other costs, including labor.
Viking Range Corporation
use & care manual
LIFETIME LIMITED WARRANTY (Outdoor Models Only)
Any stainless steel part which rusts through due to defective material or workmanship in normal use during the second year
through the useful lifetime of the unit from date of original retail purchase will be repaired or replaced, free of charge for the
part itself, with the owner paying all other costs, including labor.
NINETY (90) DAY RESIDENTIAL PLUS WARRANTY This warranty applies to applications where use of the product extends
beyond normal residential use. Examples are, but not limited to, bed and breakfasts, fire stations, private clubs, churches, etc.
This warranty excludes all commercial locations such as restaurants, food service locations and institiutional food service
locations.
This warranty extends to the original purchaser of the product warranted hereunder and to each transferee owner of the
product during the term of the warranty.
This warranty shall apply to products purchased and located in the United States and Canada. Products must be purchased in
the country where service is requested. Warranty labor shall be performed by an authorized Viking Range Corporation service
agency or representative. Warranty shall not apply to damage resulting from abuse, accident, natural disaster, loss of electrical
power to the product for any reason, alteration, outdoor use, improper installation, improper operation, or repair or service of
the product by anyone other than an authorized Viking Range Corporation service agency or representative. This warranty
does not apply to commercial usage. Warrantor is not responsible for consequential or incidental damage whether arising out
of breach of warranty, breach of contract, or otherwise. Some jurisdictions do not allow the exclusion or limitation of incidental
of consequential damages, so the above limitation or exclusion may not apply to you.
Owner shall be responsible for proper installation, providing normal care and maintenance, providing proof of purchase upon
request, and making the appliance reasonably accessible for service. If the product or one of its component parts contains a
defect or malfunction during the warranty period, after a reasonable number of attempts by the warrantor to remedy the
defects or malfunctions, the owner is entitled to either a refund or replacement of the product or its component part or parts.
Warrantor’s liability on any claim of any kind, with respect to the goods or services covered hereunder, shall in no case exceed
the price of the goods or service or part thereof which gives rise to the claim.
WARRANTY SERVICE: Under the terms of this warranty, service must be performed by a factory authorized Viking Range
Corporation service agent or representative. Service will be provided during normal business hours, and labor performed at
overtime or premium rates shall not be covered by this warranty. To obtain warranty service, contact the dealer from whom the
product was purchased, an authorized Viking Range Corporation service agent, or Viking Range Corporation. Provide model
and serial number and date of original purchase. For the name of your nearest authorized Viking Range Corporation service
agency, call the dealer from whom the product was purchased or Viking Range Corporation. IMPORTANT: Retain proof of
original purchase to establish warranty period.
The return of the Owner Registration Card is not a condition of warranty coverage. You should, however, return the Owner
Registration Card so that Viking Range Corporation can contact you should any question of safety arise which could affect you.
Any implied warranties of merchantability and fitness applicable to the above described heating element are limited in duration
to the period of coverage of the applicable express written limited warranties set forth above. Some jurisdictions do not allow
limitations on how long an implied warranty lasts, so the above limitation may not apply to you. This warranty gives you
specific legal rights, and you may also have other rights which may vary from jurisdiction to jurisdiction.
VIKING RANGE CORPORATION
111 Front Street • Greenwood, Mississippi (MS) 38930 USA • (662) 455-1200
Specifications subject to change without notice
For more product information, call 1-888-VIKING1 (845-4641), or visit the Viking web
site at http://www.vikingrange.com
F1614G
(PS0804VR)
built-in warming drawer
Congratulations . . .
Your purchase of this product attests to the importance you place
upon the quality and performance of the major appliances you use. With
minimal care, as outlined in this guide, this product is designed to provide
you with years of dependable service. Please take the few minutes
necessary to learn the proper and efficient use and care of this quality
product.
We appreciate your choosing a Viking Range Corporation product,
and hope that you will again select our products for your other major
appliance needs.
Table of Contents
Page
Important Safety Instructions . . . . . . . . . . . . . . . . . . . . . . . . . . . . . . 2
Warming Drawer Features . . . . . . . . . . . . . . . . . . . . . . . . . . . . . . . . 4
Operation . . . . . . . . . . . . . . . . . . . . . . . . . . . . . . . . . . . . . . . . . . . . 4
Temperature Control . . . . . . . . . . . . . . . . . . . . . . . . . . . . . . . . . . . . 5
Moisture Selector Control . . . . . . . . . . . . . . . . . . . . . . . . . . . . . . . . 6
Cleaning and Maintenance . . . . . . . . . . . . . . . . . . . . . . . . . . . . . . . 9
Service Information . . . . . . . . . . . . . . . . . . . . . . . . . . . . . . . . . . . . . 11
Warranty . . . . . . . . . . . . . . . . . . . . . . . . . . . . . . . . . . . . . Rear Cover
IMPORTANT SAFETY INSTRUCTIONS
WARNING: To reduce the risk of fire, electric shock, or injury to persons
when using your appliance, follow basic precautions, including the
following:
1. Read all instructions before using the warming drawer.
2. Be sure the warming drawer is properly installed and grounded by a
qualified technician.
3. Do not touch the heating elements or interior surface of the drawer
while it is in use. Use handles or knobs.
4. Do not leave children alone or unattended in an area where
appliances are in use. Close supervision is necessary when any
appliance is used by or near children.
5. Do not repair or replace any part of this drawer. All servicing should
be done by an authorized service agency or representative. Do not
tamper with the controls.
6. Do Not store flammable materials in the drawer.
7. Use only dry potholders. If moist or damp potholders are used,
steam from potholders could cause a steam burn. Do not let
potholders touch hot heating elements located under the drawer. Do
not use a towel or bulky cloths in place of potholders.
2
8. Wear proper apparel - Loose fitting or hanging garments should
never be worn while using the appliance.
9. Use care when opening the drawer. Let hot air or steam escape (open
vent) before removing or replacing food.
10. Do not place food in unopened containers in the drawer. Pressure
could build up and cause the container to burst.
11. Never use the appliance for other than intended use.
12. Do not use water on grease fires. Smother fire or flame or use dry
chemical or foam-type extinguisher.
13. Do not use aluminum foil to line the drawer. It is an excellent heat
insulator and will trap heat beneath it. This will upset the
performance and can damage the interior finish.
14. Keep warming drawer vent ducts unobstructed.
15. Placement of warming racks - Always place racks in desired position
while drawer is cool. If racks must be moved while warming drawer is
hot, do not let potholder contact heating elements.
16. Keep drawer closed when not in use.
17. Do not heat articles that have been previously cleaned in, washed in,
or spotted with gasoline, dry-cleaning solvents, or other flammable or
explosive substances, as they give off vapors that could ignite or
explode.
18. Do not place items exposed to cooking oils in your warming drawer.
Items contaminated with cooking oils may contribute to a chemical
reaction that could cause a load to catch fire.
19. Do not use heat on articles containing foam rubber or similarly
textured rubber-like materials.
20. Do not install or store indoor models where they will be exposed to
the weather.
- SAVE THESE INSTRUCTIONS -
3
Warming Drawer Features
Moisture
Selector
Control
Vents
Power
“ON”
Light
Identification
Label
Temperature
Control Knob
(behind
Heating Options:
A. Moist Heat
This prevents food from drying out, since moisture, as well as heat, is
applied to the warming chamber.
1. Your warming drawer comes with two low racks and a moisture cup.
One low rack has an opening in the rear center for the moisture cup.
Place low racks in warming drawer. Fill the moisture cup approximately
half full with water. (Should use approximately 1/2” cup water). Place
the moisture cup in the opening in the rear center opening of the low
rack.
2. Place the food directly on the rack or you can use any pans that will fit
in the warming drawer. The rack supports the food off of the steam
vents where slight amounts of moisture may appear.
3. Open the front moisture selector control half-way. (See moisture
selector section on page 7.) Additional adjustments to the control may
become necessary depending upon the type and amount of food
stored in the drawer, the number of times the drawer is opened per
hour, and the temperature setting.
B. Dry Heat
For some applications you may want to store previously prepared
foods in a “dry heat” environment. This can be easily accomplished by
placing the food directly into the empty drawer pan and sliding the
moisture control selector to open. This allows the moist heat to escape
and provides a dry environment for the food
C. Optional Accessories for Moist or Dry Heat
Pans / Lids - This warming drawer is designed to accommodate
standard size pan inserts. The optional pan/lid set consists of one 4” D. x
12” L. x 10½” W. pan/lid, two 4” D. x 12” L. x 7” W. pans/lids, and two
2½” D. x 12” L. x 7” W. pans/lids.
Operation
Your warming drawer works in two ways:
1. Sealing moisture within the drawer to keep food moist
2. Allowing the moisture to escape and keep food crisp
The purpose of the warming drawer is to hold hot cooked foods at serving
temperature. Always start with hot food; cold food cannot be heated in
the warming drawer.
4
Low Rack with
Moisture Cup
Pans/Lids
5
Temperature Control
Power “ON” Light
This dial is used to select the temperature of the drawer and is
located on the right side of the control panel. The 1 setting represents
low, 2 represents medium and 3 represents high. The majority of foods
are held at a medium setting to maintain a serving temperature. However,
your own preference may be for hotter foods.
To keep several types of food hot for serving, key
the temperature setting for the meat. For example,
to hold rare roast beef, select a lower setting,
cover the other foods that otherwise would
be kept at a higher setting.
Repeated opening of the drawer allows
the hot air to escape and the food to cool.
The drawer should not be opened unless
adding or removing food.
The power “on” light is located above the temperature control knob.
It turns on when the control knob is set and cycles on and off with the
heating element as temperature is maintained.
Proofing
Yeast dough can be proofed in the warming drawer. Place the
dough in a bowl. Place the bowl on the low rack in the drawer. Fill the
moisture cup half full with water and place in the opening in the rear
center of the low rack. Turn the temperature control to the lowest setting
to facilitate the fermentation time. A towel should be placed over the
dough to minimize surface drying. The dough should remain in the
warming drawer until it has doubled in size and a slight depression
remains when the surface is touched gently with a finger.
Warming Plates
To warm serving bowls and plates, place temperature control on a
low setting. Place the empty dishes on the low rack to raise them off the
bottom of the drawer. If you want hotter dishes or want to heat fine china,
please check with the manufacturer of the dishes for their maximum heat
tolerance.
6
Moisture Selector Control
The moisture selector control is located at the top of the warming
drawer. To keep foods moist, move the handle to the right. This closes
the vents and seals the moisture inside the drawer. For crisp foods, move
the handle to the left. This opens the vents and allows the moisture to
escape. The moisture selector can be placed in any position between “-”
(open for less moisture) and “+” (closed to retain moisture) to maintain
any degree of moisture.
In the closed position, the drawer is completely sealed which keeps
the hot foods moist and soft. In this setting, condensation may be noticed
around the inside edge of the drawer. If the drawer is not full, there may
be some drying on the surface of the food. If this happens, simply cover
the food with a lid or aluminum foil.
When in the open position, the drawer is vented, which lets moisture
escape. This dry heat keeps the foods exterior dry and crisp. With the
vents open, it is normal for moisture to collect on surfaces above the
warming drawer. Simply wipe up the moisture with a dry cloth.
CAUTION
Do not use plastic wrap to cover foods placed in the drawer, nor to keep
foods warm that are wrapped or placed in plastic containers for heating.
Plastics can melt onto the drawer if they are in direct contact. If melted
onto the drawer, they can be very difficult to remove.
7
Temperature and Moisture Guidelines
Cleaning and Maintenance
The information below is given as a guide only. You may need to
vary the heat settings to suit your personal requirements.
1. Allow warming drawer to cool completely.
2. It is important to keep the slide rails clear and free from debris.
Periodic cleaning of slide rails and other adjoining parts is necessary to
assure smooth drawer operation.
3. If needed, the warming drawer pan support can be removed for
cleaning. Pull the warming drawer out until fully extended. Slide
finger along right and left side rail until you reach hand latches (located
at the front of rails). Pull up on both right and left latches. Pull drawer
support completely out.
4. When installed outdoors, inspect annually the silicon seal around the
flange of the appliance. Re-seal as needed to assure this seam is
waterproof.
Food
Temperature Settings
Bacon
Moisture Settings
2-3
-
2
+
1-2
+
Bread, hard roll
2
-
Bread, soft rolls
2
-
Casseroles
2
+
Cooked cereal
2
+
Dough, proofing
1
+
Eggs
2
+
Beef, medium and well done
Beef, rare
Fish, seafood (baked)
2
+
Fried foods
3
-
Fruit
2
+
Gravy, creamed sauces
2
+
Ham
2
+
2-3
+
Pies, one crust
2
+
Pies, two crust
2
-
Pizza
2-3
halfway
Pork
2
+
Potatoes, baked
3
halfway
Potatoes, mashed
2
+
2-3
+
2
-
Pancakes, waffles
Poultry
Vegetables
Latches
8
9
Service Information
CAUTION
Do not use any cleaning agent with chlorine or chlorine compounds
on stainless steel finish. Chlorine and chlorine compounds are
corrosive to stainless steel.
CLEANING CHART
Material / Problem
Cleaning Products
Directions
Stainless Steel /
Enamels
Mild cleaners;
Hard Water Spots
and Scales
Vinegar and water
Sponge with cloth, then rinse
with clear water and wipe
dry. Satisfactory for use on
all finishes.
Swab or wipe with cloth.
Rinse with clear water and
dry. Satisfactory for use on
all finishes.
Apply with damp sponge or
cloth. Satisfactory for use on
all finishes if rubbing is light.
Rub in direction of the polish
lines.
Pull off knob. Wash, but do
not soak. Rinse with water,
dry and replace on control.
Soft, non-abrasive
cleaners
Plastic (Control Knob)
Soap and water
If your warming drawer should fail to operate:
1. Have you read and followed the instructions provided?
2. Is the circuit breaker open, or is a fuse blown?
If service is required:
1. Call your dealer or authorized service agency. The name of the
authorized service agency can be obtained from the dealer or
distributor in your area.
2. Have the following information readily available:
a. Model number
b. Serial number
c. Date purchased
d. Name of dealer from whom purchased
3. Clearly describe the problem that you are having.
If you are unable to obtain the name of an authorized service agency, or if you
continue to have service problems, contact Viking Range Corporation at (662)
451-4133 or write to:
VIKING RANGE CORPORATION
PREFERRED SERVICE
111 Front Street
Greenwood, Mississippi (MS) 38930 USA
Record the information indicated below. You will need it if service is ever
required. The model and serial number for your warming drawer are located
on the left side of the drawer housing on an identification label. Pull out drawer
for access.
Model Number
Serial Number
Date of Purchase
Date Installed
Dealer’s Name
Address
If service requires installation of parts, use only authorized parts to ensure
protection under the warranty.
PLEASE RETAIN THIS MANUAL FOR FUTURE REFERENCE
10
11