1
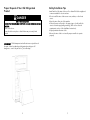
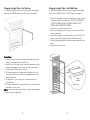
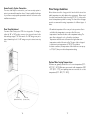
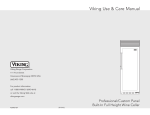
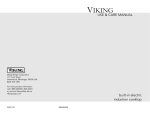
Viking Use & Care Manual
Viking Range Corporation
111 Front Street
Greenwood, Mississippi 38930 USA
(662) 455-1200
For product information
call 1-888-VIKING1 (845-4641)
or visit the Viking Web site at
vikingrange.com
Built-In Full Height Wine Cellar
F20382 EN
(030308J)
Congratulations
Your purchase of this product attests to the importance you place upon
the quality and performance of the major appliances you use. With
minimal care, as outlined in this guide, this product is designed to
provide you with years of dependable service. Please take the few
minutes necessary to learn the proper and efficient use and care of this
quality product.
We appreciate your choosing a Viking Range Corporation product, and
hope that you will again select our products for your other major
appliance needs.
Table of Contents
Warnings . . . . . . . . . . . . . . . . . . . . . . . . . . . . . . . . . . . . . . . . . . . . 3
Important Safety Instructions . . . . . . . . . . . . . . . . . . . . . . . . . . . . 3
Proper Disposal of Your Old Refrigerated Product . . . . . . . . . . . 4
Features of Your Wine Cellar . . . . . . . . . . . . . . . . . . . . . . . . . . . . 6
Before Using Your Wine Cellar . . . . . . . . . . . . . . . . . . . . . . . . . . . 8
Electronic Control Center . . . . . . . . . . . . . . . . . . . . . . . . . . . . . . . 9
Wine Storage System . . . . . . . . . . . . . . . . . . . . . . . . . . . . . . . . . . 11
Wine Storage Guidelines . . . . . . . . . . . . . . . . . . . . . . . . . . . . . . . 17
Cleaning and Maintenance. . . . . . . . . . . . . . . . . . . . . . . . . . . . . . 19
Troubleshooting . . . . . . . . . . . . . . . . . . . . . . . . . . . . . . . . . . . . . . 20
Service Information . . . . . . . . . . . . . . . . . . . . . . . . . . . . . . . . . . . . 21
Warranty . . . . . . . . . . . . . . . . . . . . . . . . . . . . . . . . . . . . . . . . . . . . 22
WARNING
To reduce the risk of fire, electric shock, or injury when using your wine
cellar, follow these basic precautions:
•Read all instructions before using
the wine cellar.
•Never allow children to operate,
play with, or crawl inside the wine
cellar.
•Never clean wine cellar parts with
flammable fluids. The fumes can
create a fire hazard or explosion.
•Always turn the power on/off
switch (located behind the air
grille on top right side) to the
OFF position before attempting
to change light tubes, clean, or
service the wine cellar.
•FOR YOUR SAFETY•
DO NOT STORE OR USE
GASOLINE OR OTHER
FLAMMABLE VAPORS AND
LIQUIDS IN THE VICINITY OF
THIS OR ANY OTHER
APPLIANCE. THE FUMES CAN
CREATE A FIRE HAZARD OR
EXPLOSION.
-SAVE THESE INSTRUCTIONS-
WARNING
Your safety is important to us. This use and care manual contains
safety symbols and statements. Please pay special attention to these
symbols and follow any instructions given.
This symbol alerts you to hazards such as fire, electrical shock
or other injuries.
2
ELECTRICAL SHOCK HAZARD
Plug into a grounded 3-prong outlet. If a 2-prong wall receptacle is
encountered, contact a qualified electrician
Do not remove ground prong. Unit must be grounded at all times.
Do not use an adapter.
Do not use an extension cord.
Failure to follow these instructions can result in death, fire, or electrical
shock.
3
Proper Disposal of Your Old Refrigerated
Product
DANGER
Risk of Child Entrapment
BEFORE YOU THROW AWAY ANY WINE CELLAR, REFRIGERATOR OR
FREEZER:
•Take off the doors.
•Leave the shelves in place so that children may not easily climb
inside.
Safety/Installation Tips
•Install and level the wine cellar on a floor that will hold the weight and
in an area suitable for its size and use.
•Do not install the wine cellar near an oven, radiator, or other heat
source.
•Keep the wine cellar out of the weather.
•Connect the wine cellar only to the proper type of outlet, with the
correct electrical supply and grounding. (Refer to the electrical
requirements section of the Installation Instructions).
•Properly maintain the wine cellar.
•Be sure the wine cellar is not used by anyone unable to operate
properly.
IMPORTANT: Child entrapment and suffocation are not problems of
the past. Junked or abandoned refrigerated products are still
dangerous... even if they will sit for “just a few days.”
4
5
Features of Your Wine Cellar
(1)TriTempTM Storage System
(8)Open Door Alarm
(behind grille)
(7)High Temperature Alarm
(behind grille)
(9)Home Security System
Connection
(behind grille)
(2)Electronic Control
Center
Your wine cellar has three independent temperature zones separated by
gaskets and tempered glass shelves to seal the zones. This allows you to
set the temperatures in your wine cellar to match your wine storage
needs. Each zone has its own fan, allowing for true air circulation within
the zone. One control, conveniently located at the top of the unit, allows
you to precisely control the temperature in each zone separately.
Bottom Zone - The bottom zone is designed for longer term wine
storage with no lighting and raised wood facings to add further UV
protection. This is the perfect place to store your most delicate and
precious wine.
(6)Black Interior
150 Bottle Capacity
Your wine cellar will accommodate 150 bottles of wine on the 15 shelves.
Each shelf has a 10 bottle capacity.
(5)Low Intensity
Lighting
(4)Energy
Efficient/UV
Resistant Glass
(1)TriTempTM
Storage System
(150 Bottle
Capacity)
(3)Versatile
Shelving
System
(11) Door Lock
(on front of door)
(2)Electronic Control Center
The electronic control center allows you to set and monitor the
operations of the wine cellar easily and accurately.
(3)Versatile Shelving System
Your wine cellar's shelving system is designed for optimal wine storage.
This system includes two convertible display shelves that lay flat for
normal storage or convert to display shelves to beautifully display your
wine. All shelves are coated to absorb vibration and prevent unnecessary
movement. Shelves pull forward on roller bearing glides and remain level
at full extension allowing for easy loading and unloading and are fully
removable for easy cleaning. Shelves are designed to accommodate
different bottles sizes and shapes including standard bottle, half-size
bottles and magnums.
(4)Energy Efficient & UV Resistant Glass Doors
(10)Door Stop Settings 90°, 110°, 120°
Glass door units are energy efficient and UV resistant. The doors are
insulated and coated to protect against UV rays.
(5)Low Intensity Lighting
The low intensity lighting system allows wines to be displayed without
compromising wine integrity. Lights can be set so that they stay on for
display purposes or to only come on when the door is opened.
6
7
(6)Black Interior
IMPORTANT
The wine cellar's black interior not only provides a stylish backdrop for
your prized wines but absorbs harmful light and protects your wines.
Be sure the power on/off switch is in the ON position after cleaning
the wine cellar or changing the light tubes.
(7)High Temperature Alarm
Power ON/OFF Switch
Your wine cellar has a high temperature alarm feature that will sound if
temperatures within your wine cellar fluctuate outside of your set point
by 5 degrees for an extended period of time.
The power on/off switch is used to turn the power off to the wine cellar
when cleaning it or changing the light tubes. The wine cellar is shipped
with the power on/off switch in the on position. To turn the power off,
remove the center grille assembly by grasping the three center louvers,
lifting up and pulling outward. Press the power on/off switch to the “Off”
position. To turn the power back on, press the power on/off switch to the
“On” position. Replace the center grille assembly by aligning the hooks
in the assembly with the slots in the brackets which are attached to the
grille. Push in over the hooks and slide grille assembly downward.
(8)Door Alarm
The door alarm feature alerts you if you have left the wine cellar's door
open for more than 3 minutes.
(9)Connection to Home Security System
For added peace of mind, your wine cellar can be connected to your
home security system to alert you while away from home if the
temperatures within your wine cellar fluctuate outside of your set point
by 5 degrees for an extended period of time.
(10)Door Stop Settings
For utmost flexibility, the wine cellar door stop can easily be set to 90,
110, or 120 degrees, allowing it to be used in many different
applications.
(11)Door Lock
A keyed door lock comes standard with the wine cellar. The door lock
provides added protection for your wine collection.
Showroom Switch
The showroom switch allows electronic controls and interior lights to
function independently of the refrigeration system. Your wine cellar is
shipped with the showroom switch in the “Off” position. To use the
showroom mode, remove center grille assembly and turn the showroom
switch to the “On” position. Showroom mode will be engaged.
Electronic Control Center
UPPER
TriTemp Wine Storage
150 Bottle Capacity
ZONE
LOWER
TEMP
MIDDLE
LOWER
LIGHTS
HIGHER
TEMP
DISPLAY
ALARM
Three Independent Temperature Areas
Electronic Control Center
Before Using Your Wine Cellar
To obtain the best possible results from your wine cellar, it is important
that you operate it properly.
Power On/Off
Switch
Showroom
Switch
8
With the TriTempTM Storage System, you can set the temperature in each
of the three zones within a range of 43°F to 65°F (6°C to 18°C). The unit
is factory set at 43°F (6°C) in the top two zones and 55°F (13°C) in the
bottom zone. Select the zone you wish to adjust by pressing the "ZONE"
key. The lighted bar on the control center will toggle between the upper,
middle, and lower zones. When the bar above the zone you wish to
adjust is lit, press the lower temp or higher temp key to select the
desired temperature. The set temperature will flash on the control center.
After 7 seconds, the temperature displayed will revert to the ACTUAL
zone temperature and will no longer flash. To again view the set
temperature, press the "ZONE" key. Refer to pages 17-18 for wine
storage guidelines and suggested serving temperatures.
9
Lower Temp
Holiday Mode for Sabbath Observance
The lower temp key allows you to decrease the temperature in the
selected zone in one degree increments.
Pressing and holding the display button continuously for 10 seconds
accesses this mode. The display will continue to be on as long as the
button is pressed and at the end of 10 seconds, the display will turn off
and holiday mode will be engaged. NOTE: To enter Holiday Mode, the
display must be on prior to initiating the Holiday Mode. To cancel
Holiday Mode, press and hold the display button continuously for 10
seconds. At the end of 10 seconds the display will turn on. When Holiday
Mode is selected: a random time delay will be applied to the compressor
relay start and stop. The chamber lights relay will remain de-energized.
The display will not be illuminated. Audible sound (beep) from the
control will be disabled. Fan outputs will not be affected by opening or
closing of the door switch. All front panel buttons will be inoperative
except a 10 second press of the display button causing the control to exit
Holiday Mode. All other functions will continue as in normal cooling.
Higher Temp
The higher temp key allows you to increase the temperature in the
selected zone by one degree increments.
Lights
The lights key allows you to turn the lighting on independent of the door
opening for displaying the contents of the upper and middle zones. To
turn the lights on, press the button once. Lights should not be left on for
extended periods of time, as long term light exposure will affect the
quality of your wine.
Display
The display key will turn the power to the display off. Press this button if
you do not wish for the control panel to be illuminated. To turn the
display on, press the display key.
Wine Storage System
CAUTION
Alarm
Your wine cellar is equipped with two alarms: High Temperature alarm
and Open Door alarm. The High Temperature alarm will signal if the
temperature in any zone fluctuates 5 degrees from your set point for an
extended period of time. To set this alarm, press and hold the alarm key
for two seconds. A bell will appear on the display when the alarm has
been successfully enabled. When the alarm is triggered, a beeping noise
will be heard and the wine cellar’s display will flash and show an alarm
message. To turn the alarm off, press the alarm key. To completely
disengage the alarm, press and hold the alarm key for two seconds. The
Open Door alarm is set automatically. The Open Door alarm will signal if
the wine cellar’s door has been left open for three minutes. A beeping
noise will be heard and an alarm message will appear on the display. The
wine cellar’s door must be closed in order to turn the alarm off.
Temperature Unit Conversion
Your wine cellar is factory set to display degrees Farenheit. If you prefer
Celsius, press and hold the alarm key and display key for 5 seconds.
10
To store magnum or oversized bottles, the shelf directly above must be
removed. Failure to do so could result in bottle breakage. See page 12
for proper shelf removal.
Versatile Shelving System
Your wine cellar's shelving system makes it easy to store standard,
magnum and half-size bottles easily. There are a total of fifteen wine
shelves which will each accommodate 10 bottles of wine, alternately
displayed. Two convertible wine shelves adjust to allow bottles to be
displayed.
Loading the Shelves
To load a shelf, pull the
shelf forward and place
the bottles on the shelf
with the neck in the
center of the shelf.
Alternate the direction of
the next bottle. Note the
illustration to the right
for maximum bottle
storage.
11
Convertible Display Shelves
CAUTION
Remove wine bottles from shelves before removing shelves. Failure to
do so could result in bottle breakage.
Shelf Removal
To remove a wine shelf:
Your wine cellar has two convertible display shelves - one in each of the
top two compartments. To use the display shelf, first remove any wine
bottles stored on the shelf. Next, remove the wine shelf directly above
(see shelf removal instructions on page 12). Lift the shelf up, rotate the
shelf support up and lock shelf into place with legs (see illustration
below).
Shelf Support
1) Pull the shelf forward
until it is fully
extended.
Wood
Front
2) Lift up the front of
the shelf.
Wood Facings
Maple wood facings are included with each shelf. These facings may be
left unfinished, finished and sealed, or replaced with other wood to
match your cabinetry. Refer to the wine cellar installation instructions on
how to replace the wood facings.
NOTE: Some finishes may cause undesirable odors. The recommended
procedure is to test a sample in the wine cellar on scrap material before
making permanent changes to wine cellar fronts.
3) Remove from the
glide.
To replace the shelf, line shelf up with glide, lower into place and push
shelf back.
12
13
Changing the Light Tube in the Top Zone
Changing the Light Tube in the Middle Zone
To change the light tube, first remove the center grille assembly and
turn the power ON/OFF switch to the OFF position (see page 9).
To change the light tube, first remove the center grille assembly and
turn the power ON/OFF switch to the OFF position (see page 9).
1. Remove the lamp wire cover by removing the two screws located on
the upper left side of the middle zone. (NOTE: ONLY REMOVE
THE TWO SCREWS HOLDING THE WIRE COVER; DO NOT
REMOVE SHELF MOUNTING SCREWS).
2. Set the wire cover and screws to the side.
3. Disconnect the lamp by disconnecting one yellow and one white
wire from each lamp.
4. Remove the clamp and screw located at the end of the lamp. The
lamp is located on the underside of the middle mullion shelf.
5. Carefully unsnap light tube from shelf and snap new light tube into
place.
6. Reassemble in reverse order.
Control Panel
1. Remove the four screws from the lamp holder attaching the lamp
holder to the underside of the control panel.
2. Rotate the rear of the lamp holder down and forward then pull the
front tabs that engage into the control out of the control panel.
3. Set the lamp holder and screws to the side.
4. Pull the wires attached to the lamp tube through the hole in the
control panel and disconnect the wires attaching the lamp to the
cabinet wire harness.
5. The lamp tube is to be connected to one white wire and one
yellow/red wire.
6. Place tubes in lamp holder. Feed wires back into control panel and
reassemble in reverse order.
NOTE: Please contact your Viking Range Corporation parts distributor
or dealer to order new light tubes.
14
Screws
Light
Clamps
Wire Cover
15
Home Security System Connection
The wine cellar may be connected to your home security system to
protect your wine while away from home. Contact a qualified technician
or your home security system representative and refer to the wine cellar
installation instructions.
Door Stop Adjustment
Your wine cellar is factory set at 110° door stop position. To change to
either the 90° or 120° position, remove door stop pin located in the
bottom hinge using a 3/16” allen wrench. For 120° swing, move pin to
utmost forward stop hole. For 90° swing, move pin to utmost rear stop
hole.
Wine Storage Guidelines
Wines that are stored for a long period of time should be stored at a
stable temperature in a dark, vibration free environment. Wines stored
for a short term (six months) can be stored at 55°F (13°C), or they can be
stored at temperatures optimal for serving. The chart on the next page
provides recommended serving temperatures for different types of
wines.
•The ambient temperature of the room you locate your wine cellar in
could affect the temperature in your wine cellar if the room
temperature is lower than the wine cellar compartment setting. The
wine cellar is designed to cool, not heat the stored wines.
Temperatures inside the wine cellar cannot be higher than room
temperatures outside of the wine cellar. The wine cellar is designed
to perform at room temperatures of 70°F (21°C) and above.
•In certain conditions, the temperature of the middle zone can vary up
to 5°F (2.8°C) from your selected temperature setting.
Optimal Wine Serving Temperatures
Red wines are generally served from cool to room temperatures (55°F 65°F [13°C - 18°C]). White wines are served at cellar temperatures (50°F
- 55°F [10°C - 13°C]), and sparkling wines are served at the coolest
temperatures (45°F - 50°F [7°C - 10°C]).
90° stop
(farthest from unit)
120° stop
(closest to unit)
16
17
Recommended Wine Serving Temperatures
Cleaning and Maintenance
Exterior
DOMESTIC FRIDGE TEMP
SWEET WINES
IDEAL CELLAR TEMPERATURE
LIGHT REDS
ROOM TEMPERATURE
Stainless Steel - Clean with a non-abrasive stainless steel cleaner and
soft cloth.
FULL-SCALE REDS
Painted Doors - Clean with mild detergent, warm water and sponge or
soft cloth. Hand wash, wipe and dry thoroughly.
Glass - Clean with glass cleaner and a soft cloth or paper towel.
Interior
Interior (liner and shelves) - Clean with a baking soda or mild detergent
and water solution and a sponge or soft cloth. Wipe and dry thoroughly.
Take care not to get water on the lights, control panel or wood facings
of the shelves. DO NOT USE ABRASIVE CLEANERS.
Gaskets - Clean with a mild detergent and water solution and a sponge,
soft cloth or paper towel. Wash, wipe, and dry thoroughly. Apply a thin
coat of petroleum jelly to keep gasket pliable. Do not use waxes,
concentrated detergents, or cleaners containing chlorine bleach.
Electronic Control Center - Clean with mild detergent, warm water, and
a sponge or soft cloth.
©Octopus Publishing Group. From The World Atlas of Wine by Hugh
Johnson and Jancis Robinson, published by Mitchell Beazley.
18
19
Troubleshooting
Service Information
Performance problems often result from little things that can be fixed
without tools. Listed in the chart below are some of the most common
problems consumers run into with their wine cellar. Please read through
the troubleshooting chart and "Service Information" on the next page
before calling for service on your wine cellar.
Problem
Wine cellar will not operate - Is the power cord plugged into a live
circuit with the proper voltage? Has a household fuse blown or circuit
breaker tripped? Is the power switch in the ON position?
Water in the defrost pan - This is normal in hot, muggy weather. Make
sure the pan is level so it does not overflow.
If service is required after checking the troubleshooting guide:
1. Call your dealer or authorized service agency. The name of the
authorized service agency can be obtained from the dealer or
distributor in your area.
2. Have the following information readily available: Model Number,
Serial Number, Date of Purchase, and Name of dealer from whom
purchased
3. Clearly describe the problem that you are having.
If you are unable to obtain the name of an authorized service agency,
or if you continue to have service problems, contact Viking Range
Corporation at (888) 845-4641 or write to:
Lights do not work - Has a household fuse blown or circuit breaker
tripped? Is a light burned out?
Wine Cellar seems to run too long - The motor will run longer on hot
days, if the room is too warm, several warm wine bottles are added at
the same time, or if the door is opened too often.
Wine Cellar too warm - Is the electronic control center set properly?
Has the door been left open for a long period of time?
VIKING PREFERRED SERVICE
111 FRONT STREET
GREENWOOD, MS 38930 USA
Record the following information indicated below. You will need it if
service is ever required. The serial number and model number of your
wine cellar is located on the left wall in the bottom zone.
Model Number
Serial Number
Date of Purchase
Date Installed
Dealer's Name
Address
If service requires installation of parts, use only authorized parts to
ensure protection under the warranty.
Please retain this manual for future reference.
20
21
BUILT-IN WINE CELLAR WARRANTY
TWO YEAR FULL WARRANTY
Built-in full height wine cellars and all of their components and accessories, except as detailed below*, are warranted to be
free from defects in material or workmanship under normal household use for a period of two (2) years from the date of
original retail purchase. Viking Range Corporation, warrantor, agrees to repair or replace, at its option, any part which fails
or is found to be defective during the warranty period
*Painted and decorative items are warranted to free from defective materials or workmanship for a period of ninety (90)
days from the date of original retail purchase. ANY DEFECTS MUST BE REPORTED TO THE SELLING DEALER WITHIN
NINETY (90) DAYS FROM DATE OF ORIGINAL RETAIL PURCHASE.
SIX YEAR FULL WARRANTY
Any sealed refrigeration system component, as listed below, is warranted to be free from defective materials or
workmanship in normal household use during the third through the sixth year from the date of original retail purchase.
Viking Range Corporation, warrantor, agrees to repair or replace, at its option, any part which fails or is found to be
defective during the warranty period.
Sealed Refrigeration System Components:
Compressor, Evaporator, Condenser
Connecting Tubing, Dryer/Strainer, solenoid valves
TWELVE YEAR LIMITED WARRANTY
Any sealed refrigeration system component, as listed above, which fails due to defective materials or workmanship in
normal household use during the seventh through the twelfth year from the date of original retail purchase will be repaired
or replaced, free of charge for the part itself, with the owner paying all other costs, including labor.
NINETY (90) DAY RESIDENTIAL PLUS WARRANTY This warranty applies to applications where use of the product extends
beyond normal residential use. Examples are, but not limited to, bed and breakfasts, fire stations, private clubs, churches, etc.
This warranty excludes all commercial locations such as restaurants, food service locations and institiutional food service
locations.
This warranty extends to the original purchaser of the product warranted hereunder and to each transferee owner of the
product during the term of the warranty.
This warranty shall apply to products purchased and located in the United States and Canada. Products must be purchased
in the country where service is requested. Warranty labor shall be performed by an authorized Viking Range Corporation
service agency or representative. Warranty shall not apply to damage resulting from abuse, accident, natural disaster, loss
of electrical power to the product for any reason, alteration, improper installation, improper operation or repair or service to
the product by anyone other than an authorized Viking Range Corporation service agency or representative. Warranty shall
not apply to damage resulting from indoor units being used in outdoor situations. This warranty does not apply to
commercial usage. Warrantor is not responsible for consequential or incidental damage whether arising out of breach of
warranty, breach of contract, or otherwise. Some jurisdictions do not allow the exclusion or limitation of incidental or
consequential damages, so the above limitation or exclusion may not apply to you.
Owner shall be responsible for proper installation, providing normal care and maintenance, providing proof of purchase
upon request, and making the appliance reasonably accessible for service. If the product or one of its component parts
contains a defect or malfunction during the warranty period, after a reasonable number of attempts by the warrantor to
remedy the defects or malfunctions, the owner is entitled to either a refund or replacement of the product or its component
part or parts. Replacement of a component part includes its free installation. Warrantor’s liability on any claim of any kind,
with respect to the goods or services covered hereunder, shall in no case exceed the price of the goods or service or part
there of which gives rise to the claim.
WARRANTY SERVICE: Under the terms of this warranty, service must be performed by a factory authorized Viking Range
Corporation service agent or representative. Service will be provided during normal business hours, and labor performed at
overtime or premium rates shall not be covered by this warranty. To obtain warranty service, contact the dealer from whom
the product was purchased, an authorized Viking Range Corporation service agent, or Viking Range Corporation. Provide
model and serial number and date of original purchase. For the name of your nearest authorized Viking Range Corporation
service agency, call the dealer from whom the product was purchased or Viking Range Corporation. IMPORTANT: Retain
proof of original purchase to establish warranty period.
The return of the Owner Registration Card is not a condition of warranty coverage. You, however, should return the Owner
Registration Card so that Viking Range Corporation can contact you should any question of safety arise which could affect
you.
Any implied warranties of merchantability and fitness applicable to the above described built-in full height wine cellar are
limited in duration to the period of coverage of the applicable express written limited warranties set forth above. Some
jurisdictions do not allow limitations on how long an implied warranty lasts, so the above limitation may not apply to you.
This warranty gives you specific rights, and you may also have other rights which may vary from jurisdiction to jurisdiction.
Specifications subject to change without notice.
22
23