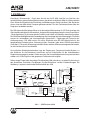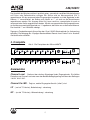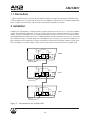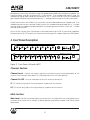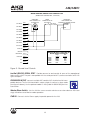
1
AS8/AS8TC AS8 und AS8TC A u t o m a t i c M i c r o p h o n e M i x e r Bedienungsanleitung EU-Konformität - Dieses Produkt entspricht EN 500-81/1 + EN 500-82/1 EU Conformity - This product conforms to EN 500-81/1 + EN 500-82/1 Conformité CE - Ce produit réspond à la norme EN 500-81/1 + EN 500-82/1 Conformità CEE - Questo prodotto risulta conforme alle norma EN 500-81/1 + EN 500-82/1 Conformadad CE - Este Producto cumple con la norma EN 500-81/1 + EN 500-82/1 1 AS8/AS8TC Inhaltsverzeichnis AKG AS8 und AS8TC Handbuch 1. Einführung ....................................................... 3 2. Installation ....................................................... 4 3. Frontplatte........................................................ 5 Kanalsektion .............................................................................. 5 Hauptsektion ............................................................................. 6 4. Geräterückseite ............................................... 6 5. Einstellungen für den Betrieb ........................ 9 6.1 Das LecNet Pro Programm ......................... 10 Einführung .............................................................................. 10 Was ist LecNet ? .................................................................... 11 Einführung .............................................................................. 11 Hinweise zum LecNet ............................................................ 11 Option-Menü........................................................................... 12 CheckNet-Menü ..................................................................... 13 Devices-Menü ........................................................................ 13 LecNet Problemlösungen ....................................................... 14 6.2 Das LecNet AS8 Programm ........................ 15 Hauptsektion .......................................................................... 16 Remote Level Control ............................................................ 16 Auswahl Auto/Direct Mode ..................................................... 17 Compressor/Leveller System ................................................. 18 7. AS8 Funktionsprinzip.................................... 19 8. Serielle Schnittstelle ..................................... 20 9. Spezifikationen .............................................. 21 10. Zubehör ........................................................ 22 2 AS8/AS8TC 1. Einführung Herzlichen Glückwunsch! Durch den Ankauf des AKG AS8 sind Sie nun Besitzer des fortschrittlichsten automatischen Mikrofonmixers, der derzeit am Markt erhältlich ist. Weiters werden Sie in Kürze die Einfachheit der Einstellung und Bedienung des Geräts schätzen. Wie Sie bereits wissen, kann der AS8 mittels Computer gesteuert werden. Fast alle Funktionen können über das Programm fernbedient werden. Der AS8 Automatic Microphone Mixer ist ein 8-kanaliger Mikrofonmixer für 19"-Rack-montage, die Gehäusehöhe beträgt eine Höheneinheit. Aufgrund des einzigartigen Adaptive Level Proportional“ - Mischalgorithmus ist die automatische Funktion nicht hörbar und überdies einfach einzustellen. Der AS8 bietet die Möglichkeit der Fernbedienung aller Kanalpegel bzw. des Masterpegels. Zusätzlich steuert ein aufwendiger und leistungsfähiger Kompressor / Pegelregler die Dynamik des Audioprogramms. Der AS8 besitzt auf seiner Rückseite eine RS-232-Schnittstelle für die ferngesteuerte Einstellung bzw. Steuerung mittels Computer (oder eines RS-232-kompatiblen Controllers). Falls es die Anwendung erfordert können mehrere AS8 zusammengeschaltet werden, um die Kanalanzahl zu vervielfachen. Als zusätzliche Sicherheitsmaßnahme kann der Zugang zum Compressor/Leveller-System, zu den Schaltern für die Betriebsart Auto/Direct und zur Schnittstelle für die fernbedienbare Pegelsteuerung gesperrt werden. Selbst wenn das Gerät anschließend ohne Computer betrieben werden soll, ist der Zugriff auf die gesperrten Funktionen nicht möglich. Sollten einige Fragen über die richtige Einstellung des AS8 auftauchen, so finden Sie Hinweise in den Abschnitten Installation, Einstellungen für den Betrieb bzw. LecNet -Problemlösungen. Die Abbildung 1 zeigt das vereinfachte Blockschaltbild des AS8. MAIN IN 1 1 OF 8 INPUT CHANNELS MIX MINUS OUT 2 DIR OUT DIRECT/AUTO PHANTOM POWER +5V TO uP +15V MIC IN + HI CHANNEL LEVEL + AUDIO VCA AUTO MIX 3 LOG IN Tone Control AM8-TC Only MIX MINUS IN 2 CHAN ON MIC PREAMP MIC IN LO MAIN OUT 1 FROM D/A CONVERTER - FROM OTHER CHANNELS Remote Level CH1 Remote Level CH2 Remote Level CH3 Remote Level CH4 Remote Level CH5 Remote Level CH6 Remote Level CH7 Remote Level CH8 Remote Level Master Auto Mix Log In SPEECH FILTER A/D CONV Compressor/ Leveller Threshold LOG CONVERTER From CH1 From CH2 From CH3 From CH4 From CH5 From CH6 From CH7 From CH8 MAIN OUTPUT TO A/D CONVERTER A/D CONV To CH1 To CH2 To CH3 To CH4 To CH5 To CH6 To CH7 To CH8 MAIN LEVEL RS-232 OUT Dir/Auto CH1 Dir/Auto CH2 Dir/Auto CH3 Dir/Auto CH4 Dir/Auto CH5 Dir/Auto CH6 Dir/Auto CH7 Dir/Auto CH8 D/A CONV RS-232 IN 68HC705 uC Compressor/Leveller Gain Reduction Display 12dB SERIAL DATA LINK 9dB SERIAL EEPROM 6dB 3dB Abb. 1 - AS8 Blockschaltbild 3 EXPANSION OUT AUTO MIX 3 LOG OUT MIC GND PREAMP GAIN 0dB (LINE) +30dB (MIC) +50dB (MIC) EXPANSION IN AS8/AS8TC 1.1. Sicherheitshinweise 1. Schütten Sie keine Flüssigkeiten auf das Gerät und lassen Sie keine sonstigen Gegenstände durch die Lüftungsschlitze in das Gerät fallen. 2. Stellen Sie das Gerät nicht in die Nähe von Wärmequellen wie z.B. Radiatoren oder Heizungsrohren auf und setzen Sie es nicht direkter Sonneneinstrahlung, starker Staub- und Feuchtigkeitseinwirkung, Regen, Vibrationen oder Schlägen aus. 2. Installation Die korrekte Installation des AS8 ist denkbar einfach, lediglich einige wenige Dinge sind zu beachten. Der AS8 sollte in einem geerdeten Metallrack installiert werden. Wird nur ein AS8 verwendet, so sollte dieser mit Hilfe der DIP-Schalter auf der Geräterückseite in die Betriebsart “Master” gebracht werden. Sollte ein einzelner AS8 fälschlicherweise im Modus ”Slave” betrieben werden, so ist die Funktion nicht vorhrsehbar, es kann jedoch kein bleibender Schaden am Gerät entstehen. Durch Wahl der Betriebsart “Master” ist die korrekte Funktion sofort wieder sichergestellt. Werden mehrere AS8 zusammen verwendet, so sollte der erste AS8 (der erste ist daran erkennbar, daß der Anschluß “Expansion In” belegt ist, der Anschluß “Expansion Out” jedoch nicht) in den Modus “Master” gebracht werden, die restlichen AS8 in den Modus “Slave.” Die Abbildung 2 zeigt die korrekte Verbindung mehrerer AS8. Abb. 2 - Zusammenschaltung mehrerer AS8 PWR IN (CH40) 20 VAC EXPANSION M A S T E R S L A V E M A S T E R S L A V E M A S T E R S L A V E OUT IN RS232 Master Switch in MASTER Position PWR IN (CH40) 20 VAC EXPANSION OUT IN RS232 Slave Switch in SLAVE Position PWR IN (CH40) 20 VAC EXPANSION OUT IN RS232 Slave Switch in SLAVE Position 4 AS8/AS8TC Der Anschluß der Mikrofone sollte mit qualitativ guten, symmetrisch verdrillten Mikrofonleitungen mit Folien- oder Geflechtschirm erfolgen. Der Schirm wird am Masseanschluß (Pin 1) angeschlossen. Wir ein unsymmetrisches Eingangssignal verwendet, so ist die Signalader an der Klemme “+” anzuschließen, der Schirm muß sowohl an “-”, als auch an die Masseklemme angeschlossen werden. Der Ausgang (Main Out) kann sowohl an symmetrische als auch an unsymmetrische Geräte angeschlossen werden. Wird ein unsymmetrisches Gerät angeschlossen, so wird die unsymmetrische Signalader an “+” angeklemmt, der Schirm nur an die Ground-Klemme. Der Anschluß “-” am AS8 bleibt unbelegt. Zugang zur Fernbedienung erhält man über den 15-pol. SUB-D-Steckverbinder (im Lieferumfang enthalten). Die Belegung des 15-poligen Steckverbinders Remote Level Control“ ist im Abschnitt Geräterückseite ersichtlich. 3. Frontplatte Abb. 3 - Die Frontplatten des AS8 und AS8TC AS8 5 AUTOMATIC MICROPHONE MIXER 6 4 7 1 10 3 ON ON LEVEL ON LEVEL CH. 1 LF ON LEVEL CH. 2 HF LF LEVEL CH. 3 HF ON LEVEL CH. 4 LF HF LF ON LEVEL CH. 5 HF LF ON LEVEL CH. 6 HF LF ON LEVEL CH. 7 HF LF LF HF 5 ON LEVEL CH. 1 ON ON LEVEL CH. 2 LEVEL CH. 3 ON LEVEL CH. 4 ON LEVEL CH. 5 ON LEVEL ON LEVEL 7 1 10 CH. 6 CH. 7 CH. 8 12 9 6 -40 OUT 0 3 POWER COMP / LEVEL 8 2 LEVEL THRESHOLD -20 -10 IN -30 AS8 AUTOMATIC MICROPHONE MIXER 6 4 3 ON GAIN REDUCTION 9 OUTPUT LEVEL CH. 8 HF 8 2 GAIN REDUCTION OUTPUT LEVEL THRESHOLD -20 -10 IN OUT 30 9 12 9 6 3 -40 0 POWER COMP / LEVEL Kanalsektion Channel Level - Bestimmt den relativen Signalpegel jedes Eingangskanals. Die übliche Einstellung von Channel Level unter normalen Betriebsbedingungen liegt zwischen den Stellungen “10 Uhr” und “2 Uhr”. Channel On LED - Zeigt an, welche Eingangskanäle aktiv (“offen”) sind. LF - (nur bei TC-Version); Baßanhebung / -absenkung HF - (nur bei TC-Version); Höhenanhebung / -absenkung 5 AS8/AS8TC Hauptsektion Main Level - Bestimmt den Gesamtausgangspegel des AS8. Sind mehrere AS8 zusammengeschaltet, so ist nur der Pegelsteller des “Master”-AS8 aktiv (siehe auch unter Abschnitt Geräterückseite). Compressor/Leveller In/Out - Aktiviert bzw. deaktiviert die Kompressor / Pegelregler- Funktion. Compressor/Leveller Threshold - Bestimmt den Schwellwert des Pegels, ab dem der Kompressor/Pegelregler aktiviert wird. Bitte beachten Sie, daß der Schwellwertpegel vor dem Gesamtausgangspegel (Main Level) gemessen wird. Das bedeutet, daß Einstellungen an “Main Level” keinen Einfluß auf die Größe der Verstärkungsreduktion haben. Compressor/Leveller Gain Reduction Meter - Zeigt den augenblicklichen Wert der Verstärkungsreduktion durch den Kompressor/Pegelregler an. 4. Geräterückseite AS8 PWR IN (CH40) 20 VAC M A S T E R EXPANSION S L A V E OUT DIRECT AUTO AUTOMATIC MIXER IN LecNet 1 CH MODE MAIN OUT REMOTE LEVEL CONTROL + – CH. 7 IN CH. 8 IN (RS232) 1234 DIR OUT 1234 OFF ON 2 PHANTOM 3 4 3 4 3 4 0dB GAIN (LINE) +30dB GAIN (ELECTRET) +50dB GAIN (DYNAMIC) CH. 6 IN DIR OUT 1234 CH. 5 IN DIR OUT 1234 MADE BY LECTROSONICS USA US PATENT NUMBER 5,414,776 CH. 4 IN DIR OUT 1234 CH. 3 IN DIR OUT 1234 CH. 2 IN DIR OUT 1234 CH. 1 IN DIR OUT 1234 DIR OUT Abb. 4 - Rückwand des AS8 und AS8TC Mic/Line Inputs 1-8 - Mikrofon- bzw. Leitungseingänge für symmetrische und unsymmetrische Quellen. Erdfrei-symmetrische Eingänge mit HF-Filter. Dir Out - Liefert ein Signal mit Leitungspegel jedes einzelnen Eingangskanals. Der Direct Out wird hinter dem VCA abgegriffen, d.h. jede Dämpfung des Automix-Vorganges, des Kompressors/ Pegelreglers bzw. Pegeländerungen via Fernbedienung haben Einfluß auf das Direct Out-Signal. Diese Ausgänge können vielseitig für die verschiedensten Mixanwendungen verwendet werden, wie z.B. für verteilte Deckenbeschallungssysteme. Die Ausgangsimpedanz beträgt 100 W, der maximale Ausgangspegel an einer hochohmigen Last ist +20dBu . 6 AS8/AS8TC Hinweis: Das Massepotential des Main Outs und der Direktausgänge ist identisch. Verwenden Sie nicht die Masseklemmen der Eingangskanäle für die Direktausgänge ! Wird der AS8 an andere Geräte angeschlossen, so reicht die Masseverbindung des Main Out aus, eine separate Masseverbindung jedes einzelnen Direktausgangs ist nicht notwendig. Function Selection Switches 1-8 - Mit den Funktionswahlschaltern können verschiedene Funktionen der Eingänge eingestellt werden. DIP-Schalter 1: Wählt den Modus der Eingangskanäle. Der Auto-Modus (Schalterstellung unten) wählt die Automatikfunktion, die Kanalverstärkung wird durch den Signalpegel relativ zu den anderen Mikrofonen bestimmt. Der Direkt-Modus (Schalterstellung oben) schaltet die Kanäle vollständig ein, unabhängig vom Signalpegel. Die Fernbedienung bietet überdies Funktionen, die unabhängig von der Stellung dieses Schalters sind. DIP-Schalter 2: Schaltet die 15V-Phantomspeisung ein (Schalter unten) und aus (Schalter oben). DIP-Schalter 3+4: Bestimmt die Verstärkung des Eingangsverstärkers. Schalten Sie für Quellen mit Leitungspegel die Schalter 3 u. 4 in die obere Position (Verstärkung = 0 dB). Sollen Mikrofone mit relativ hohem Ausgangspegel angeschlossen werden (z.B. Elektretmikrofone), so schalten Sie Schalter 3 nach oben, Schalter 4 nach unten (Verstärkung = 30 dB). Für Mikrofone mit geringem Ausgangspegel, wie z.B. dynamische Mikrofone, sind beide Schalter in die untere Position zu schalten (Verstärkung = 50 dB). Main Out - Symmetrischer Systemausgang; Der Main Out kann auch unsymmetrisch verwendet werden, indem der “+”-Anschluß des AS8 mit dem Signalleiter des unsymmetrischen Eingang des nachfolgenden Gerätes verbunden wird. Der Masseanschluß wird mit dem Masseanschluß des unsymmetrischen Gerätes verbunden, der “-” -Anschluß bleibt in diesem Fall unbelegt. Remote Level Control - Erlaubt die Fernbedienung sowohl der Pegel der Eingangskanäle, als auch die Steuerung des Masterausgangs. Es kann sowohl ein lineares 10 KW-Potentiometer oder eine Steuergleichspannung verwendet werden. Für die Steuerung durch den Vorsitzenden einer Konferenz können auch einfach Schalter verwendet werden (durch Schalten der Eingänge “Channel x Wiper” oder auch des “Main Wipers” gegen Common Ground können ein oder mehrere Kanäle ausgeschaltet werden). Die eingeschalteten Kanäle sind in diesem Fall nach wie vor im Automatik-Modus. 7 AS8/AS8TC Pin Nr. 1 2 3 4 5 6 7 Funktion Schleifer Kanal Schleifer Kanal Schleifer Kanal Schleifer Kanal Schleifer Kanal Schleifer Kanal Schleifer Kanal Pin Nr. 8 9 10 11 12 13 14, 15 1 2 3 4 5 6 7 Funktion Schleifer Kanal 8 Potentiometer 1-8 Linksanschlag (+5V ) Potentiometer 1-8 Rechtsanschlag (GND) Potentiometer Main Rechtsanschlag (GND ) Schleifer Main Out Potentiometer Main Linksanschlag (+5V) frei WIRING DIAGRAMS, REMOTE LEVEL CONTROL PORT (REMOTE LEVEL CONTROL PORT, 15 PIN D-SUB) CH1 WIPER CH2 WIPER CH3 WIPER CH4 WIPER CH5 WIPER CH6 WIPER PIN 1 PIN 2 PIN 4 PIN 5 PIN 6 CH8 WIPER PIN 8 CH1-8 CCW PIN 9 MAIN WIPER MAIN CCW N/C N/C CONTINUOUS LEVEL CONTROL, CH7 EXTERNAL DC CONTROL VOLTAGE CONTROL VOLTAGE GND PIN 7 MAIN CW ON/OFF CHANNEL MUTE, CH5 SPST SWITCH ON - OPEN OFF - CLOSED PIN 3 CH7 WIPER CH1-8 CW CONTINUOUS LEVEL CONTROL, CH1 10K LINEAR POT PIN 10 PIN 11 Maximum Distance vs Wire Gage for Remote Control Connections PIN 12 PIN 13 20 AWG 22 AWG 24 AWG 26 AWG 28 AWG PIN 14 PIN 15 Single Control 5000ft 3000ft 2000ft 1200ft 750ft All 9 Controls 550ft 350ft 200ft 125ft 75ft Abb. 5 Pegelfernsteuerung (Remote Level Controls) LecNet (RS-232) Serial Port - Dieser Anschluß ermöglicht Zugang und Steuerung einiger Bedienungsfunktionen des AS8. Die Schnittstelle ist mit der seriellen Schnittstelle eines PCs kompatibel, auch andere Controller mit einer seriellen RS-232-Schnittstelle können verwendet werden. 8 AS8/AS8TC Expansion IN/OUT - Verbindet mehrere AS8 miteinander bzw. AS8 mit anderen Geräten, die LecNet-kompatibel sind. Der erste AS8 sollte im MasterModus, die übrigen im Slave-Modus betrieben werden (s. Abb. 2). Die Geräte können mit dem Kabel IC-AS8 (Code Nr. 6000H1885) untereinander verbunden werden (Option). 8 6 7 4 5 2 3 1 Master/Slave Switch - Bestimmt, ob der AS8 in der Betriebsart Master oder Slave betrieben wird. Ein einzeln verwendeter AS8 muß immer im Modus Master betrieben werden. PWR IN - Anschluß der Spannungsversorung für den AS8 5. Einstellungen für den Betrieb Die für den Betrieb nötigen Einstellungen umfassen die richtige Stellung der DIP-Schalter auf der Geräterückseite, die Pegeleinstellung auf der Frontplatte bzw. die Einstellung des Kompressors/ Pegelreglers (sofern benötigt). Die Anwendung der Pegelfernsteuerung des AS8 wird in einem weiteren Abschnitt dieses Handbuchs erläutert. Wird der AS8 eingeschaltet, so wird mittels der Channel-On-LEDs die eingestellte serielle Adresse für ca. 1,5s angezeigt, bevor das Gerät in den normalen Betriebszustand wechselt. Die LED von Kanal 8 zeigt dabei das höchstwertigste Bit (MSB) an, Kanal 1 das niederwertigste Bit (LSB). 1) Wählen Sie zwischen den Betriebsarten Auto oder Direct mittels der DIP-Schalter auf den Kanälen 1 bis 8. Für gewöhnlich sollten alle Mikrofone für Sprachübertragung in der Betriebsart Auto verwendet werden. Mikrofone für Musik (z.B. Mikrofone für die Abnahme eines Kirchenchors in einer Kirchenbeschallungsanlage) oder Geräte mit Leitungspegel wie z.B. Bandmaschinen oder Videorecorder sollten im Modus Direkt betrieben werden. Die Pegelfernsteuerung kann dazu verwendet werden, manuell jene Mikrofone, die im Modus Direkt verwendet werden, abzuschalten, wenn diese nicht in Verwendung sind. 2) Schalten Sie die Phantomspeisung je nach angeschlossener Quelle ein oder aus, und zwar mit dem DIP-Schalter 2 auf den Kanälen 1 bis 8. Elektretmikrofone benötigen üblicherweise Phantomspeisung, dynamische Mikrofone im Gegensatz dazu nicht. 3) Wählen Sie mit den DIP-Schaltern 3 und 4 die Verstärkung des Vorverstärkers (Preamplifier Gain). Die 0dB-Stellung wird für Quellen mit Leitungspegel wie z.B. Bandmaschinen oder Videorecorder verwendet. Die 30dB-Stellung ist für Mikrofone mit relativ hohem Ausgangspegel wie z.B. Elektrettypen geeignet, die Stellung 50dB für Mikrofone mit geringem Ausgangspegel wie z.B. dynamische Mikrofone oder für Elektrettypen, die mit großem Abstand besprochen werden (beispielsweise mit einem Abstand von mehr als einem Meter). 4) Stellen Sie das Potentiometer Main Level auf einen Wert zwischen 5 und 6. Stellen Sie weiters, während Sie nacheinander in jedes Mikrofon sprechen, die einzelnen Kanalpegelsteller auf eine passende Lautstärke ein. Üblicherweise sollte die Stellung dieser Potentiometer zwischen den Positionen 10 Uhr und 2 Uhr liegen. Versuchen Sie, alle Mikrofone auf den gleichen Lautstärkepegel zu bringen; dies garantiert die bestmögliche Funktion der automatischen Pegelregelung. 9 AS8/AS8TC 5) Soll die Funktion Compressor/Leveller zum Einsatz kommen, so bringen Sie den Schalter In/ Out auf der Frontplatte in die Stellung In. Adjustieren Sie das Potentiometer Threshold (Schwelle) bei einer normalen Besprechung des Mikrofons derart, daß die 3dB LED der Gain Reduction flackert. Die Gesamtlautstärke sollte möglicherweise an diesem Punkt mit dem Potentiometer Main Level etwas nachgestellt werden. Überprüfen Sie nun, ob bei sehr lauter Besprechung die restlichen LEDs der Gain Reduction aufleuchten. Zum Schluß sollte noch überprüft werden, ob bei leiser Besprechung keine der LEDs leuchtet, keinesfalls sollte jedoch eine Rückkopplung oder Schwingung im System auftreten. Das System ist nun für den Einsatz bereit. Problemlösungen Stellen Sie eine Fehlfunktion des Systems fest, so sollte zu allererst die Ursache behoben oder isoliert werden, bevor Sie daran denken, das Gerät zur Reparatur einzusenden. Stellen Sie sicher, daß die einzelnen Einstellungen für den Betrieb ordnungsgemäß nach der Anleitung vorgenommen wurden. Überprüfen Sie alle Verbindungskabel und verwenden Sie den nachfolgenden Ratgeber zur raschen Fehlereingrenzung: SYMPTOM MÖGLICHE URSACHE 1) Gerät gibt keine Ton von sich 1) Gesamtlautstärke (Main Level) nicht aufgedreht 2) Kanalpegel nicht aufgedreht 3) Eingangsverstärkung (DIP-Schalter 3 u.) zu klein gewählt 4) Phantomspeisung für Elektretmikrofone nicht ein geschaltet 5) Pegel auf Fernbedienung zurückgedreht 1) Kanalpegel ist relativ zu den übrigen Mikrofonen richtig aktiviert zu gering Kanalpegel dieser Mikrofone weiter aufdrehen 2) Einige Mikrofone werden nicht 6.1 Das LecNet Pro Programm Einführung Die LecNet Master Pro Steueroberfläche ermöglicht die vollständige Steuerung aller aktiven LecNetGeräte, die am Computer angeschlossen sind. Es können so viele Steuerfenster geöffnet sein, wie aktive Geräte angeschlossen sind, es ist jedoch immer nur ein Steuerfenster zur gleichen Zeit verwendbar. Die generelle Vorgangsweise der Steuerung mittels LecNet ist folgende: 1) Stellen Sie sicher, daß jedes LecNet-Gerät, welches an die serielle Schnittstelle des PCs 10 AS8/AS8TC angeschlossen wird, auf eine unterschiedliche Adresse gesetzt ist. Verschiedene Gerätetypen haben werksseitig eine unterschiedliche Standardeinstellung. Nur wenn mehrere Geräte gleicher Type miteinander verbunden werden, ist eine Änderung der werksseitigen Adreßeinstellung nötig (z.B. wenn mehrere AS8 für vielkanalige Anwendungen im Verbund verwendet werden). In diesem Fall finden Sie im Menü Devices Angaben zur Adreßeinstellung. 2) Starten Sie LecNet Master Pro. Bitte beachten Sie, daß möglicherweise mit Ausnahme des LecNet Pro Hauptfensters keines der LecNet-Steuerfenster geöffnet wird. Starten Sie nun CheckNet, sobald die serielle Verbindung zwischen PC und den angeschlossenen Geräten hergestellt wurde. CheckNet findet und erkennt jedes aktive am PC angeschlossene Gerät. Nachdem CheckNet ausgeführt wurde, erscheint eine Liste der angeschlossenen Geräte samt Programmversionsnummern und der LecNet-Adresse. 3) Wählen Sie nun aus dem Menü Devices entweder die Option Select Device, um ein LecNet Steuerfenster zu öffnen, oder wählen Sie Change Device Address, um die Adresse eines der angeschlossenen Geräte zu ändern. Bitte beachten Sie, daß ein Steuerfenster auf Ganzbild geschaltet werden muß, um mit einem LecNet-Gerät zu kommunizieren. Was ist LecNet ? Einführung Das LecNet-System basiert auf der RS-232-Schnittstelle, die standardmäßig auf allen PCs vorhanden ist. Das bedeutet, keine zusätzliche Interfacekarte ist für den Anschluß von LecNetGeräten erforderlich. Zum Unterschied von üblichen RS-232-Verbindungen, bei denen ausschließlich ein einziges Gerät an den Computer angeschlossen wird, können hier bis zu 127 LecNet-Geräte an einer einzigen seriellen Schnittstelle betrieben werden. LecNet-Geräte empfangen ständig alle Informationen vom Steuercomputer. Jedes angeschlossene Gerät wartet, bis es seine exklusive Netzwerkadresse empfängt und schaltet sich dann in den Sendemodus, um dem Steuercomputer zu antworten. Es verbleibt so lange in diesem Zustand, bis der gesamte Informationsaustausch beendet ist, und schaltet dann seine Sendeleitung ab. Mit Hilfe dieses Prinzips werden Kollisionen auf der Sendeleitung vermieden. Jedes LecNet-Gerät muß eine exklusive Adresse zwischen 128 und 254 besitzen. Jedem Gerät kann mit Hilfe des LecNet Mas ter Pro-Programms eine neue Adresse zugeordnet werden. Die Datenübertragungsrate am LecNet beträgt fix 9600 Baud und kann nicht vom Anwender verändert werden. Diese Übertragungsrate ist schnell genug, um eine Quasi-Echtzeitsteuerung der einzelnen Steuerfenster bei gleichzeitig zuverlässiger Datenübertragung über größere Entfernungen (30m zwischen Steuercomputer und LecNet-Gerät) zu gewährleisten. Die seriellen Übertragungsparameter sind: 8 Datenbits, 1 Stoppbit, keine Paritätsprüfung). Hinweise zum LecNet Die Anbindung von LecNet-Geräten an den Steuercomputer ist relativ einfach. Mit Hilfe des speziellen LecNet-Interfacekabels wird eine Verbindung zwischen Com1 oder Com2 des Steuercomputers und der 3.5mm Klinkenbuchse auf einem der LecNet-Geräte hergestellt. Ist ein Kabel mit einer speziellen Länge erforderlich, so finden Sie in Abschnitt 8 Informationen über die 11 AS8/AS8TC Belegung der Steckverbinder. Werden mehrere LecNet-Geräte angeschlossen, so geschieht diese Verbindung untereinander über das 8-polige Erweiterungskabel (AKG IC AS8). Sollen mehrere LecNet-Geräte direkt am Steuerrechner angeschlossen werden, so ist zu beachten, daß jedes einzelne Gerät eingeschaltet ist. Ein ausgeschaltetes Gerät belastet die Sendeleitungen des Steuerrechners, so daß keine Kommunikation am Netzwerk zwischen Steuercomputer und den angeschlossenen Geräten möglich ist. In diesem Fall wird jedoch keines der Geräte beschädigt; sobald alle Geräte eingeschaltet sind, ist die korrekte Funktion des LecNets sofort gegeben. Obwohl AKG alle möglichen Anstrengungen unternommen hat, eine Kompatibilität der seriellen Steuersoftware mit allen möglichen Seriellen Ports zu gewährleisten, kann nicht ausgeschlossen werden, daß manche seriellen Ports nicht einwandfrei funktionieren. Speziell bei alten Schnittstellenkarten können Fehlfunktionen auftreten, da diese bei einer Datenübertragungsrate von 9600 Baud und höher nicht mehr zuverlässig arbeiten. Am Markt sind Zusatzprogramme erhältlich (z.B. von Norton), mit denen die seriellen Schnittstellen getestet und die höchste zu erreichende zuverlässige Datenübertragungsrate ermittelt werden kann. Um LecNet-kompatible Geräte am LecNet betreiben zu können, ist das LecNet Master ProProgramm und das spezielle Programm der jeweils angeschlossenen Geräte erforderlich. Ist das LecNet Master Pro-Programm installiert, so müssen Sie anschließend nur mehr die Programme der neuen angeschlossenen Geräte installieren. Dies geschieht einfach durch Kopieren der Dateien in das LecNet-Unterverzeichnis. Option-Menü Im Menü Options können drei verschiedene Optionen vom Benutzer gewählt werden. Set Max Net Address erlaubt die Angabe einer höchsten Adresse, bis zu welcher mittels CheckNet getestet wird. Die Standardeinstellung ist 254, d.h. CheckNet durchsucht den gesamten Adreßbereich nach aktiven Geräten. Da es etwa 12 Sekunden dauert, bis CheckNet den gesamten Adreßbereich durchsucht hat, kann die Geschwindigkeit dieses Vorgangs erheblich gesteigert werden, wenn der Adreßbereich auf den Bereich eingeschränkt wird, in dem sich tatsächlich angeschlossene Geräte befinden. Com Port Selection ermöglicht die Auswahl der seriellen Schnittstellen Com 1 oder Com 2 für den Einsatz von LecNet. Da die meisten Laptops oder Notebooks nur eine serielle Schnittstelle besitzen, ist werksseitig Com 1 eingestellt. 12 AS8/AS8TC Die Option CheckNet Startup bestimmt, ob CheckNet beim Start von LecNet Master Pro automatisch durchgeführt wird. Wird AutoRun gewählt, so startet LecNet automatisch, wird Prompt at Startup gewählt, so wird der Anwender beim Hochlauf gebeten, den Start von CheckNet zu quittieren oder abzulehnen. Die Standardeinstellung ist AutoRun. CheckNet-Menü Die Auswahl Run CheckNet durchsucht den Adreßbereich ab der Adresse 128 bis zu der momentan eingestellten Maximaladresse, um zu überprüfen, welche LecNet-Geräte vorhanden sind. CheckNet muß beim ersten Lauf von LecNet Master Pro ausgeführt werden, um festzulegen, welche Bedieneroberflächen geöffnet werden können. Ändert sich die physische Konfiguration des Netzwerks (d.h. Geräte werden hinzugefügt oder entfernt), dann muß CheckNet erneut ausgeführt werden. Devices-Menü Im Menü Devices sind zwei Optionen verfügbar: Die Option Select Device öffnet ein Steuerfenster eines aktiven LecNet-Geräts. Für jedes Gerät mit einer bestimmten Adresse kann nur ein Fenster geöffnet werden. Wären z.B. zwei AS8 in einem System installiert, der erste auf Adresse 128, der zweite auf 129, so kann für beide Geräte je ein Steuerfenster geöffnet werden. Wird jedoch versucht, ein weiteres AS8-Fenster auf Adresse 128 zu öffnen, so wird dies unterbunden, bis das momentan aktive Fenster für dieses Gerät geschlossen wird. Wird ein Steuerfenster geöffnet, so geschieht dies im Ganzbildmodus. Ein Steuerfenster kann nur dann mit einem LecNet-Gerät kommunizieren, wenn es sich als Ganzbild am Bildschirm befindet. Wird es auf Teilbild oder Ikone geschaltet, so wird die Verbindung zum zugehörigen Gerät so lange unterbrochen, bis das Fenster wieder in den Ganzbildmodus gebracht wird. 13 AS8/AS8TC Mit der Option Change Device Address kann die LecNet-Adresse eines aktiven Geräts verändert werden. Dies ist dann notwendig, wenn mehr als ein gleichartiges Gerät im Verbund betrieben werden soll. Ein Beispiel dafür wären zwei AS8, die zusammen 16 Eingangskanäle zur Verfügung stellen. Die werksseitige Einstellung der Adresse des AS8 ist 128. Einer der beiden AS8 würde daher eine andere Adresse benötigen (z.B. 129), um als eigenständiges Gerät erkannt zu werden. Dies wird erreicht, indem nur einer der beiden AS8 mittels des mitgelieferten seriellen Kabels an den PC angeschlossen wird. Starten Sie nun die Option CheckNet und anschließend Change Device Address, um die Adresse auf 129 zu ändern. Erst wenn alle LecNet-Geräte eine exklusive Adresse besitzen, können Sie zusammen mit dem PC verbunden und betrieben werden. LecNet Problemlösungen Obwohl LecNet einfach und robust in der Installation und Handhabung ist, können manchmal Situationen auftreten, in denen das System nicht wie erwartet arbeitet. Als reiner Computeranwender sind sie möglicherweise noch nicht in eine derartige Situation geraten. Sollten trotzdem unerwartet Probleme auftauchen, so können die folgenden Tips hilfreich sein, um Ihr System wieder zum Laufen zu bringen. Serielle Schnittstellen (Com Ports) - Das LecNet-Programm unterstützt die beiden Schnittstellen Com 1 und Com 2. Die Welt der seriellen Ports ist dunkel und mystisch, AKG hat Probleme mit einigen Schnittstellenkarten aufgezeigt, die älter als 3 bis 4 Jahre sind. Diese Karten sind üblicherweise in älteren 386SX oder 386DX-Geräten installiert und kommunizieren möglicherweise nicht mit dem LecNet-Programm. Die einzige Lösung ist der Austausch der alten Schnittstellenkarten gegen neue Typen. Da diese Karten heutzutage sehr billig sind, sollte dies kein Problem darstellen. Zusammenschaltung mehrerer LecNet-Geräte - Sollen mehrere LecNet-Geräte im Verbund betrieben werden, so sind folgende einfache Regeln zu beachten: 1) Alle Erweiterungsschnittstellen (Expansion Ports) müssen richtig mittels des 8-poligen Mini DIN-Kabels IC AS8 miteinander verbunden werden. Da die RS-232-Signale auf zwei Kontakten übertragen werden, ist der richtige Sitz der Steckverbinder wichtig. In den speziellen Handbüchern finden Sie Information über die passende Hardwareverbindung. 2) Alle NecNet-Geräte müssen eingeschaltet sein. Jedes ausgeschaltete Gerät belastet das Netzwerk und unterbindet jegliche Kommunikation zwischen den angeschlossenen Geräten und dem Steuercomputer. 3) Jedes einzelne LecNet-Gerät muß eine exklusive Adresse im Bereich zwischen 128 bis 254 besitzen. Haben ein oder mehrere Geräte die selbe Adresse, so ist mit keinen dieser Geräte eine Kommunikation möglich. Um die Adresse von sich gegenseitig beeinflussenden Geräten zu verändern, muß jedes dieser Geräte einzeln mit dem Computer verbunden werden. Mittels der Funkton Change LecNet Address im LecNet Master Pro-Programm können die Adressen dieser Geräte korrigiert werden. 14 AS8/AS8TC 6.2 Das LecNet AS8 Programm Das rechte Drittel der AS8 Bedieneroberfläche zeigt die individuelle Kanalstatusinformation. Jede Anzeige ermöglicht umfangreiche Einblicke in den internen Betriebszustand jedes einzelnen Kanals. Die Anordnung von acht Balkenanzeigen (Kanal 1 bis 8), bestehend aus jeweils drei vertikalen Balken, gibt auf einen Blick Aufschluß über die Aktivität aller acht Kanäle. Die drei großen horizontalen Balkenanzeigen stellen die Aktivität eines Kanals auf einer kalibrierten Skala dar, der durch Anklicken einer der acht Kanaltasten gewählt werden kann. Die Balkenanzeigen stellen folgende Größen dar: Active Indicator - zeigt den Zustand “on” oder “off” jedes Kanals an. Der Zustand “off” bedeutet in diesem Fall, daß der Anteil der Kanaldämpfung (Channel Attenuation) infolge des automatischen Mischalgorithmus kleiner oder gleich 4dB beträgt. Natürlich kann auch ein Kanal, dessen Status “off” ist, einen wesentlichen Beitrag zum Summensignal beisteuern, sofern das an diesem Kanal angeschlossene Mikrofon in Verwendung ist. Der Active Indicator liefert nur ungenaue Information über die tatsächliche Aktivität eines Kanals, ein genaueres Bild kann sich der Anwender über die Balkenanzeige beschaffen. 15 AS8/AS8TC Channel Level (L) - zeigt den Pegel des Steuersignals hinter der Pegelsteuerung an, welches der Mischung zugeführt wird. Der angezeigte Eingangspegel ist gleich dem Pegel des Eingangssignals abzüglich der Dämpfung der ferngesteuerten Kanal- oder Hauptpegeleinstellung (sofern eingestellt). Attenuation (A) - zeigt die momentane Gesamtdämpfung jedes Kanals infolge aller Systemfunktionen an, und zwar aufgrund des automatischen Mischalgorithmus, der ferngesteuerten Pegelsteuerung, und des Kompressor/Pegelregelungssystems. Remote Level (R) - zeigt die kumulierte Dämpfung jedes Kanals, die sich als Resultat der Summe der ferngesteuerten Kanal- und Summenpegeleinstellung ergibt. Bitte beachten Sie, daß der wählbare Bereich der Kanal- und Summenpegelstellung zwischen 0dB und 30dB liegt (inklusive “aus”). Es kann daher eine Gesamtdämpfung von 60dB erreicht werden, bevor der Kanal ausgeschaltet ist, wenn sowohl die Kanaleinstellung als auch die Summeneinstellung verwendet wird. Channel Select (Ch1 bis Ch8) - Mit diesen Schaltflächen jener Kanal angewählt werden, der in der unteren rechten Hälfte mittels der kalibrierten Balkenanzeigen angezeigt werden soll. Hauptsektion Die Hauptsektion der AS8 Bedieneroberfläche, die sich im linken Drittel des Schirms befindet, enthält die Pegelsteuerung, die Auswahl Auto/Direct Mode bzw. die Steuerung des Kompressor/ Pegelreglersystems. Jedes dieser Subsysteme besitzt einen Schaltknopf für Remote- und Local-Modus (Fernsteuerung oder lokale Bedienung). Diese Schaltknöpfe bestimmen, ob diese vom AS8 selbst oder vom Com puter gesteuert werden. Verbleibt eines dieser Subsysteme im Remote-Modus, während die AS8 Steueranwendung geschlossen wird, so werden die Bedienungselemente des zugehörigen Kanals des AS8 deaktiviert. Dies ist eine nützliche Sicherheitseinrichtung, sofern vermieden werden soll, daß einige oder alle Einstellungen lokal verändert werden können. Die lokale Bedienung kann wieder aktiviert werden, indem das AS8 Steuerfenster erneut geöffnet wird und die jeweiligen Einstellungen zurück in den Local-Modus geschaltet werden. Remote Level Control Mit diesen Steuerelementen können die Pegeleinstellungen für jeden einzelnen Kanal einzeln oder auch gleichzeitig vorgenommen werden. Die einzelnen Einstellungen bzw. Anzeigen haben folgende Funktion bzw. Bedeutung: Optionsfeld Remote - Durch Anklicken von Remote kann das jeweilige Subsystem vom Computer aus bedient werden. Die zugehörigen Bedienungselemente am AS8 selbst werden deaktiviert. Verbleibt das Subsystem im Modus Remote, während die Steueroberfläche geschlossen wird, so bleiben die zugehörigen Bedienungselemente am AS8 außer Funktion; die jeweiligen Parameter sind die im nichtflüchtigen Speicher zuletzt gespeicherten Einstellungen. 16 AS8/AS8TC Optionsfeld Local - durch diese Auswahl wird die lokale Bedienung durch die sich am AS8 befindlichen Bedienungselemente ermöglicht. Am zugehörigen Teil der Steueroberfläche erscheinen die am AS8 lokal eingestellten Werte. Main Remote Balkenanzeige - zeigt den momentanen Wert der Dämpfung des Summenkanals. Diese Einstellung wirkt zusätzlich zu den jeweiligen Kanaldämpfungen der einzelnen Kanäle. Im Modus Remote zeigt die Balkenanzeige die momentane Einstellung sowie die Änderungen, die mittels der Schaltflächen auf/ab ausgeführt werden. Im Modus Local wird jener Wert angezeigt, der auf der Rückseite des AS8 eingestellt wurde. Schaltflächen Main - stellt den Dämpfungswert der Summe ein. Main wirkt demnach auf alle Kanäle und wird am besten dann verwendet, wenn der Pegel der gesamten Anlage verändert werden soll. Die Gesamtdämpfung eines Kanals ergibt sich aus der Summendämpfung und der jeweiligen Kanaldämpfung. Auf der Balkenanzeige werden Änderungen der Summendämpfung durch die Schaltflächen sichtbar. Diese sind nur dann aktiv, wenn sich das Subsystem im Modus Remote befindet. Schaltflächen Ch1 bis Ch8 - bestimmt die jeweilige Kanaldämpfung. Diese Einstellung wirkt jeweils nur auf den zugehörigen Kanal und wird üblicherweise dann verändert, wenn der Pegel eines oder mehrerer bestimmter Kanäle verändert werden soll. Auf den AttenuationBalkenanzeigen sind die Änderungen durch die Schaltflächen ersichtlich. Diese sind nur dann aktiv, wenn sich das Subsystem im Modus Remote befindet. Auswahl Auto/Direct Mode In diesem Subsystem wird die Betriebsart jedes Kanals eingestellt bzw. angezeigt. Die einzelnen Elemente bzw. Anzeigen sind wie folgt: Optionsfeld Remote - Durch Anklicken von Remote kann dieses Subsystem vom Com puter aus bedient werden. Die zugehörigen Bedienungselemente am AS8 selbst werden deaktiviert. Verbleibt das Subsystem im Modus Remote, während die Steueroberfläche geschlossen wird, so bleiben die zugehörigen Bedienungselemente am AS8 außer Funktion; die jeweiligen Parameter sind die im nichtflüchtigen Speicher zuletzt gespeicherten Einstellungen. Optionsfeld Local - durch diese Auswahl wird die lokale Bedienung durch die sich am AS8 befindlichen Bedienungselemente ermöglicht. Am zugehörigen Teil der Steueroberfläche erscheinen die am AS8 lokal eingestellten Werte. Optionsfelder Ch1 bis Ch8 - mit diesen Feldern kann die Betriebsart jedes Kanals per Fernbedienung gewählt werden (natürlich vorausgesetzt, daß das Optionsfeld Remote aktiviert wurde). Wurde das Optionsfeld Local gewählt, so wird mit den einzelnen Optionsfeldern der Zustand des AS8 angezeigt, der durch die DIP-Schalter auf der Geräterückseite eingestellt wurde. 17 AS8/AS8TC Compressor/Leveller System Das Compressor/Leveller Subsystem ermöglicht die Steuerung bzw. Anzeige des Kompressors/ Pegelreglers. Folgende Steuerungen und Anzeigen sind verfügbar: Optionsfeld Remote - Durch Anklicken von Remote kann dieses Subsystem vom Com puter aus bedient werden. Die zugehörigen Bedienungselemente am AS8 selbst werden deaktiviert. Verbleibt das Subsystem im Modus Remote, während die Steueroberfläche geschlossen wird, so bleiben die zugehörigen Bedienungselemente am AS8 außer Funktion; die jeweiligen Parameter sind die im nichtflüchtigen Speicher zuletzt gespeicherten Einstellungen. Optionsfeld Local - durch diese Auswahl wird die lokale Bedienung durch die sich am AS8 befindlichen Bedienungselemente ermöglicht. Am zugehörigen Teil der Steueroberfläche erscheinen die am AS8 lokal eingestellten Werte. Optionsfeld C/L In - zeigt den momentanen Status des Kompressors/Pegelreglers. Wird das Optionsfeld Remote aktiviert, so kann durch zusätzliche Anwahl von C/L In der Kompressor/ Pegelregler eingeschaltet werden. Wir das Optionsfeld Local aktiviert, so ist das Optionsfeld C/L In inaktiv, es zeigt jedoch den momentanen Zustand an, in dem sich der Schalter Compressor/ Leveller In/Out auf der Gerätefront befindet. Optionsfeld C/L Out - zeigt den momentanen Status des Kompressors/Pegelreglers. Wird das Optionsfeld Remote aktiviert, so kann durch zusätzliche Anwahl von C/L Out der Kompressor/ Pegelregler ausgeschaltet werden. Wir das Optionsfeld Local aktiviert, so ist das Optionsfeld C/L Out nicht anwählbar, es zeigt jedoch den momentanen Zustand des Schalters Compressor/Lev eller In/Out auf der Gerätefront an. Comp/Lev Attenuation - zeigt die Verstärkungsreduktion, welche an jedem Kanal in Folge der Funktion des Kompressors/Pegelreglers zum Einsatz kommt. Comp/Lev Threshold - bringt den momentanen Schwellwert des Kompressors/Pegelreglers zur Anzeige. Schaltflächen Thr - ändert den Schwellwert des Kompressors/Pegelreglers. Wird das Optionsfeld Remote angewählt, so ist die Einstellungsmöglichkeit mittels dieser Schaltflächen möglich. Ist jedoch das Optionsfeld Local aktiv, so kann keine Änderung dieses Wertes vorgenommen werden. 18 AS8/AS8TC 7. AS8 Funktionsprinzip Der rein analoge Audiosignalweg des AS8 wurde absichtlich einfach ausgeführt, um bestmögliche Audio-Signalqualität zu garantieren. Diese Technik wurde mit dem Einsatz eines hochentwickelten Mikrokontrollers gekoppelt, um die Implementierung des automatischen Misch- und Kompressor/ Pegelregelungsalgorithmus zu ermöglichen. Es kommt hier der sogenannte adaptive pegelproportionale Automatikmischalgorithmus (Adaptive Level Proportional Automatic Mixing Algorithm) zum Einsatz. Dieser Algorithmus verwendet das Signalpegelmuster der Mikrofoneingänge zur Herleitung der einzelnen Kanalverstärkungen. Wird beispielsweise nur ein Mikrofon besprochen, so dominiert dieser Kanal und erhält automatisch die volle verfügbare Systemverstärkung, während alle anderen Eingangskanäle weniger Verstärkung erhalten. Sind mehrere Eingangskanäle gleichzeitig aktiv, so wird die verfügbare Systemverstärkung gemäß deren relativer Pegel aufgeteilt. Mikrofone, die längere Zeit aktiv sind, werden gegenüber seltener aktiven Mikrofonen mittels einer Skewing“-Funktion bevorzugt behandelt, um Ein-/ Ausschaltgeräusche durch Unterbrechungen zu minimieren. Da die Verstärkung jedes Kanals, basierend auf seinem relativen Pegel, kontinuierlich zugewiesen wird, werden keine abrupten Verstärkungsänderungen durchgeführt. Somit ist die Automatikfunktion praktisch unhörbar. Der Kompressor/Pegelregler verwendet eine Kombination aus kurz- und langfristiger Erfassung der Signaldynamik, um den jeweils optimalen Wert der Verstärkungsreduktion zu ermitteln. Das Resultat daraus ist sowohl die Steuerung des mittleren Programmpegels der Anlage, als auch die Vermeidung von kurzzeitigen aber intensiven Pegelschwankungen. Die Verstärkungsreduktionsfunktion wird ein- und ausgeschaltet, so daß ein Anstieg des Rauschens bei Programmsignalpausen wirksam verhindert wird. Dieses Produkt entspricht den Normen EN 50 082 - 1 und EN 50 081 - 1 19 AS8/AS8TC 8. Serielle Schnittstelle Die serielle Schnittstelle des AS8 und AS8TC entspricht einer RS-232-Schnittstelle mit minimaler Anforderung. Die Abbildung zeigt die Belegung des seriellen Verbindungskabels, mit dem sowohl über einen 9-poligen oder 25-poligen SUB-D-Steckverbinders je nach PC oder anderem Kontroller die Anbindung der Geräte erfolgt. LecNet Device to PC S R T 3.5MM Stereo Plug LecNet Device to AMX or Crestron S R T 9 or 25 Pin Female D-Subminiature 9 Pin Female D-Subminiature 3.5MM Stereo Plug Wiring Diagram, 9 Pin D-Sub CD RX TX DTR Gnd DSR RTS CTS RI 1 2 3 4 5 6 7 8 9 Host Serial Port (PC) RX TX Sig Gnd Chassis Gnd RTS CTS DSR DTR 3 2 7 1 4 5 6 20 Host Serial Port (PC) N/C Tip Ring Sleeve LecNet Device Transmit LecNet Device Receive Gnd LecNet Port N/C N/C Tip Ring Sleeve LecNet Port Wiring Diagram, 25 Pin D-Sub Tip LecNet Device Transmit Ring LecNet Device Receive Sleeve Gnd LecNet Port LecNet Device Transmit LecNet Device Receive Gnd RXD TXD N/C Gnd N/C N/C N/C N/C 1 2 3 4 5 6 7 8 9 AMX or Crestron Port AMX Programming Notes If you are using an AMX system to control your LecNet equipment, you’ll want to purchase the Lectrosonics PT3 Protocol Translator. The PT3 connects between the AMX bus and any LecNet equipment. With the PT3, the LecNet equipment looks just like native AMX equipment. The PT3 is the fastest and most productive way to control LecNet devices with an AMX system. 20 AS8/AS8TC 9. Spezifikationen Mic/Line Input Type: Elektronisch symmetriert, HF-Filter Impedanz: Größe 2.5 KW, verstärkungsunabhängig Wählbare Eingangsverstärkung: 0dB, +30dB, +50dB Äquivalentes Eingangsrauschen, 20Hz - 20Khz: -126dBu (Verstärkung: +50dB) Max. Eingangspegel: +20dBu (bei Verstärkung 0dB) -10dBu (bei Verstärkung 30dB) -30dBu (bei Verstärkung 50dB) Steuerspannungsbereich für Fernsteuerung: 6dB/Volt von 0 bis 5V , inkl. aus Serielle Datenübertragung: 9600baud, 8 Datenbits, keine Paritätsprüfung, 1 Stopbit Kompressor/Pegelregler Threshold: -40dBu bis 0dBu Maximale Verstärkungsreduktion: 20dB Maximale Systemverstärkung Eingang - Summenausgang: 75dB Gesamtklirrfaktor (+10dBu Ausgangspegel): Kleiner als 0,1%, verstärkungsunabhängig Gesamtintermodulationsverzerrung Kleiner als 0,1%, verstärkungsunabhängig (+10dBu Ausgangspegel): Phantomspannung: +15V, pro Kanal wählbar Leistungsaufnahme: 10VA max. bei 20V Wechselspannung Gewicht: ca. 1,5Kg Abmessungen: 19", 1HE, Tiefe ca. 203,5mm Technische Änderungen vorbehalten 21 AS8/AS8TC 10. Zubehör Standard Zubehör AS8 (TC) AC Adaptor 220V 15 Pin Remote Conector RS232 Conectorcable Controlsoftware (LecNet & AS8) Instruction Manual Optionales Zubehör IC AS8 Verbindungskabel zum Zusammenschluß zweier Lecnet compatiblen Geräte Kabel Set bestehend aus: 8 Stk. 10m , Stecker:1 XLR fm, 3pin und Phönix 4 Pin 1 Stk. 1m Stecker XLR m, 3pin und Phönix 3 Pin 22 AS8/AS8TC AS 8 and AS 8 TC TC A u t o m a t i c M i c r o p h o n ee M i x e rr Manual Manual 23 AS8/AS8TC AKG AS8 and AS8TC Manual Contents Contents 1. Introduction .................................................. 25 1.1. Precautions ................................................ 26 2. Installation .................................................... 26 3. Front Panel Description ............................... 27 Channel Section: ....................................................... 27 Main Section: ............................................................. 27 4. Rear Panel Description ................................ 28 5. Setup ............................................................. 31 6. Computer control of AS8 and other LecNet compatible devices ...................................... 32 6.1. LecNet PRO Program ................................ 32 Introduction ................................................................ 32 What is LecNet? ........................................................ 33 Option Menu .............................................................. 34 CheckNet Menu......................................................... 34 Devices Menu ............................................................ 35 Troubleshooting the LecNet....................................... 35 6.2. The LecNet AS8 Program ......................... 36 Channel Status Section of Control Panel .................. 36 Main Section of Control Panel ................................... 37 Auto/Direct Mode Selection ....................................... 38 Compressor/Leveller System .................................... 38 7. AS8 Technical Notes .................................... 39 8. Serial Port Hardware .................................... 40 9. Specifications ............................................... 41 10. Accessories ................................................ 41 24 AS8/AS8TC 1. Introduction Congratulations!. By purchasing the AKG AS8, you now own the most advanced automatic mixer available. In addition, you’ll find the AS8 easy to set up and operate. As you are by now aware, the AS8 is computer controllable . Most of the features of the AS8 are adjustable remotely using this application. The AS8 Automatic Microphone Mixer is an 8 channel, single rack space audio mixer. Using Lectrosonics’ unique Adaptive Level Proportional mixing algorithm, the automatic action is inau dible and simple to set up. The AS8 offers remote control of all channel levels and the master level. In addition, a sophisticated compressor/leveller is included for dynamic range control of the audio program material. The AS8 has an RS-232 port for remote setup or control by a computer or other RS-232 compatible controller. More than one AS8 may be coupled together when applications call for more than 8 channels. As an added security feature, user access to the compressor/leveller system, the auto/direct mode control switches, and remote level input port may be disabled from this application. Even if the unit is then used without connection to a computer, the user will still be unable to access the disabled features. If you find you have questions about proper setup procedures for the AS8, consult the Installation, Setup, and Troubleshooting instructions section in this brochure. Figure 1 shows the simplified block diagram of the AS8. MAIN IN 1 1 OF 8 INPUT CHANNELS MIX MINUS OUT 2 DIR OUT DIRECT/AUTO PHANTOM POWER +5V TO uP +15V MIC IN + HI CHANNEL LEVEL + AUDIO VCA AUTO MIX 3 LOG IN Tone Control AM8-TC Only MIX MINUS IN 2 CHAN ON MIC PREAMP MIC IN - LO MAIN OUT 1 FROM D/A CONVERTER - FROM OTHER CHANNELS Remote Level CH1 Remote Level CH2 Remote Level CH3 Remote Level CH4 Remote Level CH5 Remote Level CH6 Remote Level CH7 Remote Level CH8 Remote Level Master Auto Mix Log In SPEECH FILTER A/D CONV Compressor/ Leveller Threshold LOG CONVERTER From CH1 From CH2 From CH3 From CH4 From CH5 From CH6 From CH7 From CH8 MAIN OUTPUT TO A/D CONVERTER A/D CONV To CH1 To CH2 To CH3 To CH4 To CH5 To CH6 To CH7 To CH8 MAIN LEVEL RS-232 OUT D/A CONV Dir/Auto CH1 Dir/Auto CH2 Dir/Auto CH3 Dir/Auto CH4 Dir/Auto CH5 Dir/Auto CH6 Dir/Auto CH7 Dir/Auto CH8 RS-232 IN 68HC705 uC Compressor/Leveller Gain Reduction Display 12dB SERIAL DATA LINK 9dB SERIAL EEPROM 6dB 3dB Figure 1 - AS8 Block Diagram 25 EXPANSION OUT AUTO MIX 3 LOG OUT MIC GND PREAMP GAIN 0dB (LINE) +30dB (MIC) +50dB (MIC) EXPANSION IN AS8/AS8TC 1.1. Precautions 1. Spill no liquids on the unit and do not drop any objects through the top panel ventilation slots. 2. Do not place the unit near heat sources such as radiators or air ducts, or in a place exposed to direct sunlight, excessive dust, moisture, rain, mechanical vibrations, or shock. 2. Installation Installing the AS8 properly is simple, and only requires attention to a few issues. The AS8 should be used in a grounded metal rack. If only one AS8 is being used, it should be placed in the Master mode , using the rear panel switch. Erratic performance will result if the unit is in the Slave mode , but no damage will be done to the unit. Proper operation will be restored when the unit is switched to the Master mode. If multiple AS8s are used together, the first AS8 (i.e. the one with Expansion In port used but not the Expansion Out port ) should be switched to the Master mode, while all other AS8s should be in the Slave mode. Figure 2 shows the correct interconnection for multiple AS8s. PWR IN (CH40) 20 VAC EXPANSION M A S T E R S L A V E M A S T E R S L A V E M A S T E R S L A V E OUT IN RS232 Master Switch in MASTER Position PWR IN (CH40) 20 VAC EXPANSION OUT IN RS232 Slave Switch in SLAVE Position PWR IN (CH40) 20 VAC EXPANSION OUT IN RS232 Slave Switch in SLAVE Position Figure 2 - Interconnection for multiple AS8s 26 AS8/AS8TC Microphone connections should be made with good quality braid or foil shielded twisted pair. The shield should be used for the ground (Pin 1) connection. If an unbalanced signal is used, the unbalanced signal lead should be connected to the “+” input terminal, while the unbalanced ground lead should be connected to both the “-” and ground terminals of the input connector. Output connections to the Main Out connector can be made balanced or unbalanced. If an unbalanced connection is desired, simply connect the unbalanced signal lead to the “+” output terminal, and the unbalanced ground lead to the output ground terminal. Leave the “-” output terminal unconnected. Access to the Remote Level Control port is accomplished using the DB-15 connector (supplied). The pinout of the DB-15 Remote Level Control connector is given in chapter Rear Panel Description. 3. Front Panel Description AS8 5 AUTOMATIC MICROPHONE MIXER 6 4 7 1 10 3 ON ON LEVEL LEVEL CH. 1 LF ON LEVEL CH. 2 HF LF ON LEVEL CH. 3 HF LF ON LEVEL CH. 4 HF LF ON LF ON LEVEL CH. 5 HF ON LEVEL CH. 6 HF LF LEVEL CH. 7 HF LF LF HF 5 ON LEVEL CH. 1 ON LEVEL CH. 2 ON LEVEL CH. 3 ON LEVEL CH. 4 ON LEVEL CH. 5 ON ON LEVEL CH. 6 LEVEL 7 1 10 CH. 7 CH. 8 12 9 6 -40 OUT 0 3 POWER COMP / LEVEL 8 2 LEVEL THRESHOLD -20 -10 IN -30 AS8 AUTOMATIC MICROPHONE MIXER 6 4 3 ON GAIN REDUCTION 9 OUTPUT LEVEL CH. 8 HF 8 2 GAIN REDUCTION OUTPUT LEVEL THRESHOLD -20 -10 IN OUT 30 9 12 9 6 3 -40 0 POWER COMP / LEVEL Figure 3 - Front Panels AS8 and AS8TC Channel Section: Channel Level - Controls the relative signal level of each channel. Normal operation of the Channel Level control is from about 10 o´clock position to the 2 o´clock position. Channel On LED - Gives an indication as to which channels are active. LF - (TC Version only) Adjusts the low frequency response of the channel HF - (TC Version only) Adjusts the high frequency response of the channel Main Section: Main Level - Controls the overall output level of the AS8´s. If multiple AS8´s are used together, only the Main Level control of the AS8 put in Master position (see below chapter Rear Panel) will be operational. 27 AS8/AS8TC Compressor/Leveller In/Out - Enables or disables the compressor/leveller function. Compressor/Leveller Threshold - Sets the signal level above which the Compressor/Leveller is active.Note that the Threshold level is measured before the main level control.This means that adjustments of the Main Level control will not affect the amount of gain reduc tion. Compressor/Leveller Gain Reduction Meter - Shows the instantanous amount of gain re duction applied by the Compressor/Leveller system. 4. Rear Panel Description AS8 PWR IN (CH40) 20 VAC M A S T E R S L A V E OUT DIRECT AUTO AUTOMATIC MIXER EXPANSION IN LecNet OFF ON 1 CH MODE REMOTE LEVEL CONTROL MAIN OUT + – CH. 7 IN CH. 8 IN (RS232) 1234 DIR OUT 1234 2 PHANTOM 3 4 3 4 3 4 0dB GAIN (LINE) +30dB GAIN (ELECTRET) +50dB GAIN (DYNAMIC) CH. 6 IN DIR OUT 1234 CH. 5 IN DIR OUT 1234 MADE BY LECTROSONICS USA US PATENT NUMBER 5,414,776 CH. 4 IN DIR OUT 1234 CH. 3 IN DIR OUT 1234 CH. 2 IN DIR OUT 1234 CH. 1 IN DIR OUT 1234 DIR OUT Figure 4 - Rear panel AS8 and AS8 TC Mic/Line Inputs 1-8 - Accepts balanced and unbalanced signal. Fully balanced differential input, RF filtered. Dir Out - Provides a line level signal from each individual channel.The direct output is a post VCA signal. Any attenuation from the automixing process, compressor/leveller systems or remote attenu ation will be reflected in the direct out signal. This provides versatility for different mixing applica tions such as distributed overhead speaker systems. This 100 Ohm output provides a +20dBu max signal into a high impedance load. Note: The Dir Out shares a ground with the Main Out. —Don´t use the Channel In grounds for the Dir Out ! — When connecting to other equipment, the ground connection of the Main Out will also be adequate for all Dir Outs. A separate ground connection is not needed for each direct out. 28 AS8/AS8TC Function Selection Switches 1-8 - Allow various functions of the input channels to be set. Dip switch 1 - chooses the channel mode. Auto Mode (down position) sets operation to auto matic, with channel gain determined by its signal level relative to other microphones. Direct Mode (up position) turns channel fully on, irrespective of signallevels. Remote control feature functions regardless of setting of this switch. Dip switch 2 - turns +15V Phantom Power on (down position) or off (up position) Dip switch 3+4 - set the gain of the input amplifier. 0dB gain, for line level input sources, is set when switches 3 and 4 are in up position. 30dB gain, typically for high output (electret) microphones, is set when switch 3 is in the up position and 4 in down position. 50dB gain, used for low output (dynamic) microphones, is set when both switches are in down position. Main Out - Provides a balanced system output. The main out may also be used in an unbal anced mode by connecting the “+” terminal of the main out signal lead to the unbalanced de vice, and the ground terminal of the main out to the ground of the unbalanced device. Do not connect the “-” terminal of the main out. Remote Level Control - Allows remote control of both channel levels and master level. Either 10k Ohm linear pots or an adjustable DC controlvoltage may be used. For chairman functions it is also possible to simply shortcutindividual channel wipers (and main wiper) and the common ground. In this mode the Automatic Mode is still working, if switched on. Pin No 1 2 3 4 Function Channel 1 Wiper Channel 2 Wiper Channel 3 Wiper Channel 4 Wiper Pin No 12 13 14 15 5 6 7 8 9 10 11 Channel 5 Wiper Channel 6 Wiper Channel 7 Wiper Channel 8 Wiper Channel 1-8 CCW Channel 1-8 CW Main CW Connection (common to all Connection (common to all Connection (ground) 29 Function Main Wiper Connection Main CCW Connection,+5V not used not used channels,+5V) channels, ground) AS8/AS8TC WIRING DIAGRAMS, REMOTE LEVEL CONTROL PORT (REMOTE LEVEL CONTROL PORT, 15 PIN D-SUB) CH1 WIPER CH2 WIPER CH3 WIPER CH4 WIPER CH5 WIPER CH6 WIPER PIN 1 PIN 2 PIN 4 PIN 5 PIN 6 CH8 WIPER PIN 8 CH1-8 CCW PIN 9 MAIN WIPER MAIN CCW N/C N/C CONTINUOUS LEVEL CONTROL, CH7 EXTERNAL DC CONTROL VOLTAGE CONTROL VOLTAGE GND PIN 7 MAIN CW ON/OFF CHANNEL MUTE, CH5 SPST SWITCH ON - OPEN OFF - CLOSED PIN 3 CH7 WIPER CH1-8 CW CONTINUOUS LEVEL CONTROL, CH1 10K LINEAR POT PIN 10 PIN 11 Maximum Distance vs Wire Gage for Remote Control Connections PIN 12 PIN 13 20 AWG 22 AWG 24 AWG 26 AWG 28 AWG PIN 14 PIN 15 Single Control 5000ft 3000ft 2000ft 1200ft 750ft All 9 Controls 550ft 350ft 200ft 125ft 75ft Figure 5 - Remote Level Controls LecNet (RS-232) SERIAL PORT - Provides access to and control of some of the operational features of the AS8 .The port is compatible with the serial port of a PC, or other controllers of RS-232 type serial ports. EXPANSION IN/OUT - connects multiple AS8´s and/or AS8´s to other LecNet com patible devices. The first AS8 should be in master mode, the others in slave mode (see figure 2 above). Use the optional cable IC-AS8 (Code Nr. 6000H1885) for inter connection. 8 6 7 4 5 2 3 1 Master/Slave Switch - Sets the AS8 for use as a master device or as a slave device. AS8 used singly should be set as Master mode operation. PWR IN - Connects to the Power supply to provide power for the AS8. 30 AS8/AS8TC 5. Setup Setup of the AS8 consists of choosing rear panel dip switch options, setting front panel levels, and adjusting the compressor/leveller (if used). Using the Remote Level Control capability of the AS8 is addressed in the another section of this brochure. When the power is turned on to the AS8, it will display its serial address on the Channel On LEDs for 1.5 seconds before entering normal opera tion. Channel 8 On LED represents the most significant bit of the binary address, while Channel 1 On LED represents the least significant bit. 1) Select Auto or Direct mode using dip switch 1 on channels 1-8. Normally, all speech micro phones would be in the Auto mode. Microphones used for music (e.g. choir mics in a church sound system), or inputs attached to line level devices like tape players or VCRs are best used in the Direct mode. The Remote Level Control terminals may be used to manually turn off Direct mode microphones when they are not in use. 2) Turn Phantom power on or off as needed, using dip switch 2 on channels 1-8. Dynamic microphones need no phantom power, but electret types will need phantom power to operate properly. 3) Set up the preamplifier gain using dip switches 3 and 4 on channels 1-8. The 0dB position is used for line level sources like tape players or VCRs. The 30dB position works well for higher output microphones like electrets. The 50dB position is best for dynamic microphones, or electret types where the distance from the talker to the microphone is more than 3 feet or so. 4) Set the Main Level control between 5 and 6. While speaking into each microphone in turn, adjust the Channel Level to give adequate volume level. The normal operating position of the Channel Level control should be between 10 o’clock and 2 o’clock. Try to adjust all microphones to about the same volume level, as this will result in the most optimum automatic action. 5) If the compressor/leveller system is to be used, switch the In/Out front panel switch to the In position. With a normal talker, adjust the Threshold pot until the 3dB Gain Reduction LED flickers on. The system volume level may need to be readjusted at this point using the Main Level control. Next, check that a loud talker turns on most or all of the remaining Gain Reduction LEDs. Finally, with a soft talker such that no Gain Reduction LEDs are lit, be sure there is no feedback or ringing in the system. The system is now ready for use. 31 AS8/AS8TC Troubleshooting If your system malfunctions,you should attempt to correct or isolate the trouble before concluding that the equipment needs repair. Make sure you have followed the setup procedure and operat ing instructions. Check out the interconnecting cords and use the following short troubleshooting guide. SYMPTOM POSSIBLE CAUSE 1) No sound from system 1) Main level control not turned up 2) Channel level not turned up 3) Input gain setting too low 4) Phantom power not on for electret type microphone 5) Remote level control turned down 2) Difficulty activating certain mics 1) Mic level is too low relative to other mics - Turn up the mic level 6. Computer control of AS8 and other LecNet compatible devices 6.1. LecNet PRO Program Introduction LecNet Master Pro control screen allows you full control of all active LecNet devices connected to your computer. There can be as many device control panels open as there are active LecNet devices, but only one control panel is usable at a time. The general procedure for using LecNet control is: 1) Be sure every LecNet device connected to the serial port of the PC has a different address. Different types of devices will have different factory default addresses. The only time the user is required to change a device address is when more than one of the same type of device will be connected to the net (e.g., using two or more AS8s when more than 8 channels are needed). In this case, see the Devices Menu to change device addresses. 2) Start LecNet Master Pro. Note that none of the LecNet control panels may be launched except from LecNet Master Pro. After the serial connection to the PC is made, run CheckNet from the menu bar. CheckNet will find and identify all the active devices connected to the PC. After CheckNet has run, a list of devices, device software version numbers , and LecNet addresses will be displayed. 3) From the Devices menu, select either the Select Device option (to launch a LecNet control panel), or the Change Device Address option (to change the address of a LecNet device). Note that a control panel must be maximized in order to communicate with a LecNet device. 32 AS8/AS8TC What is LecNet? Introduction AKG’s LecNet system is a unique implementation of standard RS-232 serial communications. Since it is compatible with RS-232 serial ports found on all PCs, no extra interface cards are necessary to add computer control to your LecNet equipment. Unlike standard RS-232 equipment, where one serial port connects to only one device, as many as 127 LecNet devices may be simultaneously connected to a single serial port. LecNet devices can always receive information from the host. In this way, each LecNet device “listens” for its unique network address. When a device detects its address, it closes its Device Tx switch to reply to the host. The Device Tx switch is held closed until the data exchange with the host is complete, and the device opens the Device Tx switch. In this way, device contention is avoided. Each LecNet device must have a unique address between 128 and 254. Any device address is reassignable using the LecNet Master Pro application. The LecNet runs at a fixed rate of 9600 baud, which is not user adjustable. This is fast enough to provide quasi-real time response to the control panels while providing reliable communications over reasonable distances (100 feet from host to LecNet device). The serial communications pa rameters used are 8 data bits, no parity, 1 stop bit. LecNet Hints Connecting LecNet devices to a host using the LecNet is straightforward. Using the special LecNet RS-232 cable, simply connect either Com1 or Com2 on the host to the LecNet 3.5mm input on one of the LecNet devices. If a custom length cable is necessary, refer to chapter 8 in this manual for the cable connection schematic. The host-to-device connection assumes that multiple LecNet devices (if more than one are used) are interconnected using the 8 pin expansion cable (AKG IC AS8). If more than one LecNet device is connected to the host, all LecNet devices must be powered on to avoid crashing the network. This is because an unpowered device loads the Host Rx line and prevents other LecNet devices from communicating with the host. No damage will occur if all devices are not powered on, and proper operation will resume when all devices are powered. While AKG has made every effort to make the serial communications software as compatible as possible with a wide range of serial ports, some serial ports are not well behaved. Some problems occur with older serial ports, because they may not be reliable at 9600 baud or higher. Software is available (from Norton, for example) which will test serial ports and determine the highest reliable data rate. To run LecNet compatible devices by LecNet you need the LecNet Master Pro Program and the program for the specific device. Having installed your LecNet Master Pro you simply install the new device program for your new device, by copiing the file into the LecNet directory. 33 AS8/AS8TC Option Menu There are three user selectable options which are available in the Options Menu. Set Max Net Address allows an up per limit to be placed on the range of LecNet addresses which CheckNet will check. The default value is 254, which means that CheckNet will check all LecNet addresses for active devices . Since it takes about 12 seconds to com plete a CheckNet for all possible ad dresses, restricting the Max Net Address range to just enough to cover the ad dresses of LecNet devices actually present in the system will speed up the CheckNet process considerably. Note that if the address of a LecNet device is changed (via the Change Device Address option) to an address which exceeds the Max Net Address, the Max Net Address will be automatically updated to accommodate the new address range. Com Port Selection allows the choice of Com port 1 or Com port 2 for use by LecNet. Since most laptop style computers have only one serial port, Com port 1 is the default. CheckNet Startup Option sets user preference on running the Checknet option at startup. If the Auto Run at Startup option is selected, a CheckNet will be run automatically at the start of LecNet Master Pro. If the Prompt at Startup option is selected, the user will be given the option to run a CheckNet at startup. The default value is Auto Run at Startup. CheckNet Menu The Run CheckNet selection of the CheckNet menu queries LecNet ad dresses from 128 to the current Max Net Address to establish what devices are present at those addresses. A CheckNet must be run when LecNet Master Pro is first run to determine what device control panels are okay to launch. If the physical configuration of the network changes (i.e. devices are added or taken away) after CheckNet has been run, simply run CheckNet again. 34 AS8/AS8TC Devices Menu There are two options available in the Devices Menu: Select Device launches a control panel for an active LecNet device. Only one control panel may be launched for a device at a particu lar address. For example, if two AS8s are in a system, one at address 128 and one at address 129, control pan els can be launched for both. How ever, if an attempt is made to launch another control panel for the AS8 at address 128, this action will be prohib ited until the current active control panel for that device is closed. When a control panel is launched, it will start maximized. The only time that a control panel will commu nicate with a LecNet device is when it is maximized. If the panel is minimized or made normal size, it will stop communicating with its LecNet device until it is again maximized. Change Device Address allows the LecNet address of an active device to be changed. This would be necessary if more than one of a particular device type is present in the system. An example of this might be two AS8s used together to get 16 input channels. The factory default address for the AS8 is 128. One of the two AS8s would need to have its address changed to a different address (like 129) to be recognized as unique from the other AS8. This is accomplished by connecting only one AS8 to the PC using the supplied special serial cable . The CheckNet menu option is run, and then the Change Device Address option is run to change the device address to 129. After all LecNet devices are assigned unique addresses in this way, all the LecNet devices may be connected to the PC. Troubleshooting the LecNet While the LecNet is designed to be simple to connect and robust in operation, there will be times when things don’t operate as you expect. As a computer user, you’ve probably never had this experience. In the unlikely event that you do, the following are some helpful hints to get your LecNet system running again. Com Ports - LecNet software is written to use either Com 1 or Com 2. The world of serial ports is dark and mystical, and AKG has documented problems with some serial cards older than 3 or 4 years. These serial cards typically come with older 386SX and 386DX systems, and may not communicate with the LecNet software. The answer is to replace the old serial card with a new serial card. Fortunately, serial cards are cheap, so this solution is not too painful. Multiple LecNet Devices - When several LecNet devices are used together, some simple rules apply: 1) All LecNet device Expansion ports must be correctly connected using the 8-pin mini-DIN cable IC AS8. Since the RS-232 signals are carried through two of the Expansion port pins, proper connec tion is critical. See the particular manuals for the appropriate hardware connection. 35 AS8/AS8TC 2) All LecNet devices must be turned ON. Any device that is not ON will load the network and prevent any devices from communicating correctly with the host. 3) All LecNet devices must have unique addresses (in the range of 128-254). If two or more LecNet devices have the same address, no communication will be possible with any of them. To change the address of devices with conflicting addresses, the device must be connected by itself to the PC. The Change LecNet Address option of the LecNet Master Pro application can be used to change the address. 6.2. The LecNet AS8 Program Channel Status Section of Control Panel The right hand third of the AS8 control panel shows individual channel status information. Each indicator or meter provides useful insights into the internal operating conditions of each channel. The grouping of eight sets of three vertical meters (for channels 1-8) gives a picture of activity on all channels at once. The three large horizontal meters show the operating conditions on a calibrated scale. The indicators and meters include: 36 AS8/AS8TC Active Indicator - shows the“on”or“off”status of the channel. For the AS8,“on”means that the part of the channel attenuation due to the automatic mixing algorithm is less than or equal to 4dB. Clearly, even when a channel is “off”, it may well be contributing significantly to the overall mix if the microphone connected to that channel is in use. The Active indicator is only a gross indicator of channel activity, and a more accurate picture is obtained from the Attenuation meter. Channel Level (L) - gives an indication of the post level control signal level which is fed to the main mix bus. The input level shown is equal to the input signal level minus attenuation (if any) from the remote channel or remote main level controls. Attenuation (A) - shows the total instantaneous attenuation applied to each channel from all sys tem functions; the automatic mixing algorithm, remote level controls, and the compressor/leveller system. Remote Level (R) - shows the cumulative attenuation applied to each channel as a result of the sum of the remote channel level and main level controls. Note that the range of the both the channel and main remote level control is 0 - 30dB plus off. Therefore, if both the channel and main remote level controls are used,a total of 60dB of attenuation can be applied before the channel is turned off. Channel Select (Ch1 to Ch8) - allows any channel to be selected for information display in the lower half of the screen. Main Section of Control Panel The Main section of the AS8 control panel, in the left-hand third of the screen, contains control for the Remote Level Control, Auto/Direct Mode, and Compressor/Leveller subsystems. Each of the subsystems has a Remote mode and a Local mode radio button. These buttons determine whether the subsystem is controlled from the AS8 or the computer. If a subsystem is left in the Remote mode when the AS8 control panel application is closed, the AS8 controls associated with that subsystem will be disabled. This provides a useful security feature if it is desired to eliminate the possibility of user adjustment of some or all of the AS8 subsystems. Local control may be re stored to the AS8 controls by running the AS8 control panel and setting the subsystem back to the Local mode. Remote Level Control The Remote Level Control subsystem allows level adjustments to be made to each channel singly, or to all channels simultaneously. The following are the controls and indicators used in this sub system: Remote radio button - allows the chosen subsystem to be controlled from the host computer. The corresponding controls on the AS8 are disabled. If the subsystem is left in the Remote mode when the control panel application is closed, the affected controls on the AS8 will continue to be dis abled, and the subsystem parameters last stored in the AS8 nonvolatile memory will be used. Local radio button - allows the chosen subsystem to be controlled locally from the AS8. The control panel will echo the settings from the AS8 for that subsystem. Main Remote meter - shows the current value of main remote attenuation. This attenuation value is 37 AS8/AS8TC applied to all channels, in addition to the attenuation applied individually by the channel remote level controls. In the Remote mode, the meter shows the current attenuation setting and reflects changes made using the Main scroll bar. In the Local mode , the meter reflects the amount of attenuation from the Main Remote terminals on the rear of the AS8. Main scroll bar - adjusts the Main attenuation level. Main attenuation is common to all channels, and is best used when system wide level control is desired. The total attenuation for a given chan nel is the sum of the Main and Channel attenuations. The Main Remote meter reflects the changes made to the Main attenuation with the Main scroll bar. This scroll bar is only enabled when the Remote radio button is selected. Ch1-8 scroll bars - adjusts the individual channel attenuation levels. Channel attenuation is spe cific to each channels, and is used when level adjustments need to be made on a per channel basis. The Remote Lev meters for each channel reflect the changes made to the Channel attenu ation with the Channel scroll bar. These scroll bars are only enabled when the Remote radio button is selected. Auto/Direct Mode Selection The Auto/Direct mode subsystem allows remote indication and selection of the operational mode of each channel. The following are the controls and indicators used in this subsystem: Remote radio button - allows the chosen subsystem to be controlled from the host computer. The corresponding controls on the AS8 are disabled. If the subsystem is left in the Remote mode when the control panel application is closed, the affected controls on the AS8 will continue to be dis abled, and the subsystem parameters last stored in the AS8 nonvolatile memory will be used. Local radio button - allows the chosen subsystem to be controlled locally from the AS8.The control panel will echo the settings from the AS8 for that subsystem. Ch1-8 radio buttons - allow the current operational mode of each channel to be set remotely (provided the Remote radio button is selected). If the Local radio button is selected, the Ch1-8 radio buttons indicate the channel modes as determined by the rear panel mode dip switch on the AS8. Compressor/Leveller System The Compressor/Leveller subsystem allows remote indication and control of the AS8s’ compressor/ leveller system. The following are the controls and indicators used in this subsystem: Remote radio button - allows the chosen subsystem to be controlled from the host computer. The corresponding controls on the AS8 are disabled. If the subsystem is left in the Remote mode when the control panel application is closed, the affected controls on the AS8 will continue to be dis abled, and the subsystem parameters last stored in the AS8 nonvolatile memory will be used. Local radio button - allows the chosen subsystem to be controlled locally from the AS8.The control panel will echo the settings from the AS8 for that subsystem. 38 AS8/AS8TC C/L In radio button - shows the current status of the compressor/leveller system. If the Remote radio button is selected, selecting the C/L In radio button will activate the compressor/leveller system. When the Local radio button is selected, the C/L In radio button will be disabled, but will indicate the current state of the Compressor/Leveller In/Out switch on the front panel of the AS8. C/L Out radio button - shows the current status of the compressor/leveller system. If the Remote radio button is selected, selecting the C/L Out radio button will deactivate the compressor/leveller system. When the Local radio button is selected, the C/L Out radio button will be disabled, but will indicate the current state of the Compressor/Leveller In/Out switch on the front panel of the AS8. Comp/Lev Attenuation - shows the gain reduction which is applied to each channel as a result of compressor/leveller action. Comp/Lev Threshold - shows the current threshold level of the compressor/leveller system. Thr scroll bar - adjusts the threshold of the compressor/leveller system. If the Remote radio button is selected, this control is active. If the Local radio button is selected, the control is inactive. 7. AS8 Technical Notes The AS8 uses a straightforward analog signal path to provide excellent audio performance. This is coupled with a sophisticated microcontroller to implement both the automatic mixing and the compressor/leveller algorithms. The Adaptive Level Proportional automatic mixing algorithm is used by the AS8. This algorithm uses the signal level pattern at the microphones to derive a pat tern of channel gains. For instance, if only one microphone channel is being spoken into, its level is dominant and that channel gets most of the system gain, while all other channels are turned down. If more than one microphone is active, they share system gain according to their relative levels. A “skewing” function gives some advantage to microphones which are active over time, to minimize interruptions from transient noise at other microphones. Since each channels’ gain is apportioned continuously based on its relative level, no abrupt gain changes are made. This makes the automatic action virtually inaudible. The Compressor/Leveller function uses a combination of the short-term and long-term signal dy namics of the signal to determine the optimum amount of gain reduction in any situation. The effect of the function is to control both the average program level (for consistent long-term sound system level) and to minimize any large short-term deviations. The gain reduction function is gated, which means that there are no noise ups associated with program signal pauses. This product conforms to EN 50 082 - 1 and EN 50 081 - 1 Ce produit répond à la norme EN 50 082 - 1 et EN 50 081 - 1 Questo prodotto risulta conforme alle norma EN 50 082 - 1 e EN 50 081 - 1 Este producto cumple con la norma EN 50 082 - 1 y EN 50 081 - 1 39 AS8/AS8TC 8. Serial Port Hardware The serial port on the AS8 and AS8TC is a minimal RS-232 implementation. The figure shows the wiring diagram to accomodate interconnection with either a 9 pin or a 25 pin serial port on a PC or other serial device. LecNet Device to PC S R T 3.5MM Stereo Plug LecNet Device to AMX or Crestron S R T 9 or 25 Pin Female D-Subminiature 9 Pin Female D-Subminiature 3.5MM Stereo Plug Wiring Diagram, 9 Pin D-Sub CD RX TX DTR Gnd DSR RTS CTS RI 1 2 3 4 5 6 7 8 9 Host Serial Port (PC) RX TX Sig Gnd Chassis Gnd RTS CTS DSR DTR 3 2 7 1 4 5 6 20 Host Serial Port (PC) N/C Tip Ring Sleeve LecNet Device Transmit LecNet Device Receive Gnd LecNet Port N/C N/C Tip Ring Sleeve LecNet Port Wiring Diagram, 25 Pin D-Sub Tip LecNet Device Transmit Ring LecNet Device Receive Sleeve Gnd LecNet Port LecNet Device Transmit LecNet Device Receive Gnd RXD TXD N/C Gnd N/C N/C N/C N/C 1 2 3 4 5 6 7 8 9 AMX or Crestron Port AMX Programming Notes Figure 6 - Serial Port Hardware If you are using an AMX system to control your LecNet equipment, you’ll want to purchase the Lectrosonics PT3 Protocol Translator. The PT3 con nects between the AMX bus and any LecNet equipment. With the PT3, the LecNet equipment looks just like native AMX equipment. The PT3 is the fastest and most productive way to control LecNet devices with an AMX system. 40 AS8/AS8TC 9. Specifications Mic/Line Input Type: Impedance: Input Gain Settings: EIN, 20-20KHz: Maximum Input Level: Remote Level Control Range: Serial Communication (RS-232): Compressor/Leveller Threshold: Maximum Gain Reduction: Maximum System Gain Input to Main Out: System THD: (+10dBu out) System IMD: (+10dBu out) Phantom Power: Power Consumption: Weight: Dimensions: Electronically balanced and RF filtered Greater than 2.5K, any gain setting 0dB, +30dB, +50dB -126dBu (+50dB gain) +20dBu at 0dB gain -10dBu at +30dB gain -30dBu at +50dB gain 6dB/Volt from 0 to 5V, plus off 9600 baud, 8 data bits, no parity, 1 stop bit -40dBu to 0dBu 20dB 75dB Less than 0.1%, any gain setting Less than 0.1%, any gain setting +15V, switch selectable per channel 10 Watts max at 20VAC 3 lbs, 4 ozs 19" wide x 1.75" high x 8" deep Specifications subject to change without notice 10. Accessories Standard A ccessories Accessories AS8 (TC) AC Adaptor 220V 15 Pin Remote Conector RS232 Conectorcable Controlsoftware (LecNet & AS8) Instruction Manual Optional A ccessories Accessories IC AS8 stacking cable for two AS8 Cable Set - consisting of: 8 pcs. 10m ending with 1 XLR fm, 3pin and Phönix 4pin 1 pcs. 1m ending with XLR m, 3pin and Phönix 3pin 41 AKG Acoustics GmbH BodenseesstraBe 228, D-8000 München 60 / GERMANY Tel.: (089) 87 16-0, Fax: (089) 87 16-200, Telex: 523626 akg d AKG Acoustics, PLC. Vienna Court, Lammas Road, Godalming, Surrey GU7 1JG / GREAT BRITAIN Tel.: (483) 425 702, Fax: (483) 428 967 AKG Akustische u. Kino-Geräte Gesellschaft m. b. H. Brunhildengasse 1, P.O.B. 584, A -1150 Vienna / AUSTRIA Tel.: (1) 98 124-0, Fax.: (1) 982 34 58, Telex: 131839 akgac a Specifications subject to change without notice. Lectrosonics, Inc. 581 Laser Rd. NE - Rio Rancho, NM - 87124 / USA (505) 892-4501 - (800) 821-1121, Fax: (505) 892-6243, http://www.lectrosonics.com SCJ & AKG Ltd. 2F Yoyogi – Living 5-21-12 Sendagaya Shibuya-ku, Tokyo 151 / JAPAN Tel.: (813) 334 16201, Fax: (813) 334 15260 May 10, 2000